1
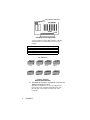
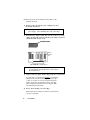
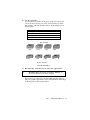
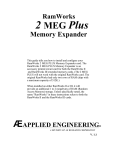
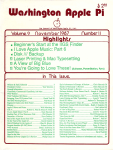
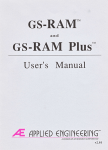
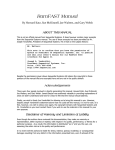
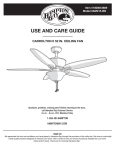
•
•
•
•
•
•
•
•
•
•
•
•
•
•
•
•
•
•
•
•
•
•
•
•
•
•
•
•
•
•
•
•
•
•
•
•
•
•
•
•
•
•
•
•
•
•
•
•
•
•
•
•
•
•
•
•
•
•
•
•
•
•
•
•
•
•
•
•
•
•
•
•
•
•
•
•
•
•
•
•
•
•
•
•
•
•
•
•
•
•
•
•
•
•
•
•
•
•
•
•
•
•
•
•
•
•
•
•
•
•
•
•
•
•
•
•
•
•
•
•
•
•
•
•
•
•
•
•
•
•
•
•
•
•
•
•
•
•
•
•
•
•
•
•
•
•
•
•
•
•
•
•
•
•
•
•
•
•
•
•
•
•
•
•
•
•
•
•
•
•
•
•
•
•
•
•
•
•
•
•
•
•
•
•
•
•
•
•
•
•
•
•
•
•
•
•
•
•
•
•
•
•
•
•
•
•
•
•
•
•
•
•
•
•
•
•
•
•
•
•
GS-RAM III
TM
User’s Manual
ÆApplied Engineering®
A Division of Æ Researc Corporation
vl.1
Table Of Contents
INTRODUCTION - ABOUT THE GS-RAM III
I
CHAPTER ONE - GETTING STARTED
Installation
1
CHAPTER Two - THE GS-RAM III AS A RAM DISK
Setting Up a RAM Disk
Addressing the GS-RAM III Disk
Using the GS-RAM III RAM Disk
FORMATTING
COPYING
SAVING
5
5
6
7
7
8
8
CHAPTER THREE - ADDING MORE MEMORY
Memory Increments
Where to Get Chips
Chip Choices
Installing the Chips
9
9
9
9
9
GETTING HELP
Returning a Product
GS-RAM III
12
13
INTRODUCTION
About The GS-RAM III Card
Memory Expansion--The GS-RAM III allows you
to increase the Random Access Memory (RAM) capacity
of your Apple IIGS. RAM is the memory that can be both
read From and written to--the addressable memory. Many
programs automatically look for and use available RAM to
give them more room to operate (desktop space). Many
programs load themselves into the available RAM at
startup. This greatly increases their performance because
it reduces or eliminates the need to access the relatively
slow mechanical floppy drives. GS-RAM Ill lets you
increase the available system RAM by a maximum of 4
Megabytes (Mb) on the board itself, in increments of 1
Megabyte. This means that IIGS ROM 03 machines (with 1
Megabyte installed on the motherboard) can have a total of
5 Megabytes while the earlier IIGS’s can have a total of 4.5
Megabytes.
6Mb--when you want to expand beyond 4Mb, you can
attach the 2Mb “Piggyback” Expander. It connects directly
to the GS-RAM III and adds its 2Mb to the 4Mb on the GSRAM HI for 6Mb s of memory.
RAM Disks--Use some of the GS-RAM memory to set
up a RAM Disk. A RAM disk acts as an internal, electronic
hard disk giving you super-Fast access to applications that
are copied to it. Loading from and storing to a RAM disk
can be as much as 20 times faster than a conventional disk
drive because i t eliminates the mechanical activity
required by a conventional drive.
DMA Support--The GS-RAM III is fully DMA
(Direct Memory Access) compatible. Any device that
requires DMA-style memory can use all the available
memory on GS-RAM III.
Introduction
i
AW 3 Expansion Software--with your GSRAM, you’ve also received Applied Engineering’s AW 3
Expander software. This program will greatly enhance the
popular AppleWorks integrated software package adding
such features as more Word Processor lines and Data Base
records, an expanded clipboard, Multiple Disk Save and
more.
Also included on the AW 3 Expander is a graphic test for
your GS-RAM III that will tell you which, if any, chips are
bad and will also check for the proper type of chips.
Refer to the AW 3 Expander User’s Manual for complete
information about the disk.
About This Manual
Below is a brief description of what is covered in each
chapter of this manual.
Chapter 1 will take you quickly through the
installation and testing of your GS-RAM III card.
Chapter 2 tells you how to use some of the expanded
memory as a RAM disk. This is a great way to increase
the access speed to different applications.
Chapter 3, as mentioned above, helps you to decide
what chips you will need to expand the memory of
your GS-RAM III card. It also explains how to install
the chips yourself as well as how to return the card
to Applied Engineering for a memory upgrade with
no additional charge for the installation and testing.
Appendices provide you with instructions on what to
do when you encounter a problem that is not covered
in the manual.
We have tried to make this manual as informative,
understandable, and error-free as possible. If you have
any comments or suggestions regarding this manual or
any other if manual, we would be glad to hear from you.
Please address any comments or suggestions to:
Applied Engineering
P.O. Box 5100
Carrolton, Texas 75011
Attention: Manager, Technical Publications
Now, turn the page and let the memory begin!
ii
GS-RAM III
CHAPTER ONE
Getting Started
+ Note: If you’re using GS-RAM III with the
RamKeeper, plug it into the front side of the
RamKeeper only.
This chapter tells you how to install and test the GS-RAM
III memory expansion card. Before you install your
memory-expansion card, please be sure you are familiar
with Setting UP Your Apple IIGs and the Apple IIGS
Owner’s Guide. You’ll need to be particularly familiar
with the Control Panel functions as this manual makes
frequent reference to the Control Panel menu.
Installation
1) Turn off the computer.
Leave the computer plugged in but flip the power
switch to the OFF position.
2) Remove the Apple IIGS cover.
Locate the two latches on either side of the backplate.
Push in on the latches while pulling up and back on
the lid.
3) Touch the power supply case.
The case is shown in the illustration below. This will
discharge any static electricity that may be on your
body. Do not skip this step. Static electricity can ruin
chips on the board and in the computer.
4) Remove the memory-expansion card from Its antistatic bag.
Hold the card by the edges, like a photograph. Do not
touch the gold fingers of the card.
5) Check the position of the switches.
The switches are located toward the top left edge of
the card. The position of the switches lets the
computer know how much memory is on the card.
(Refer to following illustration.)
Ch. 1 - Getting Started
Configuration Switches
Front
Location of the Switches
Your board may use either Flip Switches or Rocker
Switches Refer Co the drawing below for proper
settings
Memory
1 Megabyte
2 Megabytes
3 Megabytes
4 Megabytes
| Switch
| Off
| On
| Off
| On
| Switch 2
|
|
|
|
Off
Off
On
On
Flip Switches
1 Meg
1 Meg
2 Meg
2 Meg
3 Meg
3 Meg
4 Meg
4 Meg
Rocker Switches
Check the Switches
6) PositIon the memory expansion card over the
Memory Expansion Slot.
The Memory expansion slot is located in the front
right corner of the computer. Hold the card so that
the long end of the card is toward the rear of the
Computer.
2
GS-RAM III
7)
Insert the card.
+ Warning: It is possible to install the card into the slot
backwards. Make sure that the end marked “FRONT”
on the card is toward the front of the computer.
Insert the gold edge-connector into the Memory Expansion Slot
until it is completely seated. The chips will be facing the
power supply on the left side of the computer. You
can wiggle the card gently, back to front, to ensure a firm
connection.
8) Replace the Apple IIGS cover.
Slide the front of the lid in first, then press on the back edge
until it snaps into place.
9) Check the RAM Disk setting to verify correct
Installation
You can verify that the computer recognizes the
additional memory by checking the RAM Disk option
in the Control Panel menu. Those using Finder vl.3
can select the Control Panel option from the Apple
menu and then select the RAM icon, If you’re using
an earlier version of GS/OS or ProDOS 8, access the
RAM option by doing the following:
i)
Turn on the computer then access the Classic
Desk Accessories menu by holding down the
Open-Apple and Control keys while pressing
ESC.
ii) Use the up and down arrow keys to select the
Control Panel menu and press “return".
iii) Select the RAM Disk option and press “return”.
iv) The number next to the Largest Selectable listing
tells you the amount of memory that the system
now has available.
10) Make a copy of the AW 3 Expander disk.
It is very important to make backup copies of your
master disks when possible. The AW 3 Expander disk
is not copy protected. You can copy it using the IIGS’s
Finder’. Simply drag the AW 3 icon to the icon of the
destination disk.
Ch. 1 - Getting Started 3
If you don’t use the Finder, you can use the “Copy
Files” option of your GS utility disk or the “Filer”
program included on the AW 3 Expander disk.
+ Note: Instructions for copying with Filer are included
in the Appendix of the AW 3 Expander manual.
Instructions for copying with System Utilities are
included in, Apple IIGS System Disk User’s Guide.
After you copy the disk, store the master in a safe
place
11) Test the card.
Boot your COPY of the AW 3 Expander disk and
select the GS-RAM III Test program from the main
menu.
+ WARNING: The GS-RAM Ill test program will erase
any files or programs stored in RAM
12) Installation is complete!
4
GS-RAM III
CHAPTER Two
The GS -RAM III as a RAM Disk
Many of the newer application programs take advantage of
the extended memory automatically. However, you may
want to use part of the extended memory to emulate a
RAM disk. Creating a temporary RAM disk will give you
much faster access to some applications (programs which
do not automatically take advantage of the increased
memory). The following section explains how to create a
temporary RAM disk.
Setting Up a RAM Disk
If you want to set up the GS-RAM III as a RAM Disk, run
the Control Panel program from the lIGS Desk
Accessories Menu (under the menu or press control-esc). Then select the RAM Disk option.
You must first tell the computer how much of the card’s
memory you want to set aside for use as a RAM disk. The
minimum setting limits the amount of memory that
applications can use. The maximum limits how much
memory the RAM disk can use. You II want to leave
enough memory open to support the programs that
automatically take advantage of the extra memory.
•
Note. If working with GS/OS or an application that
uses a version of ProDOS before 1.2, the minimum
and maximum RAM disk settings must be equal.
If an application needs more memory than you have
allotted, a message to that effect will come up on the
screen. You can adjust accordingly by selecting ‘RAM
Disk” from the Control Panel program and decreasing the
maximum RAM disk size.
Changing the Control Panel setting will not change the
currently established RAM disk. You will have to turn off
the power to establish a RAM Disk of a different size. The
new settings will take affect upon startup.
Ch. 2 - GS-RAM III as a RAM Disk
5
+
Remember: Powering down will in turn erase what is
currently in the temporary RAM disk you have
created. Save any data from the RAM Disk that you do
not want to erase before powering down.
Addressing the GS-RAM III Disk
Some applications may ask you to identify your RAM disk
by slot and drive number.
SLOT: The GS identifies your mock RAM disk in slot
5 just as it recognizes a 3.5” drive as being in slot 5.
DRIVE: The drive number will depend on what you
decide to use as your startup device. Drive 1 can be
either the RAM disk or a 3.5” drive. Choose one or
the other using the “Slots” heading under the Control
Panel Program.
-- First, make sure slot 5 is set to “Smart Port.”
-- If you want the computer to boot your RAM disk
at startup, select “RAM Disk” next to the “Startup
Slot” heading. The GS will recognize the RAM
disk at, 55,D1 and the 3.5” drive will be 55,D2.
--
If you want the computer to boot your 3.5” drive
at startup, enter “5” (or “Scan”) under the “Startup
Slot” heading. The GS will recognize the 3.5”
drive at S5,D1 and the RAM disk will be 55,D2.
--
A second 3.5” drive will be 52,D1. The following
chart may help you to understand:
Boot “Slot 5”
Boot “RAM Disk
S5,D1 --- 3.5” drive
S5,D2 ---- RAM disk
S2,D1 ---- 3.5” drive
S5,D1 --- RAM disk
S5,D2 --- 3.5” drive
S2,D1 --- 3.5” drive
Note: If using proDOS ® 1.1.1, your second 3.5” drive
(52,D1) will not be recognized. This early ProDOS
version allows only two devices per slot. See your
authorized Apple dealer to upgrade your applications
which use ProDOS 1.1.1.
6
GS-RAM III
Using the GS-RAM III RAM Disk
Now you are ready to use the RAM disk you have
created. Think of it as a regular disk. You can format it
then save or copy documents or applications onto it.
+
Remember: The RAM disk is only a disk as long as the
power is on. The information it contains is lost when
the power is turned off (unless you have saved that
information to a disk or disks).
FORMATTlNG
You need to format the RAM disk only if you plan to use
It as your startup device. The disk will be automatically
formatted at startup for saving and copying. So, if you plan
only to save to and copy to the disk, you don’t need to
worry about formatting. If, however, you plan to use the
RAM disk as a startup device, format the disk just as you
would a regular disk. Format for either ProDOS, Pascal or
Applied Engineering’s CP/AM (5.1.1 or later) depending
upon the operating system of the application(s) you
intend to store on the RAM disk. Here are a few ways to
format for the different systems:
•
•
•
+
Format for ProDOS using the “Format” option on
your IIGS System disk or IIGS System Utilities.
Or, you may find it easier to use the Finder’s
“Format Disk” option under the “Special” menu.
Format for Apple Pascal 1.3 by X-ecuting the
“Formatter” program on your Pascal disk. (Refer
to Apple Pascal documentation for more
information on formatting for Pascal.)
To format for CP/AM versions 5.1.1 and
following, refer to the formatting instructions in
the CP/AM manual.
Note: Do not try to format the disk for DOS 3.3. The
3.3 applications were designed for use with 5.25”
disks and will not work with the IIGS RAM disk.
You can give the RAM disk any name that the operating
system will allow.
Oh. 2 - GS-RAM III as a PAM Disk
7
COPYING
You can copy programs to the RAM disk with the "Copy
Files~ option on your System Utility Disk. You may prefer
to use the Finder to make direct copies of ProDOS
applications by dragging the application’s icon to your
RAM disk’s icon.
SAVING
You can save documents onto the RAM disk just as you
do on a regular disk. But be sure to save the contents of
your RAM disk on a regular formatted disk before you
turn off the power. You will most likely want to save to a
regular disk during use to keep documents from being
lost due to power surges, power loses, and other
frustrating occurrences.
8
GS-RAM Ill
CHAPTER THREE
Adding More Memory
Memory Increments
Your GS-RAM III can be expanded in 1Mb increments up
to 4Mb on the board. When you want to add more than
4Mb, you can attach the 2Mb ‘Piggyback” Expander for a
total of 6 M b. Call Æ sales at (214) 241-6060 for more
information about the Expander.
Where to Get Chips
Selection of the proper memory chips for your GS-RAM
Ill can be a little tricky. There are several chip
manufacturers and many different types and specifications
of RAM chips available.
You may be able to find memory chips with the proper
specifications at some computer or electronics-parts
stores, But we recommend that you purchase them from
Applied Engineering. Applied Engineering receives bulkquantity discounts on purchases of memory chips and can
often offer them for less. Applied Engineering uses only
the highest-quality memory chips. When you get ready
for more memory, give Applied Engineering a call. You’ll
be assured of getting the right chips at the right price.
Chip Choices
Your GS-RAM III can contain up to 4 Mb using 1 Mb x 4
(1 megabyte by four) ZIP DRAM chips. You need to use
120 nanosecond (-12) chips or faster. Memory on the card
is organized into four blocks, labeled on the card. Each
block consists of two memory chips. You must add these
chips in groups of two, filling the blocks in order, 1Mb
thru 4Mb.
Installing the Chips
There is nothing complicated about installing RAM chips
onto the memory expansion cards. Just follow these basic
guidelines:
Ch. 3 - Adding More Memory
9
Fill the memory blocks in numerical order. Refer to the
illustrations below.
1) Remove the card from your computer if it is
currently Installed.
+
Warning! Static electricity can ruin chips. Touch the
power supply before handling the board or the chips.
2) Position the chip so that the notch (or dot, on some
chips) points UP, away from the gold edge-connector
on the bottom of the card.
Orientation Notch
Notch
Toward
Top
GS-RAM III Configuration
+
Warning: If you install a chip upside down it could
possibly damage the chip Be sure to double check
the orientation dot
3) Align each leg (pin) of the chip with its socket hole.
You may have to bend the pins slightly to align them
with the holes. Do this by holding the chip on edge
so that one of the rows of feet are against the tables
surface. Now apply downward pressure to the chip
while rolling it toward the bottom of the pins. This
will bend the pins uniformly.
4) Press down firmly on each chip.
This ensures that it is fully seated in its socket. Check
closely for bent pins.
10
GS-RAM Ill
5) Set the Switches.
You must have the switches in the proper position in order for the
correct amount of memory to be used. Your board may use either
Flip Switches or Rocker Switches. Refer to the drawing below for
proper settings.
Memory
1 Megabyte
2 Megabytes
3 Megabytes
4 Megabytes
| Switch 1 |
|
Off
|
|
On
|
|
Off
|
|
On
|
Switch 2
Off
Off
On
On
Flip Switches
1 Meg
1Meg
2 Meg
2 Meg
3 Meg
3 Meg
4 Meg
4 Meg
Rocker Switches
Set the Switches
6) Reinstall the card then test it using the appropriate
+
Warning: Make sure that the end marked “FRONT” on
the card is toward the front of the computer.
The memory test is included on the AW 3 Expander disk. The test
will give a graphic representation of the card and indicate which chips
are missing, bad or improperly installed.
Ch. 3 - Adding More Memory 11