1
•
•
•
Integral
Personal Computer
•
•
•
•
•
•
•
•
•
•
•
• • • •
•
Integral Personal Computer
HP-UX Technical BASIC
Implementation Guide
Edition 1
December 1984
Part Number
82860-90004
Notice
Hewlett-Packard makes no warranty of any kind with regard to this material, including, but not
limited to, the implied warranties of merchantability and fitness for a particular purpose. HewlettPackard shall not be liable for errors contained herein or for incidental or consequential damages in
connection with the furnishing, performance, or use of this material.
Hewlett-Packard assumes no responsibility for the use or reliability of its software on equipment that is
not furnished by Hewlett-Packard.
©
Copyright 1984, Hewlett-Packard Company.
This document contains proprietary information, which is protected by copyright. All rights are
reserved. No part of this document may be photocopied, reproduced or translated to another language
without the prior written consent of Hewlett-Packard Company. The information contained in this
document is subject to change without notice.
Restricted Rights Legend. Use, duplication, or disclosure by the Government is subject to restrictions
as set forth in paragraph (b)(3)(B) of the Rights in Technical Data and Software clause in DAR 7104.9(a).
©
Copyright 1979, 1980, 1983, The Regents of the University of California.
This software and documentation is based in part on the Fourth Berkeley Software Distribution under
license from The Regents of the University of California.
©
Copyright 1980, 1984, AT&T Technologies. All Rights Reserved.
Portable Computer Division
1000 N.E. Circle Blvd.
Corvallis, OR 97330, U.S.A.
Printing History
Edition 1
December 1984
Mfg. No. 82860-90004
Contents
Guide to Documentation
Chapter 1
Introduction
1-1
1-2
Chapter 2
About This Guide
Where to Find More Information
Integral PC Specifics
2-1
2-1
2-2
2-3
2-4
2-5
2-7
2-8
2-8
2-9
2-10
2-11
2-11
2-12
2-12
2-12
2-15
2-15
2-16
2-17
2-17
2-18
The Keyboard
BASIC Function Keys
Programming the Function Keys
o t·~ tCl B D Statement
Keyboard Escape Sequences
Alpha Display
Screen Editing
Multiple Windows
BASIC Graphics
Graphics Window
Digitizing
Keyword Specifics
Graphics Menu
'.}OLUt·1E I ::; Statement
BEEP Statement
Printer Enhancements
Programming I/O Devices
Program Performance
Number Representation
Storage Requirements
Autostarting BASIC
Loading Binaries
iii
Chapter 3
3-1
3-2
3-2
3-4
3-4
3-5
3-5
3-6
3-6
3-6
3-9
3-10
3-11
3-12
iv
Uploading Series 80 BASIC Files
Introduction
Hardware Requirements
Limitations
Preparation
Microflexible Disc Types
File Naming Conventions
Series 80 Program Files
Series 80 DATA, LIF and CRAF Files
Running the Upload Program
Using the Single Internal Disc Drive
Using Multiple Disc Drives
Options
Error Conditions
Disc Drive Naming Conventions
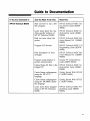
Guide to Documentation
If You Are Interested In
And You Want To Do This
Read This
HP-UX Technical BASIC
Find out how to run a BASIC program
HP-UX Technical BASIC Getting Started Guide (8286090001)
Learn more about the machine-specific features of
HP-UX Technical BASIC
HP-UX Technical BASIC Implementation Guide (8286090004)
HP-UX Technical BASIC Reterence Manual, Vol. 1 (8286090002)
Find out more about the
syntax
Program I/O devices
HP-UX Technical BASIC I/0
Programming Guide (8297890001)
Find description of error
messages
HP-UX Technical BASIC Reterence Manual, Vol. 2 (8286090003)
Integral PC Comprehensive
Guide (00095-90025)
Program using display or
printer enhancements
Upload Series 80 files to the
Integral PC
Create binary subprograms
using the HP -UX C
language
HP-UX Technical BASIC Implementation Guide (8286090004)
Getting Started With HP-UX
C (82857-90001)
Create binary subprograms
using the MC68000 assembly language
Getting Started With HP-UX
C (82857-90001)
Learn more about programming in HP -UX Technical
BASIC
HP-UX Technical BASIC Pragramming Guide (9868090035)
v
1
About This Guide
Introduction
This guide describes the machine-specific aspects of the implementation of HP-UX Technical BASIC on the Integral
Personal Computer.
HP-UX Technical BASIC is a new version of BASIC developed from Series 80 BASIC for the HP-UX series of
computers. It includes most of the Series 80 keywords found
in Series 80 BASIC, including the keywords found in the Advanced Programming ROM, Printer/Plotter ROM, I/O ROM
and the Matrix ROM. Although the language is similar, the
interpreter itself will not run on Series 80 computers. This
guide also describes how to transfer Series 80 programs and
data files to the Integral Personal Computer. In most cases,
Series 80 programs will run with only slight modifications.
Because of the machine-specific differences among HP -UX
comp~ters, the implementation of HP-UX Technical BASIC
on each machine is slightly different. These machine-specific
differences include:
• Special keys (including cursor keys, editing keys and function keys)
• Graphics capability
• Multiple window environment
• Printer enhancements
• Display enhancements
• BASIC Keyword differences
• Memory speed
Introduction
1-1
This guide provides information on each of these features to
allow you to get the most out of the advanced features of
your Integral PC.
This guide is divided into three chapters. The information in
the three chapters is summarized below.
Chapter 1: Introduction
Summarizes what information is in this manual.
Chapter 2: Integral PC Specifics
This chapter summarizes the machine-specific capabilities of
the Integral PC that may be used from HP-UX Technical BASIC programs.
Chapter 3: Uploading Series 80 BASIC Files
This chapter desribes how to transfer Series 80 files to the
Integral PC using the upload program provided with the BASIC interpreter.
Where to Find
More
Information
For more information on HP-UX Technical BASIC, refer to
one of the following manuals:
1. HP-UX Technical BASIC Getting Started Guide*
2. HP-UX Technical BASIC Reference*
3. HP-UX Technical BASIC Implementation Guide*
4. HP-UX Technical BASIC I/O Programming Guidet
(82978-90001)
5. HP-UX Technical BASIC Programming Guidet (9868090035)
* Provided with HP-UX Technical BASIC Interpreter.
t May be ordered separately.
1-2
Introduction
2
Integral PC Specifics
The Keyboard
This section describes some of the machine-specific features
of the Integral PC keyboard. For a general discussion of how
to use the keyboard, refer to chapter 3 of the user's guide. For
a discussion of how to use the keyboard specifically with
HP-UX Technical BASIC, refer to one of the following
sections:
• BASIC Function Keys
• Programming the Function Keys
• The 0 t·~ K \' B D Statement
• Keyboard Escape Sequences
BASIC Function
Keys
On the Integral PC, BASIC makes the following typing aid
assignments to the function keys. Immediate-execute keys include a terminating carriage return; pressing the key is
equivalent to typing the command and pressing ( Return).
BASIC Function Keys
Key
(ill
CID
@)
CID
Key Label
~''',
r.....,
._,;,
..·c··"
.®'~.,
•••· ••.M
¥
'
'''~''''~
c••"'••
Typing Aid
LIST (without parameters)
Immediate
Execute?
Yes
RUN (without parameter)
Yes
SINGLESTEP
Yes
CO NT (without parameter)
Yes
Integral PC Specifics
2-1
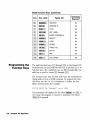
BASIC Function Keys (continued)
Key
Q[)
SCRATCH
No
@
PRINTER IS
No
em
PLiST
Yes
@
KEY LABEL
Yes
MASS STORAGE IS
No
DELETE
No
(][)
®,
CITQ)
,=
CITD
,
LOAD
No
(]I[)
,
STORE
No
;
TRACE ALL
Yes
CRT IS
No
INIT
Yes
Exits BASIC
Yes
(@
(fill
(ill)
(]])
Programming the
Function Keys
Immediate
Execute?
Typing Aid
Key Label
;:
"';:-=!.!"·Y'
,' ...• !.--., ..
The eight function keys (OD through @) on the Integral PC
keyboard may be used with the shift key to provide up to 16
function keys. The unshifted keys are OD through @; the
shift key is used to access 00 through (]]).
The function keys may be used both from the keyboard (as
typing aids) or from a BASIC program. To program the function keys, use the 0 t·~ K E \' # statement to define the key
labels and functions. For example:
10
Ot·~
KE\'#
16., "F.:epeat
II
':;Ioto
10~:1
This statement will display the key label ~;rt!l~~eat\! for (]]). It
will cause the program to branch to statement 100 when
( Shift )@ is pressed.
2-2
Integral PC Specifics
To redefine the typing aids available from the keyboard, use
the 0 t·4 K E \' # statement without a line number. For example,
to assign the CLEAP statement to the @ function key enter
the following statement:
ot·~
K E \' #
9.,
" C LEA F.: " .' "C LEA P ..... 1 3" (Return)
Pressing @ is equivalent to typing the
pressing return.
I] t·i
K \' B D
Statement
C LEA P
statement and
The Ot·4 K\'BD statement is used to initiate program branching when a specific key is pressed. The escape sequences
returned by the special keys on the Integral PC keyboard
have been remapped in BASIC from the standard TermO sequences to the escape sequences listed in the following
section. The escape sequence consists of the escape character
plus one alphabetic character. For example, the escape sequence for the @ function key is "·····366" or
CH P $ 0:: 27::0 t " n ". To branch on this key, enter one of the following statements:
1 [1
o t·~
K'-( BD
Ot·~
K \' B D ',.,'·3 1 ue .'
''-'' -3
1 ue .'
" ..... 366 " GOTO 999
or
1 [1
CHP$ ( .::. .. ) 8.:
'-1 - ,
" n " GOTO 999
When the key specified by the string expression is pressed,
the 0 t·~ K \' B D statement returns a value equal to the ASCII
value of the alphabetic character plus 256. For example, when
function key @ is pressed the variable ' -' -3 1 '-~ e is assigned the
value 366 (the decimal ASCII value of the letter n plus 256).
Testing the value of the numeric variable provides a method
of identifying the key causing the interupt when the string
expression enables branching on more than one key.
Integral PC Specifics
2-3
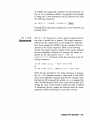
Keyboard Escape
Sequences
The following table provides a list of escape sequences returned by the Integral PC keyboard. (Because these escape
sequences have been remapped, these values are valid only
while running HP-UX Technical BASIC.)
Keyboard Escape Sequences
2-4
Integral PC Specifics
Key Name
Numeric
Key Code
BASIC Escape
Sequence
(ill
363
·····027k
@
364
···.·(1271
@)
365
··... 027m
OD
CID
00
366
···.·~~127n
367
···.·[127cl
368
·····027p
em
369
·····027,1.
00
360
·····027r
@
371
·····027:::
illQ)
372
CITD
ClID
373
·····~327IJ
374
···.·(127 .....
(ill)
375
···.·(1271.,.1
Gill
376
·····027::{
CIT[)
377
·····027'::1
C!ID
378
·····027z
W
360
···.·~~127h
@l!Dw
326
( Clear line)
331
·····~327K
( Clear display)
330
···.·(127,-'
( I nsert line)
332
·····027L
( Delete line)
333
·····027t'1
Keyboard Escape Sequences (continued)
Alpha Display
Key Name
Numeric
Key Code
BASIC Escape
Sequence
( Shift )( Tab)
361
·····027 i
(Tab)
329
···.·~:127
( I nsert char) (Mode On)
337
·····027G!
( I nsert char) (Mode Off)
338
···.·[127P
( Delete char)
336
···.·[127F'
(Prev)
342
·····027 1,}
(Next)
341
·····~327U
m
321
·····027A
@
324
·····027D
C!)
322
·····027B
CB
333
·····027C
(Shift)m
339
·····027::;
(Shift)m
340
···.·[127T
I
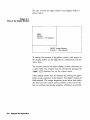
The BASIC alpha window is created when the BASIC interpreter is invoked. The initial size of the window is 24 lines by
80 columns. The alpha window is a view into a 32 line by 160
column display buffer. Like other windows on the Integral
PC, the
(CIT) and
(@) function keys may
be used to change the window. For information on how to
control the alpha window, refer to chapter 2 of the comprehensive guide.
Integral PC Specifics
2·5
The size of both the alpha window and display buffer is
shown below.
Figure 2-1.
Size of the Alpha Window
-------------,
Alpha
Window
24 lines x 80 columns
I
BASIC Screen Memory
Il __________________________
32 lines x 160 columns
_
To change the position of the alpha window with respect to
the display buffer, use the (Shift) key in combination with the
arrow keys.
The normal mode for the alpha display is black characters on
a white field. The window may be inverted by pressing the
Invert (@) function key on the system menu.
Other display modes may be obtained by sending the appropriate escape sequences to the display. The display modes are
field-oriented. The escape sequences given below only affect
the line from the current cursor position to the end of the
line, or until the next escape sequence, whichever occurs first.
2-6
Integral PC Specifics
For example, to print one word in inverse mode, enter the
following statement:
1 [1 D I !:;p
1I·····27t:dB
I
t·~'.}EF.:!:;E!
···.·27:~.:dl!!
II
Display Escape Sequences
Screen Editing
Key Sequence
BASIC Escape
Sequence
(ESC )&dB
·····27t:dB
Inverse mode.
(ESC )&dD
·····27g.:dD
Underline mode.
(ESC)&dF
·····27:~.:dF
Inverse and underline
mode.
(ESC )&d@
·····278.:dl!!
Turn off all display
enhancements.
Effect
HP-UX Technical BASIC on the Integral PC has limited screen
editing capabilities. This means that any program line or
statement on the 32 line screen buffer may be edited by simply moving the cursor to that line and using a combination of
the ( Insert char ), (Delete char ), (Backspace) and (Clear line) editing
keys. The line can then be entered into program memory by
pressing ( Return). Once a program statement has been entered
into program memory it will not be lost until it is deleted,
overwritten, or erased using the SCF.:ATCH, LOAD, or CHA I t·~
command.
For an example of screen editing, refer to chapter 3 of the
getting started guide. For more information about BASIC
editing functions, refer to the HP-UX Technical BASIC Pro-
gramming Guide.
Integral PC Specifics
2-7
Multiple
Windows
HP-UX Technical BASIC runs in a multi-tasking environment
on the Intergral PC. This means that users can have several
processes running at the same time. For example, you may
start a program in the BASIC window and then return to the
PAM window. From the PAM window you can start other
programs while your BASIC program is running. Multiple
windows are also useful when you need to run a system utility while you are in BASIC. To format a disc, for example,
simply return to PAM and run the format_disc utility, then
return to BASIC and continue.
Both the BASIC interpreter and your BASIC programs run in
the BASIC alpha window. If the BASIC program uses graphic
statements the BASIC interpreter will create a BASIC graphics
window.
BASIC Graphics
HP-UX Technical BASIC contains approximately 47 BASIC
keywords used to control the graphics window or plot. This
section will discuss some of the machine specific aspects of
graphics. For more information on how to program using the
graphics statements, refer to HP-UX Technical BASIC Programming Guide.
To enable you to use the BASIC graphics statements, the BASIC interpreter will automatically load the HP-GL (HewlettPackard Graphics Language) driver contained on the BASIC
disc. And, unless the plotting device has been reassigned, it
will also automatically create a BASIC graphics window when
the first graphics statement is executed.
2-8
Integral PC Specifics
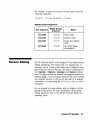
Graphics Window
The BASIC graphics window is a view into the graphics
buffer. The graphics buffer is a 512 by 255 array of bits in
memory. When plotted on the display, this corresponds to
roughly 2.8 dots per millimeter over the entire 18 by 9 cm
display. The size of the graphics window is initially 162 mm
by 67 mm. But like other windows, its size can be changed
with the j§t~tl<;":; (@) function key and moved with the
;:::·;MQi~~.: (CIT)} function key (both on the graphic window's
system menu). The size of the graphics buffer and the initial
position of the graphics window are illustrated below.
Figure 2.2
Size of the Graphics
Window
r---------------------------l
I
I
Graphics Memory Buffer
18 x 9 cm
I
I
I
I
I
I
I
I
I
Graphics
Window
I
I
L -________________________________________
~
Integral PC Specifics
__
I
~
2-9
Again, like other windows, the graphics window can be positioned over any portion of the plotter buffer by using the
(Shift) key in combination with the cursor keys. The effect is as
if the plotter buffer is sliding" under the window.
1/
Operation
Digitizing
Key
Roll left.
(Shift)@
Roll right.
(Shift
Roll up.
(Shift)ffi
Roll down.
(Shift
)0
)cy)
Description
Moves the plotter buffer left.
Moves the plotter buffer right.
Moves the plotter buffer up.
Moves the plotter buffer down.
The Integral PC has the capability to digitize from either the
internal plotter or from a peripheral plotter. The syntax for
the DIG I T I Z E statement is:
DIGITIZE XPosition,
VPosition,
Penstatus
Digitizing From the Internal Display. When the
DIG I T I ZE statement is executed from a program, it will create a graphics window and display the pen icon. Once the
pen icon appears, use the cursor keys to position the pen on
the plotter bed of the internal display. Press the (Enter) to enter the pen coordinates (the computer will beep to acknowledge the input). Press (Break) to pause the program and abort
the digitizing.
2·10
Integral PC Specifics
To use the DIG I T I Z E statement directly from the keyboard
(in the immediate execute mode), use the following
procedure:
1. Enter the DIG I T I Z E statement followed by a ( Return).
For example: DIG I T I ZE ::<., 'y'
2. Select the graphics window using the display pointer.
3. Move the pen icon with a combination of ( Select) and
cursor keys. For example, to move the pen to the right
press (Select )CE) simultaneously.
4. Press (Enter) key to enter the pen coordinates. (The pen
icon will disappear.)
5. Shuffle windows to return to the BASIC alpha window.
Digitizing From a Peripheral Plotter. Peripheral plotters
using the HP-GL (Hewlett-Packard Graphics Language) instruction set may also be used to digitize. Use the arrow keys
located on the plotter to move the pen. To enter the pen coordinates, press the ( Enter) key on the left of the Integral PC
keyboard or the ( Enter) key provided on the peripheral plotter.
Keyword Specifics
B F' LOT. The maximum number of raster dots per row on the
Integral PC is 512. This corresponds to 64 bytes per row.
F'Et·~. The color of the dots plotted on the graphics display
can be inverted using the ::Irlyjiij:: (00) key on the BASIC
graphics window system menu.
Graphics Menu
The Graph menu function keys can be used with the BASIC
graphic window. To display the menu when the graphics
window is active, press ;:9f~~~i~s:'. «(§J) on the system menu.
For more information on the Graph menu, refer to page 2-22
in the comprehensive guide.
Integral PC Specifics
2-11
i,} [I
L Ut'! E I ::;
Statement
The volume labels on discs may be renamed using the
I,} [I L Ut'l E I ::; statement. Peripheral disc drive device names
on the Integral PC consist of the upper case letter D followed
by three digits; volume number, HP-IB address, and disc
drive number. For example, D020 is the device name of volume 0 of disc drive number 0 with HP-IB address 2. The full
path name of the device file is Idev/D020. The one notable
exception to this naming scheme is the internal disc drive
which is named internal.
For more information on the naming conventions for disc
drive devices on the Integral PC, refer to chapter 5 of the
comprehensive guide.
BEE F' Statement
The BEE F' statement on the Integral PC includes both the
pitch and length parameters. The pitch parameter is interpreted as cycles per second, the length parameter in
hundreths of a second.
Printer
Enhancements
The built in inkjet printer in the Integral PC may be controlled from BASIC by using escape sequences or control
characters.
2-12
Integral PC Specifics
To send an escape sequence to the printer, use ·····27 or
CH P $ ( 27) concatenated with the escape character. For example, to send the command to skip over the perforations
«( ESC )l1L), use one of the following BASIC statements:
II
10 pF.:lt·n
II
1I·····2711L II
or
1[1 pF.:lt·n CHF.:$(27)t
ll
l1L
II
The printer control codes can be sent by using the BASIC escape sequence listed below or by using the C H P $ function.
For example, to send a command to enable bold print, use
one of the following statements:
1[1 PF.:lt·4T
11 •••••
14
11
or
10 PPINT CHP$(14)
The following list summarizes both the control and escape sequences used to control the built-in inkjet printer. For more
information on the printer enhancement escape sequences
and control codes, refer to appendix D of the comprehensive
guide. For information on escape sequences for peripheral
printers, refer to the owner's manual for that printer.
Printer Escape Sequences
Key Sequence
BASIC Escape
Sequence
(ESC)=
·····27
( ESC )&k{n}S
·····27tk {n}:::
(ESC )&dD
·····27tdD
Enable underline mode.
(ESC)&d@
..... 27 g.: d I!!
Disable underline mode .
Function
Half Line Feed.
Set print pitch {n}, where
{n}=O,1,2,3.
Integral PC Specifics
2-13
Printer Escape Sequences
Key Sequence
2-14
Integral PC Specifics
BASIC Escape
Sequence
Function
(ESC )&16D
·····27:~.:
16[1
Set line spacing to 6 lines
per inch.
( ESC)&18D
. ···27:~.: 1 ::::[1
Set line spacing to 8 lines
per inch.
(ESC )&11 L
·····27:~.:
Enable skip perforation
mode.
11 L
(ESC )&I{n}P
···. 27t:l{n}F'
Specify total length of {n}
lines per page.
(ESC )&I{n}F
···. 27t:l{n}F
Set {n} lines of text per
page.
(CTRL )H
..... :::
(CTRL )J
·····1 [1
Line Feed.
(CTRL )L
·····12
Form Feed.
(CTRL )N
·····14
Bold Print.
( CTRL)O
·····15
Disable Bold Print.
( CTRL)M
··... 13
Carriage Return.
(ESC )&IOL
·····27t: 1 [1L
Disable skip perforation
mode.
( ESC)&SOC
·····27t:s[1C
Enable Wrap-Around
Mode.
(ESC )&s1C
·····27t:sl C
Disable Wrap-Around
Mode.
Backspace .
Programming
1/0 Devices
The Integral PC provides a built in HP-IB interface and two
I/O ports. A bus expander may be connected to each I/O
port to provide space for additional interface or memory
modules. At the time this guide was printed, the following
interface and memory modules were available for the Integral
PC:
• HP 82919A Serial Interface
• HP 82920A Current Loop Interface
• HP 82921A 300/1200 BPS Modem
• HP 82923A GPIO Interface
• HP 82925A 256K Memory Module
• HP 82927A 512K Memory Module
For information on how to program either the HP-IB interface
or the plug-in interfaces, refer to the HP-UX Technical BASIC
I/0 Programming Guide.
Program
Performance
The use of external memory modules in the bus expander will
increase program execution times by as much as 30 percent. If
program execution time is critical to your application, try
configuring the system with all memory modules located in
the mainframe ports.
Integral PC Specifics
2-15
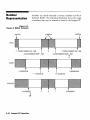
Number
Representation
Numbers are stored internally as binary numbers in HP-UX
Technical BASIC. The following illustration shows the range
of numbers that may be entered or stored in the Integral PC.
Figure 2-3.
Range of BASIC Variables
overflow
underflow
overflow
REAL
o
-1 .797693134862315E + 308
- 2.225073858507202E - 308
SHORT
1.797693134862315E+308
2.225073858507202E + 308
If'
.,..
V//'lj'.h'I'/h
- 3.402824E38
3.402824E38
-1.175494E-38
1.175494E-38
INTEGER
-1
2-16
Integral PC Specifics
o
2147483647
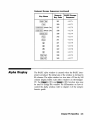
Storage
Requirements
The following table gives the number of bytes required to
store BASIC variables in the HP-UX disc file system.
Data Storage Requirements
Bytes in BASIC/DATA File
Variable Type
REAL
Autostarting the
BASIC
Interpreter
9 bytes.
SHORT
Individual variables or array elements: 9 bytes.
Entire array: 5 bytes per element.
STRING
3 bytes + 1 byte per character + 3 bytes each
time the string crosses a logical record
boundary.
The BASIC interpreter may be started automatically when the
mainframe power is first turned on by using an Autost file.
For example, to create an Autost file that will also start the
PAM window, use the following procedure.
1. Create a working copy of the BASIC disc. (Refer to the
getting started guide or to the user's guide for more information on how to copy discs.)
2. Create a file named Autost under the top-level directory
on the disc and enter the following two line shell script:
echo
BASIC
"t·4ol..) s1:at-1: in'3
#BASIC
BA~:;IC.
Please
)ai 1:."
I.•
t:
3. Save the file as an HP-UX text file.
4. Use the chmod command to add execute permission to
the file. Type in c h m0 oj +::< A,-~ 1: 0 s 1: (Return ).
Integral PC Specifics
2-17
The disc is now ready to use. To automatically start BASIC
when the power is turned on, simply insert the disc into the
internal disc drive and turn the power on. The PAM window
will first echo the message "t·4 0 1.•.1 S t a t- tin':;I B A~:; I C .
Please 1.·.1.01 it. " When the BASIC window appears, it is
ready to use.
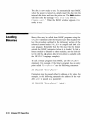
Loading
Binaries
Binary files may be called from BASIC programs using the
CALLE: I t·4 statement after the binaries have been loaded. Follow the procedure outlined in the dictionary section of the
reference manual under CAL L B I t·4 to compile and load a binary program. Remember that the file must first be linked
outside the BASIC interpreter before it is loaded. To link a
binary module to libraries or other modules, use the link editor ld with the -rd options (the ld link editor is available with
the HP-UX C Language compiler).
To call a binary program from BASIC, use the CALLB I t·4
statement. For example, if the binary program has an entry
point called "E n t t- I=, Poi n t use the following statement:
II
Parameters may be passed either by address or by value. For
example, in the following statement the address of the variable add t- is passed as a parameter:
10 CALLBIt·4
2-18
Integral PC Specifics
"Entt-'=,Point"
(addt-::'
In the following example, the value of the variable
passed as a parameter:
1[1
CALLE:It·~
"Entt-'::IPoint"
n u rtf
is
«num»
Both methods of passing parameters may be used in the same
statement. For example:
1 ~~1 CAL L E: I t·~ "E n t r '::I Poi n t"
(
.~ d dr.,
( n IJ rtf).,
15 4 2 1 )
For information and examples on how to use binary programs
in BASIC, refer to the HP-UX Technical BASIC Programming
Guide. For more information on the CALLE: I t·~ and LOADE: I t·~
statements, refer to the keyword dictionary section of the reference manual.
Integral PC Specifics
2-19
3
Uploading Series 80
BASIC Files
Introduction
The upload utility program is provided to allow users to port
Series 80 BASIC files to HP-UX Technical BASIC files on the
Integral PC.
This utility will accept files from the HP-85, 86 and 87
computers.
The utility will transfer the following disc-based files:
• Series 80 BASIC Program Files (stored as ASCII DATA
Files).
• Series 80 BASIC Logical Interchange Format (LIF) Files.
• Series 80 BASIC DATA Files.
• Series' 80 BASIC CRAF Files.
Uploading Series 80 BASIC Files
3-1
The transfer process is illustrated below.
Figure 3-1.
Upload Process
Series 80
Series 80
HP-UX
HP-UX Technical
BASIC
SAVE
"_filename"
upload
r---------,
PROG
File
LlF
File
GET
~---~
DATA
File
.----------.
PROG
File
Text
File
DATA
File
DATA
File
Text
File
GRAF
File
Hardware
Requirements
3-2
GRAF
File
No additional hardware is required to run the upload
program.
Uptoading Series 80 BASIC Files
Limitations
Number of Files. Up to 100 file names may be transferred
in one batch from a single disc. If you need to transfer more
than 100 files from anyone disc, transfer the files in two or
more batches. Files that have already been transferred in previous batches must be renamed on the source disc with an
asterisk H*" as the first character in the file name before running subsequent batches.
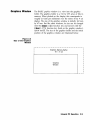
Graphic Files. The sizes of the graphic screen on the
HP-86/87 and the Integral PC are not identical. In the Series
80 GF.~ A P H mode the screen size is 400 x 240 dots; in the
GPAPHALL mode the screen resolution is 544 x 240 dots. On
the Integral PC the screen size is 512 x 255 dots. When a
Series 80 file is transferred to the Integral PC, the GRAF files
will either be padded out with zeros or truncated to fit. The
result of the GRAF file transfer is given below.
Mode
Effect of Transfer on Series 80 GRAF File
GPAP H
Blank bytes are added in 112 bit positions on
the right and 15 rows on the bottom.
GPAP HAL L
The rightmost 32 bit positions of each row are
lost; blank bytes will be added in 15 rows on
the bottom.
The relative size and position of the various screen sizes are
illustrated below.
Figure 3-2.
Relative Size of Graphics
Windows
Series 80
GRAF Mode
240 x 400 dots
Series 80
GRAFALL Mode
240 x 544 dots
Integral PC
255 x 512 dots
Uploading Series 80 BASIC Files
3-3
Data Precision and Value Range. Another limitation is
due to the differences in the internal representation of numbers. Transferring data files may result in numeric overflow or
underflow conditions or in changes in precision.
In the overflow junderflow condition, the utility replaces all
overflow or underflow values with the maximum or minimum values (I t·~ F and E P ~:;) available on the Integral PC.
When the number to be transferred cannot be represented by
a binary number, there will be a change in precision. Integer
values will be transferred with no loss in precision.
Files Containing Non-displayable Characters. With the
default character font on the Intergral Personal Computer,
characters with the ASCII decimal codes in the ranges 0
through 31 and 128 through 159 are non-displayable characters. When a program file is transferred to a HP -UX ASCII
file, any non-displayable characters are escaped with a
followed by the character's three decimal digit ASCII code.
(The "~" is represented on the screen as ~ ~".)
II , .../
II
Because this substitution expands lines of code in Series 80
BASIC, the resulting lines may be too long to use with the
GET command. In this case the user will need to edit the
ASCII text file. Once the parser has accepted the line containing the non-printing characters, the 4-character sequence is
stored as a I-byte ASCII character.
Preparation
Microflexible
Disc Types
3-4
The upload program accepts both single- and double-sided
micro flexible discs. The internal disc drive in the Integral PC
will not accept early versions of the single-sided disc that do
not have the spring-loaded shutters (used with HP 9121 single-sided disc drive). If your souce disc cannot be inserted
into the internal drive, copy the disc on your Series 80 computer to a single-sided disc with a spring-loaded shutter.
Uploading Series 80 BASIC Files
File Naming
Conventions
It is recommended that Series 80 file names be restricted to
upper and lower case alphabetic characters, numeric characters, the period, and the underscore character 1/_".
Any files that you do not want to transfer can be masked
with an asterisk 1/*" as the first character in the file name.
Series 80
Program Files
Converting Series 80 Program Files to ASCII Files.
Series 80 program files can not be directly transferred using
this utility. Program files must first be converted into ASCII
data files by the Advanced Programming ROM ::; A I.} E command or by the ::; A I.} E command available in the GET ::; A I.} E
binary.
After using the SA'.}E command to convert the program into a
data file, rename the file to start with an underscore character
1/_" (not a minus sign or a hyphen). This is to allow the utility
to distinquish between the Series 80 DATA files that contain
programs, and those that contain data. This is important since
the GET command in HP-UX Technical BASIC cannot retrieve
programs from DATA files.
Series 80 BASIC Programs Containing Binary
Programs. Any Series 80 program that contains binary pro-
gram keywords may be transferred to an HP-UX text file.
First use the Series 80 BASIC LOA DE: I t·4 command to load the
binary, then S A I.} E the file using a file name beginning with
an underscore character. Use the upload program to convert
the file, then in HP-UX Technical BASIC, use the GET command to retrieve the file. The parser will, however, flag all
binary keywords as syntax errors or variable names.
To avoid syntax errors, try the following:
1. Replace binary keywords with functionally equivalent
ROM keywords, if possible.
2. Replace binary keywords with user defined functions or
subprograms.
Uploading Series 80 BASIC Files
3-5
3. Replace binary keywords with HP-UX Technical BASIC
binary programs, for example, compiled C functions or
subroutines.
If the program requires extensive editing, it may be more convenient to edit the program using an HP-UX editor such as vi.
Note however that the HP-UX editors may only be used on
ASCII text files, not on BASIC files.
Series 80 DATA,
LIF and GRAF Files
No special preparation is needed to transfer regular Series 80
LIF, DATA or GRAF files to HP-UX text, DATA or GRAF
files.
However, if the Series 80 DATA file is to be edited by an HPUX system editor, it may be uploaded to an HP-UX ASCII
text file by renaming the Series 80 source file to begin with
the underscore (_) character.
Running the
Upload Program
Using the Single
Internal Disc Drive
Use the following procedure to transfer Series 80 files if your
Integral Personal Computer does not have an external disc
drive.
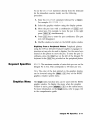
1. Insert the disc containing the upload utility program into
the internal drive. Highlight and start the program or enter the program name in the PAM command line. The
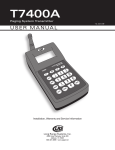
program window shown below will appear.
3-6
Uploading Series 80 BASIC Files
Upload Program Window
er prograM.
(0.
<FROM)
< TO }
[I e 11..' ice
:
Series B{I file:
[I irecto("·!:!1
:
HP-lI:lC file:
<STflTlIS}
Please insert a Series B{I disc into a disc driue.
F'("·ess UR'i1.~ when !:!IOU are ready.
2. Remove the upload disc from the internal drive and insert the source disc containing Series 80 files. Press
!I4IMff!i «(ill).
3. The program will prompt you for the name of the disc
drive containing the Series 80 disc. Enter the device
name.
Type in:
in t er- n·:::; I
4. The program will prompt you to input the name of the
destination folder. The /tmp folder should be present in
the root folder, but it should not be used for the destination folder. If no suitable folder exists, shuffle the
windows to get to the PAM window and use the
makefolder utility to create a suitable folder. Return to the
upload window and type in the name of the destination
folder.
Uploading Series 80 BASIC Files
3-7
5. If you want to copy the entire disc, press:
(00).
If
only want to copy a portion of the disc, press the
iJijjri1tji, (Q[) function key. Use the
(@) function key to move through the directory listing and the
RtflJiESi:fi (Q[) function key to mark files that are to be
transferred.
The program menu keys are summarized in the following table.
Upload Menu Keys
Menu Key
Function
Continue (00)
Continues to next step.
Disc (00)
Entire Series 80 disc is uploaded.
Files (Q[))
Enables user to select files.
Catalog (00)
Provides catalog of Series 80 source disc.
First (@)
Moves file selector to first file in directory.
Next (@)
Moves file selector to next file in directory.
Previous (@)
Moves file selector to previous file in directory.
Last (00)
Moves file selector to last file in directory.
Pick (Q[))
Picks file selected to be uploaded.
Quit (Q[))
Quits upload program.
Larger (00)
HP-UX file will have larger logical record size
than Series 80 source file.
Same (Q[))
HP-UX file will have same logical record size as
Series 80 source file.
Follow the directions in the window and use the menu
keys provided.
6. The program will end with the following message:
tt End of the upload program tt
3-8
Uploading Series 80 BASIC Files
Using Multiple
Disc Drives
When using multiple external micro flexible disc or SIf4-inch
drives, do the following:
1. Insert the utilities disc in the internal drive. Start the
mount_disc utility.
2. Insert the destination disc in an external drive. (If this is
a new disc, it will need to be formatted first.)
3. Follow the instructions in the mount_disc window and
mount the destination disc.
4. If you have another disc drive available, insert the Series
80 source disc in the drive. Do not mount this disc. Insert the disc containing the upload program in the
internal drive, start the program.
Press iillttl. (OD)·
When prompted, type in the device name of the disc
drive containing the Series 80 files as the source.
When prompted for the destination disc, type in the volume label of the destination disc, starting with the root
or "I" character.
5. If you do not have another disc drive available, insert
the disc containing the upload program in the internal
drive. Start the upload program.
Insert the disc containing the Series 80 files in the internal disc drive. Press
(OD).
When prompted for the source disc, type in: i n t Eo r n.:. 1
( Return).
When prompted for the destination disc, type in the volume label of the destination disc mounted in the
external drive.
6. Follow the instructions in the program window. After
the program is finished, the destination disc will contain
the uploaded Series 80 files in the HP-UX format.
Uploading Series 80 BASIC Files
3·9
Options
The full syntax for the upload program is:
upload -options source_device-'lame destination_folder-'lame
The options are summarized below.
3-10
f
File by file transfer. The upload program will ask for
the name of each file. Without this option, the program will copy all the files on the source disc when
both the source and destination names are given in
the argument string.
n
Suppresses expansion of the logical record in the
HP-UX Technical BASIC data file. Without this option, the program will create a DATA file that has
logical record size 12.5 percent larger than that of
the Series 80 file. For example, if the Series 80 file
contains 24 byte logical records, the uploaded file
will contain 24 byte logical records with the n option, or 27 byte logical records without the option.
For applications requiring random access to each
record, do not suppress expansion of logical record
size.
s
All Series 80 DATA files will be uploaded as HP-UX
text files. This option ignores the file name conventions to allow uploading of DATA files to HP-UX
ASCII text files without renaming them.
e
Disables the non-'printing character conversion routine. Without this option non-printing characters
will be converted to a character string starting with
the BASIC metacharacter ("") when an HP-UX text
file is created.
1,2,3
French, Spanish, HP-86B English language options
(used with -e option). This option will cause the
non-displayable characters to be mapped to the language character set specified. For example, in Series
80 BASIC, the A character is mapped to the ASCII
"NAK" character. If it is uploaded to an HP-UX text
file, using the -e3 option, this nondisplayable character will be mapped to ASCII A (decimal 216),
instead of being escaped with the string """ 21".
Uploading Series 80 BASIC Files
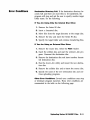
Error Conditions
Destination Directory Full. If the destination directory becomes full and there are more files to be transferred, the
program will stop and ask the user to specify another target
folder name. Do the following:
If You Are Using Only the Internal Disc Drive:
1. Remove the Series 80 disc.
2. Insert a formatted disc.
3. Move files from the target directory to the empty disc.
4. Remove the disc and insert the Series 80 disc.
5. Specify the target folder and continue transferring files.
If You Are Using an External Disc Drive:
1. Remove the source disc. Select the PAM window.
2. Insert the utilities disc and start the unmount_disc program. Unmount the destination disc.
3. Remove the destination disc and insert another formatted destination disc.
4. Run the mount_disc utility and mount the new destination disc.
5. Remove the utilities disc and re-insert the source disc.
6. Specify the name of the new destination disc and continue uploading programs.
Other Error Conditions. Several error conditions may stop
or terminate program execution. These error conditions are
summarized in the table on the following page.
Uploading Series 80 BASIC Files
3-11
Error Conditions
Condition
Program Response
Solution
Corrupt Series 80 Files
File will not be transferred. Program will go on to next file in the
directory.
Check the file or disc on your
Series 80 computer.
Source disc drive not
found.
Program terminates.
Check the /dev directory for the
device name of the disc drive.
Refer to the Integral PC Comprehensive Guide for device
naming conventions.
Destination folder not
found.
Program terminates.
Check the root directory in PAM
for the destination folder. If the
destination disc is in an external
drive, check the /dev folder for
the disc drive device file. If the
device file is not found, run the
scan_discs utility.
No valid file names or
types found on source
disc.
The program will issue a warning that the disc is empty, then
stop.
Check the disc to be sure all
program files have been saved
as ASCII data files and stored
with the correct file name.
Check to be sure the asterisk
character (*) is used only to
mark files you do not want to
copy.
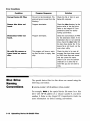
Disc Drive
Naming
Conventions
The special device files for disc drives are named using the
following convention:
D { volume-number} {HP-IB-address } { drive-number}
For example, D020 is the special device file name for a disc
drive with HP -IB address of 2, volume number 0, and drive
number o. Refer to the Integral PC Comprehensive Guide for
more information on device naming conventions.
3-12
Uploading Series 80 BASIC Files