1
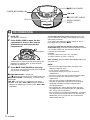
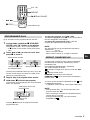
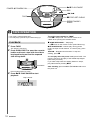
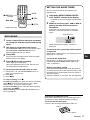
OPERATING INSTRUCTIONS
INSTRUCCIONES DE MANEJO
MODE D’EMPLOI
CSD-TD39
CSD-TD49
CD STEREO RADIO CASSETTE RECORDER
RADIOCASETE ESTÉREO CON
REPRODUCTOR DE DISCOS COMPACTOS
RADIO-CASSETTE LECTEUR DE CD STEREO
English : See page 2.
8C-CHB-903-01
020205ACK-I-AL
En
Español : Ver la página 12.
E
Français : Voir page 22.
F
U
C
WARNING
TO REDUCE THE RISK OF FIRE OR ELECTRIC
SHOCK, DO NOT EXPOSE THIS APPLIANCE TO
RAIN OR MOISTURE.
CAUTION
RISK OF ELECTRIC SHOCK
DO NOT OPEN
“CAUTION:TO REDUCE THE RISK OF
ELECTRIC SHOCK,
DO NOT REMOVE COVER (OR BACK).
NO USER-SERVICEABLE PARTS INSIDE.
REFER SERVICING TO QUALIFIED
SERVICE PERSONNEL.”
IMPORTANT SAFETY
Read the Operating Instructions carefully and
completely before operating the unit. Be sure to keep
the Operating Instructions for future reference. All
warnings and cautions in the Operating Instructions and
on the unit should be strictly followed, as well as the
safety suggestions below.
Warning
To prevent electric shock or injury, these safety
instructions should be followed in the installation, use
and servicing the unit.
Explanation of Graphical Symbols:
The lightning flash with arrowhead symbol,
within an equilateral triangle, is intended
to alert the user to the presence of
uninsulated “dangerous voltage” within the
product’s enclosure that may be of
sufficient magnitude to constitute a risk of
electric shock to persons.
The exclamation point within an
equilateral triangle is intended to alert the
user to the presence of important
operating and maintenance (servicing)
instructions in the literature accompanying
the appliance.
OWNER’S RECORD
For your convenience, record the model number (you
will find it at the bottom of the unit) and serial number
(you will find it in the battery compartment) in the space
provided below. Please refer to them when you contact
your AIWA dealer in case of difficulty.
Model No.
Serial No.
2
ENGLISH
Installation
Attachments – Do not use attachments not
recommended by the unit manufacturer as they may
result in the risk of fire, electric shock or injury to
persons.
Water and Moisture – Do not use this unit near water
- for example, near a bathtub, washbowl, kitchen sink,
or laundry tub, in a wet basement, or near a swimming
pool, and the like.
Heat – Do not use this unit near sources of heat,
including heating vents, stoves, or other appliances that
generate heat. It also should not be placed in
temperatures less than 5˚C (41˚F) or greater than 35˚C
(95˚F).
Mounting surface – Place the unit on a flat, even
surface.
Accessories – Do not place this unit on an unstable
cart, stand, tripod, bracket, or table. The unit may fall,
causing serious injury to a child or an adult, and serious
damage to the appliance. Use only with a cart, stand,
tripod, bracket, or table recommended by the
manufacturer, or sold with the unit. Any mounting of the
appliance should follow the manufacturer’s instructions,
and should use a mounting accessory recommended by
the manufacturer.
Portable cart – An appliance and cart
combination should be moved with
care. Quick stops, excessive force, and
uneven surfaces may cause the
appliance and cart combination to
overturn.
Ventilation – The unit should be situated with
adequate space around it so that proper heat ventilation
is assured. Allow 10 cm clearance from the rear and the
top of the unit, and 5 cm from the each side.
Slots and openings in the cabinet and the back or
bottom are provided for ventilation, and to ensure
reliable operation of the unit and to protect it from
overheating, these openings must not be blocked or
covered. The openings should never be blocked by
placing the unit on a bed, sofa, rug or other similar
surface. This unit should not be placed in a built-in
installation such as a bookcase unless proper
ventilation is provided.
INSTRUCTIONS
Object and Liquid Entry – Never push objects of any
kind into this unit through the cabinet slots as they may
touch dangerous voltage points or short-circuit parts
that could result in a fire or electric shock. Never spill
liquid of any kind on the unit.
Electric Power
Power Sources – This unit should be operated only
from the type of power source indicated on the marking
label. If you are not sure of the type of power supply to
your home, consult your appliance dealer or local power
company. To operate unit on battery power, or other
sources, refer to the operating instructions.
Grounding or Polarization – This unit is provided
with a polarized alternating-current line plug (a plug
having one blade wider than the other). This plug will fit
into the power outlet only one way. This is a safety
feature. If you are unable to insert the plug fully into the
outlet, try reversing the plug. If the plug should still fail
to fit, contact your electrician to replace your obsolete
outlet. Do not defeat the safety purpose of the polarized
plug.
Power-Cord Protection – Power-supply cords should
be routed so that they are not likely to be walked on or
pinched by items placed upon or against them, paying
particular attention to cords at plugs, convenience
receptacles, and the point where they exit from the
product.
Overloading – Do not overload wall outlets, extension
cords, integral convenience receptacles as this can
result in a risk of fire or electric shock.
Lightning
For added protection for this unit receiver during a
lightning storm, or when it is left unattended and
unused for long periods of time, unplug it from the wall
outlet. This will prevent damage to the unit due to
lightning and powerline surges.
Damage Requiring Service
Unplug this unit from the wall outlet and refer servicing
to qualified service personnel under the following
conditions:
1) When the power cord or plug is damaged.
2) If liquid has been spilled, or objects have fallen into
the unit.
3) If the unit has been exposed to rain or water.
4) If the unit does not operate normally by following the
operating instructions. Adjust only those controls
that are covered by the operating instructions as
improper adjustment of other controls may result in
damage and will often require extensive work by a
qualified technician to restore the unit to normal
operation.
5) If the unit has been dropped or the cabinet has been
damaged.
6) When the unit exhibits a distinct change in
performance - this indicates a need for service.
Do not attempt to service this unit yourself as opening
or removing covers may expose you to dangerous
voltage or other hazards. Refer all servicing to qualified
service personnel.
Replacement Parts – When replacement parts are
required, be sure the service technician has used
replacement parts specified by the manufacturer or
having the same characteristics as the original part.
Unauthorized substitutions may result in fire, electric
shock or other hazards.
Safety Check – Upon the completion of any service or
repairs to this unit, ask the service technician to perform
safety checks to determine that the unit is in proper
operating condition.
En
Maintenance
Cleaning – Unplug this unit from the wall outlet before
cleaning. Do not use liquid cleaners or aerosol
cleaners. Use a damp cloth for cleaning.
Condensation – Moisture may form on the CD pickup
lens when:
- The unit is moved from a cold spot to a warm spot
- The heating system has just been turned on
- The unit is used in a very humid room
- The unit is cooled by an air conditioner
When this unit has condensation inside, it may not
function normally. Should this occur, leave the unit for a
few hours, then try to operate again.
ENGLISH
3
Power supply
Using on batteries
OPE/BATT
Open the lid of the battery compartment on the rear and
insert eight R14 (size C) batteries, not supplied, as
illustrated below. Then close the lid.
To switch from AC power supply to battery supply,
disconnect the AC cord from the AC inlet.
The OPE/BATT indicator lights up while the power is
on.
R14 (C)
Using on AC house current
Connect the AC cord as illustrated below.
1 to the AC inlet of the unit
supplied AC cord
2 to an AC outlet
(AC 120 V, 60 Hz)
• The rated voltage of the unit is 120 V AC.
• If abnormal high voltage is supplied, “Hi” flashes in
the display and the unit does not accept any
operation. Disconnect the AC cord.
CAUTION
Use only the supplied AC cord. Use with other cords
may result in the risk of fire.
When the OPE/BATT indicator becomes dim, volume
decreases, or sound is distorted during operation,
replace the batteries.
When the batteries become weak during tape
operation, “Lo” flashes in the display. In stop mode, the
unit will not accept REC, e PLAY/PAUSE, f and
g. In playback or recording mode, the unit will be
stopped and turned off.
Replace the batteries.
Notes on batteries
To avoid damage from leakage or explosion, observe
the following:
• Insert the batteries with the 0 and 9 marks correctly
aligned.
• Do not mix different types of batteries or old batteries
with new ones.
• When the unit is not to be used for a long period,
remove the batteries.
• Never recharge the batteries, apply heat to them or
take them apart.
• Remove dead batteries.
If liquid leaks from the batteries, wipe thoroughly to
remove.
Maintenance
To clean the cabinet
Use a soft cloth lightly moistened with mild detergent
solution. Do not use strong solvents such as alcohol,
benzine or thinner.
To clean the heads
When the tape heads are dirty;
- high frequency sound is not emitted
- the sound is not adequately high
- the sound is off-balance
- the tape cannot be erased
- the tape cannot be recorded on
4
ENGLISH
After every 10 hours of use, clean the tape heads
with a head cleaning cassette.
Use separately sold dry-type or wet-type cleaning
cassette.
Refer to the instructions of the cleaning cassette for
details.
To clean the lens
Use a cotton swab slightly
moistened with cleaning
fluid. Wipe gently from the
center to the edge.
Lens
Remote control (CSD-TD49 only)
Specifications
Insert two R6 (size AA) batteries.
Tuner section
Frequency range, antenna – FM: 87.5 - 108.0 MHz
Rod antenna, AM: 530/531 - 1,710/1,602 kHz (10/9 kHz
step) Ferrite bar antenna
Deck section
R6 (AA)
When the reach of the remote control signal is less than
5 meters (16 feet), replace the batteries.
The remote control may not operate correctly
when:
- The unit is exposed to intense light, such as direct
sunlight
- Objects block the remote control signal to the unit
To use the buttons on the remote control
Buttons on the remote control and the main unit with
identical indications have the same functions.
To turn the power on
Press POWER to turn on the display.
When using the unit on the batteries, this button will not
turn the power on.
Track format – 4 tracks, 2 channels / Frequency range
– Normal tape: 50 - 12,500 Hz (EIAJ) / Recording
system – AC bias / Erasing system – AC erase / Heads
– Recording/playback head (1), Erasure head (1)
CD player section
Disc – Compact disc / Scanning method – Non-contact
optical scanner (semiconductor laser)
General
Speaker – 80 mm cone type (2) / Output – Headphones
jack (stereo mini-jack) / Power output – 2.5 W + 2.5 W
(EIAJ, 7 ohms, THD 10% DC) / Power requirements –
DC 12 V using eight size C (R14) batteries, AC 120 V,
60 Hz / Power consumption – 16 W / Dimensions (W ×
H × D) – 306 × 155 × 253 mm (12 1/8 × 6 1/8 × 10 in.) /
Weight (excluding batteries) – 2.5 kg (5 lbs. 8 oz.) /
Accessories – Remote control (1, CSD-TD49 only), AC
cord (1)
Specifications and external appearance are subject to
change without notice.
En
COPYRIGHT
Please check the copyright laws relating to
recordings from disc, radio or external tape for the
country in which the machine is being used.
To turn the power off
Press POWER to turn off the display.
To use the FUNCTION button
Each time FUNCTION is pressed while the power is on,
the function is selected cyclically.
CD
TAPE
TUNER
FUNCTION
POWER
If an erroneous display or malfunction occurs
Turn off the unit and press POWER 6 STANDBY/ON
while pressing s.
If the unit cannot be reset in the way above, disconnect
the AC cord and remove all the batteries to turn off the
display.
Leave the unit for a while and turn the power back on.
ENGLISH
5
\ PHONES
VOLUMEN,M
e PLAY/PAUSE
POWER 6STANDBY/ON
f, g
(TUNING -, +)
3-MODE EQ
s STOP/SET/CLEAR
T-BASS
PRESET
RADIO BAND
A
1
REPEAT/MODE/
SLEEP
TUNER OPERATION
Press RADIO BAND * repeatedly to select
the desired band.
FM
AM
The power is turned on and the previously tuned
station is received.
* or BAND on the remote control (applicable
when the AC cord is connected, CSD-TD49
only)
2
Press f, g (TUNING -, +) to select
a station.
During FM stereo reception,
is displayed.
After listening, press POWER 6 STANDBY/ON to
turn the power off.
For better reception
FM
AM
REPEAT/MODE/SLEEP *
- If an FM stereo broadcast contains noise, press the
button so that
is displayed.
Noise is reduced, although reception is monaural.
To restore stereo reception, press the button again.
- If a high-pitched sound is heard during AM recording,
press the button repeatedly to display “b1” or “b2”, so
as to eliminate the noise.
* or MODE on the remote control (CSD-TD49 only)
To change the AM tuning interval
The default setting of the AM tuning interval is 10 kHz/
step. If you use the unit in an area where the frequency
allocation system is 9 kHz/step, change the interval as
follows.
1 Press RADIO BAND.
2 Press POWER 6 STANDBY/ON while pressing
RADIO BAND.
When the AM tuning interval is changed, the preset
stations are cleared.
NOTE
If the unit picks up noise from other electrical
appliances nearby, like a TV or fluorescent lights, move
the unit.
Extend the rod antenna
and orient it for the best
reception.
The antenna is inside the
unit. Position the unit for
the best reception.
For quick tuning (Auto Search)
Keep f, g pressed until the tuner starts
searching for a station. When a station is tuned to, the
search stops.
If the broadcast signal is weak, it does not stop. To
stop the search manually, press f or g.
To listen with the headphones
Connect headphones with a stereo mini plug to the
\ PHONES jack on the rear of the unit.
6
ENGLISH
DISPLAY
0-9, +10
SOUND ADJUSTMENT
MODE
Volume or tone adjustment does not affect
recording.
EQ
VOL k, i
BAND
e PLAY/
PAUSE
f, g
s STOP
(CSD-TD49 only)
VOLUME (VOL, CSD-TD49 only)
Press VOLUME N or M on the unit or VOL i
or k on the remote control. The volume level is
displayed as a number from 0 to 25.
• The volume level is automatically set to 14 if the
power is turned off when the volume level is set
to 15 or more.
• Pressing DISPLAY on the remote control
displays the adjusted volume level (CSD-TD49
only).
3-MODE EQ * (equalizer)
PRESETTING STATIONS
You can preset up to 15 stations in each band.
1
2
Select a station.
Press s STOP/SET/CLEAR * once so that
“M” is displayed to store the station.
A station is assigned a preset number, beginning
from 1 in consecutive order for each band.
Press 3-MODE EQ repeatedly until the desired
mode is displayed.
The equalizer mode changes to R (Rock), P (Pop),
J (Jazz) or no equalization, cyclically.
Rock - Emphasizes the high and low range of
music.
Pop - Emphasizes voice and midrange of music.
Jazz - Emphasizes the low range of music.
* or EQ on the remote control (CSD-TD49 only)
T-BASS system
Preset number
The T-BASS system enhances the realism of lowfrequency sound.
Press T-BASS to turn it on or off.
En
Frequency
* or s STOP on the remote control (CSD-TD49
only)
3
Repeat steps 1 and 2.
The next station will not be stored if a total of 15
preset stations have already been stored for a
band.
To listen to preset stations
Select a band then press PRESET or e PLAY/
PAUSE repeatedly.
To select a preset number directly with the
remote control (CSD-TD49 only)
Press the numbered buttons 0-9 and +10.
Example:
To select number 15, press +10 and 5.
To select number 10, press +10 and 0.
To clear a preset station
Select the preset number first. Within 4 seconds, hold
down s until “M” and the preset number disappear.
The higher numbers in the band are decreased by one.
ENGLISH
7
e PLAY/PAUSE
POWER 6STANDBY/ON
f, g
s STOP/SET/CLEAR
CD
REPEAT/MODE/
SLEEP
B
1
CD OPERATION
Press CD.
The power is turned on.
2
Press PUSH OPEN to open the disc
compartment. Place a disc with the
printed side up and close the disc
compartment.
PUSH OPEN
Total number of tracks and total playing time are
displayed. It will take about 15 seconds when
loading a CD-RW disc.
3
Press e PLAY/PAUSE to start play.
The number of the track being played and elapsed
playing time are displayed.
s STOP/SET/CLEAR * – Stops play.
* or s STOP on the remote control (CSD-TD49 only)
e PLAY/PAUSE – Pauses play. To resume play,
press again.
f, g – Searches for a particular point during
playback. Hold down f or g and then release it.
– Skips to the beginning of a track. Press f or g
repeatedly.
8
ENGLISH
To start play when the power is off, press CD. The
power is turned on and play of the loaded disc begins
(Direct Play Function).
If you load a disc while the display flashes in step 2,
play starts without pressing e.
To select a track directly with the remote control
(CSD-TD49 only), press the numbered buttons 0-9 and
+10. CD play starts from the selected track and
continues to the last track.
Example:
To select number 25, press +10, +10 and 5.
To select number 10, press +10 and 0.
After listening, press POWER 6 STANDBY/ON to turn
the power off.
NOTE
• Do not use irregular shape CDs (example: heartshaped, octagonal ones).
It may result in malfunctions.
• Do not place more than one disc in the disc
compartment.
• Do not try to open the disc compartment during play.
• Do not touch the lens. Doing so may cause
malfunctions.
• The unit may not play a CD-R/RW disc that is
recorded on personal computers or some kinds of
CD-R/RW recorders because of differences in
recording platforms.
• Do not attach any seal or label to either side (the
recordable side or the labeled side) of a CD-R/RW
disc. It may cause malfunction.
• Do not load an unrecorded CD-R/RW disc. It will take
over 30 seconds to read the disc. The disc may be
damaged if you try to open the disc compartment
while reading the disc.
0-9, +10
REPEAT
e PLAY/PAUSE
f, g
s STOP
(CSD-TD49 only)
PROGRAMMED PLAY
Up to 30 tracks can be programmed from the disc.
1
In stop mode, hold down s STOP/SET/
CLEAR * until “M” flashes in the display.
The program number, “P-01” is also displayed.
* or s STOP on the remote control (CSD-TD49
only)
2
Press f or g to select a track, then
press s to store it.
Next program number
Pressing the numbered buttons 0-9 and +10 on the
remote control selects and stores the track at the
same time (CSD-TD49 only).
3
4
NOTE
The total playing time of the selected tracks will be
displayed as “
”:
- When it exceeds “99:59”.
- When a track number 31 or higher is selected.
En
REPEAT, RANDOM PLAY
Selected track number
Total playing time of
the selected tracks
To check the program, press f or g.
To clear the program, press s once in stop mode so
that “M” disappears in the display.
To change the programmed tracks, clear the
program and repeat all the steps again.
Repeat step 2 to program other tracks.
Hold down s to finish the program.
Total number and total playing time of the selected
tracks are displayed.
Total playing time of the
selected tracks
Total number of the
selected tracks
A single track or all tracks can be played repeatedly,
and all the tracks randomly. Random play can be
repeated as well.
Press REPEAT/MODE/SLEEP * repeatedly.
The mode changes as follows:
: Repeats a single track. Select a track with f
or g.
: Repeats all the tracks.
RANDOM: Plays all the tracks randomly.
RANDOM and
: Plays all the tracks repeatedly in
random order.
To cancel, press the button repeatedly so that
and/
or RANDOM disappears.
* or REPEAT on the remote control (CSD-TD49 only)
NOTE
• During random play, you cannot skip back to the
previous track with f.
• When selecting a track with the numbered buttons,
random play is canceled.
• During programmed play, you cannot select
RANDOM and
.
Pressing e finishes the program and starts
programmed play.
ENGLISH
9
e PLAY/PAUSE
POWER 6STANDBY/ON
REC
f, g
TAPE
s STOP/SET/CLEAR
REPEAT/MODE/
SLEEP
C
TAPE OPERATION
• Use Type I (normal) tapes only.
• The unit plays (records on) the side facing up.
PLAYBACK
1
Press TAPE.
The power is turned on.
2
Press PUSH EJECT to open the cassette
holder and insert a tape with the side to
be played facing out and the exposed
side facing down.
To set the tape counter to “0000”
Press s in stop mode. The counter is also set to
“0000” when opening the cassette holder.
s STOP/SET/CLEAR * – Stops play.
* or s STOP on the remote control (CSD-TD49 only)
e PLAY/PAUSE – Pauses play. During pause
mode, the tape counter flashes. To resume play, press
again.
f/g – Rewinds/ fast forwards. To stop the
winding, press s.
To start play when the power is off, press TAPE. The
power is turned on and play of the loaded tape begins
(Direct Play Function).
If you load a tape while the display flashes in step 2,
play starts without pressing e.
PUSH EJECT
After listening, press POWER 6 STANDBY/ON to turn
the power off.
Press PUSH EJECT to close.
3
Press e PLAY/PAUSE to start
playback.
Tape counter
10
ENGLISH
SETTING THE SLEEP TIMER
e PLAY/
PAUSE
MODE
The unit can be turned off automatically at a
specified time.
1
w REC
* or MODE on the remote control (CSD-TD49
only)
f, g
s STOP
(CSD-TD49 only)
Hold down REPEAT/MODE/SLEEP *
until “SLEEP” flashes in the display.
2
Within 4 seconds, press f or g to
specify the time until the power is
turned off.
Each time it is pressed, the time changes
between 10 and 180 minutes in 10-minute
steps.
Specified time
RECORDING
1
Insert a tape with the side to be recorded
on facing out and the exposed side facing
down.
2
Get ready to record from the source.
To record from a CD, press CD and load the disc.
To record from a radio broadcast, press
RADIO BAND and tune to a station.
3
4
While the sleep timer works, “SLEEP” is
displayed.
To check the time remaining until the power
is turned off
Press REC.
Repeat step 1 shown above. The remaining time is
displayed for 4 seconds.
The unit enters recording pause mode and “REC”
flashes slowly in the display.
To cancel the sleep timer
Press e to start recording.
“REC” lights up in the display.
When the selected function is CD, CD play and
recording starts simultaneously.
To record only the selected tracks of a CD
1 Follow steps 1 to 4 of PROGRAMMED PLAY on
page 9 to program tracks.
2 Press REC.
3 Press e.
En
Repeat step 1 to display the remaining time and
hold down REPEAT/MODE/SLEEP again until
“OFF” is displayed.
Simple sleep timer setting
Press REPEAT/MODE/SLEEP while the power is
off. The unit is turned on with the last function, and
the sleep timer is automatically turned on with the
30-minute setting.
Select the function, if you need, and start playback.
To stop recording, press s.
To pause recording (only when the source is RADIO),
press e. During recording pause mode, “REC”
flashes slowly. To resume, press it again.
To erase recording, press TAPE and start recording
(press REC then e).
After recording, press POWER 6 STANDBY/ON to
turn the power off.
To prevent accidental erasure
Break off the plastic tabs on the cassette tape with a
screwdriver or other pointed tool after recording.
To record on the tape again
Cover the tab openings with adhesive tape, etc.
Side A
Tab for side A
ENGLISH
11
NOTE
REMARQUE
This equipment has been tested and found to comply
with the limits for a Class B digital device, pursuant to
Part 15 of the FCC Rules. These limits are designed to
provide reasonable protection against harmful
interference in a residential installation.
This equipment generates, uses, and can radiate radio
frequency energy and, if not installed and used in
accordance with the instructions, may cause harmful
interference to radio communications. However, there is
no guarantee that interference will not occur in a
particular installation. If this equipment does cause
harmful interference to radio or television reception,
which can be determined by turning the equipment off
and on, the user is encouraged to try to correct the
interference by one or more of the following measures:
... Reorient or relocate the receiving antenna.
... Increase the separation between the equipment and
receiver.
... Connect the equipment into an outlet on a circuit
different from that to which the receiver is connected.
... Consult the dealer or an experienced radio/TV
technician for help.
Cet appareil a été testé et jugé conforme aux limites
des appareils numériques de Classe B, conformément
à la Partie 15 des Règles FCC. Ces limites sont
conçues pour fournir une protection raisonnable contre
les interférences néfastes dans une installation
résidentielle.
Cet appareil produit, utilise et peut rayonner une
énergie de fréquence radio et, s’il n’est pas installé et
utilisé conformément aux instructions, peut provoquer
des interférences gênantes pour les communications
radio. Mais rien ne garantit qu’une telle interférence ne
se produira pas dans une installation particulière. Si cet
appareil produit des interférences gênantes pour la
réception radio ou de télévision, ce qui peut se
déterminer en allumant et éteignant l’appareil, il est
recommandé à l’utilisateur d’essayer de corriger cette
interférence en appliquant une ou plusieurs des
méthodes ci-dessous.
... Réorientation ou déplacement de l’antenne
réceptrice.
... Eloignement de l’appareil du récepteur.
... Raccordement de l’appareil à une prise d’un circuit
différent de celui du récepteur.
... Consultez le revendeur ou un technicien radio/
télévision expérimenté.
CAUTION
Modifications or adjustments to this product, which are
not expressly approved by the manufacturer, may void
the user’s right or authority to operate this product.
PRÉCAUTION
Les modifications ou ajustements de ce produit, non
expressément approuvés par le fabricant, peuvent
invalider la droit ou l’autorité de l’utilisateur à utiliser ce
produit.
CAUTION
ATTENTION
TO PREVENT ELECTRIC SHOCK DO NOT USE THIS
(POLARIZED) PLUG WITH AN EXTENSION CORD,
RECEPTACLE OR OTHER OUTLET UNLESS THE
BLADES CAN BE FULLY INSERTED TO PREVENT
BLADE EXPOSURE.
POUR PREVENIR LES CHOCS ELECTRIQUES NE
PAS UTILISER CETTE FICHE POLARISEE AVEC UN
PROLONGATEUR, UNE PRISE DE COURANT OU
UNE AUTRE SORTIE DE COURANT, SAUF SI LES
LAMES PEUVENT ETRE INSEREES A FOND SANS
EN LAISSER AUCUNE PARTIE A DECOUVERT.
This Class B digital apparatus complies with Canadian
ICES-003.
Cet appareil numérique de la classe B est conforme à
la norme NMB-003 du Canada.
(Only for C models)
(Modèle C seulement)
Printed in China