1
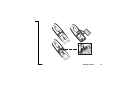
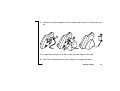
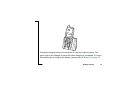
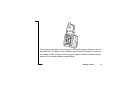
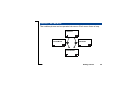
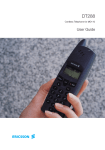
Cordless Phone Set DT288
DECT GAP/CAP
User’s Guide
EN/LZTNB 101 179 R2
WHAT TO READ FIRST
This user’s guide consists of several sections and topics which can be read
individually. You will find each section and topic listed in the table of contents.
In addition, the “Index” at the back of this guide shows where to find help on
each topic. To get the cordless phone up and running and information about
basic use of the cordless phone, you should read the “Getting started” section
in particular. Other parts can be read when needed.
ABOUT THIS USER’S GUIDE
This user’s guide is published by Ericsson Business Mobile Networks BV,
without any warranty. Improvements and changes to this user’s guide necessitated by typographical errors, inaccuracies of current information, or
changes to programs and/or equipment, may be made by Ericsson Business
Mobile Networks BV at any time and without notice. Such changes will, however, be incorporated into new editions of this user’s guide. All rights reserved.
2
Note
This user’s guide describes the most important features of the DT288 cordless phone. Since the DT288 cordless phone can be used in several networks
supporting different capabilities, some of the features might not be usable in
your network.
CORDLESS PHONE FEATURES
•
•
•
•
•
•
•
•
GAP/CAP compliant
Calling line identification (depending on the network)
Phone book for 100 names and numbers
Up to 100 hours stand-by time and up to 15 hours talk time
Menu in 11 languages
Side keys for volume
Who called list for 10 numbers
Last dialled list for 10 numbers
3
CORDLESS PHONE
Antenna
Volume up key
Warning light
Earpiece
Volume down key
Display
Off hook key
Up key
On Hook/On/Off key
Clear/Mute key
Down key
Number keys
Microphone
Battery compartment (rearside)
Internal call key
R key
4
CORDLESS PHONE DISPLAY ICONS AND INDICATORS
Signal strength
Ring off
Key
Hook
Message
Call Info
Battery
Warning light
On
Visible when connected
to a network
Ring signal muted or
microphone off
Keys locked
Cordless phone off hook
Message waiting
New unanswered entry
in the who called list
Battery status (4 blocks
is fully charged)
Flashing
Flashing quickly
Connection being made Cordless phone is ringing
Battery casing flashes; Blocks flash succesbattery almost empty
sively; battery is being
charged (steady blocks
indicate the battery level)
Warning (battery low/no Incoming call
connection)
Message waiting
For further details, please see section “Reference” on page 114.
5
Content
Getting started 8
Telephoning 37
Check for completeness 8
Preparing for use 10
Battery 15
Clip 19
Switching on the cordless phone 21
Menu structure 23
Using the menus 26
Making and receiving calls 29
Changing the menu language 31
Looking up the IPEI code 32
Switching off the cordless phone 34
Telephone networking in short 34
Information on display 37
Making a call 40
Call using the phone book 41
Redialling 44
Returning a call 46
Receiving a call 48
Transferring a call 49
Turning off the microphone 52
Turning off the ringer 53
Advanced telephoning 55
Internal, external call or call back? 55
Paging and message waiting 56
Changing the dialling mode 57
Setting long tones 58
Sending a dial tone pause 59
Baby phone 59
Direct call 60
Call statistics cordless phone 62
Content
6
Phone book 63
Networking 94
Phone book use 63
Adding name and number 66
Editing name and number 67
Deleting name and number 69
Adding last dialled numbers 70
Adding caller’s number 72
Connecting to telephone networks 94
Subscribing to a network 97
Resubscribing to a network 103
Selecting a network automatically 103
Selecting a network manually 105
Editing network name 106
Deleting network subscription 108
Changing subscription priority 109
Blocking keys and extra
security 74
Key lock 74
Cordless phone lock 76
Changing the PIN code 79
Unblocking the cordless phone 80
Overview PIN and other codes 82
Settings 83
Volume control 83
Ringer tones or melodies 86
Discreet ringing 88
Key click 89
Display light 90
Display contrast 91
Language 92
AutoIntern 92
Clearing all cordless phone settings 93
Tips and tricks 111
Reference 114
Safety instructions 114
Troubleshooting 116
Buttons and keys 121
Terminology 123
Signals 124
Maintenance 125
Technical specifications 127
Spare parts and accessories 131
Index 132
Content
7
Getting started
CHECK FOR COMPLETENESS
Make sure that all the parts are present. If anything is missing, please contact
your system manager or supplier.
The set contains:
1. Cordless phone
2. Battery
3. Clip
4. Charger
5. Charger adapter
6. Wall mount including fixation plugs and screws
7. Desk stand
Getting started
8
8. Quick Reference Guide
9. Assembly card
Note
It is important to make a note of the IPEI code. The IPEI code may be needed
for unblocking the cordless phone if an incorrect PIN code has been entered
three times. Refer to “Looking up the IPEI code” on page 32 for further details.
Getting started
9
PREPARING FOR USE
When using the cordless phone for the first time, follow the steps below to
prepare the cordless phone.
Warnings
• Do not use the equipment in conditions where there is a danger of electrically ignited explosions.
• Do not expose the equipment to direct sunlight for long periods.
• Keep the equipment away from excessive heat and moisture.
• Make sure the local mains voltage corresponds to the voltage on the
charger.
Note
Only use the charger that comes with the cordless phone.
Getting started
10
1. Attach the clip to the cordless phone. Do not press on the display!
2. Place the battery as shown below. Make sure that the battery wires are
put through the notches as shown.
Getting started
11
Getting started
12
3. Connect the mains adapter to the charger and connect it to the mains outlet.
If you place the charger on a wall, screw the wall mount to the wall.
4. Place the cordless phone in the charger to charge the battery.
Getting started
13
Complete charging before you subscribe or use the cordless phone. The
green light of the charger is turned off when charging is completed. For more
information about charging the battery, please refer to “Battery” on page 15.
Getting started
14
5. Subscribe the cordless phone to the telephone network. Follow the procedure in “Subscribing to a network” on page 97.
When the cordless phone is subscribed to a telephone network, the cordless
phone is ready for use. See also “Telephone networking in short” on page 34.
BATTERY
The cordless phone is powered by a rechargeable battery. You can fully
charge a flat battery by placing the cordless phone in the charger for 3 hours.
A fully charged battery gives you up to 15 hours calling time or up to 150
hours stand-by time. The cordless phone has a battery meter, which indicates
the power left in the battery.
Note
The cordless phone is powered by a Nickel Metal Hydride (NiMH) battery. It
can be recharged at any time. To keep the battery fully charged, you can put
or leave the cordless phone in the charger without any problem.
Getting started
15
Reading the battery meter
When the battery is fully charged, the battery meter on the cordless phone
display consists of four blocks. The number of blocks decreases as the battery discharges. If the battery is almost flat, the battery meter and the red light
on the cordless phone flash. An alarm sounds if there is less than 15 minutes
calling time left in the battery.
Charging the battery
Place the cordless phone in the charger as shown in the picture below.
Getting started
16
If the lower green light on the charger is on (and the battery meter on the display flashes), the battery in the cordless phone is being charged. As soon as
the battery is fully charged, the lower green light is turned off and the battery
meter on the cordless phone stops flashing.
Getting started
17
If the battery is completely flat it can take a few minutes before the lower
green light on the charger comes on.
Changing the battery
Rechargeable batteries have a limited lifespan.
If the stand-by time for the cordless phone becomes too low, you should
replace the battery. Please contact your system manager or supplier for more
information.
Warning
Only use batteries as specified in “Technical specifications” on page 127.
The battery does not contain cadmium and is therefore more environmentallyfriendly than other rechargeable batteries. However, all batteries should be
treated as chemical waste.
Getting started
18
CLIP
The cordless phone has a clip to attach the cordless phone to your clothes.
• How to attach the clip to the cordless phone: see “Preparing for use” on
page 10 for specific instructions.
• How to remove the clip from the cordless phone: see the drawing below.
Note
To minimize wear and tear, we recommend that you do not remove the clip
from the cordless phone too often.
Getting started
19
Remove the clip
Getting started
20
SWITCHING ON THE CORDLESS PHONE
To switch on the cordless phone:
Work
No Network
132
•
Press NO for at least one second until the stand-by display appears.
The number on the upper right-hand side of the display is the (internal)
number of the cordless phone
What to do if...
• The display does not come on or the battery icon starts flashing:
Charge the battery. Refer to “Charging the battery” on page 16.
• The cordless phone is not connected to a telephone network:
The signal strength icon is off and the message ‘No network’ will be displayed repeatedly. You cannot make or answer calls. See “Networking” on
page 94, or contact your system manager.
Getting started
21
After switching on, the cordless phone is in stand-by mode. In stand-by mode,
the cordless phone is ready to make or receive calls and consumes little
energy. In this mode the display may show several icons and other information. For more details see “Information on display” on page 37.
Tip
If you are not using the cordless phone to make or receive calls, you can put
the cordless phone in the charger to keep it fully charged.
Navigation keys
Cancel/Undo
Confirm
Left/Up
Back
Right/Down
Getting started
22
MENU STRUCTURE
Several functions of the cordless phone and the network can be accessed via
the cordless phone menus. The charts below give an overview of the most
important top level menu items to help you locate those functions.
Getting started
23
On hook menu
The on hook menu is accessible when the cordless phone is in stand-by mode
by pressing
or
(see below).
PhoneBook
Handset
Networks
Information
Find&Call
AutoKeyLock
SelectNet*
WhoCalled*
Store
BabyPhone*
Priority*
LastDialled*
Find&Edit
Alerts
Rename*
LastCall
DeleteAll
PhoneLock
Delete*
TotalCalls
DirectCall
Resubscribe
ShowIPEI
MasterReset
Subscribe
AutoIntern*
Language
Display
AutoAnswer*
* Available where applicable
Getting started
24
Off hook menu
The off hook menu is accessible by pressing
NewCall
Find&Call
or
during a call.
DialMode
GoToDTMF
WhoCalled*
SendPause
LastDialled*
DTMF-Long
* Available where applicable
Getting started
25
USING THE MENUS
The cordless phone can be operated via menus. Each menu forms a loop.
>PhoneBook
Handset
>Handset
Networks
>Information
PhoneBook
>Networks
Information
Getting started
26
•
You can activate the menus when the cordless phone is on hook or off
hook. The menu options differ in both situations (see “Menu structure” on
page 23).
•
To activate the menus, press the
or the
key. For instance, you
can enter the main menu option PhoneBook by pressing either the
>PhoneBook
Handset
or the
key.
The arrow > on the display indicates the option currently selected.
•
Press the
or
key again to scroll through the menu options.
•
To confirm a selected menu option, press YES
Some options activate a new menu. Press
menu.
.
NO to return to the previous
•
When scrolling through the menus you can return to the stand-by display
•
or previous menu by pressing NO several times.
If you do not press any key for a minute, the cordless phone automatically
returns to the stand-by display.
Getting started
27
•
If you want to cancel any operation, press CLR shortly.
Note
The cordless phone makes use of “dynamic” menus, which means that some
menu options are only visible where applicable and supported by the network.
“Changing the menu language” on page 31 shows you how the menus work.
For changing the menu language, every step of the procedure is given in
detail. For all other procedures, it is assumed that you know the handling of
the menus.
To help you locate the menu items that are not in the main menu, a path
through the menus is given at the beginning of each procedure. These paths
are indicated by the word “Route:” followed by menu items you have to select
in sequence in order to get to a specific function. In most cases, the next
menu item is not immediately visible so you have to use the
or
key to locate it. See also “Menu structure” on page 23 for an overview.
Getting started
28
MAKING AND RECEIVING CALLS
If your cordless phone is switched on, and connected to a telephone network,
you can make and receive calls. Check if a network name is displayed and
one or more bars of the signal strength icon are on. If not, refer to “Networking” on page 94 or contact your system manager or supplier.
Making a call
After switching on, the cordless phone is in stand-by mode. In this mode the
cordless phone is ready to make calls.
00535554505
Dialling while on hook:
1. Enter the number.
The number is displayed.
2. When the number is correct, press YES
3. Press NO to end the call.
The duration of the call is displayed.
.
Getting started
29
Dialling while off hook:
00535554505
1. Press YES
and wait for the dial tone.
2. Enter the number and wait for a connection.
3. Press NO to end the call.
The duration of the call is displayed.
Receiving a call
After switching on, the cordless phone is in stand-by mode. In this mode the
cordless phone is ready to receive calls.
When the cordless phone rings:
External Call
Anna
1. Press YES
to answer the call.
2. To end the call, press NO .
The duration of the call is displayed.
On an incoming call, the caller’s (extension) number may be displayed. If
however the caller’s number is included in the phone book of your cordless
phone, the corresponding name may be displayed instead.
Getting started
30
Operating area
You can use your cordless phone in the area that is covered by the network.
Outside this area, you will lose contact with the telephone network. The signal
strength icon will disappear. ‘No network’ will be displayed repeatedly, the
warning light will flash and short, fast, warning beeps will be heard at regular
intervals.
CHANGING THE MENU LANGUAGE
The default menu language is English. To select another language, use the
Language option. Please note that the menu options stay in English until you
confirm your language choice.
Getting started
31
To change the cordless phone language:
Route: Handset » Language
1. Press
or
to enter the main menu.
Option PhoneBook is displayed.
2. Scroll to Handset and press YES .
3. Scroll to Language and press YES .
The current language is displayed.
4. Scroll through the list of languages until you find the language you want.
5. Press YES
to confirm your choice.
The language has now been changed.
LOOKING UP THE IPEI CODE
Your system manager or supplier may need the International Portable part
Equipment Identity (IPEI) number of your cordless phone to enable telephone
network subscription. The IPEI code is a unique code which has been
assigned to the cordless phone. Furthermore, you may need the IPEI code to
unblock the phone if an incorrect PIN code has been entered three times.
Getting started
32
The IPEI code can be requested when using the cordless phone.
To display the IPEI code:
Route: Information » ShowIPEI
1. Select ShowIPEI and press YES .
Enter PIN: is displayed.
2. Enter the PIN code for the cordless phone (default 0000) and press
YES .
The 13-digit IPEI code is displayed.
3. Press YES
to leave this menu.
Note
Write down the IPEI code for future use. If you cannot retrieve the IPEI code,
please contact your system manager. Keep the IPEI code secret to prevent
misuse of your phone.
Getting started
33
SWITCHING OFF THE CORDLESS PHONE
Normally you do not need to switch off the phone. But if you do not want to
make or receive calls, change the battery or when you get out of range of the
network, you can switch off the cordless phone.
To switch off the cordless phone:
• Press and hold NO until the display turns blank.
You cannot switch off the cordless phone during a call.
TELEPHONE NETWORKING IN SHORT
The cordless phone can be connected to several telephone networks. If your
cordless phone is connected to a telephone network you can make and
receive calls. In a telephone network calls are transmitted from one cordless
phone to the other via radio connections.
Getting started
34
If a network name is displayed and the signal strength icon is on, the cordless
phone is connected to that network.
You can only make use of a telephone network if the cordless phone:
• Is in range of that network
• Is subscribed to that network
• Has access rights to that network
No Network
In network range
Only if the cordless phone is in range of a network it can connect to that network.
If the signal strength icon is off (not visible) and the messages ‘No network’ or
‘No access’ are displayed repeatedly, then the cordless phone is not connected to a network. This may mean:
• You are out of range.
Getting started
35
•
•
There is no access to the network.
The cordless phone is not able to connect. Set the cordless phone to automatic network selection (Route: Networks » SelectNet » Automatic).
There is no subscription to the network.
Subscribe the cordless phone to the network.
Network subscription
To get access to the network you have to subscribe the cordless phone to a
network. Once subscribed you can access the network at any time when
within network range.
Selecting a network
The coverage area of different telephone networks may overlap. In that case
you can select the telephone network you want if the cordless phone has
been subscribed to it.
Getting started
36
Telephoning
INFORMATION ON DISPLAY
After switching on the cordless phone, the display may show several icons
and other information.
Signal strength
A signal strength indicator is shown on the left-hand side of the display when
the cordless phone is connected to a network. It is a measure of reception
quality. Five vertical bars means good reception quality and one bar means
Telephoning
37
poor reception quality. In areas where the reception quality is poor, you risk
losing calls.
Work
Work
132
132
External Call
Anna
Network name
The name of the currently-connected network is displayed when the cordless
phone is in stand-by. The default network name is Work but you can set the
network name yourself. This is described in “Editing network name” on page
106.
Extension number
If supported by the network, your internal number is shown on the right-hand
side of the display when the cordless phone is in stand-by.
Call information
When the cordless phone rings, the type of call and, if available, the caller’s
name or number, is displayed. The name is displayed if the number of the
caller is in your phone book.
Telephoning
38
0:12:53
Anna
Call duration
During a call and after termination of the call, the cordless phone displays the
duration of the call.
Work
132
01-Dec 11:32
If provided by the network, the cordless phone displays the current date and
time when it is in stand-by.
Telephoning
39
MAKING A CALL
00535554505
Dialling while on hook:
1. Enter the number.
The number is displayed.
2. When the number is correct, press YES
3. Press NO to end the call.
The duration of the call is displayed.
.
Dialling while off hook:
00535554505
1. Press YES
and wait for the dial tone.
2. Dial the number and wait for a connection.
3. Press NO to end the call.
The duration of the call is displayed.
Telephoning
40
CALL USING THE PHONE BOOK
Your cordless phone contains a phone book for storing names and numbers.
You can conveniently make calls using this phone book. For use of the phone
book, see section “Phone book” on page 63.
Calling by name
The call by name option lets you search for a name and number in the phone
book.
To call by name:
Route: PhoneBook » Find&Call
1. Select Find&Call and press YES .
Enter Name: or Phone book is empty is displayed. To add names and
numbers to the phone book, see “Adding name and number” on page 66.
2. Press the key which has the first letter of the name you are searching for.
Press once for the first letter of the key, twice for the second and three
Telephoning
41
times for the third letter of the key. To narrow down the search, you can
also enter the next letter(s) of the name.
3. Press YES
to confirm.
The first name in the phone book beginning with the entered letter(s) or, if
it does not exist, a name beginning with the next letter is displayed.
4. Scroll (if necessary) until you find the right name.
5. Press YES
to dial the number.
Quick call by name
You can also search for a number by name in your phone book without using
the menus.
To use quick call by name:
1. Press the key which has the first letter of the name, and hold down the key
until the display shows the first name in the phone book beginning with the
letter on the key you have just pressed.
2. You can now enter more letters as in step 1 to narrow your search, or
scroll until you find the right name.
Telephoning
42
3. Press YES
to dial the number.
Example:
Suppose you want to call someone whose name is ‘Jones’. Follow the next
procedure:
1. Press
and hold until the first name in the phone book beginning with
‘J’ appears.
2. Press
three times for the ‘O’.
The first name in the phone book beginning with ‘Jo’ appears.
3. You can now continue by pressing
twice for the ‘N’ and so on or
scroll until you find the name ‘Jones’.
4. Press YES
to dial the number.
If the phone book does not contain a name beginning with that specific letter,
the incorrect letter flashes. You can enter another letter to correct it. If the
phone book is empty, see “Adding name and number” on page 66 for more
information.
Telephoning
43
Tip
If you press CLR instead of YES
, you can edit the number before dialling.
REDIALLING
The last ten numbers you dialled are available for redial. If the number
appears in the phone book, the name is shown instead.
To redial the last number dialled:
1. Press and hold YES
and wait until the last dialled number or name
appears.
The cordless phone beeps if there are no names or numbers available for
redial.
2. Press YES
for the second time.
The cordless phone dials the number again.
Telephoning
44
To dial one of the ten last dialled numbers:
1. Press and hold YES
and wait until the last dialled number or name
appears.
The cordless phone beeps if there are no names or numbers available for
redial.
2. Scroll until you have the right number or name.
3. Press YES
to dial the selected number.
Tip
If you press CLR instead of YES , you can edit the number before dialling.
You can also access the last dialled number memory via the LastDialled
menu (Route: Information » LastDialled). It is only available if names or numbers are available for redial.
When you switch off your cordless phone, the last dialled numbers are
erased. You can permanently store the last dialled numbers in your phone
book. See “Adding last dialled numbers” on page 70.
Telephoning
45
RETURNING A CALL
Check
WhoCalled?
1! 05-Mar
Sabrina
1 A 05-Mar
Sabrina
In some networks, when you receive a call, the number (or name) of the caller
and if available the time or date is displayed. In that case the number is stored
in the “who called” memory. The call info icon shows you if there are new
unanswered calls. By using the call return function, you can easily return a call
to these numbers. The “who called” memory holds up to ten numbers.
When there are new unanswered calls, the cordless phone displays Check
Who Called ? If you do not want to return a call, press NO .
To return a call:
1. Press YES .
A list of numbers appears. New entries are marked with an exclamation
mark. Calls that have been answered with this cordless phone are marked
with the letter A.
Telephoning
46
2. Scroll until you have the right number or name.
3. Press YES
to dial the selected number.
The number is removed from the ‘‘who called’’ memory and stored in the
last dialled memory.
Tip
If you press CLR instead of YES , you can edit the number before dialling.
You can also access the ‘‘who called’’ memory via the WhoCalled menu
(Route: Information » WhoCalled). This option is only displayed, if names or
numbers are available for returning a call.
When you switch off your cordless phone, the ‘‘who called’’ list is erased. You
can permanently store the ‘‘who called’’ numbers in the phone book. See
“Adding caller’s number” on page 72.
Telephoning
47
RECEIVING A CALL
When the cordless phone rings:
External Call
Anna
1. Press YES
to answer the call.
2. To end the call, press NO .
The duration of the call is displayed.
On an incoming call, the caller’s (extension) number may be displayed. If
however the caller’s number is included in the phone book of your cordless
phone, the corresponding name is displayed instead.
When the cordless phone rings at an inconvenient moment:
•
Press
NO or CLR to mute the buzzer.
Telephoning
48
External Call
0742918021
Caller identification
Some telephone networks provide calling line identification. This means that
in case of an incoming call the caller’s (extension) number or name is displayed.
Ask your system manager or supplier if your telephone network provides calling line identification (CLIP).
TRANSFERRING A CALL
During a call you can put the call on hold and dial another telephone number.
You can then continue the first call or transfer the caller to the dialled number
(if supported by the current network).
To put a call on hold and dial another number, use the
key or the
NewCall menu option. To look up the number in the phone book, use the
NewCall menu option.
Telephoning
49
Using the
key
You are on the phone and want to transfer a call.
To transfer calls to another number:
1. Press
to put the current call on hold.
You hear the dial tone of the switchboard.
2. Enter the (extension) number to which you want to transfer the call.
If the number is available, you hear it ring.
3. Press NO to transfer the call, or press
to return to the caller.
Using the ‘NewCall’ option
During a call, you may want to hold the call and dial another number, but you
do not know the number by heart and want to look it up in the phone book, the
‘‘who called’’ list or the “last dialled” list.
Telephoning
50
To transfer calls to another number:
1. Select NewCall and press YES .
2. Enter or search for the number to which you want to transfer the call, as
explained in “Call using the phone book” on page 41.
3. Press YES
to dial the number.
4. Wait for an answer.
If the person does not answer, or is busy, press
to return to the call.
5. If the second call is answered you can:
• Transfer the first call to the second party by pressing NO .
• Return to the first call by pressing
.
Telephoning
51
TURNING OFF THE MICROPHONE
During a call you may want to talk to someone else, without the caller hearing,
by switching off the microphone.
External Call
Anna
You can switch the microphone off by:
• Pressing CLR until you are ready to talk to the caller again.
Short beeps and the ring off icon indicate that the microphone is off.
• Pressing CLR quickly.
Short beeps and the ring off icon indicate that the microphone is off. To
switch the microphone on, press CLR again.
Telephoning
52
TURNING OFF THE RINGER
If your cordless phone rings at an inconvenient moment, you can turn off the
ringer.
To turn off the ringer temporarily (for the current call):
External Call
Anna
Work
132
01-Dec 11:32
•
Press CLR or NO .
The ring off icon appears.
Even with the sound off, you can still answer the call. The warning light and
hook icon keep flashing.
To turn off the ringer permanently:
• Press CLR when no call is received.
The ring off icon appears.
You can also turn off the ringer permanently by adjusting the ring volume to its
lowest level. See “Volume control” on page 83.
Telephoning
53
To turn the ring sound on again:
• Press CLR for one second.
The ring off icon disappears.
Telephoning
54
Advanced telephoning
INTERNAL, EXTERNAL CALL OR CALL BACK?
When you receive a call, there is a different ring signal for internal, external
and call back calls. These signals are set in the cordless phone to the following defaults:
• An internal ring signal consists of a short beep followed by a pause.
• An external ring signal consists of two short beeps followed by a pause.
• A call back ring signal consists of short beeps.
Advanced telephoning
55
Tip
You can set the tune of the ring signal for internal and external calls yourself.
This makes it easier for you to recognize the ring signal of your own cordless
phone. For more information, please read “Ringer tones or melodies” on page
86.
PAGING AND MESSAGE WAITING
This cordless phone supports paging and message waiting. Therefore, separate pages and message waiting ringer tones are available. The use of these
features depends on the network.
Advanced telephoning
56
CHANGING THE DIALLING MODE
If your phone system normally uses pulse dialling you can switch to tone dialling if required. For example: to control a teleservice (ask your system manager).
To switch the cordless phone to tone dialling during a call:
Route: DialMode » GoToDTMF
• Select GoToDTMF and press YES .
The cordless phone now uses tone dialling for the current call.
Advanced telephoning
57
SETTING LONG TONES
For some teleservices the standard tones sent out by the cordless phone are
too short. In this case the cordless phone must be switched to ‘long tones’.
To switch the cordless phone to long tones during a call:
Route: DialMode » DTMF-Long
• Select DTMF-Long and press YES .
The cordless phone switches to long tones for the duration of the call.
To switch the cordless phone back to short tones during a call:
Route: DialMode » DTMF-Short
• Select DTMF-Short and press YES .
The cordless phone switches to short tones again.
If the cordless phone is set to long tones, the tones are transmitted for the
same length of time as you keep the keys pressed down.
Advanced telephoning
58
SENDING A DIAL TONE PAUSE
To insert a dial tone pause while dialling on hook:
•
Press
for one second.
To insert a dial tone pause while dialling off hook:
Route: DialMode » SendPause
• Select SendPause and press YES .
A ‘-’ is displayed and the cordless phone waits for the dial tone.
BABY PHONE
The baby phone function may be present in some versions of the cordless
phone. This function is not used in business applications.
Advanced telephoning
59
DIRECT CALL
You can set the cordless phone so that when any key is pressed, the phone
dials a certain number.
Switching the direct call on
Direct call deactivates the automatic key lock. For information about automatic key lock, see “Key lock” on page 74.
To switch the direct call on:
Route: Handset » DirectCall
1. Select DirectCall and press YES .
Enable Direct Call? is displayed.
2. Press YES
to confirm.
DirectC.No: is displayed. If a direct call number has been set before, this
is shown in the display.
3. Enter the direct call number.
Advanced telephoning
60
Direct Call
0201300571
4. Press YES
to confirm.
The direct call function is now on.
If direct call is on, Direct Call and the number are displayed. To call it, press
any key on the cordless phone.
Switching the direct call off
If you want to switch off the direct call feature, it is important not to wait too
long between the steps: otherwise the direct call number is dialled.
To switch the direct call off:
Route: Handset » DirectCall
1. Press
or
to enter the menu and then quickly scroll to DirectCall and press YES .
Disable Direct Call? is displayed. If you do not react within two seconds,
the direct call number is dialled.
2. Press YES
to confirm.
The direct call function is now off.
Advanced telephoning
61
CALL STATISTICS CORDLESS PHONE
Your cordless phone can tell you the duration of your last call. Your cordless
phone can also display the total time of all external calls made.
To see the time spent on your last call:
Route: Information » LastCall
1. Select LastCall and press YES .
The length of the last call is displayed in hours, minutes and seconds.
2. Press YES
to leave this menu.
To see the time spent on all outgoing external calls:
Route: Information » TotalCalls
1. Select TotalCalls and press YES .
The total time of all external calls made is displayed in hours, minutes and
seconds.
2. Press YES
to leave this menu.
Advanced telephoning
62
Phone book
PHONE BOOK USE
Your cordless phone can contain a phone book for 100 names and numbers.
You can consult and change the phone book via the PhoneBook menu
option.
The phone book lists all names in alphabetical order. You can freely add
names and numbers to the phone book.
Entering names
Use the numeric keys to enter names in the phone book.
Press a key once for the first letter of the key, press it twice for the second,
three times for the third letter and so on. To enter letters with a diaeresis or
accent or to enter a digit, press the same key a few more times.
Phone book
63
For example: to insert Ä press number
five times; to insert È press
number
four times and to enter a space, press number
once. See
the table below for more details.
To insert lower case letters, press the letter first and then
. To revert to
upper case letters again, press the letter and then
. To insert an asterisk
(* ) in a name, press
twice.
Phone book
64
Key
Press the corresponding key this many times for the character
1
2
3
4
5
6
7
8
9
10 11 12
-
?
!
,
.
:
"
’
(
)
1
B
C
Å
Ä
Æ
À
Á
Â
Ã
Ç
2
D
E
F
È
É
Ê
Ë
3
∆
Φ
G
H
I
Ð
Ý
Ì
Í
Î
Ï
4
Ø
Ò
Ó
Ô
Õ
Œ
6
Σ
Ξ
Ψ
Ω
A
J
K
L
5
Λ
M
N
O
Ñ
Ö
P
Q
R
S
ß
Þ
7
Π
T
U
V
Ü
Ù
Ú
Û
8
W
X
Y
Z
Ý
Ÿ
9
0
+
&
@
/
$
%
#
£
Θ
Phone book
13
Γ
65
ADDING NAME AND NUMBER
You can use the AddNew option to enter names and numbers in the phone
book.
Enter Name:
John_
EnterNumber:
053405_
To add a new phone book entry:
Route: PhoneBook » Store » AddNew
1. Select AddNew and press YES .
Enter Name: or Phone book Full is displayed. In the latter case, you
have to delete a phone book entry first before you can add a new one.
2. Enter a name.
3. Press YES
to confirm.
EnterNumber: is displayed.
4. Enter the telephone number.
5. Press YES
to confirm.
The name and number are stored in the phone book.
Phone book
66
While entering a name or number, you can use the following keys: CLR =
delete,
= move left,
= move right,
= space,
= lower
case / enter a dial tone pause (press for at least 1 second).
EDITING NAME AND NUMBER
With the Edit option, you can change the names and numbers in the phone
book.
Editing names
You can correct a misspelled name or give a new name to an existing telephone number.
To edit a name:
Route: PhoneBook » Find&Edit » Edit
1. Select Edit and press YES .
Enter Name: is displayed.
2. Enter the first letter(s) of the name you are searching for.
Phone book
67
3. Press YES .
4. Scroll until you find the name.
5. Press YES .
The name to be edited is displayed.
6. Correct the name.
7. Press YES
twice to confirm.
While editing a name, you can use the following keys: CLR = delete,
move left,
= move right,
= space,
= lower case.
=
Editing telephone numbers
You can correct a telephone number or give another number to a name.
To edit a number:
Route: PhoneBook » Find&Edit » Edit
1. Select Edit and press YES .
Enter Name:
2. Enter the first letter(s) of the name you are searching for.
3. Press YES .
Phone book
68
4. Scroll until you find the name.
5. Press YES
twice.
The number to be edited is displayed.
6. Correct the number.
7. Press YES
to confirm.
=
While editing a number, you can use the following keys: CLR = delete,
move left,
= move right,
= enter a dial tone pause (press one second).
DELETING NAME AND NUMBER
You can also delete names and associated numbers from the phone book.
To delete a name and number from the phone book:
Route: PhoneBook » Find&Edit » Delete
1. Select Delete and press YES .
Enter Name: appears.
2. Enter the first letter(s) of the name you are searching for.
Phone book
69
3. Press YES .
4. Scroll until you find the name.
5. Press YES
to confirm.
The name and number are deleted from the phone book.
To delete all names and numbers from the phone book:
Route: PhoneBook » DeleteAll
1. Select DeleteAll and press YES .
Delete?
2. Press YES
to confirm.
Deleting all is displayed while all names and numbers are deleted from
the phone book.
ADDING LAST DIALLED NUMBERS
The last ten numbers you have dialled remain stored in the memory of your
cordless phone until you turn it off. You can use the AddLastDial option to
add these numbers to the phone book.
Phone book
70
Menu option AddLastDial appears only if names or numbers are available for
redial.
To add a number you have dialled recently:
Route: PhoneBook » Store » AddLastDial
1. Select AddLastDial and press YES .
A list of numbers is displayed. If Phone book Full appears, you have to
delete a phone book entry first before you can add a new one.
2. Scroll through the list of last dialled numbers until you have the number
you want to store. Select the number and press YES .
3. Edit Number: is displayed.
The number to be added is displayed.
4. Edit the number if necessary.
5. Press YES .
Enter Name: is displayed.
6. Enter a name.
7. Press YES
to confirm.
The name and number are stored in the phone book.
Phone book
71
ADDING CALLER’S NUMBER
If caller line identification is supported by your network, the cordless phone
keeps a list of numbers of people who have called.
The last ten numbers of your callers remain stored in your cordless phone
memory until you turn it off. You can use the AddWhoCall option to add these
numbers to the phone book.
Menu option AddWhoCall appears only if names or numbers are available for
returning a call.
To add a caller’s number to the phone book:
Route: PhoneBook » Store » AddWhoCall
1. Select AddWhoCall and press YES .
A list of numbers appears. If Phone book Full is displayed, you have to
delete a phone book entry first before you can add a new one.
2. Scroll through the list of ‘‘who called’’ numbers until you have the number
you want to store. Select the number and press YES .
Phone book
72
3. Edit Number: is displayed.
The number to be added is displayed.
4. Edit the number if necessary.
5. Press YES .
Enter Name: is displayed.
6. Enter a name.
7. Press YES
to confirm.
The name and number are stored in the phone book.
Phone book
73
Blocking keys and extra security
KEY LOCK
If you carry the cordless phone in your pocket, you might accidentally press
the keys and make a call. To prevent this, you can have them blocked by
using the AutoKeyLock option.
To enable or disable key locking:
Route: Handset » AutoKeyLock
1. Select AutoKeyLock and press YES .
The current setting is displayed.
2. Use the
or
key to select the setting you want.
3. Press YES
to confirm.
Blocking keys and extra security
74
Note
Press * to
unlock keys
After enabling the key lock function do not press a key for one minute. If the
enabling time has expired the keys no longer work and a key symbol is displayed.
During key lock the keys are blocked, so you cannot use your cordless phone.
If a key is pressed the message Press * to unlock keys is displayed. If you
have locked the keys and you receive a call, you can answer the call as usual
without switching key lock off. When the call is ended the keys are locked
again.
To unblock the keys temporarily:
1. Press
or
‘Unlock Keypad?’ is displayed.
2. Press YES
to switch off the key lock.
The key symbol disappears; the keys are enabled again.
Blocking keys and extra security
75
CORDLESS PHONE LOCK
You can protect your cordless phone against unauthorized use with your PIN
code (Personal Identification Number). You can secure the cordless phone
against being used by someone else, or just against adding or deleting telephone network subscriptions. Both security features are off by default. You
can change the PIN code of the cordless phone.
If you enter an incorrect cordless phone PIN code three times in a row, the
cordless phone is blocked.
See for the default cordless phone PIN code “Overview PIN and other codes”
on page 82.
Securing against unauthorized use
You can set the cordless phone so that the PIN code must be entered after
switching on. This option is off by default.
Blocking keys and extra security
76
To enable or disable protection against unauthorized use:
Route: Handset » PhoneLock » PowerOn
1. Select PowerOn and press YES .
Enter PIN: is displayed.
2. Enter the PIN code for the cordless phone (default 0000) and press
YES .
The current setting is displayed.
3. Press
or
to select one of the following options:
• On to enable protection.
• Off to disable protection.
4. Press YES
to confirm.
Securing against adding or deleting subscriptions
You can set the cordless phone so that the PIN code must be entered when
adding or deleting telephone network subscriptions. This option is off by
default.
Blocking keys and extra security
77
To enable or disable protection against adding or the deletion of subscriptions:
Route: Handset » PhoneLock » Subscript
1. Select Subscript and press YES .
Enter PIN: is displayed.
2. Enter the PIN code for the cordless phone (default 0000) and press
YES .
The current setting is displayed.
3. Press
or
to select one of the following options:
• On to enable protection.
• Off to disable protection.
4. Press YES
to confirm.
Blocking keys and extra security
78
CHANGING THE PIN CODE
The cordless phone is initially provided with a pre-set PIN code (see page 82).
You should change this PIN code to a personal PIN code to prevent misuse.
To change the cordless phone PIN code:
Route: Handset » PhoneLock » ChangePIN
1. Select ChangePIN and press YES .
EnterOldPIN: is displayed.
2. Enter the current PIN code for the cordless phone (default 0000) and
press YES .
Either EnterNewPIN: or Wrong PIN is displayed. In the latter case, you
have entered a number that does not the match the current PIN code.
3. Enter the four digits of the new PIN code and press YES .
RepeatNewPIN is displayed.
4. Enter the new PIN code again and press YES .
Either New PIN accepted or Wrong New PIN is displayed.
5. Note the new PIN code for future use.
Blocking keys and extra security
79
If you enter an incorrect new cordless phone PIN code three times in a row,
the cordless phone leaves this menu option.
In other situations, if you enter an incorrect cordless phone PIN code three
times in a row, the cordless phone is blocked and PIN Blocked, Unblock? is
displayed. See below for unblocking the cordless phone.
UNBLOCKING THE CORDLESS PHONE
If your cordless phone is blocked because an incorrect PIN code has been
entered three times, you can unlock the cordless phone with the IPEI code.
After entering the IPEI code, you must enter a new PIN code.
The IPEI code is a unique code which has been assigned to the cordless
phone. The IPEI code can be found in the ShowIPEI menu (Route: Information » ShowIPEI).
Blocking keys and extra security
80
If the cordless phone is blocked, PIN Blocked, Unblock? appears. The cordless phone must be unblocked before it can be used again. To unblock:
1. Press YES .
Backdoor: is displayed.
2. Enter the IPEI code and press YES .
EnterNewPIN: is displayed.
3. Enter the four digits of the new PIN code and press YES .
RepeatNewPIN is displayed.
4. Enter the new PIN code again and press YES .
Either New PIN accepted or Wrong New PIN is displayed. In the latter
case, the new PIN and the code you have just entered do not match.
If New PIN accepted appears, you can use the cordless phone again.
Blocking keys and extra security
81
OVERVIEW PIN AND OTHER CODES
The cordless phone uses several identification codes for security reasons. In
the table below, an overview of these codes and their values is given.
Code
Cordless phone PIN
Authentication Code (AC) or
BasePIN
Value
Backdoor code
0000 (default)
Unique identity provided by the cordless
system which is necessary to subscribe a
cordless phone. Consult your system manager for more information.
International Portable part Equip- Unique identity assigned to your cordless
ment Identity (IPEI)
phone by the manufacturer. In menu
Information >> ShowIPEI you can find the
number. It is recommended to write it down.
Portable Access Rights Key
A unique identity provided by the cordless
(PARK)
system. This code can be used to speed up
subscription. Consult your system manager
for more information.
IPEI
Not applicable.
Not applicable.
Not applicable.
Blocking keys and extra security
82
Settings
VOLUME CONTROL
You can adjust the volume in the earpiece and the volume of the ringer.
Adjust earpiece volume
To adjust the volume during a call:
• Press the V O L U M E U P or V O L U M E
DOWN
key once or more.
Settings
83
If you are not making a call you can still adjust the volume:
1. Press YES .
You hear the dial tone.
2. Keep listening and press the V O L U M E U P or V O L U M E D O W N key once
or more.
You hear the dial tone becoming louder or quieter.
3. Press NO to cancel the adjustment procedure.
If the earpiece is at maximum or minimum volume, you hear a warning tone.
Adjust ringer volume
VolumeLevel
To adjust the ring volume:
Route: Handset » Alerts » RingVolume
1. Select RingVolume and press YES .
A volume level bar is displayed.
2. Press the
or
key once, or more, to turn the volume up or
down.
Settings
84
You can now also use the V O L U M E U P or V O L U M E D O W N key to
change the volume. Each time you press V O L U M E U P or V O L U M E
D O W N , you hear the ring at the new volume. If you set the volume to its
lowest level, the ring off icon appears.
3. Press YES
to confirm.
Settings
85
RINGER TONES OR MELODIES
You can change the ringer tone for each call type to a different sound or a preprogrammed melody. For each ring signal type, you can choose from four
ringer tones or six melodies.
To set the sound for a ringing type:
Route: Handset » Alerts » RingType » Internal/External/CallBack/Message/
Page
1. Select the ring signal type: Internal, External, CallBack, Message or
Page and press YES .
The current setting is displayed and played.
2. Select sound Low, Medium, High, Mixed or Melody (1 - 6) using
or
.
The selected sound is played. The menu options Low, Medium, High and
Mixed refer to the pitch of the ringing tone.
3. Press YES
to confirm.
Settings
86
The table below lists the names of the melodies.
Melody
Name
1
2
3
4
5
6
Jumpy
Eine kleine Nachtmusik
Toccata
Elise
Samba
Blues Rhythm
Settings
87
DISCREET RINGING
In the discreet ringing mode, your cordless phone starts ringing at the lowest
audible volume level. It then gets louder and louder.
To set discreet ringing:
Route: Handset » Alerts » DiscreetRng
1. Select DiscreetRng and press YES .
The current setting is displayed.
2. Use the
or
key to select one of the following options:
• On to activate discreet ringing.
• Off for no discreet ringing.
3. Press YES
to confirm.
Tip
You can also turn off the ringer. See “Volume control” on page 83 for more
information.
Settings
88
KEY CLICK
Key click is the sound you hear each time you press a key. This feature can
be enabled and disabled.
To set key click:
Route: Handset » Alerts » KeySound
1. Select KeySound and press YES .
The current setting is displayed.
2. Use the
or
key to select one of the following options:
• Click to have a key click with each key press.
• Silent for no key click.
3. Press YES
to confirm.
Settings
89
DISPLAY LIGHT
Your cordless phone has a display which is illuminated when a key is pressed.
The illumination automatically goes off after a while, unless you press a key.
To set the display light to automatic or off:
Route: Handset » Display » Light
1. Select Light and press YES .
The current setting is displayed.
2. Use the
or
key to select one of the following options:
• Automatic to activate illumination of the display when a key is pressed.
• Off for no illumination of the display.
3. Press YES
to confirm.
Settings
90
DISPLAY CONTRAST
You can adjust the contrast of the display to one of eight levels to make it easier to read.
Contrast:
To change the display contrast:
Route: Handset » Display » Contrast
1. Select Contrast and press YES .
The contrast level bar appears.
2. Adjust the contrast with
and
.
You hear an error beep when either limit is reached.
3. Press YES
to confirm.
Settings
91
LANGUAGE
You can change the language of the menus at any time. The default language
is English.
To change the cordless phone language:
Route: Handset » Language
1. Select Language and press YES .
The current language is displayed.
2. Scroll through the list of languages until the language you want is
selected.
3. Press YES
to confirm your choice.
AUTOINTERN
Select AutoIntern Off.
Settings
92
CLEARING ALL CORDLESS PHONE SETTINGS
You can clear all settings on the cordless phone simultaneously. The last
dialled numbers, the ‘‘who called’’ memory and the last call information are
also cleared. The phone book, the PIN code, the subscriptions and the total
calls information, however, are not cleared.
All cordless phone settings revert to default.
To reset all cordless phone settings:
Route: Handset » MasterReset
1. Select MasterReset and press YES .
Enter Pin: or Reset All Settings ? is displayed.
2. If requested enter your PIN code for the cordless phone (see page 82)
and press YES .
Reset All Settings ? is displayed.
3. Press YES
to confirm.
Settings
93
Networking
CONNECTING TO TELEPHONE NETWORKS
Work
132
01-Dec 11:32
Your cordless phone uses a telephone network to make and receive calls. The
cordless phone can be connected to several telephone networks.
If your cordless phone is connected to a telephone network the name of this
network is displayed. The signal strength icon indicates the reception quality.
If a network name is displayed and the signal strength icon is off, the cordless
phone is not connected to that network at the moment. The cordless phone is
trying to connect to that network or it was connected to that network before.
Before you can access a network a subscription and a telephone number are
required. Subscription to a network is carried out once only. Once the cordless
phone is subscribed you can make and receive calls whenever you are within
range of that network.
Networking
94
During the subscription to a network the cordless phone receives its internal
telephone number by which it can be called.
You can subscribe up to eight different networks. You can select a subscribed
network automatically or manually.
If the cordless phone cannot connect to a network a number of warning messages can be displayed. In addition the cordless phone will give short, fast
beeping sounds and the warning light will flash.
No Network
‘No Network’ warning
If you have manually selected a network, the cordless phone cannot connect
to the selected network. If you have automatically selected a network, the
cordless phone cannot connect to any network in its subscription list. You can
solve this as follows:
• Select another network. See “Selecting a network automatically” on page
103 and “Selecting a network manually” on page 105.
Networking
95
•
•
No Access
If the cordless phone is not yet subscribed to a network, you should subscribe it first, see “Subscribing to a network” on page 97.
If the cordless phone is already subscribed, you are probably out of range.
You should bring it back into the working range of the network.
‘No Access’ warning
The cordless phone is in range of a telephone network but has no access
rights. You should solve this as follows:
• Select another network. See “Selecting a network automatically” on page
103 and “Selecting a network manually” on page 105.
• If the cordless phone is already subscribed to that network, you should
resubscribe, “Resubscribing to a network” on page 103.
Networking
96
SUBSCRIBING TO A NETWORK
To connect a cordless phone to a telephone network you must subscribe to
that network. Once subscribed to, the network can be accessed at any time,
when within network range.
Subscribing a cordless phone
Note
If the cordless phone does not have a subscription, it automatically enters the
subscription mode when it is switched on. In this case the cordless phone displays BasePIN: or Enter AC:. If so, you can skip step one and two of the procedure below.
To subscribe to network a BasePIN or Authentication Code (AC) is required.
To speed up the subscription process a Portable Access Rights Key (PARK)
can be used also. But when within system range and you are sure that no
Networking
97
other network can interfere with the subscription process then the PARK may
be omited.
Your system manager or supplier will provide you with an BasePIN/AC code
and a PARK if necessary.
The BasePIN or AC code is only used once during the subscription process.
The BasePIN or AC code can be seen as a temporary PIN code received from
the network operator, or system administrator, to perform on-air subscription.
To subscribe a cordless phone without speeding up the subscription process:
Route: Networks » Subscribe
1. Select Subscribe and press YES .
Enter PIN:, BasePIN, Enter AC: or Subscr. List Full is displayed. When
your cordless phone already has eight subscriptions. You have to delete a
subscription before you can add a new one.
2. If requested, enter the PIN code for the cordless phone (see page 82) and
press YES .
BasePIN: or Enter AC: is displayed.
Networking
98
Work
132
01-Dec 11:32
3. Enter the BasePIN or authentication code.
Each digit of the BasePIN or AC number that you enter is shown only as *
for security purposes.
4. Press YES
to confirm.
The cordless phone now looks for a network in subscription mode using
the BasePIN or AC number to test if it is allowed to subscribe.
5. Wait until Subscription Ready is displayed for a short time.
The cordless phone is connected to the network. You can see its internal
phone number on the display.
If you get the following message, try to subscribe again:
• Subscription Failed: the BasePIN or AC number you have entered does
not match the network BasePIN or AC number, or the network cannot add
another subscription.
Networking
99
To subscribe a cordless phone to speed up the subscription process:
Route: Networks » Subscribe
1. Select Subscribe and press YES .
Enter PIN:, BasePIN, Enter AC: or Subscr. List Full is displayed. When
your cordless phone already has eight subscriptions. You have to delete a
subscription before you can add a new one.
2. If requested, enter the PIN code for the cordless phone (see page 82) and
press YES .
BasePIN: or Enter AC: is displayed.
3. First enter
followed by the BasePIN or authentication code of the
network. Press YES
to proceed.
Each digit of the BasePIN or AC number that you enter is shown only as *
for security purposes.
4. Enter the PARK code of the system and press YES .
5. Enter a protection code (
= no protection,
= protection (when
you enable protection it is no longer possible to delete the subscription via
the cordless phone)).
Networking
100
Work
132
01-Dec 11:32
6. Press YES
to confirm.
The cordless phone now looks for a network in subscription mode using
the BasePIN or AC number to test if it is allowed to subscribe.
7. Wait until Subscription Ready is displayed for a short time.
The cordless phone is connected to the network. You can see its internal
phone number on the display.
If you get the following message, try to subscribe again:
• Subscription Failed: the BasePIN, AC number or PARK code you have
entered does not match the network BasePIN, AC number or PARK code,
or the network cannot add another subscription.
Eight subscriptions possible
Up to eight networks may be subscribed to. The names for these networks are
stored in a prioritised list. In case of automatic network selection, the cordless
phone will try to connect to the network with the highest priority. To change the
network priority see “Changing subscription priority” on page 109.
Networking
101
If you want to subscribe and no free entries are left in the subscription list, you
have to delete an entry first. See “Deleting network subscription” on page 108.
Networking
102
John
200
01-Dec 11:32
Network names
The names of networks can be used as a personal identity for your telephone.
Each name could, for instance, be related to the relevant area or organisation
when connected to that particular network. To edit the network name see
“Editing network name” on page 106.
RESUBSCRIBING TO A NETWORK
Resubscribing can be used to update the subscription data in the cordless
phone. For business applications this feature is not used.
SELECTING A NETWORK AUTOMATICALLY
The cordless phone can connect to a network automatically. This may solve
out of range (‘No Network’) or network access problems (‘No Access’). The
network selection is retained if the telephone is switched off and back on.
Networking
103
To have automatic network selection:
Route: Networks » SelectNet
1. Choose SelectNet and press YES .
Automatic or the currently selected network is displayed.
2. If necessary use the
or
key to select Automatic.
3. Press YES
to confirm.
The cordless phone tries to connect to a subscribed network in the order of
the prioritized subscription list. If only a network name is displayed and ‘No
Network’ is displayed repeatedly, the cordless phone has not connected to a
network. The cordless phone is out of range or a network subscription is
required. See “Subscribing to a network” on page 97, or contact your system
manager.
Networking
104
SELECTING A NETWORK MANUALLY
The cordless phone can connect to several telephone networks. You can
specify a network to connect to. The network selection is retained if the telephone is switched off and back on.
To specify the network to connect to:
Route: Networks » SelectNet
1. Choose SelectNet and press YES .
Automatic or the currently selected network is displayed.
2. Press
or
to find the network you want from the list.
3. Press YES
to confirm.
Networking
105
EDITING NETWORK NAME
Work
132
01-Dec 11:32
The name of each subscribed network can be changed to provide a personal
identity for your cordless phone. The name can be chosen freely and is shown
on the display when the cordless phone is connected to that network and in
stand-by. The default name is Work.
To edit the network name:
Route: Networks » Rename
1. Select Rename and press YES .
The first network name in the subscription list is displayed.
2. Use
or
to select the name to edit.
3. Press YES .
Edit Name: is displayed.
4. Change the name (to a maximum of ten letters).
5. Press YES
when you finish.
Networking
106
Tips
• With respect to the number keys consider the following: press the key
which has the letter of the name you want. Press once for the first letter of
the key, twice for the second and three times for the third letter of the key.
• The cordless phone can display several special characters. Please refer to
“Phone book use” on page 63 for more details.
Networking
107
DELETING NETWORK SUBSCRIPTION
If a subscription is no longer required, you can remove it from the subscription
list of the cordless phone. You can lock this option with a PIN code; then you
cannot accidentally delete a subscription.
To remove a subscription from the cordless phone:
Route: Networks » Delete
1. Select Delete and press YES .
Enter PIN: or the first network name in the subscription list is displayed.
2. If requested, enter the PIN code for the cordless phone (see page 82) and
press YES .
3. Use
or
to find the subscription for deletion.
4. Press YES .
Delete? is displayed.
5. Press YES
to confirm.
Networking
108
If you delete the currently active subscription, the cordless phone disconnects
and searches for another subscribed network.
CHANGING SUBSCRIPTION PRIORITY
The cordless phone can select a network automatically when it has been out
of range or switched on. In this case, it searches for the networks in the order
of priority starting with the first one on the subscription list. If you wish to
change the order of your subscription list, the network names can be rearranged using the Priority option.
Note
This menu option is only available if the subscription list contains two or more
network names.
Networking
109
To change the order of the subscription list:
Route: Networks » Priority
1. Select Priority and press YES .
The first network name on the list is displayed.
2. Use
and
to select the network to be moved.
3. Press YES .
Pos. 1 is displayed.
4. Use
or
to select the new position in the list for the selected
network.
5. Press YES
to confirm.
The selected network is put into the required position on the list. The other
networks on the list are re-arranged accordingly, maintaining their relevant priorities. For example, if item 3 is moved to item 1 on the list; item 1 becomes
item 2, item 2 becomes item 3 and the other items remain unchanged.
Networking
110
Tips and tricks
You can find a few useful tips and tricks in this section.
Putting a call on hold
You can put a call on hold in three ways:
•
•
During a call press
. You can now transfer the call to another cordless phone or return to the call. This and any further action is entirely
dependent on the telephone network or switchboard used. See “Transferring a call” on page 49 for more details.
Press CLR to switch off the microphone. See “Turning off the microphone”
on page 52.
Tips and tricks
111
Quick call by name
You can search for a number by name in the phone book without using the
menus. See “Quick call by name” on page 42 for more details.
Entering a dial tone pause
To include a pause in a telephone number, press
. The network waits for
the dial tone. See “Sending a dial tone pause” on page 59 for more details.
Editing a name and number
If you edit a name or a number on your cordless phone you can “jump” to the
most left or the most right character by respectively pressing
or
for one second. You can clear the whole name or number by pressing CLR for
one second.
Tips and tricks
112
Mute ringer temporarily
If your cordless phone rings at an inconvenient moment, you can turn off the
sound temporarily by pressing CLR. The ringer sounds again with the next
call. See “Turning off the ringer” on page 53 for more details.
Muting ringer and warning sound permanently
You can turn off the ringer and warning sound permanently by pressing CLR
for one second. If you press CLR during a call, you turn off the microphone. To
turn the ringer and warning sound back on, press CLR for one second again.
See “Turning off the ringer” on page 53 for more details.
Tips and tricks
113
Reference
SAFETY INSTRUCTIONS
Intrinsic safety
Do not use the cordless phone and charger in conditions where there is a
danger of electrically ignited explosions.
Exposure to sunlight, heat and moisture
Do not expose the cordless phone and charger to direct sunlight for long periods. Keep the cordless phone and charger away from excessive heat and
moisture.
Battery disposal
Defective batteries must be returned to a collection point for chemical waste
disposal.
Reference
114
Spare parts and accessories
Use only approved spare parts and accessories. The operation of nonapproved parts cannot be guaranteed and may even cause damage. For
more information see “Spare parts and accessories” on page 131.
Reference
115
TROUBLESHOOTING
These answers to frequently asked questions should help you solve problems
with the cordless phone yourself.
Can somebody eavesdrop on me?
This is not possible because of the digital encryption techniques which are
used.
Do I get a warning before the batteries run out?
An alarm sounds when approximately fifteen minutes’ calling time is left.
How can I subscribe a cordless phone?
To subscribe a cordless phone you need the BasePIN or authentication code
of the network. How to subscribe is explained in “Subscribing to a network” on
page 97.
Reference
116
I cannot understand the language on the display. Why?
An incorrect language has been selected.
To correct this:
1. Press CLR.
The cordless phone returns to the stand-by display.
2. Press 2 x
, YES , 3 x
and YES . Select the language of
your choice from the list and press YES .
I have entered an incorrect PIN code three times in a row. How can I set a
new PIN code?
If you have entered an incorrect PIN code three times in a row, the current
code is invalidated. If the cordless phone PIN code is invalidated, the cordless
phone cannot be used any more. To reset the PIN code, see “Unblocking the
cordless phone” on page 80.
Reference
117
I cannot switch on the cordless phone by pressing NO for at least two
seconds. Why?
Put the cordless phone in the charger. If the display comes on, the battery is
almost flat. Leave the cordless phone in the charger to charge the battery. If
the display remains off after charging, the cordless phone is defective or the
battery is not properly connected or may need replacing. See “Battery” on
page 15.
I know that someone is calling me, but the ring signal is not ringing. Why
not?
If you can see the ring off icon, it means that the volume of the ring signal has
been set to zero, or the ring signal is switched off temporarily. If the ring signal
has been switched off temporarily, it comes back on when you hang up. For
increasing the volume of the ring signal, see “Volume control” on page 83.
Reference
118
I hear a warning tone and the signal strength indicator is not shown.
What is wrong?
The cordless phone is not connected to the network. The cordless phone is
probably out of range. Bring the cordless phone back within range of the network.
It is also possible that the cordless phone has not been subscribed or that the
subscription has been cancelled. It could also mean that a network other than
the one which you are close to has been selected. See “Subscribing to a network” on page 97 and “Connecting to telephone networks” on page 94.
I hear a warning tone and the battery icon is flashing. What is wrong?
The battery is almost flat. Put the cordless phone in the charger to charge the
battery.
Reference
119
I cannot use the phone book. What is wrong?
The phone book in the cordless phone might be empty. To make use of the
phone book, you have to add a few names and numbers. See “Adding name
and number” on page 66.
Reference
120
BUTTONS AND KEYS
Volume up key
Volume down key
Display
Off hook key
Up key
On Hook/On/Off key
Clear/Mute key
Down key
Number keys
Internal call key
R key
Reference
121
The lists below explains the use of the buttons and keys on the cordless
phone.
Key
Function
V O L U M E U P and
VOLUME DOWN
Earpiece volume louder/quieter.
YES
Make a call or answer a call.
Confirm a menu option.
During call: microphone off.
While entering text or a number: delete last letter or digit, delete
whole line if held longer.
If the cordless phone rings: mute sound. In stand-by mode mute
ringer and warning sound permanently.
Cancel a menu option, cordless phone goes on stand-by.
If held for 1 second: switch cordless phone on.
If held for 1 second during stand-by: switch cordless phone off.
If the cordless phone rings: mute sound.
End a call.
Cancel a menu option.
Start menu.
Scroll through menu options or lists.
While entering text or number: move one character position, move
to end or beginning if held longer.
CLR
NO / O N / O F F
and
Reference
122
Key
Function (Continued)
During an external call: transfer a call (if supported).
Change case of previous and subsequent letters while entering
text.
If held for 1 second: insert dial tone pause (-) while entering a
phone number.
TERMINOLOGY
The list below explains the terms which may appear on the display.
Terminology used on display
Term
Meaning
AC
BasePIN
DTMF
IPEI
Authentication code (=BasePIN)
= authentication code
Dual Tone Multi Frequency or touch tone, for dialling.
International Portable part Equipment Identity, unique identity
assigned to your cordless phone by the manufacturer.
Reference
123
Term
Meaning (Continued)
PARK
Portable Access Rights Key, unique identity assigned to your network.
Personal Identification Number for security.
PIN
SIGNALS
The cordless phone signal certain events audibly and visually as described
below.
Signal
Meaning
Red warning light
Incoming call.
Message waiting.
Battery almost empty.
Cordless phone out of range or not connected.
The cordless phone also generates audible ring signals, alarm signals and
warning tones, and key clicks.
Reference
124
Sound
Meaning
Ring signal
Alarm signal
Incoming call.
4 short beeps every 30 seconds: battery almost empty.
4 short beeps every 2 minutes: cordless phone out of range or not
connected.
You hear this each time you press a key (when selected).
You have pressed a key which has no function.
Key click
Warning tone
MAINTENANCE
The cordless phone does not contain user serviceable parts. If your cordless
phone requires service you should return them to the supplier or retailer from
whom they were bought.
Reference
125
Cleaning
Clean the cordless phone with a soft cloth moistened with water only. The use
of soap and other cleaning products can discolour and damage the cordless
phone. Clean the battery contacts using ethanol or isopropyl alcohol.
Reference
126
TECHNICAL SPECIFICATIONS
DECT GAP/CAP
The cordless phone has the unique advantages of DECT GAP/CAP (Digital
Enhanced Cordless Telecommunications Generic Access Profile/CTM Access
Profile). This means that no one can eavesdrop on your calls and that the
quality of speech is as good as that of conventional fixed telephones. DECT
GAP/CAP enables interoperability with other manufacturers’ products.
CE marking
The cordless phone has a CE marking according to the guidelines of the
European telecommunications laws 73/23/EEC, 89/336/EEC and 91/263/
EEC. The CE marking corresponds to the European marking law 93/68/EEC.
Reference
127
Cordless phone
Power supply
Battery
NiMH pack 600 mAh, 3.6 V
Standards and regulations
CE regulations
CE marking
DECT standards
Safety standards
EMC standards
73/23/EEC, 89/336/EEC, 91/263/EEC and
93/68/EEC
CE 0344 X
CTR6, CTR10, CTR22
EN60950
ETS 300 329
Maximum environmental values during use
Temperature
Relative air humidity
0 to +40 °C
20% to 75% non-condensing
Dimensions and weight
LxWxH
Weight
142 x 54 x 25 mm (excluding antenna and clip)
143 g (including batteries and clip)
Reference
128
Performance
Battery
Stand-by time
Call time
Charge time
NiMH, 500 to 1000 charge cycles
up to 150 hours
up to 15 hours
3 hours maximum
Volume
Ring signal
Earpiece
Seven step adjustable volume from off to 85 dB (A) at 30 cm
Ten step adjustable
Ringing signals (defaults)
External call
Internal call
Call back
0.4 s on, 0.2 s off, 0.4 s on, 5 s off
1 s on, 5 s off
0.32 s on, 0.2 s off
Phone book
Maximum name length
Maximum number length
Entries
12 characters
24 digits
100
Reference
129
External interfaces
Radio connection
User interface
Accessory connector
DECT GAP/CAP, 1880-1900 MHz, up to 250 mW radiated power
during 1 of the 24 time slots
Display with two lines of 12 alphanumeric characters and 7 icons,
keys with text, volume keys on the side.
For battery charging.
Features
Menu controlled, predial, difference between internal and external calls, phone book, redial (10 numbers), caller identification (if provided), ‘‘who called’’ memory (10 numbers), illuminated display, temporarily transmit long DTMF tones, security with PIN code, keys can be locked automatically, access to up
to 8 DECT GAP/CAP telephone systems, key click on/off, battery meter, call duration indication.
Reference
130
SPARE PARTS AND ACCESSORIES
Use only approved spare parts and accessories. The operation of nonapproved parts cannot be guaranteed and may even cause damage. Contact
your supplier for more information.
• Charger with desk stand and wall mount.
• Power adaptor for charger.
• Clip for cordless phone.
• Nickel metal hydride battery for cordless phone.
• Battery door for cordless phone.
Reference
131
Index
A
C
AC 82, 123
Accessories 115, 131
AutoIntern 92
Automatic selection 103
Call
by name 41
information 38
making a call 40
quick call by name 42
receiving a call 48
returning a call 46
statistics cordless phone 62
transfer 49
using phone book 41
Calling line identification 49
Cancelling a subscription 108
CAP 127
CE 127
Charge time battery 15
Charger 131
Cleaning 126
Connecting to telephone networks 94
Contrast 91
B
Baby phone 59
Backdoor code 82
BasePIN 82, 123
Battery 15
changing 18
charging 16
meter 16
Buttons 121
Index
132
Cordless phone
changing PIN code 79
switching off 34
switching on 21
unblocking 80
D
DECT/GAP 127
Deleting subscription 108
Dial tone pause 59
Dialling off hook 30, 40
Dialling on hook 29, 40
Direct call 60
Discreet ringing 88
Display
contrast 91
information 37
light 90
DTMF 123
E
Editing name/number 67
Extension number 38
G
GAP 127
Getting started 8
I
Illuminated display 90
Installation 10
Intrinsic safety 114
IPEI 82, 123
K
Key click 89
Keys 121
L
Language
cordless phone menu 92, 117
Last dialled number 44
M
Maintenance 125
Making a call 40
Master reset
cordless phone 93
Melody 86
Menu
language 31, 92
off hook 25
on hook 24
structure 23
use 26
Index
133
Microphone off 52
Preparing for use 10
N
Q
Name/number editing 67
Network 94
selection 103, 105
Nickel metal hydride 15
NiMH 15
Quick call by name 42
O
Off hook dialling 30, 40
On hook dialling 29, 40
Overview PIN codes 82
P
PARI 124
PARK 82
Path through the menus 28
Pause, dial tone 59
Phone book 63
adding caller’s numbers 72
adding last dialled numbers 70
adding name and number 66
adding who called 72
deleting names and numbers 69
editing name 67
editing number 68
PIN code 82, 124
R
Receiving a call 48
Redial 44
Reset all
cordless phone 93
Re-subscribing a cordless phone 103
Ring
type 86
Ringer
off 53
tones 86
Route 28
S
Safety instructions 114
Selecting a network 103, 105
Signal strength 37
Signals 124
Spare parts 115
accessories 131
Specifications 127
Subscribing to a network 97
Switching off cordless phone 34
Index
134
Switching on cordless phone 21
T
Telephone number 38
Terminology used on display 123
Tips and tricks 111
Transferring calls 49
Troubleshooting 116
U
Unanswered calls 46
Unblocking
cordless phone 80
Using
menus 26
phone book 63
W
Who called 46
Index
135