1
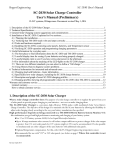
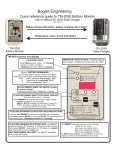
Bogart Engineering
Quick reference guide to TM-2030 Battery Monitor
with or without SC-2030 Solar Charger
June 14, 2015
Battery charge information, battery charging rate control
Temperature, solar current into battery
TM-2030
Battery Monitor
SC-2030
Solar Charger
TM-2030 controls and display
CHARGING LIGHT:
IMPORTANT DISPLAY NOTE: Flashing decimal
point means “multiply the number seen by 1000”
When light on, means “battery 1 is charging”
(“amps” or “watts” is positive)
When Flashing: battery now meets charged
criteria: (see TM-2030 instructions, sec 6.2, A).
except flashing when Program P7, level 4 selected:
battery met charged criteria-- and still at least 98% full
Optional: BATTERY REMINDERS:
See TM-2030 User’s manual section 2.2 for details
Lamp flashes and display occasionally shows these letters
when:
battery should be fully charged “Ch.F”
or
“battery should be equalized” “Ch.E”
or
“battery voltage low” “b.LO”
DO YOU PREFER “AMPS” OR “WATTS” to show
in primary display?
See User’s manual, Table 2, Program P4, to change.
TM 2030-RV
Bogart Engineering
when flashing-meets "CHARGED" criteria
CHARGING
=TIME TO CHARGE
BATTERY
REMINDERS
=TIME TO EQUALIZE
=BATT. VOLTS LOW
B1
AMPS
VOLTS
% FULL
B2
SELECT
TO ACCESS PRIMARY (MOST OFTEN USED) DISPLAYS
More description: section 1, next page
Hold SELECT 3
seconds to view
RESET
Push “SELECT” quickly to make display toggle through:
VOLTS (first battery B2, then battery B1)
AMPS (or WATTS) charging(+) or discharging (-) battery B1
%FULL (for battery 1) Battery B1 must be charged fully
at least once before this will display.
AMP-HOURS FROM "FULL"............RESET: to 0 Amp-hours
DAYS SINCE "CHARGED"................RESET: to 0 days
DAYS SINCE EQUALIZED................RESET: to 0 days
=AMPS
or
=WATTS
REPLACED PERCENTAGE FROM LAST DISCHARGE
TO ACCESS SECONDARY (LESS OFTEN USED) DISPLAYS ITEMS:
Push and hold SELECT for 3 seconds until "AH" pops into display.
Immediately release SELECT. Now push SELECT to step through the 5
items shown here. Descriptions section 2.1 next page
TO ACCESS PROGRAM OR HISTORY DATA: Hold SELECT
down and watch for “P” (Program) or “H”(History) at left in display,
then release SELECT. See sections 2.2 for details on program
data. See sections 2.2.3 on history data.
NOT SURE WHERE YOU ARE? Push SELECT repeatedly
until you get back home.
Operating and programming instructions at
www.bogartengineering.com/ins
The RESET button will reset any of the following:
“Batt% full” (to 100%)
Amp Hours from full (to 0 Ahr)
Days since charged (to 0 days)
Days since equalized (to 0 days)
To RESET any of these: (1) Use SELECT to view it on
display. (2) Push and hold RESET for 5 seconds.
1. Primary System Information (most important user’s information)
rev. 9-5-15
The most important information on your battery system can be selected by pressing the select button on the
TriMetric front panel to select these three primary items: (Multiply volts by 2, or 4 for 24V or 48V systems.)
1. volts: The voltage of your main battery (if the B1 lamp is on) or the voltage of the secondary battery (if
the B2 lamp is on). Use volts to:
a. Check whether your batteries are charging at the voltage specified by the battery manufacturer.
b. Check whether the batteries are nearing a low state of charge. This would be (for 12V system) when
volts are somewhat less than 12.0 volts. Between 12.0 and 14.0 volts the display is a poor indicator
of state of charge in a working system. Use % full instead.
2. amps (or watts): This mode shows how rapidly energy is entering or leaving the battery. It is positive
when the battery is being charged or negative when the battery is being discharged. This display mode
can be reconfigured (using program P4) to show power (in Watts) instead of showing current (in Amps).
Use amps or watts to:
a. Verify that the charger is charging the batteries at correct rate.
b. Know when to turn a charging generator off. As batteries become more charged, amps to the
batteries will decline. Running a generator with a low charge current wastes generator energy.
c. Learn the power usage of your various appliances by noting the amps (or watts) difference when they
are switched on and off. Do this when you are not charging batteries.
d. Check that all your appliances are really turned off before leaving home.
3. % Full: This display tells the state of charge (how much energy is left) in the battery on a percentage
scale. Useful to watch while you are discharging batteries. Also use this display to:
a. Minimize generator run time when charging batteries by running it when “% FULL” is low and thus
charging amps are higher. When %FULL is high, finish charging with solar at lower amps and
longer charge times.
b. Observe progress while charging.
2. Additional System Information (less important) The following four displays will repeat as long
as SELECT is held down. Release SELECT when you arrive. Programmable settings and History are
described below in summary form, and described in detail in TM-2030 Users Manual.
1.“AH” Secondary display data: Section 2.1 below. The first five items in this category are listed in
the lower box on front panel of TM-2030.
2.“P1” Programmable settings Section 2.2 below.
3.“H1” History data Section 2.3 below.
4. (shows number only) Primary System data (described above in Section 1).
2.1 Secondary System Information (five items + three more for when using SC-2030 solar
charger with TM-2030)
These are shown in lower box on front label. Push SELECT to advance to the next one.
AH: Amp-hours from full. This is another way to indicate percentage full. When the battery is full, this
value is zero. When the battery is less than full, the value is a negative number, which shows how many
amp-hours should be returned to the battery to fully charge it. Automatically resets to 0.00 A-hr and %=
“100%” when batteries are charged. May be manually reset to 0.00 A-hr (and %= 100%), not usually
necessary, by holding the reset key down for at least five seconds while showing this display.
dSC: Days since charged. This value shows the number of days since the battery was last fully charged.
If batteries are discharged below 90% every day it is important to not leave the battery at a low charge
level for long periods of time. This is only important when batteries are regularly being discharged, not
when sitting unused for days. It is reset to 0 automatically when the “charged criteria” are met, however it
can be manually reset by holding the reset key down for at least five seconds while in that display mode.
dSE: Days since equalized. Provides a reminder for when to perform a manual equalization. Shows how
many days have elapsed since the last time the battery was equalized. This number is not automatically
reset; it must be reset by holding the reset key down for at least five seconds while in that display mode.
With SC-2030 charger also accesses manual equalization: See SC-2030 User’s Manual, Sec. 6.6.
Pr or AP: Power (“Pr” on display indicating watts) or current (“AP” on display indicating “amps”)
depending on whether the amps primary display was set (using program P4) for amps or power,
respectively. This allows both Watts and Amps information to be available in all cases; as one is
available as primary information, the other is available as secondary information.
rPC: Percent returned from last discharge period. Because of batteries’ inherent inefficiency, it is
necessary to recharge batteries with more energy than was taken out. Flooded batteries require at least
10% more charge than was removed, while AGM batteries need only about 5-8% more. While the battery
is being discharged, the value shown is usually zero. While the battery is being charged, the value is
the amount of charge added so far as a percentage of the amount of charge last removed: anywhere from
0% to 115% or even more.
Push RESET while showing this display to see lowest amp hours of the previous discharge—
upon which rPC is based. If the base number is small because the discharge was light, a large value
of rPC is likely insignificant. ”
The following three are not shown on front label. They only show when the SC-2030 charger is
connected and communicating with the TM-2030, and when the sun is shining on panels.
SOL: Solar amperes: the amount of current being delivered by the solar panels from the SC-2030.
UPr: Unused solar power in watts: shows if extra power is available from the sun that could be used when
battery charging is tapering down in the afternoon. Run appliances such as a dishwasher or vacuum
when this extra power is available, which would otherwise be wasted. Displays “YES” when nearly all
solar power is available for extra use; if a number is displayed, it shows watts available.
°C: The battery temperature in degrees Celsius (when temperature sensor is present).
2.2 Programmable Settings. Two sets of programmable settings are available. The basic set is always
available. The advanced set is only available only when the “user level” has been set to L3 or higher using
program setting P7.
2.2.1. Basic Programmable Parameters
P1: Charged voltage set point: Battery signaled as “battery charged” when volts exceeds the P1 value,
and charging amps is less than P2 value. Also it is the “absorb voltage” set point for the SC-2030
charger when used. Default “14.3”
P2: Charged amps set point: As indicated in P1 above, it is the current threshold below which the
charging current must be reduced before signaling “battery charged”. It also signals the SC-2030 to
go into “finish charge” mode. The “amps” value is the percentage in P2 times the value of amp hours
in P3. Default “2.0”%
P3: Battery system capacity in Amp-Hours (10 to 9990 A-hr). Default “220”
P4: Choose either amps (“A”) or power (watts) (“Pr”) to be in the primary display group. Default “A”
P5: Days since charged alarm set point (off, 0.0 to 250 days). Default “Off”
P6: Days since equalized alarm set point (off, 0.0 to 250 days). Default “Off”
P7: User “complexity” level. L1,L2,L3,L4.
L3 or L4 is required to access “advanced” program
parameters. Default L1
2.2.2. Advanced Programmable Parameters-accessible only when Program P7 is set to L3 or L4. Default
values shown below are automatically installed when switching from L4 or L3 into L2 or L1.
P8: Maximum voltage limit: SC-2030 solar charger only: this limits the maximum charging voltage. Default 65.0
P9: Lo-battery audible alarm: based on % full and battery voltage. Set “low % full” alarm point with P9
(OFF, 1-100%). Set “low threshold volts” at P13 below. Default “OFF”.
P10: Efficiency factor (60-100%): This parameter affects how the “% full” is evaluated. Discharging amphours always evaluated at 100%. Charging amp-hours evaluate at an amps rate determined by this
setting. This compensates for battery charging inefficiency. Default 94%
P11: Shunt type: “H” means 500A/50mV. “L” means 100A/100mV. Default H
P12: Auto Reset On-OFF: When OFF percent full and amp hours are not automatically reset. Default ON
P13: Low battery voltage alarm setting: (10.0-65.0 V) Default: 10.0 Audible alarm also controlled by P9
P14: Maximum finish-charge time in hours until float, SC-2030 solar charger only: (0.0-5.0 Hr.)
P15: High finish charge voltage, SC-2030 solar charger only:: (10.0-65.0 V)
P16: Float voltage setting: SC-2030 solar charger only: (10.0-65.0 V)
P17: Shows how many hours after “now” that daily history data H7, H8 ,H9 will be recorded: (0-24)
P18: Battery calibration voltage adj. Rarely needed. See TM-2030 User’s Instructions, Section 6.4, P18.
P19: Reset TriMetric to factory settings
P20: Percentage overcharge compared to last discharge until float SC-2030 solar charger only: (1-20%)
P21: Finish charge current: SC-2030 solar charger only: enter as a percentage (0-10%) of battery capacity P3
P22: Battery charging profiles—quickly enter correct settings for SC-2030 charger
2.2.3 History data-Details can be found in the TM-2030 User’s Instructions section 6.3 Using History Data.
H1: Cumulative lifetime Amp-hours drawn from the battery. Acts like an odometer for batteries.
H2-H6 History data: for each of the last five charge-discharge cycles: Use SELECT button go down the
table rows. For each row, push RESET to step back in time up to five earlier charge cycle periods.
H2.1 – H2.5 Hours since last charge/discharge cycle ended.
H3.1 – H3.5 Charge/discharge cycle duration hours.
H4.1 – H4.5 Charge efficiency of cycle: % a-hr discharged ÷ % a-hr charged.
H5.1 – H5.5 Lowest battery charge percentage within charge/discharge cycle.
H6.1 – H6.5 Lowest battery voltage within charge/discharge cycle.
H7-H9 History data: Use SELECT to go down each row. RESET to go back in time up to five days:
H7.1 – H7.5 Highest battery voltage each day.
H8.1 – H8.5 If the charge set point voltage (set in program P1) was reached on a particular day, this
parameter shows the least charge current during that time. If set point was not reached this parameter,
shows the charge current when the highest voltage was attained that day.
H9.1 – H9.5 Highest percentage of overcharge returned to the batteries for the day.
3. Where to find Other Useful Information
Download latest versions of this document and Instruction Manuals: www.bogartengineering.com
Programming the parameters for your batteries: Bogart Engineering website, SC-2030 User’s instructions, sec 2..2.3.
How to turn on or off the audible alarm: TM-2030 User’s instructions, sec 2..2.3.
Using TM-2030 history data to analyze your system: TM-2030 User’s instructions, sec 6.3.
Activating and using the battery reminders SC-2030 User’s instructions, sec 2.2.
How to observe the “filtered volts” and “filtered amps” for determining when batteries are considered
charged, as well as an explanation of how the TM-2030 computes the battery full percentage.
Charge profile graphs which show function of all eight programmable charge parameters.
Differences between complexity levels L1, L2, L3, L4. TM-2030 User’s instructions, sec 3.
Help fixing meter problems: See Bogart Engineering web site: Support/Troubleshooting
4. SC-2030 Solar Charger LED indicators – these are two lights on the SC-2030 charge controller.
The yellow LED, marked “overcurrent” when lighted indicates that at least 0.4 amp solar current is
available from solar panels. If the current exceeds 31 amps, this LED will flash while the SC-2030
limits current to a safe value.
The green LED, marked “TM-2030 Connected” indicates the charging state of the battery. When the
green LED is on most of the time, this indicates the TM-2030 is connected and solar current is
available to charge the batteries. When the green LED is off most of the time and blinking, this means
the TM-2030 is not connected, or that no solar current is available. The number of flashes indicates
the state of battery charging:
Zero flashes: ready to bulk charge, but not enough solar input to charge batteries.
One flash: bulk charging.
Two flashes: battery at “absorb” voltage.
Three flashes: battery in “float” mode.
Four flashes: battery in “finish charge” mode with the SC-2030 limiting the current to P21 value.
Five flashes: battery in “finish charge” mode with the SC-2030 limiting the voltage to P15 value.
Six flashes: battery is between 98-100% charged after having been in “float”.


![Roostloggers [Titley] - An Introductory Manual](http://vs1.manualzilla.com/store/data/005649014_1-8c618e497bb2550a491bca85d50a292e-150x150.png)