1
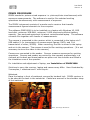
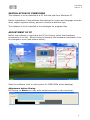
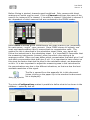
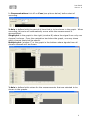
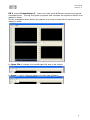
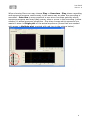
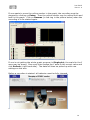
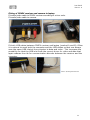
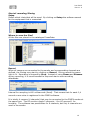
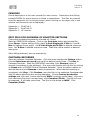
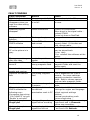
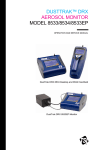
Juni 2012 Rev.nr. 0 Photo: Dagfinn Kroslid, Alcoa Lista Juni 2012 Rev.nr. 0 PIMEX PROCEDURE PIMEX stands for picture mixed exposure i.e. pictures/shots simultaneously with exposure measurements. The software is used to film selected working operations simultaneously with measurement of exposure. The PIMEX instrument consists of a sender and a receiver that transfer measurement figures telemetric to the computer. The software PIMEX2008 is to be installed on a laptop with Windows XP, SSD hard disk, minimum 2GB RAM, minimum 2 USD plugs and sufficient battery capacity. See enclosed equipment list about recommended laptop. The software connects film together with results of measurements. The camera is connected to the receiver which is connected to the laptop via 2 USB cables (1 for transmission of measurement figures; DATA, and 1 for transmission of video; VIDEO). When recording, the film is stored in the laptop and not in the camera. The camera is used to film working operations. (It is not necessary to store the video in the camera.) Censors are connected to the sender. Censors measure exposures for working operations. Censors and sender are carried by the operator preferentially in a rucksack at the back and hoses/cables are place over the shoulder and fitted in the inhalation zone of the operator. For installation and adjustment of laptop, see Installation of PIMEX2008. Solutions to carry the receiver, laptop and camera may differ. Here illustrated by 2 examples, 1 waistcoat and 1 with bicycle. Waistcoat Place the laptop in front of waistcoat, secured by burdock lock. PIMEX receiver is to be place at the back in the waistcoat. Cables are secured in the shoulder strap of the waistcoat. Photo: Sør-Norge Aluminium 1 Juni 2012 Rev.nr. 0 Bicycle Photo: Dagfinn Kroslid, Alcoa Lista To start a measurement, see Start of recording/filming. Immediately after recording, the results may be shown from the laptop (Overview). Yellow marker is moved in Overview to show certain exposure situations. Showing of PIMEX films can be done like this: 2 solutions for how to show – normal size or P1, see Open file and Overview in Adjustment of PC. Preparation and editing of film is done in an editing software, see Edit film. TABLE OF CONTENTS page Installation of PIMEX 3 Adjustment of PC 3 Charging PIMEX sender 10 Fitting of PIMEX receiver and camera to laptop 11 Start of recording/filming 12 Example of equipment 13 Censors 14 Edit film 14 Fault finding 15 Appendix list Appendix 1 – DustTrak I Appendix 2 – DustTrak II Appendix 3 – HF monitor Calculation for adjustment of signals UtstyrslistePIMEXseptember 2010 (Equipment list PIMEX September 2010) 2 Juni 2012 Rev.nr. 0 INSTALLATION OF PIMEX2008 The software is to be installed at a PC with the plat form Windows XP. Before installation of the software the settings for region and language must be done, adjust regional setting, period is chosen as decimal sign. The software is to be installed in the catalogue for program files. ADJUSTMENT OF PC Before the software is opened at the PC for filming, check that hardware acceleration is on full. When filming is finished, the hardware acceleration is to be changed to none (see picture below). Start the software (click on the symbol for PIMEX2008 at the desktop). Adjustment before filming By clicking on Notes one may write notes/comments to the recording. 3 Juni 2012 Rev.nr. 0 Before filming is started, channels must be defined. Only censors with direct analogue mV outlet may be used. Click on Channels and type the name of the censors for instance HF in channel 1, humidity in channel 2 and dust in channel 3 etc. dependent of which censors that are connected to the PIMEX sender. Below Units is defined which measurement unit that is factory set (calibrated) for each sensor - mg/m3, ppm, percent. Since PIMEX stores mV signals, one must use transformation ratio to convert back to concentration units. The method for this is described in the calculation sheet (Sette_opp_signal.xls). Follow the instructions in the calculation sheet. It is important to remember that the measuring instruments (censors) often have their own setting at its analogous outlet. Often one may define which concentration that shall give 0 mV and which concentration that shall give 5 mV. It is important to have control on this since the factors that shall be used in the calculation sheet, are dependent on this. It is also important to adjust the measuring area in the instrument to the concentrations one has in the different situations, so that one has the best available resolution of the signal. The file is opened from the appendix list in this document (when clicking on the paper clip in the window the document Sette_opp_signal.xls list is displayed). The picture Configurations makes it possible to define what to be shown in the software – option by tick off. 4 Juni 2012 Rev.nr. 0 In Communications tick off on Com (see picture below) before start of recording. X-Axis is defined with the period of time that is to be shown in the graph. When recording, this axis will automatically move while the measurement is accomplished. Single plot is the graph to the right (window B) where the signal from only one channel is shown. From the navigation bar below the graph, one may chose which channel that shall be shown. Multiple plot (window C) is the graph in the bottom where signals from all chosen channels will be shown. Y-Axis is defined with values for the measurements that are selected to be shown in the graphs. 5 Juni 2012 Rev.nr. 0 Picture below shows a general view of the software. Shown information is: Column – the column indicator shows real concentration. Window A (to left) – shows recording. Window B (to right) - Single plot shows signals from the instrument after the actual calibration factor is used (see Channels). Window C (in the bottom) - Multiple plot shows mV signals (raw signals) from all the actual channels (those channels that are marked with green in the display to the left). 6 Juni 2012 Rev.nr. 0 P1 means Presentation 1 where recording is shown (large window), exposure progress for a definite exposure factor and column for exposure value synchronised. Open file - select recording to be shown. In Scales X- and Y-Axis that is to be shown in the graph is defined. 7 Juni 2012 Rev.nr. 0 PR 2 means Presentation 2. Here one may show different exposure progress simultaneously. During the graph progress one chooses the exposure factor one wants to show. By the navigation bars below the graphs one may choose which exposure one wants to show. In Open file is chosen the recordings that are to be shown. In Axes X- and Y-Axis are chosen for the two displays. 8 Juni 2012 Rev.nr. 0 When showing films one may choose Play or Overview. Play shows recording and exposure progress continuously in the same way as when the recording is executed. Overview is more practical to use since one then gets the whole exposure progress and may freely pause, stop or move in the recording (yellow marker) to actual exposure situations. One may choose which exposure one wants to show in Single plot of the actual exposures (those that are marked with green in Multiple plot, marked with red ring in the picture below). 9 Juni 2012 Rev.nr. 0 If one wants to move the yellow marker in the graph, the recording must be stopped by clicking on Pause. Then the yellow marker may be moved forth and back in the graph. Click on Resume (in red ring in the picture below) when the recording is to be started again. If one is not getting the whole graph progress in Single plot, the scale for the Y axes may be wrong. One must then change the Y axes to the correct value and click Refresh (right hand side). The data will then be picked up with new settings on the axis. Before a recording is started, all batteries must be fully charged. Photo: Hydro Aluminium Høyanger 10 Juni 2012 Rev.nr. 0 Fitting of PIMEX receiver and camera to laptop Fit audio/video cable to PIMEX receiver according to colour code. Fit audio/video cable to camera. Photo: Sør-Norge Aluminium Fit both USB cables between PIMEX receiver and laptop (marked A and B). Often it is rational to mark both the computer and the USB cables so that one always uses the same USB inlet at the computer to data and video. This increases the possibility for that the USB inlet finds the correct driver for video and data that again reduces the risk for communication disorder between the receiver and the computer. Photo: Sør-Norge Aluminium 11 Juni 2012 Rev.nr. 0 Start of recording/filming Setup Define which inlets that will be used. By clicking on Setup the software search for the equipment that is connected. Where to save the files? All the files are placed in the catalogue PimexData. Record When all censors are connected to the sender and corresponding channels are defined, the filming may start by clicking on Record. During record the green light is lit. Recording is stopped by Stop. Instead of using Pause and Resume during recording, it is recommended to stop and start a new recording afterwards. Interval for sampling is 400 milliseconds (fixed). That means that for each 0,4 second a new value is registered in the PIMEX software. It is totally 4 censors (4 channels) that may be connected to the PIMEX sender at the same time. The HF monitor needs 2 channels, 1 for HF gas and 1 for humidity. The software has possibilities for 8 channels, but only 4 channels are used in the sender. 12 Juni 2012 Rev.nr. 0 EXAMPLE OF EQUIPMENT Photo: Sør-Norge Aluminium 1. 2. 3. 4. 5. 6. 7. 8. 9. 10. 11. 12. 13. 14. 15. 16. 17. 18. 19. Suitcase to DustTrak. Measuring hose, 0 point calibration and tool to DustTrak. Rucksack to DustTrak and sender (used by the operator). Charger to PIMEX sender. PIMEX sender with cable (for connection of censors). Serv. No. 2010 (example) 7,2 V DC. NB! PIMEX receiver must have same number. DustTrak. Aerosol monitor Model 8530. Batch No. 8530 101714 (example). Charger to DustTrak. Film rack (tripod for stationary filming and monopod for filming when moving). Hard disk (back-up). Handbag to PIMEX PC. PIMEX PC. Dell Latitude E 6510 (SSD-HD). Handbag to PIMEX PC. 2 USB cables connected between PIMEX PC and PIMEX receiver. PIMEX receiver. Serv. No. 2010 (example). NB! PIMEX sender must have same number. PIMEX receiver gets power from PC. Video camera. Canon Legerie HF R17 (example). Audio/video cable is connected between PIMEX receiver and video camera. Extra video battery. Charger to video camera. Network cable. 13 Juni 2012 Rev.nr. 0 CENSORS Follow description in the user manual for each censor. Description and fitting towards PIMEX for some censors is found in appendixes. The files are opened from the appendix list in this document (when clicking on the paper clip in the window the document list is displayed): Appendix 1 – DustTrak I Appendix 2 – DustTrak II Appendix 3 – HF monitor EDIT FILM FOR SHOWING OF SELECTED SECTIONS Check that hardware acceleration is turned off (none). Start the PIMEX2008 software. Click on the Overview button and choose film. Press Pause. Before editing of film place Y–Axis Single plot Y-Min to 0 and YMax to highest shown graph. Set X-Axis Single plot X-Min to desired minimum area. Set X-Max to desired maximum area. Draw the yellow marker to desired start point. Start editing software, here as example by: CAMTASIA RECORDER Start the software Camtasia Recorder. Click the arrow besides the Custom button. Choose Select area to record and mark the desired record area. Click Rec at Camtasia Recorder. Start the PIMEX2008 recording (click Resume) within 4 seconds (countdown in the software). One may now directly edit the film by clicking on Pause both in PIMEX2008 and Camtasia Recorder. Move the yellow marker to desired start and click Resume in both programmes. When desired recording is completed, click Stop. Click Produce, save the film in the catalogue Camtasiavideo with file name describing the working operation. Choose Custom production settings and click next, choose the format WMV (windows media video), click next, click next and click next, next and next, click Complete/Finish. The film will now be prepared. It will take some time. The film is now stored as WMV. Click Complete/Finish. 14 Juni 2012 Rev.nr. 0 FAULT FINDING Fault/symptoms PC/Screen gets black Video window disappears when one uses the video editing software Measuring signals disappear Reason Strong magnetic fields Hardware acceleration is on full Action Move and restart the PC. Deactivate hardware acceleration to none. Loose connections Equipment does not function Black/white picture in PIMEX software Discharged equipment Control all connections. When burst in the signal cable – contact STAMI. Control air hose to DustTrak. Charge after use. Video picture miss at PC or the picture is in grey Error in the software The exposures hang after the video Backlight at LED screen turns of Low battery at the sender PC too near flexible – strong magnetic fields No contact between sender and receiver Optics at the camera fails Discharged sender Sender is burned Sender has charged at 3 ampere Wrong installation of the decimal punctuation mark in PC When starting the PIMEX software the following error: Conversion from string ”154.7496875” to type ’Double’ is not valid. Cutting of graphs in Single plot Cutting of graphs in Single plot Defect RGB cable or bad contact Too strong magnetic field Wrong settings of signal before recording During playback the signals are left out Control whether the cable is properly fitted. If this does not help, change cable. Control whether old recordings may be played back. If yes: retry. If no: reinstall the software at the laptop. Charge sender. Move longer away from the magnetic fields and start the laptop again. Charge sender. This is dependent on type of camera. For some cameras magnetic protection must be fitted. Best to choose camera that can take magnetic fields. Order new and install drives again. Installation in Windows: Settings for region and language Adjust regional settings Number Decimal punctuation mark: choose single stop ’.’ Change settings at the measuring instrument and in Channels before new recording. Wrong setting at Y axis. Change Y axis and click Refresh. 15