1
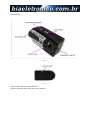
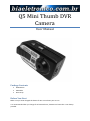
Q5 Mini Thumb DVR Camera User Manual Package Contents DVR Camera USB Cable Wrist strap Before You Start Make sure you have charged the device for 8 or more hours prior to use. It is recommended that you charge for at least 24 hours; however we know this is not always possible. Overview Figure 1 Figure 2 Figure 1 shows the item and its features. Figure 2 shows the back of the item and its features. Controls Charging/Syncing Port Use the USB Cable provided to Sync and Charge this item. Please note: You will only be able to Sync if an SD Card is in the item. When charging the Indicator will flash Red, when the item is fully charged the indicator will stay solid Red. Mode Button These buttons enable you to switch between the Camera, Video and Audio Modes depending on which you need. By pressing this button you can scroll between the modes. Each mode is identified by a different light. Photo Mode Press and hold the On/Off Start/Stop Button until the Indicator shows a steady Blue and Red Light. The item is now on. Now Scroll through the Modes by pressing the Mode Button until the Indicator shows a solid Blue light. You are now in the right Mode. Now press the On/Off Start/Stop Button once to commence the function, press it a second time to end it. When you are taking a Photo the light will momentarily go out when it is taking a Picture. Video Mode Press and hold the On/Off Start/Stop Button until the Indicator shows a steady Blue and Red Light. The item is now on. Now Scroll through the Modes by pressing the Mode Button until the Indicator shows a solid Red light. You are now in the right Mode. Now press the On/Off Start/Stop Button once to commence the function, press it a second time to end it. When you are filming the Red light will flash slowly. Audio Mode Press and hold the On/Off Start/Stop Button until the Indicator shows a steady Blue and Red Light. The item is now on. Now Scroll through the Modes by pressing the Mode Button until the Indicator shows a solid Blue and Red light. You are now in the right Mode. Now press the On/Off Start/Stop Button once to commence the function, press it a second time to end it. When you are recording Audio the light will flash Blue. Motion Detection Video Mode Press and hold the On/Off Start/Stop Button until the Indicator shows a steady Blue and Red Light. The item is now on. Now Scroll through the Modes by pressing the Mode Button until the Indicator shows a solid Blue light with a flashing Red light next to it. This has started Motion Detection mode. When the Light is flashing Red with the solid Blue light next to it the Camera is filming, it will continue to film if Motion is detected.