1
B23Q8YA-G-02-D
PRIMEPOWER
Hardware Platform Guide: Operation
for Solaris™ 10 Operating System
-- Start Here--
Preface
Solaris™ Operating System is described as Solaris in this manual.
Purpose
This manual provides notes necessary after installing the Solaris 10 on PRIMEPOWER.
Intended Readers
This manual is intended for system administrators who install Solaris™ Operating System (Solaris) and
operate it.
Readers are expected to have the basic knowledge of a system administrator.
Organization
This manual is organized as follows:
z Chapter 1 Notes after the Installation
This chapter describes post-installation notes.
z Chapter 2 Backup and Restore of System Disk (PRIMEPOWER 1/200/250/400/450/600/650/850)
This chapter explains the procedures for backup/restore of the disk (hereafter called, the system disk)
containing the Solaris software.
z Chapter 3 Backup and Restore of System Disk (PRIMEPOWER 800/900/1000/1500/2000/2500)
This chapter explains the procedures for backup/restore of the disk (hereafter called, the system disk)
containing the Solaris software.
z Chapter 4 Secondary LAN port on PRIMEPOWER250/450
This chapter describes how to use the secondary LAN (10/100/1000Mbps) port on PRIMEPOWER
250/450.
z Chapter 5 Precautions
This chapter explains precautions when using Solaris 10.
High Risk Activity
The Customer acknowledges and agrees that the Product is designed, developed and manufactured as
contemplated for general use, including without limitation, general office use, personal use, household use,
and ordinary industrial use, but is not designed, developed and manufactured as contemplated for use
accompanying fatal risks or dangers that, unless extremely high safety is secured, could lead directly to
death, personal injury, severe physical damage or other loss (hereinafter "High Safety Required Use"),
including without limitation, nuclear reaction control in nuclear facility, aircraft flight control, air traffic
control, mass transport control, medical life support system, missile launch control in weapon system. The
Customer, shall not use the Product without securing the sufficient safety required for the High Safety
Required Use. In addition, Fujitsu (or other affiliate's name) shall not be liable against the Customer and/or
any third party for any claims or damages arising in connection with the High Safety Required Use of the
Product.
Trademarks
Sun, Sun Microsystems, the Sun Logo, Solaris and all Solaris based marks and logos are trademarks or
registered trademarks of Sun Microsystems, Inc. in the U.S. and other countries, and are used under license.
Microsystems, Inc. in the United States and other countries.
Java and all Java-based trademarks and logos are trademarks or registered trademarks of Sun Microsystems,
Inc. in the United States and other countries.
Microsoft, MS-DOS and Windows are registered trademarks of Microsoft Corporation in the United States
and/or other countries.
All SPARC trademarks are used under license from SPARC International,Inc. and are trademarks or
registered trademarks of that company in the U.S. and other countries. Products with the SPARC trademark
are based on architecture developed by Sun Microsystems,Inc.
1
All other products, or company names mentioned in this document are claimed as trademark and trade
names by their respective companies.
March, 2005
September
2007
Third
Edition
Notes
z This manual may not be copied by any means without the express written permission
of FUJITSU LIMITED.
z FUJITSU LIMITED reserves the right to make changes to this manual without prior
notice.
All Rights Reserved, Copyright © FUJITSU LIMITED 2005-2007
All Rights Reserved, Copyright © PFU LIMITED 2005-2007
2
Contents
Chapter 1 Notes after the Installation ...................................................................................................................1
1.1
PRIMEPOWER - Specific Notes.....................................................................................................................................1
1.1.1
Modifications of Solaris OS (Patches, PTF, Program Local Fix).............................................................................1
1.1.2
Changing the date and time......................................................................................................................................1
1.1.3
Serial port.................................................................................................................................................................1
1.1.3.1 PRIMEPOWER800/1000/2000............................................................................................................................1
1.1.3.2 PRIMEPOWER900/1500/2500............................................................................................................................1
1.1.4
Gigabit Ethernet port on PRIMEPOWER250/450 ...................................................................................................2
1.1.5
Fibre Channel Cards (PW008FC3, PW008FC2 or GP7B8FC1) ..............................................................................2
1.2
Solaris OS - Notes and Bug Information..........................................................................................................................2
1.2.1
The order of instance numbers of optional cards .....................................................................................................2
1.2.2
Notes on Solaris OS operation .................................................................................................................................3
1.2.3
Notes on PCI cards...................................................................................................................................................4
1.2.4
Setting Up PRIMEPOWER MIB Information .........................................................................................................5
1.2.5
Other notes and bug information..............................................................................................................................6
1.3
Unsupported Features ......................................................................................................................................................6
Chapter 2 Backup and Restore of System Disk (PRIMEPOWER1/200/250/400/450/600/650/850) .....................7
2.1
Types of Backup Procedures............................................................................................................................................7
2.2
Backup and Restore of File System Unit .........................................................................................................................8
2.2.1
Backup of File System Unit .....................................................................................................................................8
2.2.2
Restore of File System Unit .....................................................................................................................................9
2.3
Backup and Restore of Disk Unit...................................................................................................................................10
2.3.1
Backup of Disk Unit ..............................................................................................................................................10
2.3.2
Restore of Disk Unit ..............................................................................................................................................10
Chapter 3 Backup and Restore of System Disk (PRIMEPOWER800/900/1000/1500/2000/2500) ..................... 11
3.1
Types of Backup Procedures..........................................................................................................................................11
Chapter 4 Secondary LAN port on PRIMEPOWER250/450 ...............................................................................13
4.1
Outline ...........................................................................................................................................................................13
4.2
Notes..............................................................................................................................................................................13
4.3
How to Set Configuration Information ..........................................................................................................................13
4.3.1
Environment Setting ..............................................................................................................................................13
4.3.1.1 Determining the Client Name of Target Driver..................................................................................................13
4.3.1.2 Defining Hostname ............................................................................................................................................14
4.3.1.3 Defining Netmask Value....................................................................................................................................14
4.3.2
Setting the Operation Mode ...................................................................................................................................14
4.3.2.1 fjgi.conf file........................................................................................................................................................14
4.3.2.1.1 Parameters List ............................................................................................................................................14
4.3.2.1.2 How to Set Parameter ..................................................................................................................................16
4.3.2.1.3 Caution ........................................................................................................................................................16
4.3.2.2 Setting a JumboFrame........................................................................................................................................16
4.3.2.3 To use ndd(1M) Utility ......................................................................................................................................17
4.3.2.4 Changing the setting of FCode...........................................................................................................................20
4.3.2.5 Network Install...................................................................................................................................................21
4.3.2.6 Configuring VLAN interface .............................................................................................................................22
4.3.2.6.1 IEEE 802.1Q TagVLAN .............................................................................................................................22
i
4.3.2.6.2 How to create the VLAN interface ..............................................................................................................23
4.4
Messages........................................................................................................................................................................24
4.5
Using GigabitEthernet on a Cluster System...................................................................................................................26
4.5.1
Support for Cluster System ....................................................................................................................................26
4.5.2
Cluster Environment Setup Procedure ...................................................................................................................27
4.5.3
Notes in Cluster Environment ................................................................................................................................27
Chapter 5 Precautions...........................................................................................................................................28
5.1
Limitations and known bugs for Solaris.........................................................................................................................28
5.2
Specification and incompatibility for Solaris .................................................................................................................37
ii
Chapter 1 Notes after the Installation
This chapter describes the post-installation notes.
1.1
1.1.1
PRIMEPOWER - Specific Notes
Modifications of Solaris OS (Patches, PTF, Program Local
Fix)
Only the modifications (patches, PTF, Program Local Fix, etc.) for PRIMEPOWER provided by FUJITSU
LIMITED can be applied to existing PRIMEPOWER systems running Solaris OS software.
Do not use patches provided by Sun Microsystems, Inc. on the World Wide Web or those provided by other
vendors. Also be careful that you do not apply modifications (patches, PTF, Program Local Fix, etc.)
intended for other systems (GP7000D, etc.) provided by FUJITSU LIMITED.
For information on Solaris OS modifications, contact a FUJITSU systems engineer.
1.1.2
Changing the date and time
PRIMEPOWER 1/200/250/400/450/600/650/850
Use the date command in single user mode if you need to change the date and time for testing purposes.
PRIMEPOWER 800/900/1000/1500/2000/2500
See "System Console Software User's Guide" for information on how to change the date and time.
1.1.3
1.1.3.1
Serial port
PRIMEPOWER800/1000/2000
z All serial ports on the system board are to be used for the System Management Console.
z Do not access the following devices relating to serial ports. Also do not change the setting of
applications using the following device files (such as a port monitor).
/dev/term/a, b, ...
/dev/cua/a, b, ...
/dev/term/fa000, fa001, ...
/dev/cua/fa000, fa001, ...
/dev/se_hdlc
/dev/se_hdlc0, /dev/se_hdlc1, ...
However, devices that are not used as the console path may be used, but only for the FJVTS and
SunVTS. The usable default devices for FJVTS and SunVTS are /dev/term/fa003, fa004, ... and
/dev/se_hdlc3, se_hdlc4, ...
1.1.3.2
PRIMEPOWER900/1500/2500
z The device name of the serial port will be as follows:
1
/dev/term/fa000, fa001, ...
/dev/cua/fa000, fa001, ...
/dev/se_hdlc0, se_hdlc1, ...
Because the number of this device name is allocated from the instance number of driver, this number
does not necessarily correspond to the slot number of the system board.
z Do not change the setting of port monitor, etc. to the serial port for the console. Because the physical
device of the serial port used for the console is the physical device path which are linked from logical
device under /dev/fjse directory, the logical devices under /dev/term and /dev/cua, and /dev/se_hdlcX
files, which link to above-mentioned physical device path, are devices used for the console.
z Other than the serial port for consoles, five serial ports can be used by the user. However, keep in
mind that it is necessary to stop beforehand the application that is using the serial port of the system
board or the PCI/disk BOX in order to disconnect the system board by Dynamic Reconfiguration.
z Only the devices that are not used as a console path, can be used for FJVTS and SunVTS.
1.1.4
Gigabit Ethernet port on PRIMEPOWER250/450
PRIMEPOWER250/450 has a Gigabit Ethernet port as standard equipment. For how to use the Gigabit
Ethernet port, refer to "Chapter 4 Secondary LAN port on PRIMEPOWER250/450."
1.1.5
Fibre Channel Cards (PW008FC3, PW008FC2 or GP7B8FC1)
Install the following versions of drivers:
FUJITSU PCI Fibre Channel 3.0 or later.
To install the driver, use the installer in the driver CD-ROM that is provided with the Fibre Channel Card. If
you don't have the driver CD-ROM mentioned above, download it from the following page.
http://www.fujitsu.com/support/computing/server/unix/driver/
Install the driver again after an update of Solaris 10.
For more detailed information, refer to "FUJITSU PCI Fibre Channel 3.0 Installation Guide" that is
provided with the driver CD-ROM or the page described above.
1.2
1.2.1
Solaris OS - Notes and Bug Information
The order of instance numbers of optional cards
If an additional option card is installed, the instance number on the card might be assigned out of order.
Additional installation by Dynamic Reconfiguration or PCI Hot-plug is also applicable but replacement by
Dynamic Reconfiguration or PCI Hot plug is not applicable.
If you need to assign the instance numbers orderly, the following setting is needed before installing an
additional option card.
1.
2.
Set the following in /etc/system.
set mtc_off=1
Reboot the system.
After the above setting, it may take longer time to reboot the system. If that affects the system, delete the
line and reboot the system.
2
1.2.2
Notes on Solaris OS operation
CD-ROM/DVD-ROM in UNIX file system (UFS) format
Do not use any CD-ROM/DVD-ROM in UNIX file system (UFS) format that is not produced for the Solaris
OS.
Even if the file system in such a CD-ROM / DVD-ROM is in UFS format, it's file construction may differ
from that of a Solaris system. If such a CD-ROM / DVD-ROM is used, serious problems, including a
system crash may occur.
Enter the OpenBoot environment
The following operations on a running system will enforce the system to move to Open Boot mode, which
might damage data.
z Connecting / Disconnecting the keyboard cable to / from the system.
z Sending a Break signal from the console terminal connected to the serial port.
z Turning on/off the power to the unit connected to the serial port of the system.
(This power on/off is treated as a Break signal.)
To prevent a system from entering the Open Boot mode, do the following:
PRIMEPOWER 200/400/600
z Set the MODE switch on the operation panel of the system to "SECURE" mode.
z Set OBP command (PROM command) to disable a Break signal. For more detailed information, refer
to "PRIMEPOWER USER'S MANUAL."
PRIMEPOWER 250/450/650/850/800/900/1000/1500/2000/2500
z Set the MODE switch on the operation panel of the system to "LOCK" mode.
z Set OBP command (PROM command) to disable a Break signal. For more detailed information, refer
to "PRIMEPOWER USER'S MANUAL."
PRIMEPOWER1
z Change the default keyboard abort sequence effect with kbd commnd.
# /usr/bin/kbd -a disable <Return>
z Change the /etc/default/kbd setting
1.
Edit the /etc/default/kbd as follows:
KEYBOARD_ABORT=disable
2.
Set keyboard defaults from the /etc/default/kbd file.
# kbd –i <Return>
z Set OBP command (PROM command) to disable a Break signal. For more detailed information, refer
to "PRIMEPOWER USER'S MANUAL."
Single-user mode
If you enter the system in single-user mode with the following commands, the run-level of the init process
displayed by the who -r command may be displayed incorrectly. In this case, the commands pkgadd,
patchadd, etc. may terminate.
/sbin/init s
/sbin/init S
/usr/sbin/shutdown [-y] [-gN] -is (N: numeral)
/usr/sbin/shutdown [-y] [-gN] -iS (N: numeral)
To avoid this problem follow the steps below.
1.
Enter the OpenBoot environment.
# /usr/sbin/shutdown -y -g0 -i0 <Return>
2.
When the ok prompt is displayed, boot the system with the following command.
ok boot -s <Return>
Transport protocols for NFS version 2/3
3
Although NFS version 2/3 can use either TCP or UDP as the transport protocol, it is recommended to use
TCP. If UDP is used on a poor quality network(in which packet loss occurs or transfer takes too long time
etc.), overall performance, stability and / or security may be degraded and further problems may occur.
Special NFS client settings may be necessary to use TCP for NFS. For more detailed information, refer to
the NFS client manual.
From Solaris 2.6 or later, NFS clients can be made to use the TCP protocol, by specifying "proto=tcp" as the
mount option. If the protocol to be used is not specified, mounting NFS using TCP is first attempted, If that
fails, mounting NFS using UDP is attempted.
How to eject a diskette
When you want to eject a diskette, follow the instructions described below. If not followed, data may be
damaged.
For more detailed information, refer to "Managing Removable Media" in "System Administration Guide."
3.
Make sure the diskette is not being used.
4.
Run the following command.
# eject floppy0 <Return>
5.
6.
Make sure the Access LED has turned off.
Press the Eject button on the diskette drive unit, then eject the diskette.
WARNING messages of se driver
When a serial port receives a lot of data, such as when a large amount of text is pasted on a console screen
connected to a serial port, the console message "seN: Buffer overrun" (N means an instance number of se
driver) will be displayed and the data will be lost.
This is because the user process cannot read data fast enough.
The size of data pasted on a console screen should be 1024 bytes or less at a time.
Speed of reception depends on each user process.
1.2.3
Notes on PCI cards
How to install PCI cards
To install a new PCI card, follow the steps described below.
Also, when you remove the PCI card or change the slot, do the following steps.
For PRIMEPOWER 1
1.
Enter the OpenBoot environment.
# /usr/sbin/shutdown -y -g0 -i0 <Return>
2.
Enter the following command to stop the system in the OpenBoot environment at the next system
boot.
ok setenv auto-boot? false <Return>
3.
Turn off the power to the system.
ok power-off <Return>
4.
Install the PCI card to the system. (For more detailed information, refer to the manual attached to
the card.)
5.
After you turn on the power, the OK prompt will be displayed. Boot the system with the following
command.
ok setenv auto-boot? true <Return>
ok boot -r <Return>
Some of the PCI cards need driver software. If that is the case, use the following steps:
6.
7.
4
Add driver software. (For more detailed information, refer to the manual attached to the card.)
Enter the Open Boot Environment. Some of the manuals attached to the card may instruct "Reboot
your machine", which means to enter the Open Boot Environment with the following command.
# /usr/sbin/shutdown -y -g0 -i0 <Return>
8.
When the OK prompt is displayed, boot the system with the following command.
ok boot -r <Return>
For PRIMEPOWER 200/400/600
1.
If the system is running, turn off the power to the system with the following command:
# /usr/sbin/shutdown -y -g0 -i5 <Return>
2.
Install the PCI card to the system. (For more detailed information, refer to the manual attached to
the card.)
3.
Set the MODE switch on the operation panel to "MANUAL" mode and turn on the power.
4.
After you turn on the power, the OK prompt will be displayed. Boot the system with the following
command.
ok boot -r <Return>
5.
Return the MODE switch on the operation panel to "SECURE" mode.
Some of the PCI cards need driver software. If that is the case, use the following steps:
6.
7.
Add driver software. (For more detailed information, refer to the manual attached to the card.)
Enter the Open Boot Environment. Some of the manuals attached to the card may instruct "Reboot
your machine", which means to enter the Open Boot Environment with the following command.
# /usr/sbin/shutdown -y -g0 -i0 <Return>
8.
When the OK prompt is displayed, boot the system with the following command.
ok boot -r <Return>
For PRIMEPOWER 250/450/650/850/800/900/1000/1500/2000/2500
1.
If the system is running, turn off the power to the system with the following command:
# /usr/sbin/shutdown -y -g0 -i5 <Return>
2.
Install the PCI card to the system. (For more detailed information, refer to the manual attached to
the card.)
3.
Set the MODE switch on the operation panel to "UNLOCK" mode and turn on the power.
4.
After you turn on the power, the OK prompt will be displayed. Boot the system with the following
command.
ok boot -r <Return>
5.
Return the MODE switch on the operation panel to "LOCK" mode.
Some of the PCI cards need driver software. If that is the case, use the following steps:
6.
7.
Add driver software. (For more detailed information, refer to the manual attached to the card.)
Enter the Open Boot Environment. Some of the manuals attached to the card may instruct "Reboot
your machine", which means to enter the Open Boot Environment with the following command.
# /usr/sbin/shutdown -y -g0 -i0 <Return>
8.
When the OK prompt is displayed, boot the system with the following command.
ok boot -r <Return>
On PRIMEPOWER450 (Rackmount Type(7U))/900/1500 (with SPARC64 V)/2500, you are able to use PCI
Hot Plug function, which is included in Enhanced Support Facility. If you use PCI Hot Plug function, refer
to "PCI Hot Plug User’s Guide" in Enhanced Support Facility.
1.2.4
Setting Up PRIMEPOWER MIB Information
If you introduce the network management software and want the machine to be monitored using its proper
model name, you have to set up the MIB information as described below.
1.
Log in as a superuser.
5
2.
Stop the Solstice Enterprise Agent (SEA) daemon.
# /etc/init.d/init.snmpdx stop <Return>
3.
Check the model name with the following command. Note the displayed model name.
# /usr/sbin/FJSVmadm/hrdconf | head -1 <Return>
Example:
PRIMEPOWER400
4.
Modify the /etc/snmp/conf/snmp.conf file.
Before modification:
sysdescr Sun SNMP Agent,
After modification:
sysdescr Fujitsu SNMP Agent, model_name
Write the model name displayed in the step 3, in the place of “model_name”.
You can customize the above sysdecr string the way you like. But some network management software
refers to "model-name", please check whether SNMP is running on the system.
5.
1.2.5
Restart the Solstice Enterprise Agent (SEA) daemon.
# /etc/init.d/init.snmpdx start<Return>
Other notes and bug information
For other notes and bug information during the system operation, refer to the following document:
z "Solaris 10 Release Notes "
1.3
Unsupported Features
The following features described in Solaris OS manuals are not supported.
Table 1.1 Unsupported features
No.
Description
Alternative method
Reference manual
1
The Suspend-Resume features,
cannot be used with
PRIMEPOWER.
None
"Solaris Common Desktop
Environment: User's Guide" in
"Solaris 10 Common Desktop
Environment User Collection"
Note:
There are some differences between the power management system provided by Solaris OS and Auto
Power Control System provided by Enhanced Support Facility. In the Auto Power Control System, you
can set AutoShutdown and AutoWakeup features on PRIMEPOWER. However, Auto Power Control
System is not supported with PRIMEPOWER1.
6
Chapter 2 Backup and Restore of System Disk
(PRIMEPOWER1/200/250/400/450/600/65
0/850)
This chapter explains the procedures to backup/restore the disk (hereafter called, the system disk) containing
the Solaris OS software.
2.1
Types of Backup Procedures
Backup of the system disk requires that the disk and slices to be backed up not be in use. The system disk
contains file systems (such as the root (/) file system) that cannot be unmounted. In backing up the system
disk, special procedures are required.
The following are some of the typical ways to back up the Solaris OS disk.
Understanding them will help you choose the appropriate method to back up your system disk properly.
For more detailed information about the procedure mentioned in a., see each subsection from "2.2 Backup
and Restore of File System Unit."
For more detailed information about the procedure mentioned in d., see each subsection from "2.3 Backup
and Restore of Disk Unit."
a.
To back up a file system unit, use the ufsdump(1M) command after booting in single-user mode.
If you are restoring, use the ufsrestore(1M) command after booting from the Solaris OS CD/DVD to
restore the file system unit.
The file system that will be backed up is only the ufs file system.
Disk partition information such as the size of each file system will not be backed up. You must
record this information separately.
The ufsdump(1M) command backs up a file system divided into file units so it is possible to
restore to a disk having a different file system size. If only a limited amount of space has been
used in the file system, this may back up into a space smaller than the size of the file system.
When backing up using the ufsdump(1M) command, it is possible to only restore selected files.
b.
To back up a file system unit, use the ufsdump(1M) command after booting from the Solaris OS
CD/DVD.
If you are restoring, use the ufsrestore(1M) command after booting from the Solaris OS CD/DVD to
restore the file system unit.
The file system that will be backed up is only the ufs file system.
Disk partition information such as the size of each file system will not be backed up. Therefore,
you must record this information separately.
The ufsdump(1M) command backs up the file system divided into file units, so it is possible to
restore to a disk having a different file system size. If only a limited amount of space has been
used in the file system, this may back up into a space smaller than the size of the file system.
When backing up using the ufsdump(1M) command, it is possible to only restore selected files.
c.
To back up a slice unit, use the dd(1M) command after booting from the Solaris OS CD/DVD.
7
If you are restoring, use the dd(1M) command after booting from the Solaris OS CD/DVD to
restore the slice unit.
If you back up slice 0, it will only be possible to restore to a disk having the same physical
properties (disk space, number of cylinders) as the original.
Disk partition information such as the size of each slice will not be backed up. You must record
this information separately.
d.
To back up a disk unit, use the dd(1M) command after booting from the Solaris OS CD/DVD.
If you are restoring, use the dd(1M) command after booting from the Solaris OS CD/DVD, to
restore the disk unit.
Because this procedure backs up the disk unit, it is only possible to restore to a disk having the
same physical properties (disk space, number of cylinders) as the original.
Depending on the tape device, you might have to observe some precautions when backing up or restoring.
Consult the manual of the tape device before such actions.
It is recommended that you select the SCSI device having the target ID 0 for Solaris OS installation. In this
case, the device name of the system disk will be "c0t0d0" obtained from the controller number (0), target ID
(0), and LUN number (0). If you install Solaris OS on a disk, having a controller number other than 0, the
controller number may change later depending on whether booting took place from a CD/DVD or a hard
disk. Thus when referring to disk device, check that it's name haven't changed due to the reason described
above.
If you apply the optional software that contains modules that run as part of the driver and file system of the
system disk, carefully follow the instructions and notes described in the manuals supplied with each
software option.
For example, if you configure disk mirroring using PRIMECLUSTER GDS, you must select the backup
procedures mentioned in b. In addition, if the system disk contains a file system other than a ufs file system
such as PRIMECLUSTER GFS, you must select the backup procedures using the backup command
provided in the file system or the dd(1M) command.
2.2
Backup and Restore of File System Unit
The following describes how to back up the file system unit using the ufsdump(1M) command. "Solaris
System Administration Guide" also describes the following procedures.
Note that disk partition information such as the size of each slice will not be backed up. Therefore, you must
record the information separately using the prtvtoc(1M) or format(1M) commands.
# prtvtoc XXXX <Return>
or
# format XXXX <Return>
format> partition
partition> print
The "XXXX" in the above example is the character device name of the target disk. Use slice 2 of the disk,
like :
/dev/rdsk/c0t0d0s2.
2.2.1
Backup of File System Unit
In single-user mode use the following procedures to back-up each file system. After backing up, reboot the
system.
1.
Boot the system in single-user mode.
8
ok boot -s <Return>
2.
2.2.2
Backup the file system with the ufsdump(1M) command.
Example: Backup to the "/dev/rmt/0."
# ufsdump 0ucf /dev/rmt/0 / <Return>
Restore of File System Unit
When restoring the file system unit, the Solaris OS is booted from the Solaris 10 CD1 or Solaris 10 DVD.
After booting Solaris OS, mount the disk to be restored temporarily, and then restore the file system unit.
Follow the procedures below to restore each file system. After restoring, reboot the system. If using a new
disk or a disk previously used for other purposes, create a boot block after creating disk slices and a disk
label with the format (1M) command, before starting the restoration process.
If optional software like PRIMEPOWER GDS, which runs as a part of the kernel is installed in the system,
extra care should be taken as the Solaris CD/DVD does not contain these modules. In such a case, consult
the manual of the respective optional software.
1.
Boot the Solaris OS from the CD/DVD in single-user mode.
ok boot cdrom -s <Return>
2.
If you use a new disk or a disk previously used for other purposes, create a disk slices and a disk
level with the format(1M) command.
# format <Return>
For information on how to create a disk slice and a disk level using the format(1M) command, see the
manuals.
Create a boot block with the installboot(1M) command.
# installboot /usr/platform/`uname -i`/lib/fs/ufs/bootblk XXXX <Return>
For information on how to create a boot block using the installboot(1M) command, see the manuals.
The "XXXX" in the above example is the character device name of the target disk. Use slice 0 of the
disk, like : /dev/rdsk/c0t0d0s0.
3.
Create a new file system with the newfs(1M) command.
# newfs XXXX <Return>
The "XXXX" in the above example is the character device name of the target disk, like :
/dev/rdsk/c0t0d0s0.
4.
Mount the file system with the mount(1M) command.
# mount -F ufs YYYY /mnt <Return>
5.
The "YYYY" in the above example is the block device name of the target disk, like : /dev/dsk/c0t0d0s0.
Change to the mounted directory.
# cd /mnt <Return>
6.
Restore the file system with the ufsrestore(1M) command.
Example: Restore from the "/dev/rmt/0."
# ufsrestore rvf /dev/rmt/0 <Return>
7.
Remove the restoresymtable file created by the ufsrestore(1M) command.
# rm restoresymtable <Return>
8.
Change the directory to the root (/), and unmount the file system.
# cd / <Return>
# umount /mnt <Return>
9.
Check the integrity of the file system with fsck(1M) command.
# fsck XXXX <Return>
The "XXXX" in the above example is the character device name of the target disk, like :
9
/dev/rdsk/c0t0d0s0.
2.3
Backup and Restore of Disk Unit
When backing up a disk unit, use the dd(1M) command. The following describes how to back up a disk unit
to a tape device using the dd(1M) command. The backup records physical properties such as disk space and
a number of cylinders, so it is only possible to restore to a disk having the same physical properties. The
prtvtoc(1M) command displays the physical properties as " Dimensions."
# prtvtoc XXXX <Return>
Specify the slice 2 of character special disk (/dev/rdsk/...) to be backed up such as "/dev/rdsk/c0t0d0s2"
with the format(1M) command.
2.3.1
Backup of Disk Unit
In the backup of a disk unit, the Solaris OS is booted from the Solaris 10 CD1 or Solaris 10 DVD. After
backing up, reboot the system.
1.
Boot the Solaris OS from the CD in single-user mode.
ok boot cdrom -s <Return>
2.
Back up the disk unit with the dd(1M) command.
Example: Backup to the "/dev/rmt/0."
# dd if=XXXX of=/dev/rmt/0 bs=64k <Return>
Specify the character special disk name (/dev/rdsk/c0t0d0s2) to be backed up such as "/dev/rdsk/..." with
the dd(1M) command. In this case, you must specify the "s2" as the entire disk.
2.3.2
Restore of Disk Unit
In the restore of a disk unit, the Solaris OS is booted from the Solaris 10 CD1 or Solaris 10 DVD. After
restoring, reboot the system.
1.
Boot the Solaris OS from the CD in single-user mode.
ok boot cdrom -s <Return>
2.
Restore the disk unit with the dd(1M) command.
Example: Restore from the "/dev/rmt/0."
# dd if=/dev/rmt/0 of=XXXX bs=64k <Return>
Specify the character special disk name (/dev/rdsk/c0t0d0s2) to be backed up such as "/dev/rdsk/..." with
the dd(1M) command. In this case, you must specify the "s2" as the entire disk.
10
Chapter 3 Backup and Restore of System Disk
(PRIMEPOWER800/900/1000/1500/2000/2
500)
This chapter explains the procedures to backup/restore the disk (hereafter called, the system disk) containing
the Solaris OS software.
3.1
Types of Backup Procedures
Backup of the system disk requires that the disk and slices being backed up not be in use. The system disk
contains file systems (such as the root (/) file system) that cannot be dismounted. In backing up the system
disk, the special procedures are required.
The following are some of the typical ways to back up a Solaris OS system disk. Understanding them will
help you choose the appropriate method to back up your system disk properly.
For detailed information about the backup procedures mentioned in b. and d., see " System Console
Software User's Guide."
a.
To back up a file system unit, use the ufsdump(1M) command after booting in single-user mode.
If you are restoring, use the ufsrestore(1M) command after booting from the Solaris OS CD/DVD to
restore the file system unit.
The file system that will be backed up is only the ufs file system.
Disk partition information such as the size of each file system will not be backed up. You must
record the information separately.
The ufsdump(1M) command backs up the file system divided into the file unit, so it is possible
to restore to a disk having a different file system size. If a limited amount of space has been used
in the file system, this may back up into a space smaller than the size of the file system itself.
When backing up using the ufsdump(1M) command, it is possible to restore only the file that
you select.
b.
To back up a file system unit, use the ufsdump(1M) command after booting from the Solaris OS
CD/DVD.
If you are restoring, use the ufsrestore(1M) command after booting from the Solaris OS CD/DVD to
restore the file system unit.
The file system that will be backed up is only the ufs file system.
Disk partition information such as the size of each file system will not be backed up. You must
record the information separately.
The ufsdump(1M) command backs up the file system divided into the file unit, so it is possible
to restore to a disk having a different file system size. If limited amount of space has been used
in the file system, this may back up into a space smaller than the size of the file system. In the
backup using the ufsdump(1M) command, it is possible to restore only the file that you select.
c.
To back up a slice unit, use the dd(1M) command after booting from the Solaris OS CD/DVD.
If you are restoring, use the dd(1M) command after booting from the Solaris OS CD/DVD to
11
restore the slice unit.
If you back up slice 0, it will only be possible to restore to a disk having the same physical
properties (such as disk space and a number of cylinders) as the original.
Disk partition information such as the size of each slice will not be backed up. You must record
the information separately.
-
d.
To back up the disk unit, use the dd(1M) command after booting from the Solaris OS CD/DVD.
If you are restoring, use the dd(1M) command after booting from the Solaris OS CD/DVD to
restore the disk unit.
The procedure divides the disk unit for back up, so it is only possible to restore to a disk having
the same physical properties (such as disk space and a number of cylinders) as the original.
It is recommended that you select the SCSI device with target ID 1 for Solaris OS installation. Before
selecting the disk to install Solaris OS, make sure it is connected to the SCSI adapter plugged into the PCI
slot of PCI0B. In this case, the device name of the system disk will be "c0t1d0" (obtained from the
controller number (0), target ID (1), and LUN number (0)). If you install Solaris OS to other than the disk
having the device name "c0t1d0", (especially, a disk having the controller number other than 0) take care to
carefully obtain the correct device name.
If applying the optional software that runs as part of the driver and file system from the system disk,
carefully follow the instructions and notes described in the manual of each option. For example, if you
configure disk mirroring using PRIMECLUSTER GDS, you must select the backup procedures described in
a. above, because the PRIMECLUSTER GDS driver does not exist in the CD/DVD files. In addition, if the
system disk contains a file system other than the ufs file system such as PRIMECLUSTER GFS, select the
backup procedures using the backup command provided in the file system or the dd(1M) command.
12
Chapter 4 Secondary LAN port on
PRIMEPOWER250/450
This chapter describes how to use the secondary LAN (10/100/1000Mbps) port on PRIMEPOWER250/450.
4.1
Outline
The secondary LAN port on PRIMEPOWER250/450 is controlled by FUJITSU PCI Gigabit Ethernet
Driver (Interface name is “fjgi”) included in Solaris 10.
4.2
Notes
z When using 1000 Mbps communication, be sure to set Autonegation to 'on'.
z If using the PCI card (PW008GE4/PW008GE5/PW008QG1), please refer to the User’s guide attached
with the PCI card.
4.3
How to Set Configuration Information
This section describes required setting to use a fjgi interface.
4.3.1
Environment Setting
This section describes how to edit files required to build environment.
4.3.1.1
Determining the Client Name of Target Driver
1.
To use the secondary LAN port as an IPv4 interface:
To allocate the IP address or hostname to the fjgi interface, edit /etc/hostname.fjgi* (* is an numerical
value) file. About netmask value, please see "4.3.1.3 Defining Netmask Value" .
Example /etc/hostname.fjgi*:
Define the unique hostname:
giga-v4
or, define the IP address:
192.168.150.1
Note: If you defined the hostname in hostname.fjgi* file, see the section "4.3.1.2 Defining Hostname "
for detailed information.
2.
To use the secondary LAN port as an IPv6 interface
To allocate the IP address and prefix to the fjgi interface, edit /etc/hostname6.fjgi* (* is an numerical
value) file.
13
Example /etc/hostname6.fjgi*:
Define the unique hostname (This sample named giga-v6):
addif giga-v6/120 up
Note: If you defined the hostname in hostname.fjgi* file, see the section "4.3.1.2 Defining Hostname"
for detailed information.
3.
To use the GigabitEthernet as an VLAN interface:
See "4.3.2.6 Configuring VLAN interface", and after defining VLAN name, proceed with above 1 or 2
procedure.
4.3.1.2
Defining Hostname
1.
Defining an IP address with a unique hostname.
To use secondary LAN port as an IPv4 interface:
Edit IPv4 address and hostname into the /etc/hosts file.
Example /etc/hosts file:
# IP Address
Hostname
190.168.150.1
giga-v4
2.
To use secondary LAN port as an IPv6 interface:
Edit IPv6 address and hostname into the /etc/inet/ipnodes file.
Example /etc/inet/ipnodes file:
# IP Address
Hostname
fe80::2e0:ff:fea6:2222 giga-v6
4.3.1.3
Defining Netmask Value
To use secondary LAN port as an IPv4 interface, define a netmask value with the IP address into
/etc/netmasks file.
Example /etc/netmasks file:
# IP Address
192.168.150.0
4.3.2
netmask
255.255.255.0
Setting the Operation Mode
This section explains how to edit the file or implement a command to change the operation mode. When you
use a secondary LAN port without the default method of automatic setup of speed/duplex/flowcontrol by
autonegotiation, change the operation mode with the procedures described below:
4.3.2.1
fjgi.conf file
When not using the default operation mode described in 4.3.2, you should use the
/platform/sun4us/kernel/drv/fjgi.conf file. The set-up procedure of this file is described below:
4.3.2.1.1
Parameters List
The following table shows the list of the parameters in which setting change is possible.
14
Table 4.1 Parameters List
Parameter
name
Value
Description
fjgi
When using PRIMEPOWER250/450
secondary LAN port, please set
name="fjgi".
FJSV,pgtb
When using PCI card PW008GE5,
please set name="FJSV,pgtb".
FJSV,pgsb
When using PCI card PW008GE4,
please set name="FJSV,pgsb".
parent
Please refer to “4.3.2.1.2 How to Set
Parameter”.
The location of the device node in a
device tree is specified.
unit-address
Please refer to “4.3.2.1.2 How to Set
Parameter”.
The address within a device node is
specified.
AutoNegotiation_A
On (Default)
AutoNegotiation is enabled. (In this
setting, unable to connect to the
remote device of a fixed mode.)
When you use 1000Mbps, please use
in Autonegotiation_A="On" (default)
mode.
Off
AutoNegotiation is disabled. (Fixed
mode)
Auto (Default)
Connect in 1000/100/10Mbps by the
connection partner.(This can be set
when AutoNegotiation_A="On".)
1000
Connect in 1000Mbps.
LinkSpeed_A
DuplexCapabilities_A
FlowControl_A
100
Connect in 100Mbps.
10
Connect in 10Mbps.
Both (Default)
Indicating that both Full-Duplex and
Half-Duplex are being supported.
(This
can
be
set
when
AutoNegotiation_A="On".)
Half
Half-Duplex operation is allowed.
Full
Full-Duplex operation is allowed.
Auto (Default)
A flow control is performed according
to a setup of partner equipment.
Rem
Only the flow control from the remote
machine is allowed. The flow control
to the remote machine is not allowed.
LocSend
Only the flow control from the main
unit is allowed. The flow control from
the remote machine is not allowed.
None
Flow control is disabled.
15
Parameter
Role_A
4.3.2.1.2
Value
Auto (Default)
Description
Auto select Master or Slave by the
partner. (This can be set when
AutoNegotiation_A= On.)
Master
Communicate by Master.
Slave
Communicate by Slave.
How to Set Parameter
The method of setting up of each parameter of the secondary LAN port (FJSV,pwga) shown in Table 4.1 is
explained. If using PCI card (PW008GE4/PW008GE5/PW008QG1), please refer to the User’s guide
attached with PCI card.
1.
Search /etc/path_to_inst file for a fjgi interface.
# grep fjgi /etc/path_to_inst <Return>
"/pci@83,4000/FJSV,pwga@1" 0 "fjgi"
2.
The interface-related parameters should be written in the /platform/sun4us/kernel/drv/fjgi.conf file.
-
Example: 1000Mbps Full-Duplex is set.
name="fjgi" parent="/pci@83,4000" unit-address="1" AutoNegotiation_A="On"
LinkSpeed=”100” DuplexCapbilities_A="Full" FlowControl_A="None";
name:
parent:
In the above example, the driver name is "fjgi".
The left-hand portion of the pathname, containing the words '/FJSV,gwga@' in
/etc/path_to_inst, is to be added here.
In this example, parent value is "/pci@83,4000".
unit-address: Please refer to the /etc/path_to_inst, and write the number (right number of
"/FJSV,pwga@..". In this example, unit-address value is "1".
3.
4.3.2.1.3
After 2, the fjgi.conf setting is reflected by reboot.
# /usr/sbin/shutdown -i6 -y -g0 <Return>
Caution
-
4.3.2.2
Setting by fjgi.conf is necessary only when autonegation is not used for speed/duplex/flow or
connecting partner cannot support autonegotiation.
Since a setup the operation mode by the fjgi.conf file becomes effective per physical interface,
when the VLAN interface is being used, a VLAN interface is also changed simultaneously.
Setting a JumboFrame
Use of JumboFrame makes it possible to expand the TCP/IP MTU size from 1500 to 9000. As the
per-packet transmission size is expanded, the number of packets processed becomes fewer and thus the CPU
load is reduced.
The procedure of setting JumboFrame is show below.
a. Add the following line to /etc/system file.
set fjgi:fjgi_jumbo=1
b.
Create /etc/fjmtu.fjgiX file and write a MTU-size between 1500 to 9000. And reboot, TCP/IP
MTU-size will be set. If you don't create this file, TCP/IP MTU-size will be the default of 9000.
vi /etc/fjmtu.fjgiX
"X" is instance number. Instance number must be the same as /etc/hostname.fjgi* file's *.
Notes
16
-
4.3.2.3
If you set a JumboFrame, it will be unable to transmit and receive the data of IEEE802.3 form.
If you use two or more cards, or VLAN interfaces, enabling JumboFrame function becomes
effective to all cards and all interfaces.
When you perform file transfer by FTP, please set MTU size to less than 8232byte.
Please use Jumbo Frames function only in 1000 Mbps communication. If you use Jumbo Frames in
10 Mbps or 100 Mbps, you won't be able to use the Jumbo Frame function.
To use ndd(1M) Utility
By using the ndd command, mode of operation can be changed dynamically.
Below shows how to reference and set each parameter by ndd command with examples.
Reference:
ndd -get /dev/fjgi 'param'
example) # ndd
-get
(param: each parameter)
/dev/fjgi
Settings:
ndd -set /dev/fjgi 'param' value
value)
example1) # ndd
example2) # ndd
-set
-set
/dev/fjgi
/dev/fjgi
'link_status'
(param: each parameter, value: each
'instance' 2
'adv_autoneg_cap'
0
To reflect the changed setting:
ndd -set /dev/fjgi 'instance' value
(Set the relevant interface instance number.)
ndd -set /dev/fjgi 'adv_autoneg_cap' 0
(Once, turn off the function of AutoNegotiation.)
ndd -set /dev/fjgi 'adv_autoneg_cap' 1
(Then, turn on the function of AutoNegotiation.)
example) In case, to set the setting of fjgi0
# ndd -set /dev/fjgi 'instance' 0
# ndd -set /dev/fjgi 'adv_1000fdx_cap'
# ndd -set /dev/fjgi 'adv_1000hdx_cap'
# ndd -set /dev/fjgi 'adv_100fdx_cap'
# ndd -set /dev/fjgi 'adv_autoneg_cap'
# ndd -set /dev/fjgi 'adv_autoneg_cap'
1000Full => 100Half.
0
0
0
0
1
A list of parameter can be used with ndd command.
Table 4.2 A list of parameters
Parameter
Status
?
Read only
Display parameter list
Meaning
link_status
Read only
0 : Link down
1 : Link up
link_speed
Read only
1000 : 1000Mbps
100 : 100Mbps
10 : 10Mbps
link_mode
Read only
0 : Half Duplex communication
1 : Full Duplex communication
autonego
Read only
0 : Autonegotiation is Off.
1 : Auotnegotiation is On.
17
18
Parameter
Status
Meaning
flow_control
Read only
0 : None (Not doing flow_control)
1 : LocSend (Can transmit pause
frame only)
2 : Rem (Can receive pause frame
only)
3 : Sym (Can receive and transmit
pause frame)
cardtype
Read only
0 : SX(PW008GE4)
1 : T(PRIMEPOWER250/450
secondary LAN port,
PW008GE5/PW008QG1)
instance
Read and write
Instance Number
adv_10fdx_cap
Read and write
Setting of 10Mbps/FullDuplex
0 : Invalid
1 : Valid (Default)
adv_10hdx_cap
Read and write
Setting of 10Mbp/HalfDuplex
0 : Invalid
1 : Valid (Default)
adv_100fdx_cap
Read and write
Setting of 100Mbps/FullDuplex
0 : Invalid
1 : Valid (Default)
adv_100hdx_cap
Read and write
Setting of 100Mbps/HalfDuplex
0 : Invalid
1 : Valid (Default)
adv_1000fdx_cap
Read and write
Setting of 1000Mbps/FullDuplex
0 : Invalid
1 : Valid (Default)
adv_1000hdx_cap
Read and write
Setting of 1000Mbps/HalfDuplex
0 : Invalid
1 : Valid (Default)
adv_pauseTX
Read and write
Setting of transmit pause frame
0 : Invalid
1 : Valid (Default)
adv_pauseRX
Read and write
Setting of receive pause frame
0 : Invalid
1 : Valid (Default)
adv_autoneg_cap
Read and write
Setting of AutoNegotiation
0 : Invalid (Fixed mode)
1 : Valid (Default)
adv_role_cap
Read and write
Setting of Role (Only 1000Mbps)
0 : Slave
1 : Master
2 : Auto (Default)
lp_10fdx_cap
Read only
Setting of link-partner
10Mbps/FullDuplex, when link up
with AutoNegotiation.
0 : Invalid
1 : Valid
Parameter
Status
Meaning
lp_10hdx_cap
Read only
Setting of link-partner
10Mbps/HalfDuplex, when link up
with AutoNegotiation.
0 : Invalid
1 : Valid
lp_100fdx_cap
Read only
Setting of link-partner
100Mbps/FullDuplex, when link up
with AutoNegotiation.
0 : Invalid
1 : Valid
lp_100hdx_cap
Read only
Setting of link-partner
100Mbps/HalfDuplex, when link up
with AutoNegotiation.
0 : Invalid
1 : Valid
lp_1000fdx_cap
Read only
Setting of link-partner
1000Mbps/FullDuplex, when link up
with AutoNegotiation.
0 : Invalid
1 : Valid
lp_1000hdx_cap
Read only
Setting of link-partner
1000Mbps/HalfDuplex, when link up
with AutoNegotiation.
0 : Invalid
1 : Valid
lp_pauseTX
Read only
Setting of link-partner transmit pause
frame, when link up with
AutoNegotiation.
0 : Invalid
1 : Valid
lp_pauseRX
Read only
Setting of link-partner receive pause
frame, when link up with
AutoNegotiation.
0 : Invalid
1 : Valid
lp_autoneg_cap
Read only
Setting of link-partner
AutoNegotiation, when link up with
AutoNegotiation.
0 : Invalid
1 : Valid
role_cap
Read only
The present Role setting, when
1000Mbps.
0 : Slave
1 : Master
jumbo
Read only
0 : JumboFrame function is not used.
1 : JumboFrame function is used.
Notes
-
Because of the specification of ndd utility, if two or more processes execute ndd command for a
fjgi interface at the same time, the value will be invalid.
19
-
-
4.3.2.4
If you execute ndd command repeatedly, fjgi interface performance may drop.
The values of link_speed, link_mode, autonego, flow_control are effective, only when link_status
= 1. If link_status = 0, these values are invalid.
The values of lp_10fdx_cap, lp_10hdx_cap, lp_100fdx_cap, lp_100hdx_cap, lp_1000fdx_cap,
lp_1000hdx_cap, lp_pauseTX, lp_pauseRX, lp_autoneg_cap are effective, only when
communication is done without Autonegation or Autonegation has not been established.
The values set by ndd command are invalid after reboot.
Since a setup of the operation mode by the ndd command becomes effective per physical interface,
when IPv4/IPv6 interface, SNA/FNA interface or the VLAN interface is being used, those are also
changed simultaneously.
Changing the setting of FCode
This section explains how to change the communication mode settings of FCode with examples.
If using PCI card (PW008GE4/PW008GE5/PW008QG1), please refer to the User’s guide attached with PCI
card.
It is needed when don't use autonegotiation for speed/duplex/flowcontrol or connecting partner cannot
support autonegotiation.
[FCode Force mode (Speed Fixed and disable autonegotiation) setting method]
Search for the device path of 'FJSV' or 'pwga' in the OK prompt screen.
Example
ok show-nets <Return>
a) /pci@83,2000/FJSV,pwga@1
b) /pci@1f,4000/network@1,1
q) NO SELECTION
Enter Selection, q to quit:
In this example, a) is the device path of the pwga (secondary LAN port)
With the following command, the device is specified.
ok cd /pci@83,2000/FJSV,pwga@1 <Return>
Implement the following commands, it will change from AutoNegotiation mode to Force mode.
This setting is invalid during OBP (Open Boot Prom). PW008GE4 (1000BASE-SX) can use only 3) speed
setting commands.
1) Role setting commands
slave-mode (slave)
2) Half Duplex setting commands
half-duplex (Half Duplex)
3) Speed setting commands
transfer-speed=100
transfer-speed=10
(Force Speed: 100Mbps)
(Force Speed: 10Mbps)
With the following command, the device setting information is displayed.
ok .prp <Return>
Example: PRIMEPOWER 450
20
ok cd /pci@83,2000/FJSV,pwga@1 <Return>
ok .prp <Return>
role
slave
*1
duplex
half
*2
transfer-speed
0000000a
*3
cabinet-name
Cabinet#0
board-name
Motherboard#1
assigned-addresses 83002810 00000000 00100000 00000000 00010000
82002830 00000000 00110000 00000000 00010000
*1: Appears only when slave-mode is set.
*2: Appears only when half-duplex is set.
*3: Appears only when transfer-speed is set. [10Mbps:0xa, 100Mbps:0x64]
In the default, those *1,*2 and *3 are not appeared.
FCode Change back to default setting (AutoNegotiation mode) method
To return to the default setting after setting Fcode Force mode, do as follows:
On ok prompt screen, implement below command or power-off the system and power-on again. (Implement
only reset command cannot back to default setting.)
ok reset-all <Return>
4.3.2.5
Network Install
The procedure which uses fjgi interface to install the Solaris OS via a network from an installation server is
explained below.
1.
2.
Setup the install server and the clients to install the Solaris OS.
About setup of install server and clients, refer to "Solaris 10 Installation Guide."
In an installation server, execute the command shown below and check the root directory of a client
system. The root directory of a client system is described by the /etc/bootparams file of an
installation server.
# grep CLIENT_NAME /etc/bootparams <Return>
Example
# grep CLIENT_NAME /etc/bootparams
CLIENT_NAME root=SERVER_NAME:/netinstall/Solaris_10/Tools/Boot
install=
In the example, the root directory of this client is set to /netinstall.
CLIENT_NAME is the name of client system.
SERVER_NAME is the name of install server.
Information
When the root directory name is not described by the /etc/bootparams file, please refer to "Solaris 10
Installation Guide."
3.
Check the ok prompt of OpenBootPROM is displayed on the client system.
If OS is booted, please stop a system by the shutdown(1M) command as follows.
# /usr/sbin/shutdown -i0 -g0 -y <Return>
Example
# /usr/sbin/shutdown -i0 -g0 –y
.......
(shutdown messages are displayed)
.......
21
ok
4.
Search the device path to the secondary LAN port with a show-nets command from ok prompt of a
client system.
ok show-nets <Return>
Example
ok show-nets
a) /pci@83,2000/FJSV,pwga@1
b) /pci@1f,4000/FJSV,pgsb@4
q) NO SELECTION
Enter Selection, q to quit:
5.
6.
From ok prompt of a client system, please start a client system using the secondary LAN port.
ok boot /pci@83,2000/FJSV,pwga@1 <Return>
Install the Solaris
4.3.2.6
Configuring VLAN interface
4.3.2.6.1
IEEE 802.1Q TagVLAN
The outline about a VLAN interface and directions required in order to setup VLAN interface are explained.
About IEEE802.1Q TagVLAN
By using VLAN, traffic management of two or more networks by a single physical interface becomes
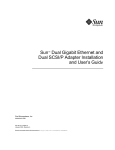
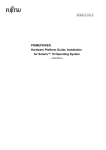
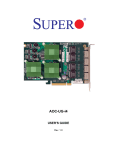
possible. In order to create a VLAN environment, which resembles Figure 4.1 Example of VLAN
environment, a VLAN setup (VLAN ID and Tagged/Untagged) of a switch is required.
22
- No TagVLAN
PRIMEPOWER
fjgi0
- With TagVLAN
PRIMEPOWER
fjgi1
fjgi1000
X.X.1.1
X.X.2.1
Secondary LAN NIC
X.X.1.1
X.X.2.1
secondary LAN
LAN Switch
LAN Switch
To X.X.1.X
network
fjgi2000
To X.X.2.X
To X.X.1.X
To X.X.2.X
network
network
network
(netmask: 255.255.255.0 )
Figure 4.1 Example of VLAN environment
By using VLAN, traffic management of two or more networks by the single physical interface can be done.
In order to create Figure 4.1 Example of VLAN environment, it is needed a VLAN setup (VLAN ID and
Tagged/Untagged) of a switch.
The vlan numbers fjgi interface can offer:
4.3.2.6.2
VLAN ID
1 – 4094 (are available)
Max number of VLAN interfaces
1024 (can be created)
How to create the VLAN interface
-To create the VLAN interface.
By setting the interface number to more than 1000, it becomes possible to distinguish VLAN interface
from physical interface.
How to set:
- In case to create the "VLAN ID = 1" VLAN interface from instance = 0 physical interface.
Please refer to "4.3.1 Environment Setting ", and create the interface named as fjgi1000.
- In case to create the "VLAN ID = 231" VLAN interface from instance = 3 physical interface.
Please refer to "4.3.1 Environment Setting", and create the interface named as fjgi231003.
Low 3 digits of VLAN interface number : physical instance number
Upper digits except low 3 digits of VLAN interface number: VLAN ID(1 4094).
VLAN interface number = VLAN ID * 1000 + physical instance number
Note:
z When connecting with a LAN switch, Tag VLAN needs to be set to a LAN switch. (Please refer to a
LAN switch specification which supported Tag VLAN.)
z Please use a VLAN interface only with TCP/IP protocol. Please do not use it with SNA/FNA and OSI
23
protocol.
z Since PRIMECLUSTER GLS 4.1A20 or previous version do not correspond to a VLAN interface,
please do not use VLAN interface with those. PRIMECLUSTER GLS 4.1A30 or later (only Fast
switching mode or NIC switching mode) can use VLAN interface.
z VLAN function can be used only in Solaris 8, Solaris 9 or Solaris 10.
z In the environment where PRIMECLUSTER has been installed, in case you use a VLAN interface,
please check that the "SMAWdtcp" package has not been installed. When installed, please remove
that package or do not use a VLAN interface.
z A VLAN interface uses about 700Kbyte at MTU size 1514byte or 900Kbyte at MTU size 9014byte of
memory (at the time of no communicating). Therefore, when creating two or more VLAN interfaces
and performing communication, a slowdown may occur due to the shortage of resources depending on
the system configuration.
4.4
Messages
Messages by fjgi driver are listed in the following table.
Table 4.3 Console Messages of the fjgi driver
Message
Cause
Link down was happened.
When Link down not intended is
generated, abnormality of the
transmission line is thought. Please
confirm the specification of the cable
and the switch.
network connection up
using portA
speed:
autonegotiation:
duplex mode:
flowctrl:
( role:
)*1
Connected
There is no problem.
-speed
1000: Transmitting and receiving by
1000Mbps
100: Transmitting and receiving by
100Mbps
10: Transmitting and receiving by
10Mbps
-autonegotiation
on: Set in autonegotiation
off: Not setting in autonegotiation
-duplex mode
full: Transmitting and receiving by
full duplex
half: Transmitting and receiving by
half duplex
-flowctrl
symmetric: Doing Flowcontrol each
other
remote send: Accept Flowcontol only
from
the
other.
local send: Doing only own
Flowcontrol
none: Not doing Flowcontrol.
24
Workaround
network connection down
Message
Cause
Workaround
-role
master: Communicate as Master.
slave: Communicate as Slave.
Illegal value for
[ParameterName].
Error found in the parameter of
definition file (fjgi.conf).
fail to FragCount
Abnormalities were found in message
fragmentation.
Multiple fragments in
descriptor area
Abnormalities were found in message
fragmentation.
Check whether the definition file is
correct.
Please try re-activation of interface. If
this is not a cause, report that to your
authorized dealer.
bind to 802.2 failed
Using protocol was different.
pci_config_setup_failed
PCI configuration space couldn't be
obtained.
Installed physical memory may be
insufficient or hardware is failed. If
memory insufficient is not a cause,
report that to your authorized dealer.
soft state alloc failed.
Driver internal resources cannot be
obtained.
Allocation of descriptor
memory failed
Driver internal resources on DMA
couldn't be allocated.
Installed physical memory may be
insufficient. If this is not a cause,
report them to your authorized dealer.
fail to
ddi_dma_bind_handle
DMA resources couldn't be allocated.
Could not allocate DMA
handle
DMA resources couldn't be allocated.
Could not bind descriptor
memory
fjgiallocthings failed !!
DMA resources couldn't be allocated.
Unable to map adapter
registers.
Mapping of register went wrong.
ddi_get_iblock_cookie-E
RROR
Interrupt
allocated.
Unable to install interrupt
routine.
Unable to install interrupt routine.
Interrupt resources couldn't be
allocated.
ddi_create_minor_node
failed
Creation of a device file went wrong.
ATTACH failed
Driver resources couldn't be allocated.
resources
couldn't
be
OPEN failed: ENOMEM
CLOSE: stream==NULL
Driver resources couldn't be freed.
fjgi_param_register error
The ndd
allocated.
fjgi_board_alloc_mem
failed !!
Driver resources couldn't be allocated.
Error filling TX ring
Transmit
allocated.
status block can't alloced !!
Status information resources couldn't
be allocated.
status block can't alloced
handle!
Status information resources couldn't
be allocated.
status block can't bind
handle!
Status information resources couldn't
be allocated.
parameter
resources
couldn't
couldn't
be
be
25
Message
fjgi_board_init_mem:
Failed to dma_alloc !!
Cause
Workaround
DMA resources cannot be allocated.
statistick block can't
alloced!!
hwmib block can't alloced
handle!
Statistic
information
couldn't be allocated.
resources
hwmib block can't bind
handle!
fjgi_board_init_mem:
Failed to dma alloc2!!
DMA resources cannot be allocated.
Illegal value for
LinkSpeed_A
The value of LinkSpeed_A of a
setting file was wrong.
Please set a right value of
LinkSpeed_A.
The error occurred in initialization.
Hardware failure was occurred. Please
report to your authorized dealer.
Illegal combination of
values AutoNeg and Speed
Auto speed couldn't be set in fixed
mode.
Please set value except Auto in
LinkSpeed_A.
Except for the above
There is the possibility that is Driver
internal bug or Hardware failer.
Report that to your authorized dealer.
fjgi_hw_init:Step 22
failed !!
fjgi_hw_init:Step 23
failed !!
fjgi_hw_init:Step 43
failed !!
*1: This appears only when 1000Mbps is used.
Table 4.4 Machine management report messages
Message
fjgi_device_check:
fjgi_hw_deinit failed !
Meaning
Workaround
The error occurred in initialization of
an adapter.
There is the possibility of hard
abnormalities. Report them to your
authorized dealer.
Acquisition of PCI
space went wrong.
There is the possibility of the shortage
of resources or hard abnormalities.
Please check the empty space of a
memory. Report them to your
authorized dealer.
fjgi_device_check:
fjgi_hw_init failed !
pci_config_setup_failed
4.5
4.5.1
configuration
Using GigabitEthernet on a Cluster System
Support for Cluster System
The contents of support at the time of using by the cluster system, the environmental setting method, etc. are
explained.
GigabitEthernet has the following functions on the cluster system:
z Operation standby mode
26
z
z
z
z
1:n operation standby mode
Mutual standby mode
TCP/IP communication
Using to the cluster interconnect (PRIMECLUSTER). (But, using in a JumboFrame or as
VLAN interface can not be performed)
The support ranges of takeover form are the following ranges.
a.
PRIMECLUSTER
Taking over form
Support
IP
Support
MAC
Not Supported
(Supported V4.1A10 or later)
IP+ MAC
Not Supported
(Supported V4.1A10 or later)
Caution
Using over operation management LAN (LAN used for cluster operation management view) cannot be
supported.
4.5.2
Cluster Environment Setup Procedure
Set up the cluster environment in the same way as for the other LAN driver, follow "Setting up the
Network" in the "PRIMECLUSTER manual". Note that the secondary LAN port (fjgi interface) resource
name is "fjgi".
4.5.3
Notes in Cluster Environment
Please use "PRIMECLUSTER 4.1 or later" for a cluster system to use fjgi interface. If an earlier version of
cluster system is used, fjgi interface cannot be used for private LAN nor for IP address fail-over on public
LAN.
When using fjgi interface as the cluster interconnect, please perform the following command before initial
composition setup.
# ifconfig fjgi* plumb <Return>
* is instance-number
Then, please execute the following command and check that a MTU size of fjgi interface is not 9000byte
(JumboFrame is not set up).
# ifconfig fjgi* <Return>
* is instance-number
GigabitEthernet in a JumboFrame function cannot be used to the cluster interconnect.
GigabitEthernet as VLAN interface cannot be used to the cluster interconnect.
27
Chapter 5 Precautions
This chapter explains necessary precautions.
5.1
Limitations and known bugs for Solaris
This chapter explains limitations and known bugs for Solaris.
Table 5.1 Limitations and known bugs for Solaris
No
Limitations and known bugs
Remarks
Recommended actions
1
2
The following patches are required to be installed in the following order after installation
of Solaris 10. In particular 119254-06 must be installed before 119254-19 or later or
equivalent. If the installation order is not followed problems may occur.
E.g. non-global zone cannot be installed, optional packages and patches cannot be
installed correctly.
1. 120719-01 or later SunOS 5.10: gzip patch
2. 121296-01 or later SunOS 5.10: fgrep Patch
3. 118815-03 or later SunOS 5.10: awk patch
4. 120900-03 or later SunOS 5.10: libzonecfg Patch
5. 121133-02 or later SunOS 5.10: zones library and zones utility patch
6. 119254-06
SunOS 5.10: Install and Patch Utilities Patch
7. 119254-19 or later: SunOS 5.10: Install and Patch Utilities Patch
8. 119317-01 or later: SunOS 5.10: SVr4 Packaging Commands (usr) Patch
9. 119042-02 or later: SunOS 5.10: patch usr/sbin/svccfg
Install these patches as soon as possible after installation of Solaris 10. Also make sure
of the following notes when applying/removing any patches.
z Read README files of the patches before applying them.
z Remove patches in the global zone and not in the non-global zone if needing to
remove patches from the system.
The following patch is required to use the NFS version 4.
NFS version 4 has limitations.
z 119828-04 or later SunOS 5.10: nfssrv Patch
Install the above patches.
3
For Dynamic Reconfiguration (DR) and PCI Hot Plug, the following patches are
required to be installed.
119254-06 or later SunOS 5.10: Install and Patch Utilities Patch
118822-08 or later SunOS 5.10: kernel Patch
913732-01 or later Enhanced Support Facility 2.5: Dynamic configuration core
command patch
4
For CPC (CPU Performance Counter) (cpustat(1M), cputrack(1M), libcpc(3LIB)), the
following patches are required to be installed.
119254-06 or later SunOS 5.10: Install and Patch Utilities Patch
118822-08 or later SunOS 5.10: kernel Patch
Solaris 10
3/05 and
Solaris 10
1/06 only
Solaris 10
3/05 only
Solaris 10
3/05 only
Install the above patches.
Install the above patches.
28
Solaris 10
3/05 only
No
Limitations and known bugs
Remarks
Recommended actions
5
For growfs(1M), the following patch is required to be installed.
120254-02 or later SunOS 5.10: ufs Patch
6
When using any of the following PGX cards and monitors, the display monitor does not
enter standby mode if you haven’t logged on from CDE (Common Desktop
Environment).
z PGX frame buffer (X3660A)
z PGX64 frame buffer (X3768A/A-A)
z Second monitor (X7128A/AA/AJ, X7128B)
To use PGX32 frame buffer (X3668A/A-A, X3668B/B-A/B-B), the following patches
are required to be installed.
119254-06 or later SunOS 5.10: Install and Patch Utilities Patch
119309-03 or later SunOS 5.10: PGX32 Graphics
Install the above patches.
Solaris 10
3/05 and
1/06 only
Solaris 10
3/05 only
The above removes the PGX frame buffer and monitor limitation. When using the PGX,
PGX64 frame buffer and a second monitor, ensure you turn off the power to the display
monitor when the monitor is not in use.
7
Some optional drivers are not yet supported with Solaris 10.
8
/etc/resolv.conf file might not be created when you select “DNS” name service during
OS installation.
Contact your support engineer for details.
Solaris 10
3/05 only
Install the following patch.
z 119252-02 or later SunOS 5.10: System Administration Applications Patch
9
svccfg(1M) might be terminated when editprop subcommand is used.
# svccfg
svc:> select /network/inetd
svc:/network/inetd> editprop
:q
svccfg: unrecognized character "
Use setprop subcommand of svccfg(1M) instead of editprop to modify properties of
service.
10
For Kernel debugger (kmdb(1), mdb(1) -K) on SPARC64 GP, the following patches are
required to be installed.
118822-23 or later SunOS 5.10: kernel Patch
Solaris 10
3/05 only
Install the above patch.
11
Solaris Live Upgrade using lu(1M) and lucreate(1M) might fail with the following error
when creating a mirror disk.
# lucreate -m /:/dev/md/dsk/d10:ufs,mirror –m \
/:/dev/dsk/c1t2d0s0,d11:attach -m/:/dev/dsk/c1t3d0s0,d12:attach -n newBE
Discovering physical storage devices
Discovering logical storage devices
Cross referencing storage devices with boot environment configurations
Determining types of file systems supported
Validating file system requests
ERROR: file system option <mirror> is not valid on this system
ERROR: cannot use file system configuration </:/dev/md/dsk/d10:ufs,mirror>
ERROR: cannot create new boot environment using file systems as configured
ERROR: please review all file system configuration options
ERROR: cannot create new boot environment using options provided
29
No
Limitations and known bugs
Recommended actions
Solaris Live Upgrade is not supported with RAID-1(mirror)
12
Custom Jumpstart installation for mirror volumes using a profile that has filesys keyword
of both original and target disk, will fail and the following error message will be shown
at first boot after the installation.
metattach: host-name: dx: can't attach labeled submirror to an unlabeled mirror
Create a one-way mirror in the profile file. Define a primary submirror Disk as filesys
keyword. Then attach additional submirrors with the finish script to create a two-way
mirror.
z Do not include cylinder 0 of the disks in meta devices.
z The disks which constitute a two-way mirror should have the same specification
and configuration. Examples of a profile file and a finish script are shown as
follows:
1) profile file
# profile keywords
profile values
# -------------------------------:
:
filesys
c0t1d0s4 0:1 unnamed
filesys
mirror:d100 c0t1d0s0 200 /
metadb
c0t1d0s3 size 8192 count 2
2) finish script
#!/bin/sh
:
prtvtoc /dev/rdsk/c0t1d0s2 > /a/c0t1d0.vtoc
fmthard -s /a/c0t1d0.vtoc /dev/rdsk/c0t0d0s2
metadb -a -c 2 c0t0d0s3
metainit d102 1 1 c0t0d0s0
metattach d100 d102
:
13
14
30
in.routed might generate a core dump under the following conditions.
1) No entry of localhost name in /etc/hosts and
2) No /etc/defaultrouter file and
3) Reboot system
Install the following patch.
z 119712-03 or later SunOS 5.10: usr/sbin/in.routed Patch
Package remove using pkgrm(1M) might fail if the package provides SMF services and
the package has been removed and installed repeatedly.
## Removing pathnames in class <manifest>
svc:/system/fjsvmadm-evhandsd:default remains enabled; aborting
pkgrm: ERROR: class action script did not complete successfully
Remarks
No
Limitations and known bugs
Remarks
Recommended actions
Follow these instructions to remove a package. (For example SUNWabc)
1) Re-install the package to system.
# pkgadd SUNWabc
2) Find out path name of SMF service manifest in the package.
# grep SUNWabc /var/sadm/install/contents | \
grep /var/svc/manifest | awk '{ print $1 }' | grep xml
/var/svc/manifest/system/abc.xml
3) Run the following command.
# svccfg -s smf/manifest delpg {$prp_mfst}
$prp_mfst strings must be specified by removing first “/” srting of the manifest path
name with all “/” and ”.” replaced by “_”. Here is an example for
/var/svc/manifest/system/abc.xml at step 2).
4)
15
Remove package.
# pkgrm SUNWabc
"netstat -i" results maybe corrupted when the network interface on the system is
unplumb/plumb by ifconfig(1M), if the system has multiple physical network interfaces.
Solaris 10
3/05 only
This problem is solved by the following patch.
119990-01 or later SunOS 5.10: netstat patch
16
Network instance number on Quad Fast Ethernet and Dual Gigabit Ethernet Card might
be assigned randomly to physical network interfaces when the card is installed after OS
installation.
# grep fjqe /etc/path_to_inst
"/pci@81,4000/pci@2/FJSV,pl4b@4" 0 "fjqe"
"/pci@81,4000/pci@2/FJSV,pl4b@5" 3 "fjqe"
"/pci@81,4000/pci@2/FJSV,pl4b@6" 5 "fjqe"
"/pci@81,4000/pci@2/FJSV,pl4b@7" 7 "fjqe"
"/pci@85,4000/pci@2/ethernet@4" 1 "fjqe"
"/pci@85,4000/pci@2/ethernet@5" 2 "fjqe"
"/pci@85,4000/pci@2/ethernet@6" 4 "fjqe"
"/pci@85,4000/pci@2/ethernet@7" 6 "fjqe"
Solaris 10
3/05 only
Install the following patch before installation of Quad Ethernet Cards or Quad
GigabitEthernet Cards.
118822-23 or later SunOS 5.10: kernel Patch
17
mpstat(1M) takes an extra interval time at the ending of the command when the
command is executed with interval and count.
Solaris 10
3/05 only
This problem is solved by the following patch.
118373-01 or later SunOS 5.10: mpstat Patch
18
pkgadd(1M) -R command might fail when target directory is on a remote NFS server.
This problem is solved by the following patch.
119254-06 or later SunOS 5.10: Install and Patch Utilities Patch
19
Solaris 10
3/05 only
The following message might be displayed if during optional driver package installation
the PCI Card is not installed.
chgrp: //dev/{driver_name}: No such file or directory
There is no impact on the system. The driver and required PCI Card work after a system
reboot.
31
No
Limitations and known bugs
Remarks
Recommended actions
20
"Internet (IP) Address” in “Workstation information” of CDE environment is shown
with a IPv6 unicast address as “::FFFF:***.***.***.***”.
This problem is solved by the following patch.
119284-01 or later CDE 1.6: sdtwsinfo patch
21
During system shutdown, some messages similar to the following might be displayed on
the console.
syslogd: /var/opt/FJSVmadm/evh/evh_pipe: Broken pipe
NFS fsinfo failed for server xxxx: error 5 (RPC: Timed out)
22
ifconfig(1M) displays “Need net number for mask” when the command is executed with
plumb and up option at the same time.
# ifconfig hme0 plumb host netmask + broadcast + up
Need net number for mask
Setting netmask of hme0 to 255.255.255.0
Ignore the message. It has no impact on the system.
Ignore the “Need net number for mask” message. The message will not be displayed
when plumb and up option are specified separately.
# ifconfig hme0 plumb
# ifconfig hme0 host netmask + broadcast + up
Setting netmask of hme0 to 255.255.255.0
23
Solaris Management Console(SMC) 2.1, User Performance (“System Status”->
“Performance” -> “System” -> “Users”) does not show any information and the
following error messages displays on the console.
CIM_ERR_FAILED:
java.lang.UnsupportedClassVersionError:
com/sun/wbem/solarisprovider/srm/Solaris_ActiveUser (Unsupported major.minor
version 49.0)
Use ps(1), prstat(1M) and pgrep(1) to check and report active process statistics instead of
the SMC feature.
24
The following message might be shown during Solaris 10 installation.
application/font/fc-cache:default failed (see 'svcs -x' for details)
25
The following message might be shown during Solaris 10 installation.
/usr/sbin/pmconfig: cannot open "/dev/pm": No such file or directory
26
After Solaris 10 installation is finished, the following messages might be shown at first
boot.
java[16552]: [ID 874347 user.error] libpkcs11: open /var/run/kcfd_door: No such
file or directory
java[16552]: [ID 523743 user.error] libpkcs11:
/usr/lib/security/pkcs11_softtoken.so unexpected failure in ELF signature
verification. System may have been tampered with. Cannot continue parsing
/etc/crypto/pkcs11.conf
Ignore the message. It has no impact on the system.
Ignore the message. It has no impact on the system.
Ignore these messages. They have no impact on the system.
32
Solaris 10
3/05 only
No
Limitations and known bugs
Remarks
Recommended actions
27
There are some differences in behavior of MIB between SNMP agents of SMA and
SEA.
z sysObjectID (MIB to show system device type)
SEA shows the value as “enterprises.42.2.1.1”, however, SMA shows the value as
“netSnmpAgentOIDs.3”.
z snmpEnableAuthenTraps (MIB to show permission of trap of authorization
failure)
SEA shows the value as “enabled(1)”, however, SMA shows the value as
“disabled(2)”.
z ifSpeed (MIB for supported bandwidth speed of the network interface)
The results may be different between SEA and SMA.
z ifType
The results may be different between SEA and SMA.
Use SEA instead of SMA. The following disables SMA and enables only SEA.
1) Stop SMA and rename rc startup script of SMA.
# /etc/init.d/init.sma stop
# mv /etc/rc3.d/S82initsma /etc/rc3.d/_S82initsma
2) Rename /etc/rc3.d/S75seaport
# mv /etc/rc3.d/S75seaport /etc/rc3.d/_S75seaport
3) Set port number from 16161 to 161 for SEA in /etc/snmp/conf/snmpdx.reg
4) Create configuration files for SEA
# cp /etc/snmp/conf/mibiisa.rsrc- /etc/snmp/conf/mibiisa.rsrc
# cp /etc/snmp/conf/snmpdx.acl /etc/snmp/conf/mibiisa.acl
5) Restart SEA
# /etc/init.d/init.snmpdx stop
# /etc/init.d/init.snmpdx start
28
The following error messages might be logged in SMF service log file.
ERROR: Restarter: Ignoring REMOVE_INSTANCE command for unknown
service svc:/TEMP/{FMRI}.
Ignore these messages. They have no impact on the system.
29
Packages that contain SMF service can not be removed using pkgrm(1M)
-R option from the other boot system,and the following messages are displayed during
the next system boot.
SunOS Release 5.10 Version Generic 64-bit
Copyright 1983-2005 Sun Microsystems, Inc. All rights reserved.
Use is subject to license terms.
Hostname: host-name
Starting SCF daemon.
svc.startd[7]: svc:/system/fjsvabc:default: Method "/lib/svc/method/fjsvabc" failed
with exit status 1.
svc.startd[7]: svc:/system/fjsvabc:default: Method "/lib/svc/method/fjsvabc" failed
with exit status 1.
svc.startd[7]: svc:/system/fjsvabc:default: Method "/lib/svc/method/fjsvabc" failed
with exit status 1.
[ system/fjsvabc:default failed (see 'svcs -x' for details) ]
-R option for pkgrm (1M) has a limitation for packages that include SMF service.
Remove the package on the local file system after booting the remote image.
33
No
Limitations and known bugs
Remarks
Recommended actions
30
A /noautoshutdown file might be created at first boot after Solaris 10 installation. If
/noautoshutdown file exists power management and power saving could be disabled.
Check for and remove /noautoshutdown file if you need to enable power management
and power saving features.
31
Patch installation may fail with the following error message when the patch binary is
located in /(root) directory.
# patchadd xxxxxx-xx
Solaris 10
3/05 only
Assertion failed: *a_gzPath != ‘\0’, file zones.c, line 2113
This problem is solved by the following patch.
119254-06 or later SunOS 5.10: Install and Patch Utilities Patch
32
Installation of non-global zone will fail if the patches that have .us and .u instances,
including the following patches, are installed in the system.
118822-02 SunOS 5.10: Kernel Patch
119309-03 SunOS 5.10: PGX32 Graphics
Solaris 10
3/05 only
118708-03 SunOS 5.10: Sun XVR-1200 and Sun XVR-600 Graphics Accelerator
Patch
118708-04 SunOS 5.10: Sun XVR-1200 and Sun XVR-600 Graphics Accelerator
Patch
If this problem occurs, the following errors show up when installing non-global zones
and the operation fails.
# zoneadm -z zone01 install
Preparing to install zone <zone01>.
Creating list of files to copy from the global zone.
Copying <129399> files to the zone.
Initializing zone product registry.
Determining zone package initialization order.
Preparing to initialize <1119> packages on the zone.
Initialized <1119> packages on zone.
Zone <zone01> is initialized.
Installation of these packages generated errors: <SUNWcakr>
Immediately install the following patch as soon as Solaris 10 is installed.
119254-06 or later
33
SunOS 5.10: Install and Patch Utilities Patch
If you have already installed 118822-02, 119309-03, 118708-03, 118708-04 without
119254-06, follow the below procedure to recover the system.
1) Install 119254-06 (or later).
2) Install 118822-08 (or later) and 118708-06 (or later).
3) If 119309-03 has been installed, remove 119309-03 and re-install 119309-03.
4) Reboot system.
During system booting, port monitor (like ttymon) log files are deleted and the following
error message is displayed. Moreover, once this error message is output, no further log is
saved.
ttymon cannot create log file "/var/saf/zsmon/log": No such file or directory
This problem is solved by the following patch.
118868-01 or later SunOS 5.10: ttymon patch
34
Solaris 10
3/05 only
No
Limitations and known bugs
Remarks
Recommended actions
34
On PRIMEPOWER 200 (360MHz or higher) / 400(360MHz or higher)/600/650(except
SPARC64 V)/800/850(except SPARC64 V)/1000/1500(except SPARC64 V)/2000, both
syslog message and FMA message are displayed when a Memory 1 bit error(CE) occurs.
e.g.)
FJSV,SPARC64-IV: [ID 635115 kern.notice] Softerrors:
FJSV,SPARC64-IV: [ID 663638 kern.notice] Seen 0 Intermittent and 1 Corrected
Softerrors
FJSV,SPARC64-IV: [ID 909492 kern.notice] from SIMM C0S00-SLOT#B00 (synd =
0x13, addr = 0x75268280).
FJSV,SPARC64-IV: [ID 805745 kern.notice] Softerror: Persistent ECC Memory Error
FJSV,SPARC64-IV: [ID 306888 kern.notice] Corrected SIMM C0S00-SLOT#B00
FJSV,SPARC64-IV: [ID 518845 kern.notice] Detected by Module ID = 0x87 (135)
unix: [ID 618185 kern.notice] NOTICE: Scheduling removal of page
0x00000000.75268000 fmd: [ID 441519 daemon.error]
SUNW-MSG-ID: SUN4US-8000-7D, TYPE: Fault, VER: 1, SEVERITY: Minor
EVENT-TIME: Mon Feb 21 21:26:51 JST 2005
PLATFORM: FJSV,GPUSC-M, CSN: -, HOSTNAME: colm2
SOURCE: cpumem-diagnosis, REV: 1.3
EVENT-ID: aaf47b25-cfd2-4984-f598-e81bcbba274f
DESC: The number of single bit errors associated with this memory module continues
to exceed acceptable levels. Refer to
http://www.fujitsu.com/global/services/computing/server/unix/prmpwr_msg/SUN4US
-8000-7D for more information.
AUTO-RESPONSE: An attempt will be made to remove this memory page from
service.
IMPACT: Total system memory capacity will be reduced as pages are retired.
REC-ACTION: Schedule a repair procedure to replace the affected memory module.
Use fmdump -v -u <EVENT_ID> to identify the module.
Ignore these syslog messages. They have no impact on the system.
35
System does not display CPU error messages via FMA if the CPU at fault has not been
replaced; even if the CPU detected the same error previously. This problem only happens
on systems installed with SPARC64 V.
This is just a messaging issue. It has no impact on the system as such.
36
After an upgrade to install Solaris 10, the following message is displayed when format
(1M) command is executed.
# format
Unknown controller 'MD21' - /etc/format.dat (xx)
Searching for disks...done
There is no impact on the system. The message is not displayed when the following
entries are removed from /etc/format.dat.
disk_type = "XXXX" \
: ctlr = MD21 \
: ncyl = XXXX : acyl = X : pcyl = XXXX : nhead = X : nsect = XX \
: rpm = XXXX : bpt = XXXXX
35
No
Limitations and known bugs
Remarks
Recommended actions
37
The -R option for pkgadd(1M), pkgrm(1M), patchadd (1M), and patchrm(1M) utilities
have limitations when zones are included in the remote target image.
When a package and/or patch needs to be removed from non-global zone, install the
following patch before patch/package removal.
z 119254-19 or later SunOS 5.10: Install and Patch Utilities Patch
38
LiveUpgrade installation and Solaris Upgrade Installation of non-global zones have
limitations.
Announcement will be made when support for this feature is enabled.
39
When you install zone using zoneadm(1M), the following error messages with FJSVdr
or FJSVparam is displayed.
# zoneadm -z myzone install
Preparing to install zone <myzone>.
Creating list of files to copy from the global zone.
Copying <2784> files to the zone.
Initializing zone product registry.
Determining zone package initialization order.
Preparing to initialize <1081> packages on the zone.
Initialized <1081> packages on zone.
Zone <myzone> is initialized.
Installation of these packages generated errors: <FJSVdr>
Installation of <19> packages was skipped.
The file </work/myzone/root/var/sadm/system/logs/install_log> contains a log of the
zone installation.
They have no impact on the system.
40
During boot system, the following warning message may be displayed.
WARNING: Time of Day clock error: reason [Reversed by 0x2]. -- Stopped
tracking Time Of Day clock.
Ignore the message. It has no impact on the system.
41
The following option for patchadd(1M) does not work.
-d , -u, -n, -B, -k, -P, -x
There is no workaround now.
42
The following message might be displayed on the console.
snmpXdmid: [ID 216524 daemon.error] Registration with DMI failed. err = 831.
If there is no map file except test.map in /var/dmi/map, it means DMI is not used, then
disable DMI service provider in the following way.
z
43
On Solaris 10 OS 6/06 and earlier.
# mv /etc/rc3.d/S77dmi /etc/rc3.d/_S77dmi
z On Solaris 10 11/06 and later.
# svcadm disable svc:/application/management/dmi:default
When removing a patch with patchrm(1M), you may fail to remove it with the following
messages.
First RE may not be null
Patchrm is terminating.
WARNING: patchrm returned <21>
Install the following patch.
z 119254-19 or later SunOS 5.10: Install and Patch Utilities Patch
36
Solaris 10
3/05 only
No
Limitations and known bugs
Remarks
Recommended actions
44
I Installation and removal of a package or patch may fail in a system with non-global
zones, under the following conditions.
z non-global zone is configured using zonecfg(1M), but not installed by
zoneadm(1M).
z non-global zone is just booted by zoneadm(1M) after installation, without any
non-global zone settings such as host name and root password.
z non-global zone is being installed or removed by zoneadm(1M).
Make sure the initial setup like hostname and password configuration of all non-global
zones has been done and all the non-global zones are in “running” state before
installation or removal of package and patch
45
The following message may be displayed during an upgrade installation from Solaris 9.
network/nfs/server:default failed repeatedly (see 'svcs -x' for details)
Ignore the message. It has no impact on the system.
5.2
Specification and incompatibility for Solaris
This chapter explains specification and incompatibility for Solaris.
Table 5.2 Specification and incompatibility for Solaris
No
Specification and incompatibility
Remarks
Recommended actions
1
Solaris 10 provides Solaris Service Manager (SMF) to enhance the UNIX startup script
(so called RC script) and system daemons during boot up. Due to this new feature, there
is some unexpected and incompatible behavior compared to Solaris 9 or older versions.
Refer to SMF documentation as follows and smf(5) manual page.
Solaris 10 System Administrator Collection
>> System Administration Guide: Basic Administration
http://docs.sun.com/app/docs/doc/817-1985/
2
/usr/bin/ln has been changed in Solaris 10.
z
Solaris 9 or older versions.
/usr/bin/ln will overwrite file if target file already exists.
z Solaris 10.
/usr/bin/ln will fail if target file already exists.
The same behavior occurs with Solaris 9 or older versions if the -f option is used with
the ln command.
3
If the DHCP sever has multiple network interfaces, it may not be able to deliver an IP
address to a DHCP client because of DHCP server settings.
pntadm(1M) -s option needs to be specified with "uname -n" or the IP address of the
primary network interface. If a non-primary IP address is specified with pntadm -s,
DHCP server will not be able to deliver an IP address to the DHCP client.
37
No
Specification and incompatibility
4
nslookup(1M) results on Solaris 10 differ from those of Solaris 9 or older versions.
e.g.)
z Solaris 9
# nslookup
> aaa213.sample.test.com.
Server: aaat11.sample.test.com
Address: xxx.xxx.xxx.nnn
Recommended actions
z
Name: aaa13.sample.test.com
Address: xxx.xxx.xxx.mmm
Aliases: aaa213.sample.test.com, aaa113.sample.test.com
Solaris 10
# nslookup
> aaa213.sample.test.com.
Server: xxx.xxx.xxx.nnn
Address: xxx.xxx.xxx.nnn#xx
aaa213.sample.test.com canonical name = aaa113.sample.test.com.
aaa113.sample.test.com canonical name = aaa13.sample.test.com.
Name: aaa13.sample.test.com
Address: xxx.xxx.xxx.mmm
* aaa113.sample.test.com is an alias of aaa13.sample.test.com
* aaa213.sample.test.com is an alias of aaa113.sample.test.com.
5
1)
Physical device (/devices) entries for hard disk drive are removed at system
reboot if the hard disk driver is removed from the system before system reboot.
e.g.)
# cd /dev/rdsk
# ls -l c1t6d0*
lrwxrwxrwx 1 root root 48 May 28 11:19 c1t6d0s0 ->../../devices/pci@1f,0
/pci@5/scsi@2/sd@6,0:a,raw
# ls -lL c1t6d0*
c1t6d0s0: No such file or directory
2) “iostat –E” and “drcstat –device” may not show all connected physical devices
right after system boot.
This behavior of devfs on Solaris 10, is to be expected. /devices entries are updated
dynamically when each device is actually attached. As a result, device entries that have
not been attached after system boot, are not displayed by those commands.
6
If non-global zones are not booted, patchadd(1M) and patchrm(1M) will make all
non-global zones boot up temporarily during patch installation and removal. As a result
the total time for patch installation and removal will take much longer than booting up in
single user mode.
Boot all non-global zones in single user mode before installing and removing patches.
Example)
global# zoneadm –z myzone boot -s
38
Remarks
No
Specification and incompatibility
Remarks
Recommended actions
7
The following messages may be displayed during patch installation using patchadd(1M).
Package {PKGNAME} from directory {PKGNAME} in patch {PATCHID} is not
installed on the system.
Architecture for package {PKGNAME} from directory {PKGNAME} in patch
{PATCHID} differs from the package installed on the system.
Example)
# patchadd 118822-18
....
Validating patches...
Loading patches installed on the system...
Done!
Loading patches requested to install.
Package SUNWcti2 from directory SUNWcti2.u in patch 118822-18 is not installed
on the system.
Package SUNWdrcr from directory SUNWdrcr.u in patch 118822-18 is not
installed on the system.
Package SUNWidn from directory SUNWidn.u in patch 118822-18 is not installed
on the system.
Architecture for package SUNWdrr from directory SUNWdrr.u in patch 118822-18
differs from the package installed on the system.
Package SUNWwrsd from directory SUNWwrsd.u in patch 118822-18 is not
installed on the system.
Architecture for package SUNWefc from directory SUNWefc.u in patch 118822-18
differs from the package installed on the system.
Package SUNWwrsm from directory SUNWwrsm.u in patch 118822-18 is not
installed on the system.
Architecture for package SUNWcakr from directory SUNWcakr.u in patch
118822-18 differs from the package installed on the system.
Architecture for package SUNWcpr from directory SUNWcpr.u in patch 118822-18
differs from the package installed on the system.
Done!
.....
Ignore these messages. They have no impact on the system.
39
No
Specification and incompatibility
Recommended actions
8
In Solaris10, rsh(1) will output messages according to the value of the LANG variable
that is defined in /etc/default/init. However, in the previous Solaris versions, the system
will use the LANG=C locale for a command, that is run at the server side by rsh(1),
without mentioning any specific value for the LANG variable.
In Solaris 10, if the LANG variable is not set explicitly to a process that is executed by
inetd(1M), the process will succeed the value of this variable from inetd(1M). To stop a
process from succeeding the value of the LANG variable from inetd(M), change the
setup with the following command:
e.g.) in case of rsh(1)
#inetadm -m network/shell:default inherit_env=FALSE
For details of the setting, see the inetd(1M) man page.
9
Patch installation using patchadd(1M) will fail if the system has any zones and if the
patch archive is on NFS server.
Copy the patch archive from NFS server to local file system such as /tmp and install the
patch.
40
Remarks