1
INSTALLATION GUIDE
System Console Software 2.1
for Solaris ™ Operating Environment
High Risk Activity
The Customer acknowledges and agrees that the Product is designed, developed and manufactured as
contemplated for general use, including without limitation, general office use, personal use, household use,
and ordinary industrial use, but is not designed, developed and manufactured as contemplated for use
accompanying fatal risks or dangers that, unless extremely high safety is secured, could lead directly to
death, personal injury, severe physical damage or other loss (hereinafter "High Safety Required Use"),
including without limitation, nuclear reaction control in nuclear facility, aircraft flight control, air traffic
control, mass transport control, medical life support system, missile launch control in weapon system. The
Customer, shall not use the Product without securing the sufficient safety required for the High Safety
Required Use. In addition, Fujitsu (or other affiliate's name) shall not be liable against the Customer and/or
any third party for any claims or damages arising in connection with the High Safety Required Use of the
Product.
UNIX is a trademark of X/Open Company limited and licensed exclusively by the company in the U.S.A.
and other countries.
Sun, Sun Microsystems, the Sun Logo, Solaris and all Solaris based marks and logos are trademarks or
registered trademarks of Sun Microsystems, Inc. in the U.S. and other countries, and are used under
license.
AnswerBook2, HotJava and SunVTS are trademarks or registered trademarks of Sun Microsystems, Inc. in
the U.S. and other countries.
Java and all Java-based trademarks and logos are trademarks or registered trademarks of Sun Microsystems,
Inc. in the United States and other countries.
Netscape, Netscape Navigator and Netscape Communications are trademark of Netscape Communications
Corporation in the United States and in other countries.
PostScript is a trademark of Adobe System, Incorporated.
All other trademarks or registered trademarks are property of their respective companies.
Copyright 1998, 2000 Sun Microsystems, Inc. All rights reserved.
All Rights Reserved, Copyright © FUJITSU LIMITED 2002
1
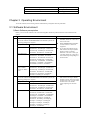
Chapter 1 Program Components
The unit of the program in which the system is composed is called the package.
this software.
The following packages compose
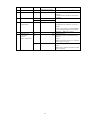
No.
Component
Package name
Version
Function
1
Console
Information
FJSVscs
2. 1
The version information of each
components of the System Console
Software.
2
Machine
Administration
FJSVcsl
2.1
FJSVkcsl
2.1
FJSVccsl
2.1
The system control management or the
system status patrol of the
PRIMEPOWER800/1000/2000 or
GP7000F Model 1000/2000.
FJSVmadm
1.0
FJSVmand
2.1.1
FJSVmasv
2.1
FJSVmaom
1.6
Supports system operation and
maintenance depending on the platform
used by the SMC.
3
Online Manual
FJSVcslom
2.1
Online manual of the System Console
Software. (HTML format)
4
Automatic
Power Control
FJSVapcs
1.3.9
Automatic power control of the
PRIMEPOWER 800/1000/2000 or
GP7000F Model 1000/2000.
5
Partition
Installer
FJSVclis
3.0
Supplementary tool to install OS and
product in the partition of
PRIMEPOWER 800/1000/2000 or
GP7000F Model 1000/2000.
6
RC2000
FJSVrcon
1.2.4
Control of the remote console screen
for each partition of the
PRIMEPOWER800/1000/2000 or
GP7000F Model 1000/2000.
7
Dump Control
FJSVdmp
1.4
Retention and management of dumps
for each partition of the
PRIMEPOWER800/1000/2000 or
GP7000F Model 1000/2000.
8
System Data
Output tool
FJSVsnap
2.3
Collects data in the SMC, of command
execution results plus hardware and
software configuration, environment
settings, logs, and operation status,
then outputs that system information
for system fault analysis to a backup
tape device.
9
SMC Assistance
FJSVscsl
1.5
Supplementary tool of the SMC.
10
SCF driver
(SMC exclusive
use)
FJSVscd
1.8
RAS control device driver.
(SCF,FaultLED) (64 bits) (*1)
FJSVscdx
1.8
RAS control device driver.
(SCF,FaultLED) (*1)
FJSVscr
1.9
RAS control daemon and configuration
file. (*1)
FJSVscu
1.9
RAS control command. (*1)
FJSVlscd
1.0
RAS control device driver.
(SCF,FaultLED) (64 bits) (*2)
FJSVlscdx
1.0
RAS control device driver.
(SCF,FaultLED) (*2)
FJSVlscr
1.1
RAS control daemon and configuration
file. (*2)
FJSVlscu
1.1
RAS control command. (*2)
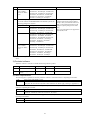
2
No.
Component
Package name
Version
Function
11
Web-Based
Admin View/
WWW Server
for Admin View
FJSVwvbs
2.1.1
WWW server for Web-Based Admin
View.
FJSVwvcnf
2.0.3
Web Communication base for Web
application.
FJSVwvdl
4.1.0
Download tool for Web-Based Admin
View
FJSVdef
For
Solaris™
7/8 OE
For
Solaris™
9 OE
1.2.4
1.3
For
Solaris™
7/8 OE
For
Solaris™
9 OE
FJSVvts
4.0
4.5
SUNWvts
4.0
4.5
SUNWvtsmn
4.0
4.5
4.5
12
13
14
15
SMC Default
Configuration
Validation Test
System
REMCS Agent
Java version
RC2000
SUNWvtsx
4.0
FJSVsmcrm
3.4
FJSVsc1rm
1.0
Prevents file system capacity shortage
due to expansion of the system log.
Online diagnosis test of SMC.
Reports to the REMCS center the unit
status and error information related to
PRIMEPOWER 800/1000/2000 and
GP7000F models 1000/2000.
FJSVsc2rm
1.2
FJSVsirms
2.2
Collects software information.
FJSVrlib
4.2
FJSVrmaos
2.6
Auxiliary function that reports
information to the REMCS center
FJSVragt
2.6
FJSVrrda
2.6
FJSVmarm
1.6.1
Reports to the REMCS center the unit
status and error information related to
PRIMEPOWER SMC.
FJSVsmcro
3.4
REMCS Agent Operator's Guide
Online Manual (in HTML format)
FJSVrcon2
3.0.0
FJSVrcond
3.0.0
RC2000 function is offered with Java.
*3
The download function of RC2000
package from WevView is offered. *3
FJSVrcone
3.0.0
FJSVrconm
3.0.0
*1: GP7000F Model 200 or PRIMEPOWER200 only
Online manual of the RC2000 User's
Guide. (HTML format) *3
*2: PRIMEPOWER 100 SMC only
*3: Only when "javarc" option is specified, it is installed. Please refer to "RC2000 User' s Guide "for the function of
Java version RC2000.
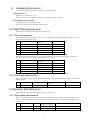
Chapter 2 Applicable Manuals
2.1 Online Manuals
The following manuals, which are in HTML format, are stored on the CD-ROM provided with the packages.
No.
Manual title
Format
1
System Console Software User's Guide
HTML, pdf
2
REMCS Agent Operator’s Guide
HTML, pdf
3
System Console Software Release Notes
pdf
4
SMC REMCS Agent Release Notes
pdf
3
No.
Manual title
Format
5
Dynamic Reconfiguration Architecture Guide
pdf
6
System Management Console Security Development Guide
pdf
7
Enhanced Support Facility User’s Guide
pdf
8
Machine Administration Guide
pdf
9
FJVTS Test Reference Manual
pdf
10
SunVTS 2.1 Quick Reference Card
pdf
11
Web-Based Admin View Operation Guide V20
pdf
12
INSTALLATION GUIDE System Console Software
pdf
13
RC2000 User's Guide
HTML, pdf
2.1.1 Referring to the online manuals (HTML format)
It is possible to refer to the manual by installing SCS on SMC. After the login procedure on SMC, please select the
icon of "User's Guide" from the tool menu window on the screen.
The following manuals selection windows are displayed.
•
System Console Software User's Guide
•
REMCS Agent Operator’s Guide
•
RC2000 User's Guide (It is possible to refer only when installing it by "javarc" option specification.)
2.1.2 Referring to the online manuals (pdf format)
It is possible to refer to an online manual of the pdf form by using Acrobat Reader. Please refer to the following
manuals for the method of installing Acrobat Reader.
• GP7000F System Management Console (SMC) User's Manual
• PRIMEPOWER System Management Console (SMC) User's Manual
• PRIMEPOWER100 User's Manual System Management Console model
• PRIMEPOWER2000/1000/800 Installation Guide
The reference method is as follows.
1.
Insert the CD-ROM into the CD-ROM drive on the server.
2.
If the CD-ROM has not been mounted, mount it.
# /etc/init.d/volmgt start <Return>
1.
Enter the command below to start Acrobat Reader.
# /opt/Acrobat4/bin/acroread & <Return>
2.
Open the following file.
/mount_point/doc/english/<File_name>
<File_name> is as follows..
Manual
File_name
System Console Software Release Notes
ReleaseNote.pdf
SMC REMCS Agent Release Notes
SMC_REMCS_RN.pdf
Dynamic Reconfiguration Architecture Guide
DR_arch_guide.pdf
System Management Console Security Development Guide
SMC_secure.pdf
Enhanced Support Facility User’s Guide
esfug.pdf
Machine Administration Guide
madm.pdf
FJVTS Test Reference Manual
fjvts.pdf
SunVTS 2.1 Quick Reference Card
sunvts.pdf
System Console Software User's Guide
scsug.pdf
REMCS Agent Operator’s Guide
REMCS_og.pdf
4
Web-Based Admin View Operation Guide V20
webview_ome.pdf
INSTALLATION GUIDE System Console Software
install.pdf
RC2000 User's Guide
rc2000ug.pdf
Chapter 3 Operating Environment
To use this software, the following software and hardware prerequisites must be performed.
3.1 Software Environment
1) Basic Software prerequisites
Before you can use this software, one of the following Basic Software products must have been installed on the
system.
No.
1
2
Name of Basic Software
Remarks
Solaris™ 7 Operating Environment (OE)
To use this software on PRIMEPOWER and GP7000F systems, the
following packages are required.
Component
Package name
SCF driver
SUNWdtbas , SUNWmfrun , SUNWtltk ,
SUNWxwice , SUNWxwplt , UNWxwcft ,
SUNWxwopt , SUNWctpls , SUNWxwfnt ,
SUNWxilrl , SUNWxilow , SUNWxildh
SunVTS,FJVTS
SUNWbtool , SUNWxwplt , SUNWxwfnt ,
SUNWxwice , SUNWtltk , SUNWxilrl ,
SUNWxilow , SUNWxildh , SUNWxwcft ,
SUNWolrte , SUNWaudio , SUNWoldst ,
SUNWxwopt , SUNWdtbas , SUNWmfrun ,
SUNWctpls , SUNWlibC , SUNWdtdmn ,
SUNWdtdte , SUNWtoo , SUNWdoc
Web-Based Admin
View / WWW
Server for Admin
View
SUNWdtbas , SUNWmfrun , SUNWtltk ,
SUNWxwice , SUNWxwplt , SUNWxwcft ,
SUNWxwopt , SUNWctpls , SUNWxwfnt ,
SUNWxilrl , SUNWxilow , SUNWxildh ,
SUNWxwrtl , SUNWscpu , SUNWlibC ,
SUNWtoo , SUNWjvjit , SUNWjvrt
Solaris™ 8 Operating Environment
To use this software on PRIMEPOWER and GP7000F systems, the
following packages are required.
Component
Package name
SCF driver
SUNWdtbas , SUNWmfrun , SUNWtltk ,
SUNWxwice , SUNWxwplt , SUNWxwcft ,
SUNWxwopt , SUNWctpls , SUNWxwfnt ,
SUNWxilrl , SUNWxilow , SUNWxildh
SunVTS,FJVTS
SUNWxilow , SUNWxildh , SUNWxwcft ,
SUNWolrte , SUNWaudio , SUNWoldst ,
SUNWxwopt , SUNWdtbas , SUNWmfrun ,
SUNWctpls , SUNWlibC , SUNWdtdmn ,
SUNWdtdte , SUNWocf , SUNWj2rt ,
SUNWocfr , SUNWmp , SUNWlpmsg ,
SUNWpcr , SUNWpcu , SUNWppm ,
SUNWpsf , SUNWpsr , SUNWpsu ,
SUNWtoo , SUNWdoc , SUNWipc ,
SUNWipcx , SUNWlibCx
5
l
l
l
l
For PRIMEPOWER and
GP7000F, Solaris™ 7 OE 5/99 or
later can be used.
When PRIMEPOWER 100 SMC
is used, Solaris™ 7 OE is not
supported.
If you select the software group
that contains "Developer System
Support" when you install
Solaris™ 7 OE 5/99 or later, you
can install Solaris™ 7 OE 5/99 or
later and the required packages at
the same time.
If you select the software group
that contains "Developer Solaris
Software Group" when you install
the Solaris™ 8 OE, you can install
the Solaris™ 8 OE and the
required packages at the same
time.
No.
Name of Basic Software
Web-Based Admin
View / WWW
Server for Admin
View
3
Remarks
SUNWdtbas , SUNWmfrun , SUNWtltk ,
SUNWxwice , SUNWxwplt , SUNWxwcft ,
SUNWxwopt , SUNWctpls , SUNWxwfnt ,
SUNWxilrl , SUNWxilow , SUNWxildh ,
SUNWxwrtl , SUNWscpu , SUNWlibC ,
SUNWtoo , SUNWjvjit , SUNWjvrt
Solaris™ 9 Operating Environment
To use this software on PRIMEPOWER and GP7000F systems, the
following packages are required.
Component
Package name
SCF driver
SUNWdtbas , SUNWmfrun , SUNWtltk ,
SUNWxwice , SUNWxwplt , SUNWxwcft ,
SUNWxwopt , SUNWctpls , SUNWxwfnt ,
SUNWxilrl , SUNWxilow , SUNWxildh
SunVTS,FJVTS
SUNWbtool , SUNWxwplt , SUNWxwfnt ,
SUNWxwice , SUNWtltk , SUNWxilrl ,
SUNWxilow , SUNWxildh , SUNWxwcft ,
SUNWolrte , SUNWlibC , SUNWcpp ,
SUNWzlib , SUNWtoo , SUNWdoc ,
SUNWipc , SUNWlibCx
Web-Based Admin
View / WWW
Server for Admin
View
SUNWdtbas , SUNWmfrun , SUNWtltk ,
SUNWxwice , SUNWxwplt , SUNWxwcft ,
SUNWxwopt , SUNWctpls , SUNWxwfnt ,
SUNWxilrl , SUNWxilow , SUNWxildh ,
SUNWxwrtl , SUNWscpr , SUNWscpu ,
SUNWlibC , SUNWtoo , SUNWcpp ,
SUNWzlib , SUNWj3irt , SUNWj3rt
If you select the software group that
contains "Developer Solaris Software
Group" when you install the Solaris™ 9
OE, you can install the Solaris™ 9 OE
and the required packages at the same
time.
Java version RC2000 is not supported in
Solaris(TM) 9 OE.
2) Software requirements
None
3) Excluded software
When this software is used, do not install the following software product.
No.
Name of software product
Package name
Version
1
Basic Software Extension
All packages
1.0 or later
2
Enhanced Support
Facility
All packages
1.3 or later
Remarks
4) Patch requirements
The following PTF or patches are necessary when this software is used with Solaris™ 7 Operating Environment.
PTF
Solaris™ OE PTF R02021 or later
Patch
111113-02, 112590-01, 107171-10, 107834-03, 107544-03, 106541-21, 106980-19
(This patch has been stored in System Console Software CD. Please apply referring to Appendix D.)
When Java version RC2000 is used, the following PTF or patches are necessary when this software is used with
Solaris™ 7 Operating Environment.
PTF
Solaris™ OE PTF R01081 or later
Patch
107226-17, 106980-16, 106541-16, 108374-05, 107636-07, 107544-03, 108376-24, 106950-13,
107081-33, 106300-09, 106327-08, 107656-07, 107702-07
When Java version RC2000 is used, the following patches are necessary when this software is used with Solaris™ 8
Operating Environment.
PTF
Solaris™ OE PTF R01082 or later
Patch
108652-33, 108921-12, 108940-24
6
1)
Hardware Environment
The following hardware environment is required when using this software.
1) Main memory
Main memory of 128Mbytes or more.
When you use Java version RC2000, main memory of 256M bytes or more is required.
2) Hardware requirements
Please satisfy hardware requirements of SMC.
Please refer to the System Console Software Release Notes.
3.2 Static Disk Requirements
The disk space requirements for this software are shown below.
3.2.1 Disk requirements
The following tables list the disk space requirements for installing this software. If disk space is insufficient, expand
the size of the appropriate file systems.
No.
Directory
1
root
2.2
2
/usr
0.2
3
/var
9.7
4
/export/home
5
Disk space requirement
(in Mbytes)
Remarks
0
/opt *
311.5
* Do not attempt to install this software in a directory other than "/opt".
The following tables list the disk space requirements for installing "Java version RC2000" (Option installation). If
disk space is insufficient, expand the size of the appropriate file systems.
No.
Directory
1
root
0.1
2
/usr
0
3
/var
0.1
4
/export/home
5
Disk space requirement
(in Mbytes)
Remarks
0
/opt *
4.1
* Do not attempt to install this software in a directory other than "/opt".
3.2.2 Work area requirements
When you install this software with the following installation procedures, additional disk workspace as shown below
might be required.
No.
Via spool directory
Directory
1
No
/tmp
Disk space requirement
(in Mbytes)
Remarks
0.5
3.3 Dynamic Disk Resources
The dynamic disk space requirements for this software are shown below.
3.3.1 Disk space requirements
When you use this software for the following operations, additional disk space might be required in the directories
listed in "3.3 Static Disk Requirements." If disk space is insufficient, expand the size of the appropriate file systems
as shown.
No.
Component
Directory
Additional disk space
requirement (in M bytes)
1
FJVTS
/var
0.1
message log
2
Server Default
/var
1.0
Normal operation
7
Operation
No.
Component
Directory
Additional disk space
requirement (in M bytes)
Operation
Configuration
3
RC2000
4
SMC Assistance
/var
0.2
/
0.01
/var
3.82
Normal operation : Composition of one
partition
(0.2MB necessity whenever one partition
is added)
Normal operation
5
Machine
Administration
/var
370
When server is one
(300MB necessity whenever one server is
added)
(There is a possibility for about 700MB to
be used when the hardware error happens
frequently. : When server is one.)
6
REMCS Agent
/var
32.0
Normal operation
7
Java version
RC2000
(Option installation)
/var
76.0
The usual operation constituted from one
partition.
(Note)
When one partition increases, 37.5 K bytes
of disk space is required.
/opt
0.03
When one host is added.
(Note)
When a host is added, 0.03 K bytes of disk
space is required.
8
3.4 Memory Requirements
The following table shows the memory required when you use this software for the following operations.
No.
Component
1
FJVTS
Memory
required
(unit: MB)
Operation
16.1
Executing the TP option with the default value, in the following situation:
l 2CPU, 1Disk(4GB), 128MB memory
46.0
Executing the TP option with the default value, in the following situation:
l 1CPU, 2Disk(4GBx2), 128MB memory
2
RC2000
6.8
When you start one console window.
3
SMC Assistance
4.84
2.5
Whenever one console window is added, it is necessary.
4
Machine
Administration
18.8
5
REMCS Agent
52.0
When event is transmitted to the center.
6
Java version
RC2000
(option installation).
31.2
One console window is started by environmental setup of an default setting
value.
9.1
When server is one
One console window is increased by environmental setup of an default setting
value.
58.9
One console window is started when scroll buffer size was set as maximum
36.8
One console window is increased when scroll buffer size was set as
maximum.
3.5 Swap Space
The following shows the swap space requirement of this software in normal operation. The swap space requirement
depends on the system situation. The total swap space can be calculating as the sum of each individual swap space
requirement. If the swap space provided by the system is insufficient, it must be expanded.
No.
Component
1
SCF Driver
2
FJVTS
3
Web-Based
Admin View
/ WWW Server
for Admin View
Swap capacity
(unit: Mbytes)
0.1
Description
Normal operation (daemon, commands)
35.4
Executing the TP option with the default value, in the following
situation:
l 2CPU, 1Disk(4GB), 128MB memory
54.0
Executing the TP option with the default value, in the following
situation:
l 1CPU, 2Disk(4GBx2), 128MB memory
0.5
Starting the web daemon, and then accessing the management server
from the client.
19.2
Starting Java VM on the management server.
20.6
Starting Java VM on the management server, then starting the
environment setting menu on the management server from the client.
20.4
Starting Java VM on the management server, then starting the
Logging View menu on the management server from the client.
Standard use (daemon, GUI menu)
4
Machine
Administration
77.5
5
Server Default
Configuration
0.5
Normal operation (Solaris™ 7 OE / Solaris™ 8 OE only)
0.7
Using the memory error inspection function. (Solaris™ 7 OE /
Solaris™ 8 OE only)
6
7
RC2000
SMC Assistance
4.8
When you start one console window.
3.3
Whenever one console window is added, it is necessary.
0.32
Standard use
9
No.
Component
8
REMCS Agent
9
Java version
RC2000
(option
installation).
Swap capacity
(unit: Mbytes)
5.4
40.2
Description
Standard use
One console window is started by environmental setup of an default
setting value.
8.1
One console window is increased by environmental setup of an
default setting value.
68.9
One console window is started when scroll buffer size was set as
maximum
30.9
One console window is increased when scroll buffer size was set as
maximum.
Chapter 4 Restrictions and Notes
4.1 Restrictions
None
4.2 Cautions when Upgrading
The cautions when upgrading from the previous level to this software level are described below.
4.2.1 User data compatibility
There are no user data incompatibilities between this version and the previous version of this software.
4.2.2 Environment definition file compatibility
There are no environment definition file incompatibilities between this version and the previous version of this
software.
4.3 Notes
This software cannot be installed in devices other than System Management Console.
Chapter 5 Installation Procedures
5.1 Preparing for installation
5.1.1 Checking the system environment
System Console Software is installed by overwriting.
Check the available disk space for installing this software. For more detailed information of the disk space
requirements, see "3.3 Static Disk Resources".
5.1.2 Installation time
It takes about 20 minutes to install this software. Note that this installation time does not include any time for
rebooting, as that depends on the system configuration.
5.2 Installing System Console Software
1.
Login as root. And open the “Terminal Console”.
2.
The SMC goes to OBP mode.
10
# /usr/sbin/shutdown –g0 –y –i0 <Return>
3.
Boot the system in single-user mode.
{?} ok boot -s <Return>
When the following message is displayed, enter the password.
INIT: SINGLE USER MODE
Type Ctrl-d to proceed with normal startup,
(or give root password for system maintenance):password <Return>
4.
Enter the root password and when the prompt (#) appears, execute the commands as shown below:
# /usr/sbin/mountall –l <Return>
# /etc/init.d/volmgt start <Return>
5.
Insert the System Console Software CD-ROM into the SMC.
6.
Change the directory.
# cd /cdrom/cdrom0/tool <Return>
Note: See "Appendix B" to mount the CD-ROM manually when it is not possible to refer to the CD-ROM.
7.
Execute the scslinstall command.
# ./scslinstall <Return>
Note1
When the option component is specified by the scslinstall command, the specified option
component is installed together. Please refer to 'Appendix A Command Reference' for details.
Please install it in a similar way when you install the option component in SMC which has
installed System Console Software2.1. In this case, the package which has already been installed
skips processing.
# ./scslinstall -a javarc<Return>
Note2
The following message may be displayed when installing package, but the installation will
complete normally.
cron may not be running - call your system administrator
Note3
The following message may be displayed when installing SUNWvts or SUNWvtsx packages, but
the installation will complete normally. (Solaris™ 7 OEt, Solaris™ 8 OE)
Note: The SyMON configd package is not installed. This package is
required in order to support the SunVTS physical configuration
mapping mode. SunVTS will function normally in its default logical
configuration mapping mode. However, if physical configuration
mapping is desired, please install the correct SyMON configd package
for your platform:
* For Desktop platform, install SUNWeswsa package.
* For WorkGroup Server platform, install SUNWeswga package.
* For Enterprise Server platform, install SUNWsycfd package.
:
:
/var/sadm/pkg/SUNWvts/install/i.inetdconf: usage: kill [ [ -sig ] id ... | -l]
Note4
The following message may be displayed when installing SUNWvts packages, but the installation
will complete normally. (Solaris™ 9 OE)
/var/sadm/pkg/SUNWvts/install/i.inetdconf: usage: kill [ [ -sig ] id ... | -l ]
8.
Ejects the System Console Software CD-ROM from the SMC.
# cd / <Return>
# eject cdrom <Return>
9.
Reboot the system.
# /usr/sbin/shutdown –g0 -y -i6 <Return>
5.3 Confirmation after System Console Software is installed
Please confirm the following files, and confirm whether the error occurs in the system during reboot.
11
# more /var/adm/messages <Return>
5.4 Environment setting after installation
5.4.1 Setting of user LAN (Administration) interface
If you want to use another interface for User (Administration) LAN interface on the partition side instead of hme0,
please follow a procedure as follows.
Additionally, Please apply the following patches for the partition included in PTF R02081 before LAN
setting when you use ESF 1.4.
Patch number:910562-03
Procedure:
1) Please execute the following commands in Solaris™ OE for the partition.
# /usr/sbin/FJSVmadm/addevhost hostname <Return>
The hostname in User (Administration) LAN interface is specified for the hostname.
2) Reboot the partition or restart the Partition-System Management Console communication daemon by the following
commands.
Execute the following command to send the daemon stop instruction.
# /usr/sbin/FJSVmadm/cmdevsnd -s <Return>
Execute the following command to confirm the stop of the daemon.
# ps -ef | grep evsndd <Return>
Confirm the process of "evsndd" is not displayed.
Execute the following command to start the daemon.
[When the partition is using ESF2.0 or before]
# /usr/sbin/FJSVmadm/evsndd <Return>
[When the partition is using ESF2.1 or later]
# /usr/sbin/FJSVmadm/rununitinfo <Return>
3) The following message might be displayed in the System Management Console while executing this procedure.
There is no problem.
Feb
5 10:38:16 console0 : machine0.partition0:FJSVcsl:I:Disk:FJSVcsl:Disk configuration changed.
5.4.2 Setting to use Web-Based Admin View
It is necessary to set the environment by installing the following software to use Web-Based Admin View.
1. Installation of Netscape Communicator 4.7X
It is not necessary to work when Netscape Communicator 4.7X has already been installed.
Note)
-
Usually, "Netscape Communicator" is not necessary to purposely be installed because it is included in
the base package CD of Solaris(TM) 8 OE and it will be installed automatically with Solaris(TM) 8 OE.
-
It is necessary to remove the security check of X server only when using "Netscape Communicator" by
super-user. Set it as follows.
1) Login from the login screen by super-user.
2) Add the following command to the end of the "/.dtprofile" file.
#/usr/openwin/bin/xhost +`uname -n` > /dev/null
2. Installation of Java 2 Runtime Environment
[Installation of Java 2 Runtime Environment 1.2.2]
1) Confirm that "Netscape Communicator" is installed.
# pkginfo -l NSCPcom <Return>
2) Confirm whether Java Plug-in has already been installed.
# pkginfo -l SUNWj2pi <Return>
12
Execute the above command. If the version is newer than below, it is not necessary to install.
than below, delete the version, and install an recommended version.
-
VERSION: 10.1.2.2,REV=1999.12.06.10.02
-
VERSION: 20.1.2.2,REV=1999.10.14.18.04aaa
Execute the above command. If the version is newer than below, it is not necessary to install.
than below, delete the version, and install an recommended version.
If it is older
If it is older
3) Prepare the package. There are two ways as follows.
- Copy the following Java Plug-in of CD-ROM to the proper directory.
<CDROM-mountpoint>/misc/jre/SUNWj2pi.tar.Z
Typically, <CDROM-mountpoint> will be: /cdrom/cdrom0
- Copy the following Java Plug-in installed to the proper directory.
/etc/opt/FJSVwvcnf/htdocs/FJSVwvbs/download/001JRE1.2/files/jp/solaris/SUNWj2pi.tar
4) Deploy the copied package.
# zcat SUNWj2pi.tar.Z | tar xf - <Return>
5) Install Java Plug-in in a super-user mode.
# su <Return>
password:XXXXX <Return>
# pkgadd -d <package-deployed directory> SUNWj2pi <Return>
For example, when the package "SUNWj2pi" is installed on "/var/tmp," specify the following;
# pkgadd -d . SUNWj2pi<Return>
Install as required in response to the prompt confirming package installation.
When installation completes normally, exit from superuser mode by using control-d.
Note)
Usually, "Plug-in 1.2" is not necessary to purposely be installed because it is included in the base
package CD of Solaris(TM) 8 OE and it will be installed automatically with Solaris(TM) 8 OE.
Refer to the above procedure for the confirmation way of whether it is installed and the installation way.
3. Setting of Java environment
It is set that Java 2 (TM) Runtime Environment 1.2.2 can be used with Java Plug-in.
Please execute the following commands, and set the environment variable of Java Plug-in in the shell variable.
[For C shell]
# setenv NPX_PLUGIN_PATH <Java Plug-in path> <Return>
[For shell and Kornshell]
# NPX_PLUGIN_PATH= <Java Plug-in path> <Return>
# export NPX_PLUGIN_PATH <Return>
<Java Plug-in path> is designated as default </opt/NSCPcom/plugins> unless otherwise specified.
Note)
-
Usually, this setting is not necessary because "Plug-in 1.2" is included in the base package CD of
Solaris(TM) 8 OE and it will be installed automatically to the </usr/dt/appconfig/netscape>
directory by default with Solaris(TM) 8 OE.
-
Java Plug-in should be installed after the Web browser. If you uninstall the Web browser after installing
-
Java Plug-in, uninstall the Java Plug-in, and then reinstall it again.
5.4.3 Setting to use the Java version RC2000
It is necessary to set the environment by installing the following software to use Java version RC2000.
1. Installation of Netscape Communicator 4.7X
Please refer to "5.4.2 Setting to use Web-Based Admin View". It is not necessary to work when Netscape
Communicator 4.7X has already been installed.
13
2. Installation of Java 2 Runtime Environment
[Installation of Java 2 Runtime Environment 1.3.1]
1) Copy Java(TM) 2 Runtime Environment, Standard Edition Version 1.3.1 for Solaris to the working directory
from CD-ROM.
Set up CD-ROM of System Console Software on the CD-ROM device.
# cd <CDROM1-mountpoint>/misc/jre <Return>
Normally, <CDROM1-mountpoint> will be /cdrom/cdrom0.
The work directory is /var/tmp:
# cp <CDROM1-mountpoint>/misc/jre/j2re-1_3_1_02-solsparc.sh /var/tmp
<Return>
2) Make sure that the execute permissions are set on the self-extracting binary.
# chmod +x j2re-1_3_1_02-solsparc.sh <Return>
3) Move directory to the location where the files should be installed.
# cd <Installed directory> <Return>
4) Run the <j2re-1_3_1_02-solsparc.sh>.
# ./j2re-1_3_1_02-solsparc.sh <Return>
Install as required in response to the prompt confirming package installation.
The directory < j2re1_3_1_02 > is made for a present directory.
Note)
Please refrain from "Install directory/j2re1_3_1_02", since it is needed by subsequent setup.
3. Place the font property file used with the Java version RC2000.
# /etc/opt/FJSVrcon/bin/rcsetfontprop jrepath <Return>
In <jrepath>, specify the absolute path to the top directory of JRE1.3.1 software.
If JRE1.3.1 software was installed in /usr as described in "Installation of Java 2 Runtime Environment
1.3.1" of 2."Installation of the Java environment", specify /usr/j2re1_3_1_02.
For rcsetfontprop command, refer to "A.1 rcsetfontprop" of "RC2000 User's Guide".
4. Set up an environment for starting RC2000 from Web-Based Admin View.
# /etc/opt/FJSVrcon/bin/rcextsetup jreextpath
<Return>
In < jreextpath>, specify the absolute path to the ext directory of JRE1.3.1 software.
If JRE1.3.1 software was installed in /usr as described in 2."Installation of the Java environment",
specify /usr/j2re1_3_1_02/lib/ext.
For rcsetfontprop command, refer to "A.2 rcextsetup" of " RC2000 User's Guide ".
Note)
In Solaris™ 8 Operating Environment, Plug-in1.2 is included in CD of Solaris™ 8 base package,
and it gets down, and is automatically installed with Solaris™ 8 OE. In this case, since the
above-mentioned command will be executed at the time of Java version RC2000 package
installation, it is not necessary to set up after installation.
5. Setting of Java environment
It is set that Java 2 (TM) Runtime Environment 1.3.1 can be used with Java Plug-in.
Java Plug-in is used by Web-Based Admin View.
1) A terminal emulator is started and set up the environment variable
Execute the following command to set the environment variable to the shell variable:
[For C shell]
# setenv NPX_PLUGIN_PATH <Java Plug-in path> <Return>
[For shell and Kornshell]
# NPX_PLUGIN_PATH=< Java Plug-in path > <Return>
14
# export NPX_PLUGIN_PATH <Return>
In <Java Plug-in path>, specify the absolute path to the directory containing the javaplugin.so file of
JRE1.3.1 software.
If JRE1.3.1 software was installed in /usr as described in 2."Installation of the Java environment" of
"5.4.3 ...", specify /usr/j2re1_3_1_02/plugin/sparc/ns4.
2) Start your Netscape browser, or restart it if it is already activated.
3) Restart your browser again. The browser needs to be restarted twice to avoid the Netscape problem.
Note:
- If the version of the installed Java Plug-in is older than that described above, install a recommended
version.
- Java Plug-in should be installed after the Web browser. If you uninstall the Web browser after installing
Java Plug-in, uninstall the Java Plug-in, and then reinstall it again.
5.5 Applying modifications
If PTF (Program Temporary Fix), patches, etc. are distributed, apply the latest versions of the modifications. Refer to
the manual supplied with the modification for information on how to do this.
5.6 Removing System Console Software
If you take the following procedures, all of the packages provided in this software will be removed.
1.
Login as root. And open the “Terminal Console”.
2.
The SMC goes to OBP mode.
# /usr/sbin/shutdown –g0 –y –i0 <Return>
3.
Boot the system in single-user mode.
{?} ok boot -s <Return>
When the following message is displayed, enter the password.
INIT: SINGLE USER MODE
Type Ctrl-d to proceed with normal startup,
(or give root password for system maintenance):password <Return>
4.
Enter the root password and when the prompt (#) appears, execute the commands as shown below:
# /usr/sbin/mountall –l <Return>
# /etc/init.d/volmgt start <Return>
5.
Insert the System Console Software CD-ROM into the SMC.
6.
Change the directory.
# cd /cdrom/cdrom0/tool <Return>
Note: See "Appendix B" to mount the CD-ROM manually when it is not possible to refer to the CD-ROM.
7.
Execute the scsldel command.
# ./scsldel <Return>
All uninstallation completed.
#
8.
Ejects the System Console Software CD-ROM from the SMC.
# cd / <Return>
# eject cdrom <Return>
9.
Reboot the system.
# /usr/sbin/shutdown –g0 -y -i6 <Return>
15
Note
Execute the following before executing the scsldel command, if the Java version RC2000 was installed.
1.
Delete the font property file of Java version RC2000.
# /etc/opt/FJSVrcon/bin/rcsetfontprop <Return>
2.
Delete the environment for starting Java version RC2000 from Web-Based Admin View.
# /etc/opt/FJSVrcon/bin/rcextsetup <Return>
Appendix A Command Refere nce
scslinstall(1M)
NAME
scslinstall - Installs System Console Software onto the system
SYNOPSYS
/cdrom/cdrom0/tool/scslinstall [-a Option Componen_name]
DESCRIPTION
scslinstall installs all packages necessary for operations as System Management Console. This command is stored in
the tool directory of the CD-ROM containing System Console Software. Execute this command in single-user mode
as shown below:
#
#
#
#
mountall -l <Return>
/etc/init.d/volmgt start <Return>
cd /cdrom/cdrom0/tool <Return>
./scslinstall <Return>
If any older version System Console Software / common packages have been installed on the system, this command
will update them.
OPTION
The following options are available:
-a Option Componen_name
Installes only the specified option component.
If it is omitted, all various packages necessary for the system console are installed.
Specifies the following option component name.
javarc
Java version RC2000
EXIT STATUS
The following exit values are returned:
0 Successful execution.
not 0
Fatal error.
SEE ALSO
scsldel(1M), pkgadd(1M)
NOTES
16
This command can be executed only with "root" authority.
Please use this command in the single-user mode.
When the package application is done, the desktop environments of root of SCS is customized in initial state as SMC.
The previous environment is saved in $HOME/.dt_org.
scsldel(1M)
NAME
scsldel - Removes System Console Software from the system
SYNOPSYS
/cdrom/cdrom0/tool/scsdel [-a Option Componen_name]
DESCRIPTION
scsldel deletes all packages necessary for operation as System Management Console. This command is stored in the
tool directory of the CD-ROM containing System Console Software. Execute this command in single-user mode as
shown below:
#
#
#
#
mountall -l <Return>
/etc/init.d/volmgt start <Return>
cd /cdrom/cdrom0/tool <Return>
./scsldel <Return>
OPTION
The following options are available:
-d Option_Componen_name
Deletes only the specified option component.
If it is omitted, all various packages necessary for the system console are deleted.
Specifies the following option component name.
javarc
Java version RC2000
EXIT STATUS
The following exit values are returned:
0 Successful execution.
not 0
Fatal error.
SEE ALSO
scslinstall(1M), pkgrm(1M)
NOTES
This command can be executed only with "root" authority.
Please use this command in the single-user mode.
When the package of SCS is deleted, the desktop environments of "Root" and Administrator is as follows. The
environment becomes a previous state by which the SCS package is applied. Or, it becomes the environment of spare
SMC. The previous environment is saved in $HOME/.dt_sc.
Appendix B Manual mount of CD-ROM in single-user mode
When you install the SCF in Solaris ™ 9 OE if you can not refer to the CD-ROM, use the following solution.
1
Stop the volume manager
17
# /etc/init.d/volmgt stop <Return>
2
Create the mount directory if it is not existing.
# mkdir /cdrom/cdrom0 <Return>
3
Mount the CD-ROM.
# mount -F hsfs /dev/dsk/<CDROM_DEVICE>
4
Change the directory to the CD-ROM.
# cd /cdrom/cdrom0 <Return>
Please do the following procedures when you eject the CD-ROM.
1
Change the directory.
#cd / <Return>
2
Un-mount the CD-ROM.
# umount /cdrom/cdrom0 <Return>
3
Eject the CD-ROM.
18
/cdrom/cdrom0 <Return>
Appendix C Installation of the J ava version RC2000 to a client
machine
Even if it installs the Java version RC2000 in SMC (system console), in order to apply on a client machine, it is necessary to
install Java version RC2000 in machines other than SMC (client). RC2000 software can be installed both on Solaris™ OE and
Windows.
The procedure that installs RC2000 software in a client machine is explained.
C.1 Downloading RC2000 software
Download RC2000 software according to OS of the machine to install.
The procedure that downloads RC2000 software is explained.
1.
Start the Web browser on the machine where RC2000 is to be installed.
2.
Designate the following URL in the Web browser:
http://<server address>:<port>/download/index.html
In <server address>, designate the IP address or host name of the SMC.
In <port>, designate the http port number for Web-Based Admin View as defined on the SMC. A user can
check the port number by logging in to the SMC as a system administrator and executing the command
shown below. The default is 8081.
# /etc/opt/FJSVwvbs/etc/bin/wvSetport fjwv-h
A download window is displayed on the Web browser.
3.
Select the operating system of the machine where RC2000 is to be installed from the combo-box list in the item
for [RC2000] in the download window. Click the [Download] button.
A download confirmation window is displayed on the Web browser.
4.
Select the [Yes] button in the download confirmation window.
Download of RC2000 software is started.
Note)
Java™ 2 Runtime Environment, Standard Edition Version 1.3.1 software is required in order for RC2000 to
operate. If not installed in the machine that installs RC2000, please download the software according to OS in
the same procedure.
C.2 Installation to Solaris™ Operating Environment
C.2.1 Operating Environment
To install RC2000 software, the software and hardware requirements described below must be met.
C.2.1.1. Software Environment
1) Basic Software prerequisites
Before you can use this software, one of the following Basic Software products must have been installed on the
system.
No.
Name of Basic Software
Remarks
1
Solaris™ 7 OE
Solaris™ 7 OE 5/99 or later can be used.
If you select the software group that contains "Developer
System Support" when you install Solaris™ 7 OE 5/99 or later,
you can install Solaris™ 7 OE 5/99 or later and the required
packages at the same time.
19
No.
Name of Basic Software
Remarks
2
Solaris™ 8 OE
If you select the software group that contains "Developer
Solaris Software Group" when you install the Solaris™ 8 OE,
you can install the Solaris™ 8 OE and the required packages at
the same time.
2) Software requirements
The software products listed in the following table are required to use RC2000 software.
No.
Name of software product
1
Java™ 2 Runtime
Environment, Standard
Edition
2
Package name
Version
and/or level
Remarks
1.3.1
System Information
FJSVsnap
2.3 or later
PRIMECLUSTERor
Output Tool
System Console Software
A web browser and so on is required in order to start RC2000 from Web-Based Admin View of SMC. For software
requirements of Web-Based Admin View, refer to "Web-Based Admin View Operation Guide".
3) Exclusive software
None.
4) Patch requirements
When using RC2000 software, all the Patches required for Java™ 2 Runtime Environment, Standard Edition 1.3.1
must be installed. Install following PTF or Patch according to basic software.
No.
Name of software product
Patch ID/PTF
1
Solaris™ 7 OE
R01081 or later.
Or all the followings:
107226-17, 106980-16, 106541-16, 108374-05, 107636-07,
107544-03, 108376-24, 106950-13, 107081-33, 106300-09,
106327-08, 107656-07, 107702-07
Remarks
2
Solaris™ 8 OE
R01082 or later.
Or all the followings:
108652-33, 108921-12, 108940-24
C.2.1.2. Hardware Environment
1) Main memory
Main memory of 256M bytes or more is required.
2) Hardware requirements
None.
C.2.1.3. Static Disk Resources
The disk space requirements for RC2000 software are shown below.
1) Disk space requirements
The following table lists the disk space requirements for installing RC2000 software. If disk space is insufficient,
expand the size of the appropriate file systems.
No.
Directory
Disk space
requirement
(Unit: M bytes)
1
/
0.1
2
/usr
0
3
/var
0.1
4
/home
0
Remarks
20
No.
Directory
Disk space
requirement
(Unit: M bytes)
5
/opt (*1)
0.1
Remarks
*1
This software can not install other than "/opt".
2) Work area requirements
The RC2000 software is downloaded as an archive file. To install the RC2000 software, the file must be
decompressed. Decompression requires the following disk space.
No
Directory
Required disk capacity
(Unit: M Byte)
1
Directory used for
decompression
0.1
C.2.1.4.
Remarks
Dynamic Disk Resources
The dynamic disk space requirements for RC2000 software are shown below.
1) Disk space requirements
When you use RC2000 software for the following operations, additional disk space might be required in the directories
listed in " C.2.1.3 Static Disk Resources." If disk space is insufficient, expand the size of the appropriate file systems as
shown.
No.
Directory
Disk space
requirement
(Unit: K bytes)
Operation
1
The home directory of
the user who logged in
to the system
76.0
The usual operation constituted from one partition.
(Note)
When one partition increases, 37.5 K bytes of disk space is
required.
2
/opt
0.03
When one host is added.
(Note)
When a host is added, 0.03 K bytes of disk space is required.
C.2.1.5.
Memory Requirements
Refer to "3.5 Memory Requirements".
C.2.1.6.
Swap Space
Refer to "3.6 Swap Space".
C.2.2 Restrictions and notes
None.
C.2.3 Installation method
C.2.3.1.
Preparations before installation
1) Check of system environment
l Check system environment with reference to "5.1.1 Check of system environment".
l Check whether Java™ 2 Runtime Environment, Standard Edition Version 1.3.1 software is installed. When not installed,
install in the following method.
1. Log in to the installation machine as a root.
2. Place the downloaded JRE 1.3.1 software (j2re-1_3_1_02-solsparc.sh) in the installation directory.
21
For example, if the installation directory is /usr, place j2re-1_3_1_02-solsparc.sh in /usr.
# mv downloaded_directory/j2re-1_3_1_02-solsparc.sh /usr <Return>
Specify the directory that downloaded j2re-1_3_1_02-solsparc.sh as <downloaded_directory>.
3. Check that downloaded JRE1.3.1 software (j2re-1_3_1_02-solsparc.sh) has an execution authority.
Set up the execution authority, if that does not have the authority.
For example, if it has arranged to /usr, move to /usr, and set up the execution right to access.
# cd /usr <Return>
# chmod +x ./j2re-1_3_1_02-solsparc.sh <Return>
4. Run the j2re-1_3_1_02-solsparc.sh.
# ./j2re-1_3_1_02-solsparc.sh <Return>
Java™ 2 Runtime Environment, Standard Edition Version 1.3.1 software is installed in the directory that
has arranged j2re-1_3_1_02-solsparc.sh.
l Check whether FJSVsnap is installed.
# pkginfo -l FJSVsnap <Return>
If the old version is installed, delete a package from a system.
# pkgrm FJSVsnap <Return>
If an old version is deleted by the above-mentioned operation or it is not installed, install FJSVsnap from CDROM by executing the pkgadd (1M) command.
# pkgadd -d /cdrom/cdrom0/Package/sun4u
<Return>
2) Installation time
The time required for installation of RC2000 software is about 1 minute.
C.2.3.2.
Installing software
1.
2.
Log in to the installation machine as a root.
The SMC goes to OBP mode.
# /usr/sbin/shutdown -y -g0 -i0
3.
<Return>
Boot the system in single-user mode.
{0} ok boot -s <Return>
When the following message is displayed, enter the password.
INIT: SINGLE USER MODE
Type control-d to proceed with normal startup,
(or give root password for system maintenance): password
<Return>
4.
Go to the directory where the downloaded package (FJSVrcon2.tar) is placed, and decompress the package.
5.
Execute the installation command.
# cd downloaded_directory
<Return>
# tar xvf ./FJSVrcon2.tar
<Return>
Specify the directory which downloaded FJSVrcon2.tar as <downloaded_directory>.
Files required for installation is decompress in downloaded_directory.
# ./rconinstall <Return>
22
Installation of RC2000 software is started.
6.
Reboot the system.
# /usr/sbin/shutdown –y –g0 –i6
C.2.3.3.
<Return>
Environmental setup after installation
Set up environment with reference to "5.4 Environmental setup after installation" . To install RC2000 software on a
machine that is not on the same network as the system console, execute the following setup.
1.
Specify the host name of SMC .
File
/etc/inet/hosts
Definition
<IP address> <host name>
In <IP address>, specify the IP address of the SMC.
In <host name>, specify the host name of the SMC.
Separate <IP address> and <host name> with a tab character or space.
C.2.3.4.
Deletion method of software
1.
Log in to the machine to delete.
2.
Delete the font property file.
# /etc/opt/FJSVrcon/bin/rcsetfontprop
3.
Delete the environment for starting RC2000 from Web-Based Admin View.
# /etc/opt/FJSVrcon/bin/rcextsetup
4.
<Return>
<Return>
Delete the RC2000 software.
# pkgrm FJSVrcon2 <Return>
Deletion of RC2000 software starts.
5.
Reboot Web-Based Admin View.
# /etc/opt/FJSVwvbs/etc/bin/wvCntl restart
<Return>
If the host name of a SMC is defined at the time of installation, delete it.
C.3 Installation to Windows
C.3.1 Operating Environment
To install RC2000 software, the software and hardware requirements described below must be met.
C.3.1.1. Software Environment
1) Basic Software prerequisites
Before you can use this software, one of the following Basic Software products must have been installed on the
system.
No.
Name of Basic Software
1
Windows® 98
2
Windows® Me
3
Windows® NT Workstaticn 4.0
4
Windows® 2000 Professional
5
Windows® XP
Remarks
23
2) Software requirements
The software products listed in the following table are required to use RC2000 software
No.
1
Name of software product
Package name
Version
and/or level
Remarks
Java™ 2 Runtime
1.3.1
Environment, Standard
Edition
A web browser and so on. is required in order to start RC2000 from Web-Based Admin View of SMC. For software
requirements of Web-Based Admin View, refer to "Web-Based Admin View Operation Guide".
3) Exclusive software
None.
4) Patch requirements
None.
C.3.1.2. Hardware Enviroment
The following hardware environments are required to use RC2000 software.
1) Main memory
Main memory of 128M bytes or more is required.
2) Hardware requirements
None.
C.3.1.3. Static Disk Resources
The disk space requirements for RC2000 software are shown below.
1) Disk space requirements
About 5 M bytes disk space require for installing RC2000 software.
2) Work area requirements
None.
C.3.1.4. Dynamic Disk Resources
The dynamic disk space requirements for RC2000 software are shown below.
1) Disk space requirements
When you use RC2000 software for the following operations, additional disk space might be required in the
directories listed in "C.3.1.3 Static Disk Resources " .
No.
Directory
Disk space
requirement
(Unit: K bytes)
Operation
1
OS installation
driver
76.0
The usual operation constituted from one partition.
(Note)
When one partition increases, 37.5 K bytes of disk space is
required.
2
RC2000 software
installation driver
0.03
When one host is added.
(Note)
When a host is added, 0.03 K bytes of disk space is required.
C.3.1.5. Memory Requirements
The following table shows the memory required when you use this RC2000 software for the following operations.
No.
1
Memory required
(unit: Mbyte)
31.2
Operation
One console window is started by environmental setup of an default setting value.
24
No.
Memory required
(unit: Mbyte)
Operation
2
5.0
One console window is increased by environmental setup of an default setting
value.
3
58.9
One console window is started when scroll buffer size was set as maximum
4
36.8
One console window is increased when scroll buffer size was set as maximum.
C.3.2 Restrictions and notes
C.3.2.1.
Restrictions
None.
C.3.2.2.
Notes
l If RC2000 for Windows that comes with the Remote Console Connection Unit is installed, RC2000 might not operate
normally. Be sure to delete the other version of RC2000 for Windows before installing the RC2000 software.
For the deletion of RC2000 for Windows, refer to "REMOTE CONSOLE CONNECTION UNIT USER’S MANUAL".
l Overwrite installation of RC2000 software cannot be performed. If RC2000 software is already installed, install, once
deleting. If it is going to carry out overwrite installation of the RC2000 software, RC2000 software already installed will
be deleted automatically.
C.3.3 Installation method
The method which installs RC2000 software is explained.
C.3.3.1. Preparations before installation
1) Check of system environment
l Be aware that “RC2000 for Windows” which comes with the Remote Console Connection Unit, is not installed.
l Check if sufficient disk space is available for RC2000 software installation.
For the disk size which RC2000 software uses, refer to " C.3.3 Static disk resources".
l Check whether Java™ 2 Runtime Environment, Standard Edition Version 1.3.1 software is installed. When not installed,
the downloaded Java™ 2 Runtime Environment, Standard Edition Version 1.3.1 software (j2re-1_3_1_02-win-i.exe) is
double-clicked with a mouse. Installation software starts. Continue the installation by following the instruction messages.
2) Installation time
The time required for installation of RC2000 software is about 30 seconds.
C.3.3.2. Installing software
1.
2.
Log on to the machine to install.
Go to the directory where the downloaded package (RC2KVxxLxx.exe) is placed, and double-click with a mouse.
(VxxLxx is version information) .
Installation of RC2000 software starts. Continue the installation by following the instruction messages.
C.3.3.3. Environmental setup after installation
1.
To the extension(ext) folder of JRE1.2.2 software that be loaded on the Web browser, copy the environment for
starting RC2000 from Web-Based Admin View.
Extension folder of JRE software
JRE_installation_folder\lib\ext
Environment for starting RC2000 from Web-Based Admin View
rc2000ext.jar
rc2000.exe
25
<JRE_installation_folder> is absolute path to the JRE software.
For example, Plug-in is 1.3.1, and when the installation folder was not changed during installation,
<JRE_installation_folder> is:
<OS installation drive>:\Program Files\JavaSoft\JRE\1.3
2.
If installed machine is not the same network as SMC, the following setup is required
Specify the host name of SMC .
File
l For WindowsNT/Windows2000:
OS installation drive:\winnt\system32\drivers\etc\HOSTS
l For WindowsXP:
OS installation drive:\windows\system32\drivers\etc\HOSTS
l For Windows95/Windows98/Windows98SE/WindowsMe:
OS installation drive:\windows\HOSTS
l If system folder is changed at the time of OS installation:
system folder\drivers\etc\HOSTS
Definition
<IP address> <host name>
In <IP address>, specify the IP address of the SMC.
In <host name>, specify the host name of the SMC.
Separate <IP address> and <host name> with a tab character or space.
C.3.3.4. Deletion method of software
1.
2.
Log on to the machine to delete.
Start Explorer, and open the ext folder of JRE software that copied the environment for starting RC2000 from
Web-Based Admin View at the time of installation.
JRE_installation_folder\lib\ext
If the installation folder was not changed during JRE1.2.2 installation, <JRE_installation_folder> is:
OS installation drive:\Program Files\JavaSoft\JRE\JREversion
3.
From the ext folder of JRE software, delete the environment for starting RC2000 from Web-Based Admin View.
Environment for starting RC2000 from Web-Based Admin View
rc2000ext.jar
rc2000.exe
4.
5.
If the host name of SMC is defined at the time of installation, delete it.
The Control Panel is displayed. Select [Control Panel] from [Settings] menu of [Start].
In WindowsXP, Select [Control Panel] from [Start].
Select [Add/Remove Programs] from the Control Panel. The Add or Remove Programs window is displayed.
Select "RC2000 VxxLxx" from the Add or Remove Programs window. Then click the "Add/Remove..."
button.(VxxLxx is version information).
Deletion is started. Delete according to the instruction messages.
26
Appendix D Method of applyin g patch to System Console Software
2.1
When this software is used with Solaris(TM) 7 Operating Environment, please apply all the following patches stored
in CD-ROM.
111113-02, 112590-01, 107171-10, 107834-03, 107544-03, 106541-21, 106980-19
D.1 Directory of patch
The patch for which this software is necessary is stored in the following directories in CD-ROM.
/cdrom/cdrom0/patch/Solaris_7
D.2 Method of applying patches
The procedure for applying the patch is as follows.
1.
Login as root. And open the “Terminal Console”.
2.
The SMC goes to OBP mode.
# /usr/sbin/shutdown –g0 –y –i0 <Return>
3.
Boot the system in single-user mode.
{?} ok boot -s <Return>
When the following message is displayed, enter the password.
INIT: SINGLE USER MODE
Type Ctrl-d to proceed with normal startup,
(or give root password for system maintenance):password <Return>
4.
Enter the root password and when the prompt (#) appears, execute the commands as shown below:
# /usr/sbin/mountall –l <Return>
# /etc/init.d/volmgt start <Return>
5.
Insert the System Console Software CD-ROM into the SMC.
6.
Change the directory.
# cd /cdrom/cdrom0/patch/Solaris_7 <Return>
7.
Execute the patchadd command.
# patchadd <Patch-ID> <Return>
Note1
Apply the patch in the following order.
8.
1)
111113-02
2)
112590-01
3)
107171-10
4)
107834-03
5)
107544-03
6)
106541-21 (Refer to "D.3 Notes to apply patch" before applying the patch.)
7)
106980-19
Ejects the System Console Software CD-ROM from the SMC.
# cd / <Return>
# eject cdrom <Return>
9.
Reboot the system.
# /usr/sbin/shutdown –g0 -y -i6 <Return>
27
D.3 Notes to apply patch
There are the following notes before patch 106541-21 applies.
1. When applying the following patch, the contents in /etc/inittab file will be replaced. Back up /etc/inittab before
applying the following patch and restore the required portions after the application.
[Condition]
If you have added the individual entries into /etc/inittab besides the entries in the original /etc/inittab, and/or
you have changed the contents of entries in /etc/inittab.
[Recommended Action]
The contents in /etc/inittab file will be replaced to the following contents.
ap::sysinit:/sbin/autopush -f /etc/iu.ap
ap::sysinit:/sbin/soconfig -f /etc/sock2path
fs::sysinit:/sbin/rcS sysinit >/dev/msglog 2<>/dev/msglog </dev/consoleis:3:initdefault:
p3:s1234:powerfail:/usr/sbin/shutdown -y -i5 -g0 >/dev/msglog 2<>/dev/msglog
sS:s:wait:/sbin/rcS >/dev/msglog 2<>/dev/msglog </dev/console
s0:0:wait:/sbin/rc0 >/dev/msglog 2<>/dev/msglog </dev/console
s1:1:respawn:/sbin/rc1 >/dev/msglog 2<>/dev/msglog </dev/console
s2:23:wait:/sbin/rc2 >/dev/msglog 2<>/dev/msglog </dev/console
s3:3:wait:/sbin/rc3 >/dev/msglog 2<>/dev/msglog </dev/console
s5:5:wait:/sbin/rc5 >/dev/msglog 2<>/dev/msglog </dev/console
s6:6:wait:/sbin/rc6 >/dev/msglog 2<>/dev/msglog </dev/console
fw:0:wait:/sbin/uadmin 2 0 >/dev/msglog 2<>/dev/msglog </dev/console
of:5:wait:/sbin/uadmin 2 6 >/dev/msglog 2<>/dev/msglog </dev/console
rb:6:wait:/sbin/uadmin 2 1 >/dev/msglog 2<>/dev/msglog </dev/console
sc:234:respawn:/usr/lib/saf/sac -t 300
co:234:respawn:/usr/lib/saf/ttymon -g -h -p "`uname -n` console login: "
-T sun -d /dev/console -l console -m ldterm,ttcompat
Depending on the optional software being used, the peculiar entries for the optional software may
automatically be added to /etc/inittab at the time of installing the optional software. (Ex. SynfinityDisk)
Since there are already 17 entries from "ap" to "co" in the original /etc/inittab, if 18 or more entries exist in
/etc/inittab, there is a possibility that the /etc/inittab has been corrected, therefore, the evacuation and
restoration works will be needed.
Moreover, in the following cases, the evacuation and restoration works will be needed because there is also
the possibility that /etc/inittab has been corrected.
- Packages except SUNWcsr are displayed as "Referenced by the following packages" by executing
"pkgchk -l -p /etc/inittab", or
- "ERROR" is displayed by executing "pkgchk -p /etc/inittab".
(1) Evacuate /etc/inittab file by another name using cp command.
(2) Apply the Patch.
(3) Referring to the evacuated file, confirm whether the description "/dev/msglog" exists or not.
If the character string "/dev/msglog" does not exist, all the descriptions ">/dev/console
2<>/dev/console" should be corrected to ">/ dev/msglog 2<>/dev/msglog".
.... >/dev/console 2<>/dev/console </dev/console
--->
.... >/dev/msglog 2<>/dev/msglog </dev/console
Since the patch 106541-04 or the later revision, it has been changed to use the character string
"/dev/msglog" in /etc/inittab, therefore, this correction work, changing the character string of "/dev/console"
to "/dev/msglog", isn't needed for PRIMEPOWER/GP7000F usually.
(4) Restore the evacuated file to /etc/inittab by using cp command.
2. When applying the following patch, it replaces the /etc/name_to_sysnum file and the /e/etc/security/audit_class
file. Therefore, please back up the file beforehand, and restore the backed up file after applying the patch..
1) When modifying the /etc/name_to_sysnum file.
[Condition]
28
When installing the product which added the system calls to the /etc/name_to_sysnum file.
[Occurrence]
The system call which was added by the product will not work.
2) When modifying the /etc/security/audit_class file.
[Occurrence]
The audit class which was defined by user will not be logged.
3. Before you install the following patch onto PRIMEPOWER 200 SMC, you should uninstall the patch 112692-01.
[Phenomenon]
If the patch 112692-01 has been installed, the installation of the [Relevant Patch] fails.
# patchadd 106541-21
Checking installed patches...
ERROR: This patch is incompatible with patch 112692-01
which has already been applied to the system. To install this patch,
first remove the incompatible patch 112692-01 using patchrm(1M).
Patchadd is terminating.
[Recommended Action]
When applying the Relevant Patch by itself, apply it by executing the following procedures.
(1) Check whether the patch 112692-01 has been installed. If the patch 112692-01 has been installed,
showrev(1M) shows patch information beginning with "Patch: 112692-01...". If not, nothing is
displayed.
# showrev -p | grep 112692-01
Patch: 112692-01 Obsoletes:
Requires: 106541-20 Incompatibles:
106541-21
Packages: SUNWcarx, SUNWcar
(2) Uninstall the patch 112692-01. If the patch 112692-01 has been installed, you should uninstall the
patch 112692-01 by using patchrm(1M).
# patchrm 112692-01
29
Information on this document
On April 1, 2009, Fujitsu became the sole owner of Fujitsu Siemens Computers. This new subsidiary of Fujitsu has been renamed Fujitsu Technology Solutions.
This document from the document archive refers to a product version which
was released a considerable time ago or which is no longer marketed.
Please note that all company references and copyrights in this document have
been legally transferred to Fujitsu Technology Solutions.
Contact and support addresses will now be offered by Fujitsu Technology Solutions and have the format …@ts.fujitsu.com.
The Internet pages of Fujitsu Technology Solutions are available at
http://ts.fujitsu.com/...
and the user documentation at http://manuals.ts.fujitsu.com.
Copyright Fujitsu Technology Solutions, 2009
Hinweise zum vorliegenden Dokument
Zum 1. April 2009 ist Fujitsu Siemens Computers in den alleinigen Besitz von
Fujitsu übergegangen. Diese neue Tochtergesellschaft von Fujitsu trägt seitdem den Namen Fujitsu Technology Solutions.
Das vorliegende Dokument aus dem Dokumentenarchiv bezieht sich auf eine
bereits vor längerer Zeit freigegebene oder nicht mehr im Vertrieb befindliche
Produktversion.
Bitte beachten Sie, dass alle Firmenbezüge und Copyrights im vorliegenden
Dokument rechtlich auf Fujitsu Technology Solutions übergegangen sind.
Kontakt- und Supportadressen werden nun von Fujitsu Technology Solutions
angeboten und haben die Form …@ts.fujitsu.com.
Die Internetseiten von Fujitsu Technology Solutions finden Sie unter
http://de.ts.fujitsu.com/..., und unter http://manuals.ts.fujitsu.com finden Sie die
Benutzerdokumentation.
Copyright Fujitsu Technology Solutions, 2009