1
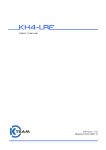
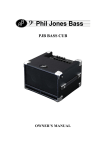
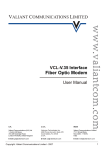
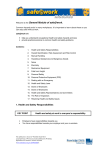
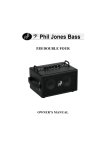
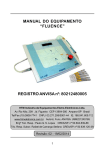
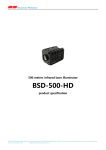
INTRODUCTION
The Laserex Laser 3000™ is a highly versatile and compact laser therapy
device that, under the guidance of a qualified Veterinarian, provides a simple
method of treatment, delivering relief from many common pain conditions.
Because of its simple design and ease of operation, the Laser 3000™
Therapy Unit is ideal for use either in a clinic or out in the field.
Laser 3000™
3000™
Therapy Unit
What is Laser Therapy?
Laser Therapy is a method of treatment using a laser, and is well established
in the areas of pain relief and rehabilitation of numerous injuries. The laser
light penetrates tissue where it is absorbed by cells and effectively stimulates
healing and relief of pain. It also induces an immediate analgesic effect at the
treatment site.
Laser Therapy also offers a painless and drug-free form of treatment.
User Manual
The Laser 3000™ provides significant advantages over conventional
treatment techniques
•
•
•
•
•
Pain Relief
Accelerated Healing
Reduction of Swelling and Inflammation
Reduced Scar Formation
Painless and Drug-Free Treatment
The Laser 3000™ is effective in providing help in the treatment of sprained
and strained ligaments, tendon injuries and muscle soreness. These are just
a few of the treatment possibilities.
1
LOCATION OF PARTS
8. Aperture label
4. LED Laser Emission indicator light
7. Danger Label
1. OLED Display
LOCATION OF PARTS
10. On / Off switch
button
2. Up button
1.
OLED Display
2.
UP button
3.
DOWN button
4.
LED laser emission indicator light
5.
Identification label
6.
Battery cover
7.
Danger label
8.
Aperture warning label
9.
Certification label
11. Enter button
3. Down button
13. Reset buttons
12. Start / Stop button
5. Identification Label
9. Certification Label
10. On/Off switch
11. ENTER button
6. Battery cover
12. START / STOP button
13. Reset buttons
(See following page for diagram showing part & label locations)
2
3
LABELS
The Laser 3000™ comes with the following labels:
Certification label – This label states that Laserex certifies that the Laser
3000™ complies with 21CFR 1040.10 and 1040.11. This label appears on
the front of the Laser 3000™.
Identification label – This label states the name and the location of the
Manufacturer, Laserex Technologies Pty Ltd. This label appears on the front
of the unit.
Warning logotype – The Danger label appears on the top of the unit and
states the Max output of laser radiation and the emitted wavelength of the
unit..
Aperture label – AVOID EXPOSURE – Laser radiation is emitted from this
aperture. This label is for the aperture at the endcap and on top of the probe.
(See Page 5 for reproductions of labels on the Laser 3000™).
4
5
INDICATORS AND CONTROLS
2. Attaching the head
•
Frequency selection (preset and variable) 0-5000 Hz and preset
Nogier frequencies
•
Setting required – dose to be delivered
•
Time will be displayed to deliver the required dose
•
Probe head recognition
Attach the selected head by screwing it in a clockwise motion onto the hand
piece until it has tightened into place. This is done by placing the head onto
the hand piece at the 10 o’clock position by lining up the notch and turning it
clockwise to the 12 o’clock position.
CAUTION: Use of control or adjustments or performance of procedures other
than those specified herein may result in hazardous radiation exposure.
Operating Instructions
Charging Batteries. Please refer to the Powercell leaflet included with the
Laser 3000™
1.Installation of batteries
3. Operating the unit
Press the Green On / Off button for a few seconds. An audible beep will be
heard. The following appears on the screen:
Remove the battery cover by turning the screw located on the bottom of the
handpiece. Place 2 batteries inside each of the slots at the end of the probe
of the unit as per the – and + symbols. Place the battery cover back onto the
probe. (When you receive the Laser 3000™, the batteries will already be in
the unit.)
The following screen appears:
Explanation:
Press UP to increase the digit, DOWN to decrease. Press ENTER to go to
the next screen. Hold ENTER for a few seconds to go back to the previous
digit.
6
7
The PIN is factory set to 9999 by Laserex. The first 9 will appear on the
screen. Press ENTER until the second asterisk becomes a 9, then press
ENTER again until 9999 appear on the screen. After the 4th asterisk become
a 9 the word OK will appear in yellow alongside ENTER on the screen. Press
ENTER and ‘correct’ appears on the screen in green. If you make a mistake
when entering a number, press ENTER for a few seconds and the digit
returns back to an asterisk. Then input the correct digit. The next screen is:
appears in green. Press ENTER and ‘Safety glasses must be worn’ appears
in red along with an image of safety eyewear glasses. Laser Ready! Appears
in yellow and START appears in red.
Press the red START / STOP button to deliver the dosage. An audible beep
will be heard. Laser On! will appear in red on the screen.
Manual Import:
At the Data Source screen press DOWN so that Manual Import is highlighted
in blue. The following screen appears:
Explanation:
•
•
•
Continue Last: enters the previous treatment.
Load memory: enters a treatment dosage stored in memory.
Manual Import: allows one to manually enter the dosage
To enter any of these, press DOWN until the correct setting is highlighted and
then press ENTER.
Continue Last:
From Data Source screen and with Continue Last highlighted in blue, press
ENTER and the most recent treatment protocol will appear. Press ENTER
with CONT highlighted in blue. ‘Safety glasses must be worn’ will appear in
red along with an image of safety eyewear glasses. START appears in red
along with the words Laser Ready! Place the laser safety eyewear on. Press
the red START / STOP button to deliver the dosage. An audible beep will be
heard whilst the dosage is being delivered.
Load Memory:
At the Data Source screen press DOWN so that Load Memory is highlighted
in blue. Press ENTER. M:1 will be highlighted in blue. If there is more than
one memory entered, press UP to select the desired treatment then press
ENTER. OK will be highlighted and then press ENTER and the stored
dosage appears on the screen. NEXT is highlighted and Laser Standby!
8
Dosage Selection: Dose will be highlighted in blue. Press ENTER and the
number of Joules are highlighted in orange. Press UP to increase the dosage
or DOWN to decrease. When the correct dosage is entered, press ENTER.
Frequency Selection: Frequency (Freq) will be highlighted in blue and
Continuous Wave (CW) will appear highlighted in orange. If you wish to use
the Laser 3000 in CW press ENTER to move to the Interlock setting.
To change the frequency from CW to one of 7 programmed Nogier
frequencies, press UP (with CW highlighted in blue) once to 73Hz, twice to
146Hz and so on. With the selected frequency highlighted in orange, press
ENTER to the Interlock setting.
Manually inputting a Frequency:
With Freq highlighted in orange, press the red START / STOP button so that
CW is highlighted. Press UP to increase the frequency to the desired level.
9
Press UP for a few seconds to change the frequency quickly. Then with the
frequency selected, press ENTER to continue.
Time: There is no need to enter the time. The Laser 3000™ calculates the
time taken to deliver the dosage.
RF Interlock: After pressing ENTER, Interlock will be highlighted in blue. If
the interlock is disabled, the letters DIS will appear on the screen in orange.
Press ENTER and the following screen appears
As the Laser 3000™is a Class 3B laser, it requires a RF safety interlock. You
will receive 2 of these with the unit. These can be placed either on the door or
window of your office. See image below. If out in the field, no RF Interlock is
required. Remember to always wear the laser safety eyewear provided when
using the Laser 3000™ either indoors or outdoors. When using the Laser
3000™ indoors, at least one RF interlock must be enabled.
Arrow
Arrow
•
•
•
Press UP until INT 1 is highlighted, then press ENTER and EN (enabled)
appears. Repeat the above until INT 2 is also enabled. If you are only using
one RF Interlock, make sure that at least one of the Interlocks is enabled. If
only one Interlock is enabled, say INT 1, press DOWN. INT 2 will appear as
DIS. OK will then appear, highlighted in blue. Press ENTER. NEXT will
appear highlighted in blue. Press ENTER. Laser Standby! will appear in
green. CONT will be highlighted in blue, press ENTER and an image of laser
safety eyewear appears along with the words ‘Safety glasses must be worn’
appearing in red. The next screen states:
START will appear in red.
It is now advisable to have the laser ready at the position where the subject is
to receive treatment. Press the red START / STOP button and the Laser
3000™delivers the requested dosage. An audible beep will be heard and the
Laser Emission indicator button on the front of the unit will be flashing in
green. A timer will appear indicating the amount of time left for treatment.
The Laser 3000™ will countdown the treatment time. The minutes and
seconds left will appear in orange text on the screen. The words Laser ON!
will be in red on the screen.
Repeating a dosage:
Upon completion of the treatment, a long beep will be heard, followed by the
words Laser Standby! in green on the screen. NEXT will be highlighted in
blue. Press ENTER, an image of laser safety eyewear appears along with
the words ‘Safety glasses must be worn’ in red. Then press the START /
STOP button. START will be highlighted in red. The same dosage will be
delivered.
Place double sided tape on the back of the RF interlock
Attach to door frame and door of room
Make sure arrows are facing each other
10
11
Storing a Treatment in Memory:
System Setting Change PIN:
After entering the dosage, frequency and interlock, press ENTER. NEXT will
be highlighted, then press DOWN until SAVE is highlighted in blue. Press
ENTER and the following screen appears:
After selecting the Manual Input, press ENTER until NEXT is highlighted, then
press DOWN twice until the arrow after SAVE is highlighted in blue. Press
ENTER. System setting appears providing information on:
Press ENTER when M1 is highlighted. The Laser 3000™allows for the
storing of 14 settings in memory. When OK is highlighted, press ENTER and
it will be stored in memory. In future, when the stored dosage is required,
press ENTER at Load Memory at the Date Source screen.
To change any of the settings, press UP until the desired function is
highlighted in blue. For example, to change the PIN, press UP until CHANGE
PIN is highlighted. Press ENTER and follow the instructions. To change
other settings, press UP to select the setting highlighted in blue. Then press
ENTER to highlight the % in orange. Press UP to increase the value or
DOWN to decrease.
If you arrive at the above screen and notice that an error was made press
DOWN so that CANCEL appears highlighted in blue. Press ENTER and you
will be returned to the previous menu. Press UP until you reach the variable
that requires changing, then proceed with the above procedure.
Stopping the unit:
If at any time you wish to stop the treatment, press the red START / STOP
button. The following will appear on the screen:
Incorrect Command entered:
If an error is made, at the Laser Standby! screen, press DOWN so that PREV
is highlighted in blue to return to the Data Source screen. Then select the
correct setting.
You can then restart the treatment. CONT will be highlighted in blue. Press
ENTER, an image of the laser safety eyewear will appear, then press the red
START / STOP button.
In case of emergency, press the 2 restart buttons (see diagram)
simultaneously and the Laser 3000™will switch off.
Changing a Dosage:
After completing a treatment and you wish to change the dosage
12
13
Press UP so that PREV is highlighted and then press ENTER. Select Manual
input and ENTER the appropriate settings.
It is recommended to stop treatment and recharge the batteries as soon as
possible.
Interlock
No Head Attached:
If no head is attached to the Laser 3000™, the following will appear on the
screen:
If the interlock is interrupted eg a door where the interlock is attached is
opened, the Laser 3000™will switch off and the above screen will appear.
Ensure that the interlock is operational, then press OK to continue.
Safe Use of the Laser 3000™
Press Enter with OK highlighted. The next screen will indicate the following:
The Laser 3000™ is a Class IIIB (3B) laser product that is potentially harmful
to the human eyes. It is strongly recommended that laser safety glasses
provided with the unit are worn during operation.
Laser Emission Indicator:
When the Laser 3000™is operating, the laser emission indicator button will be
flashing green (see diagram)
CONCLUDING TREATMENT
The Laser 3000™ should be switched off and the head re-attached. DO NOT
detach the head whilst the unit is functioning or turned on.
Once the treatment is completed and the unit has reached its preset dosage,
the laser will stop operating and the laser emission indicator will go out. At
this stage, a beep will be audible.
Flat Battery:
If the battery is flat, the following will image appear on the screen:
If the Laser 3000™ is not to be used for an extended period of time, remove
the batteries and place the unit in its carrying case.
This will prevent the possibility of battery leakage and protect the unit form
damage.
14
15
CARE AND MAINTENANCE
Laser 3000™ SPECIFICATIONS
The Laser 3000™ is a very sturdy device that is supplied with its own carry
case. However, like any other electronic product, it requires proper care and
handling. We recommend the following:
LASER Type
Laser Diode
Wavelengths Available:
635nm, 650nm, 660nm,
808nm, 830nm, 904nm
•
•
•
•
Power:
5mW-450mW
diode used)
Do Not immerse the device in water or liquids.
Pulse Repetition Mode:
Continuous Wave and preset Nogier
frequencies
Any servicing of the device must be done through an Authorised Dealer.
If you have any queries, refer them to Laserex Technologies.
Battery Type:
4 x AA NiMH rechargeable batteries
Battery Life:
Approximately 2 hours continuous
Dimensions:
250mm x 90mm x 50mm
Weight:
340 grams including batteries
Never try to disassemble the device.
Do Not drop the device or handle it roughly.
(depending
WARNINGS
•
•
•
Do Not use the Laser 3000™ directly over the eyes.
Do Not shine the laser beam into the eyes.
Keep the Laser 3000™ out of the reach of children.
TESTING THE BATTERY
With the RF interlock attached to the door frame and the 2 arrows aligned (as
shown above), press the button. If the red LED switches on, the battery is in
good condition.
16
17
785nm,
Upon
WARRANTY TERMS AND CONDITIONS
Address of Manufacturer:
Your Laser 3000™ Therapy Unit was produced under the highest standards
of quality control. Every effort has been made to ensure that the device
reaches you in good working condition. However, if the device should
malfunction due to defective materials and / or workmanship, it is warranted
for 24 months from the date of purchase providing:
•
It is returned pre-paid to Laserex or an Authorised Dealer along with
proof of purchase.
•
It is not misused, adjusted or serviced by any person other than a
Laserex Technologies Service Agent
•
It is used in accordance with the Laser 3000™ instructions issued with
this product and is used in the manner intended.
Laserex Technologies Pty Ltd
5A Corbett Court
Export Park SA 5950
Australia
Telephone: +61 8 8234 3199
Facsimile: +61 8 8234 3699
Web: www.laser3000.net
E-mail: [email protected]
Laserex Technologies and its Authorised Dealers will not be liable for any
consequential loss or damage whatsoever or howsoever arising.
18
19
Your Authorised Dealer is:
20
CONTENTS
Page
Introduction
1
Location of Parts
2-3
Labels
4-5
Indicators and Controls
6
Caution Statement
6
Operating Instructions
6
Operating the unit
7-15
Care and Maintenance
16
Warnings
16
Testing the RF Battery
16
Specifications
17
Warranty Terms and Conditions
18
Address of Manufacturer
19
21