1
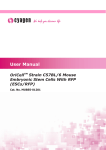
Product User Manual
Photonic Energetics
700 Valerie Drive
Raleigh, NC 27606
Internet: www.photonicenergetics.com
Email: Info@ photonicenergetics.com
Phone: 919-233-8272
1
Product Description
• The Photonic Energetics Dynamic Light Therapy
Model One provides a feature rich high power
combination visible far red and invisible infrared light
therapy product in an ergonomic, compact, and
lightweight yet very durable enclosure.
• The Model One provides selectable bio-resonate
Nogier frequencies and selectable output intensity
levels which allow the unit to be customized to
individual requirements.
• The Model One provides the many clinically
established therapeutic benefits of concentrated light
delivery systems in addition to providing beneficial
Nogier bio-resonant frequency groups. Refer to
enclosed CD for documents that describe key benefits
and study references.
General Specifications and Features
• 140 LED high density, high power array with
approximately 1100 milliwatts radiated output
power over a surface area of 8.5 sq. in. (55 sq. cm).
• 112 near infrared LEDs (invisible)
• (56) 940 nm, (36) 880 nm and (20) 875 nm
• 28 red/far red LEDs (visible)
• (20) 655 nm and (8) 680 nm
• Selectable pulse and direct (continuous) output mode
• 10 bio-resonant Nogier derived pulse frequencies
• Auto sequence random frequency select mode
• High precision quartz oscillator and digital circuitry
• Precise digital intensity control – 10% increments
• Automatic shutdown 15 minute timer with audible
tone alert and manual restart
• High capacity universal protected 120/240 Volt AC,
4 Amp power supply, (12 volt car adapter and high
capacity rechargable 12V battery packs are optional)
• Measurements: 6” (length), 4”(width), 1.25” (depth)
2
Photonic Energetics
Dynamic Light Therapy
Basic Operation Instructions
Control Functions
Power On/Off – (Left Panel) switches main power on/off
Mode – (Right Panel) selects either Pulse or Direct (continuous) mode
Start – starts 15 minute timed session – unit automatically turns off and
beeps at end of session – pressing start button initiates a new session
Frequency – selects specific Nogier frequency (see Nogier chart for details)
Intensity – selects power output intensity in progressive 10% increments
Initial Use
• Plug the provided AC power cord into the AC power adapter. This
adapter supplies the required to 12 volt DC to operate the unit. Ensure the
cord is snuggly seated in the adapter and plug the 3 prong wall plug (on
the other end) into a 120 VAC wall power outlet. The green light on the
adapter should now be illuminated.
• Plug the light unit DC power cable into the mating DC connector on the
power adapter. The unit is now ready for powering up.
• Click the Power control (left panel) to the On position The small red
LED above the power cable on the front control panel should now be
illuminated indicating the unit is properly receiving power.
• The unit will beep 3 times when initially turned on.
• Press the Start switch and the LED array will automatically illuminate
and operate for 15 minutes and then automatically turn off The unit will
beep 3 times now signaling the LED array has powered down.
• Press the red Start button (on the front control panel) to restore power to
the LED array for another timed 15 minute session.
• The main Power switch may be turned off at any time to end a session
before the automatic timeout period ends and power the unit down.
3
Directions for General Use
Recommendations for getting started
• Click the Mode switch (right side panel) to the “Pulse” position
• Choose the “F” setting on the Frequency control as a good beginning
point. This is considered to be a “universal frequency” in acupuncture.
• Choose the “5” setting on the Intensity control. This selects the 50%
power level. As you become familiar and comfortable with the unit the
power may be increased by selecting a higher number on the control.
• The intensity level may be adjusted to match specific individual needs.
The level can be reduced if lower stimulation levels seem effective.
• Begin by using the light unit in a slow scanning motion around the toe
nails, feet, ankles, finger nails, hands, wrists and base of the spine. These
locations are associated with key acupuncture points and are beneficial
places to begin treatment. Normally, keeping the light unit from 1 to 6
inches from the body will be effective.
• Initially, limit the duration of the first few sessions from 5 to 7 minutes
and then progressively extend to key focus areas as needed.
• Normally, use of the light unit several sessions a day is beneficial and
well accommodated to treat focus areas where some form of injury or
distress may exist. Full strength of the unit may be realized by placing it
directly in contact with the focus areas for several minutes.
• It is important to note that a small percentage of individuals may be
considerably more sensitive to light stimulation than normally robust
individuals. If this is known or detected, then the power level should be
reduced to a very low setting and the treatment time should be limited to
very brief intervals (30 seconds to 1 or 2 minutes). Also, the light unit
should also be held at a distance of 1 to 3 feet away from the sensitive
individuals body. Generally, a sensitive person will acclimate favorably
to light therapy and after repeated sessions will be able to tolerate
progressively higher power settings and longer exposure times. The unit
may then be used closer to the body after the individual acclimates.
Directions for using the Direct Mode
• Click the Mode switch (right side panel) to the “Direct” position. The
LED array will then operate in a continuous “steady on” state .
• The frequency control is bypassed and thus non-functional in this mode.
• The intensity control is functioning in the Direct mode, and at the 10
setting the unit is producing it’s maximum output level. The unit will
warm considerably in the direct mode at full power. So, even though it is
safe, it is not recommended to operate it at direct maximum power
continuously in multiple back to back sessions.
4
Directions for General Use
Directions for using the Nogier Frequencies
• Click the Mode switch (right side panel) to the “Pulse” position. The
LED array will then be pulsed with the frequency selected by the rotary
Frequency selection switch on the front control panel. (Refer to the chart
titled “Nogier Therapeutic Applications Detail Descriptions” chart that is
provided with the unit to identify the selectable frequency options).
• The Frequency Control is is labeled “A” – “J” and the the settings
correspond to the “Control Setting” column in the above mentioned
document. NOTE: The frequency control labeling is not the same as the
labeling of the Nogier frequency groups.
• The chart provides a listing of the frequency control settings and
identifies the specific frequency of the setting and links them to specific
Nogier frequency groups and the associated description of their
physiological and neurological therapeutic actions.
• The Nogier Therapeutic Applications chart will serve as a guide to select
the Nogier group and corresponding frequency setting that is most
appropriate for the specific condition requiring treatment.
• Use of several complementary groups are advantageous and are described
the referenced document. Thus, selecting several different frequencies at
different intervals during a session may produce the most beneficial
results. Also, switching to the “Direct” mode periodically may also be
helpful particularly for problematic areas.
• In general the higher frequencies tend to be more calming/sedating and
the lower frequencies tend to be more energizing/activating.
• The general actions of the Nogier frequency groups is further elaborated
in the document enclosed with the unit titled “Definition of frequencies
by Drs Paul and Raphaël NOGIER”. (Remember to translate the Nogier
frequency group to the actual control setting on the light unit frequency
select switch by referencing the Nogier Therapeutic Applications chart.
• The setting “J” on the frequency control selects the Auto sequence
random frequency select option. In this setting the pulsed frequency shifts
every 7 seconds in random order covering all Nogier frequency groups.
Pulsed frequencies selected are: 4.6 Hz, 9.2 Hz, 73.2 Hz, 146.5 Hz, 293
Hz, 586 Hz, 1171.9 Hz, 4687.6 Hz. This mode provides a general toning
effect and may be very beneficial in working with problematic areas
where chronic or stuck conditions exist.
5
Product Handling, Maintenance, Storage and Transportation
General Handling
• The PE-1 unit is made from very durable materials and should require
very little general maintenance if used in normal dry environments.
• Do not use in wet or extremely dusty environments
• Rough handling should be avoided. Be careful to not drop the unit or step
on the power cord and connector or roll over it with a chair, etc.
Maintenance Instructions
• Periodic light cleaning using grain alcohol, a glass cleaner, or a slightly
damp cloth with a drop of mild dish detergent will remove any soiling
and help to preserve the appearance of the unit.
• Avoid heavy scrubbing with very harsh chemicals or abrasive materials.
Product Storage and Transportation
• Store the unit in the provided carrying case to protect it during times that
it is not being used. To transport the PE-1, use either the standard padded
carrying case or optional field fanny pack. Either padded carrying case
can be used to hold the PE-1 and the optional battery pack for field use.
• Prepare the PE-1 for storage by extending the power cord to its full
length and allow any twists to gently unravel. Then roll the power cord in
the form of a coil about 6 inches to 7 inches in diameter. Start the coil
loops from the black power cord strain relief (located at the left side of
the unit) and fold it toward the right side of the unit and underneath the
back of the unit. Storing the unit with the cord coiled as described will
extend the life of the cord. The picture below illustrates this method.
6
Optional Battery Pack Use, Care, and Charging
General Information
• The PE1-BAT optional battery is a 12 Volt, 5.0 Amp-Hour re-chargeable
pack of Ni-MH construction. The battery pack power cord is fitted with
the appropriate power connector and polarity to mate with the PE-1 light
therapy unit. An AC powered smart charger is supplied to re-charge the
battery pack. The battery can be re-charged up to 1000 times using the
smart charger.
• When fully charged, the pack should power the PE-1 for up to (30)
fifteen minute sessions when operated in the Pulsed mode and up to (15)
fifteen minute sessions when operated in the Direct (Continuous) mode.
Handling and Storage
• The battery pack should always be kept in the padded carrying case to
protect it from the environment and from rough handling that could cause
permanent damage.
• Do not use the PE-1 in wet or extremely dusty environments
• Be careful to not drop the unit or step on the power cord and connector or
roll over it with a chair, etc.
Charging Instructions
• NOTE: The Smart Charger is fitted with the correct power connector and
polarity to mate with the PE1-BAT battery pack. The smart charger
should be used in an indoors environment only.
• Connect the battery pack to the Smart Charger connector and plug in the
Smart Charger AC cord into an AC power source.
• The Smart Charger indicator LED will then flash red twice and green
twice and then will detect the battery voltage automatically.
• The LED indicator light on the smart charger will shine steady red if the
battery is below the full charge level. The battery will automatically
begin charging. The charger indicator LED will shine steady red while
the battery is undergoing charging.
• The time required for charging the battery is approximately 6 hours (or
overnight) to reach a full charge.
• When the battery is fully charged the charging current will automatically
reduce to around a 50 milliamp (mA) trickle and the indicator LED on
the charger will turn from red to green, indicating the charge cycle is
complete.
• The battery pack can then be disconnected from the charger.
• The fully charged voltage of the battery pack will be approximately 14
Volts at the completion of the charge cycle.
• The PE1-BAT battery pack can then be connected to the PE-1 unit power
cord connector and the unit will then be ready for extended field use.
7
Product Warranty and Refund Policy
Product Warranty
• The Photonic Energetics Dynamic Light Therapy product warranty
covers failures incurred during normal usage and provides for full
coverage of parts and labor for a period of one year, and for parts only for
a period of two years.
• Exclusions to the warranty include evidence of damages resulting from
rough or abusive handling or excessive exposure to water, dust or other
harsh or corrosive environments.
• Exclusions to the warranty also include evidence of failure resulting from
lightning damage, fire or other natural catastrophes.
• Further warranty exclusions include user modification, attempted repair
and/or disassembly of the unit.
• Also, failures or damages resulting from apparent uses of the product for
those that are specified in the original instructions provided with unit are
not covered by the product warranty.
Refund Policy
• The Photonic Energetics Dynamic Light Therapy product refund policy
provides for a new purchase return grace period of 30 days in the event
the customer is not satisfied with the purchase, subject to a 10%
restocking charge.
• The customer is required to make prior arrangements for the refund and
then return the undamaged unit for evaluation prior to the issuance of the
refund. The customer is responsible for the insured shipment charges
incurred in the return shipment of the product.
• Damaged, scarred, or incomplete product returns are subject to a charge
assessment corresponding to the incidental damages found. The customer
is responsible for all damages or missing materials that are identified.
8
•The Frequency Control is is labeled “A” – “J” and the the settings correspond to the “Control Setting”
column in the above mentioned document. NOTE: The frequency control labeling is not the same as
the labeling of the Nogier frequency groups. Be sure to cross reference the frequency control
setting to the corresponding Nogier group when using this chart
•The chart provides a listing of the frequency control settings and identifies the specific frequency of the
setting and links them to specific Nogier frequency groups and the associated description of their
physiological and neurological therapeutic actions.
•The Nogier Therapeutic Applications chart will serve as a guide to select the Nogier group and
9
corresponding frequency setting that is most appropriate for the specific condition requiring treatment.
Photonic Energetics
Treatment Frequency Application Table
(Derived from Nogier Principles of Bio-resonate Body Tissue Types –
According to Embryologic Origin)
Photonic Energetics
Frequency Control
Setting
F
G
H
Nogier Group –
Frequency (Hz)
Bio-resonate Tissues and Organs
A – 292 Hz
Primary tissue type – Ectoderm
Central Nervous System (brain and spinal cord)
Peripheral nerves
Eye
Ear
Mammary glands
Pituitary gland (anterior and posterior)
Enamel of teeth
Body of the adrenal gland
B – 584 Hz
Primary tissue type – Endoderm
Lining of the GI tract
Lining of the Lung
Thyroid gland
Thymus
Liver
Pancreas
Lining of the bladder
Urethra
Auditory tube
C – 1168 Hz
Primary tissue type – Mesoderm
Cartilage
Bone
Muscle
Heart
Blood and lymph vessels
Kidney
Ovaries
Testes
Spleen
Cortex of the adrenal
Source for this information is from the book Healing Energies of Heat and Light –
A Quantum Leap in Heathcare by Charles T. McGee, MD. Medipress, 2000
10
Photonic Energetics Dynamic Infrared Light Therapy
Contact Information: Email: [email protected]
Web: www.photonicenergetics.com
Phone: 919-233-8272
11