1
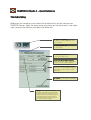
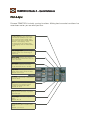
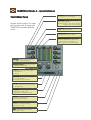
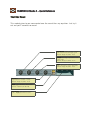
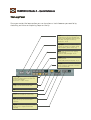
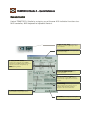
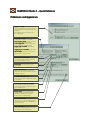
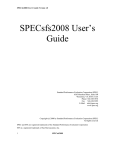
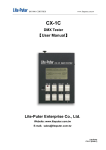
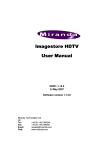
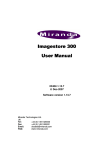
TRAKTOR DJ Studio 2 – Quick Reference
Welcome...
...to TRAKTOR DJ Studio 2, the latest and most advanced version of the software
that changed the way DJs think about computers. We’ve introduced a number of
exciting new features and improved the look and feel that made TRAKTOR the
only choice for serious DJs looking to bring digital files into the mix. No other
software or hardware can offer a DJ more power and flexibility than TRAKTOR DJ
Studio 2.
This Quick Reference gives you an introduction to the powerful new features of
TRAKTOR DJ Studio 2. Use it to get acquainted with the basic operations of the
program before diving into the numerous advanced features in detail.
The Head Panel
Help: clicking on the Help icon opens the
comprehensive "About Dialog", which
contains useful links to the Traktor
Online FAQ, the Online Forum, Online
Registration and more.
Panel Button: used to selectively open
and close the various Traktor Panels.
Setup: click on the setup icon to open
the setup dialog.
Close: clicking this icon will close
TRAKTOR DJ Studio.
Full Screen: use this icon to switch
TRAKTOR DJ Studio to Full Screen mode
(Windows only).
TRAKTOR DJ Studio 2 – Quick Reference
The Audio Setup
Before you get started you must select the soundcard that will be used for your
TRAKTOR session. Open the setup dialog by clicking on the Setup icon in the upper
right corner of the interface and select the Audio tab.
1.: Open the setup dialog by clicking on
the Setup icon in the upper right corner
of the interface.
2.: Select the Audio Tab from the top of
the setup dialog.
3.: Select the Audio Device you want to
use for your Traktor session.
4. Select the Master Output Channels;
Traktor will send the master output signal
to these channels of your soundcard.
5. Select the Monitor Output Channels:
Traktor will send the monitor (headphone)
output signal to these channels of your
soundcard.
6.: Confirm your selection by clicking OK.
Latency: In the event there are audio
problems, come back to the audio setup
to tweak the latency settings or to select
another driver for your soundcard. Try out
all available drivers listed in the device
pull down menu and increase latency if
you encounter audio dropouts.
TRAKTOR DJ Studio 2 – Quick Reference
The File Browser Tree Window
The Tree Window gives you fast access to all the music files on your computer. The
first time you start TRAKTOR DJ Studio 2 you should import all music files into the
Track Collection by dragging your music folders from the Explorer Icon to the Track
Collection Icon. Once you’ve done this you have access to your music via Categories
and Quick Search, as described below.
Current Playlist: shows played and
enqueued track; drop tracks on this icon
to enqueue them to the playlist.
Search Results: shows results of last
search.
Track Collection: click on icon to open
subfolders; click on name to show all
tracks in collection; drop tracks or folders
on this icon to add them to the collection
Quick Search: enter search, confirm by
pressing Enter.
Go: executes quick search.
Shortcut: Enter
Collection Subfolder: click on icon show
subfolders; click on name to show all
tracks sorted by this category.
Explorer: navigates your computer drives;
click on icon to show subfolders; click on
name to show folders content.
Audio CD: shows content of audio CD in
the CD-ROM drive, if available
Playlists / Mixes: shows playlists and
Mixfiles contained in selected folder on
hard drive; drop tracks on this icon to
save them as a playlist.
Playlist: icon for Traktor playlist; drop
tracks on this icon to add tracks to this
playlist
TRAKTOR DJ Studio 2 – Quick Reference
The File Browser Tree Window
The File Browser is your working space. It shows playlists (record boxes) and special
icons that monitor the state of your set.
Delete: deletes selected tracks from
playlist or collection.
Reset: resets playlist icons or clears
Current Playlist.
Edit: opens track properties dialog.
Search Results: opens advanced search
window.
Load / Save Playlist: use to load and save
the Current Playlist.
Pre-Listening: starts / stops pre-listening
of selected track.
Shortcut:
Seek: drag slider to seek through selected
track.
Shortcut:
Current Track: icon identifying the tracks
currently loaded into the decks.
Next Track: icon identifying the track that
will be loaded next.
Pre-listened Track: icon identifying the
currently pre-listened track.
Already Played Track: icon identifying
already played tracks.
Enqueued Tracks: icon identifying tracks
that have already been enqueued to the
Current Playlist.
TRAKTOR DJ Studio 2 – Quick Reference
The Waveform Display
The Waveform Display is a
completely new way of
controlling your mix. It shows
markers, breaks and
instrumentation several
seconds ahead of time. The
Track Overview shows all
relevant markers in their
relative position to the track.
Deck Select click on letter to assign focus
to this deck.
Shortcut: 1
Load Marker: marker used when loading
or pre-listening a track (yellow L)
Track Info: displays title & artist of
current track.
Loop Markers: showing start and End of
stored or active loops (green S & E)
Cue Point: shows location of stored and
current cue points (blue C)
Playback Position: red vertical line
showing current playback position; when
a deck is paused a cue point is set at
either this or the next beat’s position.
Beat Marker: used to define a beat grid
based on the current BPM value (white B)
Track Overview: showing all markers as
small icons according to their position in
the track.
Slider: shows the current position of the
displayed waveform within the track.
Waveform: waveform with selectable
appearance, showing beats and high
frequencies in two color shades.
Beat Grid: grid generated by Beat Marker
calculated from current BPM value.
Fade Points: special cue points that allow
playback of the opposite deck to be
Time Information: displays time
information about the current track, like
elapsed and remaining time.
TRAKTOR DJ Studio 2 – Quick Reference
Playback & Cue
Classic functions known from DJ hardware combine with revolutionary new features,
like "Snap to Beat", to give extensive control over the mix.
Start / End / Previous / Next: simple click
moves to start / end of track; double click
loads previous / next track from playlist
into deck.
Shortcut: Home / End - Focus
Seek: seeks through track; use SHIFT for
reduced speed.
Shortcut: Ctrl + Arrow Left / Right (fast)
Alt + Arrow Left / Right (slow)
Move: moves playback position by
displayed amount; right-click (cmd-click)
on display to select amount.
Cue Point Select: click and select cues to
selected point from pull down menu;
right-click (cmd-click) on locked cue
point to set one of five cue point types.
Lock: locks (stores) and unlocks current
cue point; unlocked cue points get lost
during next Set/Pause.
Shortcut: # - Focus
Snap: if active, cue points snap to next
detected beat event or grid beat.
Cue Set: sets cue point on the fly without
stopping playback. Combine with Set for
beat accurate positioning.
Shortcut: Ctrl + BackSpace - Focus
Cue & Play: cues to the current cue point
and starts playback on release.
Shortcut: Alt + BackSpace - Focus
Cue & Pause: cues to the current cue
point and plays track until release.
Shortcut: BackSpace - Focus
Play & Pause: starts/stops playback of
deck at current position
Shortcut: Space Bar - Focus
TRAKTOR DJ Studio 2 – Quick Reference
Pitch & Sync
Discover TRAKTOR’s fantastic syncing functions. Making beat accurate transitions has
never been easier: you see what you hear.
Tempo Display: shows the current
resulting bpm value, pitch amount and
horizontal bpm quality bar; tap on bpm
value to improve tempo reading; rightclick (cmd-click) to open tempo settings.
Shortcut: T (for tapping) – Focus
- 4 tapping events select tempo range
- over 8 tapping events for manual tempo
input
Pitch (Tempo) Fader: up / down changes
playback speed; select overall range in
preferences.
Master Tempo: switches sync reference
from other deck to master clock; also use
lock to slave deck.
Offset Meter: displays offset relative to
sync reference (other deck or master
clock); shows form +1/2 to –1/2 beat.
Pitch Bend: momentarily slows down or
speeds up the deck to correct the offset.
Shortcut: V / N - Focus
Set Offset: calibrates offset meter; when
pressed the current offset is defined to be
new zero offset.
Sync: sets speed of deck to match bpm
and beats of sync reference by pitch
bending or by instant phase shift.
Shortcut: B - Focus
Key Lock on / off: determines if Sync is
made by a Pitch Bend (off) or by instant
phase shift (on).
Reset Tempo: resets deck to original
tempo.
Shortcut: Alt + B
Tempo up / down: increases / decreases
speed of deck by 0,5% or 0,05% (shiftclick).
Shortcut: C / V - Focus
TRAKTOR DJ Studio 2 – Quick Reference
The DJ Mixer Panel
Anyone familiar with a DJ mixer
will instantly feel at home with
TRAKTOR's versatile software
mixer.
Auto Gain: automatically normalizes input
level from deck to mixer to 0 dB.
Kill Switch: kills frequency band (high,
mid or low) by 80 dB.
Shortcut: 4 high / 5 mid / 6 low – Deck A
9 high / 8 mid / 7 low – Deck B
Input Gain: controls the input gain of
signal from deck to mixer.
EQ High / Mid / Low: controls a selected
frequency band by +12 / -24 dB.
Channel Volume Fader: controls output
from deck equalizer to crossfader. Use
the entire range of these faders on–
adjust output levels of decks with Gain
EQ Trigger: enables / disables equalizer;
use Trigger for momentary action.
Headphone Volume: adjust output volume
for headphones (monitor).
Program: overwrites Cue-Mix knob,
momentarily routing the master signal to
the headphones.
Shortcut: H
Cue Select: selects deck to be routed to
the cue mix (monitor).
Shortcut: G (Cue A) / J (Cue B)
Cue Mix: independent headphone mix.
Turn left to hear Cue selection, turn right
for the Master mix.
Crossfader: central mixing tool for
merging decks A & B; adjust
characteristics in preferences dialog
Autofade: starts/stops automatic fading
using pre-selected fade-time.
Shortcut: Arrow left / right
Punch: momentarily punches in the deck
regardless of crossfader settings.
Shortcut: Ins - Focus
Mute: momentarily mutes the deck.
Shortcut: Del - Focus
TRAKTOR DJ Studio 2 – Quick Reference
The Filter Panel
This module gives to you more control over the sound than any equalizer. Just try it
out and you’ll see what we mean!
Filter Amount: controls the mix of original
(turn left) to filtered (turn right) signal.
Shortcut: Q (up) / A (down) - Focus
Low Cut: lower edge of pass band / notch
in filter curve.
Shortcut: W (up) / S (down) - Focus
Width: distance from Low Cut to upper
edge of pass band / notch in filter curve.
Shortcut: E (up) / D (down) - Focus
Resonance: amplification / attenuation of
edge frequencies (neutral = center).
Shortcut: R (up) / F (down) - Focus
Mode: toggles Band Pass / Notch mode.
Shortcut: 2 (Deck A) / ß (Deck B)
Filter Display: shows (preview) of filter
curve – highlighted if filter is active.
TRAKTOR DJ Studio 2 – Quick Reference
The Loop Panel
Once you master the loop section you can transform a track however you need to by
stretching out intros or capturing loops on the fly.
Set/In: sets a complete loop if a loop
length has been selected, otherwise sets
only loop start. Overwrites previous loop if
unlocked; click again to leave loop.
Shortcut: L - Focus
Active/Out: sets loop end (after Set/In);
activates upcoming loop, without setting
new boundaries; leaves current loop.
Move: move current loop left / right by
display amount.
Shortcut: J (left) / K (right) - Focus
Resize: shrinks / expands current loop by
display amount.
Shortcut: Ö (shrink) / Ä (expand) - Focus
Amount: determines amount of Move and
Resize operations; right-click / cmd-click
to select new amount.
Loop Length: pre-selection of loop length,
measured in beats; right-click / cmd-click
to select new amount.
Shortcut: U / I / O / P - Focus
Snap: if active, all loop boundaries are
snapped to next detected beat event.
Cue: cues to loop selected in display.
Select: steps through stored loops of a
track; if Cue is active also cues to loop.
Lock: locks (stores) and unlocks current
loop; locked loops are stored in track
collection.
Repeat: sets number of repeats for a loop;
if not set loop is repeated until ended
manually.
TRAKTOR DJ Studio 2 – Quick Reference
Recording
For the first time you can
record mixes as an
automation file (Mixfile),
overdub selected
parameters, and then
export the finished mix as
a Wav or AIFF file.
Play Mix: starts playback of recorded mix;
during overdub switches to overwrite
mode.
Auto Play: starts automatic playback of
current playlist using automatic fades.
Record: starts recording (append);
previously press "Reset" to start a new
recording; during playback, record
switches to overdub mode; recording can
be seamlessly interrupted; interruption
creates a file used by the "Redo"
function.
Dub: indicates that single controls are
currently overdubbed; disable "Dub" to
reset offset of overdubbed controls.
Redo: interrupts (if active) and restarts
recording at the previous "Redo" position
created by the last recording interruption.
Cut: cuts the mix at the current position
and discards the first part of it.
Skip in Mix: skips to previous/next mix
transition. Using shift skips to start/end
of mix.
Seek Mix: seeks through the mix. Use
shift for faster movement.
Mix Display: shows time and size of
recorded mix as well as positions of the
next/previous transitions.
Save/Load: saves current mix to hard
disk; loads mix into Automate panel.
Write: fast wav writer to export current
Mixfile to hard disk as aiff or wav file.
Reset: used to clear memory before
starting a new recording.
TRAKTOR DJ Studio 2 – Quick Reference
Remote Control
Control TRAKTOR DJ Studio by assigning any of the over 400 individual functions to a
MIDI controller, MIDI keyboard or keyboard shortcut.
1.: Open the setup dialog by clicking on
the Setup icon in the upper right corner
of the interface.
2.: Select the Input tab in the upper part
of the setup dialog.
3.: Select the MIDI Interface that
connects your computer to your MIDI
equipment. The MIDI interface hast to be
correctly connected and powered up
before starting Traktor.
4.: Select the Traktor function to be
remote controlled.
5.: Press the MIDI Learn button and
move the knob of your MIDI controller
that should be assigned to the selected
function.
6.: Alternatively press the Keyboard Learn
button and then press the key on your
computer keyboard that should be
assigned to the selected function.
7.: Select the Control Mode that ensures
correct behavior of your input device.
8.: Confirm your settings by clicking OK.
TRAKTOR DJ Studio 2 – Quick Reference
Preferences and Appearance
Appearance Setup: in the appearance tab
of the setup dialog you can select from a
series of options to change the look of the
interface.
The available options are more or less
self- explanatory.
Reset Deck on Load: resets deck-specific
settings when loading a new track.
Auto Load Next Track: loads a new track
into the deck after current track.
Lock Playing Deck: prevents tracks from
being loaded into a playing track.
Stop Deck On Load/End: does what it
claims to do.
Initially Cue to Load Marker: does what it
claims to do.
Synchro Start: starts and cues tracks in
synchronicity to opposite deck.
Mouse Scratch Transmission: selects the
speed of transmission when scratching
the waveform with the mouse.
Pitch Range selects the range of the
pitch fader.
Scratch Sound Mode: selects between
digital and vinyl scratch sound mode.
Vinyl mode uses a special filter controlled
by playback speed.
Reset Mixer On Deck Load: resets all
mixer settings (fader + EQs) when loading
a new track.
Disable Loop after Repeat Countdown: if
unchecked this option can be used to
create a loop remix by chaining a series
of pre-defined loops.
X-Fader Curve: the soft curve is the
traditional fader curve; the hard curve
narrows the transition zone to both
borders of the crossfader range.
Focus Follows X-Fader: if selected links
the deck focus to the crossfader position;
"In Mix" to the same side; "Out Of Mix" to
the opposite side.
Playlist Directory: selects the directory
opened by the Playlists/Mixes icon in the
Tree Window of the File Browser.
TRAKTOR DJ Studio 2 – Quick Reference
And now...
...turn up the volume and enjoy!
Your Native Instruments Team