1
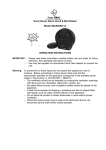
ATTENTION:
This unit can receive America ATSC HD ( DIGITAL SIGNAL) BROADCASTING
CHANNELS IN USA ONLY.
Dear Customer,
May we take this opportunity to thank you for purchasing this player.We strongly
recommend that you carefully study the User Manual before attempting to operate
the unit and that you note the listed prcautions.
1.Ensure a minimum distance of 5 cm around the apparatus for sufficient ventilation.
2.The ventilation should not be impeded by covering the ventilation openings with
items,such as newspapers,table-clothes, curtains, etc.
3.No naked flame sources, such as lighted candles should not be placed on the
apparatus.
4.Moderate climates is the recommeded surrounding of using apparatus.
5.It shall not be exposed to dripping or flashing and that no objects with liquids,such
as vases, shall be placed on the apparatus.
6.Do not place apparatus in closed bookcases or racks without proper ventilation.
7.Where the mains plug is used as the disconnect device, the disconnect device
shall remain readily operable.
8.Always place batteries in the correct polarization into electrical components.
Danger of explosion would be caused if batteries are incorrectly replaced, Replace
only with the same or equivalent type.Take attention to the environment aspects of
battery disposal.
9.“ WARNING ” and the equivalent of following. “ To reduce the risk of fire or electric
shock, do not expose this apparatus to rain or moisture. ”
INTRODUCTION
This TV power supply is AC 100-240V 50/60Hz
on remote controller,
1
Warning that batteries (battery pack or batteries installed)
shall not be exposed to excessive heat such as sunshine,
fire or the like.
POWER
SOURCE
7
VERY HOT!
DO NOT TOUCH!
7
12
11
9
10
HDMI 3 HDMI 2
HDMI 1
PC
8
PC AUDIO
IN
6
Y2
Y1
Component 2
Pb 2
Pr 2 L
Pb 1
Pr 1 L
Component 1
5
R
R
V
V
AV2
L
L
AV1
4
R
R
3
COAX.
S-VIDEO
2
RF
1.Power supply.
2.RF:Connect with antenna or cable TV to watch TV program.
3.COAX. Audio output to 2nd amplifier coaxial input.
4.SVIDEO:SVideo input terminal.
5.AV1/AV2 INPUT:Video1/Audio(L/R)input terminal,Video2/Audio(L/R)input terminal.
6.Component 1:YPBPR video input terminal/Audio(L/R) input terminal.
7.Component 2:YPBPR video input terminal/Audio(L/R) input terminal.
8.PC AUDIO INPUT:Computer Audio input terminal.
9.PC IN:Connect with computer signal input terminal.
10.HDMI 1:HDMI 1 video input terminal.
11.HDMI 2:HDMI 2 video input terminal.
12.HDMI 3:HDMI 3 video input terminal.
8
1
POWER
OSD MENU
This Digital LCP TV includes the following 6 modes.
1. TV/DTV :ANALOG TV MODE;DIGITAL TV MODE
2. VIDEO 1/VIDEO 2:AUDIO/VIDEO INPUT MODE
3.S-VIDEO: S-VIDEO SIGNAL INPUT MODE
4.Component 1/Component 2 :Y Pb Pr /AUDIO(L/R)
INPUT MODE
5. PC:PC INPUT MODE
6.HDMI 1/HDMI 2/HDMI 3 :HDMI SIGNAL INPUT MODE
Select Source
TV
Video 1
Video 2
S-Video
Component 1
Component 2
PC
HDMI 1
HDMI 2
HDMI 3
Press the SOURCE button to display the menu , use the
and
button to select the required mode, press the
OK Button
Selected mode.
1. TV/DTV MODE
Press the MENU button to enter the main menu.
Press the and button to select the.
“VIDEO/AUDIO/CHANNEL/FUNCTION/LOCK ”control
functions, press the and button to adjust the needed item.
NOTE: the MENU and EXIT button can be used as the EXIT function when want to
leave the menu.
1.OSD of the VIDEO function
MENU INTRODUCTION
Press or button to reach the required setting.
1. Picture mode: STANDARD/VIVID/CUSTOM/MILD
2. Adjust the brightness of the display.
3. Adjust the contrast of the display.
4. Adjust the color of the display.
5.Adjust the tint of the display.
6.Adjust the sharpness the display.
7.Picture color temperature adjust,Press"OK"to enter the submenu. Press or
button to select the mode :Standard→ Warm→Custom→Cool.
8. Advanced Video.Press or button to select the DNR :Off→ Weak→Medium
→Strong→Auto.
Video
Mode
Video
Stan dard
Brightne ss
33
Audio
Contrast
53
Channel
Color
60
Tint
0
Sharpn ess
40
Function
Audio
Channel
Function
Color Temperatu re
Lock
Advanced Video
Video
OK Enter
CH+/VOL+/-
DNR
Weak
Black Level Exte nder
off
White peak Limiter
off
CTI
off
Flesh Tone
off
Adaptive Luma Control
off
Lock
Select
EXIT
Exit
Advanced Video
9
CH+/VOL+/-
Select EXIT Back
2.OSD of the AUDIO function
MENU INTRODUCTION
Press or button to reach the required setting.
Video
Balance
0
1.Left/Right track balance adjust.Press or to
Bass
50
adjust the audio output between left and right
Audio
Treb le
50
speakers.
Sound Surrou nd
off
Channel
Mode
off
2.Bass adjust.Press or to increase or decrease
Equalizer
off
Function
the level of the lower-pitched sounds.
AVL
off
Lock
3.Treble adjust.Press or to increase or decrease
the level of the higher-pitched sounds.
Select
Exit
Audio
OK Enter
4.Sound Surround adjust: Select off/on.
5.Sound mode: Press or to select Concert/Living Room /Hall/Bathroom/Cave
/ Arena/Church/off.
6.Equaliter adjust:Press or to select off/Rock/POP/Live/Dance/Techno
/ Classic/ Soft.
7.AVL adjust: Select off/on.
CH+/VOL+/-
EXIT
3.OSD of the CHANNEL function
MENU INTRODUCTION
Press or button to reach the required setting.
1.Tuner mode:CABLE and ANTENNA.
2.Scan the channels and memorize the channels automatically by /OK button.
Press MENU/EXIT button to stop or it will not stop until the scan is finished.
Video
Audio
Tuner
Video
Anten na
Channel Scan
Audio
Channel Skip
Channel
Channel
Function
Function
Lock
Lock
Channel
OK Enter
CH+/VOL+/-
Select
EXIT
Exit
Statu s:Scanning...
Anten na
Analog Channels:0
Digital Channels:0
63%
Channel Scan
EXIT
Cancel
3.Channel skip:press OK button to enter the submenu.press or button to select
the channel you want to set,and press OK button to set.
Video
Audio
Tuner
Video
Anten na
Channel Scan
Audio
Channel Skip
Channel
Channel
Function
Function
Lock
Lock
Channel
OK Enter
CH+/VOL+/-
Select
10
EXIT
Exit
Channel Skip
2
3
4
5
6
7
8
9
10
11
Analog
Analog
Analog
Analog
Analog
Analog
Analog
Analog
Analog
Analog
OK Enter
CH+/VOL+/-
Select
EXIT
Exit
r
You can enter the main menu, then enter the sub-menu, use the
the key requirements of the relevant settings.
or
,
or
to meet
TROUBLESHOOTING
13
TROUBLESHOOTING
14


![Overview cPR67 and cPR84 [v00]](http://vs1.manualzilla.com/store/data/005648847_1-d158a5d3d4b92d14c7a3179652b88ffd-150x150.png)