1
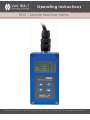
Operating Instructions
HD2 – Mobile Moisture Meter
Van Walt Ltd | Prestwick Lane | Grayswood | Haslemere | Surrey | GU27 2DU | Tel. 01428 661 660 | Fax. 01428 656 808 | www.vanwalt.com
MA167V1_03/09/2012_JO
Operating Instructions
HD2 – Mobile Moisture Meter
The HD2 is a portable device which serves for the display of measurement values
delivered by Trime moisture measurement sensors and was designed for mobile field
deployment.
Van Walt Ltd | Prestwick Lane | Grayswood | Haslemere | Surrey | GU27 2DU | Tel. 01428 661 660 | Fax. 01428 656 808 | www.vanwalt.com
Operating Instructions
HD2 – Mobile Moisture Meter
User Manual Portable Measuring Instrument HD2
Version April 2011
Content
1
1.1
1.2
1.3
1.4
2
2.1
3
3.1
3.2
3.3
3.4
4
4.1
4.2
4.3
4.3.1
4.3.2
4.3.3
4.4
4.4.1
4.4.2
4.4.3
4.4.4
4.4.5
4.4.6
4.4.7
4.4.8
4.4.9
5
6
6.1
6.2
6.3
7
8
8.1
8.2
General Notices............................................................................................................ 4
Intended Use................................................................................................................. 4
The Chargeable Accumulator ................................................................................... 4
Charging the HD2 Portable Measuring Instrument .................................................. 4
Temperatures and Ambient Conditions..................................................................... 4
Control Elements .......................................................................................................... 5
Short Overview of the Key/Button Functions: ........................................................... 5
Initial Commissioning.................................................................................................... 6
Safety Instructions ........................................................................................................ 6
Checking the Delivery Scope .................................................................................... 6
Charging the Accumulator ........................................................................................ 6
Connecting a Sensor .................................................................................................. 6
Operation .................................................................................................................... 7
Switching ON the HD2 Portable Measuring Instrument .......................................... 8
Switching OFF the HD2 Portable Measuring Instrument.......................................... 8
Measurement .............................................................................................................. 8
Operating Mode „Normal“ ....................................................................................... 9
Operating Mode „Average Value“ ......................................................................... 9
Operating Mode „Continuous Measurement“ ......................................................10
Settings ........................................................................................................................10
HD2-Mode ...................................................................................................................11
Material Calibration ...................................................................................................12
Detecting Sensor/Probe.............................................................................................12
Language ....................................................................................................................13
Auto-Power-Off........................................................................................................... 13
Display Illumination .................................................................................................... 13
Display Contrast ......................................................................................................... 14
Probe Info ................................................................................................................... 14
HD2-Info....................................................................................................................... 14
Technical Data HD2 .................................................................................................. 15
Handling of the TRIME-PICO Probes ........................................................................ 16
Introduction ................................................................................................................16
Measurement Volume of the PICO Probes............................................................ 16
Measurement of laboratory samples in the bucket ............................................. 17
Exchange of the Probe Rods................................................................................... 18
Technical Data TRIME-PICO probes ........................................................................19
TRIME-PICO64 .............................................................................................................19
TRIME-PICO32 .............................................................................................................19
Van Walt Ltd | Prestwick Lane | Grayswood | Haslemere | Surrey | GU27 2DU | Tel. 01428 661 660 | Fax. 01428 656 808 | www.vanwalt.com
Operating Instructions
HD2 – Mobile Moisture Meter
1 General Notices
Please read the operating instructions carefully.
Should you have any further questions, please contact our service department under the
contact data depicted above. In no event should you attempt to open and repair the
device yourself. Should you like to file any guarantee claims, please contact the distribution
partner where you purchased the device. Within the scope of product improvements, the
device is subject to technical and optical changes.
1.1 Intended Use
This portable measuring instrument was designed to serve as a reading device for various
IMKO probes. Only respectively intended probes may be connected to the device. The
connection of a probe not intended for connection may lead to the destruction of the
device and/or the connected probe.
1.2 The Chargeable Accumulator
Never exchange the integrated accumulator yourself.
The stated maximum operating periods refer to ideal conditions. The ambient temperature
and the charging cycle can significantly reduce the performance time. In addition, the
charging capacity reduces itself for technical reasons within the course of the utilisation of
the device or due to storage at very high or low temperatures.
1.3 Charging the HD2 Portable Measuring Instrument
Only deploy the respectively provided charger or a comparable power supply unit to
charge the HD2 port- able measuring instrument. Any deviation of the charging voltage can
lead to damage to the device.
Should the device heat up during the charging process, this is normal and not connected
with any hazards. Should the HD2 only function for a short period or not at all in spite of
several attempts to charge it, the integrated accumulator is defective and must be
exchanged. In this case, please contact our local distribution partner or us directly.
1.4 Temperatures and Ambient Conditions
The HD2 portable measuring instrument was designed for deployment under rough
conditions.
The operation of the device under conditions beyond those depicted may lead to damage
to the same.
Van Walt Ltd | Prestwick Lane | Grayswood | Haslemere | Surrey | GU27 2DU | Tel. 01428 661 660 | Fax. 01428 656 808 | www.vanwalt.com
Operating Instructions
HD2 – Mobile Moisture Meter
2
Control Elements
1.
2.
3.
4.
5.
6.
2.1 Button „Measurement“
Button „Menu“
Button „UP“
Button „DOWN“
Display
Probe/Charger Connection
Short Overview of the Key/Button Functions:
„UP“
„Measurement“
- Selection of Menu
Item/ Setting
- Performance of a Measurement
- Selection of Menu Item
- Storing and Activation of a
„DOWN“
Setting
- Selection of Menu Item/Setting
- Deletion of the Value Memory
(only for operation mode „Average
Value“)
- Power On / Off
„Settings“
- Concluding settings
- Leaving a Menu Item
Van Walt Ltd | Prestwick Lane | Grayswood | Haslemere | Surrey | GU27 2DU | Tel. 01428 661 660 | Fax. 01428 656 808 | www.vanwalt.com
Operating Instructions
HD2 – Mobile Moisture Meter
3
Initial Commissioning
3.1
Safety Instructions
Attention: Before initial commissioning, do not fail to read the General Notices, Item 1 at the front of these operating instructions. Any not intended use may lead to damage to the device.
3.2
Checking the Delivery Scope
HD2 Portable Measuring Instrument Plug-in Power Supply Unit (12V/2A) Charging Adapter Protective
Hood Manual
3.3
Charging the Accumulator
The integrated accumulator should be charged before putting the device into operation the first time.
For this purpose, plug in the provided charging adapter into the 7-pole socket of the HD2. Subsequently,
connect the plug-in power supply unit to the charging adapter. In the event that the device is already
switched on, or if the accumulator is exhaustively discharged, the charging process will commence
immediately. If not, switch on the HD2 by pressing the button „Measurement“
for approximately 1
second. An active charging process is signalised in the display by an animated accumulator symbol.
The integrated charging electronics charges the accumulator until the same is completely charged. In
case of exhaustive discharge, this will approximately take 2 hours. As soon as the charging process is
concluded, all 4 „accumulator bars“ will be permanently presented in the display and the trickle
charging will commence.
Attention: Only charge the accumulator at room temperature (approximately between 10°C and 30°C)!
At too low temperatures, it may happen that the charging concluding shut- down does not operate
safely and the accumulator is over-charged. Too high ambient temperatures may lead to damage to the
HD2 due to the additional heat-up during the charging process.
3.4
Connecting a Sensor
The HD2 portable measuring instrument can be operated with the following IMKO-moisture probes: Pico
64 Pico 32 Pico IPH
Connect the moisture probe to the HD2 by plugging in the 7-pole plug into the respectively provided
socket at the HD“ and fastening the coupling nut.
Van Walt Ltd | Prestwick Lane | Grayswood | Haslemere | Surrey | GU27 2DU | Tel. 01428 661 660 | Fax. 01428 656 808 | www.vanwalt.com
Operating Instructions
HD2 – Mobile Moisture Meter
4
Operation
Key/Button Designation:
Key/Button
Designation
Measurement
- Shutting ON/OFF- press 1s
- Perform Measurement press shortly
- Selection of a Menu Item press shortly
- Storing a setting press shortly
Settings
- Conclude Settings
- Leave Menu Item
UP
- Back to previous Menu Item or Setting
Down
- Go to next Menu Item or Setting
- Deleting the Value Memory
(Mode – Average Value)
Display Symbols:
Symbol
Designation
Residual Accumulator Capacity
Active Measurement
Settings are stored
Intensity of the Background Illumination
Remaining time until shut-down (illumination / APO)
Press button „UP“
Press button „DOWN“
Van Walt Ltd | Prestwick Lane | Grayswood | Haslemere | Surrey | GU27 2DU | Tel. 01428 661 660 | Fax. 01428 656 808 | www.vanwalt.com
Operating Instructions
HD2 – Mobile Moisture Meter
Text Meaning:
Text (German/ English)
Meaning
Kal.:
Cal.:
Number of the active calibration in the probe
Feuchte:
Moist.:
Temp.:
Temp.:
Moisture Measurement Value
Notice: Depending on the set calibration, the measurement value may refer to %vol, %grav or ns
Temperature
EC-Trime:Radio-based-Conductivity
Seriennr.:
Serialno.:
Serial Number of the probe, respectively of the HD2
HW:
Hardware Version
FW:
Firmware Version
4.1
Switching ON the HD2 Portable Measuring Instrument
Switch ON the HD2 by pressing the button „Measurement“ for approximately 1 second.
During the starting-up process, the HD2 will attempt to communicate with the connected probe. This
will take approximately 4 seconds. If no probe is connected, or the probe is not able to
communicate for any reason, an error message will be generated on the display. If the probe was
successfully detected, the accordingly set background of the operation mode will appear on the
display and the HD” is ready for deployment.
Notice:
Should no connection to the probe be possible in spite of several attempts, check if
the probe is connected properly. Should this not deliver a positive result, please contact our service
department.
4.2
Switching OFF the HD2 Portable Measuring Instrument
Switch OFF the HD2 by pressing the button „Measurement“ for approximately 1 second.
Notice: It is not possible to shut off the HD2 while it is in the „Settings“. Please, first leave the menu
item „Settings“ by pressing the button „Settings“
until the measurement display appears.
4.3
Measurement
The HD2 portable measuring instrument disposes of three operating modes:
1. Normal Individual Value Display – presents the measurement variables Moisture, Temperature
and the EC-Trime
2. Average Value presents the average value of the moisture of up to 6 individual measurements
3. Continuous Measurement continuously measures the measurement variables Moisture,
Temperature and the EC-Trime
Van Walt Ltd | Prestwick Lane | Grayswood | Haslemere | Surrey | GU27 2DU | Tel. 01428 661 660 | Fax. 01428 656 808 | www.vanwalt.com
Operating Instructions
HD2 – Mobile Moisture Meter
Notice:
During a measurement, no further actions are possible. It is necessary to wait until the measurement is concluded.
4.3.1 Operating Mode „Normal“
After switching on the HD2 portable measuring instrument, the following display will appear in the
operating mode „Normal“ after the start screen:
Number of the selected
Calibration
Serial No. of
the connected
Probe
Residual Accumulator Capacity
Name of the selected Calibration
Measurement Value Moisture
Measurement Value Temperature
Measurement Value TDR-Conductivity
In order to initiate a measurement, shortly press the button “Measurement” . The measurement
will commence and a turning symbol will appear instead of the accumulator-symbol in the upper
right hand corner. During this period, no other actions can be performed. The measurement requires
approximately 4 to 5 seconds. Once the measurement is concluded, the accumulator-symbol will
reappear and the measured values will be generated on the display. The display of the values will be
maintained until a new measurement is conducted.
4.3.2
Operating Mode „Average Value“
In this operating mode, only the moisture is measured and an average value of up to 6 individual values is evaluated. Depending on the set calibration, either the volumetric or the gravimetric moisture is
presented. After switching on the HD2 portable measuring instrument, the following display will appear in the operating mode „Average value“ after the start screen:
Individual Values of the
Measurements
Number of the selected
Calibration
Residual Accumulator Capacity
Average Value of the Measurements
Van Walt Ltd | Prestwick Lane | Grayswood | Haslemere | Surrey | GU27 2DU | Tel. 01428 661 660 | Fax. 01428 656 808 | www.vanwalt.com
Operating Instructions
HD2 – Mobile Moisture Meter
In order to initiate a measurement, shortly press the button “Measurement” . The measurement will
commence and a turning
symbol will appear instead of the accumulator-symbol in the upper right
hand corner. During this period, no other actions can be performed. The measurement requires
approximately 4 to 5 seconds. Once the measurement is concluded, the accumulator-symbol will
reappear. On the left hand side of the display, the individual values of the measurements will be
presented. The currently measured value is presented at Position 1 and old values will be shifted one
position onwards. The arithmetic average value is displayed on the right hand side. The average value is
calculated out of the existing individual values up to a number of 6 values.
Notice:
Only a maximum of 6 values can be stored in the list. Older values are removed from the list and are no longer involved in the formation of the average value.
In order to delete the measurement series, actuate the button „Down“ .
TIPP:
4.3.3
Operating Mode „Continuous Measurement“
In this operating mode, the measurement variables Moisture, Temperature, and the EC-Trime are
determined. The continuous measurement is initiated by actuating the button „Measurement“ . The
same is concluded by actuating the button „Measurement“ once more. The currently pending
measurement is performed completely once more and the sequence is concluded.
4.4
Settings
There are various options to modify and align the settings of the HD2 portable measuring instrument. You
will reach the following menu configuration by actuating the button „Settings“ :
By actuating the buttons „Up“
and „Down“ the entry intended for processing can be marked and
subsequently be selected with the button “Measurement” . You can exit the current menu item, and
also the menu “Settings”, with the button “Settings” .
Van Walt Ltd | Prestwick Lane | Grayswood | Haslemere | Surrey | GU27 2DU | Tel. 01428 661 660 | Fax. 01428 656 808 | www.vanwalt.com
Operating Instructions
HD2 – Mobile Moisture Meter
Settings
(German/English)
Designation
HD2-Modus
HD2-Mode
Switching the Operating Mode
- „Normal“ measurement of the variables Moisture,
Temperature, and EC-Trime
- „Average Value“ determination of the average value of up
6 individual moisture measurement values
- „Continuous Measurement“
ditto
Materialkalibrierung
Choosing the needed Material Calibration
Material calibration
Sonde suchen
Detect Probe
A new search for a connected probe (if an error has
occurred during the activation of the device)
Sprache
Switching the System Language -German -English
Language
Auto-Power-Off
Setting of the automatic shut-down
Displaybeleuchtung
Display Illumination
Setting of the Background Illumination
- Turn-Off-Time
- Intensity
Displaykontrast
Setting of the ideal contrast
LCD-Contrast
Sondeninfo
Issues various information regarding the probe
Probe Info
HD2-Info
Issues various information regarding the HD2 portable
measuring instrument
4.4.1
HD2-Mode
In this menu item, the operating mode of the HD2 portable measuring instrument can be changed.
With the selection „Normal“, an individual measurement of the three probe parameters Moisture,
Temperature and the EC-Trime is selected. The parameter Moisture, depending on the selected
calibration, the moisture in volumetric or gravimetric percentages or can state the running period of the
TDR pulse. In case of the display of the running period, the percent-symbol must be understood as „ns“.
When selecting “Average Value”, depending on the selected calibration, only the moisture in %vol or
%grav, respectively the running period in ns, is determined. The measured value is stored in a list of up to 6
measurement values. The arithmetic average is formed out of this list.
Notice:
Only a maximum of 6 values can be stored in the list. Older values are removed from the list and are no longer involved in the formation of the average value.
Van Walt Ltd | Prestwick Lane | Grayswood | Haslemere | Surrey | GU27 2DU | Tel. 01428 661 660 | Fax. 01428 656 808 | www.vanwalt.com
Operating Instructions
HD2 – Mobile Moisture Meter
By actuating the buttons „Up“
and „Down“
, the entry intended for processing can be marked
and subsequently be selected with the button “Measurement” . After the selection, the symbol will
appear in the upper right hand display corner which indicates that the selection is activated and has
been stored.
4.4.2
Material Calibration
Depending on the task of the deployment, various calibrations are deposited in the probe. These can
be volumetric calibrations for grounds of various densities, gravimetric calibrations for the measurement
of sand moisture contents, or also running period calibrations.
You can select the calibration required for your application within the menu item „Material Calibration“.
This enables to cover a multitude of deployment options with merely one probe.
After the selection of the menu item „Material Calibration“, the 15 calibration options are called up by
name which requires a short moment of time. Subsequently a display in a similar form as follows will be
generated:
The list can be scrolled and the wanted calibration be selected by actuating the buttons „Up“
and
„Down“ The “!“ in front of a calibration indicates the currently active one. You can set the selected
calibration to become the active one by actuating the button „Measurement“
After a short
moment, the symbol
will appear in the upper right hand display corner to indicate that the selection
has been activated. In addition, the „!“ will be placed in front of the now active calibration.
4.4.3
Detecting Sensor/Probe
In the event that communication problems arise with the probe at the activation of the HD2 portable
measuring instrument, or if no probe was connected, or it is intended to exchange the probe during
operation, this menu item should be selected. After selection of this menu item, the HD2 will again
attempt to establish a connection to the connected probe. If this attempt is successful, the serial number of the probe will appear in the display.
Should a connection not be possible, „No probe detected“ will be generated on the display.
Notice:
Should no connection to the probe be possible in spite of several attempts, check if the probe is connected properly. Should this not deliver a positive result, please contact our service department.
Van Walt Ltd | Prestwick Lane | Grayswood | Haslemere | Surrey | GU27 2DU | Tel. 01428 661 660 | Fax. 01428 656 808 | www.vanwalt.com
Operating Instructions
HD2 – Mobile Moisture Meter
4.4.4
Language
In this menu item, the language of the HD2 portable measuring instrument can be selected.
Currently, the user has the choice between the languages English and German. You can select the
desired language by actuating the buttons „Up“
and „Down“
and activate the same via the
button „Measurement“
After activation of the language, the symbol
right hand corner of the display.
will appear in the upper
4.4.5
Auto-Power-Off
In the menu item „Auto-Power-Off“, you can select an automatic shut-down offered in various time
periods.
Hereby, you can select between the following shut-off times:
-
1 Minute
-
2 Minutes
-
5 Minutes
-
10 Minutes
-
20 Minutes
Respectively also deactivate the automatic shut-down function (Display „—min“). For this purpose,
select the desired shut down time by actuating the buttons „Up“
same via the button „Measurement“
hand corer of the display.
Notice:
After activation, the symbol
and „Down“
and activate the
will appear in the upper right
The HD2 will only automatically shut down, if no further button is actuated. Any
actuation of a button will lead to the shut down time to start again.
4.4.6
Display Illumination
If required, the background illumination of the display can be individually adjusted. Consequently,
this enables the option to save power and to prolong the operational period.
After the selection of the menu entry, the following screen will be presented on the display:
The selection of the background illumination, respectively the time until the automatic shut-down of
the same is selected via the button „Up“
by actuating the same several times. Using the
button „Down“
you can adjust the intensity of the illumination, respectively turn the same
completely off. Activate and store your settings by actuating the button „Measurement“
activation, the symbol
After
will appear in the upper right hand corner of the display.
Van Walt Ltd | Prestwick Lane | Grayswood | Haslemere | Surrey | GU27 2DU | Tel. 01428 661 660 | Fax. 01428 656 808 | www.vanwalt.com
Operating Instructions
HD2 – Mobile Moisture Meter
4.4.7
Display Contrast
At extreme temperatures, it may be necessary to adjust the contrast of the display in order to
be able to clearly read the display. For this purpose, select the menu item „Display Contrast“
and then change the contrast by actuating the button „Up“
respectively „Down“
Activate and store your settings by actuating the button „Measurement“
the symbol
After activation,
will appear in the upper right hand corner of the display.
4.4.8 Probe Info
By selecting this menu item, after a short moment, you will be issued various information
regarding the connected probe.
These are:
-
Serial Number
-
Probe Type
-
Hardware Version (HW)
-
Firmware Version (FW)
4.4.9
HD2-Info
By selecting this menu item you will be issued various information regarding your HD2 portable
measuring instrument.
These are:
-
Serial Number
-
Hardware Version (HW)
-
Firmware Version (FW)
-
Accumulator Capacity
-
Accumulator Voltage
Van Walt Ltd | Prestwick Lane | Grayswood | Haslemere | Surrey | GU27 2DU | Tel. 01428 661 660 | Fax. 01428 656 808 | www.vanwalt.com
Operating Instructions
HD2 – Mobile Moisture Meter
5
Technical Data HD2
Height
36mm
Width
64mm
Length
150mm
Weight
(With accumulator) app. 437g
Power Consumption
Power Down
ca. 35µA
Idle
- Background Illum. OFF
- Background Illum. Max
ca. 26mA
ca. 56mA
Probe turned ON
ca. 100mA
Measurement
ca. 350mA
Measurement per Charge
20°C / Background Illum. Max
Mode – Continuous Measurement
ca. 5000
Connectable Sensors
PICO64, PICO32, PICO-IPH
Storage Temperature
-30°C bis 80°C
Operating Temperature
-20°C bis 70°C
Charging Temperature
10°C bis 30°C
Charging Voltage
Nom. 12V, Max. 15V, Min. 12V
Charging Current
ca. 1A
Charging Time
At exhaustively discharged accumulator. 2h
Accumulator
Ni-MH (4 x 1.2V) (AA), 2000mAh, >1500 Measurements
Physical BUS
RS485
Bus-Protocol
IMP-Bus Port Settings
IMP-BUS-Protocol II
8 Data Bits, 2 Stop Bits, Odd Parity
Van Walt Ltd | Prestwick Lane | Grayswood | Haslemere | Surrey | GU27 2DU | Tel. 01428 661 660 | Fax. 01428 656 808 | www.vanwalt.com
Operating Instructions
HD2 – Mobile Moisture Meter
6 Handling of the TRIME-PICO Probes
6.1
Introduction
The determination of the soil moisture content with the Time Domain Reflectometry (TDR)
technology has in the mean time managed to well-establish itself on the market. In former
times, the reliable measurement of the moisture was laborious and not always accurate. Since
the development of the TRIME-TDR technology, there no longer any reason to rely on
complicated and inaccurate technologies.
6.2
Measurement Volume of the PICO Probes
The penetration depth of the electrical and magnetic flux lines in theory
reach indefinitely far into the measured material. However, the effective
penetration depth of the PICO probes relevant for the measurement is
approximately 2cm in the vicinity of the probe rods. The illustration
demonstrates the effectively registered measurement volume.
For this reason, it is important to completely insert the probe rods in the material
intended for measurement.
Van Walt Ltd | Prestwick Lane | Grayswood | Haslemere | Surrey | GU27 2DU | Tel. 01428 661 660 | Fax. 01428 656 808 | www.vanwalt.com
Operating Instructions
HD2 – Mobile Moisture Meter
6.3 Measurement of laboratory samples in the bucket
A sample of material can also make easy in a plastic bucket. Due to the measurement field expansion (green waves in the figure) is a bucket with 10 liters as below to select. Thus the insertion
of the probe enough space is available to the bucket, the bucket should have a suitable height.
We recommend a plastic bucket with a diameter of 30cm and a height of 30cm. Please note the
following:
1. The bucket should be filled at least 5 cm higher than the probe rods are long (<20cm),so that the probe be pressed in the material.
2. Insert the probe rods straight in the middle of the bucket into the material. It is important to make sure that is not wobbled to produce no air gaps between the bars.
3. Insert the probe so far into the material that the blue probe body is in the material.
4. To avoid air gaps stomp the bucket a few times on the ground to compress the sand around the probe rods.
5. After completion of the measurement, you can still carry out further measurements. To obtain a representative measurement, the sand is again agitate well.
Van Walt Ltd | Prestwick Lane | Grayswood | Haslemere | Surrey | GU27 2DU | Tel. 01428 661 660 | Fax. 01428 656 808 | www.vanwalt.com
Operating Instructions
HD2 – Mobile Moisture Meter
7
Exchange of the Probe Rods
In the event that the probe rods are damaged, the same can be easily exchanged.
1) Prepare the gaskets, the probe body,
and the probe rods
2) Press the gaskets into the bore holes
3) Press the gaskets until they reach the
interior thread
4) Screw the rods into the probe body
Van Walt Ltd | Prestwick Lane | Grayswood | Haslemere | Surrey | GU27 2DU | Tel. 01428 661 660 | Fax. 01428 656 808 | www.vanwalt.com
Operating Instructions
HD2 – Mobile Moisture Meter
8
Technical Data TRIME-PICO probes
8.1 TRIME-PICO64
For measurement of the moisture content
in soil, sand, and gravel
•
•
•
•
•
•
8.2 TRIME-PICO32
For measurement of the moisture content
in soil, sand, and gravel
State-of-the-art sensor with
•
integrated TDR- electronics
Measurement Value Range
•
0..100 vol.%
Integrated Temperature Sensor
•
Deployable up to more than •
20dS/m Total Conductivity
(Bulk-Soil-Conductivity).
Measurement Volume ≙ 1250ml
•
Robust (IP68), proven, and suited for • long-term in- stallation
State-of-the-art sensor with
integrated TDR- electronics
Measurement Value Range
0..100 vol.%
Integrated Temperature Sensor
Deployable up to more than 20dS/m Total Conductivity
(Bulk-Soil-Conductivity).
Measurement Volume 250ml
Robust (IP68), proven, and suited for long-term in- stallation
Van Walt Ltd | Prestwick Lane | Grayswood | Haslemere | Surrey | GU27 2DU | Tel. 01428 661 660 | Fax. 01428 656 808 | www.vanwalt.com
Operating Instructions
HD2 – Mobile Moisture Meter
Van Walt Ltd | Prestwick Lane | Grayswood | Haslemere | Surrey | GU27 2DU | Tel. 01428 661 660 | Fax. 01428 656 808 | www.vanwalt.com