1
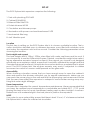
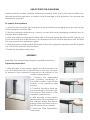
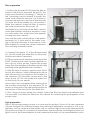
75 lt
20 gal
System MINI
Complete Reef System
USER MANUAL
www. eloseurope.com
Preface
Congratulations on your purchase of the Elos System MINI.
The uniquely colorful and diverse underwater world of the coral reef and its inhabitants
has captivated man for ages. Since the early years, aquatic hobbyists have tried to
duplicate this wonderland in their homes, focusing on the equipment and technologies
required to achieve this.
Elos developed the System MINI to provide a complete reef-ready system so that from
the beginning, you can focus on the aquarium’s inhabitants rather than the hardware.
This small aquarium have been developed with all the knowledge we have developed
in years of experience with our bigger aquarium. It is a full working copy of our big
aquarium and, in some respect, even more sophisticated. It incorporate our Skimming
technology and an innovative LED light, unsurpassed in term of innovation and quality.
This manual includes complete set-up and operational instructions for the System MINI
aquarium.
We hope that you enjoy your System MINI.
PLEASE READ AND FOLLOW ALL SAFETY INSTRUCTIONS
DANGER: To avoid possible electric shock, special care should be taken when handling a
wet aquarium. For each of the following situations, do not attempt repairs yourself; return
the appliance to an authorized service facility for service or discard the appliance.
WARNING: To guard against injury, basic safety precautions should be observed, including the following:
a. Do not operate any appliance if it has a damaged cord
or plug, if it is malfunctioning, or if it is dropped or damaged in any manner.
b. To avoid the possibility of the appliance plug or receptacle getting wet, position the aquarium stand and tank to
one side of a wall mounted receptacle to prevent water
from dripping onto the receptacle or plug. You should create a “drip loop” (see Figure 1) for each cord connecting
an aquarium appliance to a receptacle. The “drip loop” is
that part of the cord below the level of the receptacle, or
the connector. Use an extension cord, if necessary, to prevent water traveling along the cord and coming into contact with the receptacle. If the plug or receptacle does
get wet, DO NOT unplug the cord. Disconnect the fuse or
circuit breaker that supplies power to the appliance. Then
unplug the device and examine for presence of water in the receptacle.
c. Close supervision is necessary when any appliance is used by or near children.
d. To avoid injury, do not contact moving parts.
e. Always unplug an appliance from an outlet when not in use, before putting on or taking
off parts, and before cleaning. Never pull the cord itself to remove the plug from the outlet.
Grasp the plug and pull to disconnect.
f. Do not use an appliance for anything other than its intended use. The use of attachments
not recommended or sold by the appliance manufacturer may cause an unsafe condition.
g. Do not install or store the appliance where it will be exposed to the weather or to temperatures below freezing point.
h. Make sure an appliance mounted on a tank is securely installed before operating it.
i. Read and observe all the important notices on the appliance.
j. If an extension cord is necessary, a cord with a proper rating should be used. A cord
rated for less amperes or watts than the appliance rating may overheat. Care should be
taken to arrange the cord so that it cannot be tripped over or pulled accidentally.
SET-UP
The ELOS System Mini aquarium comprises the following:
1. Tank with plumbing POOL43S
2. Cabinet SQUARE43
3. External Filter SUMP100
4. Protein skimmer NS100
5. Circulation and skimmer pumps
6. Illumination with power cord and transformer E-LITE
7. Mechanical filter bag
8. Anti-Vibration pad
Location
The first step in setting up the ELOS System Mini is to choose a suitable location. The location should be decided upon in advance because, once filled with substrate, rocks
and water, the aquarium must not be moved. Consider the following parameters when
choosing the location.
Tank weight and support
The tank weighs about 120kg / 270lbs when filled with water, reef base and live rock. If
you choose not to use the System Mini Square Cabinet, consider this weight when selecting an alternative aquarium support or stand. If the support you choose is not designed
specifically as an aquarium stand, ensure that it can both withstand the weight and that
it remains balanced and level; it should also be constructed from a material that is splash
proof. The ELOS System Mini, like all glass aquaria, may crack if subjected to sudden
movement as a result of uneven water pressure on the glass walls.
Accessibility
When choosing a location, ensure that you have enough room to open the cabinet’s
door and remove the skimmer collection cup for regular maintenance. Make sure you
can reach the power plug on the wall and that the power plug can be removed. Ensure
that the area surrounding the aquarium is waterproof and consider moving away anything that water might damage.
Room temperature
Site selection is important for correct temperature maintenance. We recommended that
you keep the ambient room temperature a comfortable and stable 22°C / 72°F. Avoid
placing the tank in front of an air conditioner, heating vents or direct sunlight. A well ventilated room with moderate light is the best place to position the aquarium.
NOTE
If you plan to use a water chiller, ensure that there is least 10 cm / 4” of clearance behind
the System Mini to allow for sufficient air circulation.
Unpacking the aquarium
Please read this section carefully before proceeding. Note that in the box the filter is positioned inside the aquarium. In order to avoid damage to the aquarium, two people are
required to unpack it.
To unpack the aquarium
1. open the box from the top and remove the protective packaging from around the top
of the aquarium and the filter.
2. Remove skimmer, skimmer cup, pumps, connections and packaging materials from inside the filter/cardboard.
3. With one person positioned at either side of the tank, grasp the filter and lift it gently out
of the tank and onto a flat surface. Pay attention not to touch the aquarium with the filter.
This may scratch the aquarium’s glass.
4. With one person positioned at either side of the tank, grasp the aquarium and lift it gently
out of the box and onto a flat surface.
5. Read the Assembly Instructions.
Assembly
Assembly the cabinet following the supplied instructions.
Aquarium preparation
1. With the help of one person, gently turn the aquarium on
one of its side and onto a flat surface so that you can easily access to the connection placed on the bottom of the
overflow (see picture)
2. Connect the corrugated
tube (overflow plumbing) to
the outlet overflow tube on the
bottom of the aquarium (see
picture)
3. Connect the silicon tube (return plumbing) to the inlet overflow tube on the bottom of the
aquarium (see picture)
4. With the help of one person
gently position the aquarium on
the cabinet sliding the above
tubing inside the back hole on
the top plate of the cabinet.
5. Read the Filter Preparation
Instructions.
Filter preparation
1. Position the skimmer NS100 inside the filter as
shown in the picture. Assemble the pot (5), the
outlet valve and the T plumbing (1). The top of
the T plumbing can be rotated to modify the
water level inside the skimmer. You’ll need to
connect the injector to the inlet of the skimmer
(2). Note the foam paddle you will position it
inside the cabinet, under the filter, to reduce
the noise produced by the pumps (4).
The baffle (3) on the back of the filter is used to
avoid fine bubbles inside the aquarium. Here
you will position the outlet tube (corrugated)
coming from the overflow.
Also note the hole on the bottom of the plastic
separator (6). It force part of the water coming out from the skimmer, to the bottom of the
filter material to create the correct water flow
thus avoiding anaerobic areas.
2. Connect the injector (1) to the skimmer pump
(2). You will modify the water flow on the pump,
and the air intake if necessary.
NOTE: pumps transmit vibrations and noise to the
SUMP. To reduce the noise use the supplied suction cups to fix the pumps. Position the pumps
away from the side glass of the filter will also help
reducing noise generated from vibrations.
3. With the help of a person, gently move the filter into the cabinet, while positioning the return
tube (silicon tube) coming from the overflow of
the aquarium (3) previously connected to the
return pump (4). You will modify the water flow
on the pump to your needs.
Also position the corrugated tube coming from
the overflow plumbing of the aquarium (5) as
shown on the picture. Provide enough space on
the bottom of the tube (6) for the water flow.
4. Don’t forget to place inside the cabinet, below the filter, the black polyurethane mat.
It is important to insulate the filter from the cabinet thus reducing the propagation of the
pumps noise.
Light preparation
Light is the primary energy source in a coral reef ecosystem. Some of the reef organisms
convert the light into chemical energy that other reef inhabitants consume in turn. Invertebrates, such as corals and anemones, rely on sufficient light to promote photosynthesis.
The spectrum of light is of paramount importance because those wavelengths (colours) of
light found at the natural depths of reefs maximize the ability of the zooxanthelae to pho-
tosynthesis. The intensity of the light is also important, though it is impractical for a home
aquarium to provide the high light intensity present in natural reefs. The Elos System MINI
features an unique and innovative LED lighting system, designed specifically to attain the
lighting requirements for a healthy reef ecosystem. The lighting provides a strong, cold,
blue sky colour (10,000K) light with a 1:3 ratio to actinic blue to duplicate the magnificent
fluorescent colours of the reef invertebrates.
Installing the light onto your System MINI is very simple and
requires few simple steps:
1. Place the light body upside down on a smooth, level surface to prevent scratches.
2. Fix the acrylic, transparent plate to the steel bracket. The
screws will be straighten up later on, when the bracket will
be fixed to the aquarium glass.
3. Line up the steel bracket with the cutout in the light body
(closed to the power cord) and insert it by pushing it into its
position. A small amount of force may be required to push
the steel bracket into the body. Straighten the two hexagon
screws (see picture).
4. Make sure that the light body fits securely to the bracket.
6. You are now ready to place the light on the aquarium
and tight up the screws that fix the acrylic transparent plate
to the steel bracket (see picture).
7. It may be necessary to adjust the position of the light supports to position it perfectly parallel to the water surface.
NOTE After initial assembly, it is advisable to regularly clean
the light protection glass as well as the light and bracket
with clean, fresh water and a soft cloth.
8. Read the Pre-operative Instructions before introducing salty water, live rocks and live
animals.
Pre-operative instructions
Before installing a new aquarium it is advisable to inspect it for leaks to make sure that no
damage has occurred during transport.
To check for leaks
1. Fill the tank to the overflow hole with fresh water, avoid the water to fill up the sump for
about 10 cm above the pumps. Wait for 15 minutes and inspect for any signs of leakage.
2. Start the pumps and control again after 15 minutes for any sign of leakage.
3. Siphon the water from the tank to empty it.
NOTE: Do not try to move the aquarium with any water inside
Congratulations! You have completed the assembly of yourSystem MINI. You are now ready
to set up your reef tank.