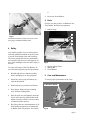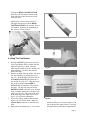
1
User’s Manual 9320 Evergreen Blvd.N.W. Suite G, Mpls. MN 55433 Phone 763-795-8885 Fax 763-795-8884 Toll Free 1-888-8RADIUS (1-888-872-3487) Web Site: www.radiustrack.com E-Mail: [email protected] Contents Topic Section About the Radius Trim Bender 1 Topic Tool Specifications and Performance 2 Advanced Features and Tips 10 Geometry and the Trim Bender 3 Useful Definitions and Formulas 11 Safety 4 Calculating points on an Arc 12 Parts 5 About Radius Track Corporation 13 Care and Maintenance 6 Contact us 14 Setting Up the Trim Bender 7 Adjusting The Spacing Bar 7 Adjusting the Bend Degree Setting 7 Using the Trim Bender 8 Field Adjustments of Angle 9 1 About The Radius Trim Bender Radius Track Corporation’s Radius Trim Bender enables contractors to bend standard 20 thru 25 gauge steel angles for curved wall and ceiling assemblies quickly and accurately without cutting or slitting the metal. Operating on powerful mechanical leverage, the Radius Trim Bender is ideal for field fabrication of curved angle, track, and accessory components for walls, arches, soffits and other curved systems. Any installer capable of curved wall construction with traditional methods will quickly learn to use the Trim Bender. Section The Trim Bender’s method of creating the indentations actually increases the rigidity of the members. No additional steel or plywood reinforcement is needed to maintain the required curvature, which translates into significant labor savings. The completed pieces can be used immediately, or stored for use later in the project. Once a piece of angle is bent into a radius, it is capable of spanning distances in excess of 3 feet (1M) between supports, significantly reducing installation time. Portable and easy to use, the Trim Bender hand tool sets up in minutes to produce precise indentations at regular intervals along the length of the material, imparting a curve into the angle. Once set, the tool will bend the angle to the same radius, piece after piece. The indentations can be spaced at intervals of 2, 3, 4, 6, or 8 inch (or 50, 75, 100, 150, or 200mm), depending on the desired application. Fully adjustable with the turn of a dial, the Trim Bender’s setting mechanism allows the user to change radius settings for a job quickly and accurately. Fig. 1 Page 1 2 Tool Specifications and Performance The Trim Bender’s performance is dependent on the quality and gauge of the metal. The tool will curve all standard 25 to 20-gauge angle and track/runner profiles manufactured in the United States, as well as all standard metric sizes, up to 2” leg length. Table 1 reflects the expected maximum degrees per bend and the minimum expected radius that would be produced. Angle Bending Table 2" 20 ga Angle Spacing Max. Bend Min. Rad. (in) (Deg) (inch) 1 4 20 2 4 31 3 4 45 4 4 59 5 4 74 6 4 88 7 4 102 8 4 117 1 4.5 19 2 4.5 27 3 4.5 40 4 4.5 53 5 4.5 66 6 4.5 78 7 4.5 91 8 4.5 104 1.5" 20 ga Angle 3 Geometry and the Trim Bender The Trim Bender uses basic geometry to create curves in angles. The radius (R) of a circle is the distance from the center to the edge of the circle. The diameter (D) is the distance across the circle (which is twice the radius), and the circumference is the distance around the edge of the circle. The circumference of every circle is divided into 360 equal parts, each called a degree. Before you can curve any steel angles or track, you need to know the radius of the arc. The value of this radius is usually provided by and/or determined from the plans and specifications of your project. These dimensions are usually shown to: 1) One face of the finished wallboard, plaster, or other finish materials. 2) The center of the wall structure, regardless of wall width or finish materials. Dimension values for the Trim Bender system uses the radius to the outside leg of the curved angle or track. (This is the edge of the angle furthest from center of the radius) We use this edge because the length of this leg is not changed by the bending process, which shortens the inside leg. In other words, after you bend a 10-foot piece of angle, the length of the outside leg still remains 10 feet long. This outside radius is a Table 1. Fig 3 Page 2 6. • Keep away from children. 5 Parts Check to see that you have, in addition to the Trim Bender, the following equipment: 1. Radius Gauge 1 Fig. 4 2 standardized number and is used in all charts and gauges included with this tool! 3 4 4 Safety Any installer capable of curved wall construction with traditional methods can quickly learn to use the Trim Bender safely and accurately. The forces generated by the jaws and handles are extremely high, however, and improper use may result in damage to the tool and/or injury to the user. To ensure safe usage of the Trim Bender, observe the following safety tips and precautions: • Read through this user manual carefully before attempting to use the equipment. Fig. 5 2. Degree Setting Charts 3. Spacing Bar 4. Users Manual 6 Care and Maintenance • Follow the step-by-step instructions provided in this manual. To ensure proper performance of the Trim • Wear hand and eye protection at all times. Lubrication Points • Keep fingers, hands and loose clothing away from the bending blade. • Keep the work area well lighted, clean and free of debris and any materials that could inhibit or interfere with the safe movement of material and the operator. • Provide regular care and maintenance of all Trim Bender equipment as recommended by Radius Track Corporation. See section Fig. 6 Page 3 Bender, generously oil or grease all moving parts frequently, as shown in Fig. 6, several times daily during heavy usage and at the end of each day. Use 3-in-1 or other medium lubricating oil. Remove any dust and grit regularly. During the bending process, zinc particles may occasionally break off the angle and land on the mechanisms. In the event of excessive zinc fouling, wash contaminated parts with WD 40 or other light solvent prior to lubrication. Locking Screw Align the number on spacing bar to the right edge of the tool 7 Setting Up the Trim Bender Fig. 7.1 The Trim Bender combines a fully variable BEND CONTROL KNOB with user-selected bend spacings to provide a wide variety of bending and spacing combinations. The spacing of bends is based on the size of the curve you need to build and the spacing of other attached components, such as studs and furring channels. The spacings should be close enough together to avoid “flat spots” from becoming visible, and as far apart as possible to minimize the work required. By selecting the proper bend spacing, you can simplify the installation of the attached stud components. Choose the final stud spacing, then work backwards to select the bend spacing. Table 1 shows minimum achievable radii for a given angle size and bend spacing combinations. The same radius can be made with several different combinations of spacing and bend settings, depending on the final application. Adjusting the Bend Degree Setting The BEND CONTROL KNOB is used to set the depth of the indentation made in the angle by the DIE BLADE. This provides a full range of degree setting adjustments, regardless of the bend spacing. These indentations can vary between 0 and 4.5 degrees, depending on the width and gauge of the angle. Die Blade Bend Control Knob Adjusting the Spacing Bar Fig. 7.2 The adjustable SPACING BAR is located on the base of the jaw assembly and secured with a locking screw. 1. Loosen the locking screw with a flat-head screwdriver (see fig. 7.1) 2. Slide the Spacing Bar through the slot openings until the spacing inch mark is flush to the right side of the jaw frame, changing the setting in 2inch increments, from 4 inches to 8 inches on center. 3. Tighten the locking screw. Bend Control Knob Set Screw Fig 7.3 Page 4 Turning the BEND CONTROL KNOB clockwise will increase the amount of the bend, and turn counter-clockwise will decrease the bend. Adjust the set screw as shown in Fig. 7.3 only tight enough to prevent the BEND CONTROL KNOB freely moving. Do not over-tighten. Normally, no adjustment of this set screw will be needed. Fig 8.2 Fig. 8.1 8. Using The Trim Bender 1. Place the ANGLE leg-up between the jaws of the Trim Bender about 6 inches from the right end of the piece. Make a bend by squeezing the handle down in a smooth, continuous motion. You have now placed a bend in the angle. 2. Remove the angle from the bender and rotate it so the smooth leg is pointing down (see Fig. 8.2). Hold the right side (short end) of the RADIUS GAUGE tight against the 6inch section (see Fig. 8.3). Align the centerline of the openings on the RADIUS GAUGE with the centerline of the bend in the angle. The left side (long end) of the RADIUS GAUGE will rotate away from the angle. Read the scale on the left edge of the gauge (see Fig. 8.4). The point on the scale at the front edge of the angle is the actual degree of bend for this indentation. 3. If you are reading a number other than the degree you want for this bend, adjust the Control Knob to increase or decrease your bend. 4. Repeat the test bending steps 1, 2, & 3 above Fig. 8.3 Fig. 8.4 until desired degrees of bend is achieved. Be sure to advance the angle at least 6” between test bends thereby allowing enough material Page 5 for the RADIUS GAUGE to provide an accurate reading. 5. Once the Trim Bender is “tuned in” to the correct setting for your metal and you are reading the correct degrees on the RADIUS GAUGE, you are ready to bend a full-length piece of material. Bend the piece from right to left down the length of the material, locating the first crimp at half the nominal bend spacing. This will maintain the nominal bend spacing should two lengths be placed end to end. Check the curved material by aligning it with a curved layout line. If the full-length test piece does not match your layout curve, slightly increase or decrease the degree setting (if you are under-bending or over-bending, accordingly) and repeat step 5 on another full piece. by alternating from side to side down the length of the track (see Fig. 10.1 and 10.2). Some people prefer to use the spacing bar and some prefer to manually layout the bend spacing. Note: The first crimp should be located at half the nominal bend spacing. This will maintain the nominal bend spacing should two lengths be placed end to end. 9 Field Adjustment of Angle It is very easy to adjust the curvature of the angle. Gently tapping down on the ridges formed by the die will increase the radius (see Fig 9). A larger radius can be re-bent using the Trim Bender to make it smaller. Fig. 10.1 Fig. 9 10 Advanced Features and Tips Fig. 10.2 The Trim Bender can also be used to form track with a “leg-in” curve type. The technique is to use the Trim Bender to crimp the flanges Page 6 You will need a calculator with a square (x2) and a square root (√) key. Begin by constructing a straight line at least as long as the length of your material. Place a mark at the midpoint of the line. This is point 1. To calculate the points on the arc, we will use the following formulas: R2 - H2 = L2 and R-√L2=V where R=Radius of the arc in inches H=Horizontal Distance between layout points L=Length of the third side of the triangle V=Vertical departure from the layout line 11 Fig. 11 Useful Formulas and Definitions Degree Setting: Desired spacing x 57.296 —————————— = Degrees Radius of Circle (inches) Circumference of a Circle: Diameter x 3.1416 (Pi or π) 12 Method of Calculating Points on an Arc Off a Straight Line. At some point in time, you may be required to bend a curve that is too large to realistically swing an arc to check your radius. The following method will allow you to layout points on the arc by measuring off of a straight line drawn on the floor. Refer to figure 12. To calculate height at point 2, we will use 240” for the radius R and 20” for the horizontal spacing H. By substituting these values for R and H in the first formula we have: 2402 - 202 = L2 or 57600 - 400 = 57200. Applying this number to the second formula, 240-√57200 = V or 240 - 239.17 = .83” Since we are measuring up from the bottom of the arc, we need to subtract the number L from the original radius. Point #2 in figure 12 will be placed at H = 20” and V = .83” (approx. 13/16”). . Repeating these calculations substituting the remaining values for H would give us points at the following locations: Point 1: H = 0.00” Point 2: H = 20.0” Point 3: H = 40.0” Point 4: H = 60.0” V = 0.00” V = .83” V = 3.36” V = 7.62” Note that the V Values are be the same on the other side of centerline. Connecting these points will give you the required arc. The more points you use, the more accurate the arc. 13 About Radius Track Corporation Fig. 12 The Radius Track Corporation is a privately owned company with manufacturing facilities in Minneapolis, Minnesota. In addition to the Trim Bender, we also manufacture and sell the Track Bender, a portable bending tool engiPage 7 We also provide Custom Curving of track and studs in up to 12” widths and in as heavy as 12 gauge material (see figure at right). We can curve track in the “Leg-in” and “Leg-out” and “Standard” (across the web) shapes. Studs can be curved in the Standard bend only. We also design and manufacture domes, ellipses, multi-bend and wave shapes to meet your specifications. Track Bender. Three models available Ellipses Domes. This is in Roswell, New Mexico Multi-Curve Arcs and Splines Page 8 14 Contact Us. You can reach us at:: Main Office and Manufacturing Facility Radius Track Corporation 9320 Evergreen Blvd. NW, Suite G Minneapolis, MN 55433 Tel: 763-795-8885 Toll Free: 888-872-3487 Fax: 763-795-8884 Toll Free: 888-772-3487 Email: [email protected] Or visit us on the web at: www.radiustrack.com This job site features extensive use of products and services offered by Radius Track Corporation. Page 9