1
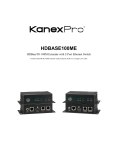
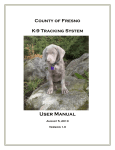
No.Y.11011/4/2007-CC&V
Government of India
Ministry of Health & Family Welfare
Nirman Bhawan, New Delhi
Dated;
To,
Directors (FW) of all States/UTs
Sub:- Guidelines for Cold Chain - matter regarding
Sir,
Kindly refer Ministry’s letter dated.—the deep freezers along with stabilizers
supplied by M/s Haier Appliances are being transported by GMSDs to the states as per the
allocation and consignee addresses. The ILRs are also being supplied shortly.
According to the supply order, the equipments will be installed by the consignees
by the help of their local refrigerator mechanics. The guidelines for installation, operation
instructions, installation report and checklist for installation is enclosed.
The installation of all the equipments are to be done immediately and installation
report be send to M/s Haier Appliances on following address with a copy to the Ministry so
that routine check up of the equipments may be done and training to the cold chain handler
on Haier equipments may be started:
Mr. Som Nath Rampal,
M/s Haier Appliances Ltd.
1
Installation and Operational Instruction of Ice-lined Refrigerator
A. Environment for Installation and Placement:
1. ILR should be placed on level ground with dry air and no dusty.
2. ILR should be placed far away fire (hot origin) without direct sunshine and good ventilation.
3. ILR should be placed by some spaces left around machine. The space between other solid (like
room wall or others) to the ILR cabinet should be more than 10 cm in order to keep good
ventilation and hot exhaust to outside. ILR CANNOT be used as built-in type into some other solid
constructions.
℃, no rainfall.
4. The better working condition for ILR is ambient temperature range 10 to 43
5. ILR should not be installed in the place with heavy humid environment or easy to splash water.
6. ILR should be placed near with socket with full room for stabilizer.
B. Before ILR installation
1. Unpacking all the outer carton\inner foam\inner package\bottom foam.
2. Open the door; remove the protection pad for door sealing. Pull out the user manual and other
accessories to be kept in other places for review. Before using the ILR, user should read manual
carefully and operate the manual accordingly.
3. Take away from all tapes for trays and boxes and pull out the trays and boxes. Take away the
tapes and fixed foam for the tray on the step. After that, be remembered to keep trays and boxes
together. Using clean cloth and neutral detergent to clean the interior cabinet of ILR
4. Put back the trays and boxes according to the instruction on the ILR door.
5. Before using the ILR, user should read carefully the using instruction packed on the ILR door
and keep in mind of the using instruction during the ILR operation.
C. Operating ILR
1. Check ILR stand by level or not and you can get level by adjustment on ILR foot.
2. Connect stabilizer with power, open the power switch and check the power indicator of stabilizer
2
3. After more than half of hour ILR standing only (please note: switch of ILR should be closed),
plug the ILR with stabilizer. Open the ILR switch, ILR start to run with alarm by thermostat. Press any
key on thermostat to get rid of the audible alarm and find the temperature from displayer.
4. During the operation of ILR, the thermostat set point of ILR should be around 4
℃. If the
temperature inside ILR is too high or too low, please adjust the set point of thermostat to get the right
temperature what you want.
5. During the ILR running with first time, compressor will continue to work and the cooling time
will be a little bit longer that because ILR will froze the icepacks inside first. On the other hand,
surrounding of ILR will because hot (temperature rising).
℃. If
6. After 48 hours at least for ILR continuous running, the temperature inside will be around 4
only temperature is between 2 to 8
℃, there will be normal with ILR not running for a long time or
continuous working for a long time since there are many icepacks inside.
7. After temperature inside come to stable, please place the vaccines by batches. Never put full
load into cabinet at one time.
3
Note: the water inside of trays has been charged in the factory, the user
doesn’t need charge water. During long time use, the water inside of trays is
less, and need to be charged again, please follow up the steps as below:
Please charge the water into trays as
per the red level (the dimension
should be 160mm from the top of
tray)
Tray on middle cabinet (on the stair)
Please charge the water into trays as
per the red level (the dimension
should be 121mm from the top of tray)
4
Installation and Operating Instructions for Deep Freezer
(Icepack Freezer)
A. Environment for installation and placement:
1. DF should be placed on level ground with dry air and no dusty.
2. DF should be placed far away fire (hot origin) without direct sunshine and good ventilation.
3. Take away all tapes from trays and boxes and pull out the trays and boxes. Take away the tapes
and fixed foam for the tray on the step. After that, be remembered to keep trays and boxes together.
4. The better working condition for DF is ambient temperature range 10 to 43
℃, no rainfall.
5. DF should not be installed in the place with heavy humid environment or easy to be splashed
with water.
6. DF should be placed near with socket with full space for stabilizer.
B. Before DF installation
1. Unpacking all the outer carton\inner foam\inner package\bottom foam.
2. Open the door; remove the protection pad for door sealing. Pull out the user manual and other
accessories to be kept in safe places for review in the future. Before using the DF, user should
read manual carefully and operate the manual accordingly.
5
3. Take away from all tapes for trays and boxes and pull out the trays and boxes. Take away the
tapes and fixed foam for the tray on the step. After that, be remembered to keep trays and boxes
together. Using clean cloth and neutral detergent to clean the interior cabinet of DF.
4. Put back the trays and boxes according to the instruction on the DF door.
5. Before using the DF, user should read carefully the using instruction packed on the DF
door and keep in mind of the using instruction during the Operating DF (icepack freezer)
C:- Installation Instructions:
1. Check DF placed by level or not and you can get level by adjustment on the foot.
2. Connect stabilizer with power, open the power switch and check the power indicator of
Stabilizer
3. After more than half of hour DF standing only (please note: switch of DF should be closed), plug
the DF with stabilizer. Open the DF switch, DF start to run.
4. During the DF operation, check the set of controller. It should be set as Number 3. The
℃. If the temperature inside is too high or too low, you can
temperature inside will be under -15
6
adjust the controller to get the right temperature what you want. Please note: the bigger of set
number, the lower temperature inside.
5. During the DF continuous operation, the surrounding of DF cabinet will be hot
(temperature will rise up). It is normal.
6. After 48 hours at least for DF continuous operation, temperature inside will be kept under
-15
℃ and DF will have normal compressor circulation. After temperature inside come to
stable, user can put vaccines by batches. Never put full load into cabinet at one time.
7. If user wants to freeze the icepacks with bigger capacity, trays can be pulled out and get
more frozen space for icepacks frozen. Trays are used to keep cold inside and harmful
temperature zone out for vaccines storage use.
7
Note: The water inside of trays have been charged in the factory, the user don’t need charge
water. During long time use, the water inside of trays is less, and need to be charged again,
please follow up the steps as below:
Tray on the storage boxes and bottom:
Please charge the water into trays as
per the instructions and marked level
(the dimension should be 160mm
from the top of tray)
8
Installation of Cold Chain Equipments
Performa no.-1
District : _____________Date : ___ /___ /________
State :
______________________________
Name of the Cold Chain Facility: _____________________________________
Level : State / Regional / Divisional / District / CHC/PHC
Name of technician : _________________________
Name of the cold chain handler --------------------------------S.No
Cold Chain Equipment
(ILR/DF/stabilizer)
Make
Model
Machine
Sr. No.
Gross
Date of Date of
Remarks if
capacity receipt installation any
in litters
1
2
3
4
5
6
7
9
Check List for installation of cold chain equipments
S.No.
Items
1 Equipment received in good condition at cold chain facility
(Un-pack and check physically)
2
3
4
5
6
7
8
9
10
11
12
13
14
15
16
17
Instruction and service manual is received
Baskets are provided with the equipments
Fixed foam is provided with the equipments
Placed in the room having sufficient space
Cold Chain room is well ventilated, dry air and no dust
No Direct Sun light on the equipment
Equipment placed on leveled ground and level adjusted by
adjusting screws
Equipment placed at least 10 cms away from surrounding in
all sides
The ambient temperature is less than 43 deg. Celsius
Proper earthing is available in the power socket
The power socket is ISI marked and equipment placed near
to it (No extension cord is used)
Voltage stabilizer is connected and input voltage is in normal
range (230 volt +/- 5%)
Thermostat alarm is in function
Equipment run for 48 hrs before loading of vaccines
Inside temperature is (-) 15/(+)4 deg. C and stable before
loading any vaccine/icepacks
Door (Lid) have lock in key
Yes/No
Yes/No
Yes/No
Yes/No
Yes/No
Yes/No
Yes/No
Yes/No
Yes/No
Yes/No
Yes/No
Yes/No
Yes/No
Yes/No
Yes/No
Yes/No
Yes/No
Yes/No
10