1
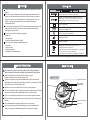
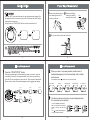
Proper Way of Measurement
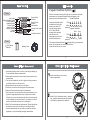
Adjusting Settings
1 Remove all clothes from your 2
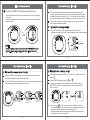
7. To set user
arm allowing the cuff to fit
directly on the skin.
Wrap the cuff tightly
around your wrist by
using the Velcro strip.
1cm
(0.4'')
9
BW211
Press the “SET” button and the mark of a user will appear when turned off or
the display function of the date and time is ON. Then press the “MEM” button
to change the current user.
Finally, press the “START/STOP” button to confirm user and turn off.
3 Sit in a chair with your feet flat on the floor.
BW2119
You can stop the setting anytime when you press the “START/STOP”
button to save the current setting and turn off.
If select to display the date and time, the current date and time will
display when turned off.
1
17
18
Take a Measurement
Take a Measurement
2
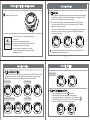
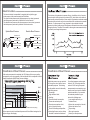
Press the “START/STOP” button.
All display symbols appear. If the positioning system is turned on, when the
unit detects your arm is not in proper position, it will remind you according
to the “Bi-Bi” voice to heighten or lower the cuff. Then the mark of arrowhead
flashes, until the mark of arrowhead disappear and the “ ” symbol display.
Bi...Bi...Bi
Bi Bi Bi Bi
Bi--Bi Bi Bi
OK
Too Iow
Iow
Bi Bi Bi Bi
Bi...Bi...Bi
High
Too High
BW2119
19
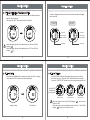
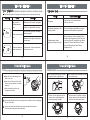
When your arm is in proper position and the mark of
heartbeat disappears, it will automatically start to inflate
and measure.
The hearbeat symbol “
Start to inflate
3
Inflating
” flashes once a pulse is detected.
Heartbeat appear
Continue Inflating
To a fit pressure
The blood pressure and pulse rate are displayed when
the measurement completed.
The cuff is deflated automatically,
and the measurement results are
OR
OR
stored in memory with date and
time.
The “
” symbol will be displayed “kPa”display
“mmHg”display
“
if irregular heartbeat deteced.
20
”display