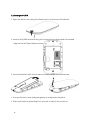
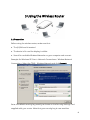
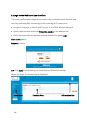
1
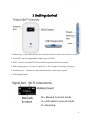
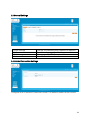
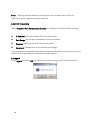
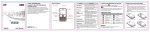
WELCOME Thank you for choosing the Telstra ELITE® Pre-Paid Mobile Wi-Fi. To get the most from your wireless router and to keep it in the best condition please read this manual thoroughly. The following parts are supplied in the box: Parts Wireless Router AC Charger USB charging cable Quick Start User Guide Security Settings card Quantity 1 1 1 1 1 Quick Reference Section Browser home page Username Password Default SSID Default Security Key Restore defaults http://192.168.0.1 (via wireless connection only) admin admin TEHS_6 digits. Supplied on your Security Card. 10 characters which are case sensitive. Supplied on your Security Card. From the powered up state: Press & hold the power key and the WPS key simultaneously. All passwords and settings will be restored to defaults and the router will reboot. IMPORTANT: Security Settings - SSID and Wi-Fi Security Key (WPA Key) The default security settings are unique for your device and are provided on the Security Card. Please keep this card in a safe place. The Security Key is case sensitive and should be entered exactly as it is written on the card. You can change the SSID and Security Key to your own preferences. You need this information to log on to the router. If you lose your Security Card or WPA Key contact your Service Provider to obtain the default WPA key for your device. 1 Contents 1 General Information ........................................................... 3 2 Getting started ................................................................... 5 2.1 Insert your USIM.............................................................................. 6 2.2 Charge your Wireless Router.............................................................. 7 2.3 Insert a microSD™ memory card (Optional Accessory) ........................... 7 2.4 Low Power Mode (Standby Mode) ...................................................... 8 2.5 Network Lock .................................................................................. 8 2.6 Connecting an External Antenna ....................................................... 8 3 Using the Wireless Router ................................................... 9 3.1 Preparation..................................................................................... 9 3.2 Login to the Web based User Interface .............................................. 10 3.3 General Settings .............................................................................11 3.4 Internet Connection Settings ............................................................11 3.5 3G Settings ................................................................................... 12 3.6 Router.......................................................................................... 12 3.7 Wi-Fi Setting................................................................................. 13 3.8 Firewall ........................................................................................ 15 3.8.1 MAC / IP / Port filter items.............................................................. 15 3.8.2 Port Forwarding .......................................................................... 16 3.9 Logout ......................................................................................... 16 4 Troubleshooting and Warranty Information ..................... 17 5 Technical Specifications.................................................... 18 6 Safety Precautions............................................................ 19 2 1 General Information Computer Requirements The router will operate with any PC, MAC or other device that supports Wi-Fi and has a standard internet browser installed. ZTE cannot guarantee that third party hardware or software is compatible with this product. Warnings and Safety Notices Please read all the safety notices before using this device. This device is designed to be used at least 20 cm from your body. Do not use the router near fuel or chemicals or in any prescribed area such as service stations, refineries, hospitals and aircraft. Obey all warning signs where posted. Copyright © 2011 ZTE Corporation All Rights Reserved. 1st Edition March 2011 No part of this publication may be excerpted, reproduced, translated or utilized in any form or by any means, electronic or mechanical, including photocopying and microfilm, without the prior written permission of ZTE Corporation. The pictures, symbols and contents in this manual are for reference only. They might not be completely identical with your product. ZTE Corporation operates a policy of continuous development. ZTE Corporation reserves the right to make changes and improvements to the products described in this document without prior notice. Limitation of Liability ZTE shall not be liable for any loss of profits or indirect, special, incidental or consequential damages resulting from or arising out of or in connection with using this product, whether or not ZTE had been advised, knew or should have known the possibility of such damages. The user should refer to the enclosed warranty card for full warranty and service information. RF Safety Information The router has an internal antenna. For optimum performance with minimum power consumption do not shield the device or cover with any object. Covering the antenna affects signal quality, may cause the router to operate at a higher power level than needed, and may shorten battery life. 3 Radio Frequency Energy Your wireless router is a low-power radio transmitter and receiver. When switched on it intermittently transmits radio frequency (RF) energy (radio waves). The transmit power level is optimized for best performance and automatically reduces when there is good quality reception. Maximum power is only used at the edge of network coverage so under most circumstances the power output is very low. Under poor network conditions the router transmits at a higher power, may get hot and have a significantly shorter battery life. Declaration of Conformity – Specific Absorption Rate (SAR) We declare that the product detailed in this manual, and in combination with our accessories, conform with the essential requirements of The Radio Communications Standard (Electro-magnetic Radiation Human Exposure) 2003 and the Australian Communications and Media Authority Section 376 of the Telecommunications Act 1997. The highest value SAR result is 0.743 W/Kg at GSM 850MHz. N14945 RoHS Declaration (Restriction of Hazardous Substances) ZTE declares that the Wireless Router is free from hazardous materials and complies with EU directive 2002/95/EC (commonly known as the RoHS Directive) and the amendments. Wi-Fi Alliance Interoperability Certification The Wireless Router has successfully completed the Wi-Fi Alliance interoperability testing and is compatible with any wireless device bearing the logo as shown. The model number is MF60. Additional information is available at http://www.wi-fi.org/certification_programs.php is a registered trademark of SD Card Association. 4 2 Getting started 1. Power Key - Press and hold the for three seconds to switch the router on or off. 2. microSD™ slot for expandable memory up to 32GB 3. WPS – Press to enable Wi-Fi Protected Setup authentication process. 4. USB charging port - Connect to your PC or AC charger for battery charging. 5. Antenna port – Connect an external antenna to boost your signal. 6. LCD Display Panel: M = Manual Connect mode A = Automatic Connect mode R = Roaming 5 2.1 Insert your USIM 1. Open the back cover using the thumb catch at the base of the device. 2. Insert the (U)SIM card with the gold contacts facing down and the beveled edge on the left hand side as shown: 3. Insert the battery with the contacts located against the gold springs: 4. Line up the back cover and press gently to snap back into place. 5. Press and hold the power key for 3 seconds to switch the router on. 6 2.2 Charge your Wireless Router 1. Insert the charger lead carefully into the socket at the base of the router. 2. The plug only fits one way. Do not use excessive force to insert the plug. 3. Check the plug is the right way round and insert it gently. 4. Insert the other end of the charger lead (Standard USB) into the AC charger or a USB socket on your computer. Please note: Under conditions of extended use, low coverage, high temperature or maximum data throughput, the battery may not fully charge, even though the router is connected to the AC charger. For these situations it is recommended that, in addition to the charger being connected, the battery is fully charged before extended data transfers commence. 2.3 Insert a microSD™ memory card (Optional Accessory) To use the device as a portable storage drive insert a microSD™ card up to 32GB: Open the memory card slot cover on the right hand side of the router. Insert the microSD™ card as shown and press gently to click into place: Close the memory card slot cover Connect the wireless router to your computer using the USB cable supplied and the memory card will display as an external drive. 7 2.4 Low Power Mode (Standby Mode) If there is no Wi-Fi device connected to the wireless router it will go into low power mode (standby mode) after 10 minutes. The LCD will extinguish. Press the Power key or the WPS key to exit from Low Power Mode (standby mode). Note: If the device is powered off and charging (power lead connected) then the charging animation will stop when fully charged. 2.5 Network Lock Your wireless router is locked to the Telstra network. When you insert a non-Telstra SIM card you are presented with unlock instructions. Contact Telstra to obtain your 16 digit unlock code. An unlocking fee may apply. 5 incorrect attempts will block the unlock process and the device will then only work with a Telstra SIM card. Contact Telstra for more information. 2.6 Connecting an External Antenna Using an external antenna may be recommended in areas of lower coverage to improve your router performance. TS9 termination antennas are available from your retailer. Insert the connector carefully to avoid damage to your router. 8 3 Using the Wireless Router 3.1 Preparation Before using the wireless router, make sure that: The (U)SIM card is inserted. The device is On and the display is visible. Search for available Wireless Networks on your computer and connect. Example for Windows XP: Start > Network Connections > Wireless Network Connection > Select the TEHS… Wireless Network and click Connect. Enter the default security key exactly as shown on the Security Settings Card supplied with your router. Note that your security key is case sensitive. 9 3.2 Login to the Web based User Interface The router configuration pages are accessed using a standard web browser and are only available after connecting to the router by Wi-Fi connection. Use your computer to Search and Connect to the TEHS Wireless Network. Open a web browser and enter http://192.168.0.1 in the address bar. Enter the username and password shown below then press Login User name: admin Password: admin TIP: Click Save to remember your Username and Password settings When you login, the Home Page is displayed: Index area 10 Content Area Information Bar 3.3 General Settings Login Settings Restore PIN Management Status Change the administrator password if required Restore to factory default settings Change you SIM PIN if required View device information. 3.4 Internet Connection Settings Configure auto or manual Connection mode. The default mode is auto connect. 11 3.5 3G Settings Network Info Network Select APN Setting View network service information. Select from 3G or GSM Networks. Default is Automatic. Manually select from available networks. The default APN is set for Telstra. There is no need to make any changes to these settings. 3.6 Router LAN DHCP Clients 12 Configure the LAN and DHCP Settings View DHCP assigned addresses for connected computers. 3.7 Wi-Fi Setting Station List Basic Security WPS View the status of connected Wi-Fi devices (computers). Configure the basic Wi-Fi parameters. Configure your security details, change your wireless access password (WPA Key) if required. Enable WPS Security if required. Basic Configuration Network Mode: If all wireless devices connect to this router with the same transmission mode, performance will be improved by manually setting the appropriate wireless mode. Network Name (SSID): Service Set Identifier. Enter up to 32 characters as the name for your wireless router network. Broadcast Network Name (SSID): If Enable is selected, the router broadcasts the SSID. Other devices can search and connect to it. If Disable is selected other devices cannot view the SSID. If you want someone to connect, you need to tell them the SSID, and let them set up the connection manually. AP Isolation: When Enabled is selected, each of your wireless clients will not be able to communicate with each other. 13 Country Code: Choose your country code. Frequency (Channel): Choose the appropriate channel to optimize the performance and coverage of your wireless network. Rate: Choose the speed rate. MAX Station Number: Choose the maximum number of stations which can connect to the wireless router. Click Apply to save your configuration. Security Configuration OPEN: Anyone can connect to your network without authentication. SHARED: WLAN clients who have the same WEP key as the wireless router can access the wireless network. WPA-PSK: WPA Pre-Shared Key, Enter the Pre-Shared key as a plain text with at least 8 characters. WPA2-PSK: A more secure version of WPA using the 802.11i standard. WPA-PSK/WPA2-PSK: Apply both the WPA-PSK and WPA2-PSK scheme. WEP Keys: Up to four keys can be set. The primary key is the only key in use at a given time. Whatever keys you enter for an access point, you must also enter the same keys for the clients in the same order. In other words, WEP key 1 on the AP must match WEP key 1 on the client. If the Authentication type is OPEN or SHARED, the bottom part of the configuration page displays further parameters. If the Authentication type is WPA-PSK , WPA2-PSK or WPA-PSK/WPA2-PSK , the bottom part of the configuration page displays the WPA parameters. 14 WPA Algorithm: TKIP, AES or AUTO. Pass phrase: You can input a pass phrase encryption key format (8~64 bytes). Click Apply to save your configuration. 3.8 Firewall You can add firewall rules to protect against malicious or intrusive software. Note: You can set a maximum of 10 filter items for MAC/IP/Port Filtering and Port Forwarding. 3.8.1 MAC / IP / Port filter items Default Policy: Set how to handle the packet if none of the rules match. MAC address: Set the MAC address to be filtered. Destination IP Address: Set the destination IP address to be filtered. Source IP Address: Set the source IP address to be filtered. Protocol: Set which protocol to be used for filtering. Destination Port Range: Set the destination port numbers to be filtered Source Port Range: Set the source port numbers to be filtered. Action: Set how to handle the detected packet. Comment: Comment for the filter settings. 15 Note:Filtering rules are matched one by one, if a provision is met it will not continue to match against the other rules set. 3.8.2 Port Forwarding Select Firewall > Port Forwarding > Enable to configure the Virtual Server Settings. IP Address: Set the IP address for the virtual server. Port Range: Set the port numbers for the virtual server. Protocol: Set the protocol for the virtual server. Comment: Comment for the virtual server settings. Port forwarding is dependent on network supported features. Contact your carrier to confirm if this requirement can be met on their network. 3.9 Logout Press Logout and then OK to confirm if you want to log out of the user interface. 16 4 Troubleshooting and Warranty Information Symptoms I cannot access the internet at all. The download or upload speeds are very slow. The signal indicator is always low. I secured my router and have lost my password(s) My battery has not charged while in use and connected to the charger Possible Problems/ Solutions Check the LCD display status. Make sure your SIM card is inserted correctly Check you have network coverage in your area. Check that your SIM card is active and enabled with data services. Please wait 1~ 2 minutes for the router to initialize. See Section 3.1 onwards to Connect to the router using a Wireless Network Connection. The speed is dependent on signal strength. Check your signal strength and network type. This indicates poor reception. Try moving the router to another location nearer the window. Reset your router to factory defaults to erase all stored passwords and encryption settings. From the powered up state: Press the power key and the WPS key simultaneously. In low coverage or high data transfer modes the internal temperature of the device can rise above 45°C. In these conditions the battery cannot be charged due to safety limits with Li-ion battery technology. 4.1 Warranty and Support Service All calls and support for PIN numbers, SIM card registration, account and billing information, network services and other general enquiries should be directed to your Service Provider. See your warranty card for warranty and service information. View Frequently Asked Questions on line at http://www.zte.com.au/telstra 17 5 Technical Specifications Network & Frequency Band: HSUPA/HSDPA/WCDMA: 850/1900/2100MHz GSM/GPRS/EDGE 850/900/1800/1900MHz Data Services: HSDPA Downlink: up to 21.6Mb/s* HSUPA Uplink: up to 5.76Mb/s* Wi-Fi working range: approx 25m radius in free space Wi-Fi Connections: supports up to 8 users Dimensions (W×H×D): 99.7mm*54mm*14.9mm Weight: 65g microSD™ or microSDHC™ card: Up to 32GB External Antenna Port TS9 Battery: 1500mAh Li-ion Standby time (low power mode): up to 80 hours Working time: up to 4hours, depending on usage and network conditions. Working Temperature Range : -10 to +45°C Operating Systems: Microsoft Windows 7, Vista & XP. 32 and 64 bit. MAC OS 10.4.11 and above. 32 and 64 bit. * HSDPA / HSUPA: 21.6Mbps downlink & 5.8 Mbps uplink rated device. Actual customer peak download/upload speeds are less. Typical customer download speeds are 550Kbps – 3Mbps. Typical customer upload speeds are 300Kbps to 3Mbps in all capitals, associated metropolitan areas and selected regional areas and 300kbps - 1Mbps in other coverage areas. Actual customer download/upload speeds will vary due to factors such as distance from the cell, local conditions, user numbers, hardware, software, download source, and other factors. 18 6 Safety Precautions Some electronic devices may be susceptible to electromagnetic interference. Locate the router away from electronic equipment to avoid interference. The router may interfere with medical devices like hearing aids and pacemakers. Please keep yourself at least 20 centimeters away from router. 1. Do not use your router in dangerous environments such as oil terminals or chemical factories. Obey all warning notices and switch off your router in such environments. 2. Please use original accessories or accessories that are authorized by ZTE. Unauthorized accessories may affect the router performance, damage the router or invalidate your warranty. 3. Do not attempt to dismantle the router. There are no user serviceable parts. 4. Do not allow the router or accessories to come into contact with liquid or moisture at any time. The router contains a liquid detection sticker that changes colour when exposed to liquids. Liquid damage will invalidate your warranty. 5. Do not place objects on top of the router or restrict air flow around the device. This may lead to overheating of the device or affect signal quality. 6. Do not expose the router to direct sunlight or store it in hot areas. High temperature can shorten the life of electronic devices. 7. Do not allow children to play with the router or charger. 8. The router and charger are for indoor use only. Cleaning and Maintaining Use an antistatic cloth to clean the router. Do not use harsh chemicals, solvents or abrasive cleaners as these could damage the case. 19