1
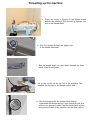
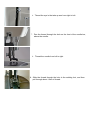
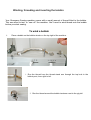
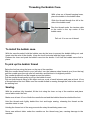
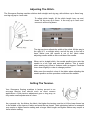
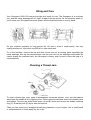
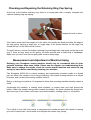
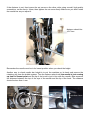
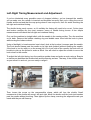
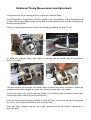
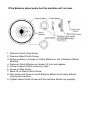
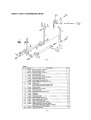
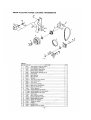
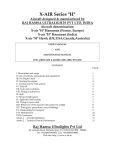
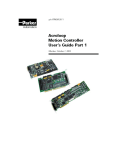
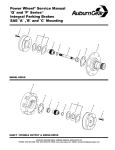
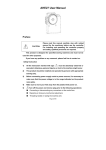
WALKING FOOT
SEWING MACHINE
USER MANUAL
Unpacking and Setting Up Your Strongarm
Sewing Machine.
Remove the tools and accessory box and the thread stand that are taped to the foam
packing surrounding the sewing machine.
Fit the base to the machine. It’s a job best done by two people, or by laying the machine
on the edge of a table. The base has two pins that insert into two holes on the back of
the sewing machine.
Slide the two pins on the base into the holes in the back of the sewing machine. The
two holes have small screws on their underside that may need to be loosened using the
screw driver supplied in the tools and accessory case. Once the pins are located in the
holes, tighten the screws to secure the base to the machine. The base can now be
swung under the machine. If the base doesn’t line up properly, loosen the screws to
adjust the position of the base, then re-tighten.
There is a small tab on the front right of the sewing machine that locks the base in
place.
Please retain the original foam and cardboard shipping container. You’ll need it if you
ever need to transport the machine or return it for service
Tools and Accessories Case
Inside the tools and accessory case you’ll find the thread post. It’s a small silver rod
about 5cm long with two holes.
The thread post screws onto the top of the machine just in front of the carry handle.
The thread stand is taped to the foam packaging. To assemble, screw the smaller rod
into the centre of the base. Loosen the small screw on the side with the supplied
screwdriver. Insert the thread guide into the hole and then tighten the screw.
Inserting Needles
INCORRECTLY INSERTED NEEDLES ARE THE NUMBER ONE CAUSE OF SEWING
PROBLEMS. PLEASE READ THE FOLLOWING INSTRUCTIONS CAREFULLY, AND REREAD THEM IF THE SEWING MACHINE IS FAILING TO MAKE A STITCH.
The Strongarm 2000U-33 comes with a size 20 (metric 125) sharp
point needle fitted.
Three spare needles are included in the tools and accessory case.
Unlike domestic sewing needles, industrial needles have a round
shank and can very easily be inserted the wrong way.
If you look closely at the needle, you will notice the needle has two
sides. One side has a groove that runs from the eye to the shank. The
other side has a smaller indent just above the eye, called a scarf.
Now look at the needle fitted to the sewing machine. Notice the long
groove faces outwards, or to the left as you face the sewing machine.
To insert a needle, loosen the small screw on the needle bar of the
sewing machine that secures the needle. Remove the old needle.
Insert the new needle with the long groove facing
outwards, or to the left as you face the machine.
Slide it all the way in, then tighten the small
screw to secure the needle.
IT’S NOT HARD TO INSERT THE NEEDLE
CORRECTLY, BUT IF IT ISN’T INSERTED
CORRECTLY, THE MACHINE WILL SKIP
STITCHES, BREAK THREAD OR BREAK
NEEDLES.
Threading up the machine
1. Place the spool of thread on the thread stand
behind the machine. Run thread up through the
arm of the thread stand.
2. Run the thread through the pigtail next
to the bobbin tensioner.
3. Run the thread down, up, then down through the three
holes in the thread guide.
4. Lift up the foot-lift on the top left of the machine. This
releases the tension on the thread tension disk.
5. Run the thread under the tension discs and up
underneath the thread spring. If you remove the lid, you
will see two grooves, make sure the thread goes around
the groove closest to the machine, not the outer groove.
6. Thread the eye in the take up arm from right to left.
7. Run the thread through the hole on the front of the needle bar,
above the needle.
8. Thread the needle from left to right.
9. Slide the thread through the hole in the walking foot, and then
pull through about 10cm of thread.
4.
6.
3.
2.
5.
7.
9.
8.
This picture shows the correctly threaded machine.
Winding, threading and inserting the bobbin
Your Strongarm Sewing machine comes with a small amount of thread fitted to the bobbin.
This was used to test, or “sew off” the machine. You’ll need to wind thread onto the bobbin
before you start sewing.
To wind a bobbin
1. !
Place a bobbin on the bobbin winder on the top right of the machine.
1. Run the thread from the thread stand arm through the top hole in the
bobbin post, from right to left.
2. Run the thread around the bobbin tensioner next to the pig tail.
3. Run the thread back again through the lower hole in the bobbin post
this time
4. Bring the thread under and up through one of the holes on the
higher side of the empty bobbin and hold the end of the thread
to give a small amount of tension.
5. Click the bobbin to the right
6. Press the foot pedal to wind the thread onto the bobbin.
The bobbin will automatically stop winding when it is full. If you’re doing a big job, it’s a good idea
to wind all bobbins before you start to save unthreading the machine. Best of all is to have two
spools of thread, one for sewing and the other for winding bobbins as you sew. This will require
the purchase of a second thread stand.
Removing and installing the bobbin
The bobbin can be accessed through the machine’s black sliding cover plate to the left of the
needle.
Removing the bobbin case
Slide the cover-plate to your left and grab the small lever on the bobbin with your thumb
and forefinger.
Pull the bobbin case out from the machine. You’ll notice with the lever out, the bobbin is
captive inside the bobbin case.
One you release the lever, the bobbin is free to be removed from the bobbin case.
Threading the Bobbin Case.
With a few cm of thread hanging loose,
place the bobbin in the bobbin case.
Slide the thread through the slit in the
side of the bobbin case.
Run the thread under the tension plate
to the notch in the top centre of the
bobbin case.
Pull out 10 or so cm of thread.
To install the bobbin case.
With the case threaded, hold the bobbin case by the lever to prevent the bobbin falling out, and
insert onto the axle of the shuttle. Keep the lever horizontal and the finger vertical.
Release the lever and push the bobbin case into the shuttle. You’ll feel the bobbin case click in
place.
To pick up the bobbin thread
Raise the foot bar using the lever on the top of the machine.
With the needle thread held in your left hand, turn the balance wheel towards you (from the top)
until the needle goes through one full revolution and finishes in its highest position.
The needle thread will now be looped around the bobbin.
Pull the needle thread gently to pull up the bobbin thread.
Fish out both threads using a flat object such as a pair of small scissors and pass at least 10 cm
of thread behind the foot. Make sure the needle thread is running through the hole in the centre of
the walking foot.
Sewing.
With the machine fully threaded, lift the foot using the lever on top of the machine and place
some fabric under the foot.
Make sure at least 10 cm of both the needle thread and the bobbin thread are behind the foot.
Hold the thread ends lightly behind the foot and begin sewing, releasing the thread as the
machine starts to sew.
Holding the thread out of the way prevents the stray thread being sewn over.
Never sew without fabric under the machine as the thread may jam, causing damage to the
machine.
Adjusting The Stitch.
The Strongarm Sewing machine stitches both straight and zig zag, with stitches up to 6mm long
and zig zag up to 4 mm wide.
To adjust stitch length, lift the stitch length lever up and
down. All the way up is 6mm. ½ the way up is 0mm and
reverse is all the way down.
The zig zag lever adjusts the width of the stitch. All the way to
the right is 0, or straight stitch, and all the way to the left is
4mm. Make sure the needle is out of the fabric when
adjusting needle width as this could bend the needle.
When set to straight stitch, the needle position lever sets the
needle to a left, right and centered position. This is useful
when sewing very close to features such as zippers. Push the
lever down slightly in order to change position.
Make sure the needle is clear of the fabric when adjusting the
needle position as this operation could bend the needle.
Setting The Tension.
Your Strongarm Sewing machine is factory pre-set to an
average tension that should work on most canvas
applications. A little tension adjustment goes a long way, so
only make small adjustments at a time.
As a general rule, the thicker the fabric, the higher the tension must be to lift the lower thread up
to the middle of the layers of fabric and meet the top thread. Thick upholstery fabrics for example
may require a higher tension setting and a longer stitch length and lighter fabrics may require a
lower tension setting.
The goal of setting tension is to have the knot made by each stitch lie in the middle of
the fabric and be no more visible on one side of the fabric than the other.
Tension can be set on the tension dial, as well as on a small screw on the bobbin. It
is rare to need to adjust the bobbin tension. In general you’ll only need to adjust it if
you are sewing very fine fabrics with fine thread and small needles.
Adjusting Walking Foot Pressure.
Heavier fabric requires more foot pressure. This is applied by turning the knob on the top of the
machine above the foot and next to the foot lift lever. Insufficient foot pressure is a common
cause of dropped stitches when sewing thick fabric.
Foot pressure knob
Changing Direction.
To change direction while sewing, stop the machine and then turn the wheel so the needle is
in the fabric. Raise the walking foot using the foot lever and turn the fabric to face the new
direction. Lower the foot and continue sewing.
Finishing A Row Of Stitches.
To finish, lock the stitches by reversing and then sewing forward again over the last
centimeter of stitching. Move the wheel by hand so the needle is in the top position. Raise the
foot and remove the fabric. Raising the foot also releases tension on the thread allowing you
to remove your fabric. Cut the thread close to the fabric leaving at least 10cm of thread
remaining in the machine.
Choosing the Right Needles.
The Strongarm 2000U-33 uses standard industrial walking foot needles.
The needle types or systems are called “135x17” for fabric needles, and “135x16” for leather
needles. Quote those systems when you re-order needles.
Walking foot needles are available from Strongarm or from industrial sewing suppliers. They
are generally not available from domestic sewing suppliers.
Needles are sized in both Metric and “Singer” sizes. Singer sizes are more common in the
US, Metric in Britain and Australia.
The Strongarm sewing machine fits Singer size 12 to 23 needles which correspond to Metric
sizes 80 to 140.
Needle And Thread Size Conversion Chart
Metric Size
60
65
70
75
80
85
90
95
100
110
120
125
130
140
150
160
180
200
Singer
7,8
9
10
11
12
13
14
15
16
18
19
20
21
22
23
24
25
Metric
US
140
V-20
100
V-30
60
V-45
40
V69
30
V92
20
V138
Choosing The Right Thread
For outdoor applications such as sails and canvas, Strongarm recommends a bonded
polyester UV resistant thread such as Coates Dabond.
For Upholstery, bonded Nylon or clear monofilament threads are recommended.
Matching Fabric To Needles And Thread
For your machine to work properly, it is important to match your fabric with the correct
needle and thread. The following chart gives general guidelinesStrongarm recommends
Schmetz Sharp point (regular) needles
For canvas sewing
Schmetz DI NeedlesFor thick leather
Schmetz SD1 NeedlesFor leather and sailcloth
Schmetz Serv7 NeedlesFor heavy and hard to sew fabrics.
Needle
Point
Needle
SizeSinger
Needle
sizeMetric
Thread
Type
Thread
WeightUS
Thread
WeightMetric
Standard
18-22
110-140
Bonded
polyester
V69-V92
40-30
Standard
16-18
100-110
Bonded
polyester
V69
40
Heavy
Duty
20-22
125-140
Bonded
polyester
V92, V138
30-20
Leather
16-22
100-140
Bonded
polyester
V69-V138
40-20
Leather
22
140
Bonded
polyester
V92- V138
30-20
Standard
12
80
Bonded
polyester
V30, V46
40-60
Standard
16
100
Bonded
polyester
V46
60
Upholstery
Fabric
Standard,
Heavy
Duty
16-22
100-140
Motor
Trimming
Vinyl
Heavy
Duty
20-22
125-140
Fabric
Sunbrella
canvas
Dacron
sailclothlight
Dacron
sailclothheavy
Soft light
leather
Dry and
thick
leather
Spinnaker
cloth < .75
ounce
Spinnaker
cloth
1.5 ounce
Bonded
Nylon,
V69-V138
Monofilament
Bonded
Nylon
V96-V138
40-20
30-20
How To Mount The Powerwheel
1. Unscrew and remove the stop
motion stop screw with a
screwdriver
2. By hand, unscrew and remove
the stop motion screw
3. Remove clamp washer from
under the stop motion screw
4. Remove the drive belt cover held
by two screws.
5. Remove longer main belt, turn
hand wheel to assist removal.
6. Remove the hand wheel, wheel
slides off.
7. Install the Powerwheel on the end
of the shaft making sure that the
teeth on the wheel are facing the
sewing machine
8. On the Powerwheel there are two
small holes, under the belt on the
bevelled side. Insert the two grub
screws into the holes, and tighten
using the 1/8” Allen key provided.
9. Install the new drive belt. Slip the
drive belt over the Powerwheel
first and then slip the belt over the
small idle pulley at the back.
10. Put back in place the stop motion
screw and clamp motion washer.
Put back in place the stop motion
clamp stop screw.
11. Put the new belt cover on with
two screws.
12. For hand crank only, install the
handle to the Powerwheel by
tightening the Allen screw with the
5/32" Allen key provided.
Troubleshooting
What do I check when the thread breaks?
Make sure the machine is threaded correctly.
Check the thread section of this manual to make sure you’re using the right thread. For reliable
sewing, use bonded polyester or bonded nylon.
Check for defective needle/needles (bent or blunt).
Make sure you are using the correct needle system, See the needle section in this manual.
Make sure you’re using the right needle size for the thread- check needle size table.
Check thread tension. It could be too tight or too loose.
Check for sharp parts or edges on the cap spring.
Check to see if thread has jumped out from between the tension dial.
Is the sewing area very dirty? Remove needle plate and clean.
Check bobbin and bobbin case for damage, replace if needed.
Bobbin case may be very dirty; clean the inside of the bobbin case.
What do I check when the needles are breaking?
Select correct needle size for the type of work being done. Thick fabric needs bigger needles.
Make sure you are using the correct needle system. Try a Serv 7 needle.
Make sure the needle is inserted correctly.
Check pressure foot is inserted correctly, and lined up with needle hole.
Needles can break when changing the zig zag or needle position setting while the needle is in
the fabric. Make sure to raise the needle when changing the zig zag or needle position setting.
Check machine timing.
Why are there are loops on the underside of the fabric?
This usually means there is insufficient needle thread (top thread) tension. This is often
because the foot has not been lowered when sewing thick assemblies. It can also be
because the needle thread is not seated between the tension discs.
What do I check for skipped stitches?
Select correct needle size for the type of work being done.
Make sure the needle is inserted correctly.
Make sure you are using the correct needle system.
Make sure the machine is threaded correctly.
The foot pressure may not be sufficient. Thick or heavy fabric requires more foot pressure.
Check the cap spring for burrs.
Is the sewing area very dirty? Remove needle plate and clean.
Check bobbin case for defects, replace with new one.
Check the timing.
Why do three threads come up when I finish?
Multiple threads appear from the throat plate when the machine hasn’t finished completing its
stitch. Turn the balance wheel until the needle is in the vertical position to finish the stitch.
Then remove the fabric and cut the threads.
Why does the thread pull out of the needle when I start to sew?
Make sure you have at least 10 cm of thread behind the needle when you start stitching.
How can I avoid oil stain on the material?
Using a piece of paper towel, clean around the needle and presser bar as often as needed.
Remove the needle plate and wipe off any excess oil accumulated on the plate.
Clean up oil soaked lint accumulated around the feed dog.
Quick Check Top Ten:
1.
Incorrect threading – Thread and re-thread the machine and the bobbin and double
check again, you may have over-looked the most simple step.
2. Wrong Size Needle – make sure you are using the right needle for the job and that it
matches your thread and fabric. Skipped stitches will result if a needle too big or too
small for the job.
3. Damaged needles – Change your needles regularly, especially after long periods of
sewing. If in doubt, use a fresh needle and make sure the needle is inserted correctly.
4. Thread and Needle Don’t Match - Your machine will strain to sew thicker thread with a
small needle, check the needle chart.
5. Not Enough Oil - Make sure you apply it to the parts of your machine in order for your
machine to run smoothly.
6. Tension - if the thread is not tight enough or too loose , your machine will not run
smoothly. Check the tension is right on a scrap piece of fabric before you start. Tip:
You may want write on the scrap of fabric, once you have it right, the tension, needle
and thread for your future reference.
7. Incorrect Thread - You may be using incompatible thread. Tough fabric needs thread
strong enough to cope with it. Remember the trifecta: fabric, needle and thread!
8. Inferior Thread – It may be cheap, but successful and durable sewing will arise from
using good quality thread. Also sewing will be easier.
9. Inferior Needles – only use recommended needles for best results.
10. Dirt in the Machine –Cleaning the machine after each project is recommended for best
results. Clean out the bobbin area, and feed dogs of all fuzz, thread and lint. Inspect
your bobbin for burrs and defects and make certain that it is wound evenly.
Oiling and Care
Your Strongarm 2000-U33 comes pre-oiled and ready to sew. The Strongarm is a precision
tool, and the metal bearings will be “tight” straight from the factory. As the machine wears in,
you’ll notice your Strongarm becomes quieter and the flywheel easier to turn by hand.
Oil your machine regularly for long service life. Oil once a week if used heavily. Use only
sewing machine oil, and never use WD-40 or other lubricants.
To oil the machine, remove the top and side covers and oil all moving parts especially the
metal bearings. Also tip the machine back from its cover and oil the bearings underneath. Be
careful tipping the machine back- the Strongarm is heavy and it’s best to have the help of a
second person.
Cleaning a Thread Jam
To clean a thread jam, you’ll need to disassemble the bobbin system. First, turn the balance
wheel until the needle is at its highest point. Tilt the machine back and remove the bobbin case
and bobbin. Turn the two small black levers (A and B) down and remove the bobbin retaining
ring (C). Grab the hook (D) by its axle and remove.
Then you can remove any snagged thread using tweezers or your fingers. Use a small brush
or compressed air to clean away any lint or dirt.
Checking and Repairing the Retaining Ring Cap Spring
At the top of the bobbin retaining ring, there is a curved plate with a roughly triangular slot
called a retaining ring cap spring.
Inspect this slot for burrs
If the fabric moves while the needle is in the fabric, the needle can bend and strike the edge of
the cap spring, causing a small burr, or rough edge. If the thread catches on this edge, the
thread will fray, or the stitch will fail to form.
To repair the burr, remove the bobbin retaining ring and inspect the cap spring on the top of the
ring. If there are any burrs on the spring, file them smooth with a small strip of sandpaper.
Make sure you don’t over-file the spring and create a sharp edge.
Measurement and Adjustment of Machine timing
Retiming your Strongarm sewing machine should only be considered after all other
potential solutions have been tested. Please see the chapter on troubleshooting first.
Make sure to change the needle, check for correct needle insertion and check the cap
spring for burrs before considering retiming your machine.
The Strongarm 2000U-33 is a robust machine, but occasionally a broken needle or a thread
jam can knock the machine out of timing. Retiming a Strongarm sewing machine is a simple
business, and can be performed by machine owners.
Before re-timing your machine, it’s important to know how a sewing machine actually creates a
stitch.
Underneath the machine, a rotating hook oscillates, or rotates back and forth around the
bobbin. When the needle swings down towards the bobbin, the hook catches the thread from
above the eye of the needle, and loops it around the bobbin, creating a knot, or a lockstitch.
For a stitch to form, the hook needs to swing past the needle just when the needle is coming
up from its lowest point, and it needs to brush past the needle very closely.
Timing a sewing machine is all about lining up the needle and the hook so the hook can catch
the thread and make the stitch.
There are three things to set, in order of importance1. How far down the needle travels, otherwise known as needle bar height;
2. How close the hook is set to brush past the needle, or left-right timing; and
3. How far around the hook is when the needle is all the way down, or rotational timing.
Re-setting the Needle Bar Height
If the needle on your Strongarm sewing machine hits a hard object such as a grommet or zip,
or if you run into impenetrable fabric such as the reinforced ends of heavy sails, the needle
bar may slip to prevent damage to the machine’s gears. Fortunately re-setting the needle bar
height is a simple job.
First, remove the end cover from the machine.
Then turn the balance wheel forward until the needle is at its LOWEST point.
To check the correct needle bar height, measure the distance between the top of the needle
bar and the top of the needle bar support. The distance should be about 16mm.
If the distance is out, then loosen the set screw on the drive collar using a small, high quality
screwdriver, set the bar to 16mm, then tighten the set screw firmly. Make sure you don’t rotate
the needle bar as you adjust it.
distance should be
16-17mm
Remember the needle must be in its lowest position when you check the height.
Another way to check needle bar height is to put the machine on its back and remove the
retaining ring from the bobbin system. Turn the balance wheel until the needle is just coming
up from its lowest point and the tip of the hook is just in line with the needle. Now measure
the distance between the top of the eye of the needle and the tip of the hook. The distance
should be less than 1 mm.
less than 1mm
Left-Right Timing Measurement and Adjustment.
If you’ve eliminated every possible cause of dropped stitches, you’ve changed the needle,
you’ve made sure the needle is inserted and threaded correctly, that you’re using the correct
needle and thread and that the cap spring doesn’t have any burrs, then it’s worth checking the
left-right and rotational timing.
The shuttle timing rarely moves, so it’s unlikely the timing will need to be re-set. Cotton jams
and broken needles are the most common cause of shuttle timing issues. A few simple
measurements will check the left-right and rotational timing.
First, set the machine to straight stitch, with the needle in the centre position. Turn the machine
on its back. Remove the bobbin retaining ring and bobbin case. Now hold the hook in place
while turning the balance wheel.
Using a flashlight, (a head mounted one is best) look at the hook as it sweeps past the needle.
The hook should sweep past the needle on its right side (behind) without touching the needle.
If the hook is too far away or on the wrong (left or in front) side of the needle, the hook will not
be able to pick up the thread to make a stitch. You will need to adjust the shuttle to move the
hook closer to the needle.
To adjust the left-right timing, turn the machine upside down and make a mark using a Sharpie
or similar pen between the shuttle shaft and the bearing surface. That way, if the shuttle rotates
as you move it in and out, you can easily re-align it.
Then loosen the screw on the compressible clamp, which will free the shuttle. Small
movements of the shuttle will move it left and right. Move the shuttle until the hook just brushes
past the needle without touching. Then tighten up the clamp, ensuring the alignment mark you
made with the pen still lines up.
Rotational Timing Measurement and Adjustment.
If the machine is still not sewing properly, check the rotational timing.
Set the machine to straight stitch, with the needle in the centre position. Place the machine on
its back. Remove the bobbin retaining ring. Now turn the balance wheel until the needle is in its
absolute lowest position.
The top of the hook should now be left of the needle by between 3.2 and 4.7 mm.
3.2-4.7mm
To adjust the rotational timing, you need to loosen the two set screws that lock the shuttle
driver to the shaft.
First note how far left and right the shuttle driver is fitted to the shaft. You want to adjust the
rotational timing while keeping the driver from shifting left and right on the shaft.
Using a 2mm Allen key, undo the two set screws. You’ll need to rotate the balance wheel after
loosening the first screw to get at the second one.
Once the two screws have been loosened, rotate the driver so the hook sits left of the needle
by 3.2 to 4.7mm, when the needle is in its lowest position.
Once set, firmly re-tighten the two set screws, making sure the driver hasn’t slipped up or
down the shaft.
If the Balance wheel spins but the machine will not sew.
1. Remove Clutch Stop Screw
2. Remove Hand Clutch Screw
3. Notice position of prongs on Clutch Washer in slot of Balance Wheel
Bushing
4. Remove Clutch Washer and make 1/2 turn and replace
5. Screw in Hand Clutch screw very tight
6. Screw in Stop Screw
7. Back off on Hand Clutch Screw
8. Run motor and check to see if Balance Wheel turns freely without
running the machine
9. Tighten Hand Clutch Screw and the machine should run properly.