1
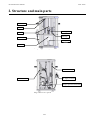
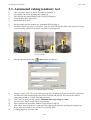
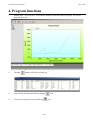
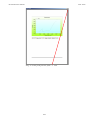
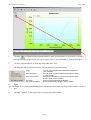
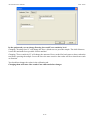
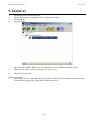
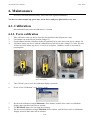
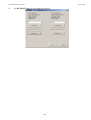
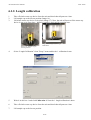
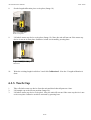
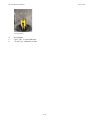
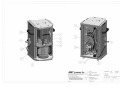
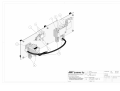
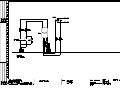
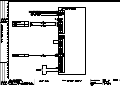
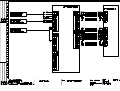
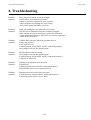
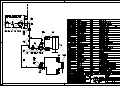
ACAP EASY USER MANUAL
AMT Systems Oy
Automated Manufacturing and Testing Systems Oy
ACAP EASY user manual
2011-10-04
Contents
1. Introduction................................................................................................................................................2
1.1. Technical data.....................................................................................................................................2
2. Structure and main parts............................................................................................................................3
3. Use instruction...........................................................................................................................................4
3.1. Before start.........................................................................................................................................4
3.2. Starting up ACAP e............................................................................................................................4
3.3. Automated caking tendency test.........................................................................................................5
3.4. Using ACAP e as a press....................................................................................................................6
4. Program functions......................................................................................................................................8
5. InstaCal....................................................................................................................................................12
6. Maintenance.............................................................................................................................................13
6.1. Calibration........................................................................................................................................13
6.1.1. Force calibration.......................................................................................................................13
6.1.2. Length calibration.....................................................................................................................15
6.1.3. Teach Cup.................................................................................................................................16
7. Spare part information.............................................................................................................................18
7.1. Drawing: SPARE PART 1, Main Assy.............................................................................................18
7.2. Drawing: SPARE PART 2, Pneumatics............................................................................................18
7.3. Drawing: SPARE PART 3, Waste device.........................................................................................18
7.4. Drawing: ACAP EASY 900, Electrical parts...................................................................................22
8. Troubleshooting.......................................................................................................................................26
9. Pneumatic drawing ACAP e.....................................................................................................................27
1/23
ACAP EASY user manual
2011-10-04
1. Introduction
This manual is meant to be used with ACAP EASY serial number 020.
ACAP EASY is designed for quick measurement of caking tendency of fertilizer granules. Also it is
possible to use ACAP EASY as a press.
Machine is controlled by PC driven program. Program controls cylinder movement, collect results, does
the required calculations and print results.
1.1. Technical data
- accuracy of length measurement
< 0,2mm
- maximum force
8,6kN
- accuracy of the load cell
+/- 0,2%
- air consumption
6 bar/ 150 l/min
- electrical connection, the unit
230 VAC/50Hz/1A
- weight, the main unit
<60kg
- dimensions, the main unit (depth, width, height)
395mm x 485mm x 660mm
- mounting on the table with load capacity
>200kg
- recommended table size (depth, width, height)
900mm x 1800mm x 750-800mm
- room temperature
+17…+25 Celsius
- humidity
nominal 40%RH
- sample volume
approximately 45ml
- computer requirements:
Microsoft Windows XP (SP2) operating system
Microsoft .NET Framework 2.0 or later (required for User's Guide installation)
Intel Pentium III class processor, 500 MHz or higher
Video display-800 x 600, 256 colors or greater
Minimum of 512 MB of RAM (1024 MB or higher recommended)
Minimum of 25 MB of free hard disk space
Measurement Computing USB Data Acquisition hardware, included in delivery
Measurement Computing's InstaCal program, included in delivery
Microsoft-compatible mouse
2/23
ACAP EASY user manual
2011-10-04
2. Structure and main parts
Potentiometer
Cylinder
Pressing piston
Load cell
Waste cup
Power switch
Pressing base
Sample cup
Image 1:Upper cover opened
Electronics device
Air supply connector
Pneumatic device
Sample cup horisontal shifting
Image 2:Back cover opened.
3/23
ACAP EASY user manual
2011-10-04
3. Use instruction
3.1. Before start
1.
A computer with following requirements is needed (if not included in delivery):
Microsoft Windows XP (SP2 or SP3) operating system
Microsoft NET Framework 2.0 or later (required for User's Guide installation)
Intel Pentium III class processor, 500 MHz or higher
Video display-800 x 600, 256 colors or greater
Minimum of 512 MB of RAM (1024 MB or higher recommended)
Minimum of 25 MB of free hard disk space
Microsoft-compatible mouse
2.
Also with delivery coming:
ACAP e analyzer
ACAP e software installation CD including:
Measurement Computing USB Data Acquisition hardware inside ACAPe
Measurement Computing's InstaCal program
3.
For hardware:
Dry and clean air connection minimum 7bar and 150 l/min, connector for 12mm ID
hose with delivery.
The 1-phase 230V 50Hz electrical supply, total amperage depends on PC.
Recommended table size (depth × width × height) 900mm × 1800mm × 750-800mm.
Room temperature +17…+25 °Celsius, humidity nominal 40 %RH.
Mounting on the table with load capacity >200kg minimum.
3.2. Starting up ACAP e
1.
2.
3.
4.
5.
Connect mouse, keyboard, screen and power cables to PC and ACAPe unit.
Update PC with Windows Update Framework 2.0 (if PC included then already installed).
Install ACAPe and after that InstaCal software's (if PC included then already installed).
Connect the USB cable between ACAPe and the computer.
Connect ACAPe power cables to power plugs.
6.
7.
8.
9.
10.
Connect air pressure tube to ACAP EASY 12mm ID hose and open the red reg. valve.
Check that air pressure is 0,6 ± 0,01 MPa from pressure gauge and if necessary set the pressure
manually with regulator.
Configure the USB I/O box using InstaCal program (see page 12).
Start ACAPe software.
Do force calibration (see page 13).
11.
12.
Do length calibration (see page 15).
Start measurement.
4/23
ACAP EASY user manual
2011-10-04
3.3. Automated caking tendency test
1.
2.
3.
4.
5.
Take off whole waste cup device from the unit (Image 3).
Lift sample cup off the pressing base (Image 4).
Take also the movement limiter with O-ring off (Image 4).
Clean all these parts fully clean.
Reassemble parts back.
6.
7.
Put the sample into the sample cup, maximum 45ml (Image 5).
Lift whole waste cup device on its place. Note, the unit will not run if the waste cup device is not
on its own place. Inductive switch is activated by pressing base.
Image 3:Waste cup device
8.
Image 4:Sample cup and
movement limiter.
Start the measurement using
Image 6: New
9.
10.
11.
12.
13.
14.
Image 5:Sample in cup
Auto button in software.
Measurement window
Change; group, name, description and pressing time (in minutes) to suit your needs, temperature
slot does not effect measurement, but will be recorded and printed. You can use any unit of
temperature (Such as Celsius, Fahrenheit, Kelvin)
Click ”OK” to start pressing sample. Minimum time of pressing is 1 min !
You can click ”Stop” at any time to end pressing
After cylinder has pressed the sample for given time it lifts up.
Now whole waste cup device is moving to the right and the piston is pressing the sample cup
down. After that whole waste cup device is moving back.
Cylinder begins to crush the cake.
5/23
ACAP EASY user manual
15.
16.
2011-10-04
Note, you can not stop the cylinder from ”Stop” button while breaking the cake.
Results are recorded in database.amt file in your program directory, you can open database.amt
without ACAP EASY program using a text editor such as Notepad.
Start the waste cup device cleaning by turning whole system downwards and shaking it same time
(Image 7).
Image 7: Turning the used sample off
17.
18.
Image 8: Shift the sample cup off
When the waste cup device is turned downwards shift the sample cup off. This prevents jamming
expecially with small granule sizes (Image 8).
End the cleaning by shining every part carefully.
3.4. Using ACAP e as a press
1.
2.
3.
4.
5.
Take off whole waste cup device from the unit.
Lift sample cup off the pressing base.
Take also the movement limiter with O-ring off.
Clean all these parts fully clean.
Reassemble parts back but lift the sample cup to its lowest position.
6.
Put the the device you want to press on its place (Image 9).
Image 9:Here plastic part
waiting pressing
7.
Lift whole waste cup device on its place. Note, the unit will not run if the waste cup device is not
on its own place. Inductive switch is activated by pressing base.
6/23
ACAP EASY user manual
8.
2011-10-04
Start the measurement using
Image 10:
9.
10.
11.
12.
13.
button in software.
New Measurement window
Change; group, name, description and pressing time (in minutes) to suit your needs, temperature
slot does not effect measurement, but will be recorded and printed. You can use any unit of
temperature (Such as Celsius, Fahrenheit, Kelvin)
Click ”OK” to start pressing. Minimum time of pressing is 1 min !
You can click ”Stop” at any time to end pressing.
After cylinder has pressed for given time it lifts up.
Results are recorded in database.amt file in your program directory, you can open database.amt
without ACAP EASY program using a text editor such as Notepad.
Note, you can not stop the cylinder from ”Stop” button while pressing.
7/23
ACAP EASY user manual
2011-10-04
4. Program functions
1.
Double click ” ACAP EASY” on Windows desktop to start the analyse program. The screen
program open into.
Image 11:
2.
Clicking
button will lift the cylinder up.
3.
You can edit measurement data by clicking
4.
You can see a print preview by clicking
icon.
icon
8/23
ACAP EASY user manual
2011-10-04
Image 12: Close print preview
9/23
from ”x” icon
ACAP EASY user manual
5.
Clicking
2011-10-04
will print selected measurement on your default printer, if you haven’t selected a
measurement the program will ask you to select. Select 1 measurements to print from list here
6.
To close program select File from top menu and click ”Exit”
7.
Clicking the right mouse button in the Measurement area open this menu
Copy:
Save Image As:
Show Point values:
Un-Zoom:
Set Scale to Default:
You can copy the selected measurement diagram to
your clipboard.
You can save selected measurement diagram image
in .PNG format.
Shows the point values of given measurement when
mouse cursor is over the point.
Zooms out the measurement diagram.
Zooms measurement diagram view to default.
8.
Zoom
You can Zoom in by clicking and holding down left mouse button while moving mouse so that it creates a
box
9.
Clicking ”options” in the setup at the top menu open this window
10/23
ACAP EASY user manual
2011-10-04
In the options tab you can change Pressing force and Force sensitivity level.
Changing ”Pressing force N” will change the force cylinder uses to press the sample. The 8600 Newtons
is near the maximum force possible for this machine.
Changing ”Force sensitivity N” will change the amount of force needed for load sensor to detect when the
test head is pressing the sample. Lower the force the more sensitive the results will be to interference such
as vibration.
You should not change the values in the calibration tab.
Changing them will cause false results if not calibrated after changes.
11/23
ACAP EASY user manual
2011-10-04
5. InstaCal
1.
2.
3.
4.
Open Start menu from Windows XP.
Select ”Measurement Computing” from ”All programs” menu.
Click InstaCal.
Program opens.
5.
There should be PMD-1408FS serial xxx identified (instead of DEMO-BOARD), if not.
Make sure usb cable is connected and ACAP`s power is on.
6.
Close InstaCal program.
If that doesn’t help.
7.
Insert Measurement Computing CD in your CD-drive and follow the installing instructions in the
”DAQ Software Quick Start” guide which came with the CD.
12/23
ACAP EASY user manual
2011-10-04
6. Maintenance
ACAP e is serviced when necessary. It does not need regular maintenance.
You have to clean sample cup, press base, waste device and press piston after every test.
6.1. Calibration
Recommended time between calibrations is 1 month.
6.1.1. Force calibration
1.
2.
3.
4.
Take off whole waste cup device from the unit and check that all parts are clean.
Lift sample cup to the lowest position (Image 13).
Set the adapter and the calibration load cell (optional) on its place into waste device (Image 14).
Lift whole waste cup device with the calibration load cell on its place (Image 15). Note, the unit
will not run if the waste cup device is not on its own place. Inductive switch is activated by
pressing base.
Image 13: Sample cup in
lowest position
Image 14: Force calibration
device on its place
Image15: Ready for force calibration
5.
Turn 230VAC power on to the calibration display (optional).
6.
Select “Force Calibration” from ”Setup” menu
7.
Do the first calibration using Calibration 1 force button, read the force value on calibration
display and write that value into its window.
Use RELEASE button for releasing the piston up.
Do the second calibration using Calibration 2 force button, read the force value on calibration
display and write that value into its window.
8.
9.
13/23
ACAP EASY user manual
10.
2011-10-04
Use RELEASE button for releasing the piston up.
14/23
ACAP EASY user manual
2011-10-04
6.1.2. Length calibration
1.
2.
3.
Take off whole waste cup device from the unit and check that all parts are clean.
Lift sample cup to the lowest position (Image 16).
Lift whole waste cup device on its place (Image 17). Note, the unit will not run if the waste cup
device is not on its own place. Inductive switch is activated by pressing base.
Image 16: Sample cup in
lowest position
Image 17: Ready for first length
calibration
4.
Select “Length Calibration” from ”Setup” menu and do the 1. calibration 0 mm.
5.
Write 0 in edit box 1 and click Calibration 1. Now the 1. length calibration is done.
6.
Take off whole waste cup device from the unit and check that all parts are clean.
7.
Lift sample cup to the lowest position.
15/23
ACAP EASY user manual
8.
2011-10-04
Set the length calibration piece on its place (Image 18)
Image 18: Calibration
device on its place
9.
Lift whole waste cup device on its place (Image 19). Note, the unit will not run if the waste cup
device is not on its own place. Inductive switch is activated by pressing base.
Image 19: Ready for 2. length
calibration
10.
Write the existing length in edit box 2 and click Calibration 2. Now the 2. length calibration is
done.
6.1.3. Teach Cup
1.
2.
3.
Take off whole waste cup device from the unit and check that all parts are clean.
Lift sample cup to the lowest position (Image 20).
Lift whole waste cup device on its place. Note, the unit will not run if the waste cup device is not
on its own place. Inductive switch is activated by pressing base.
16/23
ACAP EASY user manual
2011-10-04
Image 20: Sample cup in
lowest position
4.
5.
6.
Press button .
Click ”OK” to end calibration.
“Teach Cup” calibration is done.
17/23
ACAP EASY user manual
2011-10-04
7. Spare part information
7.1. Drawing: SPARE PART 1, Main Assy
No.
Part
Supplier/manufacturer
Details
1
2
3
4
5
6
7
8
9
10
11
12
13
14
15
16
17
CYLINDER
LOAD CELL
ROTATION REJECTOR
PRESS PISTON
LOWER COVER
REGULATOR ASSY
SPEED VALVE
CONNECTOR
CONNECTOR
SPEED VALVE
PNEUMATICS
SHIFTER
WASTE DEVICE
CYLINDER
CYLINDER END
AXIS
POTENTIOMETER
SMC
GEFRAN
AMT-Systems Oy
AMT-Systems Oy
AMT-Systems Oy
SMC
SMC
SMC
SMC
SMC
CDQ2B140-100DC
TU-K1M
AW20
AS3201F-03-08S
KQ2T08-06
KQ2L08-02
AS2201F-01-06S
SPARE PART 2
AMT-Systems Oy
BOSCH
BOSCH
AMT-Systems Oy
GEFRAN
SPARE PART 3
Ø20 / 25 0 822 333 502 MNI
M8
PZ34-S-100
7.2. Drawing: SPARE PART 2, Pneumatics
No.
Part
Supplier/manufacturer
Details
1
2
3
4
5
6
7
8
VALVE
ELECTRONIC REGULATOR
CONNECTOR
SILENCER
CONNECTOR
SILENCER
VALVE
CONNECTOR
SMC
SMC
SMC
SMC
SMC
SMC
SMC
SMC
SY5120-5LOU-01F
ITV2050-31F3N3-Q
KQ2L08-03
AN200-02
KQ2L06-01
SFE303102
EVFS3120R-5YZB-03F
KQ2L06-M5
7.3. Drawing: SPARE PART 3, Waste device
No.
Part
Supplier/manufacturer
1
2
3
4
5
6
7
WASTE TUBE
WASTE BOTTOM
PRESSING BASE
SAMPLE CUP
DISC
O-RING
O-RING
AMT-Systems Oy
AMT-Systems Oy
AMT-Systems Oy
AMT-Systems Oy
AMT-Systems Oy
Details
OR 41,28 x 3,53
OR 30 x 3
18/23
ACAP EASY user manual
2011-10-05
7.4. Drawing: ACAP EASY 900, Electrical parts
No.
Part
Supplier/manufacturer
01
02
03
04
05
06
07
Electric card
Fuse
Fuse
Terminal block
USB-card
Transformer
Trail
AMT-Systems Oy
Details
400mA
800mA
PDM 1208FS
230/2x18V
22/23
ACAP EASY user manual
2011-10-05
8. Troubleshooting
Problem:
Solution:
Press does not reach the required strength.
Check if there is sufficient air pressure.
Adjust air pressure regulator for more pressure:
- adjust regulator by winding the screw on top
- the value in gauge should be over 6 bar
Problem:
Solution:
Load cell reading does not match the given force.
Check load cell calibration from the computer program
If the settings are correct and if there is need for calibration:
- check that wires leaving ACAP EASY are correctly connected
- calibrate ACAP EASY
Problem:
Solution:
Cylinder does not move when the program order it.
Is there air pressure?
Is ACAP EASY on?
Is cable between ACAP EASY and PC connected properly?
Are settings correct in the options menu?
Problem:
Solution:
Measurement results are strange.
Are settings correct in the options menu?
Is cable between ACAP EASY and PC connected properly?
Calibrate ACAP EASY.
Problem:
Solution:
Printing to local printer does not work.
Is printer on?
Is cable between printer and PC connected properly?
Does Windows have correct printer drivers?
Problem:
Solution:
Printing to network printer does not work.
Is cable between network and PC connected properly?
Is network system able to receive data?
26/23
ACAP EASY user manual
2011-10-05
9. Pneumatic drawing ACAP e
27/23