1
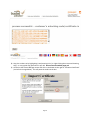
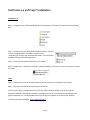
FIRE STUDIOTM 5.3 PLAYER EDITION
Installation Guide & User Manual
with Nalpeiron License Service
Revised 09/25/12
Table of Contents
About Fire Studio 5................................................................................................................3
Instructor vs Player.................................................................................................3
System Requirements............................................................................................................4
Additional Considerations (Player Edition).............................................................4
System Performance..............................................................................................4
Installation & User Permissions Notice....................................................................................5
Fire Studio 5 Installation & Activation.....................................................................................7
De-Activating and Moving Your Fire Studio 5 License..............................................................15
FastCodec 1.0 and Fraps© Installation...................................................................................20
Keyboard Shortcuts.............................................................................................................21
The Main Console Interface...................................................................................................22
The Message Box..................................................................................................23
Full-Screen (F).......................................................................................................23
Library (L) / Present (P).........................................................................................23
Interface (I)...........................................................................................................24
Four WinView (S)..................................................................................................24
Network (N).........................................................................................................24
Exiting Fire Studio 5..............................................................................................25
Standard Windows Features : Minimize, Maximize, and Close...............................25
Present Panel......................................................................................................................26
Slides...................................................................................................................26
Slides vs Windows................................................................................................26
Clear a Simulation.................................................................................................27
Loading a Simulation............................................................................................27
Print Simulation....................................................................................................27
Previous...............................................................................................................28
Next.....................................................................................................................28
The Lock Box........................................................................................................28
Moving to a Slide without Viewing those In-between............................................29
Play......................................................................................................................29
Pause...................................................................................................................29
Reset....................................................................................................................30
Screenshot File.....................................................................................................30
Screenshot...........................................................................................................30
Mini Panel.............................................................................................................31
Library Panel.......................................................................................................................32
Network Panel.....................................................................................................................33
Page 1
Fire Studio Miscellany..........................................................................................................34
Importing a Fire Studio 4/4.1 Simulation into Fire Studio 5.....................................34
Sending & Receiving Text Messages......................................................................35
Messaging with the Network Panel Shown..........................................35
Incoming Messages while the Interface is Hidden................................36
FAQ....................................................................................................................................37
Technical Support................................................................................................................41
End User License Agreement (EULA).....................................................................................42
Trademark Acknowledgments
•
Fire Studio, Communication Link, and Digital Combustion are trademarks of Digital Combustion,
Inc.
•
Adobe and Photoshop are registered trademarks or trademarks of Adobe Systems Incorporated in
the United States and/or other countries.
•
Microsoft, Microsoft Office, and Windows are registered trademarks or trademarks of Microsoft
Corporation in the United States and/or other countries.
•
Other names and products not mentioned above may be registered trademarks or trademarks of
their respective companies.
Page 2
About Fire Studio 5
Over the course of the past several years, Fire Studio has proven to be North America's leading fire simulator,
expanding to an customer base of over 4,000! Version 4 continues to be lauded as the friendliest, cheapest,
and most feature-rich simulator for the PC, and has begun taking root beyond the borders of North America,
particularly in the United Kingdom, Australia, and parts of Europe.
Version 5 builds on the strengths of its predecessors, making the integration of custom media easier, while also
expanding the range of features, such as the ability to zoom and pan the camera during playback. As always,
we strive to integrate changes and new features based on what many of our customers have reported, and will
continue to do so as this new release matures.
Although version 5 changes the way in which simulations are organized and built, it retains compatibility with
version 4 simulations. This means that users can load any of their Fire Studio 4/4.1 simulations in Fire Studio 5.
Instructor vs Player
Simply put, the Instructor Edition allows you to create and play Simulations, while the Player Edition only has
the capability to play. Simulations cannot be modified either temporarily or permanently with the Player
Edition.
The Instructor Edition forms the foundation of your Fire Studio training model. In most setups, the Player is
used to complement the Instructor by providing the ability to show Simulations on multiple computers. This
setup provides the ability to train multiple personnel at once, most often with each looking at the incident from
different perspectives. To control the aforementioned views remotely across a network, you will need Digital
Combustion’s Communication Link™ software.
Page 3
System Requirements
Minimum Requirements
Recommended
Not Supported
Operating System
MS Windows XP/Vista/7 (32 bit
and 64 bit)
MS Windows 7 Professional
All Other
CPU
Pentium 4 or AMD Athlon 64 or
faster
Intel Core 2 Duo, i5, or i7
Celeron
512 MB
2-3 GB+
-
4 GB+ free space, 5400 RPM
7200 RPM
-
Discrete chipset with dedicated
VRAM, NVIDIA GeForce or
ATI/AMD Radeon, 128 MB+
VRAM
NVIDIA Geforce series or
ATI/AMD Radeon dedicated
chipset with 512 MB+ VRAM
Any chipset without dedicated
VRAM, additionally NVIDIA
Quadro, NVIDIA NVS (Quadro),
ATI FirePro, ATI FireGL
Optional
-
-
Required for sound playback
-
Realtek (will not capture sound
to video file)
1024 x 768
-
-
Required for text entry
-
-
Optional
Mouse
Touch Screen
System RAM
Hard Disk Drive (HDD)
Video Card / Graphics Chipset
CD / DVD ROM
Sound Card / Sound Chipset
Screen Resolution
Keyboard
Mouse / Touch-Pad
Additional Considerations (Player Edition)
•
Network Interface Card (LAN card) for network connection with Communication Link or network
sharing resources
•
Video card with TV-capture capability for capturing video from a DVD player, VCR, or television
•
Speakers for connection to sound card
System Performance
Your computer’s hardware and software has a major impact on the performance you can expect from Fire
Studio. For most simulations, when the above requirements are met, Fire Studio will perform at desired levels.
However, if you are attempting to run the software on a system that does not meet the above requirements, or
you are attempting to load an incredibly large simulation, you may face some performance slowdown.
Fire Studio 5 will push the capabilities of your computer as your Simulations become larger and more complex.
Note that the hardware requirements are the same for both the Instructor and Player Edition. In order to play a
Simulation at the same performance level of the Instructor computer, the Player system must have equal or
Page 4
better hardware. Always test out your Simulations on the Player Edition computer before using them in a
training or promotional exercise, and always preview the Simulation a few minutes before it will be used in
order for the program to load the graphics into memory. Failure to do so may result in stuttering animations
during your exercise!
Installation & User Permissions Notice
Fire Studio 5 must be installed and run once using an account with full administrator privileges. Upon running
the software for the first time, several files are created (including the Nalpeiron License service) and due to
security features present in Windows, full administrator rights are required for those files to be created and
placed properly.
Once Fire Studio 5 has been installed and run once, it can be used by non-administrator accounts. However,
additional permissions may be required depending on the level of security on the system and the version of
Windows you are using.
In order to run properly, users of Fire Studio 5 should have FULL PERMISSIONS (read, write, modify, delete,
etc.) to the “Fire Studio 5” folder and all of its sub-folders. The default location for this folder is C:\Program
Files\DigitalCombustion for Windows 32 bit and C:\Program Files (x86)\DigitalCombustion for Windows 64 bit.
Network or Remote Installations
Fire Studio 5 is not designed to be remotely installed and Digital Combustion, Inc. cannot provide technical
support nor guarantee the software will work correctly if an installation is attempted in such a way. Please
install Fire Studio 5 locally at the machine that will be running the software.
Installing on a Server
Fire Studio 5 is not designed to be installed and run remotely from a server. Digital Combustion, Inc. cannot
provide technical support nor guarantee the software will work correctly if used in such a manner. Please
install and operate Fire Studio 5 locally.
Windows Home Edition Users
Windows Home Edition offers the least amount of flexibility in creating user accounts and in the most extreme
cases only Administrator accounts will have write access outside of the My Documents folders. Users with
Home Edition will be required to use Administrator accounts if they cannot set write permissions to the Fire
Studio 5 folder.
Data Redirection (Virtual Store) in Windows Vista and Windows 7
Starting with Vista, Windows employs a new security feature called Data Redirection or “Virtual Store”, which
seamlessly places saved and modified files in a special hidden user folder that mirrors the protected folder the
Page 5
user tries to write into. The purpose of this feature is to protect system files and integrity, as well as prevent
possible virus infection. Typically, only non-administrator accounts and files placed in Program Files or any of
its sub-folders will be subject to data redirection.
In the case of Fire Studio 5, any files that are modified or created may potentially be redirected, such as
simulations, screenshots, video captures, libraries, and even the library list file. While using Fire Studio,
Windows will handle the redirection automatically and users may not even realize it is occurring. However, if a
user attempts to retrieve a file outside of Fire Studio, such as through Windows Explorer, © their
modified/created files will not be present.
To track down user files that may be missing, check the following folder path. Keep in mind that the AppData
folder will likely be hidden and that the specific path may be different than what is listed below if Fire Studio 5
was not installed in the default location.
C:\Users\[User Name]\AppData\Local\VirtualStore\Program Files\DigitalCombustion\FireStudio5
Administrators: The best solution to provide your users with access to this hidden folder is to create a shortcut
folder to the path above. This will allow them to copy or insert files as required during usage of the software.
Users are highly encouraged to save any Simulations, Libraries, or other custom files in a sub-folder within
Documents. See update note below.
Update: Starting with Fire Studio 5.3, the location of modified files (such as the Library List file FS5NDL.LBL) has
been changed to a FireStudio5 folder created in Documents. This should reduce or eliminate the instances of
Data Redirection affecting end-users with Fire Studio 5. Users of ALL versions are advised to keep their
content within the Documents folder to avoid the various security restrictions of Windows.
Page 6
Fire Studio 5 Installation & Activation
Installation (Instructor and Player Edition)
Step 1 – Navigate to your CD/DVD ROM drive which contains the Fire Studio 5 CD, or navigate to the folder
which contains the files you extracted from a downloaded ZIP file, sent to you by Digital Combustion, Inc. You
should have the following files:
Documentation : Contains manuals, the EULA, and installation guides.
Resource : Contains DirectX and MS Visual C++ files for manual installation (if necessary).
Video Capture : Contains FastCodec and Fraps. Refer to Section V.
Step 2 – Begin installation by double-clicking on “setup.exe” and follow the instructions presented on the
screen. We recommend keeping the default installation path and allowing the installation for all users on the
system. You will use the same files to setup Player Editions of the software.
Please be sure to read all license agreements as proceeding with the installation constitutes your agreement to
be bound by them. Installation of the DirectX package should commence automatically near the end of the
installation procedure.
Step 3 – Once installation is complete, you can run the program by double-clicking on the Fire Studio 5 icon on
your desktop or through the Windows Start Menu : (All) Programs → FireStudio5 → FireStudio5.
Step 4 – The first time you run Fire Studio 5.3, you will be required to install the Nalpeiron License service. This
is required to operate Fire Studio. Installation requires Admin rights but will only need to take place once.
Step 5 – Activation or Evaluation. If you are running Fire Studio 5 as a trial or demo, you should choose the
evaluation option. Refer further down for Activation procedures.
Upgrading from an earlier version of Fire Studio 5
If you are upgrading from Fire Studio 5.0, 5.1, or 5.2, you must uninstall your old version before installing Fire
Studio 5.3 or later.
Page 7
Trial Period
Fire Studio 5 has a trial period built into the software. During the trial period, the software functions normally
with all of the same features and capabilities as a “full” or “activated” installation. Any Simulations created
during this time can be saved, exported, imported, and otherwise preserved to be used by other installations or
post-activation of the software. In other words, any Simulations you create during the trial period will not be
automatically erased or otherwise rendered unusable.
As a matter of common practice, we always recommend that users, or IT professionals performing the
installation, run the software once or twice prior to activation, ensuring it operates properly. It is entirely
possible for the installation and activation to work flawlessly, but then to encounter issues with Fire Studio
during launch or operation of the software due to any number of reasons. Resolving any technical issues prior
to activation helps avoid any possible (accidental) loss of total activations with your license.
Nalpeiron License Manager
During installation of Fire Studio, the Nalpeiron License Manager (also referred to simply as the License
Manager) will also be installed. This 3rd party software is required to operate Fire Studio. It facilitates
activation and also maintains the authenticity of your license via a running service (nlsx86cc). Removing the
License Manager or stopping, deleting, or otherwise tampering with the running service, will cause Fire Studio
to become inoperable!
The License Manager is an application you will need to use to perform activations and de-activations of Fire
Studio. It may launch automatically depending on the state of your current license, or may need to be launched
as a separate application from Windows Start Menu → (All) Programs → FireStudio5. The sections that follow
will cover details on performing these functions.
Activation
•
•
•
Your License Number will be required for activation. The License Number will be provided by Digital
Combustion, Inc. when your order has been processed after purchasing. Please check your invoices,
receipts, emails, or other documentation provided for this License Number. Keep this number safe!
A single License Number of Fire Studio 5 Instructor Edition comes with 2 Activations and each Fire
Studio 5 Player Edition comes with 1 Activation. If you follow these instructions correctly, you can
move your active license an unlimited number of times.
Initial installation always begins as an Instructor Edition for trial use. When you enter your Player
License Number, the software will then load as a Player Edition.
When you are ready to activate (or De-Activate) the software, you must proceed into the License Manager (if
launching Fire Studio doesn't take you there automatically). Launch the License Manager through Windows
Start Menu → (All) Programs → FireStudio5. If your trial period has expired, you will automatically be brought
to this menu and not allowed to proceed without activating. An Internet connection is required for activation.
However, this connection does not need to be on the actual computer you are installing Fire Studio on. Read
more below.
There are 2 methods for activating your installation of Fire Studio 5: Internet Activate (direct activation) and
Page 8
Import Certificate (indirect activation).
Internet Activate (direct activation) *Recommended*
When the License Manager opens, you will be greeted by the Product Activation screen. Follow these two easy
steps to activate your software:
1) Type in your License Number in the white text field labeled License Number.
2) Click Activate to initiate the automatic activation process.
3) The License Manager will communicate over the Internet to the License Server to validate the Number.
This is the fastest and best way to activate.
If successful, Fire Studio will be activated and you can continue using the software as normal. However, if you
do not have an Internet connection on the computer you're installing Fire Studio on, or you are behind a strict
firewall that is preventing your automatic activation, or for any other reason seem unable to perform a direct
activation, then you will need to use the Import Certificate (indirect activation) method below.
Page 9
Import Certificate (indirect activation)
Importing a Certificate will require web access to the Internet either from the computer you're installing Fire
Studio 5 on, or another computer. Many networks do not block the port that web browsers use so it is very
possible you may be able to use this method on a computer located behind a firewall.
Follow these steps to perform an indirect activation with Import Certificate:
1) Click on the Import Certificate icon to access the Import Certificate screen (shown above) if you have
not already done so. Take note of the Installation ID.
2) Click on the blue “Activation Page” link located under the instruction window. This will bring up your
browser to the Software Activation Center website. If you don't have Internet access on this computer,
you will still need to allow a browser to (attempt to) open it, at which point you can copy the URL and
bring it to a computer with Internet access. Alternatively, you can copy the link here:
https://www.internetactivation.com/ECOSYSTEM/ActivationServer/tiactivate/default.aspx
The website should appear like the image below.
Page 10
3) Insert the Installation ID from the Import Certificate screen in the Installation ID box. If you're using the
same computer, you can click on the Copy button to the right of the Installation ID and then Paste (Ctrl
+ V) the code into the ID box.
4) Insert the License Number provided to you by Digital Combustion Inc. on your invoice or receipt into
the License Number box on the website.
5) Read the Terms and Conditions and then check the box confirming you have agreed to them.
6) Click the button “Generate Unlock Code/Certificate.” Warning: Once you generate a Certificate, the
license server will register an activation on your License Number. It is imperative that all information
is entered properly and that you are indeed ready to activate your installation.
7) A new screen will load containing your Activation Certificate. This appears as a large series of numbers,
such as the example picture below. The numbers will not be blurred for you. Do not close the website
page yet!
Page 11
8) Copy the number set by highlighting it and pressing Ctrl+C, or right-clicking the mouse and choosing
Copy – or any typical copy procedure in your OS. Do not close the website page yet!
9) Go back to the License Manager screen and click on the button to the right of “Activation Certificate”
(circled in the image below). This will paste the code into the box.
Page 12
10) Click on the “Import Certificate” button at the bottom.
11) If successful, your software will be activated, and you can use Fire Studio 5. You may need to start Fire
Studio via your icon once your activation process has been completed.
Activation Failure?
There are some circumstances in which your activation by either of the methods above might fail:
•
•
•
•
•
•
Fire Studio is already activated.
• You should be able to use the software normally.
You do not have Admin rights on your computer.
• In most cases, Admin rights are necessary to certify the License Number and install the proper
files on your system. Your IT department may need to perform the activation.
You have reached the limit on the number of activations allowed for the License Number you are using.
• You can deactivate another machine to free up an activation.
• Contact Digital Combustion if you believe there should be an available activation.
You've attempted an Indirect Activation using Import Certificate and did not copy the entire Certificate
correctly.
• If your browser still has the Certificate page loaded, attempt to copy and paste the certificate
again. Check for any errors.
You've attempted a Direct Activation using Internet Activate and are prevented from connecting to the
License Server because of a firewall, proxy, or anti-virus program running.
• If you know your proxy settings, you can access the Advanced section under the Help menu
item and enter in the information.
• Temporarily shut down your anti-virus software or firewall to perform the activation and try
again.
• Try to use the Indirect Activation method.
The License server reports you've already activated on this computer, but the installation you're using
says you have not yet activated.
• Contact Digital Combustion during our business hours for assistance. You will need to be at the
computer you are attempting to activate.
Uninstalling Fire Studio 5
If you will be installing Fire Studio 5 on a new computer, you should first follow the instructions in the next
section De-Activating and Moving Your Fire Studio 5 License. If, however, you are installing Fire Studio 5 onto
Page 13
the same computer you can uninstall it normally, then reinstall without the need to activate again. Even if
you're reinstalling Windows, you should not need to activate on the same machine.
You can Uninstall Fire Studio 5 through the Windows Control Panel (shown above). Depending on the version
of Windows you use, the menu option will either say Add or Remove Programs, or Uninstall a Program. No
other special steps are required, although it should be noted that like most uninstall routines, user-created
content will not be automatically erased. This includes your custom backgrounds, simulations, clip-art, and all
the folders they are located in. These will only be erased if you delete them manually as you would other files
on your computer.
Page 14
De-Activating and Moving Your Fire Studio 5 License
De-Activation
•
Generally speaking, each Fire Studio 5 Instructor Edition comes with 2 Activations and each Fire Studio
5 Player Edition comes with 1 Activation. If you follow these instructions correctly, you can move your
active license an unlimited number of times.
If you need to install Fire Studio on another computer, you must first De-Activate your current installation in
order to allow the Activation on the new system. De-Activating tells the License Server you are no longer using
the software on that computer and essentially releases that Activation, allowing it to be used again. With your
purchase of a Fire Studio license, you are limited in the number of Activations you have, so it is important to
follow the listed procedures correctly to ensure you can always use the software.
When you are ready to De-Activate the software, you must launch the License Manager through Windows Start
Menu → (All) Programs → FireStudio5. An Internet connection is required for De-Activation. However, this
connection does not need to be on the actual computer you are removing Fire Studio from (but it makes the
process much easier). Read more below.
Similar to Activation, you have two means of performing a De-Activation: Internet De-Activate (direct DeActivation) and Export Certificate (indirect De-Activation).
Page 15
Internet De-activate (direct De-Activation) *Recommended*
Follow the steps below to perform a direct De-Activation:
1) Launch the License Manager (instructions above). You will initially be at the Product Activation screen.
Click on Internet “De-activate.”
2) Since you have already activated, your License Number will appear in the box. For any reason if it is not
listed, enter that number in now.
3) Click on the “De-Activate” button at the bottom. This will initiate a connection over the Internet to free
the activation on the License Server and turn off the activation on this system. You will no longer be
able to run Fire Studio 5 on this computer (unless you activate again), but should now be able to
activate the license again on another computer.
If you receive an error and are unable to perform a direct De-Activation, proceed to the next section to perform
an indirect De-Activation.
Page 16
Export Certificate (indirect De-Activation)
Exporting a Certificate will require web access to the Internet either from the computer you're installing Fire
Studio 5 on, or another computer. Many networks do not block the port that web browsers use so it is very
possible you may be able to use this method on a computer located behind a firewall.
Follow these steps to perform an indirect De-activation with Export Certificate:
1) Click on the Export Certificate icon to access the Export Certificate screen (shown above) if you have
not already done so.
2) Important : Leave the License Number box as is. The correct information should already be in place. If
you accidentally change or erase it, simply exit the License Manager and launch it again.
3) Click on the “Export Certificate” button located at the bottom. When the dialogue box pops up asking
you to Confirm, choose Yes to proceed. Be warned, clicking Yes will kill the activation on this
computer.
4) Click on the blue “Deactivation Page” link located under the instruction window. This will bring up your
browser to the Software Activation Center website (but note that it says Please enter your DeActivation Certificate.) If you don't have Internet access on this computer, you will still need to allow a
browser to (attempt to) open it, at which point you can copy the URL and bring it to a computer with
Internet access. Alternatively, you can copy the link here:
https://www.internetactivation.com/ECOSYSTEM/ActivationServer/tiactivate/deactivate.aspx
Page 17
The website should appear like the image below.
5) Copy the Deactivation Certificate from the License Manager. You can click on the Copy icon to the right
of the label Deactivation certificate (shown below) in the License Manager to copy the code, or
highlight it with your mouse cursor and press Ctrl+C.
6) Now paste the code into the orange box on the Nalpeiron website (shown above) by right-clicking in
the orange area and choosing Paste.
Page 18
7) Be sure to read the terms and condition, then check the box, and click “De-activate License.”
8) The web page will report “Process Successful” when it has worked correctly.
De-Activation Failure?
There are some circumstances in which your de-activation by either of the methods above might fail:
•
•
•
•
Fire Studio is not activated.
• You cannot perform a de-activation if the software has not been activated.
You do not have Admin rights on your computer.
• In most cases, Admin rights are necessary to make the correct adjustments to your registry and
licensing drivers when performing most activation, de-activation, installation, or uninstallation
functions. If applicable, you should contact your IT department to perform any of these
procedures.
You've attempted an Indirect De-Activation using Export Certificate and did not copy the entire
Certificate correctly.
• If your browser still has the Certificate page loaded, attempt to copy and paste the certificate
again. Check for any errors.
• If you've lost any of the info along the way and you're de-activated, but think the server did not
register the de-activation, contact Digital Combustion as soon as possible.
You've attempted a Direct De-Activation using Internet De-Activate and are prevented from connecting
to the License Server because of a firewall, proxy, or anti-virus program running.
• If you know your proxy settings, you can access the Advanced section under the Help menu
item and enter in the information.
• Temporarily shut down your anti-virus software or firewall to perform the de-activation and try
again.
• Try to use the Indirect De-Activation method.
Page 19
FastCodec 1.0 and Fraps© Installation
FastCodec 1.0
Step 1 – Navigate to your CD/DVD ROM drive which contains the Fire Studio 5 CD. You will see the following
files:
Step 2 – Double-click on the Video Capture folder to open it. You will
see two ZIP files located in this folder. Double-click on
“FastCodec.zip” to open your associated ZIP viewer. For most people,
Windows will open it's default application.
Step 3 - Extract the files within the ZIP file to a new folder.
Step 4- Double-click on “fastcodec-setup.exe” to begin installation. Follow the onscreen instructions to install
the codec.
Fraps
Step 1 – Double-click on Fraps.zip and extract the files like you did in the FastCodec section above.
Step 2 – Run Setup.exe and follow the onscreen instructions.
Instructions on how to troubleshoot and use the Fraps video capturing software can be found at the
developer's website. Although the software is provided on the CD for your convenience and optional use,
Digital Combustion, Inc. cannot provide instructional or technical support on this third party software.
The URL to the Fraps homepage: http://www.fraps.com/
Page 20
Keyboard Shortcuts
What you want to do
Key
Change between Four Window view and Single Window view
S
Open/Close the Network Panel
N
Show/Hide the Fire Studio Interface
I
Open the Library Panel (while Present Panel shown)
L
Open the Present Panel (while Library Panel shown)
P
Show Fire Studio 5 in a Window or in Full Screen
F
Pause the Slide (when Interface not shown)
Space
Move to next Slide
Right Arrow
Move to previous Slide
Left Arrow
Show/Hide the Mini Panel (when Interface not shown)
Tab
Show/Hide window information overlay
F2
Change window information overlay between black & white
F3
Display Direct3D Settings (Recommended for Advanced Users Only)
F5
Jump to Slide. Use: [J] then [Slide #] then [Enter]
Select one of the four Windows in the current Slide
J
1 to 4
Hide/Unhide Windows 1-4 in the current Slide
Shift 1 - 4
Event Key (Numeric Keypad)
Num 0 to 9
Event Key (Typewriter Keys)
Ctrl 0 - 9
Page 21
The Main Console Interface
Below is the Main Console interface for Fire Studio 5 Player Edition. Although the buttons and panel may
change during the course of use, when you first launch the software, it will appear as below.
The black area that fills most of the screen is the Viewing Area. Your Simulations will be displayed here. Below
is where you will see all the commands and indicators, which will change according the Panel you have open, or
disappear entirely if you choose to hide it.
Page 22
The Message Box
At the very bottom of the Main Console Interface is a black text area where messages will appear that tell you
what command you just clicked or action you took.
Full-Screen (F)
Why: To achieve the maximum Viewing Area, you will need to use the Full-Screen command.
expands your console to the outer edges of your desktop.
It
How:
1) Left click on the Full-Screen button.
2) To return to viewing in a window, click on the same button again.
Tips: Viewing in Full-Screen is ideal when using Simulations in a class or training center. Unless you
need to show other applications to your audience, you can remain in Full-Screen for the length of the
exercise.
Library (L) / Present (P)
Why: To change between the Library Panel and Present Panel.
How:
1) Left click on the Library or Present button. While showing the Present Panel, the Library button will
be available, and vice versa. You can also use the keyboard shortcuts as indicated: “L” for Library
and “P” for Present.
Tips: The Library and Present Panel are the main two you will use most-- particularly the Present Panel,
which is the one defaulted to at the launch of the Player Edition. The Network Panel can be opened on
top of either of these and must be closed before going to either the Library or Present Panels.
Page 23
Interface (I)
Why: If you don't want to show any of the console to your viewers, you can hide all the panels, buttons,
etc. by hiding the entire Interface. Even while hidden, you can still access commands such as moving
the Slide forward,triggering Events, or skipping to other Slides in the Simulation.
How:
1) Left click on the Interface button or press “I” to either show or hide the Interface.
Tips: Keeping the Interface up or not is a personal preference, but usually when a student is looking at a
scene and is not required to use any of the commands on the Panels, it is best to hide the Interface to
keep them better immersed in the situation.
Four WinView (S)
Why: If you want to display all four Windows at once, or at least work on all four at once, you will need
to switch to Four Window View (Four WinView).
How:
1) Left click on the Four WinView button (or press S)
2) Repeat the above to change back to Single Window View.
Tips: You can use the four Windows in any way you like, but the most common use is to display
different views of the location at one time. Your Slide may have Side A-B in Window 1, Side C- D in
Window 2, an interior shot in Window 3, a roof view in Window 4, etc. If you don't want to show all of
the views at once, you can still setup each Window with imagery, but show only one Window in the
Single View Mode, and change the Window displayed using the numbers 1-4 on your keyboard. Setting
up a Simulation in this manner is best ahead of time using the Instructor Edition.
Network (N)
This button shows or hides the Network Panel. Refer to the Network Panel later in this guide for more
details.
Page 24
Exiting Fire Studio 5
Why: All good things must come to an end. When you're ready to quit Fire Studio, you will need to shut
the program down.
How:
1) Method 1 : Left click on the Exit button located at the bottom right of the Main Console Interface.
Method 2: Left click on the Windows Exit button located at the top right of the program, denoted
by an X.
2) There will be no warning message when exiting. Once you click to exit, the program will close
immediately.
Tips: Loaded Libraries remain even once you exit the program. The only thing you will lose if you
prematurely exit the Player Edition is your current place in the loaded Simulation.
Standard Windows Features : Minimize, Maximize, and Close
At the top right your program window, just above the Window Layers Panel, you'll see the three standard
buttons you're likely familiar with in normal Windows ® OS menus. You can use these buttons to minimize,
maximize, and close Fire Studio, respectively. Unlike previous versions of Fire Studio, you can now re-size the
program to fit your needs. Note that maximizing your Fire Studio with the related button keeps it in a window,
leaving access to the taskbar at the bottom and the three aforementioned buttons at the top. This differs from
the Full Screen command that removes the top and bottom bar to expand Fire Studio 5 to its true maximum
size.
Page 25
Present Panel
Why: The Present Panel is displayed at the bottom of the main console when Fire Studio 5 Player
Edition first loads. It is similar to the Slide Panel in the Instructor Edition of the software. Here you can
Clear, Load, or Print your Simulations, change Slides with the Slider Bar, Play, Pause, and Reset Slides,
and take Screenshots of your Simulation. With the Player Edition, you cannot permanently change the
Simulation in any way, merely direct how it is presented.
Slides
Your Simulation will be composed of a number of Slides, where each Slide may represent a scene, a particular
moment in time, or the beginning of a new event. Each Slide contains four Windows, though not all of them
may be used.
Slides vs Windows
A single Slide contains four Windows. You may use any number of these four Windows for each of the Slides in
your Simulation, and view them either all at once, or one at a time. If only using a single scene in a Slide, by
default you will be using Window 1.
The most common use of Windows are to show different perspectives of an incident at the same point in time.
You might have a Side A-B view in Window 1, Side C-D view in Window 2, a roof shot in Window 3, and a larger
map of the area in Window 4. If this were Slide 1, these view might represent the incident when personnel first
arrive on the scene. Slide 2 would again have all of these views, but show smoke starting to build as time
slowly passes. In Slide 3, you might have fire beginning to appear. In Slide 4, a fully engulfed structure. And in
Slide 5, you might begin to see the fire put out, and so on. The time between these Slides can be determined
by the instructor during the exercise, or predetermined and set on a timer within the Simulation.
Page 26
Clear a Simulation
Why: Clearing a Simulation merely removes or “unloads” it from being currently active. If you are
running several individuals through different Simulations, you may want to remove the previous one
from active viewing so it is not seen by the next participant.
How:
1) Click on the Clear Simulation button.
2) You will receive a confirmation warning. Click Ok to proceed.
Tips: It isn't necessary to Clear a Simulation prior to loading another one.
Loading a Simulation
Why: In order to play a Simulation, you must first Load it into the program.
How:
1) In the Present Panel, click on the Load Simulation button.
2) Navigate to the folder with the Simulation you wish to Load.
3) Click on the Simulation file to select it.
4) Click the Open button.
Tips: In Fire Studio 5, you will Load Simulations using the standard Windows interface. This means you
can place your files anywhere you like on your computer. If you are loading a Simulation that was
Exported from another system, make sure the .lbr file is located in the same folder as the .dcs file
(Simulation) you are loading. You will also need to ensure that any Libraries used by the Simulation are
loaded prior, other than the main Library file of the same name, which will be loaded automatically. For
example, if you Export a Simulation named StripMallFire, you will have a StripMallFire.dcs and
StripMallFire.lbr file. This LBR file is the main Library for the Simulation and will load automatically with
the Simulation as long as they are kept together in the same folder.
Print Simulation
Why: If need to make a quick-reference table of contents, you can use the Print Simulation
command to generate an HTML document of your Simulation.
How:
1) With your Simulation loaded, click on the Print Simulation button.
2) Your HTML viewer (usually your web browser) will automatically open up the file.
3) With your browser open, you can go into the File menu and Save the page, or print directly to your
Page 27
printer.
Tips: You can modify an HTML file using most word processing programs, such as Microsoft Word or
Open Office. However, if you want to make a more comprehensive Simulation guide, or don't care for
working in the HTML format, you can import the photos into your document one by one as images, and
create your guide from the ground up. Even if you don't use the HTML file generated by the Print
Simulation command, once you Save the page in your browser, it will create a folder that contains
screenshots of your entire Simulation. These BMP files can then be imported as mentioned above.
Previous
Why: Use this button to step back one Slide.
How:
1) Click on the Previous button. It will only be lit if a Slide exists before the current one.
Tips: You can also use the back arrow on your keyboard.
Next
Why: Use this button to step forward one Slide.
How:
1) Click on the Next button. It will only be lit if a Slide exists after the current one.
Tips: You can also use the forward arrow on your keyboard.
The Lock Box
See below.
Page 28
Moving to a Slide without Viewing those In-between
Why: If you're using the Slider Bar to skip to a Slide out of sequence, you might not want to reveal the
Slides in-between to your viewers. This is useful when you want a scene to change according to
participant feedback; change to a scene you've already created ahead of time.
How:
1) Click on the Lock box to place a mark. This will keep the current view while you move the Slider
Bar.
2) Move the Slider Bar until the indicator below reaches the Slide you want to change to.
3) Click on the Lock box again to remove the mark. Doing so will immediately change to that Slide.
Tips: Instead of moving the Slider Bar, you could also use the keyboard shortcut by pressing J
followed by the Slide number you want to skip to, and then pressing Enter. If the Lock box is marked,
the Slide won't be shown until you remove the mark.
Play
Why: Press the Play button to resume a Slide that is paused.
How:
1) Click on the Play button when the Slide is paused.
Tips: The Play button will only be lit if the Slide/Simulation is paused.
Pause
Why: Sometimes you might need to Pause a scene.
How:
1) Click on the Pause button when you need to freeze the Frame.
Tips: Pausing can be useful if you need to discuss the scene in more detail with your audience and don't
want the Slide to auto-advance or camera movement to occur just yet.
Page 29
Reset
Why: If you need a Slide to start over again (as if you had just changed to it), then you will need to use
Reset.
How:
1) While viewing the Slide or Window you want to restart, click on the Reset button.
Tips: You can use the Reset button as many times as needed. Using Reset will begin all animations
again, including fade-ins or fade-outs, video clip-art, and so on.
Screenshot File
Why: Prior to capturing a still image from your Simulation, you need to tell Fire Studio what to name it.
How:
1) Click on the Screenshot File button. This filename will persist for your Simulation until you change
it or exit the program.
2) Navigate to the folder where you want to save the Screenshot(s) and type in a name for the image
file.
3) Click Save.
4) The path and file name will appear just above the Screenshot File button.
Tips: You can set any name you like, but Fire Studio will automatically add a number sequence at the
end of the file name, which will progress in sequence as you take screen captures. In this way, you
don't need to name the files each time to avoid overwriting, and you can take as many screen-shots as
you like.
Screenshot
Why: This command will create still-image shots of your currently selected Window, which can then be
used in any number of ways.
How:
1) You will need to set a Screenshot File first. If you have not, refer to the section above.
2) Select the Window you want to create a still-image of.
3) Click on the Screenshot button.
4) A BMP image file is automatically saved in the location you chose when creating the Screenshot File
and the filename moves up one in the sequence (000 becomes 001, etc.)
Page 30
Tips: The Screenshot feature in Fire Studio 5 can provide a still image of only one Window at a time. If
you require a Screenshot of the Four Window View, you'll need to use a 3 rd party capture application.
The easiest is simply to use the command built into Microsoft Windows by pressing the PrtScn (Print
Screen) button on your keyboard. This will take a still image of the entire desktop, but you will need to
go into some other application and Paste the image from the copy buffer. Keep in mind this will be an
image of the entire desktop, so you should maximize the size of Fire Studio and hide the Interface
before using it. In the end, you may still want to edit the image using photo editing software such as
Adobe Photoshop or our recommended Paint.net.
Mini Panel
Why: Sometimes you don't need the full Present Panel and rather have a larger display, but retain basic
controls visibly.
How:
1) Hide the Interface by clicking on the Interface button or pressing “I.”
2) Press Tab on the keyboard to hide or unhide the Mini Panel.
Tips: Controls on the Mini Panel work exactly the way they do on the Present Panel. In fact, if you look
closely, you can see that the Mini Panel is nothing more than one particular section of the full Present
Panel.
Page 31
Library Panel
Why: The sole purpose of the Library Panel is to manage the loaded Libraries for this installation of the
Player Edition. You can Load Libraries to make them available to Simulations that require them, or you
can Remove Libraries you know will not be needed.
How:
Load a Library
1) Click on the Load button.
2) A Window will appear to allow you to locate a Library on your computer.
3) Find and select the Library you want to load, then click Open.
Remove a Library
1) Select a Library from the list. The name will appear in the text box next to Library.
2) Click on the Remove button.
Tips: You must have a Library loaded before you load a Simulation in order for the Simulation to appear
correctly. If some Libraries are not loaded that the Simulation requires, Fire Studio will display an error
message for each one. Load these Libraries and then open the Simulation again.
There is no harm in having extra Libraries loaded. Simulations will only use Libraries that were used to
create them and any other loaded Libraries will not interfere. The Remove Library button is available
simply if you want to clean up the list of Libraries for any reason. A Library that has been removed is
not erased and can be Loaded again at any time.
Page 32
Network Panel
Why: The Network feature is applicable only to those connecting to Digital Combustion's
Communication Link software over a Local Area Network or the Internet using a Virtual Private
Network. This command activates the connection process to connect to Commlink.
How:
1) Prior to using this function, your computer should be connected to the network and
Communication Link (Commlink) should be running. Refer to the Communication Link manual for
more details on the network connection requirements and setup.
2) Click on the Network button or press “N.” This brings up the Network Panel.
3) User name : Enter in a unique name which will identify you and this computer in Communication
Link and press Enter. Another person connecting to Commlink cannot share the same name.
4) Room : Enter the Room Name you are connecting to and press Enter. This should be the same
name created by the Commlink Operator when Commlink was launched. It must be the same
name in order to connect properly.
5) IP : Enter the IP address of the Commlink computer and press Enter. This will appear on the
Commlink screen when it first launches.
6) Port : Enter the Port number that Commlink is using and press Enter. This will appear on the
Commlink screen when it first launches.
7) Click on Connect. Fire Studio will attempt to locate Commlink and establish a connection. If the
connection is not found, confirm you entered all information accurately. Firewalls can prevent
access as well. Refer to the Communication Link manual for more details.
Tips: Showing multiple perspectives of an incident is one of the most robust methods of using Fire
Studio for training exercises. Communication Link allows the training officer or controller to manage
and manipulate all the Fire Studio connections from the ease of a single computer. Without
Communication Link, there is no functionality of the Network button, nor any way to connect one
installation of Fire Studio with another, other than media exchange.
Page 33
Fire Studio Miscellany
Importing a Fire Studio 4/4.1 Simulation into Fire Studio 5
Why: If you have Simulations created in Fire Studio 4/4.1, you can import them to use in Fire Studio 5.
You cannot do the reverse, however, and import Fire Studio 5 Simulations into Fire Studio 4/4.1.
How:
1) Export your Fire Studio 4/4.1 Simulation using the instructions listed in the Fire Studio 4 manual.
You will have a .dcs and .dcl file for your Simulation if you've done this correctly. Keep in mind that
any media set to Read-Only will NOT be included in the .dcl file.
2) With Fire Studio 5 Simulations, you have a lot of freedom regarding where to load files from. When
importing from version 4/4.1 however, we recommend placing the two files in a folder you've
designated for version 4/4.1 Sims. Fire Studio 5 treats older Sims slightly differently, so it is a good
idea to keep them separated from any version 5 Sims you create. So copy or move your files to the
folder you've chosen and then launch Fire Studio 5, making sure you've kept both .dcs and .dcl files
together.
3) Load the Simulation as normal (refer to Loading a Simulation for instructions) from within Fire
Studio 5. Note that you will NOT see the .dcl file from within Fire Studio! You will be selecting
the .dcs file to load.
4) Your Simulation should now be loaded. Review it to make sure everything is in place and then Save
it. Choose a different folder and maybe even a slightly different name, so you don't confuse it with
your older / original file. Now it is a version 5 Simulation.
Tips: Keep in mind the guidelines of exporting Simulations in version 4. Most notably, only those media
files NOT set as Read-Only will be included in the .dcl file when you do Export Simulation. Just like in
version 4/4.1, any white backgrounds or boxes that appear in your Simulation are an indication that Fire
Studio can't locate that particular media and it probably did not get exported due to being set as ReadOnly. You should be able to track down the name of the missing Layer when the Simulation is open and
then investigate that file from the originating computer or folder to see if it is set as Read-Only. If so,
uncheck that property, and then repeat the steps above.
When you load an imported Simulation in this fashion, the custom media included in the .dcl file will
be extracted to a location parallel to where it was in your Fire Studio 4 directory. For example, if you
had a custom folder named Commercial Fire where your backgrounds for this Simulation were loaded,
then Fire Studio will create a Commercial Fire folder in Data and place your background photos inside.
You can then use these images in other Simulations.
Page 34
Sending & Receiving Text Messages
Messaging will appear different and have separate functionality based upon the mode you are in or panel you
are currently viewing.
Messaging with the Network Panel Shown
When you have the Network Panel open, messaging will appear as in the screenshot above. Incoming
messages will be displayed in the main text area with the name of the originator at the left and outgoing
messages-- those sent by the person using this system-- will also be displayed, but without an identifying
marker. If you want to scroll up to read previous messages, you can use the scroll bar at the right.
To send a message, click in the text field between the Network and Send buttons, type your message, then
press Enter, or click on the Send button. The messaging text will not be lost if you hide the Network Panel and
you will continue to receive messages “silently.”
Page 35
Incoming Messages while the Interface is Hidden
When a message is received while the Interface is hidden, a mini text box will appear at the bottom of the
screen as pictured above. Unlike messaging while viewing the Network Panel, you cannot directly reply
through this mini box. You can either click Hide to remove this mini box and continue with the Interface
hidden, or you can click the Network button (or press N) and bring up the Network Panel with the Interface. Of
course, you can also leave the message box up and new incoming messages will be displayed, one line at a
time.
Page 36
FAQ
Can I get an electronic version of the manual?
The Fire Studio 5 manual is located in the Documentation folder either on the CD you received with your order,
or in the ZIP file you downloaded from Digital Combustion. Revisions to the manual do occur on occasion, so
check the website for any posted updates. Feel free to print the manual or sections of it from this PDF file for
your own personal, non-commercial use.
Do I need a Player Edition to play simulations I’ve made with an Instructor Edition?
You will need either an Instructor Edition or Player Edition to play simulations you've created. The Instructor
can do both, whereas the Player can only play simulations you, or someone else, has made.
What's the difference between the Instructor and Player?
The Instructor Edition can do everything: create and play. The Player Edition is for users who require additional
licenses spread across several computers to playback simulations concurrently, or for personal training for
people who have access to simulations which someone else has made. In some cases, a training officer may
prefer to use the Player Edition to teach with in the field, while using the Instructor Edition in his office to
create. The Player edition is primarily intended to show multiple views of an incident to different people or
groups of people, such as a fully involved, even multi-department, training simulation.
Can I install an Instructor and Player on the same machine?
Starting with Fire Studio 5.3, Instructor Editions and Player Editions are both installed from the same file set.
Therefore, you cannot have both installed on the same computer. If you are allowing someone other than the
trainer to use Fire Studio on that computer, you should set them up into Present Mode, which operates nearly
identically to a Player Edition.
My department’s computers are all networked, can I put Fire Studio 5 on a server which students would be
able to access from a workstation?
Fire Studio is not designed to work across a network in this way. Nor is it designed to be installed remotely. You
may only operate the software on one system at a time per license you purchased. If this is adhered to, you can
attempt remote installation and use at your own risk. Digital Combustion cannot provide technical support for
this type of usage nor held responsible for any problems that arise due to this configuration.
Digital Combustion's Communication Link software (sold separately) can control installations across a network
or the internet, but Fire Studio will still need to be manually installed on all machines. Exchanging custom files
and simulations across a network or having a mapped drive pointing to a folder on the server are possibilities
some users have explored, but we cannot offer technical support in configuring your Windows working
environment. Please inquire with your IT department about setting up mapped folders.
Page 37
My department won’t let us write anything to our computers’ hard disk drive. Can I run the software off the
CD itself? Can I run it off an external device?
The short answer is No. Fire Studio must be installed prior to operating. It will not run off the original CD. In
addition to the licensing files, a custom library folder will be created in My Documents on the Hard Disk Drive,
which will contain some essential files necessary to operating Fire Studio. You can however place custom
photos, libraries, and saved simulations onto an External HD or Flash Drive during operation of the software.
But keep in mind that Fire Studio will look for these files if they are a part of the Library List. If a Library cannot
be found, it will be removed from the active Library list, and will have to be Loaded later when you have access
to the Library file again. We highly suggest you speak with your IT department about these possibilities before
assuming it can be done.
When I run the program, only a portion of the console loads, or the screen just flashes.
Both of these issues relate to one thing: the video chipset. Simply put, the chipset or video card is not powerful
enough to run the software. In all likelihood, you are using an Intel Express or Intel Mobile Express chipset.
These are low-end chipsets designed for business or simple graphics applications. They also do not have
dedicated RAM, instead drawing from the system RAM. For desktops, you can simply purchase a separate video
card and install it in the machine. Most laptops however cannot be upgraded. Speak with your IT department or
laptop manufacturer regarding upgrading the video chipset. You can refer to the section earlier in this
document for Equipment Requirements.
I get an error message that states DirectX failed to initialize. I’ve installed DirectX and reinstalled Fire Studio
but I still get the same error.
This error occurs when the video card or graphics chipset you are using in your system does not meet the
minimum requirements of the software. Typically, most customers who get this error are using an Intel graphics
chipset, which is not sufficient to run Fire Studio 4/4.1/5. If you’re using a desktop, you can purchase a new
video card to bring your system up to specification. If you’re using a laptop, it is unlikely that you can upgrade
the chipset, and will need to use a different computer.
I just saved a simulation / did a screenshot / captured a video / created a library, but when I use Windows
Explorer to find the file, it isn't there.
Most likely your files are being moved by Data Redirection. Refer to Section I of this guide for details.
I receive an error when trying to add a Library to my Library List. Something about access violations or write
permissions.
Receiving this error typically indicates your account does not have write or edit/modify permission to the Fire
Studio 5 folder. You will either need to modify the permissions of your account or use an administrator account
to run Fire Studio 5. You will also likely see this error if you attempt to save a file to the Fire Studio 5 folder.
Refer to section I of this guide for more details.
Can I backup the Fire Studio file I downloaded from your link?
Yes. In fact, if you extract the files from the ZIP and burn those to a CD or USB stick, you can install the software
directly from that device.
Page 38
Can I make a backup of my Fire Studio 5 CD?
Yes. Unlike some earlier versions of Fire Studio, you are allowed to make backup copies of Fire Studio 5. We
recommend using the copy for installations and keeping the original somewhere safe.
Do I need to keep the CD in the computer when I run the program?
No. Unlike some earlier versions of Fire Studio, you do not need to keep the original CD in the CD/DVD ROM
drive when operating the program.
Are my old Fire Studio simulations compatible with the new version?
You cannot use simulations from Fire Studio 1.x/2.x/3.x with Fire Studio 5, but simulations from version 4.0 or
4.1 will work. However, once you have imported them into version 5, you cannot bring them back to version
4/4.1. Fire Studio 5 and 5.3 are compatible, but because version 5.3 has numerous improvements and manages
libraries and exports differently, it is best to remain consistently on the newer revision as much as possible.
Will the installation of Fire Studio 5 overwrite earlier versions of the program I have on my computer? Do I
need to have the old version of Fire Studio installed on my machine for the upgrade?
Fire Studio 5 will not install over prior versions of Fire Studio (ver 1 – 4). During installation, you should not
change the installation path to any previous version as this could overwrite files and make the software
unusable. Users who purchase the upgrade do not need to have the old version installed on their system. The
CD or file sent to you will be stand-alone and can be installed on a machine with no other version of Fire Studio
installed. If you are installing Fire Studio 5.3 (or a newer revision of Fire Studio 5) on to a computer which has
an earlier revision of Fire Studio 5, files may be overwritten. You must remove your current installation and
should backup any custom files (libraries, photos, saved layers, etc.) prior to installing the newer revision.
I tried importing my video into Fire Studio 5 but it doesn't work.
Videos must be in AVI format using a codec that your system recognizes. Fire Studio does not have any codecs
built in and relies on what is installed on your system. If your video is an AVI, but Fire Studio still can't play it,
then you need to find out what kind of codec was used to encode it, and then install that codec into Windows.
Many programs available for free can tell you what codec was used if you don't know already. VirtualDub is one
of those programs and also a good video converter that will allow you to re-encode a video using a different
codec. Another program worth having is MediaInfo. Although it cannot convert videos, it has a larger database
of knowledge and may be able to recognize the type of video you have if VirtualDub cannot.
VirtualDub : http://www.virtualdub.org/
MediaInfo : http://mediainfo.sourceforge.net/en
Once you have identified the codec, you can track it down on the Internet and install it on your system. A good
place to start is http://www.free-codecs.com/. Many people can simply download the K-Lite Mega Codec pack
onto their system as it includes the most common codecs in use. However, if you're video is fresh from a
camera, you may need to investigate further.
Importing video into Fire Studio is probably the most “difficult” feature of the software. However, once you've
discovered the required steps to take, you can repeat the process ad infinitum.
Page 39
When running the software, I receive a message that states: “Capture buffer failed to initialize. Please
update sound drivers. Fire Studio 5 will continue working, but will not capture sound.”
Fire Studio 5 uses a DirectX driver called DirectSound to facilitate audio capture when making an AVI video of
your simulation. There is a known issue with certain “low-end” sound cards being incompatible with
DirectSound (particularly RealTek sound cards). If you receive this error and you want to capture audio when
creating AVI videos, then you should update your sound drivers, either through Microsoft, or through the audio
chipset manufacturer. Keep in mind that there may be different versions of the driver available, and you may
need to try more than one to get it working properly. In the event a driver update does not correct the issue,
we recommend using an alternative video capturing program, as suggested in the Video Capture section of the
Fire Studio 5 Manual.
When running the software, I receive a message that states: "Sound Manager failed to initialize. Please
update sound drivers. Fire Studio 5 will continue working, but without playing sound."
Similar to the previous issue, this message appears when the sound driver you are using is incompatible with
DirectX 9c. You should update your sound drivers immediately to remedy the problem. A rare error, if you
continue to receive this after updating your sound drivers, there may be additional issues causing problems
with the system. One possible example is if you have two sound systems and your computer is attempting to
use the incorrect one. Please contact Digital Combustion if continue to receive this error and fail to hear
sounds in Fire Studio 5.
When running the software for the first time, a message appears that states it needs to configure the
program or do a repair, and then once finished, the DirectX install appears again.
There is a known issue with earlier versions of Fire Studio 5 when using it on a computer that has more than
one user account. To correct the problem, delete the shortcut, and create a new one to the FireStudio5.exe file
located in Programs – DigitalCombustion – FireStudio5. Running the software from FireStudio5.exe will also
work. This issue has been addresses in Fire Studio 5.3.
I am receiving the following error when I try to launch Fire Studio 5 : The application has failed to start
because the application configuration is incorrect.
This error occurs most frequently on Windows XP, but can happen with other versions as well. It is caused
when you are missing drivers from MS Visual C++ 2008. To fix this issue, please manually install MS Visual C++
2008 using the provided installation package vcredist_x86.exe located in the Resource folder of your installation
files.
I am receiving the following error when I try to launch Fire Studio 5 : This application does not have
sufficient privileges to run.
This error occurs when the Nalpeiron License service is not installed and is being blocked from being installed.
Typically this should only occur when you first try to launch the software and it attempts to install Nalpeiron. If
you're not logged in as an Administrator, it may not be able to install and you'll get this error. You can fix this
issue by either right-clicking the shortcut and choosing Running as Administrator or logging in as the Admin and
launching Fire Studio. Once Nalpeiron is installed and running, non-admin users should be able to run Fire
Studio as normal.
Page 40
Technical Support
You can contact us for technical support 5 days a week during regular business hours at our toll free number 1800-884-8821.
You can also email us at the appropriate address below:
General Information: [email protected]
Sales: [email protected]
Tech Support: [email protected]
Be sure to include your name, contact information, product version, and a description of the problem if you are
sending a technical support related email.
Check our web page periodically to stay up-to-date on the latest Digital Combustion news and downloads:
http://www.digitalcombustion.com/
If you need to send us a Purchase Order or Voucher, you can fax it to us at 1-800-564-9101, or mail it to the
address below:
Digital Combustion, Inc.
9121 Atlanta Ave. #705
Huntington Beach, CA. 92646
Visit our online forums to share tips, ideas, and media with fellow Fire Studio users!
Page 41
End User License Agreement (EULA)
Fire Studio 5 (Software Activation Required)
ATTENTION: PLEASE READ THIS DOCUMENT CAREFULLY BEFORE COMPLETING INSTALLATION OF THIS SOFTWARE. THE INDIVIDUAL OR ENTITY
INSTALLING THIS SOFTWARE (THE "END USER") AGREES TO BE BOUND BY THE TERMS OF THIS LICENSE. IF YOU INSTALL THIS SOFTWARE AND DO NOT
AGREE TO THE TERMS OF THIS LICENSE, DO NOT USE THE SOFTWARE. UNINSTALL. PROMPTLY AND RETURN THE PACKAGE, AND THE LICENSE PRICE
PURCHASED WILL BE REFUNDED.
The enclosed computer program(s) and any accompanying documentation are provided to the End-User by Digital Combustion, Inc., A California
Corporation ("Licensor") for use only under the following terms. Licensor reserves any right not expressly granted to the End-user. The End-User owns
the disk on which the Software is recorded, but Licensor retains ownership of all copies of the Software itself. The End-User assumes sole responsibility
for the installation, use and results obtained from use of the Software.
This Software is copy-protected by Third-Party Software. Installation of the computer program(s) will also install this Third-Party Copy Protection and will
control the trial period of the Software and Activation. This software program will operate fully as a trial version for a limited time before the serial
number is required for Activation to allow for extended use on your computer (Call or contact Digital Combustion, Inc. for more information).
- Activation
Direct Activation of the Software requires your computer(s) to be connected and have access to the Internet. Activation can also be accomplished
indirectly by means of another computer connected to the Internet. Alternatively, activation via email or phone contact with Digital Combustion, Inc. is
also available. Direct De-Activation of Software requires your computer(s) to have access to the Internet during un-installation of the Software
simplifying License Transfer to other computers and a subsequent Re-Activation or Transfer of License. (Call or contact Digital Combustion, Inc. directly for
assistance if needed or consult other instructional materials provided with the software).
Digital Combustion, Inc. allows for a set number of Activations per License purchased by the End-User. Unless otherwise authorized by a duly-appointed
employee of Digital Combustion Inc., the number of Activations allowed i) is 2 per Fire Studio 5 Instructor Edition license ii) is 1 per Fire Studio 5 Player
Edition license iii) is 1 per Communication Link 4 license. Activation is conducted using a License Number or Serial Number provided by Licensor upon
purchase of software license(s). Activations are in use when the End-User's License Number or Serial Number has been entered / provided for validation
or authorization of software installation. Activations may be returned to the End-User automatically if correct "de-activation" procedures are followed, or
at the discretion of Digital Combustion Inc. Licensor shall not be held responsible for lost or stolen software Serial Numbers, License Numbers, or any
other codes used for the purpose of software activation. Licensor shall also not be held accountable for lost, damaged, or stolen installations or
activations due to End-User's equipment failure or failure to follow correct installation and/or activation procedures.
. License.
End-User is granted a limited, non-exclusive license to do only the following:
A. Install, maintain and use the Software on one computer at any time, per license purchased, for End-User's own personal, business, or organizational
use. The Software is protected by copyright law. By means of example, if End-User purchases 3 Fire Studio 5 Instructor Edition licenses, End-User may
operate Fire Studio 5 Instructor Edition on 3 computers concurrently.
B. Use of, or as result of using this software, the animation(s), picture(s) or other art provided in the software, cannot be used, displayed or distributed in
any form for commercial purpose(s), unless End-User or subsequent user is given express written permission from Digital Combustion, Inc.
C. Transfer the Software and all rights under this License to another party together with a copy of this License and all written materials accompanying the
Software, provided (i) the End-User gives Licensor written notice of the transfer (including in such notice the identity of the transferee), and (ii) the other
party reads and agrees to accept the terms and conditions of this License.
. Restrictions.
The End-User may NOT sublicense, assign, or distribute copies of the Software to others. The Software contains trade secrets. The End-User may NOT
decompile, reverse engineer, disassemble, or otherwise reduce the Software to a human readable form. THE END-USER MAY NOT MODIFY, ADAPT,
TRANSLATE, RENT, LEASE, LOAN, RESELL FOR PROFIT, DISTRIBUTE, OR OTHERWISE ASSIGN OR TRANSFER THE SOFTWARE, OR CREATE DERIVATIVE WORKS
BASED UPON THE SOFTWARE OR ANY PART THEREOF, EXCEPT AS EXPRESSLY PROVIDED IN SECTION 1.C. ABOVE.
. Protection and Security.
The End-User agrees to use its best efforts and to take all reasonable steps to safeguard the Software and provided Serial numbers to ensure that no
unauthorized person shall have access thereto and that no unauthorized copy, publication, disclosure or distribution in whole or in part, in any form, shall
be made. The End-User acknowledges that the Software contains valuable confidential information and trade secrets and that unauthorized use and/or
copying is harmful to Licensor.
. Termination.
This License is effective until terminated. This License will terminate immediately without notice from Licensor if the End User fails to comply with any of
its provisions. Upon termination the End User must destroy the Software and all copies thereof, and the End-User may terminate this License at any time
Page 42
by doing so.
. Export Law Assurances.
The End-User agrees that the Software is to be used only in the United States and the Software will not be transferred or exported, directly or indirectly,
outside the U.S.
. Limited Warranty.
Licensor warrants that, for sixty (60) days from the date of purchase or delivery to the original End User, the Software shall operate substantially in
accordance with the published functional specifications current at the time of shipment. If, during the warranty period, a defect appears, End User shall
return and De-Activate (Uninstall) the Software to Licensor and Licensor's only obligation shall be, at Licensor's election, to replace the defective Software
or refund the purchase price. The End-User agrees that the foregoing constitutes the End-User's sole and exclusive remedy for breach by Licensor under
any warranties made under this Agreement. This warranty does not cover any Software that has been altered or changed in any way by anyone other
than Licensor. Licensor is not responsible for problems associated with or caused by incompatible operating systems or equipment, or for problems in
the interaction of the Software with software not furnished by Licensor.
No oral or written information or advice given by Licensor or its dealers, distributors, employees or agents shall in any way extend, modify or add to the
foregoing warranty.
THE WARRANTY AND REMEDY PROVIDED ABOVE ARE EXCLUSIVE AND IN LIEU OF ALL OTHER WARRANTIES, EXPRESS OR IMPLIED, INCLUDING BUT NOT
LIMITED TO THE IMPLIED WARRANTIES OF MERCHANTABILITY AND FITNESS FOR A PARTICULAR PURPOSE. THE END-USER ASSUMES ALL RISK AS TO THE
SUITABILITY, QUALITY, AND PERFORMANCE OF THE SOFTWARE. IN NO EVENT WILL LICENSOR, OR ITS DIRECTORS, OFFICERS, EMPLOYEES OR
AFFILIATES, BE LIABLE TO THE END-USER FOR ANY CONSEQUENTIAL, INCIDENTAL, INDIRECT, SPECIAL OR EXEMPLARY DAMAGES (INCLUDING DAMAGES
FOR LOSS OF BUSINESS PROFITS, BUSINESS INTERRUPTION, LOSS OF DATA OR BUSINESS INFORMATION, AND THE LIKE) ARISING OUT OF THE USE OF OR
INABILITY TO USE THE SOFTWARE OR ACCOMPANYING WRITTEN MATERIALS, EVEN IF LICENSOR HAS BEEN ADVISED OF THE POSSIBILITY OF SUCH
DAMAGES.
LICENSOR'S LIABILITY TO THE END-USER (IF ANY) FOR ACTUAL DIRECT DAMAGES FOR ANY CAUSE WHATSOEVER, AND REGARDLESS OF THE FORM OF THE
ACTION, WILL BE LIMITED TO, AND IN NO EVENT SHALL EXCEED, THE AMOUNT ORIGINALLY PAID TO LICENSOR FOR THE LICENSE OF THE SOFTWARE.
. Enhancements.
From time to time Licensor may, in its sole discretion, advise the End-User of updates, upgrades, enhancements or improvements to the Software and/or
new releases of the Software (collectively, "Enhancements"), and may license the End-User to use such Enhancements upon payment of prices as may be
established by Licensor from time to time. All such Enhancements to the Software provided to the End-User shall also be governed by the terms of this
License. IN ORDER FOR THE END-USER TO BE ASSURED THAT IT WILL BE ADVISED OF AND LICENSED TO USE ANY ENHANCEMENTS TO THE SOFTWARE,
THE END-USER MUST COMPLETE, SIGN AND RETURN TO LICENSOR AN END- USER REGISTRATION SHEET.
. General.
This License will be governed by and construed in accordance with the laws of the California, and shall inure to the benefit of Licensor and End-User and
their successors, assigns and legal representatives. If any provision of this License is held by a court of competent jurisdiction to be invalid or
unenforceable to any extent under applicable law, that provision will be enforced to the maximum extent permissible and the remaining provisions of this
License will remain in full force and effect. Any notices or other communications to be sent to Licensor must be mailed first class, postage prepaid, to the
following address: Digital Combustion, Inc., A California Corporation, 9121 Atlanta Ave. #705 Huntington Beach, CA 92646. PH: 800-884-8821
This Agreement constitutes the entire agreement between the parties with respect to the subject matter hereof, and all prior proposals, agreements,
representations, statements and undertakings are hereby expressly canceled and superseded. This Agreement may not be changed or amended except
by a written instrument executed by a duly authorized officer of Licensor.
Acknowledgment.
BY INSTALLING THIS SOFTWARE, THE END-USER ACKNOWLEDGES THAT IT HAS READ THIS LICENSE, UNDERSTANDS IT, AND AGREES TO BE BOUND BY
ITS TERMS AND CONDITIONS. Should you have any questions concerning this License, contact Licensor at the address set forth above.
© Digital Combustion, Inc 2007-2012
Page 43