1
U.S. PATENT# 7,783,018
AlphaEntry™ 5.0
http://www.alphaentry.com
Installation & Configuration Manual
QwikBUS™ / QwikACCESS™ / MailRoom™
Integrations & Configuration
Alpha Communications® and Alpha Media®, Inc.
http://www.alphacommunications.com
http://www.alphamedia.com
42 Central Drive
Farmingdale, NY 11735-1202
Phone: 631-777-5500 Fax: 631-777-5599
Copyright© 2005-2014
Alpha Communications® All Rights Reserved
AWD199 – Rev 1.2 (11/2015)
License Agreement
ALPHA MEDIA, INC. ALPHAENTRY™, ALL VERSIONS, AND SOFTWARE RELATED COMPONENTS. END-USER LICENSE AGREEMENT FOR ALPHA MEDIA, INC. SOFTWARE
IMPORTANT-READ CAREFULLY: This Alpha Media, Inc. End-User License Agreement ("EULA") is a legal agreement between you (either an individual or a single entity) and Alpha
Media, Inc. Corporation for the Alpha Media, Inc. software product(s) identified above which may include associated software components, media, printed materials, and
"online" or electronic documentation ("SOFTWARE PRODUCT"). By installing, copying, or otherwise using the SOFTWARE PRODUCT, you agree to be bound by the terms of this
EULA. If you do not agree to the terms of this EULA, do not install or use the SOFTWARE PRODUCT.
The SOFTWARE PRODUCT is protected by copyright laws and international copyright treaties, as well as other intellectual property laws and treaties. The SOFTWARE PRODUCT is
licensed, not sold.
1. GRANT OF LICENSE. The SOFTWARE PRODUCT is licensed as follows:"
* Installation and Use. Alpha Media, Inc. grants you the right to install and use copies of the SOFTWARE PRODUCT on your computers running validly licensed copies of the
operating system for which the SOFTWARE PRODUCT was designed [e.g., Windows2000®; Windows 2003 Server®; Windows XP®; Windows Vista®; Windows 7®; Windows 8®].”
* Backup Copies. You may also make copies of the SOFTWARE PRODUCT as may be necessary for backup and archival purposes.
* Components. Certain software components of the SOFTWARE PRODUCT are subject to the following additional provisions:
2. DESCRIPTION OF OTHER RIGHTS AND LIMITATIONS.
* Maintenance of Copyright Notices. You must not remove or alter any copyright notices on all copies of the SOFTWARE PRODUCT.
* Distribution. You may not distribute copies of the SOFTWARE PRODUCT to third parties.
* Prohibition on Reverse Engineering, Decompilation, and Disassembly. You may not reverse engineer, decompile, or disassemble the SOFTWARE PRODUCT, except and only to
the extent that applicable law notwithstanding this limitation expressly permits such activity.
* Rental. You may not rent, lease, or lend the SOFTWARE PRODUCT.
* Transfer. You may permanently transfer all of your rights under this EULA, provided the recipient agrees to the terms of this EULA.
* Support Services. Alpha Media, Inc. may provide you with support services related to the SOFTWARE PRODUCT ("Support Services"). Use of Support Services is governed by
the Alpha Media, Inc. policies and programs described in the user manual, in "on line" documentation and/or other Alpha Media, Inc.-provided materials. Any supplemental
software code provided to you as part of the Support Services shall be considered part of the SOFTWARE PRODUCT and subject to the terms and conditions of this EULA. With
respect to technical information you provide to Alpha Media, Inc. as part of the Support Services, Alpha Media, Inc. may use such information for its business purposes, including
for product support and development. Alpha Media, Inc. will not utilize such technical information in a form that personally identifies you, without your permission.
* Compliance with Applicable Laws. You must comply with all applicable laws regarding use of the SOFTWARE PRODUCT.
3. TERMINATION. Without prejudice to any other rights, Alpha Media, Inc. may terminate this EULA if you fail to comply with the terms and conditions of this EULA. In such
event, you must destroy all copies of the SOFTWARE PRODUCT.
4. COPYRIGHT. All title, including but not limited to copyrights, in and to the SOFTWARE PRODUCT and any copies thereof are owned by Alpha Media, Inc. or its suppliers. All
title and intellectual property rights in and to the content which may be accessed through use of the SOFTWARE PRODUCT is the property of the respective content owner and
may be protected by applicable copyright or other intellectual property laws and treaties. This EULA grants you no rights to use such content. All rights not expressly granted are
reserved by Alpha Media, Inc.
5. U.S. GOVERNMENT RESTRICTED RIGHTS. The SOFTWARE PRODUCT is provided with RESTRICTED RIGHTS. Use, duplication, or disclosure by the Government is subject to
restrictions as set forth in subparagraph (c)(1)(ii) of the Rights in Technical Data and Computer Software clause at DFARS 252.227-7013 or subparagraphs (c)(1) and (2) of the
Commercial Computer Software Restricted Rights at 48 CFR 52.227-19, as applicable. Manufacturer is Alpha Media, Inc. 42 Central Drive, Farmingdale, NY 11735-1202.
6. EXPORT RESTRICTIONS. You agree that you will not export or re-export the SOFTWARE PRODUCT to any country, person, entity or end user subject to U.S.A. export
restrictions. Restricted countries currently include, but are not necessarily limited to Cuba, Iran, Iraq, Libya, North Korea, Sudan, and Syria. You warrant and represent that
neither the U.S.A. Bureau of Export Administration nor any other federal agency has suspended, revoked or denied your export privileges.
7. NO WARRANTIES. Alpha Media, Inc. expressly disclaims any warranty for the SOFTWARE PRODUCT. THE SOFTWARE PRODUCT AND ANY RELATED DOCUMENTATION IS
PROVIDED "AS IS "WITHOUT WARRANTY OF ANY KIND, EITHER EXPRESS OR IMPLIED, INCLUDING, WITHOUT LIMITATION, THE IMPLIED WARRANTIES OR MERCHANTABILITY,
FITNESS FOR A PARTICULAR PURPOSE, OR NONINFRINGEMENT. THE ENTIRE RISK ARISING OUT OF USE OR PERFORMANCE OF THE SOFTWARE PRODUCT REMAINS WITH YOU.
THIS SOFTWARE IS DISTRIBUTED ON A FREE 90-DAY TRIAL BASIS. IT IS THE CUSTOMER'S RESPONSIBILITY TO FULLY USE AND TEST THIS SOFTWARE, BEFORE PURCHASING, TO
DETERMINE IF THE SOFTWARE MEETS THE CUSTOMER'S NEEDS, AND PERFORMS TO THE CUSTOMERS 100% SATISFACTION. IF IN ANY WAY THE SOFTWARE IS UNSATISFACTORY
OR IS NON-FUNCTIONING, THE CUSTOMER SHALL NOT REGISTER OR PAY FOR THE SOFTWARE. ONCE THE CUSTOMER REGISTERS OR PAYS FOR THE SOFTWARE, THE CUSTOMER
HAS ACCEPTED THE SOFTWARE 'AS-IS' AND WILL NOT BE ENTITLED TO ANY REFUND OR COMPENSATION OF ANY KIND.
8. LIMITATION OF LIABILITY. To the maximum extent permitted by applicable law, in no event shall Alpha Media, Inc. or its suppliers be liable for any special, incidental,
indirect, or consequential damages whatsoever (including, without limitation, damages for loss of business profits, business interruption, loss of business information, or any
other pecuniary loss) arising out of the use of or inability to use the SOFTWARE PRODUCT or the provision of or failure to provide Support Services, even if Alpha Media, Inc. has
been advised of the possibility of such damages. In any case, Alpha Media, Inc.'s entire liability under any provision of this EULA shall be limited to the replacement of any
registered software that has been determined by Alpha Media Inc. to be defective. Because some states and jurisdictions do not allow the exclusion or limitation of liability, the
above limitation may not apply to you.
9. MISCELLANEOUS. - This EULA is governed by the laws of the State of New York, U.S.A. Should you have any questions concerning this EULA, or if you desire to contact Alpha
Media, Inc. for any reason, please contact the Alpha Media, Inc. subsidiary serving your country, or write: Alpha Media, Inc., 42 Central Drive, Farmingdale, NY 11735-1202. You
may contact us by phone at 631-777-5500 or fax at 631-777-5599 or by email at [email protected]
Table of Contents
Chapter 1 -
The Software ................................................................................................................................ 7
Introduction ...................................................................................................................................................7
Minimum System Requirements ...................................................................................................................8
Installing the AlphaEntry™ Software .............................................................................................................9
What is a Dongle? ........................................................................................................................................10
Starting AlphaEntry™ ...................................................................................................................................10
Exiting AlphaEntry™ .....................................................................................................................................10
Chapter 2 -
AlphaEntry™ User Operation ...................................................................................................... 11
The Visitor Touchscreen Interface ...............................................................................................................11
The Doorman / Concierge Interface ............................................................................................................12
Emergency, Off Premises, Staff/Other Tabs.................................................................................................12
The Switch Console ......................................................................................................................................13
Resident Text Message / Email Sending ......................................................................................................13
Taking Resident Photos ................................................................................................................................13
VoIP Calling & VoIP Group-Calling ...............................................................................................................13
QwikID™ Caller Identification.....................................................................................................................14
Call Forwarding ............................................................................................................................................15
Package Tracking Feature............................................................................................................................16
Tracking Packages from Your AlphaEntry™ Station.....................................................................................16
To Access Package Tracking through AlphaEntry™ .....................................................................................16
To Display Packages in the System for the Resident ....................................................................................17
Adding a Package ........................................................................................................................................17
Deleting a Package ......................................................................................................................................17
To Mark a Package as Picked Up .................................................................................................................17
Package Filter Button...................................................................................................................................18
AlphaEntry™ MailRoom™ ............................................................................................................................18
Using a Standard Keyboard on an AlphaEntry™ Station ..............................................................................18
Chapter 3 -
The AlphaEntry™ Editor .............................................................................................................. 20
Introduction .................................................................................................................................................20
Programming and System Configuration .....................................................................................................21
System Security Codes .................................................................................................................................21
Creating System Security Codes ...................................................................................................................22
The Main Editor Screen ................................................................................................................................23
Explanation of The Editor’s On-Screen Buttons ...........................................................................................23
Main Tab #1 - Entries ...................................................................................................................................25
•
Entries Tab #1 – Entry Setup ..................................................................................................................25
•
Entries Tab #2 - Communication............................................................................................................28
•
Entries Tab #3 - Relays ...........................................................................................................................30
•
Entries Tab #4 – Welcome .....................................................................................................................31
•
Entries Tab #5 – Phone Codes ...............................................................................................................33
•
Entries Tab #6 – Options ........................................................................................................................34
•
Entries Tab #7 – Tenant Access..............................................................................................................37
o
Important Postal or Service Personnel Access information ..............................................................37
Entries Tab #8 – Switch Console ............................................................................................................38
•
o
Adding a switch console activated relay: ..........................................................................................38
o
Deleting a switch console activated relay: ........................................................................................38
o
Editing a switch console activated relay:...........................................................................................38
o
Accessing Switch Console Switches from Concierge Station .............................................................39
Entries Tab #9 – Camera Configuration .................................................................................................39
•
o
Adding Additional Cameras ...............................................................................................................40
•
Entries Tab #10 – STR Configuration......................................................................................................41
•
Entries Tab #11 – VoIP ...........................................................................................................................43
Main Tab #4 – Email Settings ..............................................................................................................................44
Main Tab #5 –Pager Transmitter .................................................................................................................45
o
Enabling Pocket Paging......................................................................................................................45
Main Tab #6 – STR Translator ......................................................................................................................46
Main Tab #7 – VOIP & SIP Zones..................................................................................................................51
Adding Specific Devices to a Zone .........................................................................................................52
•
Main Tab #8 – SDACT ...................................................................................................................................52
Chapter 4 -
Entering Resident Information .................................................................................................... 53
Resident Record Editing Screen ...................................................................................................................53
Editor Global Function Buttons ....................................................................................................................54
•
Importing Residents from another Data file ..........................................................................................54
•
Exporting Residents to a Data file ..........................................................................................................55
•
Adding Blank Resident Records to the Database ...................................................................................55
•
Creating an STR device report file..........................................................................................................55
•
Adding a New Resident ..........................................................................................................................56
•
Hiding a Listing .......................................................................................................................................56
•
Priority Listings.......................................................................................................................................56
•
Email Address ........................................................................................................................................57
•
Assigning Call Buttons to Residents .......................................................................................................57
•
Entering Phone Numbers (Standard Dialer type) ..................................................................................58
•
Entering No Phone Bill Numbers ...........................................................................................................58
•
Entering No-Phone-Service “Dummy” Codes ........................................................................................59
•
Entering Relay / Analog (Video)Intercom Information ..........................................................................59
•
Entering VoIP Device Information .........................................................................................................60
•
Entering STR QwikBUS™ Information ....................................................................................................60
o
Programming an STR Device to a button ..........................................................................................60
o
Programming a TTE33-3 Entry to a Button........................................................................................61
•
Selecting Locations to Display Resident.................................................................................................61
•
Assigning Resident Access Codes ...........................................................................................................62
•
Entering Resident Notes ........................................................................................................................63
•
Entering Resident Pictures .....................................................................................................................63
•
Resident Notification for Package Arrival ..............................................................................................64
•
Resident Restrictions .............................................................................................................................64
•
Door Monitoring ....................................................................................................................................65
•
QwikACCESS™ ........................................................................................................................................65
•
Resident Screen Search Feature ............................................................................................................65
•
Entering Emergency Contacts ................................................................................................................66
•
Entering Off-Premises Contacts .............................................................................................................66
•
Entering Staff/Other Contacts ...............................................................................................................66
•
Editing contacts .....................................................................................................................................67
•
Deleting contacts ...................................................................................................................................67
•
Save Settings ..........................................................................................................................................67
Chapter 5 -
AlphaEntry™ Mailroom™ ............................................................................................................ 68
INTRODUCTION............................................................................................................................................68
Starting AlphaEntry™ MailRoom™ ...............................................................................................................69
Exiting AlphaEntry™ MailRoom™.................................................................................................................69
AlphaEntry™ MailRoom™ Editor Configuration...........................................................................................70
Main Tab #2 - MailRooms ............................................................................................................................70
•
Package Information Refresh Rate ........................................................................................................71
•
Display Background Settings ..................................................................................................................72
•
Delivery Types Settings ..........................................................................................................................72
•
MailRoom™ Messages ...........................................................................................................................73
Chapter 6 -
Additional Items ......................................................................................................................... 74
AlphaEntry™ Door Monitoring.....................................................................................................................74
Door Monitor Setup in Editor .......................................................................................................................74
Tenant Personal Code ..................................................................................................................................75
Tenant Operation .........................................................................................................................................75
Concierge enabling an apartment’s monitoring ..........................................................................................75
Concierge shunting an apartment’s monitoring ..........................................................................................75
Premium option for residents ......................................................................................................................76
AlphaNotify™ Mass SMS Notification Service Integration ...........................................................................76
AlphaNotify™ / AlphaEntry™ Setup .............................................................................................................76
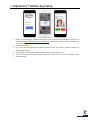
Apple iOS & Google Android Mobile Apps...................................................................................................76
AlphaEntry™ Mobile App Setup ...................................................................................................................77
Chapter 7 -
AlphaEntry™ Wiring Diagrams .................................................................................................... 78
Lobby Panel w/Handset - Std. Dialer ...........................................................................................................79
Lobby Panel w/Handset - Std. Dialer + N.P.S.* Option ................................................................................80
Lobby Panel w/Handset – No Phone Bill .....................................................................................................81
Lobby Panel w/Handset –No Phone Bill w/Outside Dialing .........................................................................82
Lobby Panel w/Open Voice - Std. Dialer ......................................................................................................83
Lobby Panel w/Open Voice - Std. Dialer w/ N.P.S.* Option ........................................................................84
Lobby Panel w/Open Voice – No Phone Bill ................................................................................................85
Lobby Open Voice - No Phone Bill w/ Outside Dialing .................................................................................86
Concierge Handset Installations ..................................................................................................................87
STANDARD DIALER – Unrestricted Outside Dialing ......................................................................................87
STANDARD DIALER – Limited Outside Dialing ..............................................................................................87
STANDARD DIALER CONFIGURATION w/ N.P.S. ...........................................................................................87
NPB CONFIGURATION – Unlimited Outside Dialing .....................................................................................88
NPB CONFIGURATION – Regulated Outside Dialing ....................................................................................88
Concierge Stations - Open Voice Configurations..........................................................................................88
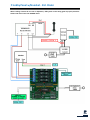
Basic AlphaEntry™ QwikBUS™ Wiring Diagram ...........................................................................................89
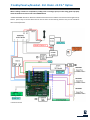
AlphaEntry™ QwikBUS™ VIDEO Wiring Diagram .........................................................................................90
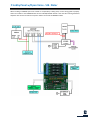
Typical Apartment Wiring For Devices through ECD2 .................................................................................91
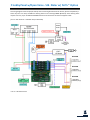
AlphaEntry™ QwikAccess™ Wiring Diagram ................................................................................................93
Chapter 8 -
Appendices ................................................................................................................................. 94
Appendix A - Creating Your Own Custom Graphics .....................................................................................94
Appendix B - The Event Log Viewer .............................................................................................................95
Appendix C – Speaker / Microphone Module Adjustments ........................................................................96
AEMDFB (Open Voice) / TW200BKAE (Handset)..........................................................................................96
AEDSMP Style...............................................................................................................................................96
Appendix D - Access the AlphaEntry™ Database Remotely .........................................................................97
Appendix E - Using AlphaEntry™ through a PBX system .............................................................................98
Appendix F - Windows Firewall Exceptions .................................................................................................99
Chapter 1 - The Software
Introduction
AlphaEntry™ is a computerized directory display system that provides resident information and communication
ability literally at your fingertips. There are different ways to configure AlphaEntry™ depending on your building's
specific needs.
As a lobby panel, AlphaEntry™ provides features for visitors to call a resident or commercial resident through an
interactive touch screen panel and can be buzzed in by the resident. Visitors are assisted through multi-lingual
voice and screen prompts. AlphaEntry™ will also allow quick resident access with personal entry codes.
When used by a Concierge, AlphaEntry™ adds additional features to allow a Concierge or Doorman to easily obtain
contact information and place a call to the desired resident’s intercom, telephone, cell phone, or work number
using either a touchscreen or a conventional flat screen monitor and mouse. As a concierge station, emergency
numbers, frequently called numbers at off premises locations, and facility staff or locations can also be
immediately accessed. You can have the ability to control lobby lights, taxi lights, gates, elevator calls, cameras, or
any other device that uses a momentary or latching dry contact closure to operate (for safety considerations this
feature is not recommended for unsupervised garage door opening or closing). Calls to the concierge telephone (if
equipped with caller ID and a CID capable modem) features on-screen QwikID™, which not only displays the calling
number, but also will search the resident database to show the residents name and apartment. QwikID™ allows
handy one touch call back and automatic received call logging.
AlphaEntry™ also enables you to manage your resident’s package deliveries, logging both delivery and pick up
time/date, and notifying your residents at the lobby panels, and/or by email or text messaging, depending on
configuration. AlphaEntry™ MailRoom™ is an optional add-on that will allow you to have displays in your
mailroom(s) to let your residents know they have received packages as well as view building announcements and
much more. With our new QwikACCESS™ access control functionality, you can also manage access to specified
access points on an individual resident basis.
AlphaEntry™ can be configured to allow your residents to notify a concierge, security guard, or main office in the
event of an emergency by using optional emergency voice call stations or other devices in their residence. These
features are invaluable in an Assisted Living scenario. Additionally, AlphaEntry™ can act as a head-end for
emergency blue-light calls with an optional live video feed.
All these available features can be enabled or disabled in the AlphaEntry™ Editor to customize the application to
suit your facility’s unique needs and security issues.
With a network / Internet connection, AlphaEntry™ is multi-building capable, and allows a virtually unlimited
number of buildings, entrances, concierges, and residents all working from a common database so that updates
and resident changes can be accomplished quickly and easily from any location. With the optional AlphaEntry™
Mobile Apps (Android & iOS), the residents can even watch live video from anywhere they have Internet access to
verify a visitor’s identity before allowing them access to the building.
AlphaEntry™ software can be used as a standard dialer telephone entry system, “No Phone Bill” type telephone
entry system, as an interface to virtually any new or existing analog intercom system ALL AT THE SAME TIME,
giving you the best of all worlds and ultimate connectivity!! Now VoIP and SIP Capable!
Minimum System Requirements
The following minimum system requirements must be met to run the AlphaEntry™ application correctly.
•
•
•
•
•
•
•
A Windows compatible PC with mouse, hard drive, CD or DVD player
Pentium 4 Processor or Higher
Operating system must be non-embedded version of Windows XP / Vista / 7 / 8
Color monitor or color touch screen monitor (standard or widescreen format)
1 GB of Ram (minimum)
One Available USB port (for USB Dongle)
USB Dongle (provided with AlphaEntry™ software)
Requirements for optional features:
•
•
•
•
•
•
•
Additional USB or Serial port(s) for additional features / functions
Caller-ID capable Modem, Dedicated Phone Line, and Concierge Handset, Lobby Handset, or Lobby Open
Voice Module are required to call to Suites.
IP Camera / Coaxial Camera / Web Camera for Optional Event Log still pictures.
USB Grabber video converter if using a coax type camera.
Additional equipment may be required for special customized applications. Please contact Alpha
Communications® for more information.
Internet or LAN connection for remote updating and multiple entrance applications.
Internet connection to allow residents to access AlphaEntry™ to update their information and
preferences.
For additional requirement information for the optional AlphaEntry™ MailRoom™ add-on, please refer to the
AlphaEntry™ MailRoom™ manual.
IMPORTANT SYSTEM NOTES
To prevent conflicts between AlphaEntry™ and other installed software, it is highly recommended that the
computer(s) be used exclusively for AlphaEntry™ and not loaded with any additional software or used for any other
purposes, with the exception of additional Alpha Media products designed to work in conjunction with
AlphaEntry™. In addition, all screen savers and system power management/hibernation options should be disabled.
To ensure system reliability and longevity, please check that all hardware is installed and configured as per
manufacturer’s recommendations and manufacturer’s distance limitations and cabling requirements are observed.
When planning your installation, consider distance limitations, and potential electromagnetic interference (EMI)
sources. It is recommended that a quality battery backup/surge protector/ power filter be used for all devices and
components connected to 110VAC power. AlphaEntry™ systems being used for emergency call, door monitoring, or
any other critical application should have their devices tested for proper operation monthly.
Installing the AlphaEntry™ Software
WARNING: Do NOT Insert USB Dongle Until Prompted!!
To begin the installation of AlphaEntry™, please insert the CD
into your CD-ROM drive. The installation wizard will guide
you through the process of installation.
Alpha Media, Inc. recommends that AlphaEntry™ be installed in the
default directory shown.
C:\Program Files (x86)\AlphaEntry\
Or
C:\Program Files\AlphaEntry\
Check the box for each component you will be installing at this
Entry/Master.
□ AlphaEntry™
□ Editor
□ Log Viewer
□ QwikAccess™
□ Database
Entry/Master Software
For Configuring and Data entry
To view real time event information
Enable QwikACCESS™ Access Control
This machine will be the System Server
If you selected the Database option, you will be prompted to
create a new password. This password will be needed
whenever making a new connection to the AlphaEntry™
database. This password can be any combination of
alphanumeric characters (A-Z, 0-9), and is case sensitive.
Once the software has completed the installation process, click the “Finish” button to close the installation
program.
On the initial start of AlphaEntry™, you will be asked if you wish to use the demo database or start with a clean
database. In a facility installation, you will want to start with a clean database and enter real information for that
facility but if using a computer for a demo, you may wish to use and/or modify the provided demo database. If you
choose to use the demo database initially to acquaint your staff with the editing procedures, you may clear the
demo database before entering your own information.
After the installation is complete, you will be instructed to insert the USB Dongle into any one of the USB ports on
that computer. The dongle is not required for use of the Editor or Log Viewer.
What is a Dongle?
A Dongle (pronounced DONG-uhl) is a mechanism for ensuring that only authorized users can
use specific software applications. This is your software key that plugs into an available USB
port on your computer. Like a key, no two Dongles are alike.
The AlphaEntry™ program accesses this key for verification while running. Removing this key while using
AlphaEntry™ will cause the program to enter “DEMO” mode, but you will be allowed to use the AlphaEntry™ Editor
without restriction.
If for any reason your Dongle is lost or damaged, you must obtain another from Alpha Communications®.
IMPORTANT NOTE: Since The AlphaEntry™ dongle contains your licensing information, replacing it could be
costly. If used in a concierge type environment where the dongle could be exposed or stolen, it is recommended
to plug the dongle into a long USB extension cable and hide the actual dongle inside a desk drawer (preferably a
locked one), or another safe location.
Starting AlphaEntry™
•
To start AlphaEntry™, Double Click on the AlphaEntry™ icon on the screen desktop.
Exiting AlphaEntry™
•
•
•
Use the regular or on-screen keyboard to spell out the word EXIT, and click the red Reset button.
If a password has been set, you will be prompted to enter the appropriate password.
Enter the password and click OK.
IMPORTANT NOTE ABOUT DEMO MODE AND YOUR SOFTWARE DONGLE
If a dongle is not installed, AlphaEntry™ will operate in Demo Mode, which will allow full functionality for a period
of 30 minutes and then require a restart. The Demo Mode is only allowed 200 starts. When in Demo Mode, the
main screen will show DEMO Mode in the upper right corner and will indicate the number of starts used.
Chapter 2 - AlphaEntry™ User Operation
The Visitor Touchscreen Interface
IMPORTANT NOTE
AlphaEntry™ has many available options. The administrator’s configuration determines which options are to be
used at each entry. The descriptions below assume all available options are enabled.
When a visitor approaches the entrance panel, they will see a welcome message displaying the building name
and/or address. Centered on the welcome screen is a prompt that reads: “Touch Screen to View Directory” in the
default language. Below the prompt, buttons listing the other available languages are displayed. If the visitor
wishes to see and hear the prompts in one of the other languages they can touch one of the language option
buttons and the welcome screen will immediately change to the language of their choice. At the end of their
session, the screen will revert to the default language predetermined by the administrator.
AlphaEntry™ comes with English, French, German, Russian, and Spanish languages installed to accommodate
different markets. Other language modules are available at additional cost.
After touching the screen to initialize a session, the directory screen will display accompanied by onscreen and
voice prompts in the requested language. Residents and/or commercial residents will display in alphabetical order;
residents by last name, companies by special order determined by the administrator (ex: Dr. William Gold D.D.S.
could be alphabetized by “G”). The up and down arrow buttons can be used to scroll the listing, or the visitor can
touch letters or numbers to search. All listings of the last name, company, or suite number that match the entered
letter(s) will display. If a match is not found, the screen will reset and the visitor can try again. AlphaEntry™ allows
searching large lists of residents quickly by name or suite number.
When a name is selected, the call box will display and list the available contact method(s). At this time the visitor
can press the call button to call the resident or press the Cancel button to return to the Directory screen. After a
predetermined time, the directory will close and revert back to the screen saver/ slideshow image(s).
When the call is placed, a countdown timer is displayed to inform the visitor how much time they have before the
call is automatically ended. The administrator determines the call duration. In a large system with multiple entries
and heavy traffic, this call time can be made shorter to reduce wait time. In a small single entry system a call timer
may not be required. All visitors that are waiting at any entry panel for a call to go through are put in a first come first served queue and given an indication of approximate wait time for the system to be available. In the event of
a Standard Dial Telephone Entry configuration, a heavy traffic system can use separate C.O. or VoIP lines for each
panel to reduce or eliminate wait time.
When the call is answered, the resident has the capability to “buzz” the door by pressing a single touchtone digit
on their phone, or pressing the door release button on their intercom after which time the AlphaEntry™ session
will end automatically. AlphaEntry™ is fully customizable to change the single touch tone digit to a string of digits if
desired.
The Doorman / Concierge Interface
IMPORTANT NOTE
AlphaEntry™ has many available options. The administrator’s configuration determines which options are to be
used at each Doorman/Concierge location. The descriptions below assume all available options are enabled.
As in the preceding section, the Doorman/Concierge can place a call to a resident and operate the interface the
same as a visitor, using a touch screen or a standard flat screen monitor with mouse. A keyboard is not required
unless data editing will be done at this location (an on-screen keyboard utility is available for minor changes when
using the Editor). Additional resident call buttons can be made visible to allow the Concierge to contact the
resident through a cell phone, home number, or work number in the event of an emergency. Buttons displayed for
resident are configurable in the Editor – Setup tab (see pg. 25). Additionally, icons may also be displayed for
residents. They are defined below. Icons displayed for resident are configurable in the Editor – Setup tab (see pg.
25).
Notes
Clicking this icon will display any stored notes pertaining to this resident. These
notes can optionally be made “read only” so they can only be changed in the
Editor.
Show
Picture(s)
There is a picture on file of the resident (or frequent visitors), which can be
viewed by clicking that icon. Multiple images can be stored for each resident.
Take Picture
There is no picture of the resident on file. Click this icon to take a picture of the
resident.
Message
A text message can be sent to this staff member or resident’s cell phone and/or
email. Clicking on this icon will open the messaging window. Staff member paging
can also be accessed here. Paging can only be sent from the PC with the paging
transmitter attached at this time.
Package
This resident has a package to be picked up. The number below the icon indicates
the number of packages (see Pg. 16 for more details).
Key
View IP
Camera
This resident has the door monitor option (see Pg. 65 for more details).
If a location has an IP Camera attached to it (i.e. for Bluelight stations), clicking
this icon allows you to view the camera at that location without placing a call.
All calls made by the Concierge through AlphaEntry™ are logged and the phone numbers are not displayed on
screen to maintain resident privacy. The Concierge can be equipped with a phone that can dial out for calls not
listed, or be restricted only to AlphaEntry™ listings.
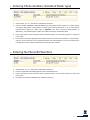
Emergency, Off Premises, Staff/Other Tabs
In addition to the regular directory screen, tabs can be turned on for emergency phone contacts and off premises
listings enabling the Concierge to place calls from AlphaEntry™ as easily as contacting residents. The “Staff/Other”
tab can be used to have call buttons for all personnel or locations (i.e.: restaurant, garage, pool, housekeeping,
etc.) for quick and easy communication. All these tabs can be enabled or disabled separately in the Editor –
Options tab (see Pg. 34).
The Switch Console
Also designed for Concierge use is the Switch Console, which enables AlphaEntry™ to control lighting, taxi lights,
doors, cameras, elevator calls, or other devices. Each switch can be configured to operate a controlling relay as
either a latching On/Off switch (Push On, Push Off), or a timed momentary contact switch (Push On, Shuts off
automatically after a specified time from 0.1 seconds to more than 24 hours). Active switches are indicated
visually. Switches are configured in the Editor – Switch Console tab (see Pg. 38).
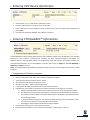
Resident Text Message / Email Sending
Staff members can send text-based messages to residents or
other staff members to their cell phones as a text message,
or to their email inbox. Recipient entities must have an email
address and/or cell phone information programmed into
their settings in the “Directory” portion of the editor.
Taking Resident Photos
The concierge or staff member can pull up a residents call box and click the camera icon to initialize
the photo-taking process. They will use a local or IP camera attached to their station to take the
photo
VoIP Calling & VoIP Group-Calling
If your system uses VoIP Devices, your AlphaEntry™ concierge
stations will have the option to call to a resident’s VoIP Device just
as they would with any other type of call. Simply click a resident’s
name, and select the appropriate VoIP button (as configured in the
editor – see pg. 60) of the device you wish to call.
AlphaEntry™ operators also have the ability to call multiple VoIP
devices at once for paging purposes. These VoIP zones are
configured in the editor (see pg. 51).
There are two pre-configured buttons that will always be available. Call all Zones (will call any device associated to
a zone), and Call all Devices (which will call any device programmed in the system).
If you are using VoIP Zones for paging purposes, only open-voice type devices should be included in the zone.
This feature is not intended for: Emergency/Fire alert/mass notification!!
QwikID™ Caller Identification
When the concierge is equipped as a standard phone dialer system and the dedicated phone line is equipped with
Caller ID and a CID capable modem, any call placed from a resident (ring down) or outside caller to the concierge
will display on screen with QwikID™ unless this feature has been disabled in the editor. If the caller has blocked the
CID information from displaying, then QwikID™ will indicate that the information was not available.
The feature works similarly to Caller ID, displaying the number and name of the calling party (if available through
the caller ID information). When a call is received, QwikID™ searches the AlphaEntry™ database. If the calling
number matches a resident phone number in the database, the resident name and suite information is added. The
actual resident phone number is not displayed to insure privacy. In addition, the call is time and date stamped. All
incoming calls are added to an on-screen list which can be viewed by the concierge (to remind him of the call in
case follow-up is necessary). The calls are also added to the system log. If an incoming number is not in the
AlphaEntry™ database, the phone number will be displayed and recorded as well, providing Caller ID information is
available.
Clicking on the green call button will automatically redial the calling number providing the Caller ID information is
available. Clicking on the red “X” button will remove the call from the list. A record of the call will be added in the
log. If the resident calling in has an associated picture in the system, the picture will pop up on the screen as well,
to aid in concierge recognition of the resident.
Emergency Staff Locations (such as Blue Light call stations), an IP Camera can be added to provide live IP Video.
•
If your system has the optional STR QwikBUS™ interface, call down to the concierge will also display in the
QwikID™ window in a similar manner, but with a unique icon and additional features. Please see Pg. 41 for
more information.
•
If your system uses VoIP devices, call down to the concierge will also display in the QwikID™ window in a
similar manner, but with a unique icon and additional features. Please see Pg.13 for more information.
IMPORTANT NOTE
It is recommended that if a resident has blocked their outgoing Caller-ID information and uses a speed dialer to call
the concierge, they preface the number with *82 to temporarily unblock that information so their identity can be
recognized by the AlphaEntry™ system.
To disable this feature, uncheck the Enable QwikID™ box located on the Editor - Communication tab (see pg.28).
Call Forwarding
This AlphaEntry™ feature allows a concierge to intercept calls from an entrance when they are either screening
visitors or wish to prevent calls from the entries to the residents at a time when their residents would not want to
be disturbed. If this feature has been enabled by the administrator, There will be a button at the top right of the
concierge screen which when clicked will alternate between ON and OFF.
When this feature is on, all entries that have been enabled by this feature will operate in this manner:
•
•
•
•
Visitor selects resident he wishes to call.
The call is automatically routed to the concierge.
The information pops up on the concierge screen identifying the calling entry as well as the information for
the resident that the visitor wishes to contact.
At this point the concierge can speak with the visitor, contact the resident for instructions if necessary, and
can open the door through the switch console to allow the visitor access.
AlphaEntry™ will operate in its normal fashion with visitors calling directly to the residents with no
intervention from the concierge.
TIP: If a resident wishes to always have his calls go to the concierge, then his contact button in his record should
contain the concierge’s phone number and the concierge can contact the resident for instructions through a second
button on the concierge screen. The concierge, however, will not have an indication of whom the visitor wishes to
contact, and must obtain this information from the visitor.
IMPORTANT NOTE
This feature is designed for AlphaEntry™ Visitor Touchscreen stations with Standard or No Phone Bill (NPB)
Telephone-Entry dialing only.
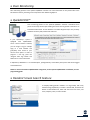
Package Tracking Feature
One of the many headaches of building management is keeping track of incoming deliveries to your residents,
notifying them, and keeping track of which packages have not been picked up yet.
AlphaEntry™ allows your doorman, concierge, or shipment receiver to manage resident packages from their
AlphaEntry™ station, and maintains a log of when deliveries are received in, as well as when your resident picks up
their packages.
This feature gives your designated employee(s) the ability to display package arrivals to residents through the
entry panels, or at a concierge station depending on the needs of your facility. AlphaEntry™ will even send emails
and/or text messages automatically to your residents when a package arrives for them!
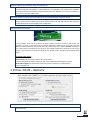
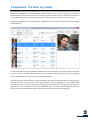
Tracking Packages from Your AlphaEntry™ Station
The screen to the left shows a typical entrance panel. Note the
package icon indicating that the resident has a package in the
system that needs to be picked up.
This icon can be configured to display or not, depending on your
facility’s needs. This is done through the Editor/Options tab for
each entry/station. With optional AlphaEntry™ MailRoom™
software, detailed package information can be displayed, along
with local time and building announcements, on additional monitors in your mail room or common areas.
To Access Package Tracking through AlphaEntry™
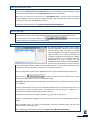
Select the residents name from the AlphaEntry™ call screen.
On the right side of the resident’s call box, you will see a
package icon. If the resident has packages in the system to
be picked up, the icon will display in color as shown to the
left with the number of packages shown below. If there are
currently no packages waiting for pickup, the package icon
will be gray but still clickable to add packages.
To Display Packages in the System for the Resident
When the package icon is clicked on, a listing of current
packages for this resident is displayed as shown to the left,
giving information on when the package was received and
from which carrier with the most recent package at the top.
The delivery time will display just the time if the package
was delivered today, show time and date if on a previous
date of the current year, or just the date if received in a
previous year.
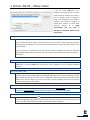
Adding a Package
Select the delivery type from the drop down box as shown
to the left, and click the Add Package Button. The system
will immediately post the new package, timestamp it, and
log the transaction in the AlphaEntry™ Log file. To close the
package tracking window click on any other part of the call
box, or click cancel to close the entire call box. Residents
can optionally receive an email and/or text message
alerting them to the arrival of their package(s).
Deleting a Package
In the event that a mistake is made when adding a
package, click on the line for the package you wish to
delete. Once it is highlighted, two buttons will appear at the
bottom of the box.
Click the pink “Delete Selected Item” button. This will
remove the package from the list.
To Mark a Package as Picked Up
If a resident has one package to pick up, you may click the
green “Package Picked Up” button. This will remove the
package from the list and log when the package was picked
up.
If a resident has multiple packages but only picks up some of them, click on the line for the package you wish to
mark as picked up. Once it is highlighted, two buttons will appear at the bottom of the box. Click the orange
“Selected Item Picked Up”. This will remove the package from the list and log when the package was picked up.
Repeat for additional picked up packages.
If a resident has multiple packages and picks them all up, click the green “All Packages Picked Up” button. This will
remove all packages listed for this resident and log the transaction.
Anytime one or more packages are picked up from an AlphaEntry™ station with a camera, the activity will be
logged with a timestamp and photo.
Package Filter Button
Pressing the Package Filter button at the top right of the screen will filter the directory screen to show only
the residents with packages to be picked up. Typing any characters or hitting Esc will change the directory
back to the unfiltered screen.
AlphaEntry™ MailRoom™
AlphaEntry™ MailRoom™ is an optional add-on module designed to seamlessly
integrate with your AlphaEntry™ systems, which provides display monitors in
your mailrooms or other locations to alert residents that they have packages
awaiting pickup.
AlphaEntry™ MailRoom™ is fully customizable to suit the unique requirements
and security concerns of your facility.
Using a Standard Keyboard on an AlphaEntry™ Station
In a concierge or staff operated station, it may be easier to use a conventional keyboard and mouse at that PC. The
PC keyboard will perform the same search/filter functions as the onscreen directory keyboard. The ESC key
functions as the Reset button in the main directory screens and will reset the search parameters. A subsequent
press will return you to the previous screen. If no search string has been entered, it will return you to the previous
screen on the first press.
The Switch Console, as well as the on-screen tabs, can be easily operated by clicking them with the mouse. For
user convenience, if this station is equipped with a touch screen, AlphaEntry™ is designed to recognize both input
methods simultaneously.
If this station will have a standard keyboard attached, you may wish to hide the on screen keyboard on that
station’s Option tab (see pg. 34 for more information).
Administrator Shortcuts: Type these 4 letter codes in at an entry or master, either by the onscreen directory
keyboard or a standard keyboard if equipped, and then click the RESET button, or Enter key, to shut down the
entry/master to access other AlphaEntry™ components. The user will be prompted for a security code if you have
them enabled (See Page 20).
•
•
•
•
•
EDIT: Shuts down the entry and invokes the Editor (at this entry only, the rest of the system will be fully
functional) if the Editor Software is installed on this Entry/Master.
ZONE: Change this Entry/Master to another Entry/Master or change to another database
LOGS: Shuts down the entry and invokes the Log Viewer.
VIEW: Same as “LOGS”
EXIT: Shuts down the entry and returns control to Windows.
Chapter 3 - The AlphaEntry™ Editor
Introduction
The AlphaEntry™ Editor allows persons with administrative access to configure all entries/ masters as needed to fit
your specific facility. It also allows access to the resident database to add, delete, and modify your resident
records.
Because AlphaEntry™ can be used with multiple entries or masters, and since each system is different in it needs,
the editor is set up to allow each entry to be configured independently as required by the physical location and
facility layout. Two examples of this follow:
A simple application:
rd
123 West 73 Avenue is an apartment building with a front and side entrance. There is no concierge or
attendant. This scenario would require the following:
Location
Front Entry
Side Entry
Will Display
All residents
All residents
A more complex application:
Miami Luxury Towers is a gated community consisting of 4 separate buildings. There are 2 concierges located in
Building 1 and there are 3 gate entrances to the facility. Gate 1 is exclusive to Bldg. 1. Bldg. 1 and Bldg. 2 have one
entrance and share a second common entrance at the rear. Bldg. 3 and Bldg. 4 have one entrance each. The
breakdown of this scenario would be:
Location
Gate 1
Gate 2
Gate 3
Bldg. 1 Front
Bldg. 2 Front
Bldg. 1 & 2 Rear
Bldg. 3
Concierge 1
Concierge 2
Will Display
All residents in Bldg. 1 and the concierges
All residents in Bldgs. 1, 2, 3, 4 and the concierges
All residents in Bldgs. 1, 2, 3, 4 and the concierges
All residents in Bldg. 1 and the concierges
All residents in Bldg. 2 and the concierges
All residents in Bldg. 1, Bldg. 2 and the concierges
All residents in Bldg. 3 and the concierges
All residents in Bldgs. 1,2,3, and 4 with additional concierge features
All residents in Bldgs. 1,2,3, and 4 with additional concierge features
The versatility of AlphaEntry™ enables you to configure difficult facilities in the easiest way possible.
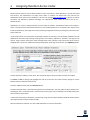
Programming and System Configuration
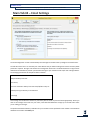
System Security Codes
The information displayed in the AlphaEntry™ application is maintained in a
database file. This file stores resident and business names, locations, and
necessary contact information. Alpha Media, Inc. has developed the AlphaEntry™
Editor to allow the administrator to input names, locations, and phone numbers as
well as set administrative options easily.
To access the Editor, click the “AlphaEntry Editor” Icon on your desktop. If you are
currently running AlphaEntry™, type EDIT at the on-screen keyboard then hit the
Reset button or, if equipped with a keyboard at this station, type in EDIT and hit
Enter (see Administrative Shortcuts). If a security code has been set, the code entry
pad pops up as shown below.
Security codes can be any combination of alphanumeric characters, A-Z and 0-9, and must be a minimum of three
characters in length. Security codes are not case sensitive.
Touch or click the keypad buttons to enter your alphanumeric code.
If your station is equipped with a keyboard you may type your security code and hit Enter.
Once your code is entered, the Main editor screen will appear.
Although it is not required for system operation, we recommend creating an administrator security code, if you
have not already done so, to prevent unauthorized changes or viewing of data and system configuration settings.
To establish your access code, you must create a record for yourself under the Staff/Other tab.
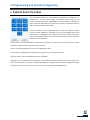
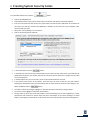
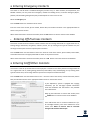
Creating System Security Codes
From the Editor Main Screen, click the
•
•
•
•
•
•
•
•
•
•
•
•
Button.
Click on the Staff/Other tab.
At the bottom of this screen click the ‘New’ button. The Person radio button is selected by default.
Enter your First Name and Last Name in the proper fields, and then click the Add button at the bottom of
the screen. This adds your record to the AlphaEntry™ database. At this time, your name will appear under
the list of Staff on the left.
Select your name by clicking on it from the list.
Click on the Security/Access Codes tab.
In the section above, click the
button.
In the Code box, enter the security password/code of your choice. Security codes can be any combination of
alphanumeric characters, A-Z and 0-9, and must be a minimum of three characters in length. Security codes
are not case sensitive.
In the Description box, you may choose to enter an optional description for this code.
In the Security Code section at the bottom, check the tasks you wish to allow for this staff member.
Checking the Administrator Box will automatically allow all tasks (all boxes will be checked and gray out).
When completed, click the
button.
To modify a code or its privileges, highlight it in the Code Box above and make the changes below.
To remove a code, highlight it and hit the remove button.
Security codes can be set up in each staff member’s record for building entry as well as AlphaEntry™ system
maintenance and restricted to certain dates and times. Descriptions of the various privileges are listed
below. If no privileges are selected for a staff member then their code would be used just for building entry.
User Privileges
This level allows total access to all functions of
AlphaEntry™
This will allow a user to close an entry and/or change
zones if needed.
This privilege will allow the user to add, delete, and
make changes to the resident records.
This privilege will allow the user to make changes to
entry and mailroom configurations.
This privilege will allow the user to view logs and
generate system reports.
This privilege will allow the user to temporarily shunt a
resident’s door monitoring feature. Doing so will notify
the system to ignore any alarms that may come from
the resident’s suite during the shunted period.
Administrator
Close AlphaEntry
Edit Residents
Edit Entries/ MailRooms
View Reports/ Logs
Shunt Door Monitoring
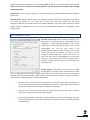
The Main Editor Screen
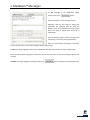
The Entries Editor is comprised of 11 tabbed screens. Depending on initial configuration some of these tabs may
not be active. The following pages are descriptions of each screen, and information on all the questions related to
them.
Each Lobby panel, Concierge station, or Gate panel, is fully configurable separately to be able to fit the needs of
the facility. In the above example, you will see that “Concierge 1” has been selected. All the tabs to the right are
only for the “Concierge 1” station.
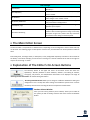
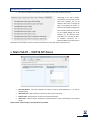
Explanation of The Editor’s On-Screen Buttons
The Directory button at the upper left corner of the Editor screen will access the
AlphaEntry™ directory database to allow additions, deletions, and editing of resident,
emergency, off premises, and staff/location information to be displayed. See Page 26
“Entering Contact Information” for further editing information.
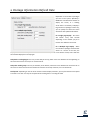
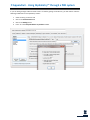
The Change Database Button allows you to change to a different database for editing and
configuration. This is usually done when editing several different systems from a remote
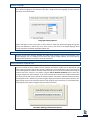
location by Internet access. Pressing this button will open the window below.
Database Selector Window
Enter your user name, password, server address, and the port number of
the system you wish to modify, and then click on the Connect to Database
Button.
If The Clear-Out Demo Database button is visible, you are operating the system using the
Demo database. To clear out the database to add new information for your system, you
may hit this button. Any modifications or additions you may have made to the Demo
Database will also be deleted. Once you have removed the Demo information, this button will also be removed to
prevent the inadvertent deletion of your facility database.
Click The Add a New Entry button to add a new entry to the system. You will be prompted to
enter the new building or entry/master name. When completed, the name will be added to the
list of system entries on the left of Main Editor screen. See Page 7 for more detailed information
regarding configuring of entry/ masters.
Click The Remove Selected Entry button to remove a highlighted entry from the system. You will
be asked to confirm before the entry/master is deleted. This decision is irreversible.
Clicking The On-Screen Keyboard button enables a pop up keyboard. This is helpful when
making minor changes to the system from one of the touch screen entries when no
standard keyboard is available.
The Close button will exit the Editor program and prompt you to launch AlphaEntry™.
In AlphaEntry™, configuring your system to your application must start by answering basic setup questions. The
first two questions relate to all entries/masters for the system. As a point of clarification, “Entry“ is generally a
public access screen at an entrance lobby or gate and a “Master” is a Concierge, Doorman, or Administrative
access screen. Other than these labels, they are synonymous and all function in the same manner dependent on
individual settings.
Enter Location Name or Address
Use this field to enter the name or address of the building (if one location) or complex. This will be
displayed on the welcome screen and the top of the main user screen(s). (i.e. “161 Street & River Avenue”
or “Miami Luxury Towers”).
Main Tab #1 - Entries
Each entry/master may have different settings depending on your application so the editor is designed to allow
separate configurations for each location.
To set up your first entry/master location:
•
•
•
Click the Add New Entry button.
Enter an appropriate descriptive and unique name for the location (i.e. Front Lobby, Building 2, Concierge)
Click OK.
The name you have chosen will now appear in the list box of Entries and Masters to the left. Clicking on the name
will enable the configuration boxes to the right for that specific location. The location name will be displayed at
the top of the main screen for that entry.
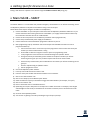
• Entries Tab #1 – Entry Setup
Entry or Building Name:
The name for this specific location will be placed in this field automatically however, if you choose to
rename this location now or at a later date, you can edit it here and it will be updated in the system
immediately.
Select items to display in directory:
Each entry/master will display just the resident/company name by default however you can list additional
information for each resident if desired. The Suite number can be listed or omitted depending on your
security issues or special configuration needs.
The Floor number can also be listed. If you are using this entry point for communication to several
buildings, the building numbers can be listed. Please check the appropriate boxes for your needs at this
entry/master.
Directory Display Options
On Screen Keyboard type:
The Keyboard can be set to Alphabetical or “QWERTY” keyboard style depending on preference.
Default is Alphabetical. With multiple entries, each entry can be configured individually.
Idle Seconds before clearing call box:
Determines how long a call box will display. When a name is selected, a call box will pop up. If a
call is not initialized within this specified time (between 5 to 999 seconds) the call box will automatically
close and control will revert to the main directory. A recommended setting for this time is between 5-15
seconds. If the duration specified exceeds the “Idle Settings before re-displaying Welcome Screen” value,
a warning box will appear after entering that value.
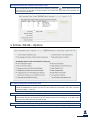
Buttons to display for this Entry:
Because AlphaEntry™ can interface with many different communication devices; the buttons can be used
to connect to a resident’s intercom, telephone, dummy phone, cell phone, or work phone. Up to three
buttons can be programmed for each resident.
With a Concierge station, usually all three buttons would be available to call the resident. So even if the
st
nd
resident was not at home (1 button) you could reach them on their cell phone (2 button) or even a
rd
work number (3 button) in the event of an emergency or situation that would require immediate
st
contact. On an entry panel used by visitors you might want to display the 1 button for the suite phone
only. Each Entry/Master can be configured to show one, two or all three buttons, or even no buttons if
you want to use that particular entry as a directory without contact capabilities. Every effort has been
made to make AlphaEntry™ flexible enough to be easily configured to your facility’s needs.
To configure the buttons that show at this entry, check the boxes for the buttons you want visible.
Default Language:
AlphaEntry™ prompts can be displayed in English, French, German, Russian, and Spanish. You can even
use a different language at each entrance if you wish. Simply select your languages of choice from the
drop down menu shown below.
Language Display Options
Buttons will appear on the main screen to allow visitors to select their preferred language during their
session with AlphaEntry™. When their call is done, the entry will return to the default language which
must be selected in the default language dropdown box.
Play Voice Prompts:
Checking the Play Voice Prompts checkbox will enable audio prompts as well as visual prompts in the
chosen language. This is a valuable tool for those who may be visually impaired. Your entry must be
equipped with speaker(s) connected to the PC for this feature.
Adding Residents automatically:
If you have already entered residents into the database, this feature enables you to automatically add
them to the entry/master that you are currently configuring. In some applications, such as two entrances
in one building where all residents would be listed, this saves data entry time by automatically marking all
resident records for inclusion in the display using the Add all EXISTING Residents button rather than
having to change each record manually. If you have a situation where most of your residents will be listed
but not all, you may still want to mark all for inclusion and then override the individual resident records by
removing them from a specific entry/master using the display check boxes (shown below). Obviously, this
global change must be used cautiously because it will change all the records and is an irreversible action.
A warning box to this effect will appear when this button is selected.
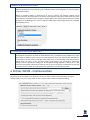
Automatic Adding of Residents Features
Include all NEW Residents by default
This check box will automatically mark a new resident record to display at this entry/master as they are
added to the database to save data entry time. Individual records can be changed at any time through the
resident record editor.
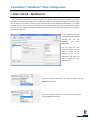
Where an individual resident is displayed can be seen by accessing the individual resident record/
Location tab where all entry/masters in the system will be displayed. The picture below shows the portion
of the Resident record where these changes are applied. Note in this example that this particular resident
will display on the Building 1 entry screen as well as the Main Gate and Concierge screens but not display
in the Building 2 entry.
All entries will be sharing one phone line?
(Telephone Entry/ Multiple Entry systems)
Check this box if all entries will share the same telephone line. If a Telephone Entry multiple entry system
will be used, the different entries can share the same telephone line or each has their own dedicated line.
If the facility has several entrances and high visitor traffic, then it is recommended to use separate lines. If
shared, when one entry is in use, the other entries, when placing a call, will display a system busy
indication with an approximate waiting time. All calls placed through AlphaEntry™ will be put in a first
come-first served queue and will be processed in order as soon as the system is available for the next call.
If a system has one or more concierge stations then separate lines should always be used.
• Entries Tab #2 - Communication
The settings in this area allow you to specify the modem you want to use for call-down/call-up, the type of
handset/speaker-mic you’re using, as well as other common features related to telephone dialing.
Will this Entry be using a Modem to dial out?
If your system will use a dedicated phone line or “no phone bill” equipment, the computer will require a
modem to interface to those connections. Please refer to System Requirements on Pg.2 to determine the
correct modem type. If the Yes radio button is selected, the following questions will need to be
answered. If the No radio button is selected, the following questions will be grayed out and not required
for this entry.
Dialing Button
This will open a dialog box where you can specify special dialing prefix requirements for your area. For
more information about this feature, see Appendix E
Specify the modem to dial out:
You will most likely have only one choice available unless your computer is equipped with multiple
modems. If using an external modem, you may enter a Comm Port number.
Select the type of device you will use to Talk/Listen when dialing out:
Choices are Open Voice (Brown Box), Open Voice (Lt. Gray Box), Handset (Black Box), Handset (Brown
Box), or Phone connected directly to modem. Each entry/ master can be configured independently.
Enter the Serial Comm Port used to connect the open-voice interface board:
If Open-Voice speaking has been selected above, you must specify which serial port will be connected to
the open voice interface boards. Otherwise, this field will be grayed out.
Maximum number of seconds a call can last: Open Voice ONLY
At an open-voice entry, the call will end when the resident buzzes the visitor in. If the visitor is not buzzed
in, there must be a way for the program to end the call. This has been done by limiting the amount of
time the call will stay active before reverting back to a ready state for the next visitor. Usual suggested
time is 45 seconds but you can specify 10 to 999 seconds for this function. The screen will display a
“countdown bar” to the visitor to indicate when the call will be ending. The call can also be canceled by
pressing the “Cancel Call” button that will appear on screen.
Enable QwikID: Concierge ONLY
Check this box if this station will be receiving incoming calls and wishes to see who is calling down or
calling in from outside. Refer to Pg. 7 for more QwikID™ information.
Both a “No Phone Bill” AND an outside phone line will be connected at this Entry?
Check this box if this Entry will use this configuration.
What is the Phone Number for this entry?
If your system will use the call forwarding option, the phone number of this entry is required. Otherwise it
is optional but recommended.
“This Entry can Forward its Calls to another Entry” (Visitor Panel)
When checked, all calls will be sent to the station selected in the drop box (usually a Concierge). The
information of whom they are trying to contact will be displayed at the receiving station enabling the
Concierge to screen visitors for their residents when required.
“This Entry can receive Forwarded Calls” (Concierge)
When checked, this location will have a button that will toggle the Call Forwarding feature On & Off.
When this feature is on, all visitors calling at the forwarding panel will be forwarded to this location with
on screen information on which resident they are trying to contact.
• Entries Tab #3 - Relays
The settings in this area allow you to specify the Comm Port your relay board(s) is hooked into, as well as other
common features related to your relay board(s).
Will you be using a Serial Comm Port to connect to external relay boards?
AlphaEntry™ can be used as a telephone entry type system and may not require use of relay boards.
However if AlphaEntry™ is interfaced to a conventional intercom system or requires door strike control or
special functions such as on screen concierge building controls (Switch Console) or other special
applications then one or more relay boards will be required.
If Yes is selected, then you will be required to answer the remaining four questions on this tab.
If No is selected, the remaining answers are not required and will be grayed out.
Enter the Serial Comm Port to use to activate the relays:
If the radio button “Yes” is selected then you must assign which serial port will be used to connect to the
relay boards. More information on available Ports can be found on your PC by the methods below:
Windows 2000 / 2003 Server / XP
•
•
•
•
•
•
Click the Windows Start Button
Right-click on My Computer
Select Properties
Select Hardware
Select Device Manager
Expand (+) Ports
Windows Vista / 7
•
•
•
•
•
Click the Windows Start Button
Right-click on Computer
Select Properties
Select Device Manager
Expand (+) Ports
Windows 8
• Right-Click the Windows
Start Button
• Select Device Manager
Display “Switch Console”
The Switch Console is used for Concierge control of lights, gates, cameras, elevator calls, etc. If this
feature is used by your application, it will control relays providing either momentary or latching dry
contact closures. Checking this box enables the Switch Console configuration tab in the Editor and the
Switch Console tab on the AlphaEntry™ directory screen. This feature is usually used for Concierge
controls however; it can be enabled for any entrance if special needs require it.
Default number of Seconds a relay is activated for:
When AlphaEntry™ is interfaced to a conventional intercom system the program presses the apartment
call button using the relay board(s). To make AlphaEntry™ as adaptable to your requirements as possible,
the amount of time the relay will be energized is determined here. Default time is 3 seconds. Duration can
be set from .1 seconds to 999 seconds.
The relay boards used to call the residents will be using Multiple Common Wires
Some intercom systems use a matrix based wiring scheme and may require multiple commons. If your
existing system uses this method, then this box must be checked. This will add a common wire field to the
resident button fields to allow proper system configuration.
Optional Relay Call Button
In some facilities, there may be a need for a visitor or delivery person to contact a staff member, off
premises call center, or even ring a bell at a location. AlphaEntry™ allows you to place a call box on the
Welcome Screen which when pressed, will close a dry contact relay on the optional RY008AE board (if you
use a door release controlled by at this entrance, you probably already have this board as part of your
system). This call box can be easily customized for your specific needs in the editor with the fields shown
above.
To configure this call box:
Select the YES Radio button
Button Label: Enter the text you wish to show on the button.
Enter the Relay Board and Relay number you wish to be energized when this button is pushed
Relay Active Length: Enter the duration of the relay closure in seconds (0.1 to 999 seconds)
Enter an optional icon.
• Entries Tab #4 – Welcome
Idle Seconds before displaying Welcome Screen
This field controls the amount of time in seconds that the active window will revert back to the Welcome
Screen picture(s).
Slide Show Welcome Screen
The Welcome Screen settings allow the administrator full customization of pictures and text.
By checking the “Welcome Screen is a slide show” box, the screen background will automatically change
pictures at the interval chosen in the “Change Slide every” field. (5 –999 seconds)
When you put a check mark in the box next to “Hide Welcome Text” it will take out the text overlay
leaving the Welcome Screen just with the background image. This allows the administrator to make any
custom graphics with their own Welcome Screen text.
The graphics file default location is C:\Program Files\AlphaEntry\SlideShowPics
Installer Message:
These fields allow the installer or maintenance company to display contact information at the
administrator’s discretion. The message will appear in the bottom left corner of the welcome screen.
As a convenience to the installer, clicking on the
installer information to all existing entries automatically.
button will copy the
Scheduled Welcome Screen
The Scheduled Welcome Screens, when enabled,
allows the AlphaEntry™ Welcome Screen to display
alternate special images. This feature is generally
used when AlphaEntry™ is used as a lobby panel for
public and resident use. It allows the administrator
to display a background image relating to a holiday
greeting, special event, or announcement during a
programmed date range. Checking the “Use
Scheduled Welcome Screens” box will automatically
enable the special messages to activate when the
current date is within the administrator’s determined date range. It can also be used to display advertising
messages and turns your AlphaEntry™ station into a revenue-generating tool.
Placing a check mark in the box next to “Hide Welcome Text” leaves the Welcome Screen images only.
Clicking/Touching
will open the screen where the administrator can input
and delete scheduled welcome screens and adjust date ranges.
Please Note: The Define Schedule & Images button is grayed out if the “Use Scheduled Welcome Screen”
is not checked.
To add a special welcome screen, click the “Add New Schedule” button. A window will open where you
can specify the starting and ending dates. The administrator will also specify the image name. A
thumbnail of the selected image will appear on the lower right.
The graphic can be created in any graphic program in .jpg, .gif, .bmp, or .png format.
To delete a scheduled entry, highlight from the list on the left, and click the “Delete Selected Schedule”
button.
When scheduled screens are used it will automatically suspend the slideshow during the date range
associated with the scheduled screen.
The scheduled graphics file default location is: C:\Program Files\AlphaEntry\SchedulePics
• Entries Tab #5 – Phone Codes
If you are using AlphaEntry™ as a
telephone entry type system, the phone
codes tab will be enabled. This screen is
used to configure relays to respond to
DTMF tones produced by the resident’s
telephone. This allows the residents to
operate door releases or control other
necessary
devices.
It
is
highly
recommended that you enter a
description to document what the relay
usage will be.
Adding a phone code:
Enter the phone key you wish to control the device in the Phone Code field (0-9, *, or #).
Enter the Relay you will be using to control the device. You can have up to 16 boards of 8 relays each
depending on your application so you must enter the board number and then the relay number in their
respective fields.
Enter the duration in seconds that the relay will be activated. The Editor will insert the previously
specified global default relay time, but this can be overwritten. The duration of activation can be from 1 –
999 seconds.
Deleting a phone code:
Highlight the line of the relay you wish to remove by clicking on it. Press the Remove Selected Phone
Code button to the right. Note: Only one relay line can be removed at a time to prevent accidental
deletions.
Editing a phone code:
Highlight the line of the relay you wish to edit by clicking on it.
The information for that line will appear in the Add/Edit fields below and can then be modified as needed.
When editing is finished for that relay press the “Add Phone Code” button and the information will be
added into a new line. When you are sure your listing is correct, highlight the old line and click the
“Remove Selected Phone Code” button.
A few notes regarding phone codes and relays:
The relays provided on the RY008AE boards are factory set to be Normally Open but can be individually
changed to a Normally Closed state if needed, by changing the relay’s jumper on the board.
Setting one number to operate more than one relay:
In the example below, pressing the
key will release the door for 3 seconds on one relay, turn on the
inside lobby lighting for 180 seconds on a second relay, and call an elevator to the lobby with a third relay
set for a 2 second duration (wired in parallel with the lobby elevator call button).
Setting more than one number to activate a relay:
In the example below, the first relay will also activate by pressing the
key to release the door, but
this will not turn on the light or call the elevator, as the other two relays will not be activated. This
scenario is illustrated below.
• Entries Tab #6 – Options
“In Tenant Listing Sort Residents by Suite”
Checking this box allows an entry or concierge screen to display tenants by ascending Suite number
instead of alphabetically by tenant last name. To also include First name field in the search, check the
“Include First Name …” Box also.
“Include First Name in Resident Listing Search”
When searching for a resident on screen, typing either the first few characters of the Last Name or the
Suite Number will filter the listing until you can easily find who you are looking for. If you wish to also
filter by the First Name field you can check this box.
“Show a Package Icon in Tenant Listing…”
If checked, this option will display an icon when a tenant has a package or message waiting for them.
“Show Tenant Notes in Call Box” (Concierge)
Checking this option will allows concierge station operators to view notes about the tenants from the call
box. This is recommended as a concierge option and not used on a visitor entry panel.
“Show Tenant Photo in Call Box” (Concierge)
Checking this option will allows concierge station operators to view a picture of the tenants from the call
box. This is usually a concierge option and not used on a visitor entry panel.
“Messages can be sent from Call Box (Email/Cell/Pager)” (Concierge)
This checkbox allows the messaging icon to be visible within the call box so that manual Staff and Tenant
text messages can be sent to pagers, cell phones, or by email.
“Package Delivery & Pickup can be done from this Entry” (Concierge)
This checkbox allows processing of tenant packages through this entry/master. This procedure is done
through the tenant call box by clicking on the package icon.
“On Package Arrival turn on STR message LED in Apartment” (Concierge)
Enabling this option will automatically turn on a tenant’s message LED when a package arrives for them
and is entered into the system. Note: Compatible STR QwikBUS™ Intercom Stations are required for this
feature.
“Apartment Door Monitoring can be Enabled from this Entry” (Concierge)
This option enables the concierge to remotely activate the resident’s door monitoring feature, if
equipped, from his console.
Tenant Notes Can be edited from this Entry
Enabling this option will allow Resident Notes to be edited by the staff manning the selected entry. This
gives you the option of allowing the staff to edit the Notes without opening the Editor software.
“Hide On-Screen Keyboard” (Concierge)
This checkbox is usually used at a concierge station where the PC has a regular keyboard and the onscreen touch keyboard is not needed. This allows more room for resident listings.
When the keyboard is not displayed, the Keyboard button at the bottom right of the screen can be
clicked on to display the keyboard when needed.
Display “Emergency” and “Off Premises” tabs: (Concierge)
If this check box is checked, the additional tabs on the Information screen will be visible and enabled. This
is usually done for a Concierge or Doorman operated system if you wish your concierge to have access to
these features. It is rarely done when used as a lobby panel for resident and visitor use but is available if
your application should require it for special applications.
Display “Staff/Other” Tab: (Concierge)
If this check box is checked, the Staff/Other tab on the Information screen will be visible and enabled. This
allows a Concierge or Doorman quick access to contact other staff members or locations (i.e.: office,
garage, housekeeping, front entrance panel, etc.) by phone, email, or pager depending on configuration
and hardware.
Display “QwikCAM” Button: (Concierge)
With this box checked, a concierge can easily access the cameras on the AlphaEntry™ system by clicking
on the
QwikCAM icon near the top right of the screen.
“Display Minimize & Close Buttons” (Concierge)
This checkbox allows the minimize and close button to be visible on a concierge screen to allow the PC to
be used for other functions without exiting AlphaEntry™ or to close AlphaEntry™ without the “EXIT” code.
The pass code is still necessary to be able to exit the program in this fashion.
Can Take Photos of Residents
Enabling this option will allow the staff manning the selected entry to take photos of the Residents using a
local camera. This gives you the option of allowing the staff to associate photos to residents without
opening the Editor software.
Can Lock Directory
This option allows the directory to be locked from viewing. When this option is enabled you will see a pad
lock button at the top of the AlphaEntry directory to turn the directory locking on. When the pad lock
button is clicked it will ask for an access code. Then to disable the locking you will need an access code to
view the directory. An access code with the admin or close AE ability will allow you to lock and unlock the
directory.
• Entries Tab #7 – Tenant Access
If relay boards are being used
in your application, residents
can let themselves in by
entering a personal password.
This screen is used to connect
the relay(s) that you will use to
release the door(s). The
program must know which
relay on which board will be
activated when a resident’s
password is entered on the
lobby screen. Each resident will
have, at the administrator’s discretion, an individual password with the option to have additional passwords for
special usage (refer to Pg. 46 - Assigning Resident Access Codes). Specify the Board number, relay number, and
duration of closure in the fields provided. If a Normally Closed relay is required for a Magnetic Lock or other
special device, a jumper on the relay board for that specific relay can be moved to make the relay operate as
Normally Closed. Please be sure to check that amperage and voltage requirements do not exceed relay tolerances.
o Important Postal or Service Personnel Access information
If your application requires access for a mail carrier, or other service provider requiring access and you wish to
allow entry through the lobby touchscreen you must answer this question yes and follow these steps.
• Make a new commercial listing putting “Mailman” in the Business Name field
• Make a non-existent Suite # (Example: “M”)
• Check the Hide Listing Box so “Mailman” does not show in the resident listings.
• Enter a Resident Access Code of your choice (Example: 123)
The Mail Carrier will now be able to release the door by entering “M123” at the lobby panel. This procedure can be
used for other service personnel that require building entry on a regular basis. By listing each service person and
their pass code separately, the event log will display time and date of access for each person.
Note: A standard Postal Lock device can be interfaced with the system however there will be no record of access in
the event log.
• Entries Tab #8 – Switch Console
If external relay boards are used,
another available feature included in
AlphaEntry™ is the ability to control
lobby lights, taxi lights, gates,
elevator calls, cameras, ADA
automatic doors, or any other device
that uses a momentary or latching
dry contact closure to operate (for
safety considerations this feature is
not recommended for unsupervised
garage door opening or closing).
These features are usually used only for concierge or building management masters.
Each RY008AE board has eight programmable relays. Some of the relays are reserved for system use, dependent
on configuration, but others are available to be programmed to respond to DTMF tones sent by the resident
telephones (when configured as a telephone entry system) or concierge operated switches. Up to a total of (8)
RY008AE boards (64 relays total) can be chained on the same serial cable run if your application requires additional
switches.
The relays provided on the RY008AE boards are factory set to be Normally Open but can be individually changed to
Normally Closed state if needed, by changing the relay’s jumper on the board. Note: Please be sure to check that
amperage and voltage requirements do not exceed relay tolerances, and be sure to use isolation relays for higher
voltage applications to prevent possible system damage. All of these available features can be enabled or disabled
in the AlphaEntry™ Editor to customize the application to suit your building’s unique needs and security issues.
o
Adding a switch console activated relay:
1.
2.
3.
4.
5.
Switch Label: Using the appropriate fields below the main box, enter a label to identify the switch
function. This label will be displayed on the button.
Relay Board Number: Enter the Relay Board Number for the relay to be used. (1 – 16)
Relay Number: Enter the Relay position on the board (1-8)
Relay Type: Specify if this relay will be used as a latching/toggled switch (Push ON, Push OFF), or a Timed
switch (after pressing the switch the relay will remain active for a specified amount of seconds). If the
switch is timed, enter the time duration the relay will remain active (between 0.1 – 999 seconds).
Add Switch: When finished, press the “Add Switch” button.
o Deleting a switch console activated relay:
1.
2.
Highlight the switch to be deleted.
Press the “ Remove Selected Switch” button
o Editing a switch console activated relay:
1.
2.
Highlight the switch to be edited.
Edit the switch information in the fields provided below, and then press the “Add Switch” button.
o Accessing Switch Console Switches from Concierge Station
Switch Console Tab
When a switch is activated on screen, its pilot light will glow
red to indicate the switch is on. If any of the switches are
active, the pilot light indicator on the Switch Console tab
will also illuminate, as an indication when the Switch
Console is minimized.
• Entries Tab #9 – Camera Configuration
PLEASE NOTE: In some jurisdictions there are laws regulating video camera recording and this feature may not be
permitted in some states or localities. Please check with local authorities to determine if this function can be used.
AlphaEntry ™ keeps an event log whenever the lobby
panel is used. If a camera is connected to this entry, it
will take a snapshot to be included in the event log. This
camera should be mounted in the panel, or elsewhere in
the lobby area in such a way as to see the visitor or
resident using the lobby panel. For camera set up
convenience, the live feed from the camera will display
in the lower right side of the box if it has been connected
and enabled. In a concierge situation, some facilities mount a dome camera behind the concierge to capture
visitors standing at the desk for the log. If this installation has an Internet connection, you can allow your residents
to see live video on their computer, iPhone®, or Android® from this camera to verify visitors. The camera added
here can be a standard camera connected to the station, or an IP Camera (with JPEG output). Select the camera
from the drop-down list or enter its IP Address in the textbox provided. NOTE: Smart Phone video is a subscription
service.
Clicking on the
button will
open the window shown to the right. This window will vary
with the camera and device driver that is chosen, but can be
used to optimize and adjust the camera for the best picture
results. With most cameras, a live window will open so you can
view your adjustment results.
Always be sure to take variations in lighting during the day into
account. Note: The Camera Properties button is only accessible
from the PC that has the camera attached.
o Adding Additional Cameras
Clicking on the
button will open the window shown below.
This window will allow you to add one or several additional cameras, which will attach directly to the entry/master
PC you are currently configuring.
Click the
button and respond to the prompt giving the camera location name.
Once the location is listing in the box to the left, click to highlight it and, on the right, select the camera you will be
assigning to this location. The drop down box will list all available cameras attached directly to this PC.
When the camera has been selected, the resolutions, format, or other camera specific information should appear
in the next drop down box.
A live picture and a
button will appear so that adjustments can be made in aiming
and configuring the camera for best picture quality.
These cameras can be viewed throughout the system, by a concierge in AlphaEntry by clicking on the
the top right of their screen (if enabled).
icon on
This particular application displayed can be used as a secondary still shot saved in the visitor log. In a drive up gate
scenario this would enable you to take a picture of the driver placing the call, take a second picture from a camera
aimed to capture the license plate, and store both in the log at the time the call is placed. To store the second
frame, check the secondary photo box on this screen.
Both cameras must be connected to the same PC.
• Entries Tab #10 – STR Configuration
Will this Entry be calling STR devices?
If your facility will be using the STR QwikBUS™ system in conjunction with AlphaEntry™, then click the Yes
radio button to enable the rest of the configuring questions.
Programming the STR device that will be used at this entry:
If this is a concierge master, you will program the handset or open voice station by clicking the
button and then holding down the circle button
or
on the station device
for approximately 5 seconds until the station gives a confirmation beep. After successful programming the
device address (in hexadecimal) will be listed in blue to the right as shown in the above example. There
are over 65,000 address combinations.
To clear the device address field, click the
button.
If this entrance will be using a TTE33-3 device, instead of programming through the system, you will be
prompted to enter the device number set by the dipswitches at the TTE33-3 type device.
This entry will be using a handset for communication
If this box is checked then this station will use an HT333 (concierge) handset. If not checked, it will use an
FSE1500 style open voice station.
Enable Call-Down to this entry
In a concierge scenario, enabling this feature by checking the box will allow other FSE1500 style devices to
call down to this station by pressing one of three buttons. Specify the Circle Button, Button 1, or Button 2.
Specifying the same button for two stations (example: two concierges) would ring both stations when
pressed. The first to answer it would get the call and will automatically clear the call from the other called
station(s).
The three buttons can be programmed to call different QwikBUS™ entry locations within the system. This
is a global configuration that programs these buttons for all stations.
Note on setting the Concierge handset VOX sensitivity:
In a half-duplex system, the louder side of the conversation transmits and the quieter side receives.
If the concierge lobby area has a high ambient noise level, the volume on the concierge phone may always
be higher not allowing the apartment station to talk down without shouting. To lower the
sensitivity/volume level of the concierge microphone, pick up the concierge handset and hold the
Function Button (The bottom one that lights up) down for about 3 seconds and it will beep 1, 2, or 3
times. The default equal balance is 2. Setting it for three beeps is the setting that will work best in a noisy
concierge environment. Setting it for one beep is the setting that will work best if the apartment noise
levels are high. It will cycle through 1, 2, 3, and then back to 1 again. For each level change you must hang
up the receiver to move to the next selection otherwise it will switch to the ring volume control function.
QwikID™screen for QwikBUS™ Call Down
When a call down is placed to a concierge unit from a
QwikBUS™ device, the QwikID™ Box will pop up with
an intercom icon as shown on the left. The return call
back procedure is the same as the standard
telephone type in that you can click the icon and then
lift your handset to return the call.
Once the call has been returned and the resident has
answered, the call bar will turn blue as shown in the
second picture.
If you need to, you have the capability to transfer
their call to another QwikBUS™ device.
As an example, the resident you are speaking with
wishes to contact the garage to have their car
brought around. You can transfer their call to the
garage valet by clicking on the blue transfer icon on
the left and then select the device to call from the
staff/location, or the main directory then hang up.
The receiver of the call must have a QwikBUS™
FSE1500 intercom to receive the call.
Enable Door Release for this entry
When this box is checked the fields will be visible to enter the Relay board, Relay number, and the
number of seconds you want the door to be activated. This will close the specified relay for the specified
length of time, when the key button
at the inside station is pressed.
Unanswered calls get forwarded to a call center
Enabling this option will cause any calls to an STR Device which are not answered within a preset amount
of time to be forwarded to the call center you have set up under the Relays tab.
• Entries Tab #11 – VoIP
Will this Entry be calling VoIP devices?
If your facility will be using VoIP devices in conjunction with AlphaEntry™, then click the Yes radio button
to enable the rest of the configuring questions.
SIP Account Settings
You will need to specify the SIP Username, SIP Password, and Auth Username for your SIP Server. Note:
You will also need to specify your global SIP Server Address in the Main VoIP – SIP & Zones Tab.
Sound Devices
Specify which audio devices you want to use for speaker and for your microphone when communicating
through VoIP technology. If you are using a handset, select the “This entry will be using a handset for
communication” checkbox. This checkbox does not actually change the functionality of the software, but
staff will be prompted with more accurate wording, icons, and prompts.
Audio Settings
AlphaEntry™ allows for some manual editing of the audio settings used in VoIP Communication. These
might come in handy for noisy lobby locations or outdoor environments. Options provided are
Echo/Noise Cancellation, Auto Gain Control, and Mic Boost.
Volume Levels
These options are used to manually adjust the speaker & microphone volume levels.
Main Tab #4 – Email Settings
The email configuration is used to automatically send messages to residents when a package is received for them.
The left side of this form is to associate your email address that you will be sending from and the necessary SMTP
protocols if required. The right side contains the message that will be sent. The fields between the # signs will be
added from the database to provide a personalized message to your residents email and/or text message address.
The message generated in this sample would be as follows:
Subject: Delivery from UPS
Tom Evans,
You have received a delivery from UPS on 05/20/09 at 2:45 p.m.
Please pick-up your delivery in the mailroom.
Concierge
This message can be edited to conform to your facility but be careful to place the fields appropriately. When you
click on the message text to edit it to your needs, a box with field definitions will pop up on the left side to assist
you in making your changes.
The preferred method of delivery notification for your residents can be specified for each resident in the Residents
database record under their Notify tab.
Main Tab #5 –Pager Transmitter
Being able to instantly contact
staff in an urgent situation is a
very important part of building
communications. Whether your
AlphaEntry™ system is being used
in an assisted living facility to
contact medical personnel, or an
apartment complex where a
concierge needs to get in touch
with maintenance or other staff,
a pocket pager system is an
invaluable tool. AlphaEntry™ has
these features built in and only
requires
nominal
additional
paging hardware.
This section discusses the
additional equipment needed, configuration, and installation of these additional components to enable any
AlphaEntry™ master to contact any and/or all pager equipped staff members by entering plain text into the screen,
and also to send automatic messages identifying calling locations and residents, in the event of an emergency, to
specific staff or groups of staff depending on your facility’s needs.
Due to the flexible design of AlphaEntry™, many other ways of using the paging system are easily available to you
to solve communication issues unique to your facility.
AlphaEntry software has built-in pager message encoders and therefore needs no additional equipment other than
the pager transmitter with power supply, and the serial cable from the PC.
o Enabling Pocket Paging
To Enable Pocket-Paging on your AlphaEntry™ system, simply specify the port number that your pager transmitter
is plugged into. Note: The pager transmitter must be plugged into the computer that has the Hub Software
running on it, and the port number reflects the port number on that computer.
Main Tab #6 – STR Translator
If you will be using STR QwikBUS™ Devices with your AlphaEntry™ system, simply specify the port number that
your STR Translator is plugged into. Note: The STR Translator must be plugged into the computer that has the Hub
Software running on it, and the port number reflects the port number on that computer.
This AlphaEntry™ installation will be using push button panel(s):
Because the entry/master you are currently configuring is indicated as the one to be attached to the
TL333 Translator, which will read these panels and send the information to AlphaEntry™, this check box is
visible and related to this particular entry/master even though this is a global decision for the entire
system.
Disable checking of STR Devices:
This option is normally only enabled during initial installation to prevent the system from reporting STR
Devices that have not yet been installed.
Door Monitor Enabled/Disable Seconds
If you are using Door Monitoring (see pg. 74) with STR Devices, enter the number of seconds you would
like to give residents before the alert is triggered on a monitored door.
QwikACCESS™ Hardware Setup
If you have QwikACCESS™ access control features enabled you can specify your different hardware access
points here.
Program New Device – Add a new access point to your hardware collection.
Remove Device – Remove the selected device.
Rename Location – Change the name of a hardware item.
Program Door Opener – Enables programming on the access device.
Optional S1 and S2 Apartment Inputs
An optional model ECD2 (see pg. 91) dual input
connector attached to an FSE1500 series apartment
station will allow easy connection to emergency
devices, smoke detectors, wireless pendant
receivers, motion sensors, or other dry contact
signaling inputs.
These connections are the heart of the AlphaEntry™
emergency call system providing your facility with
voice communications to a master station for
regular
resident/staff
communication
and
emergency response capabilities, as well as many invaluable features designed for assisted living, but
versatile enough to be configured for any facility in a number of ways that no other system can.
The ECD2 plugs into the FSE1500 open voice apartment station and gives two connections, which can
accept either momentary or latching dry contact devices, which are globally configured at the
AlphaEntry™ PC that is directly connected to the TL333 Translator.
Configuring the S1, S2, & Button Inputs
Click the
button to open the screen below.
NOTE: These settings are global. S1, S2, Buttons 1 through 4 in all apartments will be assigned the same
values. However, some customization for each apartment can be done through the Resident’s individual
screen. Please see Pg. 64 - Resident Restrictions Screen.
The following pages are explanations of the configuration screens for the S1 and S2 inputs and Button 1
through 4 assignments.
These settings are global for all the S1, S2, and Buttons 1 through 4 in the system. Note that all inputs/
buttons have separate tabs and can be configured individually for different purposes.
NOTE: Buttons 3 & 4 are only available with the QwikBUS™ video monitors.
The S1/S2/Button - Setup
Description: Enter a label for the devices that will be connected
to all S1 or S2 inputs. Enter a label for Buttons 1, 2, 3, & 4 if used.
Disable Input: Checking the box in the upper right hand corner
will disable all S1, S2, B1, B2, B3, or B4 inputs (selected
individually from their respective screens).
Type of contact closure: From the drop down box, select one of
the two options, either a locking/maintained device, a
momentary/self-resetting device, or Door Monitor.
Delay before activation: If a resident actuates a latching type
device, this allows the device to be reset within the allowed delay
time without setting an alert. If the contact is still closed after this
grace period, the system will react as configured. This option is only available to a latching/maintained device and
will be disabled in the case of a momentary/self-resetting device.
There are many devices available which are compatible with
AlphaEntry™. For specific needs, contact us for additional choices and
customized solutions.
Turn on Audio: Normally, if resident suites are equipped with STR open voice stations, when the system receives
an emergency call, the concierge will pick up their handset when alerted, and ring back the calling resident station.
The resident would then press the ON button and talk. If Turn on Audio is enabled, when the concierge calls up,
the resident station will sound a warning beep (that voice is being automatically enabled) and then the concierge
or responder can speak directly to the resident through the open voice station. In a situation where a resident
cannot reach the ON button due to distress this is a very important feature. NOTE: The HTE40 Series apartment
handsets can be connected to the ECD2 Interface for emergency calls, but cannot have the audio turned on
automatically.
Please keep in mind that emergency devices associated with the resident’s station may be located distant to the
station itself, possibly even in a different room, which would hinder voice communications or the resident may be
unable to reply, so the staff should be instructed to physically respond to these calls if there is no voice
communication.
Log Input: Select Yes or No from the drop down box.
• Selecting Yes, will log date and time of closure each time the device is activated.
• Selecting No, will not log the device closure.
The S1/S2/Button – Display
Display On-Screen: Select Yes or No from the drop down box. When
Yes is selected, activating this device will cause a box, containing
resident information, to pop up with a visual or visual/audible alert,
depending on configuration, on all checked entries and masters
enabled to receive emergency or notification calls. If No is selected,
activating a device will not cause an alarm. This option is for simple
logging of a closure without notification. An example of this would
be if you want to record date and time of a door opening in the
event log using a normally open magnetic reed or contact switch.
Display Notes: AlphaEntry™ can store notes for each resident that
will display on screen when a device is activated. If Resident Notes
is selected then the notes found in the Resident’s Note section of
their individual record will be displayed. This is useful for sending
preformatted instructions to a specific location. If Emergency Notes
is selected, then the information found in the Emergency Note section of their individual record will be displayed
(only when an emergency call is received). This may include doctor contacts, relative notifications, medical history,
or other relevant information. When a device or button call is received from that resident’s station, the
appropriate notes will be displayed on screen. Selecting None will display no notes related to the device/ button.
NOTE: Please be sure to conform to all HIPPA regulations and other government regulations when detailing
medical information.
Display Colors: You can specify a Red, Blue, or Green notification pop up box to differentiate between different
types of calls.
At which Entries: Device or Button calls can be displayed at selected entry/masters depending on the needs of
your facility. All locations on your system will be listed here. Check each location that will receive
emergency/notification calls. Please note that entries without QwikBUS™ voice devices will not be able to respond
audibly through the QwikBUS™ system but can still receive audible/visual notification of an emergency device
being activated.
The S1/S2/Button - Alerts
Sound file (.wav) to play: When a closure is detected, a .wav
file entered in this field will play at entry/masters that are
configured to accept emergency/notification calls and will
repeat every 1 to 60 seconds until the device is reset or call is
acknowledged. The .wav file must reside in the
AlphaEntry/Sounds folder of EACH emergency call receiving
masters. Be sure that the speakers are always on for the
emergency call receiving masters. Please note that you can
silence the tone with an acknowledgement but you cannot
remove the call from the screen until the latching device is
physically reset at the location. Momentary contact device calls
can be fully reset.
Activate Relay(s): Some facilities may need visual or audible
signaling when an emergency device is activated such as bells,
sirens, or strobe lights. Some may want to trigger an auto-dialer. To set a relay to close when an S1 or S2 device is
activated, enter the specific Relay Board, Relay number on that board, and the number of seconds you wish the
relay to remain closed (ranging from 1 second to 999 seconds).
•
If you do not put a value in the Active Seconds field, the relay will remain closed until the device is
reset or the emergency call has been acknowledged. If the device is a momentary contact type, then
the relay will operate until the emergency call has been acknowledged.
•
If you put a value in the Active Seconds field, the relay will open even if the device has not yet been
reset or the emergency call has not been acknowledged.
•
If a Normally Closed Relay is needed for a specific application, the jumper for the specific relay to be
used can be switched on the relay board, enabling the relay contact to open on activation (normally
closed operation).
The S1/S2/Button - Notifications
When an input is activated, AlphaEntry™ has multiple ways of notifying the
people that need to respond.
Depending on the facility type, Concierge, Security, Nursing Desks, or
Management may need to receive the alarm and related information. Staff
members or family members may need to be notified directly by emails,
text messages, pagers, or remote signaling devices. All these notification
methods are available through AlphaEntry™.
The message sent can be customized through the AlphaEntry™ Editor to
give appropriate information to the recipients.
To send Notifications to Pagers
Check the pagers box to activate this feature. You may enter a pager capcode in the field to send the
notification to all pagers within that capcode group.
Pagers allow up to 6 capcodes so that they can be programmed to be part of several zones or groups as
well as an individual receiver making this system extremely flexible for all applications.
Any staff member with a pager listed in their record will be included in the Staff Members drop down list.
Their individual pager capcode is located in their staff record under the Notifications tab. Select the staff
members to receive pages by checking the appropriate boxes. Please note that if a staff pager is checked
to be notified and he is also part of a group to be notified, he will receive two pages for this event.
•
Only send notification if call is not acknowledged in XX seconds: By checking this box and putting in
a delay value, this allows time for someone at a master station that normally receives calls to respond
to the call before the general notifications go out. This reduces unnecessary alarms to pagers, emails,
or cell phones and, at the same time, insures that a notification will go out if a call is made and
someone is not at a master station to respond.
To send Notifications to Email / Cell Phones
Specific emails can be entered here to keep additional parties informed. Separate multiple email
addresses with a comma. These addresses do not have to be in the database but would be used to keep
essential parties in the notification stream.
Remember that emails will only alert people when they check their email! For real-time notification,
these contacts should be entered as a Staff record with their necessary contact information to receive
text messages or pages.
For notification of parties related to a specific resident, check the Notify Family Members box. Resident
specific email and text message/cell phone information can be entered in the resident’s record on the
Notifications tab.
•
Only send notification if call is not acknowledged in XX seconds: By checking this box and putting in
a delay value, this allows time for someone at a master station that normally receives calls to respond
to the call before the general notifications go out. This reduces unnecessary alarms to pagers, emails,
or cell phones and, at the same time, insures that a notification will go out if a call is made and
someone is not at a master station to respond.
Resident Restrictions Screen
•
This screen is located in the Directory in the resident’s record under the Restrictions tab.
Depending on the type of facility
and residents, you may have need to
allow some residents, but not all
residents, door access, concierge call
down, or emergency call access. To
allow the most flexible configuration
for the facility needs, these features
can be enabled globally, but some
residents can be restricted from
using them on a case-by-case basis.
To establish restrictions for a
specific resident use the Restrictions
tab located in that resident’s record to check off the features that they will not be permitted to use.
Main Tab #7 – VOIP & SIP Zones
SIP Proxy/Domain - This option specifies the address of the SIP Server AlphaEntry™ is to use for
VoIP/SIP calling.
• Add a New Zone - Click this button to add a new Zone to your VoIP Zones
• Rename Zone - Click this button to rename the selected VoIP Zone
• Delete Zone - Click this button to delete the selected VoIP Zone and its relationship to all contained
devices
NOTE: Installer must arrange for separate SIP Service provider
•
• Adding Specific Devices to a Zone
Zoning a VoIP device to a specific zone is done through the Residents Location Tab (see pg. 61)
Main Tab #8 – SDACT
The Keltron SDACT-2 is a serial dialer that provides emergency communication to an off-site monitoring service.
The AlphaEntry software can by tied into the SDACT-2 using a serial comm port.
Please follow these steps to configure the SDACT-2 and AlphaEntry
1) Connect the SDACT-2’s 9 pin serial port to the PC that has the AlphaEntry database installed on it. If you
need to extend the cable running from the PC to the SDACT-2, it is highly recommended to extend only
the serial side of the cable. Do not use a USB extender.
2) Connect at least one phone line to the SDACT-2 (see Keltron manual pages 20 & 21).
3) Connect the provided 24 VDC power supply to the SDACT-2.
4) Use the Keltron CD to install the Keltron programmer software on your PC.
5) Basic programming steps (in the Keltron manual see chapter 4 for detailed instructions on how to
program the SDACT-2):
a. Use the “Set Comm Port” menu at the top of the programmer screen to select the comm port
number you serial to USB converter is using.
b. On the SDACT-2 click the “Program” button to put it into programming mode.
c. In the programmer screen click on the “Download Config From S/FDACT” button.
d. Change the Primary and Secondary phone numbers to the phone numbers your off-site
monitoring service gave you. They are both required and can be the same number.
e. Set the Primary and Secondary Account Numbers to the number your off-site monitoring service
gave you.
f. Click the “Upload Config To S/FDACT” button.
g. Exit the programmer screen.
6) Go into the AlphaEntry Editor software.
7) In the top row of tabs click on the “Keltron” tab.
8) Enter the comm port number that the Keltron SDACT-2 is connected to.
9) Click on the “STR Translator” tab.
10) Click on the “Setup S1, S2 and Button Inputs” button.
11) Select the tab for the input you would like to trigger the Keltron SDACT-2 (for example, “S1 Input”).
12) Click on the “Keltron” tab.
13) Place a check-mark next to “Call Off-Site Service”.
14) Optionally you can put a delay timer on the input for X number of seconds. For example, if the call gets
acknowledged or reset locally on-site before the set number of seconds, then a call off-site will not be
made.
15) Close out of the AlphaEntry Editor.
16) You can then try placing a test call by activating the type of input you setup.
Chapter 4 - Entering Resident Information
From the Main Editor Screen, touch/click on
The Directory Editor Screen will open.
Resident Record Editing Screen
On the left side of this screen is a scrolling list of all residents in the database. From here you can highlight any
existing resident to modify or delete their related information.
A search box is included below the list to make it easy to find a specific resident by first, last, or suite number, even
with several thousand residents. As you enter the letters of the resident’s name or suite number, AlphaEntry™ will
filter the list automatically.
The count of residents entered in the system is located below the search box and will change as search filters are
applied.
Editor Global Function Buttons
Across the bottom of the main Editor screen there are buttons for special operations to assist in adding residents
to the database and extracting information from the database. These are described below.
• Importing Residents from another Data file
To assist in entering basic Resident information, AlphaEntry™ will allow the importing
of Comma Delineated Files a.k.a. Comma Separated Values (.CSV). Excel files saved in
.CSV format can be used providing the fields are setup in the proper order. Many
other spreadsheet programs also support this file extension.
To start this process, click the Import Residents button on the bottom left of the Resident Editor main screen. The
screen below will appear. The blue Example link on this screen demonstrates the proper format required to move
your data successfully into the AlphaEntry™ database. If you wish to use the example as a template for your data
you may do that also.
The conversion program looks for the “RESIDENTIAL LISTINGS” and the “COMMERCIAL LISTING” demarcations to
differentiate between the ways a commercial or residential listing is saved, so be sure to retain those between
your two types of listings and enter your residential residents first.
NOTE: When the Resident Import Option is used, if
you already have information in your resident
database, it will append to the existing information
and not overwrite your existing information.
NOTE: This option will only import Resident and
Commercial listing information. It will not import any
information for the Emergency, Off Premises, and
Staff/Other entries.
• Exporting Residents to a Data file
AlphaEntry™ can export a copy of your resident database in a Comma Delineated
File a.k.a. Comma Separated Values (.CSV) so that you can use the information in a
spreadsheet, such as Excel.
To start this process, click the Export Residents button on the bottom left of the Resident Editor main screen. The
screen below will appear.
Determine the folder you wish to save it in, name your file, and press save to generate the converted file. Most
spreadsheet and database programs support the .csv file format.
• Adding Blank Resident Records to the Database
Sometimes an initial set up of the database may be easier if the resident records are
made first and then filled in as information becomes available. This button allows
you to add X number of records to the database for this purpose which will be
temporarily labeled Res001 etc. until additional resident information is available.
• Creating an STR device report file
This button allows you to make a .csv file of all the STR devices in the AlphaEntry™
database including their locations and related residents to assist in the physical set
up and programming of the QwikBUS™ system.
• Adding a New Resident
Select the New button near the bottom of the window. This will create a new blank resident record.
Using the Radio Buttons, select whether the entry is a Residential or Commercial Listing.
Near the top of the window you may enter the “Suite” number or location within the building if you wish it to be
listed on the Directory Screen, or leave the suite number empty so that the number will not show for privacy
and security reasons.
RESIDENTIAL
COMMERCIAL
Enter the first name of the resident.
Enter the last name of the resident.
Enter the Business name as you want it displayed
Enter the Start sort position (for Alphabetizing)
The “Start Sort Position” allows the administrator to
determine the sort position of the business name. In
the example “Dr. William Gold DDS”.
If the
administrator wishes to sort the name under “G” that
th
would be the 13 character, so 13 would be entered in
the “Start Sort Position:” text box.
Residents are alphabetized automatically by
Last Name, then First Name or Initial.
(Residents can be listed by Suite Number also)
Please Note: Spaces and punctuation are included in the number of characters.
• Hiding a Listing
The Hide check box on the right side will make that button position invisible, preventing calling to that number or
intercom but will leave the information available for system use. Hiding a listing enables you to store information
that is not displayed at any of the lobby or concierge screens. Why would you want to do this?
If you create a resident record “MAILMAN” and give that record an access code of MAIL123, the mailman can buzz
himself in to deliver and pickup mail. Then hide the listing so MAILMAN does not show up on the resident
directory.
Creating non-displayed listings for any service personnel that come to the building frequently gives them easy
access and also logs all their arrival times in the AlphaEntry™ event log.
• Priority Listings
All priority listings will display at the beginning of the AlphaEntry™ directory in Yellow on Black. You may wish to
list the building super or the management office at the top of the screen for easy visitor access. The listing will also
appear in its usual alphabetized location.
• Email Address
Enter this resident’s main email address to give them the availability to access their information through
http://login.alphaentry.com/ (requires an internet connection and AlphaEntry™ Resident Package). In the package
tracking section, additional email addresses and text messaging information can be added. Note: When the system
is enabled with the optional resident package, and email will be sent to the resident with their password.
• Assigning Call Buttons to Residents
Up to three different phone numbers or relay codes can be entered for each resident or business. A suite can be listed
but not have a call button, or a button only visible to the concierge.
On systems that interface with “No Phone Bill” hardware, the necessary information passed to the N.P.B.
equipment will be dependent on the manufacturer of the equipment and their code requirements. The necessary
string for the relay equipment is entered in the “Dial Num.” field.
Dependant on configuration, available connections are:
Regular C.O. Telephone Number
Dial Num
No Phone Bill Telephone Number
Dial Num (required NPB string)
No Phone Service- Dummy Phone
Related NPS Tel Relay
Standard Analog Intercom connection
Related Relay
STR QwikBUS™ Interface
STR QwikBUS intercom in Apartment
VoIP Device Interface
VoIP Devices
Which buttons are displayed at a lobby panel is determined during each lobby panel configuration.
For each phone number entered, add the location and comments as needed. For example, you can enter the
phone number for that suite, the cell phone number for that person, and a work number as well. In the comments,
you can specify the times when each phone number should be used or other pertinent information.
As a good rule to follow, always make Button 1 the number that the visitors will use. In your system you may make
a global decision to only allow visitors to see Button 1 and your concierge to view 1 & 2 or all 3.... This is variable at
each entrance/master to allow for maximum versatility in configuring your facility.
Any combination of Phones and Relays can be combined. For instance, a suite with an open voice or handset
intercom would use a relay, but a work phone or cell phone number for that resident, or an STR QwikBUS™
intercom could be assigned to the other buttons (a dedicated phone line is required for telephone contact
options).
•
Entering Phone Numbers (Standard Dialer type)
1.
2.
3.
4.
•
Choose button 1, 2, or 3, and click the radio button “Dial Num”
Enter the Number (999-9999 or 999-999-9999 format). If the phone number requires a “1” before dialing,
the program will provide it automatically. If a PBX system is being used where a “9” or other prefix is
required before dialing out, please refer to Appendix E for ways of entering dialing prefixes. In
AlphaEntry™, international phone numbers can now be entered into the Number fields.
Enter a Label (such as: Suite, Cell phone, Work, Conference Room, etc.) if no label is given the button will
just say CALL.
Enter optional Comments displayed next to Button (such as: No Calls after 10:00 pm., Call here 8:00 –
5:00, etc.) These comments are very important because they make AlphaEntry™ even more powerful as a
concierge tool, as well as better communications with visitors to residents.
Entering No Phone Bill Numbers
1.
2.
3.
4.
Choose button 1, 2, or 3, and click the radio button “Dial Num”
Enter the required No Phone Bill Equipment code in the Number field
Enter a Label (such as: Suite, Cell phone, Work, Conference Room, etc.) if no label is given the button will
just say CALL.
Enter optional Comments displayed next to Button as required.
• Entering No-Phone-Service “Dummy” Codes
st
NOTE: NPS Available on 1 button only
1.
2.
3.
4.
Choose button 1 and click the radio button “NPS”
Enter the No Phone Service code in the Board/Relay fields.
Enter a Label (such as: Suite, Cell phone, Work, Conference Room, etc.) if no label is given the button will
just say CALL
Enter Comments for Button (such as: No Calls after 10:00 pm., Call here 8:00 – 5:00, etc.)
• Entering Relay / Analog (Video)Intercom Information
Optional relay boards are used to interface with a new or existing in-house (video)intercom system. AlphaEntry™
can be used with most any intercom system that requires a dry contact to initiate a call.
1.
2.
3.
4.
5.
6.
Click the radio button “Relay”. (After this is selected, the relay fields will appear.)
Enter the Board number in the first field (1-16)
Enter the Relay number on that board in the second field. (1-32)
The Length field, which determines the duration in seconds of relay activation, is set to the system
default, but is adjustable here for each relay and its special applications.
Enter a Button Label (such as a Suite number or location.)
Enter Comments for Button (such as: No Calls after 10:00 pm., Call here 8:00 – 5:00, etc.)
NOTE: When using relays for calling, you must provide a set of relays for EACH AlphaEntry™ calling station
(Concierge or Visitor type), as well as the related multi-entrance device(s) needed, depending on your exact
system type.
•
Entering VoIP Device Information
1.
2.
3.
4.
•
Choose button 1, 2, or 3, and click the radio button “VoIP”
Enter the VoIP Extension of the device that is to be called
Enter a Label (such as: Suite, Cell phone, Work, Conference Room, etc.) if no label is given the button will
just say CALL.
Enter optional Comments displayed next to Button as required.
Entering STR QwikBUS™ Information
The STR QwikBUS™ interface allows direct operation of the QwikBUS™ digital system by AlphaEntry™ for standard
intercom (or video intercom) communications, concierge call down, optional emergency call devices, and
additional features. The information below is for programming of the STR devices in the resident locations. For
more detailed information on the STR QwikBUS™ interface, please refer to Chapter 5 -The STR QwikBUS™/
AlphaEntry™ Interface on pg. 51.
NOTE: All programming of STR QwikBUS™ equipment must be done from the PC directly connected to the TL333
translator.
o Programming an STR Device to a button
1.
2.
3.
4.
5.
6.
7.
8.
Click the radio button “STR”. (After this is selected, new fields will appear.)
To program the apartment station into the system:
Be sure all other STR apartment intercoms are off.
Click the “Prog. Addr.” Button in the resident editor.
If this button is disabled, this PC does not have the TL333 attached to it.
Hold down the circle button on the apartment station until a beep is heard (approx. 5 seconds).
a. A beep will indicate that the address for that station was sent to the PC through the translator.
b. The address will now be saved in the AlphaEntry™ database and associated with this call button.
c. The number of station addresses associated with this button will display in the Button box after a
successful programming.
d. To program additional stations in this apartment repeat this step with each apartment station.
The maximum number of stations in one apartment is (5) five.
e. Exceeding five stations will overwrite the first station’s address.
Enter a Button Label (such as a Suite number or location.)
Enter Comments for Button (such as: No Calls after 10:00 pm., Call here 8:00 – 5:00, etc.)
9.
Check the Forward un-answered calls to call center box if using this option. This allows the visitor to speak
to a predetermined location if the call is not answered by the resident within a specified time.
o Programming a TTE33-3 Entry to a Button
When a TTE33-3 device is detected on the system, a panel link button will also be
visible in the STR device button box (shown above). This will enable the TTE33-3 to
call to the apartment station(s) when the corresponding panel button is pressed.
To link apartment stations to a TTE33-3 panel:
1.
2.
3.
•
Be sure all other QwikBUS™ devices are off except for the translator.
Click the “Panel Link” Button in the resident editor. (If this button is not visible, this system does not have
a TTE33-3 attached to it.)
Press the associated button at the TTE33-3 panel. It will link with all the devices specified in this button
box. If additional devices are added to the apartment at a later time, it will link to them automatically.
Selecting Locations to Display Resident
In large facility or multiple building scenarios,
you may want to list the resident only at a main
gate, the Concierge’s screen, and the resident’s
specific building entrance. To do this, check the
boxes for all the locations that you wish the
resident to be displayed. All available locations
will be shown in the list box.
Enter the Floor number or name, and the
Building if applicable. All entry/masters in the
complex will be available in the drop down box.
Whether or not these fields will be displayed is determined at the set up for each entry/master.
If the system is equipped with AlphaEntry™ MailRoom™, the mailroom drop down box will list all available Mail
Rooms in the facility for display purposes.
If the system is using VoIP Devices, you can set up the relationship between your VoIP Zones and your VoIP devices
here.
•
Assigning Resident Access Codes
Resident Access codes are used to allow residents to “buzz” themselves in when AlphaEntry™ controls the locked
entry door(s). The administrator can assign access codes, or residents can choose their own and have the
administrator enter them into the database or set their own through www.AlphaEntry.com (requires an internet
connection and AlphaEntry™ Resident Pacakage). The administrator must enable this feature (see Pg. 62 –
Resident Access).
AlphaEntry™ can store an unlimited amount of access codes per resident. The additional codes can be used for a
visitor or service personnel that would need access to the residents apartment on a temporary basis. Access can be
limited to specific days, date ranges and times by checking the appropriate boxes and setting the parameters in the
Access Codes tab.
Access codes can be 3 to 15 characters consisting of numbers 0-9 and letters A-Z. By allowing combinations of 36
alphanumeric characters and requiring matching of the suite number, AlphaEntry™ provides a very high level of
security. A log is kept for each system event including which access code was used, and a picture of the visitor, if
equipped with a camera, for additional security/tracking ability. These logs can be found in your AlphaEntry folder.
This box shows the resident’s access codes. This example already has two pass codes stored for this resident.
To remove or edit an existing code, highlight the code in the list box, then make necessary changes or hit the
Remove button to delete the code entirely.
To add an additional code, Press the New Code button.
The above example shows a pass code being created for a housekeeper. The code, JSB2, has been labeled Janet Housekeeper and is a restricted code in that the code will only allow entry on Mondays and Fridays between the
hours of 8:00 am and 2:00 pm.
If the access should only be allowed for a specific date range, then the Dates checkbox would be checked and the
date range entered into the two adjacent fields.
After the parameters have been set, hit the Add Code button to save the information.
• Entering Resident Notes
This feature is used in concierge applications to store needed information regarding a resident. If there are notes
in this field, the concierge will see a clipboard icon on the right of the resident’s call box. Clicking that icon will
display the notes.
Emergency Notes are only used with the optional AlphaEntry™ emergency call system and will display only when
an emergency call is received from the resident. These notes will be instructions to the concierge regarding
notifications and/or other health related information pertinent to the resident. Both of these memo fields are only
editable with administrator access through the editor.
If the Clipboard Icon is visible after selecting a resident in AlphaEntry™, it indicates notes are
available regarding this resident.
• Entering Resident Pictures
The Photo tab allows you to display multiple pictures of the residents and their common visitors to assist in
identification by the concierge or other personnel with access to AlphaEntry™. Photos could be displayed at a
visitor entrance but it is not recommended for security reasons. You may Take a photo from a local camera or
insert resident pictures (jpg, bmp, gif, png). Select the picture by clicking the browse button. A copy will
automatically be stored in the AlphaEntry™ database. Once the photo is uploaded, you can enter an option
description for that photo if needed.
Although the program will resize the picture as needed, for best results it is recommended that you do not exceed
a picture size of 400 wide by 300 high.
If this icon is visible after selecting a resident in AlphaEntry™, it indicates a resident picture is
available.
NOTE: Resident photos can also be taken by the concierge, if enabled (see pg. 13)
• Resident Notification for Package Arrival
There are two areas of the Resident record that are used for email features of AlphaEntry™. The primary email
address is to be entered into the field next to the resident’s or company name. This email is used to login to the
AlphaEntry™ Premium area on the AlphaEntry™ website.
The other location for email is under the Notification tab, as shown below, which is used for package arrival and
text messaging functions. Residents email addresses and/or mobile device contact information can be stored in
AlphaEntry™ to enable automatic notifications of package arrivals to email accounts or cell phones capable of
receiving text messages. These Email/Cell Phone addresses can also receive text messages sent from masters with
message sending capabilities.
Addresses listed on the left will be sent notification messages when a package or message has arrived for them.
Addresses listed on the right will be sent notification messages in the event of an emergency related to the tenant.
For multiple emails, please list them on separate lines.
To add a mobile text message address, enter the Mobile Phone number and then select the carrier from the drop
down box. After filling in these two fields, click either the Add to list of Emails or the Add to list of Emergency
Emails button and the correct address will be automatically generated and added to the selected Email list.
A button to create a test send has been added to allow the administrator to confirm notification addresses are
correct and operational. When this button is pressed, the editor will send a test message.
Please note that Internet access is required for these functions.
• Resident Restrictions
Restrictions pertain to the optional QwikBUS™ interface. For more information on this please refer to the STR
Interface section, pertaining to the setup of the S1/S2/Button inputs.
• Door Monitoring
Door monitoring pertains to the optional QwikBUS™ interface. For more information on this please refer to the
STR Interface section, pertaining to the setup of the Door Monitoring Options.
• QwikACCESS™
Door monitoring pertains to the optional QwikBUS™ interface. Controlled access
points can be setup around your building and access can be granted or denied on an
individual-resident basis. Choose between our backlit keypads and/or our proximity
readers that use key fobs, wallet cards and more.
If your AlphaEntry™ system is
equipped
with
QwikACCESS™
access control features enabled,
you can assign a tag (or multiple
tags) to a staff member and
grant/deny their access to your
various access points. In order to
program a new tag press the
“Program New Tag” button and
follow the on-screen instructions.
If AlphaEntry™ MailRoom™ is an installed option, package delivery and resident pick-up times will also be logged
and viewable here.
NOTE: For more information on QwikACCESS™ integration, see the separate QwikACCESS™ installation, use and
programming guide.
• Resident Screen Search Feature
To simplify finding specific residents in a large facility with many
resident listings, AlphaEntry™ includes a Search field, located at the
bottom of the Resident list, which will search for First name, Last
name, Company name, or Suite number.
• Entering Emergency Contacts
This section is used for what is considered Emergency contacts only (i.e.: Police numbers, Fire Department, and
Medical numbers). You may have some emergency numbers for building issues (i.e. Elevator Emergency Repair,
plumber, off-site building management) that you would prefer to enter in here as well.
Select the Emergency tab.
Press the New button near the bottom of the screen.
Enter the name of the contact, phone number, button label, and related comments in the appropriate fields as
shown in the previous section.
When all the information is entered and verified, Press the Add button to save the contact to the database.
•
Entering Off-Premises Contacts
This section is used for Phone numbers at other locations that the concierge would call on a regular basis such as,
Parking Garage, Restaurants, Drug Stores, Cleaners, Florists, etc. By entering these types of numbers here, the
concierge will have quick access to important phone numbers.
Press the New button near the bottom of the screen. Enter the name of the contact, phone number, button label,
and related comments in the appropriate fields as shown in the previous section.
When all the information is entered and verified, Press the Add button to save the contact to the database.
• Entering Staff/Other Contacts
This section is used set up communications with employees or locations in the facility that the concierge would call
on a regular basis such as, Parking Garage, Restaurant, Main Office, Valet, Housekeeping, etc. By entering these
types of contacts here, the concierge will have quick access to important staff and locations.
Press the New button near the bottom of the screen. Enter the name of the contact, contact information, button
label, and related comments in the appropriate fields as shown in the previous section.
If your AlphaEntry™ system is equipped with a paging
transmitter, you can add pager capcode information
under the notification tab. This feature is only available
in the Staff section.
When all the information is entered and verified, Press
the Add button to save the contact to the database.
If the staff location has an IP Camera attached to it (i.e.
for a bluelight location), enter the IP Address for the IP
camera here. NOTE: IP Cameras must be accessible
through a URL and have JPEG output.
•
Editing contacts
To edit a contact of any type, highlight the selected entry from the appropriate list on the left of the Contacts
Editor Screen, and make your changes to the fields as needed. The updated information will be saved to the
database automatically.
•
Deleting contacts
To remove a contact of any type, highlight the selected entry from the appropriate list, and press the “Remove”
button. Enter the Security code to complete the deletion.
• Save Settings
When exiting the Editor program, AlphaEntry™ will ask if you would like to launch the application.
Choosing “Yes” will automatically launch the AlphaEntry™ application.
Choosing “No” will bring you back to Windows.
Chapter 5 - AlphaEntry™ Mailroom™
INTRODUCTION
One of the many headaches of building management is keeping track of incoming deliveries to your residents,
notifying them, and keeping track of which packages have not been picked up yet.
AlphaEntry™ allows your doorman, concierge, or shipment receiver to manage resident packages from their
AlphaEntry™ interface, and maintains a log of when deliveries are received in, as well as when your residents pick
up their packages.
This feature gives your designated employee(s) the ability to display package arrivals to residents through the
entry panels, or at a concierge station depending on the needs of your facility. You can even send emails and/or
text messages automatically to your residents that a package has arrived for them!
AlphaEntry™ MailRoom™ is an add on module designed to seamlessly integrate with
your AlphaEntry™ products to provide display monitors in your mailrooms, common areas, or other
locations to alert the residents that they have packages awaiting pickup. It is fully customizable to suit the
unique requirements and security concerns of your facility.
Starting AlphaEntry™ MailRoom™
To start MailRoom™, Double Click on the AlphaEntry™ MailRoom™ icon on your display.
NOTE: On initial start-up only, you will be asked to
specify where the AlphaEntry™ database is located.
Please fill in the required information on the screen and
press the
button.
Exiting AlphaEntry™ MailRoom™
To exit out of MailRoom™,
Double Click anywhere on
the Dark Gray Header and
the program will close or hit
Esc if you have a keyboard
connected. NOTE: If a
password is required to end
the program, you will be
asked to enter it at this time.
The password will usually be
the same as the AlphaEntry™
Editor pass code.
AlphaEntry™ MailRoom™ Editor Configuration
Main Tab #2 - MailRooms
When AlphaEntry™ MailRoom™ has been installed in your system; additional options will appear in your main
AlphaEntry™ Editor which will enable you to configure your display(s) in each of your mailrooms or common areas.
You can have as many display monitors as you need and each can be configured independently. In multiple
mailroom scenarios, you can select in each resident’s record which mailroom you wish to associate that resident
with. This way, this resident’s package information will be directed only to the display monitor in the mailroom
they would normally use.
In the example to the left,
The MailRooms tab has been
selected and the East
MailRoom
has
been
highlighted.
On this screen you may
enter the Header text you
wish to display at this
location as well as the
information and order you
wish to display for each
package entry.
Select the preferred information you wish to display from the
Display drop down box.
Select the preferred method you wish to sort the information
from the Sort drop down box.
• Package Information Refresh Rate
Dependent on the number of packages
you have in the system, AlphaEntry™
MailRoom™ will determine whether to
display one screen, or a scrolling
screen when it is necessary to display a
large amount of packages. Either way,
you can specify how often the screen
will refresh with updated information.
For a Single page Display: The screen
will refresh every 1-60 seconds
depending on the number you put in
this box. The default is 10 seconds.
For a Multiple Page Display: When
the number of packages exceeds what
will fit on a screen at one time, the
display will scroll from the top of the list to the bottom of the list, wait for a set amount of time, then it will start
the refreshed display from the top again.
Delay before scrolling begins: You may set the delay at the top, which is the time between its first appearing on
the screen until it starts to scroll, from 1 to 60 seconds.
Delay after scrolling stops: You may set the delay at the bottom, which is the time between the end of the list on
the screen is shown until the screen refreshes and starts from the top of the list, from 1 to 60 seconds.
Scroll Speed: Depending on the size of the monitor and the display resolution, you may find that the scroll speed
is too fast or too slow. You may set the speed of the scrolling from 1 to 5 using this field.
• Display Background Settings
The Display Settings tab allows you to set
the background colors for the display. Each
text field can be set separately as well as the
text shadow color.
The Background can be a gradient between
your choices of 2 colors, or you can use an
image of your choice in the background by
selecting the Image radio button.
There are several images stored in the
AlphaEntry / MailRoom Backgrounds folder,
or you can add your own images to this
folder, and display them as a background
also.
• Delivery Types Settings
AlphaEntry™ MailRoom™ comes with default delivery types
installed, which should cover most if not all scenarios however;
you may install your own types and related graphics if needed.
To add a new delivery type, click on
, enter the
new name, and assign a new graphic image to it. You may
choose one of the included graphics or create your own. The
requirements for additional delivery type icons are that they
are PNG files sized 100 pixels wide by 100 pixels high.
If you see default delivery types that you do not see as being
needed you may delete them using the
button, however, it may be a good idea to retain them for
possible future needs.
• MailRoom™ Messages
To add messages to the MailRoom™ display
monitor, click on the
button.
Add the message line to the message text box.
Optionally, add any date range by clicking the
appropriate box specifying when you want the
display to show. You can specify Date range, specific
days of the week, or specific times of the day in
combination.
Select an optional image if needed, and specify the
mailroom(s) you wish this message displayed in.
When you have finished entering the information,
you can exit the screen, or click new message to add the next message.
To Edit the message, highlight it from the list of MailRoom Messages and make the necessary changes below.
When you have finished changing the information, you can exit the screen, or click new message to add the next
message.
To Delete a message, highlight he message and press the
button. Click OK on the confirmation box.
Chapter 6 - Additional Items
AlphaEntry™ Door Monitoring
AlphaEntry™ includes the option to setup "Door Monitoring" with AlphaEntry™ QwikBUS™ FSE1500 or VFSE1500
units. When the system is QwikBUS™ equipped and this feature is enabled, all residents have the option to
arm/disarm door monitoring for added security in their building.
Note: If an apartment elects to use the Door Monitor function, the package notification light will not flash on the
apartment station since its new function will be as a door monitor active indicator. However, all other package
notification methods will still be available.
When the door monitoring is enabled in an apartment, the resident, on entering, will have an editor configurable
time (default is 45 seconds) to enter in their personal code to disarm the monitor. If the proper code is not entered
within this time, the concierge(s) will be notified by a popup emergency call with audio alert identifying the
apartment and tenant information. The concierge can then place a call to the apartment to determine if there is a
problem. You may wish to enter a prearranged “password” in the tenant’s emergency notes (which will show when
the alert pops up) to verify the tenant’s identity when calling up to the apartment.
Door Monitor Setup in Editor
1.
2.
3.
4.
Open the AlphaEntry™ Editor
Click on the STR Translator tab
Click on the Setup S1, S2 and Button Inputs button
Select the S1 or S2 Input tab that you will be using
This is a global setting for all S1 or S2 inputs.
In the Setup tab enter a description for the concierge alert such as “Apartment Door Monitor”.
In the Type of contact closure field select “Door Monitor” from the drop down menu.
If a normally closed type of door switch is used, check the box to the right. If the door switch is a normally open
type, leave the box unchecked.
Recommended settings: Delay before activation: leave blank, Turn on Audio: Yes, Log Input: Yes
In the Display tab select Yes on the Display On-Screen drop down menu, and Emergency notes in the Display
Notes box.
The length of delay before activation is set in the STR tab of the main editor screen and has a default value of 45
seconds.
Tenant Personal Code
To set a tenant personal code, Click the Directory button in the upper left corner of the main Editor Screen. Select
the tenant from the list on the left, and click the “Door Monitor” tab.
Enter a code of 1-8 characters consisting of numbers 1 and 2 (video units can also use 3 and 4). An example might
be “12122” or “222”. Once the code is entered the code is hidden behind 8 asterisks for security reasons. If a
tenant forgets their number, you must reenter a new code here. There is no way to see the code after entry.
Tenant Operation
To activate the door monitoring from the apartment station, hold down the
button for three seconds until the
red light behind the
switch flashes to indicate the system is active. The system is now set. If the tenant is
leaving the apartment, the door must be open and shut within the predetermined delay time.
To deactivate the door monitoring from the apartment station, enter the personal combination code using the
and
buttons (also the
and
buttons with the VFSE1500 video stations) within the predetermined delay
time. If a mistake is made, start your code sequence again and the system will disregard your previous entries.
Concierge enabling an apartment’s monitoring
If a tenant comes down and has forgotten to activate their door monitor, the concierge can activate it from his
console. To enable this ability select the Options tab for the concierge station and check the box for “Apartment
Door Monitoring can be enabled from this Entry”
Select the tenant from the main directory screen, when the call box appears there will be a key icon in the upper
right side. A gray key indicates the system is not active and a gold key indicates it is active. Clicking on the key icon
will turn it gold, indicating that the monitor is now active. The concierge cannot disarm the monitor remotely but
he does have the ability to temporarily shunt it for a length of time.
Concierge shunting an apartment’s monitoring
If work needs to be done in a tenant’s apartment or if emergency access is needed, the concierge will be able to
shunt the door monitoring for a selected length of time.
NOT ACTIVE
ACTIVE
SHUNTED
Select the tenant from the main directory screen, when the call box appears there will be a key icon in the upper
right side. A gray key indicates the system is not active and a gold key indicates it is active. If the key is gold,
indicating that the system is currently active, clicking on the key icon will cause a drop down box to appear to
select the length of time you wish to shunt the apartment. The concierge must enter his password for this
function which is recorded in the system log for security purposes. When the apartment is shunted the key will
turn red. The system will automatically restore to active status when the time is up. The concierge can restore
active status earlier by clicking on the key icon and clicking yes on the pop up “cancel shunt?” box. The key will
then change to gold indicating active status.
Premium option for residents
With the optional Resident Package, tenants can change their personal
code online through their AlphaEntry™ web portal. For more
information on AlphaEntry™ Premium Features, please visit
http://www.alphaentry.com
AlphaNotify™ Mass SMS Notification Service Integration
AlphaEntry™ includes the option to integrate with your AlphaNotify™
account. AlphaNotify™ is a mass SMS notification service that allows
administrators to mass-send SMS message to a list (or multiple lists)
of subscribers. AlphaEntry™ allows you to enter your AlphaNotify™
login credentials to link your account to AlphaEntry™. Now, when
you log into your AlphaNotify™ account as normal, you will see your AlphaEntry™ buildings as lists you can send to.
AlphaNotify™ / AlphaEntry™ Setup
1.
2.
3.
4.
5.
6.
If you don’t already have an AlphaNotify™ account, sign up for one at: http://www.alphanotify.com/.
Open the AlphaEntry™ Editor
Click on the AlphaNotify™ Tab
Enter your AlphaNotify™ login credentials
Click “Link”
a. In the future, to break the link between AlphaEntry™ and AlphaNotify™, simply click “Unlink”
You will see the newly created list(s) in your AlphaNotify™ Lists section.
Apple iOS & Google Android Mobile Apps
The AlphaEntry™ mobile apps give your residents the ability to receive visitor calls via IP Audio and to receive a live
IP Video stream of the caller. The functionality requires an IP camera and Internet access at the call station, and for
the building be subscribed to the Resident Package. Please visit http://www.alphaentry.com/ for more
information.
AlphaEntry™ Mobile App Setup
1.
2.
3.
4.
5.
Visitor our Download Page, download and install the correct version of the AlphaEntry™ App for your
mobile phone (http://www.alphaentry.com/downloads). Alternatively, you can search for “AlphaEntry” in
your phone’s app store.
the AlphaEntry™ App
Log in using your email address and assigned password. If you do not have a password, contact your
building administration.
Once logged in, you will receive phone notifications when a call is placed to you.
There is no charge for the iOS or Android version of the apps, but use requires a subscription to the
Resident Package.
Chapter 7 - AlphaEntry™ Wiring Diagrams
Wiring of AlphaEntry™ systems vary depending on application so these wiring diagram examples have been
included to insure proper connections and ease of installation. Once the determination has been made on
specific facility requirements, please refer to the appropriate diagram(s) in this section.
Please remember that facilities using multiple entrances/masters may likely require several different wiring
configurations depending on the functions and capabilities required at each entrance/master.
PAGE
Handset
Lobby Panel
Open Voice
Concierge
Handset
Open Voice
QwikBUS™
Diagrams
Open Voice
Standard Dialer
79
Standard Dialer w/ N.P.S.
80
No Phone Bill
81
No Phone Bill w/ Outside Dialing
79
Standard Dialer
83
Standard Dialer w/ N.P.S.
84
No Phone Bill
85
No Phone Bill w/ Outside Dialing
Standard Dialer – Unrestricted Outside Dialing.
86
87
Standard Dialer – Limited Outside Dialing
87
Standard Dialer w/ N.P.S.
87
No Phone Bill - Unrestricted Outside Dialing
88
No Phone Bill - Limited Outside Dialing
Information on Open Voice Configurations
Basic AlphaEntry™ QwikBUS™ Wiring
AlphaEntry™ QwikBUS™ VIDEO Wiring
QwikBUS™ Typical Apartment Wiring
88
88
89
89
91
N.P.S. = No Phone Service (Dummy Phone Options)
Lobby Panel w/Handset - Std. Dialer
When installing a handset for use with an AlphaEntry™ lobby panel use this wiring guide to properly attach the
handset and control unit to the RY008AE Board.
Lobby Panel w/Handset - Std. Dialer + N.P.S.* Option
When installing a handset on an AlphaEntry™ lobby panel or concierge system, use this wiring guide to properly
attach the handset and control unit to the RY008AE Board.
Additional RY008AE boards are added as needed for No Phone Service residents. One board controls eight Dummy
Phones. Spare relays on the first board can be used as well to control dummy phones if they are not needed for
other controls/functions.
DPH100W
DPH100W
DPH100W
* No Phone Service
Lobby Panel w/Handset – No Phone Bill
When installing a handset for use with an AlphaEntry™ lobby panel use this wiring guide to properly attach the
handset and control unit to the RY008AE Board.
Lobby Panel w/Handset –No Phone Bill w/Outside Dialing
When installing a handset for use with an AlphaEntry™ lobby panel, use this wiring guide to properly attach the
handset and control unit to the RY008AE Board.
Lobby Panel w/Open Voice - Std. Dialer
When installing an AEDSMP open voice module on an AlphaEntry™ lobby panel, use this wiring guide to properly
attach the module to the RY008AE Board and the VVDTMF/VV100D decoder. Note that the incoming dedicated
telephone line connects to both the computer modem Line IN and the AEDSMP module.
Lobby Panel w/Open Voice - Std. Dialer w/ N.P.S.* Option
This wiring diagram shows the proper hookup when connecting No Phone Service dummy phones to AlphaEntry™.
There may be 2 to 4 relays available for dummy phones on the existing RY008A (Board #1). Each dummy phone
requires one relay. Up to 15 additional RY008A boards can be chained on the same serial/power cable.
(15 x 8 = 120 maximum + available relays on Board #1)
DPH100W
DPH100W
DPH100W
* N.P.S. = No Phone Service
Lobby Panel w/Open Voice – No Phone Bill
When installing an AEDSMP open voice module on an AlphaEntry™ lobby panel, use this wiring guide to properly
attach the module to the RY008AE Board and the VVDTMF/VV100D decoder.
Note that the incoming No Phone Bill equipment telephone line connects to the computer’s modem Line IN as well
as the AEDSMP tip and ring connections.
Lobby Open Voice - No Phone Bill w/ Outside Dialing
This wiring diagram shows the proper hookup when connecting AlphaEntry™ to an in building No Phone Bill
system. In this configuration, calls can be made through either No Phone Bill equipment or a dedicated telephone
company line. The programming of the system restricts outgoing calls.
Concierge Handset Installations
STANDARD DIALER – Unrestricted Outside Dialing
If AlphaEntry™ will be used by a concierge, the Standard Dialer configuration allows the concierge outside phone
call capabilities as well as calls placed through AlphaEntry™ by simply dialing from the attached telephone. The
RY008AE Relay Board may not be required for this application unless door release or switch console options will be
used.
Calls placed to the concierge on this phone line will show up on the AlphaEntry™ display as incoming calls. If the
C.O. line has optional Caller ID capabilities then QwikID™ will display the incoming phone number. If the calling
phone is contained in the AlphaEntry™ database, the Name and Suite number provided in the contact's record
would be displayed only. For more information on QwikID™ refer to Page 7.
STANDARD DIALER – Limited Outside Dialing
If the concierge is not to be allowed outside dialing except for phone numbers listed in the AlphaEntry™ database,
please contact Alpha Communications, 1-800-666-4800, to discuss the options that would be best suited to your
application.
STANDARD DIALER CONFIGURATION w/ N.P.S.
If the concierge is not to be allowed outside dialing except for phone numbers listed in the AlphaEntry™ database,
then the Lobby Panel w/Handset - Std. Dialer w/ N.P.S. method on Page 59 is recommended. This will allow
communication with all contacts listed in AlphaEntry™ including dummy phones for residents with No Phone
Service.
A conventional Phone may be used instead of the Alpha handset but will still be controlled (to prevent
unauthorized dialing) by AlphaEntry™ if connected to the wires going to the TW200BKAE2 handset from relays 1 &
2.
If the concierge requires unrestricted outside dialing then connect the conventional phone to the Phone OUT jack
of the modem. This would also allow incoming calls to the concierge (ring down).
Please note that the RY008AE Relay Board would be required for this application.
NPB CONFIGURATION – Unlimited Outside Dialing
If the concierge is allowed to dial out to any number as well as phone numbers listed in the AlphaEntry™ database,
then the Lobby Panel w/Handset – No Phone Bill w/ Outside Dialing Capability method on Page 61 is
recommended.
Modifications to this wiring for concierge use would be to disregard wiring to relays 1 and 2 and connect the
concierge full feature telephone to the Phone OUT jack of the modem. This would allow regular use of the C.O.
Line without intervention from AlphaEntry™ unless a No Phone Bill call is made at which point AlphaEntry™ would
take command of the phone. Ring down to the concierge would be available by the residents regular telephone
dialing to the concierge’s telephone number. A dedicated C.O. Phone line is required for this configuration.
The RY008AE Relay Board (with related components) is required for this application
NPB CONFIGURATION – Regulated Outside Dialing
If the concierge is not to be allowed outside dialing except for phone numbers listed in the AlphaEntry™ database,
then the Lobby Panel w/Handset – No Phone Bill w/ Outside Dialing Capability method on Page 61 is
recommended. A dedicated C.O. Phone line is required for this configuration.
If ring down to the concierge is needed, then a separate phone without dialing capabilities would be hooked to the
incoming C.O. Lines before the RY008AE board.
The RY008AE Relay Board (with related components) is required for this application.
Concierge Stations - Open Voice Configurations
In the event of a Doorman or Concierge station that requires Open Voice configuration, please refer to the
wiring diagrams for Lobby Panels in the desired format. All Concierge functions can be easily configured into the
station by the software. Although outside dialing through AlphaEntry™ is easily accomplished, unrestricted outside
dialing would only be available through a standard telephone connected into the system and controlled through
the Switch Console.
Basic AlphaEntry™ QwikBUS™ Wiring Diagram
AlphaEntry™ QwikBUS™ VIDEO Wiring Diagram
Typical Apartment Wiring For Devices through ECD2
In this example, the S1 has been
globally set for latching contacts and
the S2 has been globally set for
momentary contacts.
Devices can be:
Pull Cords
Push Buttons
Motion Sensors
Light Sensors
Wireless Pendant Receivers
Door or Window Contacts
Smoke Detectors*
Limit Switches
Isolation Relays
FSE1500
All devices must be dry contact
devices. Voltage producing signals
can be used with a suitable isolation
l
* The QwikBUS™ system used with smoke and/or heat detectors in not an approved fire alarm system. It is only
intended as a secondary notification device.
This diagram illustrates using a
Double Pole Single Throw Emergency
Switch (SF119/2A) to close the S1
contact on one side to send the
emergency call, and also closes the
connection between a dome light
(LI381) and its 24-volt DC power
source to turn on the light.
FSE1500
DC power for auxiliary devices such as dome lights is recommended to minimize the risk of electrical magnetic
interference with the QwikBUS™ system.
FSE1500
This is an illustration of wiring a two-bulb Dome Light (LI382) to differentiate between an S1 device being actuated
(lighting the white bulb in this example), and an S2 device being actuated (lighting the red bulb). One side of the
double pole switch closes the connection between the S1or S2 input, and the other side completes the circuit to
the respective bulb.
Other wiring methods can allow you to operate multi-color dome lights denoting specific devices or locations
regardless of them triggering the S1 or the S2 alarm. Please note that when using a device to illuminate a dome
light, the devices must be latching. A momentary device will only illuminate the light for the time of the switch
closure unless additional electronics are included to “latch” the momentary closure.
AlphaEntry™ QwikAccess™ Wiring Diagram
Chapter 8 - Appendices
Appendix A - Creating Your Own Custom Graphics
AlphaEntry™ allows you to add your own graphics as a background for your Welcome Screen.
Whether you want pictures of your building, a neighborhood map, a text message announcing an event, rental
information telephone numbers, advertising, or other ideas you may have, this can be done quite easily following
these guidelines.
A picture size of 1024 by 768 pixels or 800 by 600 pixels will fill the screen nicely and is the best
size for the display. AlphaEntry™ features automatic scaling of pictures for both 4:3 standard
and 16:9 wide screen format monitors making slideshow designing and maintenance even
simpler. If the size you have chosen is not these exact dimensions, the image will be
automatically adjusted for best fit to your screen resolution.
When your pictures have been properly formatted, save them to the SlideShowPics Folder.
The graphics file default location is C:\Program Files\AlphaEntry\SlideShowPics.
If your “Welcome Screen is a slide show” box is checked, all the images in that folder will rotate in alphabetical
order. If it is not checked only the picture that is first in the folder alphabetically will be displayed.
You may wish to move images that you do not want to show into a new folder such as:
Files\AlphaEntry\SavedPics
C:\Program
Image files with .bmp, .jpg, or .gif extensions can be used.
Use these same rules to create your scheduled welcome screens for holidays, events, or announcements and then
save them to C:\Program Files\AlphaEntry\SchedulePics.
When scheduled screens are used it will automatically suspend the slideshow during the date range associated
with the scheduled screen.
Appendix B - The Event Log Viewer
Any activity on AlphaEntry™ creates a date/time stamp and stores it in the system event log. The contact and
event information is also saved at this time as you can see in the screenshot below. If a camera is connected to an
entry it will also save a still frame taken during any visitor initiated session or resident entry access attempt.
If AlphaEntry™ MailRoom™ is an installed option, package delivery and resident pick-up times will also be logged
and viewable here.
The Event Log Viewer is a separate software application that can be installed in any computer that has the ability
to access the server, to enable authorized persons to view the calls placed at all entries. If an entry is equipped
with a connected camera, still shots of all visitors will also be included.
The Event Log Viewer software does not require a Dongle for operation, which would enable a security guards PC
to monitor real time, or review previous, entry activities. When an event is highlighted in red it indicates a failed
access attempt. If an event with a still picture is selected, the picture will display to the right of the log viewer in a
larger format. Events are displayed in time order and filtered by date. The count indicator displays the amount of
events recorded on the particular date that has been selected in the drop-down calendar select box.
Appendix C – Speaker / Microphone Module Adjustments
AEMDFB (Open Voice) / TW200BKAE (Handset)
There is a gain control on the back of this unit in the bottom left corner
that can be adjusted with a small screwdriver.
Back View
If the volume is too low turn the screw clockwise, if
the volume is too high or if you hear a pulsing volume
level turn the screw counterclockwise until the
pulsing stops.
The pulsing is caused by the switching of the VOX
electronics between speaking and listening and when
the gain is set too high, the mic will hear the speaker
and cut back and then not hear the speaker and raise
the level causing the pulsing. Because the acoustic
and ambient noise of each installation is different this “threshold level” will usually need to be adjusted for optimal
operation.
AEDSMP Style
The AEDSMP is used as an Open Voice Speaker/ Mic assembly
and has two user adjustable controls.
The first, marked “M” is used to increase microphone sensitivity.
In a loud environment, turning this counterclockwise will help to
minimize background noise and make speech clearer. In quieter
surroundings, turning it clockwise will increase mic volume level.
Back View
The second, marked S will increase the lobby speaker volume by
turning the adjustment clockwise.
Both of these adjustments are very sensitive and should be adjusted only if needed in different environments.
Appendix D - Access the AlphaEntry™ Database Remotely
If the computer that contains your AlphaEntry™ database has Internet access, you can allow your database to be
accessed remotely. This is useful for updating the AlphaEntry™ database with new resident information, for
allowing multiple entries to connect to a database from outside of your local network, or for viewing the logs from
a remote location.
To setup your network so you can access your SQL Server database from the Internet through you need to have
the following:
A network that has a public IP address that you can use on the Internet
Access to go into your firewall/router settings
Whenever you try to connect to your AlphaEntry™ database from any location on the Internet you will need to
enter your public IP address in the database login screen. If you do not know what your public IP address is just go
to the computer that you have your database on and open up the following URL: http://www.alphamedia.net/cgibin2/ip.exe
NOTE: There is a difference between the IP address that you use to connect to your database on your local
network and the public IP address that you need to use on the Internet. If you try to login to your database from
the Internet (outside of your local network) with the IP address you use on your local network, it will not work.
Once you know what your public IP address is, you will then need to go into your firewall/router that you have
your database behind and setup port forwarding. Basically what needs to be done is any traffic that comes into
your firewall/router on port 1433 (the default port number used by the SQL Server) needs to be forwarded to the
local IP that you have your SQL Server database running on. For example, if the local IP address of your database is
"192.168.1.100", then in your firewall/router settings you will need to specify that any incoming traffic on port
1433 be forwarded to "192.168.1.100".
IMPORTANT: The machine that the SQL Server database is located on may also have its own personal firewall
software on it for more security in addition to your hardware firewall. Please see Appendix F – Windows Firewall
Exceptions.
Appendix E - Using AlphaEntry™ through a PBX system
If you are dialing through a PBX and need to dial a “9” before getting an outside line, you will need to make the
following modifications in the AlphaEntry™ Editor.
1.
2.
3.
4.
Select the Entry you wish to edit
Click on the Communication tab
Click on the Dialing button
Enter “9” in the Dial prefix before any numbers textbox
Appendix F - Windows Firewall Exceptions
All versions of Microsoft Windows since XP (Service Pack 2) have a software firewall built into the operating
system. Also, many different types of anti-virus packages have a software firewall in them that block any outside
access to the computer.
To properly setup AlphaEntry™ you may need to configure the personal firewall software on a machine to allow
network traffic for AlphaEntry™ to enter that machine. Normally these settings are listed in an area called
“Exceptions” in the personal firewall.
If you are using multiple entries that share one database, or you need to remotely use the Editor or Log Viewer
software, you will need to setup two exceptions for AlphaEntry™, one for the SQL Server database file
“sqlservr.exe”, and a second for the AlphaEntry™ Hub Software (aehub.exe).
To setup these exceptions in the Windows Firewall please do the following:
1.
2.
3.
4.
5.
6.
7.
8.
9.
10.
11.
12.
13.
14.
15.
Go to the machine that you have your database installed on.
Go into the Windows Control Panel.
Double-Click on Windows Firewall.
Click on the Exceptions tab.
Click on the Add Program... button.
Click on the Browse... button.
Browse to the folder that AlphaEntry is installed in
a. Usually c:\Program Files\AlphaEntry\.
Select the aehub.exe file and click Open.
Click OK in the Add a Program window.
Click on the Add Program... button again.
Click on the Browse... button.
Browse to the folder that the Microsoft SQL Server software is installed in
a. Usually C:\Program Files\Microsoft SQL Server\MSSQL.1\MSSQL\Bin\
Select the sqlservr.exe file and click Open.
Click OK in the Add a Program window.
Click OK in the Windows Firewall window.
For specific instructions on how to set up exceptions in other types of software firewalls please see their
instruction manual for details.