1
Connect2Doorman™
Installation & Configuration Manual
http://www.Connect2Doorman.com
Alpha Communications® and Alpha Media®, Inc.
http://www.AlphaCommunications.com
http://www.AlphaMedia.com
42 Central Drive
Farmingdale, NY 11735-1202
Phone: 631-777-5500 Fax: 631-777-5599
Copyright© 2011
Alpha Communications® All Rights Reserved
AWD153 (06/2011)
License Agreement
ALPHA MEDIA, INC. Connect2Dorman™, ALL VERSIONS, AND SOFTWARE RELATED COMPONENTS. END-USER LICENSE AGREEMENT FOR ALPHA MEDIA, INC.
SOFTWARE
IMPORTANT-READ CAREFULLY: This Alpha Media, Inc. End-User License Agreement ("EULA") is a legal agreement between you (either an individual or a single
entity) and Alpha Media, Inc. Corporation for the Alpha Media, Inc. software product(s) identified above which may include associated software components,
media, printed materials, and "online" or electronic documentation ("SOFTWARE PRODUCT"). By installing, copying, or otherwise using the SOFTWARE PRODUCT,
you agree to be bound by the terms of this EULA. If you do not agree to the terms of this EULA, do not install or use the SOFTWARE PRODUCT.
The SOFTWARE PRODUCT is protected by copyright laws and international copyright treaties, as well as other intellectual property laws and treaties. The
SOFTWARE PRODUCT is licensed, not sold.
1. GRANT OF LICENSE. The SOFTWARE PRODUCT is licensed as follows:"
* Installation and Use. Alpha Media, Inc. grants you the right to install and use copies of the SOFTWARE PRODUCT on your computers running validly licensed
copies of the operating system for which the SOFTWARE PRODUCT was designed [e.g., Windows XP®; Windows Vista®; Windows 7®].”
* Backup Copies. You may also make copies of the SOFTWARE PRODUCT as may be necessary for backup and archival purposes.
* Components. Certain software components of the SOFTWARE PRODUCT are subject to the following additional provisions:
2. DESCRIPTION OF OTHER RIGHTS AND LIMITATIONS.
* Maintenance of Copyright Notices. You must not remove or alter any copyright notices on all copies of the SOFTWARE PRODUCT.
* Distribution. You may not distribute copies of the SOFTWARE PRODUCT to third parties.
* Prohibition on Reverse Engineering, Decompilation, and Disassembly. You may not reverse engineer, decompile, or disassemble the SOFTWARE PRODUCT,
except and only to the extent that applicable law notwithstanding this limitation expressly permits such activity.
* Rental. You may not rent, lease, or lend the SOFTWARE PRODUCT.
* Transfer. You may permanently transfer all of your rights under this EULA, provided the recipient agrees to the terms of this EULA.
* Support Services. Alpha Media, Inc. may provide you with support services related to the SOFTWARE PRODUCT ("Support Services"). Use of Support Services is
governed by the Alpha Media, Inc. policies and programs described in the user manual, in "on line" documentation and/or other Alpha Media, Inc.-provided
materials. Any supplemental software code provided to you as part of the Support Services shall be considered part of the SOFTWARE PRODUCT and subject to the
terms and conditions of this EULA. With respect to technical information you provide to Alpha Media, Inc. as part of the Support Services, Alpha Media, Inc. may
use such information for its business purposes, including for product support and development. Alpha Media, Inc. will not utilize such technical information in a
form that personally identifies you, without your permission.
* Compliance with Applicable Laws. You must comply with all applicable laws regarding use of the SOFTWARE PRODUCT.
3. TERMINATION. Without prejudice to any other rights, Alpha Media, Inc. may terminate this EULA if you fail to comply with the terms and conditions of this
EULA. In such event, you must destroy all copies of the SOFTWARE PRODUCT.
4. COPYRIGHT. All title, including but not limited to copyrights, in and to the SOFTWARE PRODUCT and any copies thereof are owned by Alpha Media, Inc. or its
suppliers. All title and intellectual property rights in and to the content which may be accessed through use of the SOFTWARE PRODUCT is the property of the
respective content owner and may be protected by applicable copyright or other intellectual property laws and treaties. This EULA grants you no rights to use such
content. All rights not expressly granted are reserved by Alpha Media, Inc.
5. U.S. GOVERNMENT RESTRICTED RIGHTS. The SOFTWARE PRODUCT is provided with RESTRICTED RIGHTS. Use, duplication, or disclosure by the Government is
subject to restrictions as set forth in subparagraph (c)(1)(ii) of the Rights in Technical Data and Computer Software clause at DFARS 252.227-7013 or subparagraphs
(c)(1) and (2) of the Commercial Computer Software Restricted Rights at 48 CFR 52.227-19, as applicable. Manufacturer is Alpha Media, Inc. 42 Central Drive,
Farmingdale, NY 11735-1202.
6. EXPORT RESTRICTIONS. You agree that you will not export or re-export the SOFTWARE PRODUCT to any country, person, entity or end user subject to U.S.A.
export restrictions. Restricted countries currently include, but are not necessarily limited to Cuba, Iran, Iraq, Libya, North Korea, Sudan, and Syria. You warrant and
represent that neither the U.S.A. Bureau of Export Administration nor any other federal agency has suspended, revoked or denied your export privileges.
7. NO WARRANTIES. Alpha Media, Inc. expressly disclaims any warranty for the SOFTWARE PRODUCT. THE SOFTWARE PRODUCT AND ANY RELATED
DOCUMENTATION IS PROVIDED "AS IS "WITHOUT WARRANTY OF ANY KIND, EITHER EXPRESS OR IMPLIED, INCLUDING, WITHOUT LIMITATION, THE IMPLIED
WARRANTIES OR MERCHANTABILITY, FITNESS FOR A PARTICULAR PURPOSE, OR NONINFRINGEMENT. THE ENTIRE RISK ARISING OUT OF USE OR PERFORMANCE
OF THE SOFTWARE PRODUCT REMAINS WITH YOU. THIS SOFTWARE IS DISTRIBUTED ON A FREE 90-DAY TRIAL BASIS. IT IS THE CUSTOMER'S RESPONSIBILITY TO
FULLY USE AND TEST THIS SOFTWARE, BEFORE PURCHASING, TO DETERMINE IF THE SOFTWARE MEETS THE CUSTOMER'S NEEDS, AND PERFORMS TO THE
CUSTOMERS 100% SATISFACTION. IF IN ANY WAY THE SOFTWARE IS UNSATISFACTORY OR IS NON-FUNCTIONING, THE CUSTOMER SHALL NOT REGISTER OR PAY
FOR THE SOFTWARE. ONCE THE CUSTOMER REGISTERS OR PAYS FOR THE SOFTWARE, THE CUSTOMER HAS ACCEPTED THE SOFTWARE 'AS-IS' AND WILL NOT BE
ENTITLED TO ANY REFUND OR COMPENSATION OF ANY KIND.
8. LIMITATION OF LIABILITY. To the maximum extent permitted by applicable law, in no event shall Alpha Media, Inc. or its suppliers be liable for any special,
incidental, indirect, or consequential damages whatsoever (including, without limitation, damages for loss of business profits, business interruption, loss of
business information, or any other pecuniary loss) arising out of the use of or inability to use the SOFTWARE PRODUCT or the provision of or failure to provide
Support Services, even if Alpha Media, Inc. has been advised of the possibility of such damages. In any case, Alpha Media, Inc.'s entire liability under any provision
of this EULA shall be limited to the replacement of any registered software that has been determined by Alpha Media Inc. to be defective. Because some states and
jurisdictions do not allow the exclusion or limitation of liability, the above limitation may not apply to you.
9. MISCELLANEOUS. - This EULA is governed by the laws of the State of New York, U.S.A. Should you have any questions concerning this EULA, or if you desire to
contact Alpha Media, Inc. for any reason, please contact the Alpha Media, Inc. subsidiary serving your country, or write: Alpha Media, Inc., 42 Central Drive,
Farmingdale, NY 11735-1202. You may contact us by phone at 631-777-5500 or fax at 631-777-5599 or by email at [email protected]
2
Table of Contents
Chapter 1 - Introduction.........................................................................................................4
How Connect2Doorman™ Works ................................................................................................... 4
Requirements ................................................................................................................................. 6
Building Hardware Installation ....................................................................................................... 7
Building Network Setup .................................................................................................................. 8
Call Center Operator Software Installation .................................................................................... 8
Chapter 2 - Operator Software .............................................................................................11
Login ............................................................................................................................................. 11
Automatic Updates....................................................................................................................... 12
System Tray Icon........................................................................................................................... 12
Call Request .................................................................................................................................. 13
Control Buttons ............................................................................................................................ 15
Operator Script ............................................................................................................................. 16
Switching Call to Other Locations................................................................................................. 16
Resident Information.................................................................................................................... 16
Resident Calling ............................................................................................................................ 17
Resident Package Receiving.......................................................................................................... 18
Resident Notes ............................................................................................................................. 18
Approved Visitors ......................................................................................................................... 18
Multiple Call Tabs ......................................................................................................................... 18
Audio Settings............................................................................................................................... 19
Operator to Operator Calling........................................................................................................ 20
QwikCams ..................................................................................................................................... 21
Chapter 3 - Settings..............................................................................................................23
Operator Settings ......................................................................................................................... 23
Change Operator Password .......................................................................................................... 23
Admin Settings.............................................................................................................................. 24
Chapter 4 - Appendices ........................................................................................................26
Appendix A - Port Forwarding for Video IP box............................................................................ 26
3
Chapter 1 - Introduction
Connect2Doorman™ is a remote doorman service that allows residents of a nondoorman building to receive deliveries while they are not home, be alerted of guests
they missed, and have all their visitors professionally greeted by trained individuals in a
call center.
This manual can be used by a number of different types of individuals (Installers, Call
Center Managers, Operators, IT and networking people). The following chapters will
explain to an installer how to setup the building entry hardware needed to use
Connect2Doorman™. It will explain the required networking setup and how to install
and configure the Connect2Doorman™ software on computers in a call center. It will
also explain how to use the Connect2Doorman™ software. This applies to a manager
teaching an operator how to use the software, or if an operator themselves wants to
learn how to do something in Connect2Doorman™.
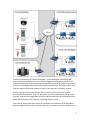
How Connect2Doorman™ Works
Connect2Doorman™ uses hardware located at a building entry to provide both live
audio over VoIP and video communication. The hardware at the building must be
connected to a fulltime internet connection. The internet connection provides the
ability for the remote call center to speak with building visitors and watch cameras at a
building for both security and visitor verification. All the communication at the call
center is provided through the Connect2Doorman™ software. There is no software that
needs to be installed at the building or its entries. Also, there is no hardware that needs
to be installed at the call center. All you need is a USB headset and the call center
operators will be able can control everything in Connect2Doorman™ directly from their
Windows™ based computers.
4
The basic functionality of Connect2Doorman™ is activated when a building visitor
presses a button located at the entry. That will trigger the software to pop-up a call
request video display on any operators connected to that building. The first operator to
accept the call request will then have full audio communication with that location and
that call request will be cleared from the rest of the operator's computer screens.
Once an operator has communication with a visitor they can see all the cameras
connected at that location. They can speak with any other audio devices setup at that
location. They can also trigger door releases to allow visitors into the building and into
other specific locations (for example, a package delivery room).
There are no phone lines that need to be installed at any locations. All of the audio is
done through VoIP (Voice over Internet Protocol). An operator can even call directly to a
5
resident's phone through the Connect2Doorman™ software on the same VoIP
connection. All of this audio and video communication is controlled and maintained by
the Connect2Doorman™ central servers. Since everything is done over the internet, an
operator does not have to be physically located in a call center. The operators can work
from anywhere they have a good internet connection.
The following chapters will go into detail about all of these features and options in
Connect2Doorman™.
Requirements
Requirements needed to use Connect2Doorman™ other then the software and
hardware that will be provided to you by Alpha Communications®.
At Call Center:
• A fulltime internet connection with at least a T1, Ethernet, or cable line with
upload and download speeds of 1.5Mbps or better.
• Operators must have a Windows™ compatible PC.
• Operating system must be Windows™ XP, Vista or Windows™ 7.
• The operator's computer must have a USB headset connected to it for audio
communication (available from Alpha Communications®).
• Microsoft Windows™ .Net Framework v3.5 or later. This is a free installation and
if it is not already installed on the PC it can either be downloaded from the
Microsoft website or the Connect2Doorman™ website.
At Building:
• A fulltime internet connection with at least a T1, Ethernet, or cable line with
upload and download speeds of 1.5Mbps or better.
• Networking equipment to provide the internet connection to any locations you
would like to have audio and/or video.
• Additional security cameras and proper wiring that may be used with
Connect2Doorman™.
6
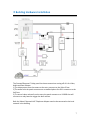
Building Hardware Installation
The Connect2Doorman™ lobby panel has three connections coming off of it for Video,
Audio and Door Release.
1) The video output from the camera at the entry connects to the Video IP box.
2) The audio from the panel connects over a standard phone line RJ11 connector to the
VoIP box.
3) To control a door release from the entry the panel connects to a VV100D that will
connect to a relay board to trigger the door release.
Both the Video IP box and VoIP Telephone Adapter need to be connected to the local
network in the building.
7
Any number of entries needed can be setup this way on the same local network. Plus, if
you would like, a location can just have audio or video. For example, you may have
some security cameras throughout the building that you would like to use with
Connect2Doorman™. Each camera would have its own Video IP box.
Building Network Setup
The entries can all share the same internet connection or if needed you can use
different internet connections for separate entries if they are a long distance from each
other. It does not make a difference, just as long as each entry is connected to the
internet somehow.
Both the Video IP box and VoIP box use DHCP to receive their local IP Addresses from
the router setup on the local network. This is the default configuration for these devices
but they can be configured to use static IP addresses on the local network if needed.
The VoIP boxes will be preconfigured for you to connect to the Connect2Doorman™
servers as soon as both power and an internet connection are applied to them. For the
Video IP box you will need to setup port forwarding in the router connection to make
them accessible from the internet to use with Connect2Doorman™. Each Video IP box
will have its own specific port number pre configured on it. In your router setting and
the port forwarding/firewall settings you will need to specify the local IP address and
port number for each Video IP box. Please see Appendix A for further details on port
forwarding.
Call Center Operator Software Installation
On each Windows™ based PC that you would like to setup to be able to accept calls with
Connect2Doorman™ you will need to run a simple software installation. The installation
file will be provided to you by Alpha Communications® or you can download it at
anytime from the Connect2Doorman™ website at
http://www.Connect2Doorman™.com.
NOTE: Connect2Doorman™ is a 32bit application but will run perfectly normal on any
Windows™ based 64bit machines.
Once the installation file is Run you will see an installation wizard screen open up to
guide you through the installation process. Click Next to Continue.
8
Please read and then click to agree to the License Agreement and then Click Next.
The folder that the Connect2Doorman™ software will be installed in will be shown. This
does not need to be changed unless you would like it in a different location. If you have
multiple Windows™ logins on this machine and you would like for all the users to have
access to Connect2Doorman™ select the "Everyone" option. Then click Next.
Click Next to begin installing the files needed for Connect2Doorman™.
9
Once the installation is complete you can click to Close the installation wizard.
You will now see a Connect2Doorman™ icon on your desktop. You can double click on
that icon to startup Connect2Doorman™.
10
Chapter 2 - Operator Software
Login
The first time you startup Connect2Doorman™ you will see the login screen.
In the login screen enter in the Operator Name and Password that has been provided to
you either by your installer or Alpha Communications®.
You will be give the following three options:
1) Save Password - allows you to quickly login without typing your password again next
time. This is only recommended for an environment where security is not an issue.
2) Auto Log In when Connect2Doorman™ starts - when this option is checked the next
time you startup Connect2Doorman™ you will not see this login screen. It will
automatically log you in.
11
3) Start Connect2Doorman™ when computer starts - this option will always start up
Connect2Doorman™ as soon as you login to Windows™.
Then click the "Log In" button to start using Connect2Doorman™.
Automatic Updates
When Connect2Doorman™ is started it will check to see if a new version of the
Connect2Doorman™ software is available for download. This checking will also be
periodically done while the software is running for an extended period of time.
If a new version is available you will be prompted with a box asking if you would like to
upgrade. Just click 'Yes' to complete the upgrade and Connect2Doorman™ will be
restarted with the newest version.
System Tray Icon
Once you are logged into Connect2Doorman™ you will see a small blue
Connect2Doorman™ icon running in the Windows™ System Tray (near to the Windows™
Clock). Whenever Connect2Doorman™ is running you will see this icon displayed.
NOTE: if this icon ever turns Yellow, it means that you currently are not connected to
the Connect2Doorman™ service either because you have lost internet service or there is
another connection issue. When the icon is yellow it will periodically try to reconnect to
the Connect2Doorman™ service in the background. Once the connection is
reestablished the icon will turn blue again and you will be able to fully use the software
again.
12
If you click the right-mouse button on the Connect2Doorman™ icon you will see a menu
that shows all of your current options. If you left click on the Connect2Doorman™ icon it
will open up the QwikCams screen.
The menu items are as follows:
• QwikCams - provides a simple view of multiple cameras at once.
• Operators - list your other operator's online status and allows you to call them.
• Settings - login settings and change your password.
• Admin Settings - configuration of all settings in your Connect2Doorman™
account.
• Help - online help with your Connect2Doorman™ questions.
• About Connect2Doorman™ - gives current version that you have running.
• Log In as another Operator - lets you switch the current login to connect with a
different Operator Name.
• Close Connect2Doorman™ - shuts down the Connect2Doorman™ software on
your computer.
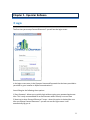
Call Request
A Call Request can be made from any location that has the Connect2Doorman™ audio
hardware setup. When the visitor presses the call button from an entry, the Call Request
is activated and the visitor will hear a welcome message.
13
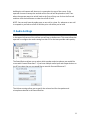
The Call Request will be displayed at any operator screens that are currently running the
Connect2Doorman™ software for that location. When an operator receives a Call
Request they will have a window that pops up on their screen that looks like the above
image. It will show the live video from the location if they have a camera setup there. At
this point they have two options. They can click "Yes, Accept Call" or No (or close the
window) to not accept the call.
If the call is accepted, the call request will be cleared off of any other operator screen
that the call request appeared on. If all operators say No or the call request is not
answered by any operators in a timely fashion the call will be automatically ended and
the visitor will hear a call ended message.
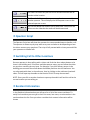
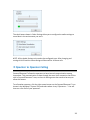
When the call is accepted, the operator will have audio communication with the entry
station, through their USB headset and the screen will then look like the following
image.
14
From this screen the operator has full control over all the Connect2Doorman™ hardware
at that location. The screen is broken down into the following sections. Current live
video in the upper left and the name of the location and entry shown above it. To the
right of the video you have five different buttons for controls for that location. To the
far right is the operator script. Under the live video you will see video for your current
location and any other locations that you can connect to. Then at the bottom of the
screen you will see the Resident Information box.
Control Buttons
The Unlock Door button is used to trigger the door release at the
viewed location only.
The Mute Mic button will mute your microphone, but still will allow
you to hear audio from that location.
15
The Hold Call button will put the call on hold and no audio will be
heard at either location.
The Transfer Call button allows you to transfer the current call to
another operator. This will display the Call Request screen on the
selected operator screen.
The End Call button will end the call on both ends. You will still be
able to see the video but the audio will be disconnected.
Operator Script
The Operator Script box will show the operator the recommended steps to handle a call.
The operator is shown step by step what to say next and what to do depending on how
the visitor answers your questions. The script is fully customizable to how you would like
your operators to handle calls.
Switching Call to Other Locations
Once an operator is done talking with a visitor and clicks the door release button to let
them in the building and, if there are multiple cameras setup, you can follow the visitor
on any other cameras you may have. For example, if you let a delivery person in the
building you can watch them walk down the hallway and then into the mailroom. You
can also speak with them in the mailroom, then by clicking on the mailroom thumbnail
video. This will open up the audio at that location if VoIP is setup there as well.
NOTE: Once you click on another location to open up the audio it will end the call at the
current location you are talking to.
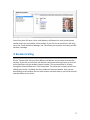
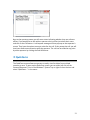
Resident Information
In the Resident Information box you will see a list of all of the current residents. To
easily find a resident you can type in their first name, last name, or suite number in the
text box above the list. Once you select a resident their contact information will be
shown.
16
You will see their full name, suite, email address, call buttons for each contact phone
number they have and a photo of the resident. If you click on the email link it will bring
you to the "Send Resident a Message" tab. This allows you to quickly and easily send the
resident a message.
Resident Calling
On the "Contact Info" tab up to four different call buttons can be setup to contact the
resident. If you click on one of the call buttons it will automatically put your current call
on hold and then call the resident's phone number. This communication is all done
through the Connect2Doorman™ VoIP connection. This allows you to easily switch from
talking to the visitor, to talking with the resident on the same headset. Once you are
done talking to the resident you can either end the call with them or put the call on hold
and switch back to the visitor.
17
Resident Package Receiving
The "Package Receiving" tab allows the operator to receive different types of deliveries
for a resident. Select the type of delivery from the pull-down box and the click on the
"Add Delivery" button. As soon as this is done the resident will automatically be sent an
email and/or text message that they have a delivery waiting for them.
Resident Notes
The "Resident Notes" tab will show the operator any specific notes about the selected
resident. For example, if their packages need to be put in a specific location or if they do
not want to be called during certain hours. You can put any type of text you would need
in the Resident Notes.
Approved Visitors
The "Approved Visitors" tab will show a list of any regular visitors that the selected
resident allows into the building. This list can be family members and friends, to make
visitor entry a little quicker, easier, and secure.
Multiple Call Tabs
A single operator can handle multiple calls at once if needed. While an operator is on a
call, if another call comes in from a different entry or even a completely different
18
building the call request will show up in a new tab at the top of the screen. If the
operator chooses to accept the second call the first call will be placed on hold. Then
when the operator wants to switch back to the first call they can click on the first tab
and then click the hold button to take the call off of hold.
NOTE: You can only have the audio open on one call at a time. So, whenever a new call
is accepted or you take a call off of hold the prior call will be put on hold.
Audio Settings
In the upper left corner of the call box you will see an Audio menu. This menu allows the
operator to configure the audio settings on their PC for the best possible audio quality.
The Sound Devices allows you to select which speaker and microphone you would like
to use with Connect2Doorman™. If you have multiple audio input and output devices on
the PC just select the one you would like to use with Connect2Doorman™.
The Volume settings allow you to specify the volume level for the speaker and
microphone selected in the Sound Devices.
19
The check boxes shown in Other Settings allow you to configure the audio settings to
sound best in the environment you are in.
NOTE: All the Audio Settings only need to be configured once. After changing and
settings click OK and the same settings will be used for all future calls.
Operator to Operator Calling
Connect2Doorman™ allows the operators to have internal communication among
themselves. This communication is done through the same VoIP connection that all the
calls in Connect2Doorman™ uses, so there is nothing extra that needs to be setup to
allow this feature.
To call another operator, click the right-mouse button on the Connect2Doorman™ icon
shown in the Windows™ System Tray and select where it says "Operators...". You will
then see a list of all of your operators.
20
Next to the operators name you will see a status indicating whether they are online or
offline. If you would like to talk with an operator who is online just select their name
and click on the Call button. A call request message will then pop-up on that operator's
screen. They have the option to accept or decline the call. If they accept the call you will
then have audio communication with that operator. The call can be ended at any point
by either operator by clicking the End Call button.
QwikCams
The QwikCams screen allows an operator to easily view live video from multiple
cameras at once. To open up the QwikCams screen you can either left click on the
Connect2Doorman™ icon in the Windows™ System Tray or right-click on the icon and
select "QwikCams..." in the menu.
21
In the QwikCams screen if you have multiple locations setup you will see a drop-down
box in the upper left hand corner to select All Locations or a specific location. If you
select a specific location you will only see the cameras at that location.
If you click the mouse button on any of the video boxes it will enlarge the video to
640x480. Then default video size shown is 320x240. You can shrink the size down by
moving the mouse away from that video or clicking to enlarge another video box.
In the top right corner of a video box that also has audio communication setup you will
see a green microphone icon. Clicking on this icon allows you to call directly to that
location and open up an audio conversation.
22
Chapter 3 - Settings
Operator Settings
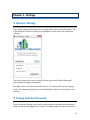
To get into the operator Settings screen just right-click on the Connect2Doorman™ icon
in the Windows™ System Tray (next to the Windows™ Clock) and in the menu select
"Settings...".
This screen allows you to turn on and off the auto login and if Connect2Doorman™
starts up when you login to Windows™.
Auto login means that when Connect2Doorman™ is started you will not see the login
screen. The software will go directly into the Windows™ System Tray and wait for call
requests.
Change Operator Password
From the operator Settings screen you can also change the password for the operator
name you are currently logged in as. Click the "Change Password" button, then enter in
23
the "Current Password", and the new one you would like to setup and confirm the
password. Then click the "Update Password" button to apply the change.
Admin Settings
The Admin Settings in Connect2Doorman™ allows you to control all of the account
settings. You can update billing info, add/remove operators, add new buildings, update
apartments and resident info. Only an operator who has been setup with admin access
can get into the Admin Settings. There are one of two ways to get into the Admin
Settings.
1) If you are logged into Connect2Doorman™ with an operator name who has admin
access you can right-click on the Connect2Doorman™ icon in the Windows™ System
Tray and select "Admin Settings".
2) Go to Connect2Doorman™.com and login with the operator name and password for
your admin username.
Company & Subscription Information - This page shows you basic company information
like name, address, city and company logo. This page also allows you to update your
credit card billing information used to bill you for the Connect2Doorman™ service.
My Operators - This page lets you add and remove operators from your
Connect2Doorman™ account. It also allows you to edit their settings like name, email,
and if they have admin access.
My Buildings - This page lets you add new buildings to be used with
Connect2Doorman™ or edit existing buildings. In buildings you can edit wave files used
for playing audio at the entry panels to greet and give instructions to visitors. It allows
you to add/remove entry panels in a building.
24
My Apartments & Residents - This page allows you to add/remove apartments and the
residents in those apartments. For each resident you can upload a photo of them and
change all of their contact information and notes.
Administrative Reports - This page gives you reports to see what type of activity you
have going on at your different buildings.
25
Chapter 4 - Appendices
Appendix A - Port Forwarding for Video IP box
To be able to access cameras over the internet from outside of a building's local
network you will need to setup port forwarding for each Video IP box in the buildings
router/firewall hardware. By default, the router/firewall hardware will block all camera
access to the internet. Port forwarding allows you to setup a local address and port
number for each camera to be able to view it from the internet. Each Video IP box will
have its own specific port number pre configured on it.
To setup port forwarding you will need to know the address and password of the
router/firewall device setup to share the internet connection. All devices are configured
a little differently but they basically all work the same way. First go into a web browser
on a machine that is inside the network. Then enter in the IP address of the router. The
IP address of the router is normally the first address. For example, if all the IP's on the
network start with 192.168.1 then the address of the router is normally 192.168.1.1.
Once you enter in the address of the router you will see a login screen. Enter in the
password (and sometimes username) to get into the settings. In the settings you should
see a port forwarding area (sometimes it may be labeled as applications & gaming).
In the port forwarding settings you will see fields were you can enter in a local port
number and IP address for the Video IP box. If it asks what type of Protocol select TCP.
The port numbers will be provided to you by Alpha Communications® when you are
shipped all of the hardware for Connect2Doorman™ and you will be given instructions
that tells you how to lookup the local IP address of the Video IP Box.
26