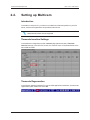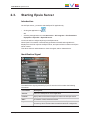
1
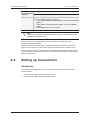
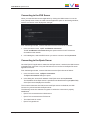
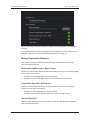
USER MANUAL
Version 1.00 - March 2014
USER MANUAL Epsio FX 1.00
Copyright
EVS Broadcast Equipment SA– Copyright © 2014. All rights reserved.
Disclaimer
The information in this manual is furnished for informational use only and subject to
change without notice. While every effort has been made to ensure that the information
contained in this user manual is accurate, up-to-date and reliable, EVS Broadcast
Equipment cannot be held responsible for inaccuracies or errors that may appear in this
publication.
Improvement Requests
Your comments will help us improve the quality of the user documentation. Do not
hesitate to send improvement requests, or report any error or inaccuracy on this user
manual by e-mail to [email protected].
Regional Contacts
The address and phone number of the EVS headquarters are usually mentioned in the
Help > About menu in the user interface.
You will find the full list of addresses and phone numbers of local offices either at the end
of this user manual (for manuals on hardware products) or at the following page on the
EVS website: http://www.evs.com/contacts.
User Manuals on EVS Website
The latest version of the user manual, if any, and other user manuals on EVS products
can be found on the EVS download center, on the following webpage:
http://www.evs.com/downloadcenter.
I
USER MANUAL Epsio FX 1.00
Table of Contents
TABLE OF CONTENTS
III
1.
1
1.1. Product Overview
1
1.2. Requirements and Limitations
2
2.
CONFIGURATION
3
2.1. Configuration Overview
3
2.2. Setting up Multicam
4
2.3. Starting Epsio Server
5
2.4. Setting up Connections
6
2.5. Clip and Transition Effect Lists
10
2.6. Selecting and Managing Effects
13
3.
Table of Contents
INTRODUCTION
OPERATION
16
3.1. User Interface Overview
16
3.2. Playlist Tab
17
3.3. Adding and Removing Effects in Playlists
20
III
USER MANUAL Epsio FX 1.00
1.
Introduction
1.1.
Product Overview
Description
Epsio FX is a software that allows users to apply video effects to playlists stored on the
EVS server. The effects can be applied on playlist transitions or playlist elements.
Working in conjunction with the Multicam LSM and the LSM Connect applications, Epsio
FX gives the operator a centralized interface to manage video effects. This solution
eliminates complex post-production processes and allows to deliver special and
sophisticated effects in a twinkling.
Setup
Epsio FX is based on a client-server architecture in which:
•
The Epsio FX server application is installed on the Epsio server.
•
The Epsio FX client is the LSM Connect application installed on the LSM tablet.
The LSM Connect application communicates with the Epsio server and the EVS server
through an Ethernet connection. The Epsio server gets information on the EVS server via
LSM Connect.
The effects are centralized, defined and managed by the Epsio FX server application.
The effects are applied to playlists stored on the EVS server via the Epsio FX client built
in the LSM Connect application.
1. Introduction
1
EVS Broadcast Equipment SA
1.2.
Issue 1.00.A - March 2014
Requirements and Limitations
Hardware and Software Requirements
EVS Server
Hardware: XT3 server
Software: Multicam version 11.02 or 12.02 (or higher)
LSM Tablet
Software: LSM Connection version 2.00 or higher
Epsio FX
OS: Windows 7
Graphic Board: NVIDIA QUADRO FX 2000
Note
The old Epsio hardware is not supported.
Limitations
2
•
The Epsio server must be cabled to PGM 1, and therefore only works with PGM1.
•
1080p and 4K formats are not supported.
•
There is a 6-frame delay between Epsio and EVS server outputs.
•
The number of images the operator can load depends on the memory size of the
NVIDIA board.
•
Playlists in loop are not managed.
•
Due to the previous limitation, a transition effect defined on the first playlist element
will not be applied.
•
Only local playlists are managed.
•
When two playlists with effects are merged, the effects are lost.
•
Half the duration of the .tga image sequence used as transition overlays may not
exceed the duration of the next playlist element.
1. Introduction
USER MANUAL Epsio FX 1.00
2.
Configuration
2.1.
Configuration Overview
Involved Applications
The configuration process involves several steps to be performed:
•
in the Epsio FX application on the Epsio server
•
in the LSM Connect application on the LSM tablet
•
in the Multicam Configuration window on the EVS server
Configuration Steps
The configuration steps are performed in the following sequence:
1. On the EVS server, you need to set up the Multicam configuration, and launch the
given configuration.
See section "Setting up Multicam" on page 4.
2. On the Epsio server, you will start the Epsio FX application.
When Epsio FX is started, it automatically generates an identification signal that is
displayed on the VGA output of the Epsio server, and opens a DOS console on the
Epsio server monitor.This allows the truck administrator to check the signal, and its
characteristics.
See section "Starting Epsio Server" on page 5.
3. From the LSM Connect application on the LSM tablet, you need to connect:
◦
to the EVS server and LSM Remote panel you want to work with
◦
to the Epsio server you want to work with
See section "Setting up Connections" on page 6.
4. In the LSM Connect application, you need to select the effects you want to be
available.
See section "Selecting and Managing Effects" on page 13.
2. Configuration
3
EVS Broadcast Equipment SA
2.2.
Issue 1.00.A - March 2014
Setting up Multicam
Introduction
To be able to use Epsio FX, you have to run a Multicam LSM configuration on your XT3
server, and set some parameters as specified in this section.
Note
1080p and 4K formats are not supported.
Timecode Insertion Settings
In the Multicam Configuration module, Channel page (advanced view), Timecode
Insertion settings, in the HD OUT section, the value for Hanc VITC parameter has to be
set to LTC for PGM1:
Timecode Regeneration
In the Playlist operational window (F10) of the VGA application in Multicam, the timecode
regeneration option needs to be set to Off:
4
2. Configuration
USER MANUAL Epsio FX 1.00
2.3.
Starting Epsio Server
Introduction
On the Epsio server, you need to start the Epsio FX application by:
•
clicking the application icon
OR
•
selecting the application from the Start menu > All Programs > Evs Broadcast
Equipment > EpsioFX > EpsioFX Server.
You do not need to configure anything on the Epsio server.
When Epsio FX is started, it automatically generates an identification signal that is
displayed on the VGA output of the Epsio server, and opens a DOS console on the Epsio
server monitor.
This allows the truck administrator to check the signal, and its characteristics.
Identification Signal
The identification signal generated by Epsio FX onto the VGA contains the following
information:
2. Configuration
Field Name
Description
Version
Version of the Epsio FX server application
License
Expiry date for the XSecure Epsio FX license on the Epsio server
NIC1
IP address of the first Ethernet board.
Input1
Video format configured on the video board of the Epsio server.
At start up, this is the last video format the board was configured in.
5
EVS Broadcast Equipment SA
Issue 1.00.A - March 2014
Field Name
Description
Genlock
Genlock type sent to the Epsio server
Phases
Horizontal and vertical phases.
You can modify the phases as follows:
• Press CTRL+ arrow left / arrow right to change the horizontal
phase.
• Press CTRL + arrow up / arrow right to change the vertical
phase.
• Press CTRL+ R to reset the phases.
Note
When Epsio FX identifies a problem with one of the specified parameters, this
parameter is displayed in red.
When the LSM Connect application connects to the Epsio FX application, the
identification signal disappears.
When the LSM Connect application is connected to Epsio FX and to the EVS server,
Epsio FX will check that its video format matches the video format of the EVS server.
In case of video format mismatch, Epsio FX will restart and reconfigure its video board.
The user will then manually restablish the connection between the LSM Connect and the
Epsio FX applications.
2.4.
Setting up Connections
Introduction
In the LSM Connect application, you need to perform the following actions to have a
functional setup:
6
•
Connecting the LSM Connect to the EVS server
•
Connecting the LSM Connect to the Epsio server
2. Configuration
USER MANUAL Epsio FX 1.00
Connecting to the EVS Server
When you start the LSM Connect application by clicking the LSM Connect icon on the
main (central) home screen, the LSM Connect application opens on the Settings window,
with the Connection menu displayed on the right:
From the Settings window, connect LSM Connect to the EVS server as follows:
1. In the Connection menu, tap XT and Remote connection.
The XT and Remote connection dialog box opens with the list of EVS servers
accessible on the network.
2. In this dialog box, select the EVS server you want to connect to and tap Connect.
Connecting to the Epsio Server
Once the Epsio FX application is started on the Epsio server, it waits for the LSM Connect
to establish the connection. Only one LSM Connect can connect to the Epsio FX server
application at a time.
From the Settings window, connect LSM Connect to the Epsio Server as follows:
1. In the Connection menu, tap Epsio Connection.
The Epsio Connection dialog box opens.
2. In the dialog box, enter the IP address of the Epsio server and tap Connect.
The IP address of the Epsio server is specified in the identification signal (NIC1 field)
of the Epsio server displayed on the VGA.
The connection between the LSM Connect and Epsio server is initialized, the LSM
Connect is synchronized with the Epsio server.
The following connection statuses turn green to confirm the connection is properly
established:
2. Configuration
•
Epsio FX is connected to the LSM Connect.
•
Epsio FX is connected to the EVS server.
•
The video format is correct.
•
Epsio FX is genlocked.
7
EVS Broadcast Equipment SA
Issue 1.00.A - March 2014
When all connection statuses are correct, the Epsio FX menu appears in the Settings
menu list.
You can then select the clip and transition effects you want to use in the LSM Connect
application. See section "Selecting and Managing Effects" on page 13.
Wrong Connection Statuses
This section can help you identify and solve issues if one of the above-mentioned
connection status turns red.
Connection LSM Connect - Epsio Server
When the connection between the LSM Connect and Epsio server is not working properly,
you can check the following:
•
The Epsio FX server application is correctly started.
•
The Epsio server and the LSM Connect are on the same PC LAN network.
Connection Epsio FX - EVS Server
When the connection between the Epsio server and the EVS server is not working
properly, you can check the following:
•
The Epsio FX server application is correctly started.
•
The Epsio server and the EVS server are on the same PC LAN network.
Genlock Epsio FX
When the Genlock status is wrong, you need to check and cable properly the genlock
entry onto the Epsio server.
8
2. Configuration
USER MANUAL Epsio FX 1.00
Video Status
At first connection, the video format defined on the Epsio server might be different than
the video format of the running Multicam configuration on the EVS server.
In this case, the Video Status remains red, and the following automatic process takes
place:
•
The LSM Connect displays a warning message to the user.
•
The Epsio server automatically reboots in a compatible video format, and generates a
new identification signal.
When the new identification signal (with the right video format defined) is displayed on the
VGA, you need to manually reconnect the LSM Connect to the Epsio server, using the
Connect button, as described above.
2. Configuration
9
EVS Broadcast Equipment SA
2.5.
Issue 1.00.A - March 2014
Clip and Transition Effect Lists
Introduction
When you set up the LSM Connect as a client of the Epsio server, you can select, from
the Clip FX list or Transition FX list, the clip or transition effects you want to be available
in LSM Connect.
These Clip FX list and Transition FX list are available from the Settings window in LSM
Connect, Epsio FX menu, respectively via the Clip FX and Transition FX command.
Effect Categories and Types
The following table provides an overview on the effects types you can add to the effects
you will make available in LSM Connect:
Effect Type
10
Description
Clip or
Transition FX?
Predefined effect The predefined clip effects are fully defined in
Epsio FX and can be directly applied to the clip.
This is for example the case of clip effects that
consist in color correction.
Clip
Picture overlay
effect
Clip
A picture overlay effect consists in applying a
fixed image to a clip. It requires loading the
picture to be used as overlay.
You can define up to three picture overlays as
clip effects.
2. Configuration
USER MANUAL Epsio FX 1.00
Clip or
Transition FX?
Effect Type
Description
Sequence
overlay effect
A sequence overlay effect consists in applying Clip or
Transition
a sequence of images to a clip or transition.
It requires loading the image sequence to be
used as overlay.
• For clips, up to three sequence overlays can
be defined.
• For transitions, four sequence overlays are
already available with assigned .tga files.
Warning
The images used for clip or transition overlays have to be .tga or .png (32bits)
files. The .png format is however recommended.
The .tga file names shall consist in a continuous iteration of the same name, for
example IMG_000.tga, IMG_001.tga, IMG_002.tga, etc.
Clip or Transition Effect Definitions
Illustrations for Clip Effects
In the Clip FX list, each clip effect is represented by an area including the elements
displayed and described below.
In addition, the clip effects are organized in categories you can filter on by selecting a
category in the drop-down field in the upper right.
2. Configuration
11
EVS Broadcast Equipment SA
Issue 1.00.A - March 2014
Illustration for Transition Effects
In the Transition FX list, each transition effect is represented by an area including the
elements displayed and described below:
Item
Description
Name
Name of the clip or transition effect
Picture
In case of a predefined clip effect, the picture illustrates the
effect definition.
In case of an overlay, the picture corresponds to:
• the associated image
• the middle frame of the associated image sequence, or
• a placeholder when no image sequence is associated
Information icon to display a description of the effect
This icon is only available with clip or transition overlays.
The Edit icon allows you to select the image sequence you want
to use as a transition overlay.
A sequence or image overlay must be a .tga or .png (32 bits) file.
This icon is only available with clip or transition overlays.
The Remove icon allows you to remove the associated image or
image sequence.
OR
12
Favorite icon to select the effect as a favorite, and therefore
making it available in the LSM Connect application:
• When the effect is not selected, the star is gray.
• When the effect is selected, the star is blue.
2. Configuration
USER MANUAL Epsio FX 1.00
2.6.
Selecting and Managing Effects
Introduction
A large range of effects is available in Epsio FX. Via the Epsio FX Settings menu in LSM
Connect, you will be able to perform the following actions:
•
Specifying the favorite effects, that means the effects that have to be available in the
LSM Connect application
•
Setting up the requested transition overlays
•
Importing or Exporting a list of favorite effects
See section "Clip and Transition Effect Lists" on page 10 for full information on the
definition of clip and transition effects.
Accessing the Epsio FX Settings
1. From the main window of the LSM Connect, tap the Settings icon
.
2. In the Settings window, select the Epsio FX menu.
The Epsio FX settings are then displayed on the right.
From the Epsio FX settings, you can perform the following actions to select and manage
favorite effects.
Setting all Effects as Favorites
To select all effects to be available in LSM Connect, tap
.
Removing all Effects from Favorites
To remove all effects from the favorites, tap
2. Configuration
.
13
EVS Broadcast Equipment SA
Issue 1.00.A - March 2014
Defining Individual Predefined Clip Effects as Favorites
To define individual predefined clip effects as favorites, proceed as follows:
1. In the Epsio FX settings, tap Clip FX.
2. To select clip effects, go through the list of effects and tap the Favorite icon (star)
corresponding to the effects you want to set as favorite.
When an effect is set as favorite, the star turns blue.
When you leave the Clip FX window, the effects selected as favorites are directly
available in the LSM Connect application.
Defining Individual Transition or Clip Overlays as Favorites
Warning
The images used for clip or transition overlays have to be .tga or .png (32bits)
files. The .png format is however recommended.
The .tga file names shall consist in a continuous iteration of the same name, for
example IMG_000.tga, IMG_001.tga, IMG_002.tga, etc.
To define individual transition or clip overlays as favorites, proceed as follows:
1. In the Epsio FX settings, tap Clip FX or Transition FX depending on whether you
want to define a clip or transition overlay.
2. In the Effect list, identify the overlay definition you want to configure.
3. In the area corresponding to the overlay definition, tap
and select the image or a
frame of the image sequence you want to use as an overlay.
4. Tap the Favorite icon
an image to.
corresponding to the overlay effect you have associated
When an effect is set as favorite, the star turns blue.
When you leave the Clip FX or Transition FX window, the effects selected as favorites
are directly available in the LSM Connect application.
Exporting the List of Favorite Effects
You can export your list of favorite effects into a .fav file you can later upload onto another
LSM Connect.
To export a list of favorite effects, proceed as follows:
1. In the Epsio FX settings, tap
.
The File Manager opens.
14
2. Configuration
USER MANUAL Epsio FX 1.00
2. In the File Manager, typed the name of the .fav file to be created.
3. Tap Export.
A .fav file that contains the list of favorite effects is generated and stored in
storage/sdcard0/LsmTablet/XXX.fav where XXX is the file name you have
assigned.
Importing the List of Favorite Effects
You can import to an LSM Connect a .fav file that includes a list of favorite effects.
To import a list of favorite effects, proceed as follows:
1. Save the .fav file that contains the list of favorite effects to the LSM tablet.
2. In the Epsio FX settings, tap
.
The File Manager opens.
3. In the File Manager, select the .fav file you have saved to the LSM tablet.
If the file has the right format, and contains the right information, you will get a
confirmation message that the favorite effects have been imported to LSM Connect.
2. Configuration
15
EVS Broadcast Equipment SA
Issue 1.00.A - March 2014
3.
Operation
3.1.
User Interface Overview
Accessing the Working Environment
Note
The operational section of the Epsio FX user manual solely focuses on the use
of LSM Connect in combination with the Epsio server. Refer to the LSM
Connect user manual for more information on general clip and playlist functions.
When LSM Connect is used as Epsio FX client to add effects to playlist elements or
transitions, you first need to open a window layout with the Clip tab on the left and the
Playlist tab on the right.
From this window layout, the Effect window will automatically appear on the left (instead
of Clip tab) when you open a playlist in the Playlist tab and select at least a playlist
element.
In this user manual, this window layout is called this the Epsio FX layout.
Introduction
The Epsio FX layout consists of the following areas displayed and shortly described
below:
16
3. Operation
USER MANUAL Epsio FX 1.00
Area Description
The table below describes the various parts of working window when LSM Connect is
used in combination with Epsio FX:
3.2.
Part
Name
Description
1.
Effect area
Displays all clip and transition effects selected as favorites in the
Epsio FX settings.
To view the Effect area (Epsio FX favorite presets), your Epsio
FX set up must be operational.
2.
Playlist area Displays the currently open playlist, in which you apply the
effects selected in the Effect area.
See section "Playlist Tab" on page 17 for more information on the
Playlist tab.
3.
Toolbar area Displays metadata information of the playlist selected in the
Playlist area.
4.
Contextual
action bar
When one or more playlist elements (and its transition around IN
point) are selected in this working window, a contextual action
bar is displayed.
See section "Adding and Removing Effects in Playlists" on page
20.
Playlist Tab
Introduction
In Epsio FX, you can assign effects by selecting playlist elements and transitions in the
Playlist tab, and selecting the effect you want to apply to the selection in the Effect tab.
For this reason, we will describe the Playlist tab in details.
In LSM Connect, the Playlist tab can be declined in two views:
•
Initially, it displays a set of selected playlists which you define as 'visible playlists'.
We will call this the List view
•
When you tap on a playlist, the selected playlist opens in the Playlist tab, and you can
view all playlist elements and transition information.
We will call this the Detail view
In the Epsio FX workflow, the users work in the Detail view. We will therefore focus on
this view. Refer to the LSM Connect user manual for more information on the List View,
and for the general fonctions with playlists.
3. Operation
17
EVS Broadcast Equipment SA
Issue 1.00.A - March 2014
Playlist Detail View
The table below presents the various areas or icons on the Detail view:
#
18
Area/Icon
Description
1.
Add button used to insert the
selected clip(s) between the
surrounding playlist elements.
2.
Add button used to insert the
selected clip(s) at the end of the
playlist.
3.
Playlist button that represents the
open playlist, and the related
information.
4.
Arrow up button used to close the
Detail view and comes back to the
List view.
3. Operation
USER MANUAL Epsio FX 1.00
#
Area/Icon
Description
5.
Transition button that represents the
playlist transition and displays related
information:
• Video effet type and duration
• Audio effet type and duration
• Icon that represents the effect
type
6.
Element button that represents the
playlist element and displays related
information, from left to right:
• position in the playlist
• clip LSM ID
• clip TC (LTC)
7.
Goes back to the List view. All
changes previously done in the Detail
view are applied.
Displays larger boxes for playlists
elements, and the same clip
metadata as in the Clip Grid view.
Allows to sort the playlist elements
by TC IN, but resets all transitions to
the default settings.
3. Operation
19
EVS Broadcast Equipment SA
Issue 1.00.A - March 2014
Effect Icon
The following table presents the various icon or icon types that can be used to illustrate an
effect:
Icon
Meaning
No effect is defined on the playlist element or playlist transition
Icon representing the effect applied to a playlist element
Icon representing the effect applied to the playlist element when a
playlist is on air.
In this case, the effect can only be applied when the playlist is back
in Edit mode on the LSM Remote panel.
Icon representing the image or middle frame of the image sequence
when a clip or transition overlay is applied.
Icon representing an image or image sequence that cannot be applied
for one of the following reasons:
• The duration of the transition effect is too long compared to the
clip duration.
• The transition effect is defined on the first timeline element.
3.3.
Adding and Removing Effects in
Playlists
Introduction
When you use the LSM Connect as Epsio FX client, you have access to all effects that
have been defined as favorites through the Epsio FX settings in LSM Connect.
Principles and Limitations
Clip Effects
A Clip effect is always applied to the whole playlist element.
If the clip has already an effect, the new effect will replace the former one.
20
3. Operation
USER MANUAL Epsio FX 1.00
Transition Effects
The transition effects available in Epsio FX consist in a sequence of images between two
playlist elements.
If a transition effect has already been applied in Multicam LSM, the image sequence
transition is applied over the effect. The underlying transition is therefore preserved.
The image sequence is centered on the transition defined in Multicam.
The duration (number of frames) of the Epsio transition is equivalent to the number of
images.
An Epsio transition effect defined before the first playlist element will not be applied as
playlist loops are not supported.
Warning
It is not possible to add an image sequence transition if half of the transition
duration is longer than the playlist element.
Prerequisite(s)
To perform all actions described in this section, you need to start from a layout with the
Clip tab on the left, and Playlist tab on the right, as explained in "User Interface Overview"
on page 16.
Then you need :
•
open the playlist you want to edit in the Playlist tab on the right.
•
select at least one playlist element in the Playlist tab.
When at least one playlist element is selected, the Effect pane displays on the left,
instead of the Clip tab.
Adding an Effect on Selected Elements or Transitions
To add an effect to selected playlist elements or transitions in a playlist already open in
the Playlist tab, proceed as follows:
1. If you want to add an effect to a single element or transition, go directly to step 2.
If you want to add an effect to several elements or transitions at a time,
first tap the multi-selection icon
in the contextual menu bar.
2. Tap the playlist element(s) or transition(s) you want to add an effect to.
A playlist element is always selected with the preceding transition, and vice versa.
3. In the Effect area on the left, tap the effect you want to apply to the selected items.
If the selected effect is a clip effect, the effect will be applied to the playlist element.
If the selected effect is a transition effect, the effect will be applied to the selected
transition.
3. Operation
21
EVS Broadcast Equipment SA
Issue 1.00.A - March 2014
Adding an Effect on All Playlist Elements or Transitions
To add an effect to all elements or transitions of a playlist in a playlist already open in the
Playlist tab, proceed as follows:
1. Tap the Playlist button at the top of the Detail view in the Playlist tab.
2. In the Effect area on the left, tap the effect you want to apply to the playlist.
If the selected effect is a clip effect, the effect will be applied to all playlist elements.
If the selected effect is a transition effect, the effect will be applied to all playlist
transitions, excepted the first one.
Removing Effects from Elements or Transitions
To remove an Epsio effect from one or more playlist elements, proceed as follows:
1. If you want to remove an effect from a single element or transition, go directly to step
2.
If you want to remove an effect from several elements or transitions at a time,
first tap the multi-selection icon
in the contextual menu bar.
2. Tap the playlist element(s) or transition(s) you want to remove the effect from.
A playlist element is always selected with the preceding transition, and vice versa.
3. In the contextual menu bar, tap Remove Clip Effect or Remove Transition Effect
depending on whether you want to remove the effects on the selected playlist
elements or transitions.
Removing the Effects from All Playlist Elements or
Transitions
To remove the Epsio effects from all elements or transitions of a playlist in a playlist
already open in the Playlist tab, proceed as follows:
1. Tap the Playlist button, similar to the button below, at the top of the Detail view in the
Playlist tab:
2. In the contextual menu bar, tap Remove All Epsio Effect.
All effects (transition of clip effects) from Epsio FX will be removed.
22
3. Operation
Corporate
+32 4 361 7000
North & Latin America
+1 973 575 7811
EVS Headquarters
Liège Science Park
16, rue Bois St Jean
B-4102 Seraing
Belgium
To learn more about EVS go to www.evs.com
Asia & Pacific
+852 2914 2501
Other regional offices
www.evs.com/contact
EVS Broadcast Equipment is continuously adapting and improving its products in accordance with the ever changing
requirements of the Broadcast Industry.
The data contained herein is therefore subject to change without prior notice. Companies and product names are
trademarks or registered trademarks of their respective companies.