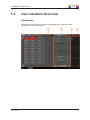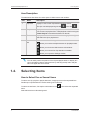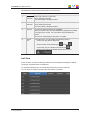
1
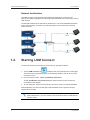
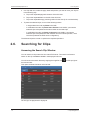
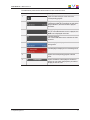
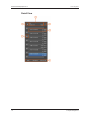
USER MANUAL
Version 1.3 - July 2013
USER MANUAL LSM Connect 1.3
Copyright
EVS Broadcast Equipment S.A.– Copyright © 2013. All rights reserved.
Disclaimer
The information in this manual is furnished for informational use only and subject to
change without notice. While every effort has been made to ensure that the information
contained in this user manual is accurate, up-to-date and reliable, EVS Broadcast
Equipment cannot be held responsible for inaccuracies or errors that may appear in this
publication.
Improvement Requests
Your comments will help us improve the quality of the user documentation. Do not
hesitate to send improvement requests, or report any error or inaccuracy on this user
manual by e-mail to [email protected].
Regional Contacts
The address and phone number of the EVS headquarters are usually mentioned in the
Help > About menu in the user interface.
You will find the full list of addresses and phone numbers of local offices either at the end
of this user manual (for manuals on hardware products) or at the following page on the
EVS website: http://www.evs.com/contacts.
User Manuals on EVS Website
The latest version of the user manual, if any, and other user manuals on EVS products
can be found on the EVS download center, on the following webpage:
http://www.evs.com/downloadcenter.
I
USER MANUAL LSM Connect 1.3
Table of Contents
TABLE OF CONTENTS
III
1.
1
1.1. Product Overview
1
1.2. Starting LSM Connect
2
1.3. User Interface Overview
3
1.4. Selecting Items
4
2.
6
CLIP MANAGEMENT
2.1. Clip Tab
6
2.2. Clip Display in Grid View
8
2.3. Accessing Distant Servers
9
2.4. Managing Clips
9
2.5. Copying and Moving Clips
11
2.6. Searching for Clips
12
3.
PLAYLIST MANAGEMENT
14
3.1. Playlist Tab
14
3.2. Managing Playlists
18
3.3. Editing Playlists
20
4.
Table of Contents
INTRODUCTION
SETTINGS
22
III
USER MANUAL LSM Connect 1.3
1.
Introduction
1.1.
Product Overview
Description
The LSM Connect is a tablet-based application that allows users to manage clips and
playlists stored on EVS video servers.
The application is directly connected to the Remote Panel and to the EVS video server via
the Ethernet network. This gives users instant access and control of all clips and playlists
created on EVS servers.
Automatic and instant synchronization between the LSM Connect and the EVS server
provides an excellent interactivity, as well as an easy and intuitive solution to manage clip
and playlist in a live production environment.
Compatible Hardware and Software
EVS Video Servers
The LSM Connect application shall run with EVS servers and Multicam application in the
following conditions:
•
It can run with XT3, XT2+ or XT2 servers.
•
The EVS servers controlled by the LSM Connect shall run a Multicam version 11.02 or
higher
•
The EVS servers controlled by the LSM Connect shall be running a Multicam LSM or
Replay Only application.
Tablet
When the LSM Connect connects to an EVS server, Multicam checks whether the
installed version of the LSM Connect is compatible with the Multicam version. Otherwise,
Multicam pushes and installs automatically the compatible version of the LSM Connect
application to the tablet.
1. Introduction
1
EVS Broadcast Equipment S.A.
1.3.A July 2013
Network Architecture
The LSM Connect communicates with the Multicam application via the PC LAN
network.The tablet is plugged onto a docking station that allows the connection to the PC
LAN network.
The illustration below shows the network architecture. You can find detailed information
on the network setup, connectivity and docking station in the LSM Connect docking
station technote.
1.2.
Starting LSM Connect
To start LSM Connect and connect to an EVS server, proceed as follows:
1. Tap the LSM Connect icon
located on the main (central) home screen page.
The LSM Connect application opens on the Settings window, with the focus on the
Connection menu.
2. In the Connection menu, tap XT and Remote connection.
The XT and Remote connection dialog box opens with the list of EVS servers
accessible on the network.
3. On this dialog box, select the EVS server you want to connect to and tap Connect.
After initialization, the main window opens with the default view: Clip tab on the left,
Playlist tab on the right.
Note
With LSM Connect, you can connect to one EVS server and one LSM Remote
Panel at a time.
2
1. Introduction
USER MANUAL LSM Connect 1.3
1.3.
User Interface Overview
Introduction
By default, the main window of the LSM Connect application contains the areas
highlighted on the screenshot below:
1. Introduction
3
EVS Broadcast Equipment S.A.
1.3.A July 2013
Area Description
The table below describes the various parts of LSM Connect main window:
Part
Name
Description
1.
Clip area
Displays a view on the clips stored on the EVS server.
The clips can be displayed in grid view
or list view
.
2.
Playlist area Displays a view on the visible playlists stored on the EVS server.
You can remove playlists from or add playlists to the list using the
Visible Playlist command at the bottom on the tab.
3.
Toolbar area Displays metadata information of the element (playlist or clip)
selected in the clip or playlist area.
4.
Command
bar
Gives access to the following windows or commands:
allows you to select multiple elements in clip/playlist area.
allows you to lock the LSM Connect main window.
allows you to search for clips based on metadata.
allows you to open the Settings window.
Note
You can easily switch the position of the clip and playlist areas, or display two
clip or two playlist views at the same time by selecting the Clip tab or Playlist
tab on the upper left corner of area.
1.4.
Selecting Items
How to Select One or Several Items
To select one clip, playlist or playlist elements, simply tap once on the requested item.
Double tap or tap and hold will not allow other types of selection.
To select several items, first tap the multi-selection icon
items.
, then select the requested
Selected items have a blue background.
4
1. Introduction
USER MANUAL LSM Connect 1.3
Contextual Action Bar
When items are selected, a blue contextual action bar (CAB) appears at the top of the
window. It shows several commands you can perform on the selected items.
The screenshot below shows an example of contextual action bar:
The bar contains the following elements, from left to right:
GUI element
Description
Done icon
allows you to confirm the executed action.
This confirms the action and closes the CAB.
# items
displays the number of selected items, and their LSM ID.
Command icons
shows the various action buttons available for the selected
elements. It depends on the context.
Multiselection icon
shows whether the multiselection is activated, and allows
enabling or disabling multiselection.
How to Unselect Items
To unselect only one item, tap again on the item you want to unselect.
To unselect all items, tap
1. Introduction
without performing any other action.
5
EVS Broadcast Equipment S.A.
2.
Clip Management
2.1.
Clip Tab
1.3.A July 2013
Introduction
The Clip tab can be displayed in a Grid view or List view. You can open two clip tabs on
the main window, in the same or in a different view.
Grid View
6
2. Clip Management
USER MANUAL LSM Connect 1.3
The table below presents the various areas on the Grid view:
#
Area
Description
1.
Page
selection
Pages with clips are in white font.
Empty pages are dimmed.
The current page is displayed in blue.
2.
Bank
selection
Banks with clips are in white font.
Empty banks are dimmed.
The current bank is displayed in blue.
3.
Clip box
The clip box displays several clip metadata.
When you tap on a clip, the clip metadata are displayed in a toolbar
on the right of the screen. You can edit the clip metadata in the
toolbar.
See section "Clip Display in Grid View" on page 8
4.
Option
bar
In the option bar, you can perform the following actions:
• Switch from Clip tab to Playlist tab.
•
Switch the Clip view between grid
and list
•
•
Access the clips on a distant EVS server with
.
View the EVS server the displayed clips are stored on
.
List View
In the List view, the clips are listed by default from the smallest to the highest LSM ID.
The empty clip positions are not displayed.
It is possible to display clips or several distant EVS servers in the same list.
You can tap on a column to sort the clips downwards or upwards.
2. Clip Management
7
EVS Broadcast Equipment S.A.
2.2.
1.3.A July 2013
Clip Display in Grid View
Clip Metadata
In the Clip tab, in Grid view, each clip position is symbolized by a rectangle.
When you tap a clip, the full clip metadata are displayed on the toolbar area (right). You
can modify the clip metadata in the toolbar area.
The clip metadata described in the table below can be displayed:
Metadata type
Description
Clip LSM ID
LSM ID in white font if a clip is stored on the given LSM ID.
LSM ID dimmed if no clip is stored or if the configuration does not
include the corresponding recorder channel.
Clip rank
* for primary clip, = for secondary clip
Auxiliary clip
Indicates if the clip is an auxiliary clip.
Archive status
blue folder if the clip is tagged as 'to be archived'
white folder if the clip has already been archived
Otherwise, no icon.
Protected status
red lock if the clip is protected by LSM user
white lock if the clip is protected by other users
Otherwise, no icon
Emoticon
You can add an additional icon that can be used to easily identify
specific clips.
Keywords
Associated keywords are displayed on a second line
Colored left border
You can select add a color on the left border to easily identify
specific clips.
Clip Background
By default, the clip background is grey. The following background color can be displayed:
8
Background color
Meaning
Dimmed
codec mismatch between clip and EVS server configuration
Blue
selected clip
Red
on-air clip
Dark
empty position (and dimmed LSM ID)
2. Clip Management
USER MANUAL LSM Connect 1.3
2.3.
Accessing Distant Servers
Introduction
From the Clip tab in Grid or List view, you can access distant EVS servers available on
the network, and perform actions on the distant clips.
In Grid view, you can select a single EVS server. The EVS server name and net number
whose clips are displayed in the grid is displayed at the top of the Clip tab, next to the
Network icon:
In List view, you can select several servers. The clips stored in the selected EVS servers
will be displayed in a list view, one server after another.
How to Access a Distant EVS Server
To access a distant EVS server, proceed as follows:
1. In the Clip tab, in Grid or List view, tap the Network icon.
2. Select the EVS server whose clips you want to view in the grid or list.
If you are in List view, you can select several servers.
3. Click OK.
In Grid view, the clips of the distant server are displayed in the grid, and the server name
and number is displayed on the top of the screen.
In List view, the clips of the first distant server are displayed, then the clips of the second
server, and so on.
2.4.
Managing Clips
Introduction
The actions you can perform on clips are available as a contextual action bar (CAB) once
you have selected at least one clip in the Clip tab:
The general elements of the CAB are explained in section "Selecting Items" on page 4
2. Clip Management
9
EVS Broadcast Equipment S.A.
1.3.A July 2013
Actions on Clips
The table below describes briefly the available commands for clips. Some of the actions
are explained in details in a separate topic:
Action button
Description
Allows you to cut selected clips, send them to the clipboard, and then
move them to a new selected position using a paste action.
See section "Copying and Moving Clips" on page 11
Allows you to copy selected clips, send them to the clipboard, and
then copy them to a new selected position using a paste action.
See section "Copying and Moving Clips" on page 11.
Allows you to delete selected clips.
Allows you to set selected clips as 'to be archived'.
Clips set as to be archived but not archived yet have a blue folder
displayed in the grid view.
When the clips are archived, they have a white folder displayed in the
grid view.
Allows you to push selected clips to the location defined in the Push
settings in the Multicam Configuration module.
In Copy and Move actions, when you select the requested position for copy or move, the
following paste options can be available in the CAB, depending on the type of selection
(single ou multiselection):
Action button
Description
When you have selected a single clip, you can copy it to
the selected new position using the Paste icon in the
CAB.
When you have selected several clips, you can copy
them to the selected new position using Paste Same
Position icon in the CAB.
In this case, the clips are pasted one after the other from
the selected position, taking into account the initial
CAM name.
When you have selected several clips, you can copy
them to the selected new position using Paste
Contiguous icon in the CAB.
In this case, the clips are pasted one after the other from
the selected position, disregarding the initial CAM
name.
10
2. Clip Management
USER MANUAL LSM Connect 1.3
2.5.
Copying and Moving Clips
Introduction
This section explains how to copy or move one or more clips from one position to another
one, located on the same EVS server or to a distant EVS server.
You need to perform copy and move actions in Grid view, not in List view. To copy and
move clips, you will use commands available in the CAB, the blue Contextual Action bar
located at the top of the screen:
Tip
Clips can only be pasted on empty positions. Do not select a position that is not
empty for pasting selected clips.
Selecting Clips
This is the initial step before you can apply a command to one or several clips
To select one clip, playlist or playlist elements, simply tap once on the requested item.
Double tap or tap and hold will not allow other types of selection.
To select several items, first tap the multi-selection icon
items.
, then select the requested
When the multiselection mode is active, you can select several clips on different banks,
pages of the same EVS server or even on different EVS servers.
How to Copy or Move Clips
1. After selecting the requested clips in a Clip Grid view, do one of the following actions:
◦
To move clips, tap Cut in the CAB.
◦
To copy clips, tap the Copy icon.
2. If you want to copy or move the clips to a distant EVS server, do the following.
Otherwise, go to step 3:
a. Tap the Network icon
.
b. Select the requested server.
c. Tap OK.
2. Clip Management
11
EVS Broadcast Equipment S.A.
1.3.A July 2013
3. In a Clip Grid view, select the page, bank and position you want to move your clips to
in the following way:
a. Tap on the requested page at the bottom of the Grid view.
b. Tap on the requested bank on the left of the Grid view.
c. Tap on the requested empty position (position for the first clip in a multiselection).
4. To paste the selected clips, do one of the following actions:
◦
In single selection mode, tap Paste in the CAB.
◦
In multiselection mode, tap Paste Same Position in the CAB if you want the
selected clips to be pasted on the same CAMs as the initial clips.
◦
In multiselection mode, tap Paste Contiguous in the CAB if you want the
selected clips to be pasted one after the other from the selected position, on all
recorders (whatever the EVS server configuration).
The selected clips are moved or copied to the requested positions.
2.6.
Searching for Clips
Accessing the Search Clip Window
You can search for clips stored on the current EVS server. The search is a free-text
search on the clip metadata available in the displayed columns.
You will access the search feature by tapping the magnifier icon
the main window.
on the top right of
This opens the Search window on the left tab:
On the right, the playlist tab is displayed.
12
2. Clip Management
USER MANUAL LSM Connect 1.3
How to Search for Clips
To search for clips, proceed as follows:
1. In the Search window, type the text you want to search for on the right of the magnifier
icon in the CAB:
As you type, the application suggests metadata that includes the text you have
already entered.
2. Do one of the following:
◦
If you do want to search strictly for your text string, tap on the entered text again.
◦
If you want to select a suggested text string, tap on it.
The clips that contains the requested text are displayed as a list.
You can select the search results as in the Grid view, and perform all possible actions on
those clips.
2. Clip Management
13
EVS Broadcast Equipment S.A.
3.
Playlist Management
3.1.
Playlist Tab
1.3.A July 2013
Introduction
The Playlist tab can display be declined in two views:
•
Initially, it displays a set of selected playlists which you define as 'visible playlists'.
We will call this the List view
•
When you tap on a playlists, the selected playlist opens in the Playlist tab, and you
can view all playlist elements and transition information.
We will call this the Detail view
List View
14
3. Playlist Management
USER MANUAL LSM Connect 1.3
The table below presents the various areas or icons on the List view:
#
Area/Icon
Description
1.
Adds the selected clips at the end of the
corresponding playlist.
2.
Playlist containing playlist elements:
The Playlist LSM ID is specified, as well as the
playlist duration, and the number of playlist
elements.
Empty playlist position.
As you can add elements to such a playlist, the
Add icon is displayed on the left.
Timeline position.
You cannot add elements to a timeline in LSM
Connect.
Selected playlist displayed on a blue
background.
Loaded playlist displayed on a red background.
3.
Opens the corresponding playlist in Detail
view.
4.
Opens the Select visible playlists window in
which you can check the playlists you want to
display in the List view.
3. Playlist Management
15
EVS Broadcast Equipment S.A.
1.3.A July 2013
Detail View
16
3. Playlist Management
USER MANUAL LSM Connect 1.3
The table below presents the various areas or icons on the Detail view:
#
Area/Icon
Description
1.
Insert the selected clip(s) between the
surrounding playlist elements.
2.
Insert the selected clip(s) at the end of the
playlist.
3.
Represents the open playlist, and the related
information.
4.
Closes the Detail view and comes back to the
List view.
5.
Represents the playlist element and displays
related information, from left to right:
• position in the playlist
• clip LSM ID
• clip TC (LTC)
• Video effet type and duration
• Audio effet type and duration
6.
Goes back to the List view. All changes
previously done in the Detail view are applied.
Displays larger boxes for playlists elements,
and the same clip metadata as in the Clip Grid
view.
Allows to sort the playlist elements by TC IN,
but resets all transitions to the default settings.
3. Playlist Management
17
EVS Broadcast Equipment S.A.
3.2.
1.3.A July 2013
Managing Playlists
Introduction
This section presents the actions you can perform on playlists.
Actions on Playlists
How to Change the Playlist Name
To change the playlist name, proceed as follows:
1. In the Playlist tab in List view, tap the playlist whose name you want to modify.
The playlist name and other information are displayed in the toolbar.
2. In the Name field, type or modify the playlists name.
3. Tap the Done key on the virtual keyboard.
How to Regenerate the Playlist Timecode
To regenerate the playlist timecode, proceed as follows:
1. In the Playlist tab in List view, tap the playlist whose timecode you want to
regenerate.
The TC Regeneration area is displayed in the toolbar.
2. Set the requested field values in the TC Regeneration area.
18
3. Playlist Management
USER MANUAL LSM Connect 1.3
How to Delete a Playlist
To delete a playlist, proceed as follows:
1. In the Playlist tab in List view, select the playlist you want to delete.
2. Tap
in the CAB.
How to Merge Two Playlists
When you merge two playlists, the first selected playlist is in fact merged into the second
selected playlist. In other words, all playlists elements of the first playlist are added at the
beginning of the second playlist.
To merge two playlists, proceed as follows:
1. In the Playlist tab in List view, select the two playlists you want to merge together.
2. Tap
in the CAB.
3. Tap OK to confirm the merge action.
3. Playlist Management
19
EVS Broadcast Equipment S.A.
3.3.
1.3.A July 2013
Editing Playlists
Introduction
This section presents the actions you can perform on playlist elements.
Actions on Playlist Elements
How to Add Clips at the End of a Playlist
In the Playlist tab, you can work in List view or in Detail view.
To add at the end of a playlist, proceed as follows:
1. In the Clip tab or in the Search window, select one or more clips you want to add to the
playlist in the Clip tab.
See section "Selecting Items" on page 4 for more information.
2. Do one of the following actions:
◦
If the playlists are displayed in List view, tap
you want to add the selected clips.
◦
If the playlist to which you want to add the selected clips is open in Detail view,
tap the Add icon
in front of the playlist to which
at the top of the playlist tab, next to the playlist box.
The Add icon briefly turns green and the playlist box briefly turns orange as the clips are
added at the end of the playlist.
How to Add Clips Between two Playlist Elements
In the Playlist tab, the playlists to which you want to add clips must be open in Detail
view.
To add between two playlist elements, proceed as follows:
1. In the Clip tab or in the Search window, select one or more clips you want to add to the
playlist in the Clip tab.
See section "Selecting Items" on page 4 for more information.
2. In the Playlist tab, tap the Add icon
want to insert the selected clips.
in between the two elements where you
The Add icon briefly turns green and the playlist box briefly turns orange as the clips are
added at the end of the playlist.
20
3. Playlist Management
USER MANUAL LSM Connect 1.3
How to Reorganize Elements inside a Playlist
You can only move an element at a time inside a playlist.
To reorganize elements inside a playlist, proceed as follows:
1. In the Playlist tab, open the playlist you want to reorganize in Detail view.
2. Tap and hold the playlist element you want to move.
3. Drag the element at the requested position and release when the Add icon at the
requested position turns green.
How to Remove Elements from a Playlist
To remove elements from a playlist, proceed as follows:
1. In the Playlist tab, open the playlist you want to remove elements from in Detail view.
2. Select one or more playlist elements (when multiselection is active) you want to
remove.
3. Tap
in the CAB.
How to Copy Clip Elements Between Playlists
To copy clip elements from one playlist to another one, proceed as follows:
1. Open the requested playlists in both tabs in Detail view.
2. Select the playlist elements you want to copy from one playlist to the other.
3. Tap and hold one of the playlist elements until an dark grey element box is displayed
4. Without releasing, drag to the Add icon of the second playlist, where you want to
insert the selected elements.
5. Release when the Add icon turns green.
The elements selected in the first playlists have been copied to the second playlist, and
are still in the first playlist.
3. Playlist Management
21
EVS Broadcast Equipment S.A.
4.
1.3.A July 2013
Settings
Introduction
The Settings include four menus or windows:
•
Connection Menu
•
Parameters Menu
•
Maintenance Menu
•
About window
Connection Menu
The Connection menu allows you to select the EVS server and LSM Remote Panel to
which LSM Connect has to connect to. You can connect to one EVS server and one
Remote Panel at a time.
See section "Starting LSM Connect" on page 2 for full information on how to connect to
EVS servers.
22
4. Settings
USER MANUAL LSM Connect 1.3
Parameters Menu
The Parameters menu allows you to set LSM connect parameters.
The table below describes the available parameters:
4. Settings
Name
Description
Edit clip metadata
on mark in/out
This option allows you to enter the clip metadata using LSM
Connect when you mark an IN or OUT point with the Remote
Panel.
When this option is active and when you mark an IN or OUT point
on the Remote Panel, a metadata window pops up on the LSM
Connect.
Tablet and remote
sync
This option allows the automatical page and bank synchronization
between the Remote Panel and the Clip tab in Grid view.
Load clip/playlist
This option allows you to load a clip or a playlist on the first PGM
using a double tap on the requested clip or playlist in LSM
Connect.
Clips List Visible
Columns
This section lists the columns that can be available in the Clip tab,
List view and in the Search window.
Only the selected columns will be displayed in the lists.
23
EVS Broadcast Equipment S.A.
1.3.A July 2013
Maintenance Menu
The Maintenance menu allows you to perform some maintenance tasks on the LSM
Connect.
The table below describes the available maintenance commands:
24
Name
Description
Clear icon and
color cache
The colors and emoticons assigned to clips in the Clip toolbar are
only stored on the LSM Connect.
This command allows you to clear this metadata for each EVS
server the LSM Connect has connected to.
To clear the cache, select the serial number of the EVS server you
want to clear the cache information and tap Clear.
Export logs to the
connected server
To export the LSM Connect logs directly to the EVS server it is
connected to, tap Export.
Multicam Web
Configuration
To launch the Multicam Web Configuration module on the tablet,
tap Launch.
4. Settings
Corporate
+32 4 361 7000
North & Latin America
+1 973 575 7811
EVS Headquarters
Liège Science Park
16, rue Bois St Jean
B-4102 Seraing
Belgium
To learn more about EVS go to www.evs.com
Asia & Pacific
+852 2914 2501
Other regional offices
www.evs.com/contact
EVS Broadcast Equipment is continuously adapting and improving its products in accordance with the ever changing
requirements of the Broadcast Industry.
The data contained herein is therefore subject to change without prior notice. Companies and product names are
trademarks or registered trademarks of their respective companies.