1
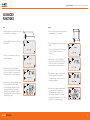
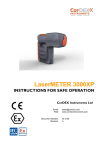
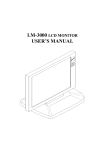
USER
MANUAL
LM3000
EXPLOSION PROOF
LASER DISTANCE METER
RUGGED AUTHORITY
www.cord-ex.com
Congratulations – You are the
owner of the next generation
explosion proof laser distance
meter designed and certified
specifically for use in hazardous
(explosive) atmospheres.
3000XP is certified ATEX/IECEx as follows:
•
Zone 1 IIC T4 hazardous (explosive) area
!
WARNING! LASER HAZARD!
This device is a Class II laser
product (< 1mW, 635nm,
EN60825-1:2002). Never look
directly at the laser beam, aim
it at people or shine it at highly
reflective surfaces: it may cause
eye damage.
CONTENTS
Getting To Know Your 3000XP
4-5
Overview
7
Preparation
8
Settings
9
Basic Operation
10-11
Advanced Functions
12-15
Troubleshooting
16
Specification
17
LaserMETER 3000XP - Explosion-proof Laser Distance Meter
GETTING TO KNOW
YOUR 3000XP
Keypad
Display
3
1
2
1
OFF/
CLEAR
REF/
LIGHT
A/V/P
5
2
3
4
5
19
18
ftim
UNITS
19
18
4
ON / DIST
6
ftim
7
8
1
On / measure distance
2
Cancel last action / Off (hold
button for 2s)
RUGGED AUTHORITY
3
Change reference (front/back)
/ turn backlight on/off (hold
down for 2s)
4
Addition (one press),
subtraction (two presses) /
change units (hold key for 2s)
5
1
Advanced mode: Area (one
press) / Volume (two presses)
Reference indicator
Pythagorean - calculate
hypotenuse (three presses)
Area/volume/Pythagorean
mode
Pythagorean - calculate
opposite side (four presses)
2
3
Battery charge indicator
4
Secondary display
5
Laser activity indicator
6
Addition/subtraction mode
7
Units
8
Main display area
5
LaserMETER 3000XP - Explosion-proof Laser Distance Meter
OVERVIEW
Congratulations on your purchase of the
LaserMETER 3000XP.
The LaserMETER 3000XP is an explosionproof laser distance meter, ATEX-certified
for use within a Zone 1 IIC T4 hazardous
(explosive) area. The robust IP65 design
incorporates a shock resistant, anti-static
over mould, interchangeable battery pack and
backlit LCD display.
The LaserMETER 3000XP is capable of
measuring distances of 30m with an accuracy
of 3mm (accuracy may vary depending on
reflectivity and ambient conditions). It allows
Pythagoras, Area and Volume calculations.
PACKAGE CONTENTS
Carefully unpack your LaserMETER 3000XP
and ensure that you have the following items:
• LaserMETER 3000XP
• Removable/rechargeable battery pack
• Safe area charging station
• Wrist strap
• Power pack
• Battery removal tool
Focus Ring
RUGGED AUTHORITY
135˚ Swivel Lens
7
LaserMETER 3000XP - Explosion-proof Laser Distance Meter
PREPARATION
SETTINGS
Battery Pack and Charging
2
Connecting the Reference Mode
Place the CorDEX Approved Battery Pack
in the supplied Charging Station. Plug
the charger into a suitable mains supply.
The green LED flashes during charging,
and remains on when the battery is fully
charged (approximately 2 hours). Do not
leave batteries in the charger longer than
is necessary - this may lead to shortened
battery life.
Load the battery pack paying careful attention
to its orientation.
When you make a measurement using the
LaserMETER, the distance is measured from
either the front or back of the device (default).
The reference point is indicated by an icon on
the left of the screen.
WARNING! Only use CorDEX Approved Battery
Packs Only (CDX2341-007). There could be a
risk of explosion if other types of batteries are
charged.
Please note that batteries can become warm
during the charge cycle.
Do not attempt to open the charger.
3
Close the battery cover, replace the screws
and make sure the cover is locked securely.
!
Never open the battery
compartment in a hazardous
environment. Only use cordex
approved battery packs.
Keep the charger in a dry place (indoor use
only).
Do not use the charger if there are any signs of
damage to the housing, mains, pins, cables or
connectors. In case of a defect, please return
to an authorized service center.
Loading the battery:
1
Open the LaserMETER’s battery compartment.
Remove the six retaining screws using the
supplied battery removal tool.
RUGGED AUTHORITY
Switching On and Off
To switch the meter on, press the ON/DIST
To switch the unit off, press and hold down
the CLEAR/OFF button. The device also
switches off automatically if no key is pressed
within 3 minutes. button.
If you want to change the reference point,
press the Reference button until the required
mode is displayed.
BACK
FRONT
Choosing The Units
Distances
The LaserMETER can display measurements
in metres, feet, feet & inches, or inches. To
cycle through the seven display formats,
shown opposite, press the UNITS button.
Areas
You can display areas in three formats:
0.000m², 0.00m² or 0.00ft².
Press the UNITS button to cycle through these
options.
Volumes
You can display volumes in three formats:
0.000m³, 0.00m³ or 0.00ft³.
Press the UNITS button to cycle through these
options.
19
18
ftim
19
18
ftim
19
18
ftim
13
16
ftin
13
16
ftin
13
16
ftin
13
16
ftin
9
LaserMETER 3000XP - Explosion-proof Laser Distance Meter
BASIC OPERATION
Single Measurements
1.Press the ON/DIST button to switch on the
meter. The laser is activated. Place the meter
against a stable surface and aim the laser at
the far end of the range to be measured.
Continuous Measurement
M
19
18
ftim
19
18
ftim
2.Press the ON/DIST button again to take the
measurement. The laser is deactivated.
M
19
18
ftim
19
18
ftim
3.To take another measurement, press the
ON/DIST button again. The laser is activated.
Your previous measurement is transferred
to the secondary display area. Aim the laser
as before.
4.Press the ON/DIST button again. The new
measurement is shown in the main display
area.
M
19
18
ftim
19
18
ftim
M
Hold down the ON/DIST button for about
2 seconds to start continuous measuring.
The meter beeps with each updated
measurement. During continuous measuring,
the latest measured value is displayed in
the main display area. The previous value is
displayed in the secondary display area.
19
18
Addition/Subtraction
1.Press the ON/DIST button to switch on the
meter and activate the laser.
M
2.Press the ON/DIST button again to take your
first measurement as described previously.
3.Press the +/- button once for an addition
or twice for a subtraction operation,
as required. The first measurement is
transferred to the secondary display area.
19
18
ftim
M
ftim
19
18
ftim
19
18
ftim
ftim
19
18
19
18
ftim
4.Press the ON/DIST button again to take the
next measurement. Its value is displayed in
the secondary display area; the result of the
addition/subtraction operation is shown in
the main display area.
M
19
18
ftim
19
18
ftim
5.Repeat these steps to carry out further
addition/subtraction operations.
RUGGED AUTHORITY
11
LaserMETER 3000XP - Explosion-proof Laser Distance Meter
ADVANCED
FUNCTIONS
Area
Volume
1.Position yourself at one corner of the area to
be measured (X - see diagram).
1.Position yourself at one corner of the volume
to be measured (X - see diagram).
2.Press the ON/DIST button to switch on the
LaserMETER.
2.Press the ON/DIST button to switch on the
meter.
3.Press the A/V/P button twice. The volume
symbol is displayed and the laser is
activated.
3.Press the A/V/P button once. The area
symbol is displayed.
4.Point the laser at one of the adjacent
corners in the area (A). Press the ON/DIST
button. The length A-X is measured and
displayed in the secondary display area.
5.Point the laser at the other adjacent corner
(B). Press the ON/DIST button again.
The meter displays the length X-B in the
secondary display area. It calculates
and displays the area based on the two
measurements (XA x XB) and displays it in
the main display area.
RUGGED AUTHORITY
4.Point the laser at one of the adjacent
corners in the area (A). Press the ON/DIST
button. The length A-X is measured and
displayed in the secondary display area.
5.Point the laser at another adjacent corner
(B). Press the ON/DIST button again.
The meter displays the length X-B in the
secondary display area.
6.Point the laser at another adjacent corner
(C). Press the ON/DIST button again.
The meter displays the length X-C in
the secondary display area. The meter
calculates the volume (XA x XB x XC) and
displays it in the main display area.
13
LaserMETER 3000XP - Explosion-proof Laser Distance Meter
ADVANCED
FUNCTIONS (CONT)
PYTHAGOREAN (hypotenuse mode)
PYTHAGOREAN (baseline mode)
The Pythagorean mode allows you to measure
distances accurately when it is not possible
to gain access to an area, or when there is an
obstacle preventing a direct line of sight. The
first mode calculates the hypotenuse from two
measurements taken at right angles.
The second Pythagorean mode calculates a
baseline length from the measurements of the
hypotenuse and the adjacent side.
1.Position yourself so that:
You can see both measurement points (A
and B) and the lines (X-A) and (X-B) are at
right angles (see diagram).
2.Press the ON/DIST button to switch on the
meter.
3.Press the A/V/P button until the symbol is
displayed.
4.Aim the laser at the first measurement point
(A) and press the ON/DIST button. The meter
measures the distance: X-A, and displays it
in the secondary display area.
5.Moving the meter as little as possible, rotate
it through 90°and point it at the second
measurement point (B).
6.Press the ON/DIST button again. The meter
measures the distance: X-B and displays it
in the secondary display area.
• Position yourself so that:
You can see both measurement points (A
and B) and the lines (X-A) and (A-B) are at
right angles (see diagram).
• Press the ON/DIST button to switch on the
meter.
• Press the A/V/P button until the symbol is
displayed. Press the mode button again (the
hypotenuse of the symbol flashes).
• Aim the laser at the first measurement point
(A) and press the ON/DIST button. The meter
measures the distance: X-A, and displays it
in the secondary display area.
• Moving the meter as little as possible, rotate
it to aim at the second measurement point
(B).
• Press the ON/DIST button again. The meter
measures the distance: X-B and displays it
in the secondary display area.
The meter calculates the distance A-B and
displays it in the main display area.
The meter calculates the distance A-B and
displays it in the main display area.
RUGGED AUTHORITY
15
LaserMETER 3000XP - Explosion-proof Laser Distance Meter
TROUBLESHOOTING
SPECIFICATION
Error Message
Cause
Correction
Certification information
204
Data overflow
Repeat the measurement steps.
ATEX Certificate No
Sira 10ATEX1283X
205
Measurement
range exceeded
The meter has a maximum range of 30m (100ft). If you need to
measure a greater distance, try to break it down into smaller steps.
IECEx Certificate No
IECEx SIR 10.0133X
252
Temperature too
high
Allow the meter to cool down and then repeat the measurement.
Certificate Type
0518 II 2 G
Ambient Temperature
Tamb -20°C to +50°C
253
Temperature too
low
Warm the meter and then repeat the measurement.
255
Received signal
too weak
Select another target point with higher reflectivity.
256
Received signal
too strong
Select another target point with lower reflectivity.
257
Pythagorean
measurement
violation
Repeat the measurement and ensure the hypotenuse is greater than
the right angle edge.
258
Initialization
error
Turn the meter off, wait a few seconds and then turn it back on.
Hardware error
Turn the meter off, wait a few seconds and then turn it back on.
General Information
Range
0.5m (1.6ft) to 30m (100ft)
Measuring Accuracy
Typically: 3mm (0.1in)
Measurement Unit Displayed
m, ft, ftin, in
Laser Type/ Class
635mm, <1 mW, II
Acc
IEC 60825-1 : 2001
Body/ Lens and LCD
Cast Aluminium chassis with anti-static over-mould/Toughened safety
glass
Emited Wavelength
620-690nm
IP
54
Detailed Information
!
If any of these problems persist,
please contact your dealer.
RUGGED AUTHORITY
Weight
<1kg (<2.2lb)
Dimensions
Length 140mm (5.5in), height 130mm (5.1in) width 75mm (3.0in)
Functions
Pythagoras, Volume, Area
Electrical Information
Battery type
Rechargeable
Capacity
1100mAh
Cell type
NiMH
17
Copyright © 2014, CorDEX Instruments Limited.
All other brand and product names are
trademarks of CorDEX Instruments Limited.
Ref. ID 2102, Rev. B