1
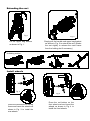
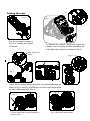
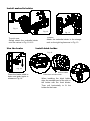
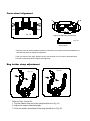
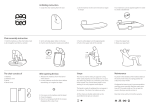
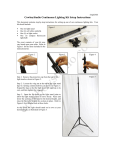
One-click folding 4-wheel golf push cart
Model: CaddyCruiser ONE V3
User Manual
CaddyTek Inc.
20153 Paseo Del Prado
Walnut, CA 91789, USA
Tel: 909-895-6478
www.caddytek.com
Service/Technical support: 800-630-0968
WARNING:
FOR YOUR OWN SAFETY, PLEASE REVIEW THESE WARNINGS AND
KEEP THIS USER GUIDE FOR FUTURE REFERENCE.
●Before using this golf cart, please read and understand the important
instructions and warnings in this user guide.
●AVOID INJURY by always following the instructions carefully.
●AVOID INJURY by keeping clear of moving parts while adjusting, folding
or unfolding this cart.
●ALWAYS make sure the cart is fully extended and locked before use.
●ALWAYS make sure the cart is folded and locked properly before lifting or
transporting.
●ALWAYS use the brake when parking the cart.
●DO NOT run while using this cart.
●DO NOT use accessories other than those designed specifically for this
cart.
●Keep hands and fingers away from moving parts or sliding sections of the
cart
Package contents:
1. The main frame of the cart
2. Two front wheels 26.6 cm (10.5 in.) and 2 rear wheels 29.2 cm (11.5 in.)
3. Umbrella holder
4. Basket (pre-installed on the cart)
5. Drink holder
6. This user manual
7. Hangtags on the handle
8. Tools for adjustment
In case any of the above items are missing or damaged, please call 909-895-6478 or email
[email protected] to report.
Parts identification:
A: PVC handle grip
B: Scorecard holder assembly
C. Handle frame
D: Upper bag holder bracket assembly
E: Adjustable handle mechanism
D
F: Main connecting rod
G: Main frame
H: Leg bracket
I:
2 holes right leg frame
J: 4 holes leg frame
K: 2 holes left leg frame
S
L: Left stabilization bar
L1: Right stabilization bar
M: Footbrake assembly
N: Left rear wheel holder
T
N1: Right rear wheel holder
O: Holding slot for folded cart frame
P: Supporting cable
Q: Sub-connecting rods
R: Front wheel fork assembly
U
S: Rear wheel assembly
T: Lower bag holder bracket assembly
U: Front wheel lock mechanism
V: Front wheel assembly
W: Umbrella holder base
X: Umbrella holder
Y: Basket with cooler
Y1: Handle mesh net
Z: Drink holder
Z1: Umbrella holder storage rack
X
A
C
W
B
Y1
Z
I
E
G
H
L1
F
Q
P
J
M
N1
R
V
O
Z1
K
Y
N
L
Extending the cart
Fig. 1
Lift the upper bag bracket
as shown in Fig. 1.
Fig. 2
Simply pull the handle and upper bag bracket
as shown in Fig. 2 to extend the cart. (Shake
the cart slightly to release the main frame
from the holding slot if necessary.)
Unfolding motion
Install wheels
Fig. 3
Fig. 4
Press the red bottom on the leg
frame and insert the wheels as
shown in Fig. 3 to install the
rear wheels.
Press the red bottom on the
front wheel axel and insert the
wheels as shown in Fig. 4 to
install the front wheels.
Folding the cart
Fig. 5
Fig. 6
Turn the red knob as shown in
Fig. 5 to release and tighten
the handle.
To achieve the optimal folded size, adjust the
handle to the 2nd highest location marked by the
small label near red knob as shown in Fig. 6.
Cart folding red
button
Fig. 7
Fig. O
Fig. 8
Press the red folding button and push the handle downward as
shown in Fig. 7 and Fig. 8 to fold the cart till the main frame clicks
into the holding slot as in FIG. O.
Fig. 10
Fig. 9
Push the upper bag bracket downward as
shown in Fig. 9.
Fig. 10 shows the cart is folded.
Install umbrella holder
Fig. 11
Fig. 12
To put in use:
Simply attach the umbrella holder
onto the cart as in Fig. 11 & 12.
Use the brake
Fig. 13
To store:
Attach the umbrella holder to the storage
rack on the right leg frame as in Fig. 13.
Install drink holder
Fig. 15
Fig. 14
Press the brake pedal to
brake and push again to
release as Fig. 14.
Slot on holder
Fixed block on base notch
When installing the drink holder,
align the smallest part of the slot on
the holder with the fixed blocks.
Then pull horizontally to fit the
holder on the base.
Front wheel alignment
A
B
Right
Left
Fig. 17
Fig. 16
Alignment adjusting screws A/B
Fig. 18
Hex wrench
If the cart veers to the left, please use the hex wrench to turn screw A counterclockwise and
Screw B clockwise to adjust the alignment.
If the cart veers to the right, please use the hex wrench to turn screw A clockwise and
screw B counterclockwise to adjust the alignment.
Bag holder strap adjustment
Fig. 19
Fig. 20
Refer to Figs. 19 and 20:
1. Pull the elastic strap out of the strap buckle as in Fig. 19.
2. Adjust the strap to desired length.
3. Push the elastic strap back to the strap buckle as in Fig. 20.
WARRANTY
CaddyTek Inc. warrants its products to be free of defects and workmanship for one year
from the date of purchase. We will either repair or replace defective products at our option.
Normal wear and fading of products is not considered a manufacturer's defect. This
warranty does not apply to claim of damage to items used in connection with CaddyTek Inc.
products. In the case of deterioration due to normal use we will repair the item for a normal
charge. CaddyTek Inc. is the sole judge of any claim or warranty.
For customers in North America, please contact CaddyTek Inc. for the service. For
customers outside of North America, please either contact your dealer for the warranty
service or you are welcome to contact CaddyTek Inc. directly.
Failure to return this card may result in delayed response to your warranty claim
Signed:________________________ Date:________________________
Rounds of Golf per Month:_______________ H'CAP_______________________
Date of Purchase :______________Name of Store/Dealer:__________________
Tel:____________ Email____________________
City:______________ Province:____________ Postal Code:______________
Address:______________________________________________
Name (Mr./Mrs./Ms.):________________________________
Model:______________________________
I have read and understand this product's operation and warranty, and wish to record
my purchase:
PRODUCT REGISTRATION
6
You can also register your Golf Cart on www.caddytek.com
Walnut, CA 91789
USA
20153 Paseo Del Prado
CaddyTek Inc.
Stamp