1
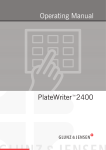
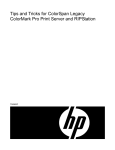
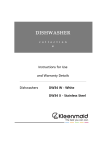
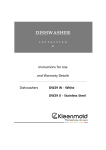
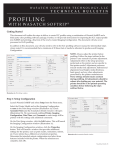
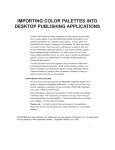
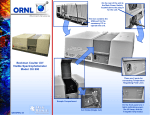
Feb 3, 2005
Louis Dina
A New User’s Tutorial to Using IJC/OPM
I am a recent purchaser of the Bowhaus IJC/OPM RIP for Windows. This program is for
monochrome printing only, including toned B&W images. I am finding it is capable of exquisite
output, far superior to most of the other solutions I have seen on the market. But what really sets
this application apart is the IJC (Ink Jet Control) portion of the software, which allows the user to
build or tweak fantastic profiles for any paper and virtually any combination of inks that will fit
into their printer.
The reason I am writing this is the lack of currently available information on how to use IJC to
work its magic. Bowhaus is fully aware that inadequate instructional information is making it
difficult for users to understand and get the most out of the product. They are working hard on
it. As a new user, I have the time and desire to get something out there quickly for other users,
so they can see how powerful and awesome the product really is. I am hoping this will help
other users understand the basics of creating profiles with IJC so they can hit the ground running.
Joe Berndt, creator of IJC/OPM spent a few hours walking me through the basics, and that is
basically what I will try to share in this document. Thanks, Joe. By the way, IJC/OPM stands
for the two components that make up the software and work hand in hand. IJC is Ink Jet
Control, the profile creation and editing part of the software. OPM is Open Print Maker, which
uses IJC profiles to print. I will be focusing on IJC, since OPM is fairly simple and intuitive.
General Background
“Profiles” in IJC are really inking recipes that tell each ink cartridge how much ink to deposit for
a given density level. Each ink cartridge used in a given profile has its own curve, which can be
adjusted and finely controlled across the entire density range. IJC/OPM profiles should not be
confused with ICC Profiles, which are typically used to display and print color images.
With IJC, you can create profiles using standard color inksets, such as Epson UltraChrome , MIS
color inksets, Quad Inks, Variable Tone B&W Inksets, etc. If the ink cartridges will fit into your
Epson printer, IJC can create a profile for them. In an Epson 2200, for example, (on which I will
base the examples in this document), there are 7 available ink slots. You can put any color ink in
any slot, (but be sure to use a correctly chipped ink cartridge for that position to prevent serious
damage to your printer).
You can create new profiles from scratch, use existing profiles to create new profiles, tweak
existing profiles and create toned profiles from neutral ones.
Creating new profiles from scratch is generally a more involved undertaking, especially if you
are using color inksets to build B&W profiles. The goal is to create a profile that is totally
smooth from the deepest obtainable black to paper white. To accomplish this with color inks
requires that you use more than just the black ink cartridge, so you need to mix colored inks to
get smooth gradations, especially in the lighter areas of the print. Another reason for color is to
Bowhaus IJC/OPM
Beginner’s Guide
page 1 of 16
counteract and balance the generally warm tones of black and gray inks to produce neutral
shades of gray. A lot of time and effort is spent to develop starting curves for a given inkset,
trying to get the best blend of inks across the entire tonal range. The user can surely do this with
a little experience, but be prepared for some time, effort and testing.
In general, it makes much more sense to start with a good profile that is reasonably close. So, if
you want to build a profile for Somerset Velvet Fine Art paper using the Epson UltraChrome ink
set with the Matte Black ink (mk), you might start with a preexisting profile for Epson Enhanced
Matte using that same inkset. Or if you want to create a profile for Epson Premium Glossy, you
may start with a similar glossy profile using the photo black (pk) inkset. This way, most of the
heavy lifting has been done and you can concentrate on quickly building a set of profiles.
Once you have a fairly neutral profile, you can quickly build a series of profiles, using simple
tone sliders. For example, you can take a Neutral profile and quickly generate Cool, Warm,
Sepia, Selenium, Platinum and other profiles. You can use these profiles individually in OPM,
or you can blend two profiles for an intermediate result. Generally, a family of 3 or 4 profiles
per paper/inkset will give the typical user all the flexibility he desires.
Last but not least, IJC has a very powerful linearization engine. This allows the user to fine tune
their profiles for smooth even gradations from black to white. This is crucial for silky smooth
skin tones, good shadow detail, delicate highlights and smooth transitions. IJC also has excellent
ink limiting tools to insure you get the deepest Dmax in your prints.
So, let’s build some profiles.
Building a New Profile from an Existing One
We will build a profile for an Epson 2200 and Moab Entrada Fine Art Paper – Bright White. We
will be printing with the Epson Ultrachrome inkset using the matte black ink (mk) since this is a
matte paper. You may wish to follow along and build an actual profile for your chosen paper.
If you choose a matte paper, use the mk black ink and select a similar preexisting profile, such as
Epson Enhanced Matte. If building a profile for a glossy paper, use the pk cartridge (photo
black) and pick an existing glossy profile, such as Epson Picture Paper. The steps will be the
same even though you are profiling a different paper.
•
Launch OPM (which will print out your test charts) and then
launch IJC, which you will use to create your profiles. From
IJC, use the drop down box and select a suitable profile to
edit. Since I am creating a profile for Moab Entrada Matte
paper, I will select an Epson Enhanced Matte profile as my
starting point (2200_MK_EEM_1). See figure below. You
will see three possible selections ~ Ink Shapes, Linearization,
and Adjust Toners. Even if you select the “wrong button”
you can navigate from one to the other after selecting one.
For now, select Linearization.
•
The Linearization screen will appear.
Bowhaus IJC/OPM
Beginner’s Guide
page 2 of 16
The first thing I do is click the “Edit” button in the upper left. This allows you to rename the
profile, enter the name of the printer, the ink type, and the paper type. Doing this will
prevent you from accidentally overwriting your source profile when you save it, and will also
provide valuable information about the new profile. Nothing is physically saved to disc until
you click the save button above the graph, and even then you have the option of renaming
your profile. This data will also display in OPM when you select profiles, which is very
handy. As you can see above, I renamed my profile to 2200_UC-mk_MoabBW_Neutral.
•
Now, look at the left hand portion of the Linearization screen. You will see 7 ink
positions, reflecting the available ink slots in a 2200. (others will have more or less
depending on the physical printer). You will notice that 5 of them are checked for the
profile we are copying ~ 1. Black, 2. Gray, 4. Light Cyan, 6. Light Magenta and 7.
Yellow. Even though the entire inkset is installed in the printer, these are the only inks
being used for this particular profile. If you click on the thumbnail of the color, you can
use a color picker to change the color. This is merely a convenience and is for display on
your monitor to avoid confusion. It does not affect the profile at all, but makes the graph
and the ink positions more intuitive at a glance.
•
The next box to the right of the color thumbnail is the ink limit dropdown box. The range
is from 1 to 26, with 1 being very little ink, and 26 representing maximum ink flow. For
zero, you would just disable the ink with the check box to the left. The ink limit boxes
really do two things in this version of IJC. The first is to make sure you don’t apply too
much ink to a given paper, which can cause ink to run, wrinkling, buildup, and even less
Dmax on many papers. The most critical one is the black setting (typical settings for
Bowhaus IJC/OPM
Beginner’s Guide
page 3 of 16
black are between 22 and 26). The second function of the ink limit numbers is to provide
an easier way to increase or decrease flow from a specific ink. You will notice that all of
the remaining selected inks are well below 26, and that the yellow is currently set to 4
(4/26, or about 15% of maximum ink flow). For now, we will go with the standard ink
limits. If you found that your test prints were fine overall, but you had excess yellow
across the entire density range, you could lower the yellow ink limit to 3, and you would
see a reduction of yellow in your next print across the entire range. Moving the slider to
3 would limit yellow to about 11.5% (3/26) of its maximum.
•
The next box to the right is a drop down box that currently has the word Quad Group
displaying. You can also choose Toner1, Toner 2, and Toner 3. In the image below, you
can see that I have set LC as toner 1, LM as Toner 2, and Yellow as Toner 3.
Designating these as “Toners” does not affect the profile, but it does make these three
inks available as easily adjustable sliders on the “Adjust Toners” tab. You can use these
sliders to gently nudge a color, add a sepia tone to a neutral profile, cool a profile down,
etc. Pretty slick, but more on that later.
To the right of the Quad/Toner
group boxes, you will see a
small Icon (I’ve circled the
bottom two in blue). Clicking
on an icon will display the
curve for an individual ink, and
give you the option to adjust it
to create the perfect profile.
We will save that for later, but
I wanted to at least point out
what it does.
I will also describe the rest of
the Linearization window as
we progress through this
example.
•
So, we have opened a similar profile (Epson Enhanced Matte), renamed it, and now we
want to see how that will translate to our new paper, in this case, Moab Entrada Fine Art
Bright White. Click the “Print Target” icon above the graph. You will see the following
display.
You can print four different targets. We will concentrate on the last two targets for now.
“Print Target for Linearization” will print a 26-step grayscale using the ink limits and curves
currently specified.
Bowhaus IJC/OPM
Beginner’s Guide
page 4 of 16
Before selecting that option, you can choose how far your
target will print from the top edge by entering a number in
the “Position of Target from top of page in inches” box.
This allows you to move your position if printing multiple
targets on the same sheet of paper.
Make sure OPM is open, that you have the correct inkset
installed (in this case UC with the mk black ink), the correct
paper is loaded, and the correct paper size is indicated in
OPM. Click “Print Target for Linearization” and your target
will print. Ideally, you should let the print dry for a few
hours, or even overnight depending on the paper and inkset
used. If in a rush (almost always) I cut off the printed target
and heat it in the microwave for about 10 seconds on high
power. (This is not optimum and is not necessarily
recommended for the best profiles, but it allows me to work
fast, and the results seem to be good.)
•
Now inspect your target visually. Step 1 will be paper white. Step 26 should be black.
Steps 2 through 25 should be shades of gray. Are there any notable color casts or color
crossovers? While unwanted color casts can be assessed by eyeball, a spectrophotometer
or densitometer is ideal and will yield the best results. For our example, I will use an Eye
One Spectrophotometer to assess the image. (If you are happy with the results, you can
simply move onto linearization, which will automatically adjust densities so you have
even gradation between every step on the test target. For instructional purposes, we will
assume the unwanted colors exist that you wish to correct).
•
Using my Eye One (or your densitometer or your eyeball), I have read a number of test
patches and determined that there is a little too much yellow throughout the test target.
There are a number of different ways to handle this. You can lower the Yellow ink limit
from 4 to 3 (15% to 11.5%), you can adjust the physical yellow curve (discussed later), or
you can simply adjust the Yellow Toner Slider in the Adjust Toners tab, since we have
designated Yellow as Toner 3. Adjusting the slider gives finer control than reducing the
ink limit, so let’s explore that method.
•
In the image below, you will see the Adjust Toners tab. The left side of the window is
the same as shown on the Linearization tab. We have left all ink limits as they were. On
the right side of the window, you can see three sliders. The Toner 1 slider allows you to
adjust ink 4, or in this example, Light Cyan. Toner 2 adjusts Light Magenta, and Toner 3
adjusts Yellow. (If we had left these inks as “Quad Groups” the sliders would be grayed
out and this handy feature would be disabled. If you wanted to use the handy sliders, you
would just change the desired inks to Toners and proceed.) As you can see, I adjusted
the yellow toner slider to –4, which reduces the total amount of yellow ink. You will
have to get a feel for how far to move the slider. As you moved the yellow slider to –4,
you probably noticed that the LC and LM sliders each moved to +2. That is because the
“Link Sliders” box is checked. When Link Sliders is checked, IJC will adjust all three
sliders to maintain the same overall density (increasing some inks while decreasing
Bowhaus IJC/OPM
Beginner’s Guide
page 5 of 16
others.) Pretty cool. If you uncheck the Link sliders box, you could reduce yellow
individually and the other two sliders will not move, but in many cases that might be
exactly what you want. Since this is a fairly minor tweak to reduce yellow, the difference
will be minor at any rate. Large moves would probably be better handled using the ink
limit adjustments. Let’s see how we did.
•
Let’s print another target for linearization using the procedure outlined earlier. If you
are printing on the same sheet of paper, make sure you start the printing lower on the
page. (If you cheated, like I did, and cut off the original test strip and heated it in a
microwave, you can print again at 0.25” from the top, since you have a clean sheet).
•
If you are satisfied with the coloration across the entire grayscale, you can proceed to
linearization. Since this will often be the case, (especially if starting with a good
profile for a similar paper and the same inkset), we will proceed to linearization and
discuss curve adjustment later. To linearize, you will need a spectrophotometer,
densitometer or a scanner. A spectrophotometer or densitometer is much more
accurate, but a scanner will give decent results. Since I have an Eye One, I will use
that for this linearization example. (IJC/OPM version 1.0.0 for Windows does not yet
support direct import of spectrophotometer readings into IJC. This will be added
soon and is being worked on as I write.)
Bowhaus IJC/OPM
Beginner’s Guide
page 6 of 16
With the Eye One (use your chosen instrument) I opened Gretag MacBeth Measure Tool
and set it up to take spot readings. Place the sensor over each of the 26 patches and take
readings, writing down the L* value for each of the 26 patches on a sheet of paper. (Like
I said, this will be automated in the future). Now, click the “Clear” button in the lower
right hand corner of the graph. This will remove all data in the “Readings” column to the
left of the graph. Now enter your step 1 reading in the top box, and enter your step 26
reading in the bottom box. For my paper and ink setting, those readings were L=96.5 for
step one, and L=16.2 for step 26, as shown above. You will see that the “Aims” column
fills in an evenly spaced series of numbers between your two end points. These AIM
points constitute a perfectly linear profile, and will be represented on the curve to the
right as a perfectly straight green diagonal line. (A densitometer uses a logarithmic scale,
so a perfectly linear profile would be described by a gamma curve. A scanner works in a
linear fashion with L* values, similar to a spectrophotometer. The numbers in the
Readings column can be any numbers that represent density or lightness, since IJC treats
them relative to one another. It is the relationships that matter, not the units.)
•
Now, enter the remaining 24 values in the Readings boxes (use the mouse or Tab key
to move from box to box). When you are done, you will see your points plotted on
the curve as red circles connected by red lines (see image below). Most often, your
curve will not be straight and will not represent the ideal (as shown by the green line).
Ideally, you want to be fairly close to the green line for the best profile. If your curve
is very erratic and diverges wildly from the green line, you may want to adjust curves
or ink limits (discussed later).
Bowhaus IJC/OPM
Beginner’s Guide
page 7 of 16
Our curve looks pretty good.
Since it lies above the green line
the entire way, it indicates that our
raw data will print a little darker
than the ideal, linear curve. If
portions of our curve (or our whole
curve) were below the line, it
would indicate lighter output than
the ideal.
This is where IJC really shines.
All you have to do to create your
linear profile is click the save
button, and save your profile. IJC
will automatically make
adjustments to your 26 points so
your have a perfectly linear gray
scale. The display will still show
your raw data, so you know what
your raw curves represent. Very
slick.
How do you know you have an active, linearized
profile? Easy. From the menu bar, select View >
Profile Summary, and you will see the following
window, which shows the profile name, data you
entered when you edited the profile information, all
your ink limit settings, Toner positions, and a line
that says, “Linearization: Active”.
So you have a finished, neutral, linearized profile
which you can begin using immediately in OPM. I
always run the linearization step on profiles supplied
by Bowhaus or others, even if the profile was created
for the same printer/paper/ink combination. My
printer seems to be a little different than their 2200
and yields a slightly different tonal range. So, this is
a powerful, easy to use tool to make sure you are getting profiles that work great on YOUR
printer. That may explain why so many canned profiles from other applications fall short of
expectations. With IJC, you can get it right.
Bowhaus IJC/OPM
Beginner’s Guide
page 8 of 16
As a final step, you can (but don’t have to) print a Target With Linearization to see how your
linearized profile will look. It will show you your final color and tonality of your profile.
You might want to print and save this as a reference in a folder for future use.
You probably noticed a vertical slider to the left of the graph window on the Linearization
window. This serves a couple of different neat functions.
If you are using a densitometer, which reads density in a logarithmic scale, you don’t want a
straight line as your aim point. You need a gamma curve. When using density
measurements, move the slider toward the negative numbers until the step 13 Aim Point
reads between 0.63 and 0.70 (this assumes you have entered values for steps 1 and 26 to
establish the end points first). If you are profiling a matte paper with a low Dmax of 1.6, you
might want step 13 closer to 0.63. If you are profiling a glossy paper with a high Dmax of
2.2, you might prefer to have step 13 set closer to 0.70. Part of this is preference, but these
settings will get you close. As you move the vertical slider, a smooth green curve will be
generated showing the ideal “linear” density curve in logarithmic gamma terms. And when
you save your profile, the same adjustments will be made to give you a linear profile.
The slider has another use. Let’s say you decide your profile is just a little dark, and you
would like to lighten it up just a little. It would be a pain to regenerate the entire profile from
scratch, so all you have to do is move the slider down one notch and save the profile. By
moving the green Aim curve down, you are telling IJC to set your midpoint (or gamma) just
a little lighter. When you save the profile, IJC will make slightly different adjustments and
give you a lighter curve. Of course, you can move it up one notch instead if you want a
darker curve. More than one point in each direction simply increases the effect. How cool is
that!
Creating Toned Profiles from a Neutral One
Now that you have a good neutral profile, you can quickly and easily build a family of toned
curves for the same paper and inkset, using your neutral curve as a starting point. (It doesn’t
have to be perfectly neutral, by the way. Your neutral may be slightly cool, warm or
whatever you like.) You have done most of the heavy lifting, and the rest is pretty easy.
•
Open your neutral profile in IJC. Edit the name so you don’t accidentally overwrite
your neutral profile. Now, go straight to the Adjust Toner tab. If you want a warm
profile, simply slide the light cyan slider to the left to remove a little cyan. If the Link
Sliders checkbox is checked, the light magenta and yellow inks will move to the right
as you move cyan to the left, thus keeping the density level of your print constant. If
you move it a little, you get a slight warming effect. If you move it a lot, you will get
a stronger effect. By moving LC to the left, you are adding red to your print. If you
decide you want a little more yellow, then adjust the yellow slider a little bit, maybe a
few points to the right. Now print a target with linearization to see how your final
profile looks. If you like the effect, save it. If not, tweak it a little, print a test target
again, and save it when you are happy.
Bowhaus IJC/OPM
Beginner’s Guide
page 9 of 16
•
For a cool profile, try adding some cyan and removing a little yellow. For a sepia
profile, add a little magenta and a little yellow.
•
Many people settle on 3 or 4 profiles, such as neutral, warm, cool and sepia. I try to
have a very neutral profile as a baseline, then build the warm, cool and sepia profiles
with a bit more intensity than I might typically want. Since OPM allows you to blend
two profiles, you can combine profiles for unlimited subtle tonal variations. If your
warm profile is a little too warm, combine the neutral and warm profile and adjust the
slider to favor one over the other.
•
Building a family of profiles is fast and easy once you have a good neutral starting
profile. And a good starting profile is easy to create if you have a decent profile you
can copy from a similar type paper.
•
Here are some starting points for building a family of toned curves using the Toner
Sliders. These are my preferences and may differ substantially from yours. It
assumes you start with a neutral profile, have set your LC, LM and Y inks as Toners
1, 2 and 3 respectively, and is based on my experimentation with Moab Entrada
Bright White Matte paper using the UltraChrome inkset with matte black ink. The
effects will no doubt be different with different inks, papers and surfaces. Knowing
myself, these formulas will change as I gain more experience and print more images,
but at least it is a starting point for your experimentation and refinement.
Profile
Neutral Profile
Warm Profile
Sepia Profile
Cool Profile
Very Cool Profile
LC
0,
-5,
-7,
+3,
+7,
LM
0,
-2,
-1,
0,
-2,
Y (Slider Positions)
0
+9
+13
-3
-5
I am inclined to dump the Warm and Cool profiles, and just blend the Neutral profile
with either the Sepia or Very Cool profile. Since the blending slider in OPM can be
set anywhere from 0 to 100, you can achieve subtle effects to meet your needs. Of
course, you might want to create a Selenium toned profile, or experiment with
Platinum, Brown, etc. Now you have the tools to do so.
Adjusting Curve Shapes
The above will probably handle the majority of cases if you have decent starting profiles,
such as those supplied by Bowhaus or other users. It will be all many users ever want or
need to build a library of wonderful profiles.
But what if we ran into a problem with the neutral profile we built above? Let’s assume we
have gorgeous, neutral grays in the quarter tones and mid tones, from step 1 through about
step 18, but we still have too much yellow in the shadow areas. If we lower the yellow ink
limit or move the yellow toner slider further to the left, we will remove yellow across the
Bowhaus IJC/OPM
Beginner’s Guide
page 10 of 16
entire 26 step range. That may be an acceptable compromise, especially if you prefer a
slightly cool neutral profile, which many do. That is a personal preference. But, for
illustration, we will assume you want a totally neutral profile as read by a spectrophotometer
from 1 through 26. This requires you to make adjustments to the shapes of curves for one or
more inks. These tools are very powerful and let you control the color and tonal range
precisely, but they do take more time and effort, and should probably only be used if the
other simpler methods come up short. But it is great to have this flexibility and power.
•
My spectrophotometer showed that my b* readings were in positive territory (from
0.5 to about 2.5). The b* scale in LAB measures the blue to yellow axis. Positive
readings are more yellow, negative readings are more blue. No doubt, the Epson MK
and LK inks are partially responsible for the warmer readings, since they are really
warm black inks, not neutral black. So, I write down a few readings at various steps,
such as 18, 20, 23, 25. (You can do this by eye, but a spectrophotometer is a
tremendous aid in getting it accurate and making sure you adjust the right color ink.)
•
Now, click on the “Ink Shapes” tab. Study the graph for a moment. It shows a
composite with curves of all the “active” inks. Note that if two curves are identical,
one may be superimposed over another, so it may not be visible. Let’s study the
composite curve for a moment and see what it tells us.
First, the black ink starts at about step 14 or 15 and increases rapidly as it approaches step 26.
The LK, LC, LM and Y inks are all almost identical in shape. Even though their shapes are the
same, they are not depositing the same amount of ink. Why? Because the ink limits have been
set differently, with LM at 20 depositing the most ink, followed by LC at 10, LK at 9, and Y at a
Bowhaus IJC/OPM
Beginner’s Guide
page 11 of 16
very low 4. So it is clear that we are relying on these four light inks to generate all the light
tones from steps 1 through 14, and they are doing the bulk of the work in steps 15 through 20,
with the MK ink contributing more and more as we reach the deeper shadow areas.
We don’t want to disturb our nice gray balance in steps 1-18, but we do want to reduce the
overly warm tones in the shadows. My spectrophotometer readings showed the following b*
readings:
Step 18
0.3
Step 20
0.9
Step 23
1.6
Step 25
2.2
So, the yellow effect becomes more pronounced as the shadows deepen. Luckily, it is harder to
see these hue shifts as you approach solid black (as opposed to the highlights, where a similar
shift would be quite noticeable). So, my goal is to reduce the yellow (and/or increase cyan) until
I have a pleasing result that doesn’t show unwanted color crossovers as I go into the shadows.
Based on my quick review, I will start by subtracting some yellow, from step 20-26, and I will
also bump up the cyan from 20-26, knowing that the warm dense black ink is pretty warm.
Again, I want to leave steps 1-18 alone, since they are fine as they are.
•
In the above illustration, I clicked on the icon to the right of the Yellow ink, which
displays the yellow ink curve shape. We are now in the curve editing mode. You can
grab a point with your mouse and move it, but there is probably a better way. By using
Bowhaus IJC/OPM
Beginner’s Guide
page 12 of 16
the Control and Tab keys in combination, you can move from anchor point to anchor
point on the yellow curve. Control Tab until you get to the point near step 19. For this
curve, the point shows coordinates of 179 X 215. 179 is the horizontal position on the xaxis, and 215 is the vertical position on the y-axis. Using the number keypad, use the
down arrow and move down approximately 5 to 8 points to reduce the amount of yellow.
You will see movement of this point does affect the shape of the curve in this region, so
just be aware of what you are changing in general terms. Now, Control Tab to the next
point, near step 22. It reads 209 X 209 on my monitor. Since the yellow was more
pronounced as we got darker, I will remove more yellow at this point than I did at step
19. I will try removing about 15 points to start. Now Control Tab to the point near step
25. I will reduce this by about 20-25 points, and finally I will move step 26 to zero.
Click “Apply” above the graph, and you now have set these points for the yellow curve.
Not so bad. This approach keeps your curves and transitions nice and smooth.
•
You can print a test target at this point, or you may decide to bump up the light cyan a
little, since you know that even with zero yellow, your Epson MK and LK inks tend to
the warm side. That is what I did. I clicked on the LC icon to display and edit the light
cyan curve. I picked similar points, but I increased them to provide more coolness, thus
offsetting the natural warmth of the Epson Black and Gray inks. Click “Apply” and then
print a Target with Linearization to see how you did. Let it dry and assess it visually or
with a spectro. If happy, Save. If not, repeat. You have removed color crossovers.
Other Advanced Features
The above methods are generally applicable to both color ink sets, Quad inks, Ultra-Tone
inks, etc. It is always best to start from a good base profile for your inkset. When using
monochrome inksets, the same rule applies. If no profiles exist for you inkset, Bowhaus has
supplied some generic curves as starting points for Quad inks. On the Ink Shapes tab, you
will see a “Curve Type” dropdown box in the upper right above the graph window. When
you activate an ink for editing, you can select from 5 choices: Free Edit, Black, Dark Gray,
Mid Gray, Light Gray. The four ink definitions allow you to have a good starting point for
your different density inks.
Free edit is what we have been using as we adjusted our light cyan and yellow curves.
Another very cool feature is the ability to export and import curve shapes. Let’s say you
tweaked the shape of your yellow curve in the previous example and got it perfect. While
you are in the edit mode for the yellow ink (or return to that mode) click the export button
above the graph, then save the curve with an appropriate name.
Now you can “import” this curve and place it in ANY ink position in ANY profile. If you
want to duplicate this shape for light magenta in the same profile, click the LM icon to enter
the shape editing mode for LM, click “import” and import the shape you just saved. Click
apply, and that’s done. You can then free edit to your heart’s content as required.
We didn’t discuss it previously, but you can determine ink limits for all of the inks in your
printer. If you have a good starting profile for the same inkset and a similar paper, this will
Bowhaus IJC/OPM
Beginner’s Guide
page 13 of 16
often not be required, but you may find that a different paper would benefit by more or less
ink (for greater Dmax or to reduce over saturation of ink). This would be a recommended
first step in building new profiles from scratch (i.e., without any previous profile as a starting
template). To check ink limits, select Print Target, the Print Test Patches. This will print a
series of steps for each color ink in your printer. The black ink is the most critical, because
too little ink (and sometimes even too much ink) will reduce your Dmax. Too much ink can
cause wrinkling, running, ink buildup, dullness, etc. The Bowhaus manual has a good
writeup on how to select the right patch for determining ink limit.
You don’t want to exceed the ink limit on any ink. You will generally want to use the black
ink limit from this test target and input it into IJC. You can also use a spectrophotometer or
densitometer to find the optimum ink limit for your black ink. You generally WILL NOT
use the actual ink limit for most or all of your other inks. You don’t want to exceed the ink
limit for sure, but you will generally use the Ink Limit box to increase or decrease the amount
of each non-black ink for smooth transitions. Bowhaus has spent a lot of time developing
good curve shapes and starting ink limits for various inksets. Unless you want to spend a lot
of time working from the ground up, you may just want to tweak their starting ink limits.
There is one other target, called the Tweaked Inks Target. This allows you to see the tonal
transitions of each individual ink based on the ink limit settings and the curve settings for
each ink. It also shows you a composite overlay at the bottom. This is especially helpful in
building new profiles from scratch or when experimenting with new inksets (standard ones or
inkset combinations of your own choosing). If your composite looks ragged and has huge
color crossovers or an overall color tone, it is a great starting point to show you what you
need to adjust and where you need to make those adjustments.
Soft Proofing in Photoshop
Using ICC profiles for color work allows you to see the color, contrast, tonal range in
Photoshop while you are working on your image. It can be argued that no monitor can
exactly match a final print exactly, but a good “soft proof” can come very close and is an
invaluable aid during editing. A soft proof is only as good as the profiles and equipment
used in simulation.
Unfortunately, most B&W applications do not use ICC profiles for printing. Using a color
ICC profile to print a B&W image usually leads to disappointment, since very minor color
shifts can dramatically affect a print that is supposed to be neutral shades of gray. The eye is
very sensitive to neutrals, skin tones, etc. So, most B&W printing applications or RIPs use
“profiles”, which are really ink deposition recipes telling the printer exactly how much of
each color to lay down for a given shade of gray. They are designed for printing, not
rendering on your monitor. Open PrintMaker does not use ICC profiles. Even if your
Photoshop image is tagged with a gamma 2.2 grayscale or Adobe RGB profile, OPM ignores
it entirely and takes the raw data from the file as input. It looks at the luminance level of
each part of your image, then deposits ink on the paper in accordance with your inking
recipes.
Bowhaus IJC/OPM
Beginner’s Guide
page 14 of 16
On my computer, I find that assigning a gamma 2.2 profile in Photoshop shows the image on
screen darker than the final print. Gamma 1.8 is closer, but it is a little light compared to the
print. And besides, these working spaces do not take into account the dynamic range of the
paper and ink combination used for the final print. A print on high Dmax glossy stock will
definitely have more contrast and dynamic range than a print made on a low Dmax matte
paper. The above profiles won’t adjust for all the subtleties.
If you find you have a good monitor to print match with your current setup, by all means
continue to do what you are doing. I continue to look for better ways of proofing in
Photoshop, since that is where I do the editing. I want to come as close as possible to hitting
my target first time.
Some of the methods I have discovered include:
•
Creating Curves Adjustment Layers in Photoshop (done by eye when comparing a
print to the monitor). To do this, make a print, then view it in appropriate lighting
while comparing it to the same image on the monitor. Add a Curves adjustment layer
adjust the curve until tonality and contrast match the print as closely as possible. You
can save this adjustment layer for use when you print using the same paper/ink
combination in the future. Before clicking OK, use the save button. Make sure you
turn this layer off before printing, otherwise the visible layer it will adjust the data
being sent to OPM, which will defeat its intended purpose. The adjustment layer is
simply an aid to viewing the print for editing in Photoshop.
•
Creating Custom Dot Gain Curves (also done by eye), is another good way to view a
preview on screen. Carl Schoefield describes this method on his website, at
http://home1.gte.net/res09aij/Monitor-Profiling.htm.
•
Creating ICC profiles for proofing in Photoshop (but not for printing). This requires
a spectrophotometer and profiling package, such as ProfileMaker, Eye One Photo, or
Monaco Profiler, and thus far is my preferred method. I find it to be reasonably
accurate, plus if you profile a sepia or cool profile, you get to see the toning on screen
as well, which is an aid to editing. Roy Harrington describes this procedure on his
website and has a downloadable TIF and reference file. To review this procedure,
visit http://harrington.com/QuadToneRIP.html#softproof
Hopefully, one of these previewing techniques will work well for you. Or you can simply
run a test print then make adjustments in OPM, using the Contrast and Brightness sliders. I
do find the preview in OPM to be reasonably close to the actual print on my monitor, and
these sliders work well for making last minute adjustments, but I want to see and a pretty
accurate preview of my final print as I am editing the file in Photoshop.
I am not certain, but I think Bowhaus may be working on creating live previews, including
toning for the OPM portion of their program. Don’t quote me on that, as it may be an
incorrect understanding.
Bowhaus IJC/OPM
Beginner’s Guide
page 15 of 16
Summary
This was not meant to be a comprehensive manual of every feature in IJC/OPM, but
hopefully it will serve as a great introduction to get you up and running much more quickly.
The tools are here to build, adjust and modify profiles for any conceivable inkset and paper
combination for any supported printer. Here are some quick summaries of the steps, without
all the explanation, for your reference.
Linearizing an existing profile for your printer
If you have an existing IJC/OPM profile for you printer/paper/ink combination, (created by
Bowhaus or anyone else), you can just use it as is, or if you wish, linearize it to make sure it
is really ideal for your printer.
1.
2.
3.
4.
5.
6.
7.
Open the profile in IJC (make sure OPM is open in the background)
Go to the linearization tab and print the Target FOR Linearization.
Let it dry and cure
Read L* or density with a spectrophotometer, densitometer or scanner.
Enter the data into the Readings boxes.
If desired, print a target WITH linearization to see the final result.
Save the profile. That’s it.
Repurposing an existing profile for a different paper
If you have a supplied profile for you printer/ink combination, but want to use it with another
paper, you can try it as is and see how it works, or adjust it for your printer and paper
combination. This is basically a repeat of the above with a few extra steps.
1. Open the profile in IJC (make sure OPM is open in the background). Select the
Linearization tab.
2. If desired, you can “Print Test Patches” to see if you can get a more optimum black level
first. Unless the two papers react very differently, or you are starting with a profile that is
very different for your paper/ink combo, this is probably not required, but it may improve
some profiles. Pick the optimum ink limit for the black ink ONLY and enter that into the
ink limit box for the black ink.
3. Print the Target FOR Linearization.
4. Let it dry and cure
5. If there are any unwanted hues or color crossovers, correct as covered earlier, using the
toner sliders or by adjusting curve shapes.
6. Read L* or density levels with a spectrophotometer, densitometer or scanner.
7. Enter the data into the Readings boxes.
8. If desired, print a target WITH linearization to see the final result.
9. Save the profile. That’s it.
Please consult the official IJC/OPM User Manual for more in depth information.
Enjoy, Lou Dina
Bowhaus IJC/OPM
Beginner’s Guide
page 16 of 16