1
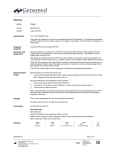
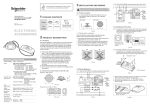
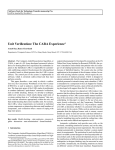
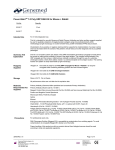
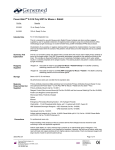
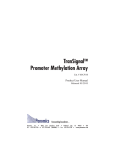
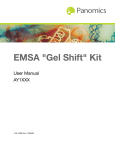
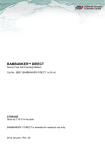
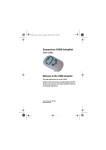
Genemed
Biotechnologies, Inc.
TM
Profiler Array
Nonradioactive System
User Manual
(Version 2.2)
STORAGE
Store Box 1 at room temperature (RT), Box 2 at –20°C, and Box 3 at
4°C. Please note that the Substrate is light sensitive and should be
stored in the dark.
FOR RESEARCH USE ONLY.
(PRT0088)
Profiler Array Nonradioactive System
TABLE OF CONTENTS
I. Introduction
II. Package Contents
3
5
III. Additional Materials & Equipment
6
IV.
Instructions for Use
6
Troubleshooting Guide
10
V.
VI. Appendix
11
TRADEMARKS
ProfilerTM is a trademark of Genemed Biotechnologies, Inc.
CDP-Star® is a registered trademark of Tropix, Inc.
GenBank® is a registered trademark of The United States Department of Health and Human Services.
FluorChemTM is a trademark of Alpha Innotech Corporation.
HyperfilmTM is a trademark of Amersham Pharmacia Biotech.
Saran Wrap® is a registered trademark of S.C. Johnson.
WARRANTY
GENEMED BIOTECHNOLOGIES, INC. WARRANTS THAT THE MATERIALS SOLD MEET
GENEMED’S PERFORMANCE SPECIFICATIONS FROM THE TIME OF SHIPMENT UNTIL
THE EXPIRATION DATE, IF STORED UNDER THE RECOMMENDED CONDITIONS. NO
OTHER WARRANTIES OR GUARANTEES, EXPRESSED OR IMPLIED, ARE PROVIDED, INCLUDING WARRANTIES FOR MERCHANTABILITY OR FITNESS FOR A PARTICULAR PURPOSE. UNDER NO CIRCUMSTANCES SHALL GENEMED BE LIABLE FOR ANY DAMAGES
ARISING OUT OF THE USE OF THE MATERIALS.
© 2000, Genemed Biotechnologies, Inc.
Page 2
Genemed Biotechnologies, Inc.
Profiler Array Nonradioactive System
I.
INTRODUCTION
With the advent of macroarray technology, studying differential gene expression has become relatively easy and routine. The expression profiles of hundreds of genes can be studied simultaneously in a single array experiment.
Typically, array experiments require the use of radioactive cDNA probes.
However, working with radioactively labeled probes is a hassle, requiring timeconsuming procedures. Furthermore, radioactively labeled cDNA arrays tend
to generate high levels of background.
The ProfilerTM Array provides researchers with an alternative approach—a
hassle-free, nonradioactive array system that employs digoxigenin (DIG)-11dUTP-labeled cDNA and chemiluminescent detection. With this method, you
can obtain semiquantitative results in just 1–2 days, compared to 4–7 days that
radioactive-based methods demand.
Our first array, the Star Profiler Array, contains 373 genes—an exclusive set
of the most popular and well-studied genes—spotted onto a positively charged
nylon membrane. Star Profiler Array contains genes that play a significant role
in biological functions and are corroborated with published literature; thus, a
single experiment using Star Profiler Arrays generates highly informative data.
In addition, each spot contains long oligonucleotides (>90 nt), synthesized
from a carefully selected sequence. Our selection process eliminates any homologous regions among the genes on the array so there is no risk of
crosshybridization. As a result, your labeled cDNA probe will hybridize efficiently and selectively to specific sequences on the array. In addition, we offer
targeted arrays such as the Oncogene Profiler Array and Apoptosis Profiler
Array. For a complete list of genes for each array, see the Product Certificate
Sheet provided with each kit.
Benefits of the ProfilerTM Array
Unlike other macroarrays, which often require poly-A+ RNA, the Profiler Array
has no preference for total or poly-A+ RNA. In fact, our method provides
equivalent results using either total RNA or mRNA, so there is no need for
special RNA purification procedures.
Genemed Biotechnologies, Inc.
Page 3
Profiler Array Nonradioactive System
I.
INTRODUCTION continued
Sample 1
Sample 2
(e.g., control)
(e.g., experimental)
Obtain cell or tissue samples
AAAA
AAAA
AAAA
AAAA
AAAA
AAAA
TTTT
DIG
Isolate Total RNA
(~1–6 hr)
DIG
TTTT
DIG
DIG
Prepare Labeled cDNA &
Prehybridize Profiler Arrays
(~2–3 hr)
Hybridization Bag
array 1
array 2
Hybridize overnight
(~12 hr)
Detect & analyze
(~3–4 hr)
(5-min exposure to x-ray film)
Total Time:
1–2 days (~24–28 hr)
Figure 1 provides a simplified overview of the Profiler procedure. After cDNA
labeling, Profiler Arrays are hybridized overnight with DIG-11-dUTP-labeled
cDNA. The next day, the array membranes are washed and subsequently incubated with Anti-DIG-Alkaline Phosphatase (DIG-AP) Antibody. Upon
addition of the CDP-Star chemiluminescent substrate (provided), detection
of DIG-AP can be obtained within minutes by exposing array membranes to
x-ray film or by using a chemiluminescent-imaging system, such as Alpha
Innotech's FluorChem Imaging System.
Page 4
Genemed Biotechnologies, Inc.
Profiler Array Nonradioactive System
II.
PACKAGE CONTENTS
See the front cover of this User Manual for appropriate storage conditions.
For Buffer Solutions & Recipes, see Appendix at the back of this User Manual.
Profiler Array Nonradioactive System†
Profiler Array and Hybridization Kit (Store at room temp.)
•
•
•
•
2
25 ml
60 ml
60 ml
Profiler Arrays
Hybridization Buffer
20X SSC
10% SDS
Profiler Array cDNA Synthesis Kit (Store at –20°C)
• 10 µg
• 10 µl
• 15 µl
• 15 µl
• 50 µl
• 100 µl
• 100 µl
Control K562 Total RNA (yellow)
Reverse Transcriptase (amber)
Random Primer Mix (blue)
Probe Mix (pink)
100mM DTT (salmon)
5X RT Buffer (purple)
dH20 (natural)
Profiler Array Chemiluminescence Detection Kit (Store at 4°C)
•
•
•
•
•
•
15 ml
30 ml
50 ml
50 ml
30 ml
15 µl
CDP-Star Substrate
5X Blocking Buffer
10X Antibody Wash Buffer I
10X Antibody Wash Buffer II
10X Detection Buffer
Alk-Phosphatase Conjugate (orange)
Additional Materials Provided
•
1
Profiler Grid
•
1
Product User Manual
†
See Product Analysis Certificate provided with each kit for complete list of genes spotted on the array.
Genemed Biotechnologies, Inc.
Page 5
Profiler Array Nonradioactive System
III. ADDITIONAL MATERIALS & EQUIPMENT
Additional Materials Required
•
•
•
•
Sheared salmon testes DNA (Sigma, Cat. #D7656)
Hyperfilm ECL Film (Amersham, Cat. #RPN31144)
Plastic wrap (e.g., Saran Wrap) or plastic sheet protectors
Commercial pouch sealer or equivalent
Additional Materials Recommended
• Trizol (Life Technologies, Cat. #15596-018) or equivalent
Additional Equipment
• Thermal cycler or water bath
• Temperature controlled Shaking or Rotating platform
• [Optional] Hybridization oven and bottles (Stratagene Cat. #401031)
• [Optional] Alpha Innotech FluorChem or equivalent
IV. INSTRUCTIONS FOR USE
A. Isolation of total RNA from cells or tissues
Total RNA can be isolated from tissues or cells using standard methods (e.g.,
Trizol or equivalent). You can use poly-A+ RNA if you wish; however, we have
found that equivalent results can be achieved using total RNA.
Quantify your RNA samples by measuring the absorbance at 260 nm and 280
nm. Total RNA samples that are free of proteins have an A260/A280 ratio of
~1.8–2.2. In addition, you should check the quality of your RNA by agarose gel
electrophoresis. Run 0.5–2.0 µg of RNA on a denaturing formaldehyde/agarose/ethidium-bromide gel. Two bright bands, 28S and 18S rRNA, should be
observed at approximately 5 and 2 kb, respectively. These bands are sharply
defined and visible at about a 2:1 ratio (28S:18S).
B. Preparation of cDNA probe
For best results, we recommend using a thermal cycler for all incubation steps;
however, if a thermal cycler is unavailable, heating blocks may be used. If desired, first perform prehybridization (Step C.1–4), and then prepare RNA (Step
B.2) and cDNA synthesis mixture (Step B.4), simultaneously.
1. Preheat a thermal cycler or heating block (or equivalent) to 70°C.
Page 6
Genemed Biotechnologies, Inc.
Profiler Array Nonradioactive System
IV. INSTRUCTION FOR USE continued
2. For each total RNA sample, combine the following components into a
sterile 0.5-ml microcentrifuge tube:
5–10 µg Total RNA
3 µl
Random Primer Mix
Bring each tube to a final volume of 10 µl by adding dH2O (provided). Mix
well by pipetting and spin briefly in a microcentrifuge. Keep on ice.
3. Heat samples at 72°C for 2 min. Then reduce temperature to 42°C and
incubate for 1–2 min.
Note: If a heating block is used, tubes must be incubated for a minimum of 2 min at 42°C.
4. Prepare the cDNA synthesis mixture for each total RNA sample:
6 µl
5X First Strand Buffer†
3 µl
0.1 M DTT†
6 µl
Probe Mix
1 µl
Reverse Transcriptase
4 µl
H2O (provided)
20 µl
Total volume per RNA sample
5. Mix well by pipetting. Incubate the cDNA synthesis mixture at 42°C for 2 min.
6. Transfer the mixture to the tube containing the RNA sample (from Step
B3) and mix well by pipetting. Then incubate at 42°C for 2 hr.
7. After incubation, samples at 75°C for 10 min to inactivate RT. Proceed
directly to Step D (Hybridization) or store DIG-labeled cDNA probe(s) at
–20°C until use.
C. Pre-Hybridization
Before you start, preheat Hybridization Buffer to 52°C. Completely dissolve all
precipitates in the Hybridization Buffer. Prepare sheared salmon testes DNA:
1. Heat the sheared salmon testes DNA (~10 mg/ml) at 95–100°C for 5 min,
then immediately place on ice (~5 min). We recommend preparing aliquots
of 100 µl (i.e., 50 µl per membrane), then storing at –20°C until use.
2. Place each membrane into a hybridization pouch with the spots facing up.
(Note the orientation of the membranes. The correct orientation is shown
in the Appendix, indicating that the notch is on the top, right-hand corner.)
Fill the pouch entirely with pre-warmed 5 ml deionized H2O; avoid adding
H2O directly onto the membrane. Then carefully decant water.
4. For each membrane, prepare pre-hybridization solution: Add 50 µl of the
sheared salmon testes DNA to 5ml of pre-warmed Hybridization Buffer.
After mixing, add 5 ml of pre-hybridization solution to each pouch containing the membrane. Remove bubbles before sealing the pouch. Incubate
at 52°C for ≥ 2 hr.
Genemed Biotechnologies, Inc.
Page 7
Profiler Array Nonradioactive System
IV. INSTRUCTIONS FOR USE continued
D. Hybridization
1. Heat DIG-labeled cDNA probe at 94°C for 5 min. Then incubate on ice
for 5 min.
2. Cut open hybridization pouch, add each DIG-labeled cDNA probe directly
to the Hybridization Buffer (Step C.4), reseal pouch and hybridize overnight (≥ 12 hours) at 52°C.
3. The next day, prepare SSC/SDS washing solutions as described in the Appendix. Preheat SSC/SDS solutions to 52°C before use. Ensure that the
SSC/SDS solutions are free from all precipitates. Shake well before use.
4. Cut open hybridization pouch, decant cDNA probe/buffer and place membrane into a clear plastic container such as a 200 µl pipet tip container.
Quicky rinse each membrane with 10 ml 2X SSC/0.5% SDS and decant.
Wash twice with 30 ml of prewarmed 2X SSC/0.5% SDS at 52°C for 10
min per wash. Then wash twice using 30 ml of prewarmed 0.1X SSC/0.5%
SDS at 52°C for 10 min per wash. Keep SSC/SDS solutions at 52°C during
wash steps.
E. Detection
Note that all incubation and wash steps, below, should be performed on a rotating platform with moderate shaking at room temp.
1. Blocking: Decant 0.1X SSC/0.5% SDS washing solution and add 30 ml of
1X Blocking Buffer to each container.
2. Incubate at room temperature for 30 min.
3. Prepare anti-DIG-AP Antibody Mixture: For each membrane, mix 1 ml
of 1X Blocking Buffer and 6 µl of anti-DIG-AP Antibody. Mix well. Add
the 1-ml mixture to each container, and incubate at room temperature for
30 min.
Note: Be sure to spin the antibody conjugate for 5 minutes at maximum speed before
diluting in 1X Blocking Buffer. Some lots may contain aggregated conjugates that precipitate and can cause a spotty background on the membrane.
4. Wash the membranes at room temperature: Remove the anti-DIG-AP
Antibody Mixture/Blocking Buffer, and wash twice using 40 ml of 1X Antibody Wash Buffer I for 10 min per wash. Then repeat washes using 40 ml
of 1X Antibody Wash Buffer II for 10 min per wash.
5. Dilute CDP-Star Substrate in 1X Detection Buffer (1:30 for x-ray film or
1:10 for Imager). Incubate each membrane in 30 ml diluted substrate for 30
minutes at room temperature.
6. Using forceps, remove each membrane from the diluted substrate. Do not
allow the membrane to dry. We recommend placing the membrane on a
plastic support, such as a developed/used x-ray film.
Page 8
Genemed Biotechnologies, Inc.
Profiler Array Nonradioactive System
IV. INSTRUCTIONS FOR USE continued
7. Immediately cover each membrane with plastic wrap (e.g., Saran Wrap) or
plastic sheet protectors, and remove excess substrate. Avoid air bubbles.
Expose the membrane to Hyperfilm ECL (Amersham Cat. #RPN31144)
for 3–10 min at room temperature. We suggest trying several different exposures of varying lengths of time (i.e., 2–10 min). Alternatively, use a chemiluminescent-imaging system, such as Alpha Innotech's FluorChem Imager
or equivalent.
F. Interpretation of results
For quantitative results, we suggest using an chemiluminescent-imaging system
such as Alpha Innotech's FluorChem or equivalent. Be sure to read Section G
(below) to find out how to normalize the genes on the arrays. For a quick,
cursory analysis of results, you may perform the following:
1. Place the two x-ray images together such that the housekeeping genes are
aligned.
2. Slowly shift one x-ray film to the left or right, and observe any differences
in spot intensity. Spots that exhibit differences in signal intensity may indicate that a gene is upregulated or downregulated; however, results are not
conclusive until you have normalized the genes on the arrays.
G. Normalization
On each array, two housekeeping genes (beta-actin and ubiquitin), have been
spotted at different locations on the array. Four beta-actin spots have been
placed on the lower right hand corner for orientation purposes, see Appendix.
Select one housekeeping gene. On each array, take the average intensity for the
housekeeping gene of your choice and use this value as the baseline. Normalize
each spot with respect to the average value of the housekeeping gene. After
normalizing each array, compare spot intensities on separate arrays for each
gene. Generally, a threefold increase or decrease in spot intensity is considered
significant.
Genemed Biotechnologies, Inc.
Page 9
Profiler Array Nonradioactive System
V.
TROUBLESHOOTING GUIDE
The following list of tips is designed to help you troubleshoot problems that you may
encounter when performing the procedure. If you feel you need additional technical
assistance, please contact us by phone, fax, or email.
A. Problem: high background
•Was the membrane completely immersed in solution during the incubations?
Never let the membrane dry out, and be sure membrane is completely immersed during all incubations. If desired, paper clips can be used to clip membranes to the bottom of the plastic containment during washing/blocking/
detection steps. Use extreme caution when using this method.
•Was the membrane completely covered in the solutions during detection?
Be sure solutions completely cover the membrane during these steps.
•Were the hybridization solutions completely dissolved?
Check Hybridization Buffer for visible precipitated particles.
•Is the film overexposed?
Try several exposures for varying lengths of time. This is necessary for obtaining optimal results.
•How much antibody did you add to the Blocking Buffer (in Step E3)?
Make sure the antibody is diluted 1:5,000.
B. Problem: hybridization signals weak or absent
• Is the problem with your RNA quality?
Be sure to check the quality of your RNA (Section IV.A).
•Are the kit reagents working properly?
Strip the membrane and use the control K562 RNA (provided) to confirm
that reagents and materials are working properly.
•Did you hybridize the membrane at the correct temperature?
Check to make sure the hybridization temperature is set at 52°C.
•How long was the hybridization time?
An overnight hybridization (~12 hours) is necessary for optimal binding of
the probe to the array.
• How much CDP-Star substrate did you use?
Make sure that the substrate is evenly distributed over the membrane during
detection (Step E5).
•How long was the exposure?
Try several exposures for varying lengths of time. This is necessary for obtaining optimal results.
Page 10
Genemed Biotechnologies, Inc.
Profiler Array Nonradioactive System
VI. APPENDIX
Genemed Biotechnologies, Inc.
BOTTOM
TOP
Notch
Beta-actin spots
Array Orientation
Page 11
VI. APPENDIX continued
Solution/Dilution Recipes (enough for two array membranes)
250 ml of 2X SSC/0.5% SDS
To 212.5 ml of deionized H2O, add 25 ml of 20X SSC stock solution and 12.5 ml of
10% SDS stock solution. Shake well before use.
250 ml of 0.1X SSC/0.5% SDS
To 236.25 ml of deionized H2O, add 1.25 ml of 20X SSC stock solution and 12.5 ml
of 10% SDS stock solution. Shake well before use.
75 ml of 1X Blocking Buffer
To 60 ml of deionized H2O, add 15 ml of 5X Blocking Buffer stock solution. Shake
well before use.
200 ml of 1X Antibody Wash Buffer I
To 180 ml of deionized H2O, add 20 ml of 10X Antibody Wash Buffer I stock solution. Shake well before use.
200 ml of 1X Antibody Wash Buffer II
To 180 ml of deionized H2O, add 20 ml of 10X Antibody Wash Buffer II stock
solution. Shake well before use.
100 ml of 1X Detection Buffer
To 90 ml of deionized H2O, add 10 ml of 10X Detection Buffer stock solution.
Shake well before use.
Genemed Biotechnologies, Inc.
458 Carlton Court
South San Francisco, CA 94080
Tel: 650-952-0110
Toll Free (USA & Canada): 1-877-GENEMED (436-3633)
Fax: 650-952-1060
Email: [email protected] • www.genemed.com
Technical Support
Tel: 650-952-0110
Toll Free (USA & Canada): 1-877-GENEMED (436-3633)
Fax: 650-952-1060
Email: [email protected]