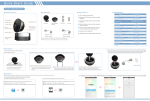
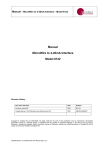
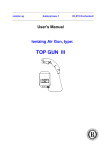
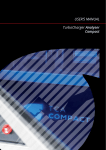
1
7. Security notes
The unit is only suitable for indoor use. The heat being generated in the unit has
Copyright @2013 by this company. No. Part of this publication may be reproduced,
to be removed via air circulation. Therefore the circulation vents at the housings
transmitted, transcribed, stored in a retrieval system or translated into any language
must not be covered with any objects.. Do not insert or drop anything into the air
or computer language, in any form or any means. Electronic, mechanical, magnetic,
vents ! This could result in a short-circuit. If the unit is used for purposes other
optical, chemical, manual or otherwise, without the prior written permission of this
than originally intended, if it is connected in the wrong way or not repaired by
company.
authorized skilled personnel, there is no liability for possible damage. To
cleaning only use a dry, soft cloth, by no means chemicals or water. .If the unit
is to be put out of operation definitively, bring it to a local recycling plant for
disposal.
SAFETY INSTRUCTION
1. Never push objects of any kind, or spill liquid of any kind into these products.
2. Do not attempt to service this product yourself, as opening or removing covers
8. Technical Data
LCD technology : TFT active matrix
may expose you to dangerous voltage points or other risk. Refer all servicing to
Display size: Diagonally measured 7”
qualified service personnel, if any misuse mentioned above happened or any
Color system:
accident dropping, miss-operations occurred.
Sync. :.hor. 15 625 Hz, vert. 50 Hz.
NTSC and PAL Dual System
Number of pixels: LM7327
800 x 3(RGB) x 480
Audio level: 1V/10k
Power supply:
Dimensions : LM-7327
Front panel 193.8x 133.2 mm
Weight : 2 Kg
Page 6 of 6
Page 1 of 6
12V-,270mA
5. Operation
1) Switch on the device with the Main power switch ○
12
1.
Contents :
2) Select the right Video input ○
11
3) Adjust the Brightness control □
+ □
- in order to obtain an image
LCD Monitor x 1
Sun Shield x 1
as clear and sharp as possible.
4) Adjust the Volume for the headphones to desired level with the volume control
Power supply x 1
Bracket Foot + Back Plate x 1
Screws x 6 pcs
(Optional)
5) You may push the reverse image function button ○
10 if the monitor is connected
to a Rear View Camera.
6) Please push OSD Control Menu
7
○
bottom to select the Brightness, Contrast,
and Display Mode. that you wish to change , then use
+□
-
□
to get desired
picture.
Display modes:
a. 4:3 , b. Linear 16:9 c. Non-Linear 16:9, please use
+
□
bottom to change the
Display modes.
CAUTION: When using headphones do not adjust a high vol.
Permanent high volumes may damage a person’s hearing! The human
ear gets accustomed to high volumes which do not seem to be that high
after some time. Therefore, do not further increase a high volume after
getting used to it.
Fig. 1. Accessories
6. Application range
The LCD color monitors offer a sharp and high contrast display. They can be
universally applied, e.g. in surveillance systems, in reverse monitoring car systems or
for multimedia applications. Moreover, an additional Audio input enables sound
transmission via headphone
Page 5 of 6
Page 2 of 6
4.
Connections And Operating elements
2 . Installation
Sun Shield :
To attach the Sun Shield onto the metal housing of Monitor, use the small
screws to fasten it.
Bracket :
To fasten the Back Plate into the 4 VESA Holes on the rear Cabinet of Monitor
with 4 big Screws, then attached into the bracket foot..
The model in a metal case is suitable for mounting into furniture, walls , etc.
Insert four screws into the mounting holes at the front panel and mount the
device to desired location.
3. Connection
1) Connect the Video source to Video input I or II ( ○
1 or
2
○
2) Connect the VGA source to the VGA input.
3) Connect the Audio input ○
4 (Optional)
).
Fig. 2 Connectors and Controls
4) Select the correct Input ○
11 Source
5) Connect an electronically regulated 12V power supply
6
○
The positive pole must be connected to the middle contact.
6) Connect the Audio Output
5
○
(Optional)
Page 3 of 6
1 Video I Input
2
Video II Input
○
○
3 Video Out-Put
4
Audio Input (Optional)
○
○
5 Audio Output ((Optional)
6
DC 12V Power Input
○
○
7 OSD Menu
8
+ Increase ( default to Brightness )
○
○
□
9 □
- Decrease ( default to Brightness)
○
10 Left-Right-Up-Down Reverse ○
11 Video Input selector
○
12 Main Power
13 LED Power Indicator
○
○
14 VGA Connector
○
Page 4 of 6
LM7327
7” Color TFT LCD Monitor
User’s Manual
Version 3.1