1
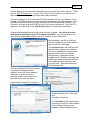
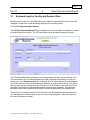
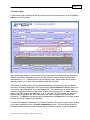
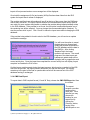
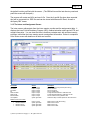
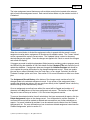
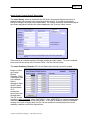
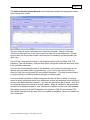
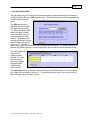
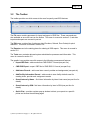
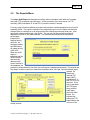
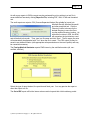
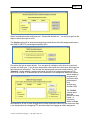
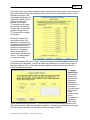
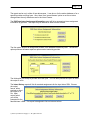
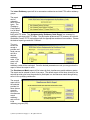
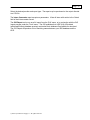
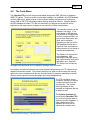
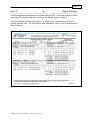
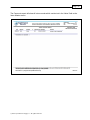
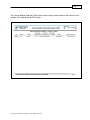
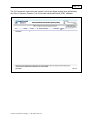
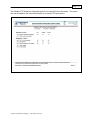
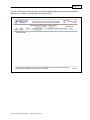
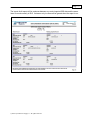
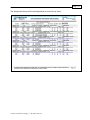
Page 1 Intern/Resident Information System (IRIS) User Manual © 2010 by Charles H. Briggs, Jr. All rights reserved Page 2 Intern/Resident Information System (IRIS) User Manual and Help Revised October 12, 2010 Version 4.2.3 © 2006 - 2010 by Charles H. Briggs, Jr., all rights reserved. All rights reserved. No part of this work may be reproduced in any form or by any means – graphic, electronic or mechanical, including photocopying, recording, taping or information storage and retrieval systems – without the written permission of the publisher. Products that are referred to in this document may be either trademarks and/or registered trademarks of the respective owners. Neither the publisher nor the author makes any claim to these trademarks. While every precaution has been taken in the preparation of this document, the publisher and the author assume no responsibility for errors or omissions, or for damages resulting from the use of information contained in this document or from the use of programs and source code that may accompany it. In no event shall the publisher and/or the author be liable for any loss of profit or any other commercial damage caused or alleged to have been caused directly or indirectly by this document. © 2010 by Charles H. Briggs, Jr. All rights reserved Page 3 Table of Contents Part l ♦ Introduction 1.1 Welcome to HFS IRIS 5 1.2 System Requirements 5 1.3 What‟s New in IRIS 5 Part ll ♦ Installation and Setup 2.1 Getting Started – Installation 9 2.2 Network or Remote Server Implementation 12 2.3 Software Updates 16 2.4 Uninstall IRIS 16 Part lll ♦ Data, Reports and the Intern Screen 3.1 Intern Screen 17 3.2 Toolbar 28 3.3 The File Menu 29 3.4 The Edit Menu 29 3.5 The Reports Menu 30 1. Intern Audit Report 2. Foreign Medical Graduates (FMG) 3. Out of IRP 4. Overlaps 5. Import Audit Report 6. Intern Assignments 7. Intern History 8. Residency 9. Simultaneous Match 10. Comments Report 11. OIG Comparison Report / OIG Data Import 3.6 The Tools Menu © 2010 by Charles H. Briggs, Jr. All rights reserved 30 31 32 32 33 34 34 35 35 36 36 37 Page 4 Part IV ♦ How do I … 1 Add a new Intern via keyboard 42 2 Import CMS-formatted data 42 3 Export CMS-formatted data 42 4 Add a new assignment to an existing Intern 42 5 Delete an assignment 42 6 Modify an Intern record 42 Part V ♦ Report Samples Intern Audit Report 43 Overlap Assignments (Standard Method) 44 Overlap Assignments (Ordinal Method) 45 Intern Comments 46 FMG Report 47 OIG Comparison Report 48 Intern Assignments by Residency 49 FTE Summary (MCR worksheets E, A and E-3, IV) 50 Interns with Simultaneous Match 51 Interns Beyond IRP 52 Import Audit Report 53 Intern Assignment History 54 © 2010 by Charles H. Briggs, Jr. All rights reserved Page 5 ♦ Part l 1.1 Introduction Welcome to HFS IRIS Welcome to the latest version of the Intern/Residency Information System (IRIS) from Health Financial Systems (HFS). We are glad you‟ve chosen HFS for your IRIS needs. We are committed to ensuring your new software installs correctly and runs properly. With version 4.2 our IRIS product has been redesigned at its core, completely refreshed on the outside and enhanced with new tools and new reports. 1.2 System Requirements Component Computer and Processor Memory (RAM) Removable Drive Display Monitor Disc Space Minimum Requirements 500 megahertz (MHz) or higher 512 megabytes (MB) or higher CDR/DVD 1024 x 768 resolution 2 gigabytes GB (including data) Operating System Microsoft Windows XP® Application Software At least one registered full copy of Microsoft Access XP® or higher (for security maintenance and extended support functions.) Recommended 1 gigahertz (GHz) or higher 1 gigabyte (GB) or higher CDR/DVD 1024 x 768 resolution 2 gigabytes GB (including data) Microsoft Windows Vista®, Windows 7® At least one registered full copy of Microsoft Access 2007® or higher (for security maintenance and extended support functions.) HFS IRIS does not require the full copy of Access to operate. However for simplified maintenance of user accounts and management of database trusts (Access 2007®) it is highly recommended. Additionally, if more complex support operations should become necessary, a local copy of Access will greatly facilitate our support efforts. If you are uncertain about HFS IRIS compatibility with any component of your PC or your network infrastructure, please contact HFS Customer Support at (888) 216-6041 or via email at [email protected] for assistance. 1 .3 What’s new in IRIS There are several new features over the previous IRIS release. Below is a summary of the new features: Streamlined interface – The look and feel of the database-to-user interface has been narrowed to a single three-part intern screen. Previous versions used one screen for the SSN view, another for the name view and yet another for searches. Standardizing the system operations to communicate to/from on screen format enhances cognition, flattens the system learning curve, simplifies system enhancements, removes two layers of objects thereby speeding up © 2010 by Charles H. Briggs, Jr. All rights reserved Page 6 viewing search results and makes other enhancements possible, such as faster searching, intern data entry via keyboard and others. Intern Master Record – In versions up to 3.07.03 the intern object (and therefore the intern him/herself) was identified only by the most recently imported data from CMS. The CMS „M Record‟ could include errors, changes not intended or at least needing review, but because the data was swept into IRIS automatically these changes often went unseen. Therefore this methodology did not provide a dependable base for the related data and did not accurately represent the true environment the system was intended to manage – a single individual. By building out and standardizing the intern information into a single master record, we have a oneto-one relationship of environment to data, a single place to track changes to the intern data as well as more reliable links to related data. The intern master is not changed through any automated process and, if changed through the online system, the changes are tracked and user/date/time stamped. Enhanced Search – As mentioned earlier the streamlining of the interface and the standardization of the intern master record made possible a new search tool. The new search engine uses optimized indexes without the need to link additional tables for search fields. Once the search results are displayed (now in an easy-to-read, linked form) a single click on the desired record takes the user directly to the main screen rather than an intermediate screen as in previous versions. Summary – faster search results and a single click from search results to data. Simultaneous Match – Residency codes which qualify for SM are denoted in their IRIS residency table with an SM flag. Then, when an intern is working in an SM-qualifying residency and then accepts a rotation in a different residency, IRIS can immediately identify the match qualification for the rotations. Once identified, the intern master record is notified to include the potential simultaneous match and display it on-screen. Both the main and SM residencies are readily viewable, and switching the primary rotation from one residency to the other is a single click. IRIS keeps track of the „active residency‟ automatically. Facility Information Record – As with the establishment of a single master record to represent a single intern, the Facility Information Record (FIR) does the same thing for a provider. The key information about the facility (provider number, name, fiscal calendar) are entered and then can become the default provider pre-fill for any newly added interns via keyboard. Furthermore, for a management facility working with a number of providers, many FIRs can be entered and chosen for defaults as need be. Lastly, the establishment of the FIR can be used as a base for facility-based preferences and data (e.g. report footers, sorting algorithms, report groups, data security.) Ordinal Overlaps- Ordinal overlap programming in HFS IRIS permits assignment overlap evaluations on a day-by-day basis, calculating the overlapping FTE amount based only on the overlapping days versus an entire rotation. Intern / Assignment Entry – A major enhancement is intern/provider/assignment entry via keyboard. Data entry for new interns as well as adding providers and assignments to existing interns are available. Now as new interns start their rotations or new rotations are needed the data can be keyed in directly to the IRIS database. The entry system uses off-loaded data tables in a queue fashion which allows for rapid entry of many interns, providers and assignments in a single sitting. The queue can be saved between entry sessions for later processing. The queue is editable and reviewable without affecting the live database. The © 2010 by Charles H. Briggs, Jr. All rights reserved Page 7 queue system does enforce the same data rules as the main system, helping to ensure clean data. Once the entry is complete a single click updates IRIS adding all necessary table entries and re-indexing the database, making the data available to the entire IRIS system of reports, searching and browsing. Intern Master Record Editing – As outlined above the establishment of a single master record to represent each intern was an important alignment of system and environment. But as people change so must the system be able to represent that change in a consistent manner. Also, when changes are made they need to be tracked and recorded. The intern master editing feature provides these important functions. An authorized user can make changes to various intern master fields (e.g. name, residency, school information, etc) which IRIS records and stores along with the intern master record. Changes can be viewed and comments added to each change for auditing purposes. Lastly, any previously saved version of the data can be reinstated by clicking the „Revert‟ button to reload the original values. Assignment Record Editing – Much in the same way as Intern records can be edited to reflect changes, all rotation records may be edited on key fields and all changes tracked. Also, as with the Intern record, a previously saved version of a rotation can be reinstated with a single click. Residency Calendar – Connected with the single intern master record is a multi-year residency calendar, generated by IRIS automatically when new interns are added. The calendar aligns the July-to-June fiscal year with the intern‟s years in program, using the medical school graduation date as a base. The calendar is stored along with the intern record and can be edited as need be and comments added for changes. When the audit report is run or data entered, the residency calendar is consulted to check the data and assist in flagging input errors. Import Processing – In prior IRIS versions the CMS data import process while accurate was not very dialog-friendly. The process could disappear for long periods of time without any status feedback. To correct this and enhance the experience overall, a new front end tool has been built into the import process. Now as each major step is completed the screen dialog manager informs the user and moves a progress bar interface to estimate the completion percentage along with update messages about current processing steps. Reports – All reports within IRIS received a standard report header and footer along with a format refresh. Additionally, these reports were either added or had their functionality enhanced to provide better decision support information: 1. Audit Report - Combining several reports into one, the Audit report provides information on all intern record attention items, overlaps, and an FTE grid (GME, IME, GME-Unweighted) for each intern selected by provider and fiscal calendar. Intended for use in auditing and for a „one-stop shop‟ for intern information and rotation status. 2. Overlap Processing – No other report or processing cycle within IRIS received as much consideration, retooling and overhaul as did overlaps. IRIS now identifies rotation date concurrencies, date overlaps as well as ordinal overlaps. Overlaps are tracked including all overlapping providers and rotations. In addition, the overlap status of each rotation is available on-screen for review without needing to run a report. Overlap information and calculations to determine net FTE values were added to the Audit report and the FTE Summary © 2010 by Charles H. Briggs, Jr. All rights reserved Page 8 3. Import Audit report – As mentioned above, tracking changes to the intern master is critical and handled by a separate form in the case of changes entered by keyboard. In the case of CMS files, while no changes are applied to the intern master automatically, variances detected between imported data and the intern master are recorded and viewable in the import audit report. The report shows a line-by-line comparison between intern master and imported file by intern. Browse by SSN – A browser screen, which is read-only and limited in functions, is now available to leaf through the intern records and rotations. Tool Bar – Also new is the addition of a toolbar for commonly used functions. A detailed review of the toolbar is just ahead in part three of this manual. System Event Manager – The SEM process monitors key activities within IRIS, such as database updates and Intern record changes, and tracks the user making the changes and when they were made. Also, the SEM decides when and if report data extracts need to be rebuilt, monitors the IRIS system file size and tracks all data output and input locations. © 2010 by Charles H. Briggs, Jr. All rights reserved Page 9 Part ll 2.1 ♦ Getting Started Installation DATA ADVISORY: It is recommended that prior to installing this software you make a full backup of any existing IRIS database files or related materials (on your local PC or server) along with other critical files to guard against lost or corrupted data. The IRIS source database accepts, stores, maintains, displays, prints and exports HIPAA data elements. As such when installing this software and its source database it is important to implement appropriate file security and backup procedures. 2.1.1 Installation The HFS IRIS software tool is a wholly separate application from our cost report preparation software. Just as our cost report software has a unique „HFS Cube‟ icon (red for the 16-bit software, yellow for 32-bit), IRIS uses a unique icon to identify itself on your desktop or help menu. The HFS cost report and IRIS software applications are currently not connected, nor do they exchange data electronically. The IRIS installation file is available as a registered product download from our web site (http://www.hfssoft.com) or available on CD media. If you would prefer the CD media you can contact our sales staff at (888) 216-6041or via email at [email protected]. The installation process consists of these steps: 1. Download the set up program (or use the CD media, if applicable) 2. Run the installation program 3. Set up a database trust for IRIS 4. Refresh the data link To download the installer from our web site, go to the address above and click on „Downloads‟. You will be required to log in with your name and password. If your account licenses IRIS it will appear in your list of available downloads. The IRIS download appears in the „Other Software Products‟ section near the bottom of the page. © 2010 by Charles H. Briggs, Jr. All rights reserved Page 10 Click on the product link and you will be asked to save the setup file to your computer. The file name is „HFS IRIS setup.exe‟. You can run this file from any location on your hard drive, or from any local server to which you have at least read permissions. If you are installing from a CD insert the HFS IRIS Installation CD into your computer. Once inserted, the Installation welcome screen should be displayed and start the installation. If the Installation does not self-start, you can navigate to your CD drive by double-clicking on „My Computer‟ and then open the IRIS CD in your CD drive with a double-click. Once the CD is open you can double-click on the „HFS IRIS Setup.exe’ file to start the Install Wizard Close all other applications that may be running on your computer. You will need to have administrative privileges to your PC in order to install IRIS. If you are not certain if you have these privileges please contact your local IT person for more information. After agreeing to the EULA (End User License Agreement) you will be asked to select one of two client types. The Full Client option will install the IRIS system and an empty source database. The source database file contains intern personal and education information, change history, assignment rotation schedules and information (including some HIPAA data elements) and houses all the other database tables for working with your IRIS data. These tables also build the CMS export files. If you are installing IRIS for use by one or more persons sharing the same computer, then a full client installation would be the correct choice as a database needs to be installed rather than shared, as in the next option. Either accept the default (Full Client) or change the setup type to Thin Client and click „Next‟ to continue. The Thin Client option installs all the components of the Full Client however not including the empty source database. When installing the Thin © 2010 by Charles H. Briggs, Jr. All rights reserved Page 11 Client, you will see the intermediate screen confirming (with an X) that the Full Client option is disabled. Click „Next‟ to continue. After some initialization the install process will begin. An HFS IRIS icon will be created on your desktop once the installation process is completed. Once you confirm the completion message the install will be complete. 2.1.2 IRIS Application Structure Although the full IRIS installation contains many files for the Microsoft Access Runtime module, various system files and others, the core of the HFS IRIS system consists of these three files: 1. The application or „engine‟ file (HFSIRIS40.accdr) – this contains all the reports, screens, logic and data manipulation routines required to run the system. No HIPAA data resides in this file. The engine file requires the support table and source database files to operate. 2. The common or „support‟ file (HFSSUPData40.mda) – this contains external data, such as medical school codes, residency codes and error codes. No HIPAA data resides in this file. The support file also keeps statistics about the source database. Therefore if you have or plan to build multiple IRIS databases, each database „set‟ would consist of two files; one support file and one data file (described below) which must reside in the same folder with appropriate permissions. 3. The IRIS source database file (HFSIRISData40.mda) – this file contains HIPAA data (interns and rotations) and is the source data for the entire system. This file is not installed if the „Thin Client‟ option is chosen. The source database file is paired with a support file to make a complete IRIS database. 2.1.3 Access 2007 Run Time Environment HFS IRIS runs under the Microsoft Access 2007® database engine. If your PC already has Access 2007® installed then IRIS will not install the bundled Access 2007® runtime software. If however you do not have Access 2007® software already installed, when IRIS starts it will prompt you to install the Access 2007 Run Time environment. Click the checkbox to access Microsoft‟s © 2010 by Charles H. Briggs, Jr. All rights reserved Page 12 software terms and click „Continue‟. Once the run time environment is installed, you will receive a confirmation message. Click „OK‟ on the message and again start IRIS from the icon. Once the installation has completed, remove the IRIS installation CD from your CD drive. If you downloaded the install from the web site, you may delete the HFS IRIS setup.exe file. 2.2 Network or Remote Server Implementation 2.2.1 Network Topology The IRIS setup program will put all necessary data files in the directory chosen during the installation, therefore in a standalone IRIS installation there is no need for a server. However in larger installations, to permit for resource sharing and to apply appropriate data security, you will need to locate the support and source database files (identified in previous section) on a secure centralized server location to allow other users to access it from their client PCs. Although the IRIS software is designed to minimize the impact network traffic has on access to your data, peak periods of network activity can cause the IRIS reports and searches to run slower. To operate IRIS in a shared environment with a centralized database, the set up is fairly simple. The items to consider when setting up an IRIS work environment are trusts, the Trust Center and network folder security. Each of these points are covered in the following sections. Once you have the server location established and added to the Trust Center (see section 2.2.3 below for more information), move the two database files from your local PC and place it in the server location. Lastly remove the files from the install directory on your client PC. 2.2.2 Security Considerations - Trusts When it comes to macro security settings and enabling content in your IRIS database, the data files are designed to behave just like the rest of the 2007 Office system products. This means that in addition to Windows user profile security, IRIS uses a „trusted data‟ location as part of its content security. © 2010 by Charles H. Briggs, Jr. All rights reserved Page 13 When you first open IRIS you might see the Message Bar, as shown above. The „trust‟ is the most basic level of database security. If you trust a database, you can enable the executable content in the database to run and, with Windows folder security, set read and write privileges by user or group on the server. If you do not trust a database, you can still open the database, view the information in it, and run certain Access macro commands. This protection exists to stop code from using Access to perform actions that are harmful to the user's data or computer environment. 2.2.3 Security Considerations – the Trust Center The first thing you should do is put your IRIS source database in a trusted folder or subfolder. The secure folder‟s path should be trusted by IRIS for optimal performance and security. The common interface for managing trusted folders for all of Microsoft Office is called the Trust Center. © 2010 by Charles H. Briggs, Jr. All rights reserved Page 14 To help you manage how executable content behaves on your computer, Office Access 2007 and the other Office applications share a common trust center. This means if you already have trusted locations for another Microsoft Office product (Excel® or SharePoint®, for example), you can edit the Trust Center from that application. The data will be shared with Access 2007® and all other Office products. To open the Trust Center, start your full registered copy of Access 2007® and click the Microsoft Office Button in the upper-left corner of the Access window, and then click Access Options. Click Trust Center in the left pane, and then select Trust Center Settings. At first, you are probably only interested in making your database work the way you expect, so select Trusted Locations in the left pane. Trust center locations can be added with your licensed copy of Microsoft Access 2007. At a minimum the installation directory will need to be added to your trusted databases. If you are planning to link to a network database, and have that location mapped to a drive letter on your PC, this location can be added as a trusted location as well. In Trusted Locations, you can define a folder in which you allow all databases to run with no warning messages or executable content turned off. In the Trusted Locations section, follow these steps: 1. Click Add new location. 2. Enter the location (directory). 3. If you need to, select the Subfolders of this location are also trusted check box. 4. If you have to set up a trusted location on your network, select the Allow Trusted Locations on my network check box. Generally, the more specific you can be with network locations, the better the security. Also, if you choose a mapped network drive (for example, a P: drive), it translates to the equivalent UNC path. 5. Enter a description, and then click OK. All you have to do now is move your database to that location, and all the executable content in that database will work as designed. Trust Center location also may be entered directly into the Windows Registry if a licensed copy of Access is not available. If you have any problems with adding Trust Centers or with securing your IRIS database properly, please contact HFS support for assistance. After your server security and trusts are established and the data files are copied to the server the next step will update IRIS on where to find its source data on your network or PC. This is accomplished within IRIS by using the data refresh feature located in the Tools menu (Tools > Refresh Data Link). Upon opening the refresh screen, the lower half of the dialog box will reflect the current database link. If blank, no database is currently linked. © 2010 by Charles H. Briggs, Jr. All rights reserved Page 15 After choosing the „Refresh Data Link‟ option you will be asked to select the type of refresh desired: 1. Delete existing data link and reconnect – this option is the most commonly used. 2. Refresh existing – use this option if you have had a network or disc problem and simply need to reconnect to the data. Choose the desired option and click „Refresh Link‟. After the refresh operation is completed you will receive a confirmation message. Click „OK‟ and then close the „Refresh‟ form. The active link to which IRIS is connected will display on form when a connection is established. Once connected to an HFS IRIS database, the System Event Manager (SEM) will start and report the current state of the connected database. The SEM reports the overall database status („Calculated‟, „Not Calculated‟, „Not Linked‟) to most major forms in IRIS. The SEM tracks the history of system update events (such as FTE calculations, overlap rebuilds, changes to data records, etc.) and logs the activity date and time. Once the FTE calculation has been run the database will show as „Calculated‟ and the indicator will be green. Once an update has been run, or any intern master or assignment data has been changed, the status will read „Not Calculated‟ and the indicator will be red. The SEM also may be accessed by clicking the status flag available throughout the system. A sample of the SEM display panel is shown here. The design of Microsoft‟s 2007 database engine limits its size to approximately 2 GB (gigabytes). This file will increase in size as large batch jobs are run (e.g. overlap rebuilds, CMS data import.) If this size limit is © 2010 by Charles H. Briggs, Jr. All rights reserved Page 16 exceeded, the engine can malfunction. The SEM has a process which monitors the engine file size and will prompt you to compact the database as it becomes avoid corruption of the system. 2.2.4 Security Considerations – Network Folder Security When installing IRIS in a multi-user environment with various levels of data clearance and responsibilities throughout the organization, there will be some users who need read / write permissions to IRIS data as well as those granted „read only‟ capabilities. In a Microsoft Windows® environment, data permissions and user profiles are typically set by IT administration according to the user‟s responsibilities, his/her security clearance within the organization and the folder content they need to use. IRIS accommodates this model of „Enterprise Security‟, meaning that IRIS is designed to work within the guidelines of Windows user profile and folder security. If a user needs full access to the IRIS data (to run FTE calculations, overlap updates, change intern data, etc.), the folder wherein the IRIS database resides as well as that user‟s Windows domain account will need to reflect the read and write permissions to the IRIS data. Likewise, if a user is supposed to have „read only‟ access (to run audit reports, overlap reports, look up interns, etc.) read only access would be granted for the user‟s account on the IRIS database folder. 2.3 Software Updates Periodic updates to the IRIS application are necessary for bug fixes, updated information and new feature enhancements. Once IRIS has been updated and posted on our web site, it can be downloaded and installed on your PC. When installing IRIS software updates use the „Thin Install‟ option available in the installer. If your IT environment requires remote or managed software installation, an IRIS MSI installer is available. IRIS updates, information, tutorials and help pages can be accessed from our web site at http://www.hfssoft.com/ . 2.4 Uninstall the Software Should it become necessary to uninstall the IRIS software please use the Windows Hardware and Software control panel to select the HFS IRIS package, then choose „Change/Remove‟ to uninstall the software. It is recommended that prior to removing the software from your PC make a backup CD or DVD of the entire IRIS installation directory in the event it needs to be restored. Also, if the source database files are located on a server, make copies of these files as well. If your source database files are located outside of the IRIS installation directory (e .g another drive on the network or PC), these database files will not be removed during the standard uninstall procedure. © 2010 by Charles H. Briggs, Jr. All rights reserved Page 17 Part llI 3.1 ♦ Data Entry and Import/Export Keyboard Input for Facility and Resident Data Beginning with version 4.0, HFS IRIS features the adding of interns and providers to the IRIS database via keyboard, as well as adding assignments to existing interns. 3.1.1 The Facility Information Record The Facility Information Record (FIR) is designed for use by providers to establish the default information about their facility. The FIR information can be accessed through the toolbar. The FIR will hold data about the facility, the current fiscal period and a private text area. The „Provider Number‟ entry is matched against the CMS numbering nomenclature to verify the facility type. If the default provider box is checked, the FIR values will pre-fill on all keyboard input intern records and any new assignments added to an existing intern record. The „Memo‟ field is private and not transferred to any other part of the IRIS system. Note that the FIR prefills apply only to intern records and assignments entered via the keyboard. Any data input through the CMS import channel will be use the values contained within the imported files. There may be an unlimited number of FIR records in one IRIS database, and the default box may be changed to another record at any time or turned off altogether. Only one record at a time may be marked as default. © 2010 by Charles H. Briggs, Jr. All rights reserved Page 18 3.1.2 Intern Input To add a new intern record along with a provider and at leat one assignment, choose the Add Intern icon from the toolbar. Upon opening the add form, if you have a Facility Information Record filled out and marked as „default‟, the provider information from the FIR will pre-fill the intern add form with the fields marked above in red. Otherwise without an FIR default record, these values can be added manually each time an intern record is added through the keyboard. The process of adding interns via keyboard was designed to pre-edit and hold in a queue all new intern data being added within the current session (button labeled ‘A’ above), then move the queue to the live database in one step (button ‘B’.) This speeds up the manual entry process by avoiding an update to the source database each time an intern is added. Begin by typing in the SSN number (preceded by a „U‟ or „C‟) and then the SSN number, no spaces or dashes and then complete the intern information with name, medical school and provider information. The Memo is optional and will be transferred to the Notes field in the intern master once the records are added to the database. To fill out the assignment information, if you have created an FIR record, start by double-clicking on the open assignment row in the Intern Assignments section. The new record will pre-fill with the provider information, fiscal calendar, paying institution, residency year and residency © 2010 by Charles H. Briggs, Jr. All rights reserved Page 19 type. To complete the rotation, add the assignment dates and the percentages for Time, IME and GME. Percentages are entered as whole numbers from 0 to 100. To add more assignments for this intern, simply repeat these steps on the next open row until all desired assignments have been entered. Once the intern is entered and all the assignments filled out, if you have other interns to add, click the Add Next Intern Record button (‘A’ on previous diagram) to move the new record into the queue table and clear the form for the next intern add. Then add the next intern in the same fashion as the previous. When you are finished adding new interns, click the Add All Records button (‘B’ on previous diagram) to add the intern data to the IRIS source database. Once the records have been successfully added to the IRIS database you will receive a confirmation message. When adding new data to the IRIS database, either through keyboard to CMS file, the FTE and overlaps need to be recalculated. See section 3.6 for more details on these tools. The Delete Que On Close control box will, when the add form is closed, delete the queue table used as the source for the last intern adding session. If you wish to retain the queued intern records to add into IRIS at a later session, remove the check from the Delete Que On Close control box before closing the add form. Also new in IRIS 4.0 and above is the ability to add new assignments to existing intern records. This is done through the Add Provider/ Assign. Records control on the Intern screen. See section 3.1.5 for the location of this control and instructions on how to add new assignments to existing interns. 3.1.3 CMS Data Import External data in CMS IRISV3.1 format is added to the IRIS database through the Import IRIS Data tool on the toolbar. When it is started, the IRIS import will request the location of the IRIS „M‟ file (the file containing the intern master information.) using a Windows® Explorer window. As per CMS IRISV3.1 the file must be in at least dBase III format (.DBF), and it must have a companion „A‟ file containing the assignment information in the same directory. If both files are not present in the same directory, or if the files are not in the correct (or adjustable) format, the © 2010 by Charles H. Briggs, Jr. All rights reserved Page 20 import will not proceed and an error message box will be displayed. Once both the assignment (A file) and master (M file) files have been linked into the IRIS system the import launch screen is displayed. The provider and fiscal year information will pre-fill at the top of the screen from the CMS data files as they are linked. The Import Options feature will recommend an import activity (add all new, add only new, replace data) based on whether the provider being imported already exists in the IRIS database. If the provider is not found, the first option is assumed otherwise one of the remaining two will be selected. You may change the recommended option if desired. To start the process click „Import‟. Click „Cancel‟ to leave the import area without changing the IRIS database. If the provider being added is found to exist in the IRIS database, you will receive an update confirmation message. You will have the option to cancel the data import or proceed and update the provider information in the IRIS database with the data in the CMS file. After clicking „Replace Data‟ the import operation will resume. The overall progress of the data import and subsequent update steps will be displayed with a progress bar and current activity box. Once the import has completed the current activity box will display „Import complete‟ and enable the „Exit‟ button. If critical errors are discovered during the import process, which require a resubmit of the IRIS files from the provider, the import process will advise you and halt the import. All working records up to the point of the bad or questionable record will be reversed out of the IRIS database leaving it unchanged. 3.1.4 CMS Data Export To export data in CMS required format („A‟ and „M‟ files), choose the CMS IRIS Export tool from the toolbar. The export accepts a provider number and a fiscal year. Once selected you may choose the location for your export files by clicking the „Directory‟ button, keying in the desired path or use © 2010 by Charles H. Briggs, Jr. All rights reserved Page 21 the default location pre-filled with the screen. (The SEM will record the last directory used and prefill the screen with that path.) The process will create one M file and one A file. Once the A and M files have been exported they will be converted into .DBF files and can be viewed with Microsoft ® Excel, Access or third-party DBF viewer. 3.1.5 The Intern and Assignment Screen The intern screen gathers data from the Intern master, provider and the assignments table. It displays the intern‟s Initial Residency Program (IRP), medical education status and all FTE and overlap information. You can view the intern‟s residency calendar and, with sufficient security privileges, edit either the intern master record or assignment information. Below is a snapshot of the intern screen with details on all fields and controls: Field Name SSN Last Name First Name MI FMG Cert Date FMG Cert ID Med Grad Date Last Updated Source Import or keyed Import or keyed Import or keyed Import or keyed Import or keyed Import or keyed Import or keyed System generated Description Intern‟s Social Security Number (Record Key) Intern‟s surname Intern‟s first name Intern‟s middle initial Foreign Medical Graduate‟s certification date Foreign Medical Graduate‟s certification number Intern‟s medical school graduation date Date/Time stamp of latest update from the Edit function Medical School and Location Med School Code Med School Name Med School City Med School State Import or keyed System generated System generated System generated Medical school code (Record Key) Medical school name Medical school city Medical school state © 2010 by Charles H. Briggs, Jr. All rights reserved Page 22 Field Name Intern‟s Initial Residency Program (IRP) Primary Res Code Primary Res Description Primary Active Flag Intern Category Yrs Limit Source Description Import or keyed System generated User keyed System generated System generated Code for Primary Residency Description of Primary Residency Denotes IRP is the Active Residency Category description of the chosen IRP The chosen IRP‟s program length Intern‟s Secondary Residency Program (Simultaneous Match) Secondary Res Code Import or keyed Secondary Res Description System generated Secondary Active Flag User keyed Intern2 Category System generated Yrs Limit System generated Code for Secondary Residency Description of Secondary Residency Denotes Secondary Residency is the Active Residency Category description of the chosen residency The chosen secondary program‟s length Notes User keyed Intern-level free-form text field for notes Intern‟s Assignment Records ProviderID Adj Asgn Beg Asgn End Yr Comp Res Residency Description Wgt Time % GME (#) GME (%) IME (#) IME (%) UN GME AssignmentID Import or keyed System generated Import or keyed Import or keyed Import or keyed Import or keyed System generated System generated Import or keyed Import or keyed Import or keyed Import or keyed Import or keyed System generated System generated Provider‟s ID number (Record Alternate Key) Flag to denote that this rotation has edits applied Assignment begin date Assignment end date Number of residency years completed by intern Assignment residency code Assignment residency description FTE weighting factor applied to this assignment Base percentage of time used for this assignment Calculated Graduate Medical Education FTE factor Graduate Medical Education FTE percentage Calculated Independent Medical Education FTE factor Independent Medical Education FTE percentage Calculated Un-weighted GME FTE factor Database unique ID for assignment (Record Key) Additional Notes: GME FTE Calculation: FTE = (Number of Assignment Days) / ((Days in Year[365,366] * (GME percentage) * (FTE weight)) Un-weighted FTE Calculation: FTE = (Number of Assignment Days) / ((Days in Year[365,366] * (GME percentage)) © 2010 by Charles H. Briggs, Jr. All rights reserved Page 23 The intern assignment record features an edit-or-delete control button located at the extreme right of each intern assignment record. Each control button affects only the rotation to which it is attached. When the control button is clicked the assignment editor is opened with the record‟s current assignment overlap status, assignment ID number and its editable values. The „Current Values‟ column represents the record‟s current status. The „Updated Values‟ column is where any desired changes are applied. Once the changes are applied click „Save‟ to commit the changes and refresh the display. If changes are made to weighting-dependant fields (percents, residency code or program years) the SEM will flag the database as „Not Calculated‟ and the Calculate FTEs tool should be run to update the database. If assignment dates are changed the Initialize Overlaps tool should be run to update the overlap information for the changed assignment record. These two update jobs can be run either individually from the Tools menu, or as a single „Calculate‟ job with the „Evaluate Overlaps‟ option set to true. See section 3.6 for more information on how to run these jobs. The Assignment Record History at the bottom of the change record contains a list of all changes made to the selected assignment record. If any version of the assignment history contains the desired new values, you can copy them directly to the „Updated Values‟ column by double-clicking on the desired history record. Once an assignment record has been edited, the record will be flagged and contain an „A‟ character in the Adj column of the intern assignment sub-screen. The location of the adjusted flag can be seen at the top of section 3.1.5 in the Intern Assignments section. To remove the selected rotation from all calculations, the intern screen and all reports, click the Delete Assignment button on the change record. You will be asked to confirm the delete. If confirmed the record will be marked as deleted and removed from any further calculations or reports. If a record is deleted by accident it can be restored to active status from the „Deleted Assignments‟ list. For more information on how to restore a deleted assignment record see the „Deleted Assignments‟ option in section 3.6. © 2010 by Charles H. Briggs, Jr. All rights reserved Page 24 Intern Screen Control Name & Description The Intern History screen is linked with the „Edit Intern‟ feature and displays the history of changes made to the current intern record through this control. If an intern record has no history of changes, the button will be deactivated. The „Revert‟ feature will automatically adjust the current assignment record to the values displayed in the „Previous Value‟ column. There may be an unlimited number of change records per intern master. To revert a selected intern record to the values in the „Previous Value‟, click the „Revert‟ button. The Intern Residency Calendar (IRC) is calculated when the intern record is created. Based on either the Foreign Medical Graduate (FMG) Certification Date or the Medical School Graduation Date, the IRC stores the fiscal dates of 10 consecutive future years from the base date. The IRC is used to edit the „years completed‟ value (CMS IRISV3.1 field ‘ARESYEAR’) on incoming assignment records and the same value in the intern master. If an intern‟s residency career is interrupted causing a one year or longer delay, the IRC can be modified to correctly adjust the intern‟s residency calendar to reflect the skipped time. © 2010 by Charles H. Briggs, Jr. All rights reserved Page 25 The „Edit Intern‟ button, with sufficient security privileges, unlocks certain fields in the intern master for direct editing. The editable fields will change to edit color (red) and back to standard colors when the edits are saved. The „Edit‟ doubles as the „Save‟ button and is used to save changes. All change records are date/time stamped along with the logon name used to make the change. The fields that can be changed with this feature are: Intern Name (First, Middle Initial, Last) FMG dates Med school graduation date Med school information IRP (Initial Residency Program) Simultaneous Match The 1995 Year Override (95YO) is used in order to accurately weight assignments started before July 1, 1995. To determine valid interns for pre-1995 residency evaluation, IRIS will use the FMG Certification Date or Medical School Graduation Date. Those base dates before July 1, 1995 will by default use the pre1995 residency program year values. These intern master records will be marked with a check in the 95YO box, which is only visible on the intern screen when the base dates indicate as applicable. To have a selected intern identified as a pre-1995 candidate weight against the post-1995 residency year limits, uncheck the 95YO box. The Close button will close the intern form. If there are unsaved changes IRIS will display a „Save‟ prompt or „Cancel‟ prompt before the intern form closes. The Provider Summary will display a screen with key provider information for the intern‟s assignments. The provider summary records are tied to a unique set of assignment records. A unique provider record is generated for each combination of provider number, fiscal year, residency type and years completed. © 2010 by Charles H. Briggs, Jr. All rights reserved Page 26 The Add Provider/Assignment Records control adds new providers and assignment records to an existing intern record. The form will pre-fill with the selected intern‟s personal information. Start by clicking the „Provider No‟ dropdown box to look for the correct provider key for this assignment. Provider keys are built from the provider number, the fiscal year, the residency type and program year (Res Year). If you find the correct provider number in the dropdown and the other key fields (FYB, FYE, Residency Type and Residency Year) are also correct, choose the record and the screen will fill in the necessary information. If you find the correct provider number in the dropdown, but the other key information isn‟t as desired, then you need to add a new provider key. If you need to add a new provider key, check the „New Prov Key‟ box and fill in the pertinent information. (The most common need for a new provider key is a different residency program or residency year.) Once the provider information is added, assignment records can then be added. By clicking across an empty assignment record in the assignment section, the assignment record will pre-fill with the newly added provider information. You may also override the pre-fill values. Then fill in the remaining assignment information for each rotation. When all rotations for this provider are entered into the assignment section, click „Add Record‟ to add the records to the IRIS database. After adding new records to the IRIS database via keyboard or CMS file, the Calculate FTEs and Initialize Overlaps tools will need to be run to update the database. Section 3.6 details how to run these tools. © 2010 by Charles H. Briggs, Jr. All rights reserved Page 27 3.1.6 Finding Intern Data The two primary keys for finding intern information both on reports and through the screens is via Social Security Number (SSN) and last name. Therefore there are two search engines builtin which target these two paths. The SSN search can be launched from the Toolbar icon mentioned in section 3.2. When clicked the SSN search will open a search screen pre-filled with a „U‟, which precedes the SSN number. Depending in the preceding character you may need to change this pre-fill value to a „C‟. After the correct letter, enter the SSN number with no spaces and no dashes. If a group of matches is desired, the wildcard symbol (*) can be used to find „like‟ records for further individual review. The initial search will return a list of qualifying intern records. To view a full intern record click on the yellowhighlighted SSN number of the record desired. The Last Name search is identical to the controls use for the SSN search. Is it launched from the Toolbar icon as shown in section 3.2. The qualifying interns screen will be sorted by last name and with links to the intern record. © 2010 by Charles H. Briggs, Jr. All rights reserved Page 28 3.2 The Toolbar The toolbar provides one-click access to the more frequently used IRIS features: The File menu contains processes for import and export of IRIS files. These commands are also available as one-click icons on the toolbar. This menu is covered in section 3.3, and data imports and exports are covered in part six. The Edit menu contains lists of reference data (Providers, Schools, Error Codes) for quick reference. This menu is covered in section 3.4. The Reports menu is the starting place for ordering all IRIS reports. This menu is covered in section 3.5. The Tools menu contains data and system administrative processes and information. This menu is covered in section 3.6. The graphic icons provider one-click access to the following processes and features: Import IRIS Data – add records from CMS IRISV3.1 format (see part five) CMS IRIS Export – export .DBF files in CMS IRISV3.1 format (see part five) Add Intern Record – add a new intern record, provider and assignments (see part six) Add Facility Information Record – add records to store facility defaults used for creating intern, provider and assignment records Search Interns by Name – find intern information by intern‟s last name (see part four for details) Search Interns by SSN– find intern information by intern‟s SSN (see part four for details) Quick Print – provides a printer pop-up window to direct your reports to a specific printer and choose the start/stop pages © 2010 by Charles H. Briggs, Jr. All rights reserved Page 29 3.3 The File Menu Below is a preview of the File menu: The Import IRIS Data option is available here as well as the toolbar. The illustration of data import process is detailed in section 3.1.3. The Export option is also available here as well as through the toolbar. The illustration of the data export process is detailed in section 3.1.4 The Exit option will close the IRIS application. A confirmation box will be presented at closing with the option to cancel. 3.4 The Edit Menu Below is a preview of the Edit menu: The Browse Assignments by SSN option will open the browser screen beginning with the first intern in SSN order. This data is read-only and can be paged through one record at a time. The Error Codes option will list all critical and non-critical errors and edits supported by IRIS. The errors tracked by IRIS can be selected and de-selected in this screen, thereby allowing for both targeted research and an opportunity for paper savings. The Providers option will list all provider/fiscal/residency combinations in the database. Each record also contains a drill-down option (the „+‟ symbol on each line) to see a datasheet of the intern records tied to that provider record. The School Codes option will list all the IRIS medical school codes along with the school name, city and state. The Facility Information Records (FIR) can be accessed here as well as through the toolbar. Refer to section 3.1.1 for more information on setting up the FIR for your facility. © 2010 by Charles H. Briggs, Jr. All rights reserved Page 30 3.5 The Reports Menu The Intern Audit Report is designed to combine intern information, data edits and overlaps along with FTE summaries into one report. At the conclusion of the main report, an FTE summary (MCR worksheets E- A and E-3-IV) can be included, if desired. For many types of intern evaluation this report will provide a valuable perspective of an intern‟s residency profile. The report is ordered in two steps and may be run for interns with attention records (edits or overlaps) or for all interns within the selected provider and fiscal year. After selecting the desired report type, click „Build‟. The run time for this pre-build process will depend on the size of your IRIS database. The activities performed and the completion percentages progress are reported during the build. As discussed earlier, the SEM tracks all update activity within IRIS. When the audit report is launched and the SEM indicates that the audit tables are still current relative to the database, the pre-build of these tables for use within the audit report is skipped automatically. The second and final step to order the report is to select the desired provider, sort type, fiscal period and output method. By default the optional FTE report (MCR worksheets E- A and E-3-IV) is not selected. If you wish to generate the FTE report along with the audit report, select the radio button. Be advised that adding the FTE report adds to the run time of the overall process. © 2010 by Charles H. Briggs, Jr. All rights reserved Page 31 As with many reports in IRIS the report may be previewed for print or written to a text file in several different formats by clicking Report to File, including PDF, XML, HTML and formatted text. The audit report can output a CSV (Comma Separated Values) file suitable for import into Microsoft Excel®, Microsoft Access® and other analytical tool. Click the „Directory‟ button to browse for the desired directory to save the file or use the prefilled directory location. As with other functions in IRIS, the SEM will remember the last directory used and will default to that path. Then, type in a file name and click „Save‟. The file name you enter will automatically be appended with “.csv” when the file is saved. The CSV output file may be saved to any desired location (with appropriate write permissions on the user‟s profile) and may be named as necessary. The Foreign Medical Graduates reports FMG interns by the certification status (all, noncertified, certified.) Select the type of report desired, the provider and fiscal year. You may preview the report or direct the output to a file. The Out of IRP report will list the interns who are active beyond their initial residency period. © 2010 by Charles H. Briggs, Jr. All rights reserved Page 32 Select the desired provider and fiscal year. Choose the desired sort. You may then preview the report or direct the output to a file. The Overlap report will list interns and assignment detail where coinciding assignments have a total GME or IME FTE percentage exceeding 100%. First select the type of report desired. You may print all overlaps or only those for a selected provider and fiscal year. If you choose the provider select option the next screen will accept the desired provider information. Then choose the desired output sort and overlap method. The „Standard’ overlap method is assignment-based and will list a complete assignment‟s FTE value as an overlap FTE based solely on the intersection of the assignment dates with another active residency assignment so long as the time percentage of both assignments exceeds 100%. The „Ordinal’ overlap option takes the process one step further. In calculating ordinal overlaps, the intersection of two or more assignments is further reduced to claim only the concurrent days in the assignments as overlapping FTE amounts rather than flagging an entire assignment. © 2010 by Charles H. Briggs, Jr. All rights reserved Page 33 The overlap report will include assignments from the selected provider and fiscal year as well as those from other providers whose assignments overlap those of the selected provider. Prior to formatting the report, a list of providers identified by the report will be shown with an option to include each provider on the report. To exclude from the report any provider, de-select the „Include‟ flag. An excluded provider‟s listing and any FTE impact will not appear on the report. At the top of the provider select screen there is an option box to suppress any overlapping assignment that would have no numerical influence on the outcome of the report. To suppress these records click the options box at the top of the screen. The default option is to print all records. If no critical overlaps are found, a single overlap report page with „No Overlaps Found‟ will be produced and can be printed. After the providers are selected you may preview the report or direct the output to a file. A CSV option is also available for other data tools like Microsoft Excel® or Microsoft Access®. The Import Audit Report will provide a listing of any intern master differences detected as IRIS CMS files are loaded. The audit report will compare name, residency and school information on a matching SSN in the current database and flag variances. The intern master is not automatically changed by the IRIS import should a variance in that data be detected. Changes can be reviewed in the report and then changed manually, thereby also providing a change audit trail. © 2010 by Charles H. Briggs, Jr. All rights reserved Page 34 The report can be run in either of two data scopes. It can be run for the entire database or for a specific provider and fiscal year. Also, there is an „Ignore Names‟ option to not list an Intern change when the only differences are in the Intern‟s name. The IRIS Data Intern Assignment Information report will list or summarize intern assignment information by provider. The report may be ordered in each of three formats. The first option will print all assignment records in the database ordered by SSN. The second option produces the same report as option one but sorted by provider. The third option will accept a provider and fiscal year. You can then preview the report or direct the output to a file. The Intern History report will list all recorded assignments for the input intern SSN. Choose the output format, either preview or direct the output to a file. Upon output select you will be prompted for the desired intern‟s SSN. This report is designed to list one intern at a time. © 2010 by Charles H. Briggs, Jr. All rights reserved Page 35 The Intern Residency report will list or summarize residencies and total FTEs within residency groups. The report can be ordered in each of three types. The „Residency Code Report‟ is a full detail assignment listing with FTE totals. The „Assignments by Residency Code Report‟ is a summary by residency code along with FTE totals. The third option produces an FTE summary for use with Worksheet E and E-3 FTE totals aligned with the appropriate worksheet line numbers. Choose the desired report type and click „Continue‟. The next screen will accept a provider and fiscal year as well as a desired residency code. If the code is left blank, all residency codes will be evaluated. Once the desired parameters are set you may preview the report or direct the output to a file. The Simultaneous Match report will list interns by their simultaneous match residency status. The report can be ordered in each of two ways. The default report will list those interns for the selected provider who have the potential to participate in a simultaneous match through being active in two qualifying residencies. The second report will for the selected provider list those interns currently active in a simultaneous match residency and not their initial residency program (IRP). © 2010 by Charles H. Briggs, Jr. All rights reserved Page 36 Select the desired provider and report type. The report may be previewed or the output directed to a CSV file. The Intern Comments report accepts no parameters. It lists all intern with entries in the „Notes‟ field of their intern master record. The OIG Report can be run as a full report from the „Edit‟ menu, or in conjunction with the OIG Import process under the „Tools‟ menu. The OIG publishes their LEIE (List of Excluded Individuals/Entities) database quarterly and makes their database file available for download. The OIG Report will produce a list of matching names between your IRIS database and the LEIE. © 2010 by Charles H. Briggs, Jr. All rights reserved Page 37 3.6 The Tools Menu The Calculate FTEs tool will compute and update assignment GME, IME and un-weighted GME FTE values. The this must be run after data is added to or modified in the IRIS database, such as CMS import, adding interns via the keyboard, adding assignments via keyboard or editing GME or IME FTE percentages within existing assignment records. If data is added to the IRIS database and their FTEs are not calculated, any assignment records will not be displayed on the intern screen or appear on any reports until they are calculated. The calculate process can be ordered in two ways. If you have added a CMS disk with one provider or changes were made to a single provider, you may choose the provider and fiscal year to calculate. Depending on the size of the IRIS database this can be a significant time and computer resource saver by not having to read the entire database. The default is to compute the entire database. After choosing the calculate option, and a provider and fiscal year if applicable, click „Calculate‟. The „Status‟ line will indicate the steps being performed and a completion message upon conclusion. As noted on the calculate screen this process will delete all previously run FTE values for the targeted assignment records. The process should be run when no other reports are running against the source database and can take several minutes to complete depending on factors such as machine speed, network throughput and source database size. The FTE calculation screen contains a checkbox to rebuild overlap evaluations from the same screen. The overlap rebuild processes is also available as a separate job and is described next. The Initialize Overlaps tool, much like the Calculate FTEs tool, must be run after data is added to the IRIS database. If data is added to the IRIS database and they are not initialized for overlaps, their © 2010 by Charles H. Briggs, Jr. All rights reserved Page 38 overlap status will not be reflected on any reports. Due to the frequent overlaps among multiple providers a single provider option could result in inaccurate overlap evaluations. Therefore the only option is to evaluate the entire database. Click „Rebuild‟ to begin the process. The „Status‟ line will report the current process activity. At the completion of the rebuild, a rebuild statistics panel will be available to view the run summary. You may view the statistics panel by clicking „Show Statistics‟. Again as in the Calculate FTEs tool, factors can influence the run time of this process and it can take several minutes to complete. The processes for this tool run best with no other jobs or reports running against the source database. The Refresh Data Link tool was covered earlier in this manual in part 2 (Installation). The Run Macro tool is designed for use in conjunction with HFS Support. There are no regular system management jobs requiring this tool. The Administration tools that follow are outside the daily or periodic data and system maintenance routines. These jobs require special access to the database and should be run by a system with „owner‟ privileges. See part two for more information on the types of user accounts available. The Compact and Repair Database tool will target the IRIS engine file only. (Refer to chapter two for an identification of the engine file with its location and file name.) This tool compresses the database by removing deleted records and re-indexing tables in sequential order. This also improves performance by precisely indexing records for faster location by the system. As it requires exclusive access to the database this tool requires that no other reports are open when it is running. Depending on the size of the database the process may take several minutes to complete. For best performance on large databases, this maintenance should be run monthly. As outlined earlier the Microsoft Access® 2007 database file sizes are restricted to less than 2 Gigabytes (2,000,000 kb) on most operating systems. If the IRIS engine file size nears the limit, this compact routine should be run. The SEM also reflects the IRIS file size and, if necessary, will warn of the file size and publish a „Compact‟ button to resolve the problem. We recommend that a backup of the engine file be made before running this tool and retained until the postcompact engine file‟s status can be verified. If you have questions about using this tool, please contact HFS Customer Support. The Delete All Data Tables tool should be used in conjunction with HFS Support. Without a valid backup of the source database, this tool can permanently erase all intern, provider and assignment information. Therefore, as indicated in part two of this manual, data security and backups are essential. If „Yes‟ is clicked a second confirmation will be offered with an option to cancel. If confirmed then the system will purge all of the intern, provider and assignment © 2010 by Charles H. Briggs, Jr. All rights reserved Page 39 data, overlaps, FTE information and all HIPAA data from the source database. At this point the system will not report any data and nothing will be available to search or browse. The system will be empty of intern data and contain only IRIS support tables such as errors, residency codes and school information. If „No‟ is clicked the process is not activated and the system is left unaltered. The Refresh IRP Years is a shortcut tool to update the Initial Residency Program Years particularly when changing the status of a 1995 Year Override setting (see section 3.1 for a description and location of the 1995 year option box.) The Delete Specific Provider/FY tool will accept a specific provider and fiscal year and delete all provider records and assignments found matching these inputs. This process can be run to clear the database of assignment information prior to importing a CMS file correction. After choosing the desired provider and fiscal year, click „Delete Records‟ to active the process. After it is complete the removed provider information can be added back into the system through an IRIS disc or through the keyboard. The Update Active Residency and Update Intern Master Sim Match are shortcut tools designed to make changes to intern residency information. The intern‟s active residency, whether IRP or Simultaneous Match, will determine weighting values as well as many other aspects of the intern‟s FTE evaluation. Therefore these jobs should be run after activating or deactivating a Simultaneous Match condition or editing an initial residency. These two tools are automatically run with every Calculate FTEs run as well. If you are making several residency changes through the intern editor, run the Calculate FTEs job at the completion of all edits to update affected active residencies prior to calculating weights. The Deleted Assignments list will show all assignments currently marked as deleted. Assignment records can be deleted through the Intern screen if sufficient privileges are granted to the IRIS user. See section 2.1 for more information on user authority levels. If a record is deleted from an intern‟s assignment history, that assignment record will appear in this list. The deleted assignment will no longer appear in FTE calculations or on any report. To reinstate a deleted record, click on the „Deleted‟ flag on the delete to remove the checkbox. Then run the Calculate FTEs and Initialize Overlap tools to refresh the reactivated assignment records. © 2010 by Charles H. Briggs, Jr. All rights reserved Page 40 The About box will contain your current IRIS version and contact information for HFS support. The Import OIG File is a tool for accepting the OIG download file, importing it and comparing the data to the Intern Master. The LEIE data is stored in IRIS and is compared (by last name, first name and middle initial) to all Intern Masters and lists the matches found. The match does not include the Social Security Number – the OIG/IRIS match is based solely on name. The IRIS system installs with the OIG table preloaded with data effective July, 2010. © 2010 by Charles H. Briggs, Jr. All rights reserved Page 41 To update the OIG table data within IRIS from the OIG website, follow these steps: 1. Go to the OIG website within the Health and Human Services website located at http://oig.hhs.gov/fraud/exclusions/exclusions_list.asp 2. Downloaded the LEIE data file and extract the UPDATED.DBF file 3. Save the .DBF file to a convenient location 4. In IRIS, go to Tools > Administration > Import OIG file 5. Click on „Import OIG download‟ and navigate to the saved .DBF file 6. Click „Open‟ After the data has been updated, you may run the OIG report from this screen for either a specific provider or the full database comparison. Also, you can run the OIG comparison report from the „Reports‟ menu at any time. © 2010 by Charles H. Briggs, Jr. All rights reserved Page 42 Part V ♦ How do I … The following items can serve as a quick reference guide to some of the more frequently performed IRIS functions. Add a new Intern via keyboard 1. Find and click the yellow plus symbol on the toolbar 2. Fill in the pertinent Intern information 3. Add rotation data as necessary 4. Click „Add Interns‟ to complete Import CMS Data 1. Find and click the „CMS Import‟ button on the toolbar 2. Navigate to your A & M files (only the M file will appear in the listing) 3. Click on the desired file and then „Open‟ 4. Accept or override the default action set by IRIS 5. Click „Import‟ Export CMS Data 1. Find and click the „CMS IRIS Export‟ button on the toolbar 2. Choose the desired provider and fiscal year 3. Click on the „Directory‟ button to locate the desired folder 4. Click „Export‟ Add assignments to existing Interns 1. Search and find the Intern already in IRIS that is to have assignments added 2. Below the assignment grid on the screen, click on „Add Provider/Assign. Records 3. Add the pertinent information and click „Add Record‟ Delete an assignment 1. Search and find the Intern already in IRIS that is to have assignments deleted 2. On the assignment to be deleted, click the „Edit/Del‟ button 3. Click on „Delete Assignment‟ and click on the confirmation message to close the form Modify an Intern record 1. Search and find the Intern already in IRIS that is to his/her information changed 2. Click on „Edit Intern‟. The fields available for editing will change color to red 3. Make the necessary changes 4. Click „Save‟ © 2010 by Charles H. Briggs, Jr. All rights reserved Page 43 Part VI ♦ Report Samples The following pages are samples of the reports offered in IRIS. The launch screens for these reports and their various options are outlined in the „Reports‟ section 3.5 above. The Intern Audit Report will identify either all or „attention only‟ assignments for a chosen provider and fiscal year. The „Error Codes‟ table described in section 3.4 will define the errors that are reported. © 2010 by Charles H. Briggs, Jr. All rights reserved Page 44 The Overlap report is available in several formats. It can be run for all providers and fiscal years or for a specific provider and fiscal year. Furthermore, the report can be run with „Standard Overlap‟ (intersecting rotations with full FTE values) or in „Ordinal‟ format where the actual overlapping days within intersecting assignments are individually calculated (next example). The Standard Overlap © 2010 by Charles H. Briggs, Jr. All rights reserved Page 45 The Ordinal Overlap © 2010 by Charles H. Briggs, Jr. All rights reserved Page 46 The Comments report will show all Intern records which contain text in the „Notes‟ field on the Intern Master screen. © 2010 by Charles H. Briggs, Jr. All rights reserved Page 47 The Foreign Medical Graduate (FMG) report will list foreign medical students with options to see certified, non-certified and all FMG Interns. © 2010 by Charles H. Briggs, Jr. All rights reserved Page 48 The OIG comparison report will match names in the Intern Master against those published by the Office of Inspector General‟s “List of Excluded Individuals/Entities (LEIE)” database © 2010 by Charles H. Briggs, Jr. All rights reserved Page 49 The Intern Assignments report will list all pertinent information about Interns‟ assignments at a given provider for a specific fiscal year. © 2010 by Charles H. Briggs, Jr. All rights reserved Page 50 The Resident FTE Summary will provide specific cost report line item information. This report also can be added to the Intern Audit Report by choosing FTE report option. © 2010 by Charles H. Briggs, Jr. All rights reserved Page 51 The Simultaneous Match report will show either „Potential‟ or „Matched‟ Interns and the residency with which they could (Potential) or are (Matched) assigned. © 2010 by Charles H. Briggs, Jr. All rights reserved Page 52 The Out of IRP report will list all Intern records that have assignments which extend beyond the completion of the Intern‟s Initial Residency Program (IRP). © 2010 by Charles H. Briggs, Jr. All rights reserved Page 53 The Import Audit report will list variances between any newly imported IRIS data and the same Intern‟s record currently in IRIS. Variances only in name can be ignored when the report is run. © 2010 by Charles H. Briggs, Jr. All rights reserved Page 54 The Assignment History will list all assignments on record for an Intern. © 2010 by Charles H. Briggs, Jr. All rights reserved