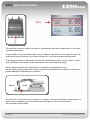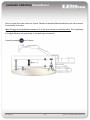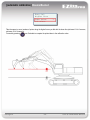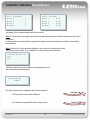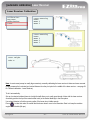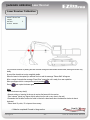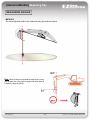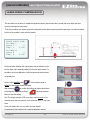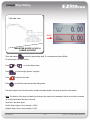
1
User Manual
manual version
23
software version
EZ01_03
Contents
Introduction
System Functionality…………...………..….3
System Components……………..……….4-6
First Time Setup……………………………..7
Usage
Display – Simple Mode……………………..60
Display – Advanced Mode……………..61-62
Remote Display……………………………..63
Zeroing the Target Depth……………...64-65
Set the Depth Reference…………………...66
Slope Setting………………………….… 67-68
Laser Function…………...………………69-72
Bucket Selection…………………………….73
Dead Band Selection……………………….74
User Options Menu……………………...75-76
Unit of Measure…………………………......77
Parameters……………………………….78-79
Zeroing the Target Reach…………………. 80
Set the Reach Reference…………………..81
Memory Function……………………………82
Maximum Height Function………………….83
Maximum Depth Function………………….84
Profile Setting……………………………85-88
User Settings…………………………….89-90
Components Installation
Control Box & Remote Display…………8-10
Sensors………………………………….11-17
Control Box
System Start-Up………………………..18-19
Keypad Identification………………….. 20-21
Calibration Setup
Part Names…………………………….. 22-23
Access to Calibration Functions…………..24
Calibration Menu…………………………...25
Sensor Assignment…………………….26-27
Machine Selection………………………….28
Calibration Selection……………………….29
Automatic Calibration
Sensors Position………………………..30-31
Dog Bone………………………………..32-33
Booms/Bucket…………………………..34-40
Laser Receiver……………………………...41
Troubleshooting
Battery Level…………………………………91
Sensor Reception…………………….……..92
Alarms
Sensors………………………………93
Remote Display……………………..94
Manual Calibration
Booms & Dog Bone…………………….43-51
Bucket……………………………………51-53
Laser Receiver……………………………...54
Measuring Tips…………………55-57
Laser Speed Compensation….58-59
Specifications…………………………………….…95
Safety
EMC, FCC, CDRH………….…………...96-97
Warranty & Contact Information……………..98-99
EZDigPro
-2-
User & Calibration Manual
[intro] System Functionality
DEPTH
A
Fig.1
This system can be used to dig with an excavator to a desired depth and create a leveled plane or to set a slope
and create a tilted surface.
It’s also possible to dig a multi-slope surface using the additional setup functions in the advanced mode. The
profile function pre-sets the shape, and no further settings on the control box are required during operation.
All the digging information is referenced to the center of the bucket blade (or teeth – point A in figure 1) and the
depth value shown is the distance from the actual position to the correct depth value (target).
With the system the operator has to dig “straight” (only moving the booms/bucket in and out).
After the reference (target) depth has been set, the chassis has to stay stable and any rotation of it will produce a
possible additional error depending on the inclination.
A
Every time that the excavator tracks are moved, it’s necessary to zero again the reference (target) depth on a
previous point or, depending on the setup, take the laser height again or use the “memory function”.
See next pages for further details.
EZDigPro
-3-
User & Calibration Manual
[intro] System Components
EZDigPro
x1
x1
x1
x2
x1
x3
x1
x1
x1
-4-
User & Calibration Manual
[intro] System Components
Each component of the system has a serial number. Please note this number before requesting service.
EZDigPro
-5-
User & Calibration Manual
[intro] System Components
If your excavator has an articulated 2nd boom, you need to use a 4th sensor. If you don’t have a 4th sensor, the only
way to make the system work is to lock the articulated boom during calibration and operation. You’ll be prompted
during the calibration of the system to ensure the correct number of sensors.
If you have locked the boom, periodically check that the lock position (usually fully open) doesn’t change during work
or there will be a loss of accuracy.
EZDigPro
-6-
User & Calibration Manual
[intro] First time setup
How to set up the system for your machine
Choose where to install the system’s components on your machine and proceed with
control box and remote display installation.
Do not place the sensors on the elements until completing the assignment procedure.
(see Components Installation section)
Power up the control box and assign the sensors to the correct machine elements
where they will be attached.
(see Sensor Assignment section)
Fix the sensors in their final position on the assigned elements.
(see Components Installation - Sensors section)
System Calibration
- Dog Bone calibration (if the Bucket sensor has been mounted on the Dog Bone)
- Booms/Bucket calibration
- Laser Receiver calibration (if the system will be used in combination with a laser transmitter)
(see Calibration section)
Ready!
EZDigPro
-7-
User & Calibration Manual
[installation] Components Installation
Control Box
The control box can be powered using the
supplied cable directly through the
cigarette lighter.
If a direct connection to the battery is
needed, please verify the battery voltage
(see technical specifications at the end of
this manual).
Junction
Suction Cup
1
2
EZDigPro
-8-
User & Calibration Manual
[installation] Components Installation
Remote Display
Note: The radio antenna is on the top of
the Remote Display.
Suction Cup
1
EZDigPro
-9-
2
User & Calibration Manual
[installation] Components Installation
Control Box & Remote Display
Note: The Remote Display must always be
connected to the control box. Otherwise, the
entire system will not work.
Junction
EZDigPro
- 10 -
User & Calibration Manual
[installation] Components Installation
Sensors
Pay Attention!
Sensors are equipped with magnets. Magnetic fields
in proximity can cause interference with pacemakers
and other medical devices.
Magnets
Charging
Sensors are equipped with batteries charged through solar cells.
The supplied multi-charger might be necessary to externally charge the sensors.
Charge the batteries for at least 8 hours before the first use of the system.
By doing this, the batteries will be able to charge to their full capacity
during the following discharge-charge cycles.
EZDigPro
- 11 -
Solar Cells
User & Calibration Manual
[installation] Components Installation
Place of Installation
Sensors
BOOM 1
Attach directly with the magnets or use the support plates
You can either place the sensors directly on the equipment with the magnetic attachments, or attach the sensors
magnetically to the support plates, which can be welded or screwed on the individual elements. The advantage of the
support plates: you don’t need to mark the sensors’ locations and orientations before you remove the sensors at the
end of the day; the plates stay in position. If you don’t want to use the support plates and you want to remove the
sensors at the end of the day, you should mark (with a pen or a screwdriver) the sensors’ locations and orientations to
avoid having to calibrate again.
Note the “nose” on one side of the sensor, which will help you orientate it correctly the next day. If you attach it
incorrectly (turned 180°), it will cause an error in the calibration and performance of the system.
Caution: Check with your machine dealer if welding or screwing into the excavator’s elements might lead to a loss of
the element’s warranty.
Boom 1 Sensor
Attach the sensor to the main boom close to the chassis near the pivot point. There is less movement near the pivot
point and the readings will be steadier, with less fluctuation. Same for the 2nd articulated boom (if you have this).
EZDigPro
- 12 -
User & Calibration Manual
[installation] Components Installation
Sensor
with laser
receiver
Place of Installation
BOOM 2 – DIPPER STICK
Detection
window
If you plan to use the laser receiver during operation, you need to choose where you want to install it.
Boom 1 (Main Boom): Might not be the best solution, as the main boom can’t be moved up and down through a big space.
Still, if you decide to place the sensor with the laser receiver on the main boom, try to put it as close as possible to the top
pin, close to the next element (either the articulated 2nd boom or the dipper stick).
Boom 2 (2nd articulated boom if working with 4 sensors): See above.
Boom 2 (Dipper stick if working with 3 sensors): Usually the best place, as the dipper stick has the greatest latitude in
movement, and you need space to be able to move through the laser plane.
Boom 3 (Dipper stick if working with 4 sensors): See above.
Note: Check in advance the height at which your rotating laser will be set up, and install the sensor at a place/element
which gives you the most opportunity to catch the laser plane during operation.
Note: To ensure that you can make use of the entire capture height of the receiver, install that sensor so that the detection
window will be oriented about 90° to the laser plane when you are using the receiver.
EZDigPro
- 13 -
User & Calibration Manual
[installation] Components Installation
Place of Installation
Sensors
BUCKET
C
B
A
Determine a safe location for the bucket sensor. You can install it in the following locations:
A) On the top part of the backside of the bucket
Might be unsafe – be sure that the sensor is protected.
B) On a quick connector
Usually the best place. If you decide to install the sensor “inside” the quick connector, note to which side the
plastic cap of the sensor is located (you will be asked during the calibration process).
C) On the dog bone
If you decide to install the bucket sensor on the dog bone, be sure to run the dog bone calibration before
running the complete sensor calibration.
Note: Remember the side you’re installing each sensor. Even if you install a sensor on the right part of an element (for
example on the inside of the quick connector), still the clear housing might show to the left. Usually a complete installation
on the left side is recommended to have all the sensors visible from the cab.
EZDigPro
- 14 -
User & Calibration Manual
[installation] Components Installation
Sensors
Fixing with Magnets
Pay Attention! Strong magnets!
Don’t put hand or fingers between sensor
and support plate or other metal parts.
EZDigPro
- 15 -
User & Calibration Manual
[installation] Components Installation
Sensors
Fixing with Support Plates
Pay Attention! Strong magnets!
Don’t put hand or fingers between sensor
and support plate or other metal parts.
EZDigPro
- 16 -
User & Calibration Manual
[installation] Components Installation
Sensors
…sensor to plate
…to machine
Fixing with Support Plates
Releasing
Pay Attention! Strong magnets!
Don’t put hand or fingers between sensor
and support plate or other metal parts.
EZDigPro
- 17 -
User & Calibration Manual
[controlbox] System start-up
At system start-up a welcome screen shows the
software version loaded into the EZDigPro control box.
Before starting to work with the system, you must assign each sensor to the machine elements where they will be
installed and calibrate the machine with the calibration procedure.
EZDigPro
- 18 -
User & Calibration Manual
[controlbox] System start-up
This is the start-up procedure:
WELCOME
SCREEN PAGE
(ABOUT 5 SEC.)
NO
ALARM PAGE
REMOTE DISPLAY
CONNECTED ?
YES
NO
SETTING MENU
SENSOR
ASSIGNMENT
DONE ?
YES
NO
SETTING MENU
CALIBRATION
DONE ?
YES
SENSORS SEARCH
PAGE
NO
SENSORS
RECEIVED ?
YES
RECEIVED WITHIN
150 SECONDS ?
YES
NO
ALARM PAGE
WORK SCREEN
EZDigPro
- 19 -
User & Calibration Manual
[controlbox] Key Identification
-
+
Enter
0
%
Press once:
To confirm any setting in progress.
Press & hold:
To enter the USER MENU.
In the working page
Scroll down the screen to the next working page
-
In text menu
Press to move the cursor down in any text menu
If the cursor is on the last line of the page, it starts again from the top (or next page is displayed, if there is
one).
Press to move the cursor up in any text menu
If the cursor is on the first line of the page, the previous menu page will be displayed.
Depth value setting:
To set a new distance to the target depth.
Bucket selection page
Press once:
%
To set a new slope (%).
Press & hold (only in Advanced Mode):
Profile Mode
EZDigPro
- 20 -
User & Calibration Manual
[controlbox] Key Identification
-
+
Enter
0
%
Press once:
To enable the laser acquisition (reference the depth value to the laser plane)
Press & hold:
To set a depth value in correlation to the laser plane height
Zeroing function
To zero the depth or reach value.
To exit any menu.
Press once to cycle through the horn settings: Off, On, Loud.
Enabling the speaker enables additional on-grade audio indication:
On-grade: Continuous tone
Too high or too low: Beeping tone
Press & hold to access the Dead Band setting page
EZDigPro
- 21 -
User & Calibration Manual
[calibration] Part Names
EXCAVATOR PARTS USED IN CALIBRATION
Conventional Boom – 3-Sensor Machine
Boom 2
Boom 1
Bucket
Chassis
Boom 2
Boom 1
If you have an articulated boom and you lock it to the main boom and use it as a
single boom, the system can be set and used as a 3-sensor machine.
EZDigPro
- 22 -
User & Calibration Manual
[calibration] Part Names
EXCAVATOR PARTS USED IN CALIBRATION
Articulated Boom – 4-Sensor Machine
Boom 3
Boom 2
Boom 1
Bucket
Chassis
To assign a 4-sensor system to a 3-sensor machine
(eg: the next day):
- Skip the assignment procedure and go directly to Calibration.
- When you choose how many sensors will be used, answer: “3 sensors.”
- The system will tell you that it sees “4 sensors.” Enter: “OK” to continue.
- The system will automatically ignore Sensor # 3 from the previous
4-sensor assignment, so do not use the sensor that was on Boom 3.
- Place the sensor that was on Boom 2 (the articulated boom from your first
machine) onto the dipper stick, which is now called Boom 2.
- Sensor 1 will again be on the main boom and Sensor 4, again on the bucket.
If the laser receiver was sensor #3 on the 4-sensor machine
and you want to use it on the 3-sensor machine as well, then you have to reassign sensor #3 as the new sensor #2, and sensor #2 as the new sensor #3
(which the system will ignore) prior to entering calibration.
Note: Use the machine data storing function (see: User Options Menu) to avoid re-calibration each time you put the
system on another machine. Also mount the sensors with the support plates if you plan to change machines often.
EZDigPro
- 23 -
User & Calibration Manual
[calibration] Access To Calibration Functions
From the working screen (operative mode) or the alarm page, press & hold
- to reach the “Calibration Menu” line.
Scroll the cursor down with
Press
to enter into the USER MENU.
to enter into calibration.
USER MENU
Sensors Check
Calibration Menu
If a calibration password is not needed (default mode), see next page to continue.
If a password has been set, the system will prompt for it.
CALIBRATION
PIN:
Confirm
0
Scroll to Confirm and press
If the password is incorrect, the message “Access denied!” will be displayed.
Press the
button to return to the operation mode.
EZDigPro
- 24 -
User & Calibration Manual
[calibration] Calibration Menu
SETTING MENU
Sensor Assignm.
Calibration
Load Default
Save
Service Paramet.
SetPassw.
0
Sensor Assignm.
To assign a sensor to the correct machine part.
First operation that has to be done on a new system.
Calibration
To calibrate the system with the automatic or manual method.
To be done when all the sensors are already assigned and received.
Mandatory on a new system, new machine, or next-day setup if the sensors won’t be put back on the same locations
(and with the same orientation) as the day before.
Load Default
Reset the system to the factory defaults (calibration deleted!). Strongly recommended after a system update (new
software).
Save
To SAVE all the changes made during the calibration process.
This is mandatory, so you don't lose modified data with a control box power off.
Service Paramet.
Advanced parameters and remote sensors parameters. Password protected; only accessed by service
SetPassw.
You can set a password to protect the calibration menu. Default value is zero (the control box will not prompt for a
password).
See next pages for complete description of every menu
EZDigPro
- 25 -
User & Calibration Manual
[calibration] Sensor Assignment
Before calibrating, you must assign the sensors to each element and then place them in position. You can choose any
element, except for the laser receiver (select the best location as described on page 13 under "Components
Installation"). See previous section on “Part Names” for location of Boom 1, 2 and 3.
1.
Select one of the sensors.
2.
Put it in horizontal position and make sure the other sensors are all in vertical position. To do this, you can leave the
others in the case in their vertical slots, and lay the selected sensor flat on top of the case foam or on the ground.
The sensors should be at least 1 meter (3 ft.) away from the remote display when assigning them.
There must be only one sensor in horizontal position during sensor assignment. If any of the others are horizontal, it will
cause problems. Even if there is no error message shown, you may get errors during calibration or operation.
3.
Follow the menu prompts on the next page.
4.
Put that sensor on the boom or location you assigned before proceeding to the next sensor.
For the greatest capture range, the laser receiver sensor should be placed on the boom so that the detection window
will be 90° to the laser plane. For the other sensors, it does not matter how they are oriented.
5.
Take another sensor and follow the same procedure, until all are assigned and in position on the excavator.
Programming condition: only one sensor horizontal.
Work condition: all sensors vertical
Note: If there are sensors on other machines or in carrying cases within the radio reception area, they also
must be vertical while you are assigning your horizontal sensor.
Note: Don’t assign a sensor to an element which already has a sensor assigned to it.
Note: The sensors only communicate with the system when they’re vertical – except during sensor
assignment.
EZDigPro
- 26 -
User & Calibration Manual
[calibration] Sensor Assignment
Follow these menu prompts to assign each sensor:
SENSOR ASSIGNM.
Put one sensor
horizontal and
press Enter…
SENSOR ASSIGNM.
Searching
sensor...
150
NOT FOUND
SENSOR ASSIGNM.
No sensor ready
to be programmed
Enter to exit.
FOUND
Assign to:
Boom 1
Boom 2
Boom 3
Bucket
SENSOR ASSIGNM.
Programming…
Please Wait
PROGRAMMING
SUCCESSFUL ?
NO
SENSOR ASSIGNM.
Programming
FAIL !
ZERO to exit
YES
SENSOR ASSIGNM.
Sensor
programming OK !
Enter to exit
After the sensor assignment – or before the next-day setup – you can verify the sensor assignment per the
Troubleshooting Sensor Reception section on page 92 by rotating a sensor (in vertical) with your hand. The value that
changes the most indicates which sensor you’re actually using.
EZDigPro
- 27 -
User & Calibration Manual
[calibration] Machine Selection
MACHINE SELECTION: CHOOSE SYSTEM WITH 3 OR 4 SENSORS
Machine:
3 Sensors
4 Sensors
Sensors Search..
1, 2 or 4
sensors
found
No Sensor
Assignment done!
Press Enter
If the number of
“received sensors”
doesn’t match what
you just indicated,
you’ll see screen 1 or
2. If it matches,
proceed to calibration.
4 SENSORS
3 SENSORS
0
sensors
found
The validity of your
choice is checked with
“Sensors Search.”
After a pause, you will
see 1 of the 3 screens
shown in blue below.
0
sensors
found
3
sensors
found
System sees
X sensors
OK
BACK
1, 2 or 3
sensors
found
4
sensors
found
Calibration:
Automatic
Manual
X: number of received sensors
EZDigPro
- 28 -
User & Calibration Manual
[calibration] Calibration Selection
Calibration:
Automatic
Manual
After you’ve finished the sensor assignment and installed the sensors, you must calibrate the system. You can either
calibrate the system manually or automatically.
Important: Check the units of measurement that are set in the user menu before calibration: meter [M], feet [F], or
feet & inches [FI]. Change them now if necessary. If you don’t, and are partway through calibration and leave the
screen to change the units, all your calibration data will be lost!
Note: Avoid low frequencies from the machine’s engine or heavy vibrations, which can cause major inaccuracies
during calibration due to sensor instability. An idling machine is the worst -- run at half throttle (half RPM). You can
check the stability of the sensors any time in “Sensor Check” on page 92. Values shouldn’t jump more than 10 digits.
Automatic Calibration (EZCalibration):
These three procedures must be done in this exact order:
1) Dog Bone Calibration (if the bucket sensor is installed to the dog bone).
You need to temporarily use the boom 1 sensor for this.
2) Booms/Bucket Sensors Calibration
A self-leveling laser pointer or rotational laser is very helpful.
3) Laser Receiver Calibration
You’ll need a horizontal rotational laser and a hand detector.
Even if you calibrated the other sensors automatically, you can still calibrate
next page
the laser receiver manually.
Manual Calibration:
Usually the most time-consuming method. You'll need 2 people and tools and instruments.
If you only want to calibrate just a new bucket, manual calibration might be faster than automatic
calibration of the whole system.
Page 43-59
Note: After calibration, remember which machine and bucket number you were using. Next time you set up the
system on the same machine, you can use the same machine and bucket number to recall the old settings. By doing
this, you don’t have to do a sensor assignment or calibration, and immediately may proceed to operation.
Note: You can check the system's calibration at any time by “rotating” the bucket tip over a certain point. While doing
this, the depth value on the control box shouldn’t change more than +/- 1cm (+/- ½ inch).
The automatic calibration procedure was developed by the Institute for
Industrial Mathematics at the University of Paderborn, Germany.
EZDigPro
- 29 -
User & Calibration Manual
[automatic calibration] Sensors Position
Answer the menu questions about your installation:
Bucket sensor
position:
Dog Bone
Bucket
C
B
A
Left Side
Bucket sensor
Mounting side:
Left
Right
C
B
A
Right Side
EZDigPro
- 30 -
User & Calibration Manual
[automatic calibration] Sensors Position
Continue answering the menu questions about your installation:
Boom 3 sensor
Mounting side:
LeftBoom 2 sensor
Mounting side:
Right
LeftBoom 1 sensor
Mounting side:
Right
Left
Right
Sitting in the cab and looking at the elements:
If the sensor’s clear housing shows to the left, the mounting side is left
– and vice versa.
If the bucket sensor is installed on the Dog Bone
Calibration:
Dog Bone
Booms/Bucket
Laser
If the bucket sensor is installed directly on the bucket or
quick connector (no need to calibrate Dog Bone!)
Calibration:
Booms/Bucket
Laser
EZDigPro
- 31 -
User & Calibration Manual
[automatic calibration] Dog Bone
Dog Bone
Calibration:
Dog Bone
Booms/Bucket
Laser
Boom 1 sensor
must be mounted
on the bucket
Press Enter
Attach Boom 1 sensor temporarily to the Bucket.
Don’t attach it to the Dog Bone!
Note: Be sure to have Boom 2 (and Boom 3) sensors
already attached in their final positions.
Boom 1 sensor on
bucket side:
Left
Right
EZDigPro
Select the side where the sensor has been temporarily placed.
- 32 -
User & Calibration Manual
[automatic calibration] Dog Bone
Dog Bone
EZCalibration
Dog Bone
Take Point
Press Enter
1
How to Take Points for Dog Bone calibration:
•
With the bucket in the first position, press
over Take Point, and
wait for the position to register. When done, the point counter on the
right will advance and you will hear a beep.
•
Proceed to point 2 and take the second point.
•
Take a minimum of 10 points, rotating the bucket from completely open
to completely closed.
•
Do this with 2 different dipper stick positions.
Don‘t press enter too fast after you‘ve moved your bucket to the next
position. The bucket or the dipper stick should not swing or vibrate
while you press the enter button.
Other sensors The dipper stick sensor (and - if you need 4 sensors – the articulated boom sensor) must be attached in
their final positions during the Dog Bone calibration procedure and shouldn’t be moved afterwards. If the dipper stick
sensor (or the articulated boom sensor) gets moved after the Dog Bone calibration, the calibration has to be done again!
Calibration Done!
Boom 1 sensor
can be moved
again on Boom 1
When the Dog Bone calibration is done, the
Boom 1 sensor temporarily mounted on the
bucket can be attached again on Boom 1.
Press Enter
EZDigPro
- 33 -
User & Calibration Manual
[automatic calibration] Booms/Bucket
Booms / Bucket Sensors
For automatic calibration of these sensors, you must move the bucket to 10 to 15 points along 2 lines that have a
different elevation.
Choose a method to create these 2 lines that will give you the greatest difference in height between Beam 1 and Beam
2. The easiest is to create a laser line with the self-leveling laser pointer that’s included with the system. You can mount it
on a tripod, attach it anywhere on the machine using the magnetic L-bar, or use the remote display’s suction cup mount
(which has a ball joint for easy positioning).
Before starting, place the chassis horizontal and levelled. Make sure that it’s very stable and that you can take enough
points in both lines without moving the chassis. You need a minimum of 10 points with 3 sensors or 15 with 4 sensors.
EZDigPro
- 34 -
User & Calibration Manual
[automatic calibration] Booms/Bucket
Laser Pointer
LASER LEVELING METHOD
EZDigPro
- 35 -
User & Calibration Manual
[automatic calibration] Booms/Bucket
OTHER LEVELING METHODS
EZDigPro
- 36 -
User & Calibration Manual
[automatic calibration] Booms/Bucket
Easy Cal.
Lower Line
Take Point
Continue
1
Don’t calibrate the system with the machine’s engine idling. Keep the engine at least at half throttle (half RPM). On
load-sensing machines, deactivate the load-sensing first and put the machine at least at half throttle. The higher the
RPMs, the more stable the sensor’s angle reading will be, and the more accurate your calibration.
How to Take Points for boom
or bucket sensor calibration:
1) With the bucket in the first position, press
over Take Point, and wait for the position to register. When
done, the point counter on the right will advance and you will hear a beep.
2) Proceed to point 2 and take the second point.
3) Take a minimum of 10 points if you have 3 sensors, and a minimum of 15 points for 4 sensors.
Don‘t press enter too fast after you‘ve moved your bucket to the next position. The bucket or the dipper stick
should not swing or vibrate while you press the enter button.
Try to put all the elements (bucket, dipper stick, main boom) in as many different angle positions as possible when
you take the points. Have at least two points registered for each element in the most extreme positions (eg: the
bucket fully closed and fully open; the dipper stick fully extended and fully retracted). A wide variety of angles is very
important to achieve good calibration!
Make sure to always have the laser-point exactly on the very edge of your bucket (on the tip of the bucket tooth).
When done, proceed to the next step, “Height Difference,” by pressing
Easy Cal.
Height
Diff.:
Continue
EZDigPro
- 37 -
over Continue.
0.000
User & Calibration Manual
[automatic calibration] Booms/Bucket
Move to a higher line to take another set of points. Calculate the elevation difference between the first and the second
line and enter it in the menu.
Note: The bigger the height difference between d1 & d2, the more accurate your calibration will be. This is significantly
more important than the number of points taken during calibration!
If the height difference isn’t great enough, it can cause major inaccuracies!
Proceed by pressing
EZDigPro
over Continue.
- 38 -
User & Calibration Manual
[automatic calibration] Booms/Bucket
Easy Cal.
Higher Line
Take Point
Calculate
1
Take the same (or more) number of points along the higher line as you did with the lower line (minimum 10 for 3 sensors,
minimum 15 for 4 sensors).
Proceed by pressing
over Calculate to compute the points taken to the calibration value.
EZDigPro
- 39 -
User & Calibration Manual
[automatic calibration] Booms/Bucket
Cal. Lengths:
Boom 1
Boom 2
Boom 3
Bucket
0
0
0
0
Calc. Offset:
Boom 1
0.00
Boom 2
0.00
Boom 3
0.00
Bucket
0.00
A summary of the calculated lengths and offsets is shown.
Note: You should check the lengths automatically calculated by measuring the distance between the center of the
pivot points.
It’s also possible to manually adjust the lengths if the element values are already known (written in the machine
documentation).
Note: At this point, the new calculated calibration is not in use and not permanently stored.
The following screen will ask for a confirmation to overwrite the previous calibration.
SaveCalibration?
Yes
No
YES will overwrite the previous calibration and permanently store it.
NO will discard all calculated values.
Calibration
DONE !
The system will be used in combination with a laser transmitter ?
next page
• YES: proceed to laser receiver calibration
• NO: calibration completed! Proceed to Usage section.
EZDigPro
- 40 -
Page 60
User & Calibration Manual
[automatic calibration] Laser Receiver
Laser Receiver Calibration
Calibration:
Dog Bone
Booms/Bucket
Laser
Laser mounting
boom:
Boom 1
Boom 2
Laser mounting
boom:
Boom 1
Boom 2
Boom 3
Laser Height
Take H
Note: In most cases (except on really big excavators), manually calibrating the laser receiver is faster and more accurate.
(Simply measure the horizontal and vertical distance from the pivot point to the middle of the laser receiver – see page 54
for “Manual calibration - Laser Receiver).
To do it automatically:
Set up a horizontal rotational laser at a height that will allow you to easily pass through it later with the laser receiver.
Accurately position the tip of the center bucket tooth (or the bucket blade tip) in the laser plane.
Use a hand detector to find the correct position if the beam is not visible enough.
Press
to take that value. Be careful that the boom doesn’t move in the meantime. Best is to keep the machine
engine at full throttle (full rpm).
EZDigPro
- 41 -
User & Calibration Manual
[automatic calibration] Laser Receiver
Laser Receiver Calibration
EZCalibration
Laser
Point:
Press Enter
1
The procedure consists of passing the laser receiver through the laser beam several times, moving the booms very
slowly.
As usual the chassis has to stay completely stable.
When the beam is intercepted you will hear the horn and the message “Please Wait” will appear.
After a couple of seconds the message “Press Enter” means the unit is ready for a new acquisition.
Move your dipper stick to a new position prior to pressing
.
Press
and acquire the beam again.
Note:
- Move the booms very slowly!
- Alternate raising or lowering the booms to capture the beam with the receiver.
- Take “extreme” points (e.g. dipper stick far away from the cab or very close to the cab)
- Remember that the laser receiver isn’t able to receive the laser beam when the detection window is almost
horizontal.
- Take at least 10 points, 15 to improve the accuracy.
• Calibration completed! Proceed to Usage section.
EZDigPro
- 42 -
Page 60
User & Calibration Manual
[manual calibration] Boom 1
BOOM 1 - SIDE
Skip this section if you have done automatic calibration
BOOM 1 CALIBRAT.
Side
L
Length
6.600
Angle
30.0
-Offset
25.0
-Actual
0.0
Select (press
) the Side where the sensor is installed; viewing the excavator from the cab: L = Left and R =
Right.
This setting has to be done for every sensor.
BOOM 1 - LENGTH
BOOM 1 CALIBRAT.
Side
L
Length
6.600
Angle
30.0
-Offset
25.0
-Actual
0.0
Boom Length (Boom1)
Fig.1
Measure accurately the length of the first boom between the center of pivot A and the center of pivot B.
Move the cursor to highlight Length and set the exact value expressed in the selected unit of measure.
EZDigPro
- 43 -
User & Calibration Manual
[manual calibration] Boom 1
BOOM 1 - ANGLE
BOOM 1 CALIBRAT.
Side
L
Length
6.600
Angle
30.0
-Offset
25.0
-Actual
0.0
Boom Angle (Boom1)
Fig. 2
Move the cursor to highlight parameter Angle, set the exact boom value in degrees referring to Fig. 2.
See next page for the best method to define boom's angles.
Press
and you will see the new offset value acquired.
The system also calculates the correction factor. Offset is the angle difference between the sensor absolute angle
and the real machine boom angle. It can be manually adjusted.
Actual is the actual real boom angle – valid only after boom angle calibration. Useful to compare immediately after
calibration the real machine angle.
EZDigPro
- 44 -
User & Calibration Manual
[manual calibration] Measuring Tips
MEASURING ANGLES
METHOD 1
Place a straight edge from center of pivot A to center of pivot B and using an inclinometer, read the actual angle (Fig.2).
Fig.2
METHOD 2
If a tripod with laser transmitter and visible beam is available, the previous procedure could be executed by the alignment
of the points A and B to the horizontal plane of the transmitter; first by pointing the beam on point A (moving up and down
the laser) and then moving the boom until the point B is again spotted by the beam. In this case the angle value to be
entered is 0.0 (0 degrees).
The same procedure could be used for other booms. If it is not possible to reach the horizontal position, rotate the laser
90 degrees in order to generate a vertical plane and align the boom A and B point (i.e. stick or bucket) to vertical plane
again by fixing A point first and then B. In this case the angle value to be entered is –90.0 degrees.
EZDigPro
- 45 -
User & Calibration Manual
[manual calibration] Measuring Tips
MEASURING ANGLES
METHOD 3
The vertical alignment could be also obtained by using the plumb bob method.
Note: When the boom is horizontal the angle is zero; when
pivot M lower than L the angle is negative and when pivot M
is higher the angle is positive.
EZDigPro
- 46 -
Fig.10
User & Calibration Manual
[manual calibration] Boom 2
BOOM 2 - LENGTH
BOOM 2 CALIBRAT.
Side
L
Length
6.600
Angle
30.0
-Offset
25.0
-Actual
0.0
Fig.4 – articulated boom
Fig.3 – conventional boom
Measure accurately the length of the second boom between the center of pivot E and the center of pivot F
Move the cursor to highlight parameter Length and set the exact value expressed in the selected unit of measure.
EZDigPro
- 47 -
User & Calibration Manual
[manual calibration] Boom 2
BOOM 2 - ANGLE
BOOM 2 CALIBRAT.
Side
L
Length
6.600
Angle
30.0
-Offset
25.0
-Actual
0.0
Fig.6 – articulated boom
Fig.5 – conventional boom
Move the cursor to highlight parameter Angle, set the exact boom value in degrees referring to Fig.5 or Fig.6
Press
EZDigPro
and you will see the new offset value acquired.
- 48 -
User & Calibration Manual
[manual calibration] Boom 3
BOOM 3 - LENGTH
BOOM 3 CALIBRAT.
Side
L
Length
6.600
Angle
30.0
-Offset
25.0
-Actual
0.0
Fig.7
Boom 3 refers to the dipper stick on excavators with articulated booms (3 booms).
On excavators with conventional booms (boomerang – 2 booms) the Length must be set to “0” (zero).
Select (press
) the Side where the sensor is installed; viewing the excavator from the cabin: L = Left and R =
Right.
Measure accurately the length between the center of pivot G and the center of pivot H
Move the cursor to highlight Length and set the exact value expressed in the selected unit of measure.
EZDigPro
- 49 -
User & Calibration Manual
[manual calibration] Boom 3
BOOM 3 - ANGLE
BOOM 3 CALIBRAT.
Side
L
Length
6.600
Angle
30.0
-Offset
25.0
-Actual
0.0
Fig.8
Move the cursor to highlight parameter Angle, set the exact boom value in degrees referring to Fig.8
Press
EZDigPro
and you will see the new offset value acquired.
- 50 -
User & Calibration Manual
[manual calibration] Dog Bone
DOG BONE - Bucket Sensor mounted on the Bucket Leverage
Dog Bone calibration must be done before the bucket calibration.
Changing the dog bone calibration means that the bucket calibration has to be done again.
DOG BONE CALIBR.
Dog Bone:
0
Seg1Length 0.000
Seg2Length 0.000
Seg3Length 0.000
Seg4Length 0.000
Seg1Angle
0.00
-Offset
0.00
-Actual
0.00
Seg2Angle
0.00
-Offset
0.00
-Actual
0.00
Dog Bone:
0: manual Dog Bone calibration not in use
1: manual Dog Bone calibration in use
Note: If the Dog Bone has been calibrated with automatic calibration (EZCalibration) this value has to be 0! (you will not see
automatic calibration data in this page).
Seg1Length (Seg2Length – Seg3Length – Seg4Length)
Measure the four segments (the bones) of the dog bone and set into the proper line referring to the picture.
Seg1Angle:
Set the real segment 1 angle, use same techniques used to measure machine’s booms angles from pivot to pivot.
Press
when ready to take the correct offset value.
Seg2Angle:
Set the real segment 2 angle as done above for segment 1.
EZDigPro
- 51 -
User & Calibration Manual
[manual calibration] Bucket
BUCKET
System can store up to 9 different buckets for each machine (from 1 to 9 ).
The bucket number that will be manually calibrated is the actual bucket selected from the bucket selection page.
BUCKET - LENGTH
Measure accurately the length of the bucket currently installed from the center of pin (L) to the tip of the tooth (M).
Move the cursor to highlight Length and set the exact value expressed in the selected unit of measure.
Fig.9
BUCKET CALIBRAT.
Side
Length
Angle Y
-Offset
-Actual
EZDigPro
- 52 -
User & Calibration Manual
[manual calibration] Bucket
BUCKET - ANGLE
BUCKET CALIBRAT.
Side
Length
Angle
-Offset
-Actual
Fig.10
Angle
Set the exact bucket angle value in degrees.
Press
EZDigPro
and you will see the new offset value acquired.
- 53 -
User & Calibration Manual
[manual calibration] Laser Receiver
LASER RECEIVER
LASER RECEIVER
Boom N.
2
HoriDist
0.000
VertDist
0.000
Boom N.
Boom number where the laser receiver is installed.
HoriDist
This value indicates the distance between A and C (ref. drawings in fig 11 – fig 20 in the following pages). This point
is obtained at the intersection on the projected line A-B by the perpendicular through center of the Laser Receiver.
Insert the relevant value in meters or feet.
VertDist
This value corresponds to the distance between E and D (center of Laser Receiver to point D on projection AB, ref.
Fig.11 – Fig.20).
Insert the relevant value in meters or feet.
Note: Be careful to dial in the correct sign especially for the vertical distance (E-D). Refer to the following drawings.
EZDigPro
- 54 -
User & Calibration Manual
[manual calibration] Measuring Tips
REFERENCE DRAWINGS TO DETERMINE POSITION OF LASER RECEIVER
BOOM 1 (CONVENTIONAL BOOM)
Fig.11
LASER RISE = ED
LASER DISTANCE = AC
BOOM 1 (ARTICULATED BOOM)
Fig.12
LASER RISE = - ED
Fig.13
LASER RISE = ED = 0
Fig.14
LASER RISE = ED
LASER DISTANCE = AC
EZDigPro
- 55 -
User & Calibration Manual
[manual calibration] Measuring Tips
REFERENCE DRAWINGS TO DETERMINE POSITION OF LASER RECEIVER
BOOM 2 (ARTICULATED BOOM)
Fig.15
LASER RISE = ED
Fig.16
LASER RISE = ED = 0
Fig.17
LASER RISE = - ED
LASER DISTANCE = AC
EZDigPro
- 56 -
User & Calibration Manual
[manual calibration] Measuring Tips
REFERENCE DRAWINGS TO DETERMINE POSITION OF LASER RECEIVER
BOOM 2 (CONVENTIONAL BOOM)
BOOM 3 (ARTICULATED BOOM)
Fig.18
LASER RISE = ED
Fig.19
LASER RISE = ED = 0
Fig.20
LASER RISE =
- ED
LASER DISTANCE = AC
EZDigPro
- 57 -
User & Calibration Manual
[manual calibration] Laser Speed Compensation
LASER SPEED COMPENSATION
This procedure can be done to compensate dynamics effects (inaccuracies due to speed) that occur when the laser
receiver intercepts the laser beam.
To do this procedure you need a horizontal rotating laser and a reference point (another lower laser or a solid and stable
point that it’s possible to touch with the bucket).
LASER SPEED COMP
DO COMP L
Speed L
0
Comp. L
0.000
DO COMP.H
Speed H
0
Comp. H
0.000
Set the elevation between the rotating laser and the reference point
into the depth value manually editing it in the main work screen. It’s
possible to exit from calibration to edit the value and continue later if
not already set.
Set the value negative using
-
if the reference point is
below the laser beam (usually the case).
After pressing
to confirm the setting, the depth value shown
will change the sign (now positive) if
has been pressed
before to start the setting.
Hint: The height indication LCD arrow has to point opposite to the
direction where the laser plane is to the reference point – in this case
down.
Once you’ve done this, you can enter the Laser Speed
Compensation (the last point in the manual calibration section).
EZDigPro
- 58 -
User & Calibration Manual
[manual calibration] Laser Speed Compensation
LASER SPEED COMPENSATION
LASER SPEED COMP
DO COMP L
Speed L
0
Comp. L
0.000
DO COMP.H
Speed H
0
Comp. H
0.000
Press
over “DO COMP L” and the laser page will appear, try to catch the laser raising the boom at low
speed (Hint: keep the speed indicator just above the middle of the speed bar). When “Comp L” changes to “REF.0”
(means, you hit the beam), move the bucket tip to the reference point and press
Comp L
REF.0
Press
to proceed.
PRESS
ENTER
It’s now possible to perform directly the high speed compensation. The procedure is the same
as for the low speed compensation but now you have to raise the boom at high speed. High
speed means to keep the speed indicator higher than before on the speed bar (higher speed).
Don’t exceed with the speed: don’t keep the indicator collapsed with the top of the speed bar
border.
Pressing
to take the second reference 0 point with the bucket on it the system will
jump back again to the calibration page with the acquired values shown.
Comp H
Exit and save your calibration.
EZDigPro
- 59 -
User & Calibration Manual
[usage] Display – Simple Mode
Main operator screen shown at system start-up.
Depth and actual slope set are shown.
Depth
Slope
Press
-
to change the page.
Second operator screen with a dynamic bucket
icon (reflects the real bucket angle). Depth &
Slope setting/visualization plus a small depth
graphical bar.
Sensors battery life page.
See “Battery Level” page for more details.
EZDigPro
- 60 -
User & Calibration Manual
[usage] Display – Advanced Mode
Advanced Mode
Main operator screen shown at system start-up.
Depth, reach and actual slope set are shown.
Depth
Note: The advanced mode may be enabled
through the user menu, by changing the value for
“Advan.Mode” from “OFF” to “ON”.
Reach
Slope
Press
-
to change the page.
Second operator screen with status icons.
Slope
MIN
Reach
H Min Set
H Max Set
Laser Set
Memory F.
MAX
Third operator screen with a dynamic bucket icon
(reflects the real bucket angle). Depth & Slope
setting/visualization plus a small depth graphical
bar.
EZDigPro
- 61 -
User & Calibration Manual
[usage] Display – Advanced Mode
Advanced Mode
Sensors battery life page.
See “Troubleshooting - Battery Level” on page 91 for
more information.
1
Display of Advanced Mode settings:
1) Bucket Selection
2) Buzzer Status (0 - OFF, 1 - ON, 2 - LOUD)
3) Height Max and Height Min
4) Memory Function
Detailed information on these settings (except buzzer
status) follows in the following [usage] pages.
2
“User Settings” on pages 89-90 have a summary of
these settings.
3
EZDigPro
4
- 62 -
User & Calibration Manual
[usage] Remote Display
REMOTE DISPLAY
Red: too high, move the bucket down.
Depth
Green: on grade.
Red: too low, move the bucket up.
Advanced Mode
Reach
All the default values used to switch OFF/ON the LEDs depending on
the actual depth, can be customized with:
Dead Band Selection
Page 74
Page 78
User Parameters
Other functions of the remote display LEDs
EZDigPro
Depth Green LED and
Reach Green LED
flashing alternately
Searching sensors at control box start up
Depth Green LED flashing
Remote display in sensor assignment mode
All red LED flashing
together
Sensors Alarm (sensor not synchronized)
- 63 -
User & Calibration Manual
[usage] Zeroing the Target Depth
DEPTH
A
Bucket on grade:
Zero depth.
Position the bucket on the ground at a desired reference point and press the
key to zero the depth value.
Now the depth value will be zero at that depth (even in other reach positions) and the distance value to that point will
be shown if the bucket is higher (positive) or lower (negative).
A
Bucket too low:
Negative depth.
EZDigPro
A
Bucket too high:
Positive depth.
- 64 -
A
Bucket on grade:
Zero Depth.
(no tilt indications).
User & Calibration Manual
[usage] Zeroing the Target Depth
DEPTH
A
Bucket on grade:
Zero depth.
Note:
It’s possible that when pressing
the depth value will be NOT zeroed if:
• A depth value has been set manually (that value will be shown when pressing
• Solution: Press
)
and press
afterwards to zero out the depth value.
and press
within 15 seconds to disable the laser function.
• The laser function is enabled.
• Solution: Press
EZDigPro
- 65 -
User & Calibration Manual
[usage] Set the Depth Reference
DEPTH
A
Elevation offset
Press
to enter the depth setting mode. The correspondent value will flash.
To set the target depth, use these buttons:
Press
- or
to set the desired value. Note: To go down, dial in a negative value! Once you press
the sign changes!
Press
to invert the sign (positive / negative).
Press
to fast zero the value.
Press
to confirm the value and end the setting mode.
The shown depth is now the distance from the actual bucket position to the target depth.
If the bucket is higher in respect to the target depth the value is positive and vice-versa.
Note that this value can be affected by other functions; see following pages for details.
EZDigPro
- 66 -
User & Calibration Manual
[usage] Slope Setting
Left side view
SLOPE
NEGATIVE SLOPE (-X.XX %)
LOWER IN FRONT
Press and release
to enter the slope setting mode. The correspondent value will flash.
To set the slope, use these buttons:
Press
- or
to set the desired value.
Press
to invert the sign (positive / negative).
Press
to fast zero the value.
Press
to confirm the value and end the setting mode.
The shown slope is now the value used to calculate the depth related to the slope set and the reach position.
Note: The direction of the slope is indicated by the slope icon, based on the assumption that the control box is mounted
on the right-hand side of the driver in the cab.
As shown in the above figure:
Positive Slope: higher in front (example +1.00%)
Negative Slope: lower in front (example -1.00%)
EZDigPro
- 67 -
User & Calibration Manual
[usage] Working With a Slope
X
Y
Reference direction (parallel to Y axis)
Example: Axis Y of the laser (excavator has to start parallel to this line)
The first operation that has to be done when working with a slope is to align the Y axis of the excavator to the field that
you have to dig.
Align the excavator’s chassis (cabin) with the surface Y axis (reference direction).
To properly use the system you must follow the Y direction when digging.
IMPORTANT !
If you use a rotational slope laser as the reference, it’s VERY IMPORTANT that the Y of the system is exactly parallel
to the laser transmitter’s Y axis.
If not, you can get inaccuracies, especially if you are digging a steep slope.
Slope laser, not laser level:
If the excavator is moved along the slope axis (such as when digging a trench) and you want to use a laser as a
reference – it must be a slope laser with the grade dialed in. You cannot use a horizontal-only laser.
EZDigPro
- 68 -
User & Calibration Manual
[usage] Laser Function
LASER REFERENCE
An external laser transmitter can be used to have an absolute reference height.
The use of the laser has 2 advantages:
1)
There’s no cumulative error moving the excavator.
2)
It’s possible to dig in many different places. Just move the excavator to the new place and catch the laser beam again
with the laser receiver (no need to transport the height step by step).
Every time that the excavator is moved (including tilted), you must press
to activate the laser receiver and move it
slowly through the laser beam. After the laser has been caught, you can continue to work.
Press
to enable the laser receiver sensor. The laser beam page will appear
indicating that the system is waiting for a laser acquisition.
Move the machine's booms up or down slowly and steadily until the laser sensor catches
the laser level beam. When caught, the control box will “beep” indicating acquisition and
show a STOP sign. After 2-3 seconds the STOP sign disappears and the laser page will be
shown again. Don’t move any element during this time!
If no laser acquisition will be done within 15 seconds with the laser page shown, the laser
sensor will be automatically switched off and the control box will return to the previous
screen.
When the depth is affected by the laser function a center line indicating the distance from
the laser beam to the reference zero point (target “zero” depth) is shown.
Advanced Mode
EZDigPro
- 69 -
User & Calibration Manual
[usage] Laser Function
LASER REFERENCE
How to work in combination with a rotating laser:
1) Using the laser with reference zero (a benchmark is available on the job site).
Put the bucket on your reference point and press
It's possible to set a manual depth offset at any time, before or after pressing
, in case
the physical reference point does not have the same target depth as what you have to dig (eg:
the point is higher).
Take the laser beam
Zero depth will be again at the ref.0 height (plus / minus the manual depth offset set).
After this first initial laser referencing, you should move through the laser beam every time after
you’ve moved the machine prior to start digging to grade.
2) Using the laser plane as an absolute reference (setting the laser beam elevation from
ref.0 keeping the laser button pressed before the first laser catch).
Press & hold
to set the distance from the laser beam to the target digging depth.
LASER HEIGHT:
0.000
Confirm
A dedicated page will appear.
Take the laser beam.
Zero depth will be below the laser beam at the set distance.
In this way to set a manual depth offset is NOT possible and NOT considered if previously set!
The only way to change the reference zero (digging target) on-the-fly while you are working with
the laser is by changing the laser elevation (center line).
You can now move the excavator; take the laser beam again with
before continuing to
dig.
EZDigPro
- 70 -
User & Calibration Manual
[usage] Laser Function
Press & hold
Short press
LASER HEIGHT:
0.000
Confirm
Set the known
laser height to your
reference – target
height distance
LASER RECEIVER ENABLED
Beam not caught within 15 sec
or
pressed
Beam catch within 15 sec.
DoubleLS parameter:
ON (default)
OFF
pressed
Stop the machine
movement when the
laser beam is
intercepted and wait
for a second static
laser beam
acquisition with the
laser sensor over
the beam.
Return to previous
screen
(laser function status
as before)
EZDigPro
Return to previous
screen
(laser function in use)
- 71 -
Return to previous
screen
(laser function
disabled)
User & Calibration Manual
[usage] Laser Function
LASER SPEED and “DOUBLE LASER CATCH”
If the boom’s rising (or lowering) is too fast, the laser acquisition is ignored to
Speed limits avoid inaccuracies. The maximum speed is reached when the speed
indicator touches the top or bottom edge of the speed bar: an attention mark
appears on the right to highlight this.
Note: Try to move slowly and steady through the laser beam to avoid
inaccuracies.
Laser Receiver Speed Indication
• Double beam catch – first dynamic and the second static (default setting)
By default, you can move the laser receiver through the laser beam at a (relatively)
high speed, but you must stop the boom movement when the control box “beeps”
(indicating that the laser receiver has reached the laser beam). There will be a stop
sign on the screen.
Stop the boom movements and wait (approx. 2 seconds) with the sensor over the
laser beam to acquire the laser beam a second time (second static catch with the
laser receiver over the laser beam) for optimal accuracy.
• Single beam catch – limited speed.
If the “DoubleLS” parameter gets manually disabled (see user parameters section),
the first laser catch will be considered immediately.
Note: To avoid inaccuracies, the maximum allowed boom speed in this mode is
reduced.
• Single beam catch – increased speed range allowed.
If you want a higher boom speed and not have to to stop over the laser beam for a
second laser catch, you can perform the “Laser Speed Compensation” procedure
available in the manual calibration section.
EZDigPro
- 72 -
User & Calibration Manual
[usage] Bucket Selection
Press
to enter the bucket selection page.
Press
to change the bucket in use.
Press
to return to previous screen. If the bucket number has been changed the following screen will appear:
Press
to confirm the new bucket selected and return to previous screen
Press
to return to the previous screen and not change the actual bucket (old selected bucket will stay in use)
Note: If you want to calibrate the new bucket doing a whole automatic calibration all sensors (slow method), you have
to choose your new bucket at this page prior to calibration. If you want to calibrate the new bucket using the manual
calibration method (for the bucket only, fast method), you can choose your new bucket (number) during the manual
calibration method.
Note: Even though you might have not moved the bucket sensor after you’ve changed the bucket (if attached to the
dog bone or quick connector), you still have to calibrate this new bucket.
Be sure to use the correct number in the calibration mode when you’re doing the calibration.
EZDigPro
- 73 -
User & Calibration Manual
[usage] Dead Band Selection
Press & hold
to enter the dead band selection page.
In this page you can choose between 3 dead bands (defined thresholds of the on-grade indication).
Green LED activated alone: bucket is on grade (depth value zero or inside the selected dead
band range).
Solid audible signal
To change the horn volume: after you leave this dead band selection page, use the same
button, with a short press
Press
to cycle through the choices of Off – On – Loud.
to select a new dead band:
FINE Default: 1cm (0.5”)
MEDIUM Default: 2.5cm (1.0”)
COARSE Default: 5cm (2.0”)
Note: The defaults for the deadband settings can be changed in the “[usage] Parameters” section (DeadBaF,
DeadBaM, DeadBaC)
Press
EZDigPro
to return to the previous screen. New dead band setting will be in use.
- 74 -
User & Calibration Manual
[usage] User Options Menu
USER MENU
Contrast:
60
Language:
EN
UnitMeasur
M
Resolution
.00
Advan.Mode
OFF
Machine
1
Parameters
Sensors Check
Calibration Menu
Keep pressing
until the USER MENU page appears.
Contrast
Set the display contrast. Possible setting 0 - 100
Language
Set the system language: EN English, FR French, IT Italian, DE German, SP Spanish, NO Norwegian, FI Suomi.
UnitMeasur & Resolution
Page 77
Unit of measure used and resolution.
Advan.Mode
Page 80
Enables advanced software features of the control box:
- Reach indication/set
- Memory Function
- Min & Max height warning
- Profile Mode
May be enabled by changing the setting from “OFF” to “ON”
EZDigPro
- 75 -
User & Calibration Manual
[usage] User Options Menu
USER MENU
Contrast:
60
Language:
EN
UnitMeasur
M
Resolution
.00
Advan.Mode
OFF
Machine
1
Parameters
Sensors Check
Calibration Menu
Machine
Indicates the machine calibration that’s in use. It’s possible to store up to 5 different calibrations (machines) to quickly
recall a previously set calibration (control box / sensors moved to another machine).
Note: There is a total of 9 buckets per machine available.
Parameters
Page with more parameters that affect the behavior of the system
Description in the followings pages.
Page 78
Sensors Check
Dedicated page showing the raw angle and battery value received from the sensor.
Page 91- Troubleshooting
section
Calibration Menu
To calibrate the system, described in the calibration section.
This section can be password protected depending on the system installer choice.
Page 22- Calibration
section
EZDigPro
- 76 -
User & Calibration Manual
[usage] Unit of Measure
Unit of Measure
Set the unit of measure you want the system to use for lengths:
M = metric.
Resolution = .00
Resolution = .0
Values shown in meters and 2 decimal digits (centimeter).
Values shown in meters and 1 decimal digits (decimeter).
Note: For calibration, lengths are always shown with 3 decimal digits (millimeter).
BOOM 1 CALIBRAT.
Side
L
Length
2.952
Angle
29.6
-Offset
135.6
F = feet. Values shown in feet and 2 decimal digits (feet, tenths and hundredths)
BOOM 1 CALIBRAT.
Side
L
Length
9.68
Angle
29.6
-Offset
135.6
F.I. = feet and.inches. Values shown in feet and inches (to the ¼”). Example 8’ 2 ¼”.
Note: For calibration, lengths are always shown to the tenths of inches (feet. inches. tenths of inches).
Example below: 9.68 feet = 9' - 8 2/10" (feet, inches and tenths-of-an-inch), displayed as 9’ 08.2”
BOOM 1 CALIBRAT.
Side
L
Length
9’08.2”
Angle
29.6
-Offset
135.6
It is strongly recommended to check the units set before calibration or operation!
EZDigPro
- 77 -
User & Calibration Manual
[usage] Parameters
PARAMETERS
Caution:
Changing values in the parameters has a big effect on the performance of the system. Only access this menu area after
you've carefully read the following section!
PARAMETERS
LasTimOut
150
DoubleLS
ON
Filter
1
DeadBaF
0.010
DeadBaM
0.025
DeadBaC
0.050
LedDeUp
0.500
LedDeDw
-0.100
LedReGr
0.050
LedReRe
0.100
^^^^^^^^^^^^^^^^
LedDeUp
LasTimOut
Laser activation time: number of tenths of a second the system
waits for a laser catch, before it automatically returns to the
previous screen. (150 is 15 seconds).
Dead Band
LedDeDw
DoubleLS
Enable/Disable (ON/OFF) the second static laser catch of the
laser beam in laser enabled mode. See details in “[usage]
Laser Function.”
Filter
Depth and Reach visualized values filter.
Higher filter: more stable reading but slower response time.
LedReRe
LedReGr
DeadBaF / DeadBaM / DeadBaC
The defaults for the 3 dead bands (fine, medium, or coarse)
are listed in “Usage - Dead Band Selection” on page 74. You
can change the defaults in this Parameters screen.
LedDeUp / LedDeDw / LedReGr / LedReRe
Depth and reach indication limit of the Remote Display.
EZDigPro
- 78 -
User & Calibration Manual
[usage] Parameters
PARAMETERS
^^^^^^^^^^^^^^^^
BuzMode
0
BuzRanMin 0.025
BuzRanMax 0.500
BuzFreMax
15
BuzFreDW
4
BuzFreUP
2
GraphBarR. 0.200
DepthIconR 0.030
ReachIconR 0.050
BuzzMode
0: the frequency of the buzzer “beep” becomes higher going close to the zero value.
1: the frequency isn’t related to the distance from zero but is different if the bucket is higher or lower to the zero. This mode
can be personalized using the following parameters:
From depth value 0 to BuzRanMin value the buzzer sound is continuous.
From depth value BuzRanMin to BuzRanMax value the buzzer sound is beeping related to the parameter
BuzFreUp.
Below zero values are complementary and the buzzer frequency is related to the BuzFreDw parameter.
GraphBarR.
Visualization limit of the depth graph bar shown in the third operator work screen.
DepthIconR
Below this value the depth icon on the left of the depth number shows that the bucket is leveled.
ReachIconR
Below this value the reach icon on the left of the reach number shows that the bucket is leveled.
EZDigPro
- 79 -
User & Calibration Manual
[usage] Zeroing the Target Reach
Advanced Mode
REACH
A
Bucket on grade:
Zero reach.
Position the bucket on the ground on a desired reference point and keep pressing the
key for a couple of
seconds to zero the reach value.
Now the reach value will be zero at that distance (even in other depth positions) and the distance value to that point
will be shown if the bucket is further away (positive) or closer (negative) to the cab.
A
Bucket on the reach
zero reference
EZDigPro
Bucket too far,
Positive reach
- 80 -
A
Bucket too close.
Negative reach
A
User & Calibration Manual
[usage] Set the Reach Reference
Advanced Mode
REACH
Keep
pressed to enter the reach setting mode. The correspondent value will flash.
To set the reach reference, use these buttons:
-
Press
or
to set the desired value.
Press
to invert the sign (positive / negative).
Press
to fast zero the value.
Press
to confirm the value and end the setting mode.
The shown reach is now the distance from the actual bucket position to the target reach.
If the bucket is closer to the cab in respect to the target reach, the value is negative and vice-versa.
Note: The direction of the reach is indicated by the reach icon (arrow), based on the assumption that the control box is
mounted on the right-hand side of the driver in the cab.
EZDigPro
- 81 -
User & Calibration Manual
[usage] Memory Function
Advanced Mode
Although not often used, the memory function provides a way to move the excavator when you are not using a
laser as a reference (eg: moving the excavator on its tracks to dig to the same level at a different location on the site).
No Reference: Memory function is not in use.
1.) Use
-
to move to the Memory Function (lower right quadrant of the screen will have a bold border).
2.) Then, press
to enter this mode. The bold border will flash and the symbol changes to
3.) Press
again to begin setting the reference point. The bold border around
stops flashing.
4.) “Set Reference:” Position the bucket tip on a reference point. Choose anything stable that can also be accessed
from the next location. After moving the excavator, you will need to use this same reference point (or another
point that is at exactly the same elevation).
5.) “Keep Reference:” Press
to save the value at this reference point. The bold border will flash again and the
symbol changes to
6.) Move the excavator to your next position. Place your excavator bucket tip on that same reference point used in
Step 4. Press
to acquire the value.
7) The arrow is replaced by an excavator symbol. The memory function is in use (the system understands that the
elevation of the excavator has changed) and you can continue working.
To disable the Memory Function:
Press
and the excavator symbol will flash; press again and the arrows icon replaces it (“No Reference”).
First location
EZDigPro
Same reference
point, accessed from
both digging sites
- 82 -
Second location
User & Calibration Manual
[usage] Max. Height Function
Advanced Mode
MAX
Caution:
Although you can use this function to set a maximum height warning, this is not a fail-safe security function and
can’t replace systems that have automatic shut-off. If you are working in a hazardous area, such as under power
lines, you should be using a more secure warning system.
Function disabled.
There’s no max height set.
With the icon flashing, move the boom to the maximum height that you want or can reach safely depending on
your work environment.
Press
to set this point as maximum height.
Function enabled (in use)
When the highest machine pivot is as high or higher than the max height set, an alarm will sound and the
display will have the following warning:
Move the booms down to return to previous screen (max height not reached).
To disable the Max Height function, press and hold
The icon
EZDigPro
.
will appear on the Max. Height settings page as confirmation.
- 83 -
User & Calibration Manual
[usage] Max. Depth Function
Advanced Mode
MIN
Caution:
Although you can use this function to set a maximum depth warning, this is not a fail-safe security function and can’t
replace systems that have automatic shut-off. If you are working in a hazardous area, such as around gas lines, you
should be using a more secure warning system.
Function disabled.
There’s no maximum depth set.
With the icon flashing, move the bucket to the maximum depth that you want or can safely reach depending on
your work environment.
Press
to set this point as the maximum depth (which means the same as “minimum height” MIN).
Function enabled (in use)
When the bucket blade (or teeth) is at the same depth or lower than the maximum depth set, an alarm will sound
and the display will have the following warning:
MIN
Move the bucket up to return to previous screen (max. depth not reached).
To disable the max. depth function, press and hold
The icon
EZDigPro
.
will appear on the Max. Depth settings page as confirmation.
- 84 -
User & Calibration Manual
[usage] Profile
Advanced Mode
HOW TO SELECT A PROFILE
Profile:
Use
Edit
Delete
Figure P1
Figure P2
Press and hold
Press
Press
-
Figure P3
to enter the profile setting mode. The page represented in figure P2 will show.
or
to select the desired profile.
and the page in figure P3 will be shown. Note: If no icon is selected, the profile mode will be disabled and
the panel will return to the main operator page.
Use – Start to work with the selected profile. No further settings, and the system will return in the working page.
Edit – Enter a new shape for the selected profile or edit the actual shape. This can be done manually or by copying an
existing shape. See next page.
Delete – Delete all values set of the selected profile.
If the control box is using a profile instead of the single slope to calculate the actual depth, the slope icon on the working
page will appear as follows:
EZDigPro
- 85 -
User & Calibration Manual
[usage] Profile Setting
Advanced Mode
ENTER A PROFILE BY COPYING EXISTING JUNCTION POINTS
Profile:
Use
Edit
Delete
Set the profile:
Automatic
Manual
Figure P4
Figure P3
Take a point ?
Acquire P 1
End Profile
Figure P5
Start with the bucket on the first profile point (the start point, furthest away from the cab), zeroing the depth and reach
value on the main operator working screen (figure P1 on earlier page). Select the desired profile as described previously
to reach Figure P2.
Press
with the cursor over “Automatic” to enter into the profile “self learning” mode.
Press
with the cursor over “Acquire P” to acquire the actual bucket position as the selected profile point.
You can now move the bucket to the next point (actual point number is shown on the same line). When the last point has
been taken, stop the acquisition by choosing “End Profile.”
The profile shape will be shown on the screen. See “Profile View” page.
EZDigPro
- 86 -
User & Calibration Manual
[usage] Profile Setting
Advanced Mode
ENTER A PROFILE BY MANUALLY SETTING DEPTH & REACH VALUES
Profile:
Use
Edit
Delete
PROFILE:
Point:
Depth
Reach
Slope
Set the profile:
Automatic
Manual
Figure P6
Figure P3
1
1
0.000
0.000
0.00
Figure P7
Start with the bucket on the first profile point (the start point, furthest away from the cab), zeroing the depth and reach
value on the main operator working screen (figure P1 on previous page). Select the desired profile as described
previously to reach Figure P2.
Press
with the cursor over “Manual” to enter the profile “manual” mode.
Press
with the cursor over “Depth” to set the depth of the selected profile point.
Press
with the cursor over “Reach” to set the reach of the selected profile point.
Use
-
at the end of the page to set the next point.
When all settings are done, press
to exit from the profile setting mode.
The profile shape will be shown on the screen. See “Profile View” page.
EZDigPro
- 87 -
User & Calibration Manual
[usage] Profile View
Advanced Mode
4
2
1
3
On this page, you can see a graphical summary of the profile set.
Starting from the left side of the screen (point 1), the line follows the settings done.
You can zoom in / zoom out on the graph with
Press
- or
buttons.
to exit to the main operator page.
Note: Once you moved your machine, you need to put your bucket tip back again on point 1 of the profile prior to
continue working.
EZDigPro
- 88 -
User & Calibration Manual
[usage] User Settings
Advanced Mode
Press
-
Press
Press
or
to select the desired function (bold border).
to enter the selection mode (border flashing).
- or
to select the desired value and confirm with
Bucket Selection
Select the actual bucket in use.
Buzzer Volume
Select the buzzer volume:
0: OFF
1: ON
2: LOUD
Height MIN
Change the icon with
-
Function disabled.
There’s no minimum height set.
Setting in Progress
Move the boom to the minimum height that you want or can reach
depending on your work environment.
Press
to set this point as the minimum height.
See dedicated page for more details.
Function enabled.
When limit is reached, there will be a warning screen and alarm.
EZDigPro
- 89 -
User & Calibration Manual
[usage] User Settings
Advanced Mode
Height MAX
Change the icon with
Function disabled.
There’s no maximum height set.
Setting in Progress
Move the boom to the maximum height that you want or can reach
depending on your work environment.
Press
to acquire this point as maximum height.
See dedicated page for more details.
Function enabled.
When limit is reached, there will be a warning screen and alarm.
Memory Function
Memory function not in use.
Set Reference:
Memory function point acquisition at 1st location.
Keep Reference:
Reference point is saved, before moving the machine and taking same
reference point at 2nd location.
3
Memory function is in use (depth affected by the function).
See dedicated page for more details.
EZDigPro
- 90 -
User & Calibration Manual
[troubleshooting] Battery Level
BATTERY LEVEL
When a sensor has 10% capacity left, the system automatically jumps to this page to show the low battery warning.
Every sensor is represented by a battery.
2 Booms excavator:
Bucket
Dipper Stick
Boom
3 Booms excavator:
Bucket
Dipper Stick
Articulated Boom
Boom
You can continue working by using
-
to go to another screen.
The low battery page will pop up again every 10 minutes if the battery is still low.
At 0% of capacity, the page stays on the screen (it’s not possible to work; the sensor will be dead in a few minutes).
If you wish to see the % capacity of each battery, see next page.
EZDigPro
- 91 -
User & Calibration Manual
[troubleshooting] Sensor Reception
SENSORS CHECK
USER MENU
Contrast:
60
Language:
EN
UnitMeasur
M
Resolution
.00
Advan.Mode
OFF
Machine
1
Parameters
Sensors Check
Calibration Menu
SENSORS VALUES
Ang 1
0
Ang 2
0
Ang 3
0
Ang 4
0
Batt 1
0
Batt 2
0
Batt 3
0
Batt 4
0
Laser
0
Here you can see the measured sensor angle (this angle is not the machine real angle!).
You can use this page to check if and what sensor is assigned to a specific slot.
Just by moving the sensor, you will see the relevant angle changing.
Ang 1 – Boom 1 sensor angle
Ang 2 – Boom 2 sensor angle
Ang 3 – Boom 3 sensor angle
Ang 4 – Bucket sensor angle
Batt 1 – Boom 1 sensor battery level %
Batt 2 – Boom 2 sensor battery level %
Batt 3 – Boom 3 sensor battery level %
Batt 4 – Bucket sensor battery level %
Laser – Latest offset value received from laser receiver sensor.
EZDigPro
- 92 -
User & Calibration Manual
[troubleshooting] Alarms - Sensors
ALARMS - SENSORS
ALARMS
BOOM 1
BOOM 2
When there’s a sensor alarm, all the
red LEDs are flashing.
A self diagnostic continuously checks all the system sensors.
If a sensor signal is not received for 5 or more seconds, the system will show a message that helps the operator to
identify the faulty sensor.
When an error message appears, you can no longer use the system. The only action you can do is enter into the
USER MENU by keeping the
button pressed.
Activity (synchronization) green LED inside the top-right part of the sensor.
You can see this LED flashing about once per second if the sensor is connected to the
REMOTE DISPLAY.
ALARM
SCREEN
SENSOR “N”
SENSOR “N”
(new system or new
components – usually
after start-up).
SENSOR “N”
(during normal
operation).
EZDigPro
LED
ACTIVITY
blinking
OFF
OFF
CAUSE / SOLUTION
WRONG SLOT ASSIGNED WITH SENSOR ASSIGNMENT
Check received sensors on previous “Sensors Check” page.
Do Sensor Assignment procedure
SENSOR NOT SYNCHRONIZED – WRONG CONFIGURATION
Do Sensor Assignment Procedure
If you can’t find the sensor in sensor assignment mode (sensor horizontal and REMOTE DISPLAY in
programming mode): charge battery.
SENSOR NOT SYNCHRONIZED – OUT OF RANGE
Move booms closer to the cab to make the re-synchronization faster.
Position the REMOTE DISPLAY in a better place to improve the radio range. Radio antenna is on the top
of the REMOTE DISPLAY.
- 93 -
User & Calibration Manual
[troubleshooting] Alarms – Remote Display
ALARMS – REMOTE DISPLAY
ALARMS
REMOTE DISPLAY
Remote Display powers up together
with the control box.
Power button on it has no function.
Note: The Remote Display must always be connected to the control box. Otherwise, the whole system
doesn't work.
The message above appears if there’s a problem in the communication between REMOTE DISPLAY and CONTROL
BOX (or the REMOTE DISPLAY is not connected at all).
EZDigPro
ALARMS: REMOTE
DISPLAY
LEDs are all OFF
No Connection between Control Box and Remote Display or
Remote Display is not Working
Check connection
Clean connectors
Check power supply voltage
ALARMS: REMOTE
DISPLAY
Some LEDs ON or startup test working (all LEDs
are switched ON in
sequence when powered
up).
Communication Error between Control Box and Remote Display
Clean connectors
Restart the control box
- 94 -
User & Calibration Manual
[technical data] Technical Specifications
TECHNICAL SPECIFICATIONS
SYSTEM:
Accuracy
+/- 1 cm (+/- 0.4“)
Components
1 control box, 1 remote display, suction cup mounts for control box and remote display, 3 sensors (incl. 1 laser
receiver), sensor removal tool, support plates for optional use, multi-charger, and self-leveling laser pointer.
Options
Extra sensor for articulated boom
Sensor Weight
0.6 kg (1.3 lbs.)
Sensor Dimensions (L/W/H)
130.6 x 104 x 38mm (5 x 4 x 1.5“)
Control Box Weight
0.6 kg (1.3 lbs.)
Control Box Dimensions (L/W/H)
162 x 121 x 64.5mm (6.5 x 5 x 3“)
Remote Display Weight
0.25 kg (0.5 lbs.)
Remote Display Dimensions (L/W/H)
375 x 75 x 107mm (15 x 3 x 4“)
Environmental Protection
Sensor IP 68
Control Box & Display IP 64
Electrical Characteristics
Power Supply: +9 V ÷ +30 VDC
Current Requirements max. 220 mA
Rating and Environmental Features
Operating Temperature Range: from -20°C to +70°C (-4° to158°F)
Storage Temperature Range: from -30°C to +80°C (-22° to176°F)
ONE-DOT LASER:
Recommended Use
Accuracy
Self-Leveling Range
Laser Beam
Power
Battery Life
Working Temperature
Storage Temperature
Tripod Mount
Size
Weight
Material
Bracket Size
Bracket Weight
Bracket Material
EZDigPro
Up to 30m (100 ft.) outdoors
± 3mm at 10m (± 1/8” at 30 ft.)
± 5°
Visible, 635nm
2 AA Batteries
25 hrs
14° to 122° F (-10° to +50°C)
4° to 158° F (-20° to +70°C)
1/4’’ x 20 camera tripod
3.7 x 5.5 x 6.5cm (1.5 x 2.25 x 2.5”)
180g, 225g with batteries (6.3oz, 8 oz. with batteries)
Aluminum
2.5 X 6.2 x 8 cm (1 x 2.5 x 3.25”)
64g (2.3 oz.)
Mild steel
- 95 -
User & Calibration Manual
[safety] Safety Directions
PRECAUTIONS
The product must not be disposed with household waste.
Dispose of the product appropriately in accordance with the national regulations in force in your country.
ELECTROMAGNETIC COMPATIBILITY (EMC)
Description
The term Electromagnetic Compatibility is taken to mean the capability of the product to function smoothly in an
environment where electromagnetic radiation and electrostatic discharges are present, and without causing
electromagnetic disturbances to other equipment.
WARNING
Electromagnetic radiation can cause disturbances in other equipment. Although the product meets the strict
regulations and standards which are in force in this respect, the manufacturer cannot completely exclude the
possibility that other equipment may be disturbed.
CAUTION
There is a risk that disturbances may be caused in other equipment if the product is used in conjunction with
accessories from other manufacturers, for example field computers, personal computers, two-way radios,
nonstandard cables or external batteries.
Precautions:
Use only the equipment and accessories recommended by the manufacturer. When combined with the product,
they meet the strict requirements stipulated by the guidelines and standards. When using computers and two-way
radios, pay attention to the information about electromagnetic compatibility provided by the manufacturer.
CAUTION
Disturbances caused by electromagnetic radiation can result in erroneous measurements. Although the product
meets the strict regulations and standards within this respect, the manufacturer cannot completely exclude the
possibility product may be disturbed by very intense electromagnetic radiation, near radio transmitters, two-way
radios or diesel generators.
Precautions:
Check the plausibility of results obtained under these conditions.
WARNING
If the product is operated with connecting cables attached at one of their two ends, for example, external supply
cables, interface cables, the permitted level of electromagnetic radiation may be exceeded and the correct functioning
of other products may be impaired.
Precautions:
While the product is in use, connecting cables, for example product to external battery, product to computer, must be
connected at both ends.
SAFETY LABELS
The One-Dot Laser is a Class 3R laser, manufactured to comply
with the international rules of safety IEC 60825-1, 2001.
Although the power of the emission of the beam is less than
5mW in Class 3R, the following cautions are recommended:
• Do not stare directly at the beam
• Do not set up the laser at eye level
FCC
Labels
EZDigPro
- 96 -
User & Calibration Manual
[safety] Safety Directions
FCC STATEMENT, APPLICABLE IN U.S.
WARNING
This equipment has been tested and found to comply with the limits for a Class B digital device, pursuant to part 15 of
the FCC rules.
These limits are designed to provide reasonable protection against harmful interference in a residential installation.
This equipment generates, uses and can radiate frequency energy and, if not installed and used in accordance with
the instructions, may cause harmful interference to radio communication.
However, there is no guarantee that interference will not occur in a particular installation.
If this equipment does cause harmful interference to radio or television reception, which can be determined by turning
the equipment off and on, the user is encouraged to try to correct the interference by one or more of the following
measures:
• Reorient or relocate the receiving antenna.
• Increase the separation between the equipment and the receiver.
• Connect the equipment into an outlet on a circuit different from that to which the receiver is connected.
• Consult the dealer or an experienced radio/TV technician for help.
Notice for Canada
This Class B digital device meets all requirements of Canadian
Radio Standards Specification RSS-210.
Cet appareil numérique de la Class B respecte toutes les exigences
du Règlement sur le matériel brouilleur du Canada.
WARNING
Changes or modifications not expressly approved by the manufacturer for compliance could void the user's authority
to operate the equipment.
RESPONSIBILITIES
Manufacturer of the product
The manufacturer is responsible for supplying the product, including the user manual and original accessories, in a
completely safe condition.
Person in charge of the product
The person in charge of the product has the following duties:
• To understand the safety instructions on the product and the instructions in the user manual.
• To be familiar with local regulations relating to safety and accident prevention.
• To inform the manufacturer immediately if the product and the application becomes unsafe.
WARNING
The person responsible for the product must ensure that it is used in accordance with the instructions. This person is
also accountable for the training and the deployment of personnel who use the product and for the safety of the
equipment in use.
HAZARDS OF USE
WARNING
The absence of instruction, or the inadequate imparting of instruction, can lead to incorrect or adverse use, and can
give rise to accidents with far-reaching human, material, financial and environmental consequences.
Precautions:
All users must follow the safety directions given by the manufacturer and the directions of the person responsible
for the product.
EZDigPro
- 97 -
User & Calibration Manual
[warranty] Warranty & Contact Information
LIMITED WARRANTY
EXPRESS WARRANTY FOR HARDWARE
The manufacturer warrants to the original end user (“Customer”) that this Product will be free from defects in
workmanship and materials, under normal use, for two (2) years (one year in North America), unless such warranty
period has been extended by the manufacturer, and provided any and all operating and maintenance instructions are
strictly respected, in particular in case of extreme and/or continuous applications/use of the Product. The warranty
period begins on the proved purchase date, or if applicable, date of delivery or date of acceptance report. The
manufacturer’s sole obligation under this express warranty shall be, at the manufacturer’ sole option and expense, to
replace or repair the Product or part, or refund the purchase price paid for the Product. The manufacturer warrants
any repaired or replaced Product or part for a period of ninety (90) days from shipment, or through the end of the
original warranty, whichever is longer. All Products or parts that are replaced become the property of the
manufacturer. This express warranty does neither cover consumables, such as batteries, bulbs and fuses, nor third
party products.
OBTAINING WARRANTY SERVICE
Customer must contact an authorized service center of the manufacturer within the applicable warranty period to
obtain warranty service authorization. Dated proof of original purchase from the manufacturer’s authorized distributor
and a description of the defect will be required. The manufacturer is not responsible for Products or parts received
without a warranty service authorization. Repaired or replacement Products will be shipped to Customer at the
manufacturer’s expense. The repaired product or part will be shipped as soon as reasonably possible. The
manufacturer shall not be responsible for any damages occurring during such shipment. For Products forming part of
a fixed installation, such place of performance shall be the site of such installation and the manufacturer shall have
the right to charge for additional costs for such services under warranty if the site of the Product is other than where
the Product was originally shipped or installed.
WARRANTY EXCLUSIVE
Customer’s sole remedy for breach of the warranty shall be the express warranty. The foregoing warranty is exclusive
and is in lieu of all other warranties, terms, or conditions, express or implied, either in fact or by operation of law,
statutory or otherwise, including warranties, terms or conditions of merchantability, fitness for a particular purpose,
satisfactory quality and non-infringement, all of which are expressly disclaimed. The manufacturer shall not be liable if
the alleged defect or malfunction was caused by Customer’s or any other person’s misuse, neglect, improper
installation, unauthorized attempts to open, repair or modify the Product, inadequate maintenance, disregard of
operating instructions, excessive load or stress, normal wear and tear, or any other cause beyond the range of its
intended use, by accident, fire, or other hazards, or other cause not due or attributable to The manufacturer. This
warranty does not cover physical damage to the Product or malfunctions resulting from the use of the Product in
conjunction with any sort of ancillary or peripheral equipment and the manufacturer determines that there is no fault
with the Product itself.
EZDigPro
- 98 -
User & Calibration Manual
[warranty] Warranty & Contact Information
LIMITED WARRANTY
LIMITATION OF LIABILITY
The manufacturer also excludes any liability, whether based on contract or tort (including negligence), for incidental,
consequential, indirect, special, or punitive damages of any kind, or costs of procurement of substitute products by
customer, or for the loss of revenue or profits, loss of business, loss of information or data, or other information or
financial loss arising out of or in consequence with the sale, installation, maintenance, use, performance, failure, or
interruption of this product, even if the manufacturer or its distributors have been advised of the possibility of such
damages, and limits its liability to replacement, repair, or refund of the purchase price paid, at the manufacturer’s
option. This limitation of liability for damages will not be affected if any remedy provided herein shall fail of its
essential purpose.
Note: User is responsible for checking and maintaining calibration. At a minimum, the sensor position should be
periodically checked if magnetic mounted.
DISCLAIMER
Should a court of jurisdiction not allow the entire exclusion or limitation of implied warranties or the limitation of
incidental or consequential damages for certain products supplied to Customers, or the limitation of liability for
personal injury, such implied warranties and such liabilities will be limited to the duration of the applicable express
warranty.
With this Limited Warranty, the manufacturer grants Customer specific legal rights which do not restrict any statutory
consumer rights.
FOR MORE INFORMATION, PLEASE CONTACT:
For US, Canada and Latin America
AGL / AGATEC Construction Lasers
2202 Redmond Rd.,
Jacksonville, AR 72076 - USA
Tel: (800) 643-9696 ; (501) 982-4433
Fax: (501) 982-0880
[email protected]
www.agl-lasers.com
For all other countries
AGATEC
21 boulevard Littré
78600 Le Mesnil le Roi - France
Tel: +33 (0) 1 34 93 35 80
Fax: +33 (0) 1 34 93 35 89
[email protected]
www.AGATEC.com
www.ezdigpro.com
EZDigPro
- 99 -
User & Calibration Manual
[notes]
EZDigPro
- 100 -
User & Calibration Manual
[notes]
EZDigPro
- 101 -
User & Calibration Manual