1
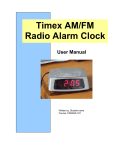
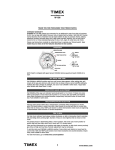
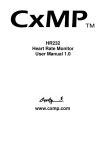
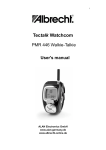
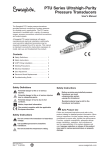
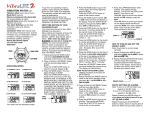
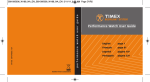
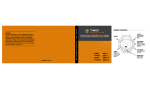
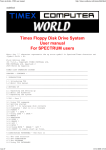
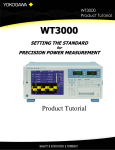
TIMEX DATA RECORDER
User Manual
1
INTRODUCTION.........................................................................................................................................3
DATA RECORDER CONTROLS AND INDICATORS ...........................................................................................3
BUTTON OPERATION....................................................................................................................................3
Turn the Data Recorder On....................................................................................................................3
Turn the Data Recorder Off....................................................................................................................3
Recording data from a second device.....................................................................................................3
Clearing the Memory Manually..............................................................................................................4
WHAT THE LED FLASHES MEAN .................................................................................................................4
Model 532 LED Flash Description.........................................................................................................4
What LED Flashes Mean During Startup...............................................................................................4
Searching for BodyLink Sensors.............................................................................................................5
During Your Workout .............................................................................................................................5
Model 167 LED Flash Description.........................................................................................................6
What LED Flashes Mean During Startup...............................................................................................6
During Your Workout .............................................................................................................................6
HOW TO CONNECT THE USB CABLE TO THE DATA RECORDER ...................................................................7
HOW TO USE THE CLIP.................................................................................................................................9
RECORDING YOUR WORKOUTS ........................................................................................................10
STARTING UP THE DATA RECORDER AND TRANSMITTER(S) FOR BEST RESULTS .......................................10
Recording Data From Two Sensors .....................................................................................................10
WHAT IS AND WHAT ISN’T RECORDED......................................................................................................11
Time and Date Information ..................................................................................................................11
GPS Transceiver...................................................................................................................................11
Digital Heart Rate Monitor ..................................................................................................................11
WHEN YOU ARE DONE EXERCISING ..........................................................................................................11
SOLVING DATA RECORDING PROBLEMS ....................................................................................................12
TRANSFERRING DATA TO THE COMPUTER ..................................................................................13
TRANSFERRING WORKOUT DATA TO YOUR PC.........................................................................................13
SYNCHRONIZING THE DATA RECORDER WITH YOUR PC’S CLOCK ............................................................13
SOLVING DATA TRANSFER PROBLEMS ......................................................................................................14
FREQUENTLY ASKED QUESTIONS ....................................................................................................15
HOW MUCH DATA WILL MY DATA RECORDER STORE?...............................................................................15
I’M ALREADY RECORDING MY HEART RATE DATA WITH THE DATA RECORDER; HOW TO I GET IT TO ALSO
RECORD GPS INFORMATION (OR VICE VERSA)? .........................................................................................15
HOW DO I SET OR CHANGE THE TIME IN MY DATA RECORDER? .................................................................15
HOW DO I CHANGE THE BATTERY IN MY DATA RECORDER? ......................................................................15
SPECIFICATIONS.....................................................................................................................................17
WARRANTY...............................................................................................................................................18
2
INTRODUCTION
Data Recorder Controls and Indicators
The Data Recorder has only two controls, the push button with which you operate it and the LED
that indicates its state of operation.
LED
Push Button
Button Operation
Turn the Data Recorder On
When you are ready to begin a workout and want the Data Recorder to collect data, press the
push button once. The unit will check the battery, check the available memory, then start looking
for signals from a TIMEX Speed + Distance System GPS Transceiver and/or Digital Heart Rate
Monitor.
Turn the Data Recorder Off
Press and hold the push button for more than 1.5 seconds. The LED will glow amber, then go out.
Recording data from a second device
If you have already started recording data from one device, say the Heart Rate Monitor, and want
to also record data from a Speed and Distance transceiver, press and release the push button at
any time while it is operating. The Data Recorder will begin searching for the new device. If it
does not lock onto the new device within sixty seconds, the Data Recorder will resume its
previous operation.
NOTE: If you start recording data from a second device after you’ve already been recording data
from one, the Data Recorder will store the data recorded so far as one workout, then start a new
session with the data from both devices.
3
Clearing the Memory Manually
NOTE: The following procedure should only be performed if you are absolutely sure that you
don’t want to keep any of the workouts that are stored in the Data Recorder. If there is any data
that you wish to keep, make sure that it is transferred to the PC BEFORE you clear the Data
Recorder’s memory.
Start with the Data Recorder powered off. Then, press and hold the push button for 5 seconds.
When the LED flashes amber, release the push button and quickly press and release the button
again while the LED is flashing. If you did it correctly, the LED will change to a solid green color
for a moment, then go dark to indicate that the memory has been cleared. You can now turn the
Data Recorder on normally and use it to record the data from your workout.
What the LED Flashes Mean
When the Data Recorder is operating, the LED is communicating the operating status of the
device by flashing either red, green or amber. The flashes mean different things at different times,
however there is one general rule of thumb; the LED colors are a lot like a traffic light. Green
generally means that all systems are “go”, amber generally means “caution” such as a low battery
or memory is getting full and red always means trouble, either the battery is dead, the memory is
full or there are problems communicating to the BodyLink sensors. This section will describe
what to expect from the LED during startup and during your workout.
First, you need to determine the model number of your Data Recorder. This can be found by
sliding the belt clip off of the device, and looking for a three digit code on the metal caseback.
You will find either 532 or 167. Also, you may open Timex Trainer and connect the Data
Recorder to the PC. Then, from Timex Trainer select Help -> About. The version (167 or 532)
can be found as the three left-most digits of the Main Micro display
Model 532 LED Flash Description
What LED Flashes Mean During Startup
When the Data Recorder is turned on to begin recording data from a workout, the LED will report
the condition of the battery and the amount of free memory available:
LED Action
Description
Meaning
Two green flashes
Normal – plenty of battery life and free
memory.
Amber flash, then a green flash
The battery voltage detected was lower
than expected. The data recorder will
continue to operate normally.
Green flash, then an amber flash
The memory is filling up; there is still
space available but you should transfer to
the PC as soon as you can.
Two amber flashes
The memory is filling up and the battery
voltage detected was lower than expected.
4
LED Action
Description
Meaning
The data recorder will continue to operate
normally, but consider transferring the data
to your PC as soon as you can.
Green flash, then a rapid red flash
for four seconds, then the Data
Recorder shuts off.
The Data Recorder memory is full and no
more workouts can be stored until the
memory is cleared.
Amber flash, then a rapid red
flash for four seconds, then the
Data Recorder shuts off.
The Data Recorder memory is full and no
more workouts can be stored until the
memory is cleared. Also, the battery
voltage in the Data Recorder is low;
change it soon.
Red for two seconds, then the
Data Recorder shuts off
The battery level is too low for reliable
operation and must be replaced.
Rapid alternating red and green
flashes for 4 seconds
The Data Recorder experienced a serious
memory error. This may occur if the
battery voltage is very low. Try replacing
the battery; if this does not correct the
problem, contact Timex Customer Service.
Searching for BodyLink Sensors
If the memory and battery status are OK, the Data Recorder will then start searching for Timex
BodyLink devices from which to record data. The LED glows steady green while it is searching
and if it doesn’t detect any devices sending data, it will shut itself off after fifteen seconds.
Otherwise, the LED will appear as follows:
LED Action
Description
Meaning
Steady green for up to 15
seconds.
The Data Recorder has received no
BodyLink data.
Green, with regular dark “blips”.
The Data Recorder is receiving data from
one BodyLink sensor and is looking for a
second device. It will wait for up to fifteen
seconds for a second device.
Regular green flashes
The Data Recorder is receiving data from
one sensor device.
Irregular green flashes
The Data Recorder is receiving data from
two sensor devices.
During Your Workout
If everything is going smoothly, the LED will continue flashing green every time it receives data
from the sensor(s), which means that the data are being properly recorded. If the Data Recorder
detects a problem, the LED can indicate the following conditions during your exercise session:
LED Action
Description
Meaning
Alternating red
and green
flashes
The Data Recorder has lost
the signal from one device,
but is still receiving from the
other one. Try to move the
devices closer to the Data
Recorder.
What You Should Do
Try to reconnect the “lost” device
by pressing the push button or
moving the devices closer to the
Data Recorder
5
Steady red
glow
The Data Recorder is no
longer receiving any data at
all. Try to change the
position of the devices to
bring them closer to the
Data Recorder.
Try to reconnect the “lost”
device(s) by pressing the push
button. You may have to change
the position of the devices to bring
them closer to the Data Recorder.
Amber flashes
The Data Recorder’s
memory is running low.
Download the stored data
to your PC before your next
workout.
Download the stored data to your
PC before your next workout.
Rapid red
flashes for 4
seconds.
The Data Recorder’s
memory is full and it will
shut off. Download the
stored data to your PC
before your next workout.
Download the stored data to your
PC before your next workout.
Model 167 LED Flash Description
What LED Flashes Mean During Startup
When the Data Recorder is turned on to begin recording data from a workout, the LED will report
the condition of the battery and the amount of free memory available:
LED Action
Description
Meaning
LED glows green
Normal – plenty of battery life and free
memory.
LED glows amber
The memory is getting close to full or the
battery voltage is getting low. Consider
transferring the data to your PC and
clearing the Data Recorder’s memory as
soon as you can. If the LED still glows
amber after the memory has been cleared,
then the battery should be replaced. See
the Frequently Asked Questions section
for battery replacement instructions.
LED rapidly flashes red for four
seconds, then the Data Recorder
shuts off.
The Data Recorder memory is full and no
more workouts can be stored until the
memory is cleared
Rapid alternating red and green
flashes for 2 seconds
The Data Recorder experienced a serious
memory error. This may occur if the
battery voltage is very low. Try replacing
the battery; if this does not correct the
problem, contact Timex Customer Service.
During Your Workout
If the memory and battery status are OK, the Data Recorder will then start searching for Timex
Bodylink devices from which to record data. The LED is illuminated steadily while it is searching
and if it doesn’t detect any devices sending data, it will shut itself off after fifteen seconds.
Otherwise, the LED will appear as follows (the chart below assumes that the LED was green at
6
startup; it may also appear amber if the memory is getting full or if the battery voltage is getting
low as described previously):
LED Action
Description
Meaning
What You Should Do
The Data Recorder is
receiving data from one
sensor device.
Nothing. Everything is OK.
Regular flashes
The Data Recorder is
receiving data from two
sensor devices.
Nothing. Everything is OK.
Irregular flashes
Alternating red
and green
flashes
The Data Recorder has
lost the signal from one
device, but is still
receiving from the other
one. Try to move the
devices closer to the
Data Recorder.
Try to reconnect the “lost” device by
pressing the push button or moving
the devices closer to the Data
Recorder.
Steady red glow
The Data Recorder is
no longer receiving any
data at all. Try to
change the position of
the devices to bring
them closer to the Data
Recorder.
Try to reconnect the “lost” device(s)
by pressing the push button. You
may have to change the position of
the devices to bring them closer to
the Data Recorder.
How to Connect the USB Cable to the Data Recorder
The USB cable supplied with the Data Recorder has a standard USB connector on one end for
connection to your PC, with a special connector on the other end to connect to your Data
Recorder. Connect the USB cable to the Data Recorder as follows:
1. Pull the locking lever on the connector open.
2. Hook the tab opposite the locking lever into the slot in the connection on the rear of the
Data Recorder.
3. Rotate the connector forward to lock it into position on the Data Recorder.
4. Connect the other end of the USB cable to an open USB port on your PC.
7
8
How to Use the Clip
The flexible clip on the rear of the Data Recorder is provided to allow you to hook the Recorder
to your clothing during a workout. Simply slide the bottom of the clip over the edge of your
clothing. Alternatively, you can also put the Data Recorder in a pocket.
When using the clip, we recommend that you always use the lanyard supplied with the Data
Recorder (unless you are putting the Data Recorder in a pocket or other safe place). Thread it
through the loop on the top of the Data Recorder and attach it securely to your clothing, around
your waist, or wherever is most convenient.
Lanyard
Loop
Side View of
Data Recorder
Clothing
Clip
9
RECORDING YOUR WORKOUTS
This section describes how to use the Data Recorder in conjunction with a TIMEX Speed +
Distance System GPS Transceiver and/or Digital Heart Rate Monitor.
Starting Up the Data Recorder and Transmitter(s) for
Best Results
NOTE: The Data Recorder should be within 1 meter (about 3 feet) of the transmitter(s). In
addition, you will get the most reliable results if the Data Recorder is located on the same side of
your body as the GPS Transceiver.
1. In preparation for your exercise session, attach one or both of the GPS Transceiver and Heart
Rate Monitor to your body and turn it (them) on.
2. After the transmitters are powered up and transmitting, turn on the Data Recorder; for best
results the Data Recorder should always be the last device you turn on. It will
automatically attempt to synchronize with the transmitter(s) for fifteen (15) seconds. If no
data transmissions are detected, the Data Recorder will shut itself down to conserve battery
power.
3. Check the LED to make sure that you are recording data from the sensors properly. If you are
using only one sensor, the LED will flash green in a steady rhythm every few seconds. If you
are recording data from two sensors, the LED will flash with a slightly irregular rhythm every
second or so. Don’t skip this important step! Get to know the flashing pattern of the
LED to verify that the Data Recorder is recording all of your performance data!
See the section “What the LED Flashes Mean” for more complete explanations of the LED
signals.
When you are satisfied that the Data Recorder is receiving data from the transmitter(s), you can
attach it to your clothing with the clip (and lanyard) or drop it in a pocket and you’re ready to
start your workout.
Recording Data From Two Sensors
When you first start the Data Recorder, it will try to record data from two sensors automatically.
If you have followed the sequence above and placed the Data Recorder within 1 meter of both
sensors, the Data Recorder will be able to record data from both devices without any extra effort
on your part.
However, there are times when the startup procedure may not go so smoothly, or you may have
forgotten to turn the GPS transceiver on before the Data Recorder. This might result in the Data
Recorder recording data from only one sensor, characterized by the regular rhythmic flashing of
the LED. If this is case, or if you want to record performance data from a second device, simply
press and release the push button once again and the Data Recorder will search for data from a
second device for fifteen seconds. If no new sensor data is detected, the Data Recorder will go
back to the previous state, recording data from the first sensor only. If the Data Recorder is
successful in recording data from the second device, the LED will flash with an irregular rhythm,
as described above.
10
What Is and What Isn’t Recorded
The Data Recorder operates completely independently from any watch that you might be using
during your workout. As a matter of fact, you don’t even need a watch at all when using the Data
Recorder. This means that the Data Recorder does not store things like chronograph data and
averages per lap that you may see on your watch, since most of these data rely on features or
functions that are specific to the watch. At no time is any data transmitted from a Timex watch to
the Data Recorder.
Time and Date Information
Each workout is time-stamped for identification, with the time synchronized to the clock in your
PC. Thus, it is important to be sure that your PC clock is correct. If you travel to a different time
zone and plan to use the Data Recorder to track your workouts, try to resynchronize the Data
Recorder at your destination. If you are using a laptop computer, be sure to first change its clock.
GPS Transceiver
The Data Recorder will record all of the raw performance data transmitted from the GPS unit
over the course of your workout, for later analysis and display by the PC software.
Digital Heart Rate Monitor
The Data Recorder will record all of the raw heart rate data transmitted from the Heart Rate
Monitor over the course of your workout, for later analysis and display by the PC software.
When You Are Done Exercising
As soon as your workout is over, turn off the Data Recorder (press and hold the push button until
the LED glows amber and then goes out). This will prevent the Recorder from continuing to
record data that are not a part of your workout.
As soon as you can, you should download the data to your PC. This ensures that the Data
Recorder’s memory will have maximum capacity for recording future workouts.
11
Solving Data Recording Problems
Here are some common problems you might encounter during workouts and what you can do
about them.
Problem
Probable Cause
I am getting erratic results,
The Data Recorder is located
including losing the signal from too far from one or both of the
one or both of my transmitters transmitters
My workout data were
incomplete; only part of the
workout was recorded.
I’m trying to record both my
running partner’s and my heart
rates (or time vs. distance), but
only mine shows up.
What You Should Do
Make sure that the Data
Recorder is no more than 1
meter (about 3 feet) from the
transmitters; the closer the
better. In particular, the Data
Recorder should be on the
same side of your body as the
GPS Transceiver.
The batteries in the sensor
devices are weak
Check the battery voltages in
your sensor devices and
replace if necessary.
A workout partner is also using
the Speed + Distance system
and those signals are
conflicting with your
transmitter(s).
Maintain a distance of at least
6 feet (2 meters) from anyone
else using a Heart Rate
Monitor or GPS Transceiver.
The memory in the Data
Recorder became full during
the workout and the unit shut
off.
Make sure that the memory
check during startup shows
sufficient memory. Whenever
possible, download any data in
the Data Recorder before
starting a workout.
The batteries in the GPS
Transceiver or Heart Rate
Monitor died during the
workout.
Check that the transmitter(s)
have good batteries before
each workout.
The battery in the Data
Recorder is too low for reliable
operation
The Data Recorder reports the
status of its battery when you
turn it on. If the LED indicates
that the battery voltage is low,
you should replace the battery
as soon as possible.
Even though the Data
Recorder will accept data from
two devices, they must be
different types; one GPS
Transceiver and one Heart
Rate Monitor.
Don’t try to record data from
two devices of the same type.
12
TRANSFERRING DATA TO THE COMPUTER
The function of the Data Recorder is to store data during your workouts for later transfer to your
computer, where you can analyze and display the results with the Timex Trainer software.
Transferring Workout Data to Your PC
Connect the USB cable between the Data Recorder and your PC. The Timex Trainer software
will automatically start up and transfer all workout data from the Data Recorder’s memory to
your PC. If the transfer doesn’t start automatically, you can start it manually from Timex Trainer
and use the menu items to transfer the data from your Recorder to the PC. After the data is
transferred to the computer, you can use the features of Timex Trainer to analyze your workouts
and display the results (see the Software Help for detailed information).
The clock inside the Data Recorder is automatically synchronized to the PC’s clock at the
completion of the transfer.
Synchronizing the Data Recorder with Your PC’s Clock
NOTE: You should connect the Data Recorder to the PC and let Timex Trainer initialize the Data
Recorder’s clock and memory before you record your first workout, and anytime that you travel
to a new time zone with your Data Recorder.
The Data Recorder’s time and date are automatically synchronized with the PC each time you
transfer your workout data to the PC. However it might be necessary to change the time in the
Data Recorder to account for time changes due to daylight savings or travel, for instance. The
procedure to set the time in the Data Recorder is the same as for transferring workout data.
Connect the USB cable between the Data Recorder and your PC. The Timex Trainer software
will automatically start up and synchronize the Data Recorder’s internal clock to the PC’s clock.
You may also see a message indicating that the Data Recorder does not contain any workout data.
For best results, make sure that your PC’s clock is correct. Disconnect the cable first from the PC
and then from the Data Recorder.
13
Solving Data Transfer Problems
Here are some common problems you might encounter during data transfer and analysis and what
you can do about them.
Problem
Probable Cause
What You Should Do
There is a lot of extraneous
“junk” data recorded after the
end of my workout.
The Data Recorder wasn’t
Be sure to turn off the Data
turned off immediately after the Recorder as soon as possible
end of the workout and
after the end of your workout.
recorded an additional 1
minute’s worth of data before
automatically shutting off.
The data displayed on my PC
are different from what was
recorded by my Speed +
Distance watch.
The PC software employs
more sophisticated processing
techniques than the watch.
Use the data displayed on the
watch to regulate your workout
and rely on the PC software
results for more accurate
analysis later.
The Data Recorder does not
record any user input or data
processing from the watch.
Use the data displayed on the
watch to regulate your workout
and rely on the PC software
results for more accurate
analysis later.
The Data Recorder may have
lost the signal from the
transmitter(s) and the data
from the workout are
incomplete.
If possible, periodically check
the LED on the Data Recorder
during your workout to verify
that the unit is actively
recording data from your
transmitter(s).
Be sure to turn off the Data
The Data Recorder wasn’t
turned off immediately after the Recorder as soon as possible
after the end of your workout.
end of the workout and
recorded up to an additional 1
minute’s worth of data.
The workouts stored in my
Data Recoder don’t have the
correct time or date
information.
The Data Recorder’s internal
clock is set incorrectly for your
current time zone.
Connect the Data Recorder to
your PC and let Timex Trainer
set the Data Recorder’s clock.
Be sure that your PC’s time is
set correctly.
14
FREQUENTLY ASKED QUESTIONS
Here are some additional tips that may help you to use your Data Recorder more efficiently.
How much data will my Data Recorder store?
It can store up to 72 hours of HRM-only data, 26 hours of GPS speed and distance data, 13 hours
of full GPS data, 14 hours of combined HRM and speed and distance data, and up to 9 hours of
combined HRM and full GPS data. The Data Recorder can store a maximum of 128 workouts.
I’m already recording my heart rate data with the
Data Recorder; how to I get it to also record GPS
information (or vice versa)?
After one device is synchronized with the Data Recorder, as indicated by the regular green
flashing of the LED, simply press the push button and the unit will attempt to synchronize with
the second device. Note that this might result in two consecutive workouts appearing in Timex
Trainer; the first with just the one device and the second workout containing data from both
devices.
How do I set or change the time in my Data Recorder?
Simply connect the Data Recorder to your PC and start up Timex Trainer (if it doesn’t start
automatically). Timex Trainer will set the Data Recorder’s internal time and date to the time and
date of your PC. For best results, make sure your PC’s clock is set correctly.
How do I change the battery in my Data Recorder?
It’s easy, as long as you have the right tools. You need a “jeweler’s” screwdriver with a #0
Phillips head and a new battery of the proper type. Follow these steps:
1. Download any workout data still in the unit that you want to save.
2. Slide the clothing clip off the back of the unit to reveal the battery compartment.
3. Use the screwdriver to remove the four screws holding the battery cover in place, then pull
off the cover.
4. Carefully remove the battery (it will probably pop up) and insert a new one of the same type.
Be very careful not to touch, move, or get dirt on the rubber gasket in the battery
compartment that surrounds the battery.
5. Put the cover back and secure it with the four screws you removed earlier.
6. Slide the clip back in place.
7. Press the reset button on the back of the Data Recorder to the left of the clip. On some
models, this may be a silver button while on others it may be recessed within a small hole.
For the recessed button, carefully insert a paper clip into the hole to reset the Data Recorder.
8. Press the push button on the front to make sure that the unit is working properly.
15
However, Timex still recommends that you have a jeweler or retailer replace the
battery for you, particularly if you don’t have the proper screwdriver to safely
remove the back or have difficulty handling very small parts.
16
SPECIFICATIONS
Parameter
Recording Capability
Speed & Distance
GPS 3D
72 Hours HRM only
72 Hours HRM only
26 Hours GPS only
7 Hours GPS only
13 Hours combined HRM+S/D
6 Hours combined
HRM+GPS 3D
128 workouts maximum
128 workouts maximum
Data Memory
128K
Battery Type
CR 2032
Operating Temperature Range
Water Resistance
0 to 100° F (–18 to 38° C)
Splash Resistant
17
WARRANTY
To obtain warranty service, please return your product to Timex, one of its affiliates or the Timex
retailer where the product was purchased, together with a completed original Product Repair
Coupon or, in the U.S. and Canada only, the completed original Product Repair Coupon or a
written statement identifying your name, address, telephone number and date and place of
purchase. Please include the following with your product to cover postage and handling (this is
not a repair charge): a US$ 7.00 check or money order in the U.S.; a CAN$6.00 cheque or money
order in Canada; and a UK£ 2.50 cheque or money order in the U.K. In other countries, Timex
will charge you for postage and handling. NEVER INCLUDE A SPECIAL WATCHBAND OR
ANY OTHER ARTICLE OF PERSONAL VALUE IN YOUR SHIPMENT.
For the U.S., please call 1-800-448-4639 for additional warranty information. For Canada, call 1800-263-0981. For Brazil, call 0800-168787. For Mexico, call 91-800-01- 060. For Central
America, the Caribbean, Bermuda and the Bahamas, call (501) 370-5775 (U.S.). For Asia, call
852-2815-0091. For the U.K., call 44 208 687 9620. For Portugal, call 351 212 946 017. For
France, call 33 3 81 63 42 00. For Germany, call 49 7 231 494140. For the Middle East and
Africa, call 971-4-310850. For other areas, please contact your local Timex retailer or Timex
distributor for warranty information.
TIMEX INTERNATIONAL WARRANTY (U.S. – LIMITED WARRANTY) Your TIMEX®
product is warranted against manufacturing defects by Timex Corporation for a period of ONE
YEAR from the original purchase date. Timex and its worldwide affiliates will honor this
International Warranty. Please note that Timex may, at its option, repair your product by
installing new or thoroughly reconditioned and inspected components or replace it with an
identical or similar model.
IMPORTANT – PLEASE NOTE THAT THIS WARRANTY DOES NOT COVER DEFECTS
OR DAMAGES TO YOUR PRODUCT: 1) after the warranty period expires; 2) if the product
was not originally purchased from an authorized Timex retailer; 3) from repair services not
performed by Timex; 4) from accidents, tampering or abuse; and 5) lens or crystal, strap or band,
watch or transceiver case, attachments or battery. Timex may charge you for replacing any of
these parts.
THIS WARRANTY AND THE REMEDIES CONTAINED HEREIN ARE EXCLUSIVE AND
IN LIEU OF ALL OTHER WARRANTIES, EXPRESS OR IMPLIED, INCLUDING ANY
IMPLIED WARRANTY OF MERCHANTABILITY OR FITNESS FOR PARTICULAR
PURPOSE. TIMEX IS NOT LIABLE FOR ANY SPECIAL, INCIDENTAL OR
CONSEQUENTIAL DAMAGES. Some countries and states do not allow limitations on implied
warranties and do not allow exclusions or limitations on damages, so these limitations may not
apply to you. This warranty gives you specific legal rights and you may also have other rights
which vary from country to country and state to state.
18