1
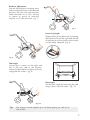
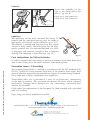
EASyS
BSS®inside
Ergonomical and adjustable safety system for rehabilitation strollers
User manual for seat units 1 and 2
Thomashilfen
KinderReha
Dear EASyS user,
The EASyS rehabilitation stroller that you purchased is an innovative product
made by the company Thomashilfen. After several years’ of research we have
developed a new concept for rehabilitation strollers’ that is one of the safest
and most advanced seating systems available.
In order to make the operation of the EASyS seating system and frame safe,
practical, and comfortable for you and especially for your child, please read
this user manual completely before use.
Should you have any further questions or issues, please contact your specialist
supplier or Thomashilfen directly.
For more information about Thomashilfen and our products, please visit our
website at www.thomashilfen.com
Our address:
Thomashilfen für Behinderte
GmbH & Co. Medico KG
Walkmühlenstraße 1
D - 27432 Bremervörde
phone +49 (0) 47 61 / 8 86-68 or -63
www.thomashilfen.com
Contents
Page
General safety instructions .......................................................
4
Technical data ..........................................................................
5
Engaging the seat unit ..............................................................
5
Removal of the seat unit...........................................................
5
Adjustment options ..................................................................
5
Accessories...............................................................................
8
Padding ....................................................................................
12
Care instructions ......................................................................
12
Guarantee terms.......................................................................
12
Please observe the following safety instructions:
è We recommend that you adjust the EASyS seat growth settings every 3 months to best
fit your child. If necessary, let your therapist / prosthetist / dealer help you.
è This stroller is intended to transport only one child. More than one child in or on the
stroller may result in injury.
è Check all control elements and fastening screws monthly. The sliding bars should be
kept free of sand.
è Please remember to re-tighten the screws and clamping levers (hip angle adjustment)
after each re-setting.
è Always lock the stroller brakes before placing or removing a child from the stroller;
and before adding any accessories or performing maintenance.
è CAUTION: wet or flat wheels may affect the braking effect. If not in use or stopping
for a longer period, engage the stroller foot brake in order to prevent accidental
rolling.
è Do not exceed the maximum size and weight capacity of this stroller. Please refer to
the literature for specification details.
è Leaning or reaching far too any side can cause the stroller to be unstable and tip
over. Always use the seat belt in addition to close observation to prevent this type
of movement.
è Attaching bags, equipment, or other heavy items may cause the stroller to become
unstable. These items are best stowed in the basket / equipment tray below the
seat unit.
è We recommend that you always secure your child with the 2-point pelvic belt
(standard equipment) or another retention belt (available as an accessory). Never
leave your child unattended in the stroller; even if the brakes are engaged and the
seat belt is in use. Be especially careful about other children playing around the
stroller. The stroller should only be operated by a mature individual.
è This stroller contains many small pieces that can be a choking hazard. Never leave
children unattended in or around the stroller. Choking hazards include, but are not
limited to: packaging materials, screws, nuts, and plastic caps which can become
loose or dislodged with use. Inspect the stroller frequently to insure safety and
proper operation.
è The pelvic belt (seat belt) supplied with the stroller, as standard equipment, is NOT
intended for use as a safety belt for transportation in a motor vehicle. When
transporting the child seated in the stroller in a motor vehicle, always ensure that the
tie down and occupant restraint system meet all current regulations.
è When using an anterior trunk support (H, butterfly, or vest style harness) always use
a pelvic belt and/or an abduction block to prevent sliding that can result in
strangulation.
è Always be alert when pushing a child in the stroller. Give particular attention to
using the stroller when on or near slopes, uneven ground, stairs, obstacles and when
near moving motor vehicles. Stairs should only be attempted with two or more
capable attendants.
è Strolling after dark can be extremely hazardous. Please use great caution, obey all
traffic laws, use lights and/or light clothing to increase visibility to others.
è When working with the seat unit, please observe the recommendations in the user
manual, especially when dismantling it and folding it together.
è Any modifications that alter the frame, such as drilling holes in the frame, will void
the approved use of this stroller for transportation in a vehicle.
è Before use, always check that the seat is securely fastened to the frame and that the
recline and tilt mechanisms are securely fastened.
Tip: More information is available on our website www.thomashilfen.com
4
Technical data
EASyS seating system
EASyS 1
Seat depth
Seat width
Back height
Lower leg length
Knee angle
Hip angle
Seat tilt-in-space
Overall dimensions (w x h x l)
19 - 30 cm / 7.5 – 11.8"
19 - 31 cm / 7.5 – 12.2"
40 - 65 cm / 15.8 – 25.6"
17 - 30 cm / 6.7 – 11.8"
90° - 180°
90° - 180°
-15° to +45°
38 x 98 x 64 cm
15 x 38.6 x 25.2"
Folded dimensions (w x h x l) 38 x 29 x 88 cm
15 x 11.4 x 34.7"
Carrying capacity
35 kg / 77.1 lb
Weight
7.7 kg / 17 lb
Seat turning range
180°
EASyS 2
27 - 38 cm / 10.6 – 15"
25 - 36 cm / 9.8 – 14.2"
53 - 73 cm / 20.9 – 28.8"
25 - 36 cm / 9.8 – 14.2"
90° - 180°
90° - 180°
-10° to +40°
45 x 116 x 76 cm
17.7 x 45.7 x 29.9"
45 x 40 x 81 cm
17.7 x 15.8 x 31.9"
40 kg / 88.1 lb
9.4 kg / 20.7 lb
180°
Inserting the seat unit
Place the seat unit on the rear
crossbar and engage forwards.
The EASyS click-system engages
automatically. (fig. 1)
Removal of the seat unit
To remove the seat unit, push the
EASyS click-lever under the seat
forwards and take the seat unit off
the chassis forwards.
(fig. 1)
Adjustment options
EASyS 2 hip angle adjustment
The EASyS 2 clamping lever for hip angle adjustment is
equipped with an extra safety locking pin. It must be loosened
during adjustment. After adjustment, make sure that the
locking pin is engaged again. (fig. 2)
(fig. 2)
5
Seat width
Loosen the hip guide screws from the seat top
surface (under the seat upholstery) with an Allen
key. Move the hip guide to the appropriate width
and retighten the screws. (fig. 3)
(fig. 3)
(fig. 4)
Seat depth
Loosen the front Allen screws (also for the hip
guide setting) on the surface and pull out the seat
plate. Retighten the screws when the seat depth is
correct. (fig. 4)
Tip: For easy adjustment of the seat depth grip the
frontal edge of the seat with one hand and press
against the bottom part of the backrest (concentric)
with the other hand.
Back height
Loosen both black knobs to adjust the backrest
variably to the desired height. (fig. 5)
(fig. 5)
Lateral back support
Loosen both black knobs on the upper
crossbar and the Allen screw on the righthand side of the tube guide to set the lateral
support freely at the height desired until it
snaps into place (the locking pin snaps into
place audibly). Press the locking pin (only
on the right-hand side) to reduce the height
of the lateral support. (fig. 6)
(fig. 6)
Tip:
6
The extended lateral support offers additional protection to children who
are primarily transported in a lying position.
Backrest adjustment
Loosen the backrest clamping lever
and move the backrest to the desired
position. The seat unit automatically
slides forwards on its rails, shifting
its centre of gravity to maintain
stability in all seat positions. (fig. 7)
(fig. 7)
Lower leg length
Release the locking device by loosening
the black knobs on the right and the left
of the bottom of the footrest; the footrest
can be freely adjusted. (fig. 8)
(fig. 8)
Foot angle
Loosen the 4 screws on the right and
left of the rear side of the footrest.
Adjust the desired foot angle and firmly
re-tighten the screws. (fig. 9)
(fig. 9)
Knee angle
Set the knee angle by loosening the side
wing screws (on both sides). (fig. 10)
(fig. 10)
Tip:
The footrest can be flipped up to facilitate getting on and out of
the stroller.
7
Accessories
Lateral head support
Open the back padding in the quilted
area at head height.
Insert both button-headed screws into
the grooves in the lateral support,
guide the lateral support through the
back padding and attach them to the
backrest‘s longitudinal slots using the
hand wing screws. (fig. 11)
EASyS size 1, item code: 6624
EASyS size 2, item code: 6724
(fig. 11)
Lateral trunk support
Open the back padding in the
quilted area at the measured thorax
height. Insert both button-headed
screws through the grooves of
the lateral trunk support, guide
the lateral trunk support through
the back and attach them to the
backrest‘s longitudinal slots using
the hand wing screws. The more
sloping side of the lateral trunk
support must be pointed upwards.
(fig. 12)
(fig. 12)
EASyS size 1, item code: 6634 EASyS size 2, item code: 6734
Tip:
If there is any restricted operability for the wing screws, use the nuts
enclosed with the packaging.
Foot straps
Select the hole spacing according to
foot size and thread the belt through
the foot support holes. If necessary
the straps can be shortened. (fig. 13)
EASyS size 1 and 2, item code: 6648
(fig. 13)
8
Belts
Butterfly harness
H-belt
Seat waistcoat
(fig. 14)
(fig. 15)
(fig. 16)
(fig. 17)
Cut the seat padding open in the quilted seam. Guide both upper belts through
the resulting grooves. Insert the Allen screw through the belt eyelet into the back
plate screw thread and screw it down firmly (figs. 14-16). Guide both lower belt
ends respectively right and left from the inside around the outer rim of the seat side
supports and attach them externally in one of the three nut inserts using an Allen
key. (fig. 17)
Butterfly harness
H-belt:
Seat waistcoat:
(fig. 14): size
size
size
(fig. 15): size
(fig. 16): size
size
size
1, item code: 6616 (small: S),
1 + 2, item code: 6617 (medium: M),
2, item code: 6717 (large: L)
1, item code: 6629, size 2, item code: 6729
1, item code: 6631 (small: S),
1 + 2, item code: 6632 (medium: M),
2, item code: 6731 (large: L),
Belt buckle
(fig. 18a)
Soft pelvic harness
(fig. 18b)
(fig. 19)
Place the soft pelvic harness on the seat surface
(buckles point downwards). Attach both belts which
run to the back under the seat surface to the rear
crossbar (turn the hand screws using existing screw
thread). Attach the belts which pull to the side on the
right and left-hand sides of the seat side supports.
Guide both lower belt ends respectively right and
left from the inside around the outer rim of the seat
side supports and attach them externally in one of
the three nut inserts using an Allen key. (fig. 18a-b)
EASyS size 1, item code: 6614
EASyS size 2, item code: 6714
The belt buckle is
equipped with quickaction fastening: pull
the buckle to the end
of the belt, place the
child, close the buckle
and pull the belt ends
tight. (fig. 19)
9
Abduction block
Cut the seat padding open in the quilted
area. Insert the abduction block through the
opening (narrow end pointing toward the
child’s body). Tighten the screw at the front
of the seat unit to lock the abduction block in
place. Adjust the abduction block height by
loosening the screw fitting. (fig. 20)
(fig. 20)
EASyS size 1, item code: 6620
EASyS size 2, item code: 6720
(fig. 21b)
(fig. 21a)
Grip rail
The retainer tube must be prepared before the grip rail is mounted:
1. Remove the plastic caps.
2. Screw in the tension locking pins.
Insert the grip rail in the tubes: a height of 14, 16.5, 19 or 21.5 cm (5.5, 6.5, 7.5
or 8.5") can be set using the locking pin. Turn over the grip rail to vary the distance
to the child. (fig. 21a-b)
EASyS size 1, item code: 6621
EASyS size 2, item code: 6721
The retainer tube must be prepared before the tray is mounted:
1. Remove the plastic caps.
2. Screw in the locking pins.
Now the tray can be inserted in the tubes and a height of 14, 16.5, 19 or 21.5 cm
(5.5, 6.5, 7.5 or 8.5") set using the locking pin (fig. 21a). Bend the tray for mounting
and fold it as far forwards as possible. Angle adjustment is made using two hand
screws in the 15° grid. Depth setting is made using four hand screws in the guide
rail underneath the tray. (fig. 22b)
EASyS size 1, item code: 6630
10
EASyS size 2, item code: 6730
(fig. 22b)
(fig. 22a)
Tray
Sun/rain cover with leg blanket
a
b
2.
3.
Open the zippers each on the left and right lateral backrest upholstery (1). Screw
tight the receiver with the clamp (a) between the two markings on the tube. Make
sure that the straight side of the triangle receiver (b) faces forwards (2). Now put
the sun / rain cover into the receiver (3). Close the zippers as far as they will go.
The leg blanket can be buttoned to the sun/rain cover. If necessary, remove the
cover apron using the zipper which runs around it (under the back cover clamp).
EASyS size 1, item code: 6637
Tip:
EASyS size 2, item code: 6737
To fold the hood, swivel the hood behind the
back of the seat before folding it up behind the back.
Sleeping bag
(fig. 23b)
Pull the upper section over
the backrest and down
to the seat surface. Place
the lower section on the
seat surface, guide the
strings through the groove
between the back and the
seat surface and fasten them
on the black plastic sliding
elements on the guide
rails. The upper and lower
sections can be joined at all back heights which can be
set using Velcro. (fig. 23a-b)
(fig. 23a)
EASyS size 1, item code: 6618 (woven fur) EASyS size 2, item code: 6718 (woven fur)
EASyS size 1, item code: 6619 (padded)
EASyS size 2, item code: 6719 (padded)
11
Umbrella
Mount the umbrella on the
right or left -hand side of the
chassis. (fig. 24a-b)
EASyS size 1, item code: 6643
EASyS size 2, item code: 6643
(fig. 24b)
(fig. 24a)
Upholstery
The upholstery can be easily removed. The Trevira CS
material and the interlaced spacing yarns are made of
high-quality cloth which can be washed at up to 30°C.
The material is printed with non-poisonous dies which
are free of heavy metals. Please be aware that the highquality materials may also become bleached as a result
of long-term and intensive sunlight or due to frequent
washing. The upholstery is flame resistant. (fig. 25)
(fig. 25)
Care instructions for Velcro fasteners:
In order to maintain the functionality of the Velcro fasteners, brush them down from
time to time. Always close the Velcro fasteners when washing them.
Item code: 95500/GB, status: 01/2007, subject to technical alterations
Guarantee terms / CE marking
The company Thomashilfen is certified in accordance with the ISO standards DIN
EN ISO 13485:2003 and guarantees the quality of the products they supply. Both
material selection and processing meet the very highest of manufacturing standards.
Every single part is always subjected to final inspection.
Thomashilfen offers you a guarantee of 3 years for all frame parts, commencing
on the date of purchase. This guarantee incorporates all claims which influence
functionality. Damages due to improper use (e.g. overloading), and natural wear
and tear are excluded.
EASyS meets the requirements of the European EN 1888 standard and is provided
with a CE marking.
Enjoy using your EASyS rehabilitation stroller!
Walkmühlenstraße 1 · D - 27432 Bremervörde · phone +49 (0) 47 61 / 8 86-68 or -63
www.thomashilfen.com · [email protected]
Member of the International
Support Association for the
Rehabilitation of Children and Youths e.V.