1
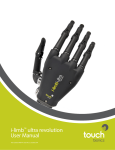
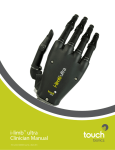
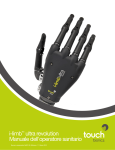
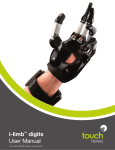
Training Protocol for Therapists
i-limbTM ultra revolution and i-limbTM ultra
Part number MA01243: Issue No. 1, July 2014
This manual should be read and used in conjunction with training from the Touch Bionics clinical team for the evaluation and
training of users of the i-limb products. The material herein is designed to facilitate the authorization of patient services, enhance
patient evaluation, support team-based rehabilitation services and to optimize outcomes.
This symbol signifies important information and is used throughout the manual.
Refer to www.touchbionics.com/downloads/document-library for the most up-to-date version of this document.
Table of Contents
1. Introduction to Upper Limb Prosthetics
1.1
Upper Limb Amputee Training 2. Overview of i-limb ultra revolution and
i-limb ultra Prosthetic Devices 2.1
Device Overview
2.2
Features Overview
2 3
Operating in Standard Hand Mode 2.4
Wrist Options
3. Training Protocol
3.1
Pre-Prosthetic Training Phase
3.1.1 Acute Pre-Prosthetic Training
3.1.2 Subacute Pre-Prosthetic Training
3.2
Prosthetic Training Phase
4. biosim Overview for Therapists
4.1 biosim Overview
4.2 Connecting to biosim
4.3 Navigating biosim
4.3.1 Myo-testing
4.3.2 Features
4.3.3 Triggers
4.3.4 Training
4.3.5 Usage 4.4
Mobile Apps
5. Appendix
5.1
Warnings and Precautions
5.2
Usage Do’s and Don’ts
5.3
References and Recommended Reading
Part number: MA01243: Issue No. 1, July 2014
3 of 46
1.0 Introduction to Upper Limb Prosthetics
1.1 Upper Limb Amputee Training
Individuals with upper limb loss or deficiency are impacted in profound ways. The human hand functions in gross grasp and prehensile activities, as a sensory organ, and as a means of communication and social interaction. Any amount of loss or deficiency can
interfere with an individual’s productivity and alter one’s interactions with the environment. In fact, it is estimated that the hand
provides 90% of the overall function of the upper limb (Light,
Chappell & Kyberd, 2002). Emotional impacts, such as a feeling of
incompleteness, are also common.
Each person with an upper limb amputation is unique, and no two
amputations are identical. Because we rely on our hands for engagement with the world around us, training an individual to use
a prosthesis can be one of the most challenging and rewarding
clinical opportunities a therapist can experience.
The goal of most people with upper limb loss or deficiency is to
achieve independence in the functional activities they want or
need to perform. For the majority of unilateral amputees, this goal
is entirely possible. Individuals with bilateral transhumeral (above
the elbow) or bilateral shoulder disarticulation limb loss, present
with a significantly more challenging situation, typically requiring more adaptations and creative solutions to improve independence.
From the acute phase to community reintegration, the therapist
has a critical role in every stage of the functional training process.
In a survey of individuals one year post amputation, respondents
indicated a strong desire for functional training with their prosthesis (van Lunteren, et al., 1983). By contributing to the successful
integration of a prosthesis, the therapist helps reduce the risk of
cumulative trauma disorders which are three times more likely for
individuals with unilateral limb loss (McFarland, et al., 2010).
Various studies show that the type and amount of therapy received correlates to improved functional outcomes. Weeks, Anderson, and Wallace (2003), noted the importance of having variation in training, rather than purely rote practice. In another study,
individuals were instructed to complete a list of functional tasks.
One group was given formal training to complete the tasks while
the other group was instructed to complete them independently.
In a period of just four days, those who received formal training
demonstrated significantly better efficiency in completing the
tasks than those without training (Lake, 1997).
Part number: MA01243: Issue No. 1, July 2014
1 of 46
2.0 Overview of i-limb ultra revolution and i-limb ultra Prosthetic Devices
2.1 Device Overview
Touch Bionics offers two myolectric powered options for patients
with upper limb loss at the wrist or more proximal: the i-limb ultra
revolution and the i-limb ultra.
The i-limb ultra revolution and the i-limb ultra offer many
customizable features, providing wearers with the flexibility to
perform a wide range of daily activities with improved control,
accuracy, and ease-of-use.
Motorized Digits
Multi-Articulating Digits
The i-limb ultra revolution and the i-limb ultra have five articulating
digits powered by motors. Four motors power the index to small
digits with articulations at the metacarpophalangeal (MCP) and
proximal interphalangeal (PIP) joints. The fifth motor powers
thumb flexion and extension at the MCP joint. The i-limb ultra
revolution has these same motors but also offers one additional
motor for thumb rotation (Figure 1).
Motorized Thumb
Manual Versus Powered Rotating Thumb
The one extra motor in the i-limb ultra revolution provides the
wearer with a powered rotatable thumb, a distinguishing feature
from the i-limb ultra since the i-limb ultra thumb must be manually
(or passively) rotated and positioned to achieve certain grips and
gestures.
The i-limb ultra revolution includes a powered rotating thumb
allowing motion from the palmar position to a fully lateral position
and anywhere in between. The thumb automatically moves to
the position needed for the selected grip pattern, saving time and
improving grasp accuracy. The thumb also has a manual override
so it can be manually rotated, increasing the versatility to available
positions along the full range of thumb rotation.
Figure 1. i-limb ultra revolution
Stall Out and Compliant Grip
For both the i-limb ultra revolution and the i-limb ultra, the
motors can be stalled (or stopped) when they reach resistance
or when pressure is put against them. This stalling mechanism
allows the hand to conform to objects of various shapes and
sizes (Figure 2) to provide a compliant grip. This is a significant
advancement over the single-grip style hands which only
offer a 3-Jaw Chuck (Tripod) style grip for all tasks.
The i-limb ultra thumb can be manually positioned anywhere
along the range of motion, but it must be pre-positioned by the
user during specific grip patterns. Typically, a user can achieve
manual rotation by pushing the thumb against the upper thigh
or a hard object, or by reaching over with the contralateral side.
Figure 2. Compliant grip allows hand to take shape of the object
Part number: MA01243: Issue No. 1, July 2014
2 of 46
Proportional Control
Both the i-limb ultra revolution and the i-limb ultra function
with proportional control, meaning the stronger the muscle
contraction, the faster the hand will move. Likewise, a weaker
muscle signal will cause the hand to move more slowly. A
helpful analogy to describe this is an accelerator pedal on a
car, where the vehicle’s speed is controlled by the amount of
pressure placed on the pedal. With the i-limb hands, once a user
grasps an object, the hand will continue to hold the object until
a clear open signal is given.
The commonalities and differences between the i-limb ultra
revolution and the i-limb ultra are summarized below:
Product Features
vari-grip
i-limb ultra
i-limb ultra
revolution
Five articulating digits
The compliant grip of the hand allows a firm grasp on most
objects, but there are tasks that sometimes require extra force,
such as opening a candy bar, a container, or even tying one’s
shoes. For these types of tasks, vari-grip allows for an increase
in grip force when a sustained close signal is given. This extra
ratcheting down of force increases the grip or pinch strength.
Individual stall out
ability
Compliant grip
Enhanced grip feature
(vari-grip)
auto-grasp
Automated grip
14
patterns & gestures
When engaging in tasks such as putting away the dishes, some
individuals may be concerned about dropping a glass if they
were to accidentally fire an open signal while moving. Autograsp assists in these cases by detecting inadvertent open
signals and re-closing the hand when a short un-intentional
open signal is detected, thereby improving the user’s control
over objects.
24
12 additional
customized my-gripsTM
Thumb
Rotated manually
Powered
rotating with
manual override
Compatible with
mobile app
Use of Quick Grips in
control app
Non-backdrivable digits
All digits of the i-limb ultra revolution and i-limb ultra are
non-backdrivable, which means that each digit is capable of
sustaining a load. This saves battery power since no power
is applied when the hand is static with no EMG signal. It also
means the digits should not be forced open manually.
ACTION
i-limb ultra revolution and
i-limb ultra
Push up from wheelchair,
full hand
83kg/183lbs
Push against one digit
22kg/48.5lbs
Carry heavy bag, full hand
90kg/198lbs
Carry heavy bag, one digit
32kg/71lbs
Carry heavy bag on thumb
36 kg/79lbs
Lateral Pinch
3.5 kg/7.7lbs*
Tip Pinch
2.1kg/4.6lbs*
Power Grip
13.9kg/30.6lbs*
*With activation of vari-grip pulsing technology by continuation
of the “close” muscle signal
Part number: MA01243: Issue No. 1, July 2014
3 of 46
2.2 Features Overview
The functionality of the i-limb hand enables it to mimic many of the basic grasp patterns of the natural human hand: spherical,
cylindrical, hook, pinch, tripod, and lateral (Figure 3). These grasp patterns or grips (called “Features” ) can be achieved in various
ways. The user can program Triggers, quick gripsTM, grip chipsTM, or, alternatively, the user can leverage the i-limb conformable grip
technology while operating in Standard Hand mode. With the latter approach, the user can manually position the thumb to the
desired position (oppositional or lateral), then simply close the hand to achieve the desired grasp.
Figure 3. Patterns of the natural hand
1- Triggers
Triggers are signals that tell the hand to change function. Each Trigger instructs the i-limb ultra revolution or i-limb ultra to activate
an automated Feature (e.g. tripod or lateral grip).
There are 4 potential Triggers a user can select:
•
`hold open’ (sustaining the open signal for a set period of time)
•
`double impulse’ (two quick open signals after the hand is fully open)
•
`triple impulse’ (three quick open signals after the hand is fully open)
•
`co-contraction’ (contracting both the open and close muscles simultaneously)
The number of Triggers programmed depends on each individual’s ability to control and activate the signals. More detailed information
about Triggers and appropriate training techniques is available in the prosthetic training section.
2- quick gripsTM
In both the mobile apps and desktop software, you will find “quick grips.” This is another way you can enter and exit features and
offers instant access to 24 different grip patterns . By clicking the “quick grip” button for the selected grip, your hand will enter that
mode. To exit, click the “quick grip” again.
3- grip chipsTM
“grip chips” enable users to easily activate “quick grips”, “my
grips”, or “favorites” for i-limb ultra revolution.
Using the my i-limb app, patients can easily program grip
chips with any grip pattern or gesture they choose and place
in a desired location. Simply holding an i-limb ultra revolution
device within close range to a grip chip will activate the
programmed feature.
Part number: MA01243: Issue No. 1, July 2014
4 of 46
Precision Pinch Grip Options
Precision pinch grip options are best for picking up small items between and the thumb and index finger. There are 4 options available
depending on how you want the other digits to perform while doing the pinch. The most popular is Thumb Precision Pinch Closed.
Feature
Picture Example
Description
Use
Middle, ring and little
fingers remain open while
the index finger and
thumb open and close
together to provide grip.
Allows for a wider space opening
to pinch larger objects. Positions
the other three fingers out of the
way to avoid interference with
tasks.
1. Returning cards or
money to wallet
2. Picking up napkins
3. Folding laundry
Task Examples
Middle, ring and little fingers remain open. Thumb
automatically moves to a
partially closed position. Only index finger
will move to provide grip
against the fixed thumb.
Accuracy is improved when picking up an object by allowing you
to place the thumb against the
object to be pinched. Only the
index finger moves to grasp the
object. Ideal for repetitive tasks.
1. Pick up pencil or slim,
long objects
2. Thread needle
3. Sort/Pick up medications
Middle, ring and little fingers remain closed. Both
index finger and thumb
open and close together
to provide grip.
Allows for a wider web space
opening to pinch larger objects.
Allows better visual access to
objects when the working surface
is not at eye level. Positions the
other three fingers so as not to
block the user’s view of the task.
1. Retrieve small object
from shelf over head
2. Pick up small object
from floor
Middle, ring and little
fingers remain closed.
Thumb automatically
moves to a partially closed
position. Only index finger will move to provide
grip against the fixed
thumb.
Can improve accuracy for picking
up an object by allowing you
to place the thumb against the
object to be pinched and only the
index finger moves to grasp the
object. Ideal for repetitive tasks.
1. Pick up and open sugar
packet from a coffee stand
2. Pick up coins
3. Alternative way to tie
shoes (also see “lateral
grip”)
Standard Precision
Pinch Open
Thumb Precision
Pinch Open
Standard Precision
Pinch Closed
Thumb Precision
Pinch Closed
Part number: MA01243: Issue No. 1, July 2014
5 of 46
Tripod Grip Options
Tripod Grip, also known as 3-Jaw Chuck, is achieved when the thumb opposes both the index and long fingers. Typically, Tripod Grip
is preferred over Precision Pinch when handling slightly larger objects for more stability. There are 4 options for the Tripod Grip that
are categorized the same as the Precision Pinch options on the previous page.
Feature
Picture Example
Description
Use
Ring and little fingers
remain open. Thumb,
index and middle fingers
actively open and close to
provide grip.
Allows for larger objects to be
grasped using the tripod pinch.
Can also improve positioning.
May also decrease compensation
at shoulder for tasks where closed
digits get in the way of the pinch.
1. Preparing food with
ring and little finger clear,
such as slicing cucumber
or carrot
2. Holding cell phone
(would manually rotate
thumb laterally based on
size of phone or setup
custom grip)
Ring and little fingers
remain open. Thumb
automatically moves to a
partially closed position.
Only index and middle
fingers will move to provide grip against the fixed
thumb.
For smaller motion, but increased
accuracy. Tripod grip allows for
greater stability with larger or
round objects in comparision
to Precision Pinch. May also
decrease elbow compensation
when seated.
1. Grab spices from
cupboard
2. Open bag of chips
Ring and little fingers
remain closed. Thumb,
index and middle fingers
actively open and close
together to provide grip.
Allows for a wider space opening
tio pinch larger objects. Tripod
grip allows greater stability for
larger or round objects in comparision to precision pinch.
1. Open bag of chips
2. Pull up socks
Ring and little fingers
automatically close and
switch off. Thumb automatically moves to a partially closed position. Only
index and middle fingers
will move to provide grip
against the fixed thumb.
Can improve stability and control
grasping larger objects. With
thumb in a static position, your
ability to align an object can
improve particularly on small
objects. Can also decrease elbow
compensation when seated.
1. Repetitive factory type
work moving pieces
2. Grasp pen for writing
3. Laundry
4. Pack bag
Standard 3 Jaw
Chuck (Tripod)
Open
Thumb 3 Jaw
Chuck (Tripod)
Open
Task Examples
Standard 3 Jaw
Chuck (Tripod)
Closed
Thumb 3 Jaw
Chuck (Tripod)
Closed
Note: Due to the stall out ability of each individual digit, both Precision Pinch and Tripod Grip can be achieved in the
Standard Hand Mode (i.e. no Features have been activated).
Part number: MA01243: Issue No. 1, July 2014
6 of 46
Additional Features
Feature
Picture Example
Description
Use
Task Examples
Thumb rotates to palmar adduction and the other four fingers
remain fully open. Only the thumb
moves open and closed.
For longer dressing period that
will require more than the 1.5
seconds of thumb park quick or
grasping light weight flat objects.
Can also use stalling out digits
to complete, putting pressure
against index to little and closing
thumb in to hand.
1. Put on jacket
2. Grasp flat objects,
such as a book or a tablet
computer or clipboard
3. Opening letters or
sorting paperwork.
Thumb rotates to palmar adduction and the other four digits
remain fully open. Only the thumb
moves open and closed for 1.5
seconds of run time. In contrast to
Thumb Park Continuous, this feature returns to the Standard Hand
Mode after the open signal is sent.
Dressing or putting on a coat. You
can achieve this position by using
the stall out capability of digits
against a table if you do not want
to program.
1. Put on jacket or shirt
Thumb automatically rotates into
lateral position and partially closes.
All four fingers fully close and
switch off. Only thumb will move.
Holding onto plate, papers, CD
or other flat objects. Improved
stability with use of the side of
the index finger.
See additional images on page
10.
1. Hold plate while serving food
2. Hold clipboard
3. Get card from ATM
5. Open ziplock bag
6. Tie Shoe Laces
7. Hold a utensil
Thumb automatically rotates into
lateral position and fully closes.
Thumb switches off. Middle, ring
and little fingers fully close and
switch off. Index finger remains
open and active
Used for pushing buttons, typing
on computer, or simply pointing.
Can be achieved with stall out.
1. Keyboarding (pressing
shift key, CTRL, ALT, DEL,
general typing)
2. Push Button for
elevator
All digits automatically move to
a user defined position with each
digit option as open or closed.
There are 2 programmable custom
gestures available in this feature.
Allows user to customize the
hand. Many positions can be
obtained using stall out if the user
does not have enough available
triggers to use this feature.
1. Boy scout salute
2. Sign Language gestures such as “I love you”
Digits move to user defined position with options for degree of
open or closed and option to keep
selected digits “active.”
Can be used to fully customize
for use of specific tool for work or
hobby. Multiple can be set up as
“favorites” on iPod.
1. Customize grip to
specific work or hobby
type tool
2. Supporting and operating a camera
Thumb Park
Continuous
Thumb Park
Quick
Lateral Grip
Index Point
Custom
Gesture
Custom Grip
Part number: MA01243: Issue No. 1, July 2014
7 of 46
Extra Features Available with the i-limb ultra revolution
The i-limb ultra revolution offers ten additional Features than the i-limb ultra, for a total of 24 pre-set Features.
Feature
Picture Example
Description
Use
Task Examples
Thumb and all four
fingers fully open. Only
thumb will rotate for 2.5
seconds of run time.
No flexion or extension of the digits
will occur, one signal will rotate
thumb laterally and the other will
rotate into the palm.
1. Used to position the
thumb when you do not
want to use the manual
override. Can ONLY be
used if the option to rotate
the thumb when exiting
the feature is turned off.
Thumb automatically
rotates laterally and
closes partially. All
fingers remain open. All
digits switch off.
For tasks where balancing an object
on the open hand is useful.
1. Stabilize a tray of food
2. Balance a Bowl
Thumb rotates
automatically to a semi
lateral position. All digits
are active in this feature.
Many handled type objects require
this cylindrical grip. You can also
use the manual override of the
thumb to position manually rather
than having to use this feature.
1. Broom Handle
2. Shovel or Rake
3. Hair Brush or Hair Dryer
Hand forms shape
appropriate for using a
computer mouse.
Note that multiple steps
are involved in this grip:
Step 1: Place the closed little finger
against the side of the mouse.
Step 2: Provide a close signal until
the thumb rests against the other
side of the mouse (the thumb must
detect pressure, so you may also
provide pressure with your other
hand if the thumb will not stop)
Step 3: The index digit will now
close with the signal to click the left
mouse button, relaxing signal will
re-open.
1. To left click, use signal to
close index digit
2. To right click, use motion
of the arm to put pressure
on the mouse from the
ring digit
Thumb automatically
rotates into semi lateral
position and partially
closes and switches off.
All fingers remain fully
open. When a close
signal is given the fingers
close, when this signal is
relaxed the fingers open.
Note that with this feature the
thumb moves to a slightly closed
position and only the digits will
move with the closed signal. As
soon as you relax the signals the
hand will automatically re-open.
1. Shaking hands
Rotate Thumb
on Exit
Open Palm
Cylindrical
Mouse
Handshake
Part number: MA01243: Issue No. 1, July 2014
8 of 46
Feature
Grasp
One Finger Trigger
Two Finger Trigger
Thumb Trigger
Picture Example
Description
Use
Task Examples
Hand adopts partially closed
position. When a close signal
is given the hand closes at full
speed. (no proportional control).
When the close signal is relaxed
the hand will fully open and
then reposition into its partially
closed starting position again.
For grasping objects where crushing
the object is not a concern. Note that
as soon as you stop giving a signal
the hand will open automatically and
reset to the slightly flexed position.
1. Sorting objects
2. Grasping large
soft objects such as
socks when packing
a suitcase
Thumb automatically rotates
into opposition and partially
closes. All fingers partially close.
When a close signal is given the
thumb, middle, ring and little
fingers close. Once they have
stalled around an object the
next close signal will operate the
index finger in squeeze mode
(when a close signal given index
will close, when signal relaxed
index will open).
Note this feature requires multiple
steps:
Step 1: Enter the feature using either
the trigger or “Quick grip”.
Step 2: Provide a close signal until the
thumb, middle, ring, and small digits
have fully closed around the object
being held.
Step 3: Providing a close signal will
close the index digit onto the trigger
and relaxing the signal will re-open
the digit.
1. Pulling trigger on a
small spray bottle
Thumb automatically rotates
into opposition and partially
closes. All fingers partially close.
When a close signal is given the
thumb, ring and little fingers
close. Once they have stalled
around an object the next close
signal will operate the index
and middle fingers in squeeze
mode (when a close signal is
given the index and middle will
close; when the signal is relaxed
the index and middle digits will
open).
Note this feature requires multiple
steps:
Step 1: Enter the feature using either
the trigger or “Quick grip”
Step 2: Provide a close signal until the
thumb, ring, and small digits have
fully closed around the object being
held
Step 3: Providing a close signal will
close the index digit onto the trigger
and relaxing the signal will re-open
the index and middle digits
1. Pulling trigger on
spray bottle
Thumb automatically rotates to
a semi lateral position and partially closes. All fingers partially
close. When a close signal is
given, fingers will close around
the object, once fingers are
stalled the thumb will operate
in squeeze mode (when a close
signal given thumb will close,
when signal relaxed thumb will
open).
Note this feature requires multiple
steps:
Step 1: Enter the feature using either
the trigger or “Quick grip”.
Step 2: Provide a close signal until the
index, middle, ring, and small digits
have fully closed around the object
being held.
Step 3: Providing a close signal will
close the thumb onto the trigger and
relaxing the signal will re-open the
thumb.
1. Pressing down on
a small aerosol can
button
Hand forms the proper
shape for donning and
doffing a cover.
When changing out covers for the
hand to avoid too much pressure
against the thumb.
1. Putting on covers
2. Taking off covers
Donning or
Doffing a cover
Part number: MA01243: Issue No. 1, July 2014
9 of 46
More Information on the Lateral Grip
Additional Images for Lateral Grip Uses:
Also known as ‘key grip’, the Lateral grip occurs when the
thumb closes down on the side of the index finger. The Lateral
grip allows the user to grasp flat shaped items such as a
plate, or key. It enables the individual to comfortably hold a
plate or to manipulate credit cards when making a payment
transaction. Some other examples of tasks in which lateral grip
can be useful are dressing and writing. This grip pattern can
significantly reduce the need for compensatory techniques
with many tasks. Users also find that the flat surface area and
increased pinch force in this grip pattern assists with opening
packages and getting a firmer grip on objects.
Rather than programming this grip, many unilaterally involved
individuals will simply rotate the thumb laterally and place the
object directly into the hand. However, the Lateral grip feature
allows the four digits from index to small to fully close and
switch off, a valuable capability for performing many tasks (i.e.
picking a plate off a table or opening a drawer). In many of the
tasks where Lateral grip is useful, the object sometimes blocks
the user’s view of the digits. By making the digits inactive, one
can minimize this challenge.
2.3 Operating in Standard Hand Mode
Although there are many benefits that come from using the available grip modes in the i-limb hand, it is important to note that
by using the Standard hand mode with compliant (or conformable) grasp capability, the hand can achieve many common grasp
patterns without any additional programming. These include:
Power Grip
Power grip occurs when the thumb and four fingers close to
create a gross grasp. The i-limb is able to adapt and conform
to the unique composition, shape and size of an object. For
example, proportional control technology allows for the slow
movement of the digits to lightly grasp around an object such
as another person’s hand. Vari-grip allows the user to adjust the
grip strength depending on the item and task at hand. This is
helpful when performing more difficult tasks such as tying one’s
shoe or opening a jar. This power grasp can also be utilized in
activities such as holding tools.
Spherical Grasp
The Spherical grasp is designed to be a compliant grip that will
stabilize the object without exerting a damaging amount of
force. Examples of this include holding a ball or stabilizing fruits/
vegetables when peeling them.
Part number: MA01243: Issue No. 1, July 2014
10 of 46
Hook Grasp
Hook grasp is utilized for carrying heavier loads such as a briefcase or light suitcase. All four digits
are used to create a strong hook position. Clinicians should train the user to position the weight
of the object as close to the knuckle block and palm as possible and to fully close around the
object to prevent unnecessary torque on the digits.
When lifting objects, using a palms up to the ceiling method ensures the object stays balanced
over the strongest point on the hand. This will help prolong the life of the prosthesis. Refer to
“Usage Do’s and Don’ts” in section 5.3 of the Appendix for more precautionary measures.
Natural Hand Position
The hand will return to a natural hand position after the hand has been fully opened and there
are no additional input signals for a predetermined amount of time (between 2 to 30 seconds).
The hand must be fully opened for Natural Hand to be activated. This ensures the hand does not
accidentally go into the natural hand position when the user is holding an object. This feature
can be programmed “on” or “off” and the position of the natural hand can be adjusted to the user’s
preference.
Note that natural hand position will only be activated when in standard hand operation and will
not be activated when any of the features are in use.
Rotate Thumb On Exit
Rotate thumb on exit programs the thumb to automatically rotate to the palmar position every
time the user exits a different grip pattern.
vari-grip and auto-grasp
vari-grip and auto-grasp come as standard on i-limb ultra revolution and i-limb ultra. Both can
be turned off or on depending on user preference and functional tasks. For example, a user may
decide to turn vari-grip on when tying their shoes or opening a jar of pickles.
Part number: MA01243: Issue No. 1, July 2014
11 of 46
2.4 Wrist Options
The i-limb ultra revolution and the i-limb ultra are compatible with several wrist options. Wrist options add weight and length to
the overall prosthesis and the prosthetist often determines if they are necessary /appropriate for the user. The standard i-limb
hands come with the Quick Wrist Disconnect (QWD), a wrist that the user can manually rotate to achieve supination and pronation.
Another option is the Wrist Disarticulation (WD), which is fixed and provides no rotation. The WD is fabricated directly into the
socket frame, then attached to the i-limb. The prosthetist may choose to add an electric wrist rotator to help with supination/
pronation particularly if the patient is involved bilaterally. It is important that the therapist understands how the wrist componentry
functions to provide the best support possible to the user.
Other wrist options include Flex Wrist and Multi-flex Wrist:
Flex Wrist
The flex wrist option offers a locking wrist that can be positioned
in three wrist positions: 30° dorsiflexion, 0° neutral and 30°
palmar flexion. The lock button is easy to control and may be
particularly helpful for individuals involved bilaterally for tasks
at midline.
For more information, see the document library on the
Touch Bionics website: www.touchbionics.com/downloads/
document-library.
Multi-flex Wrist
A multi-flex wrist allows for passive flexion, extension, radial and
ulnar deviation and can compensate for loads placed on the hand.
The lock can be used to lock the wrist up to 30° dorsiflexion, 0°
neutral and 30° palmar flexion. However, many users keep the
wrist unlocked for a more natural feel.
If the lock is used, it is important to note the wrist is spring-loaded
and the user must release the spring tension when un-locking by
pushing the hand in the direction it was locked. The wrist cannot
be locked in ulnar or radial deviation.
For more information, see the document library on the Touch
Bionics website: www.touchbionics.com/downloads/documentlibrary.
Part number: MA01243: Issue No. 1, July 2014
12 of 46
3.0 Training Protocol
3.1 Pre-Prosthetic Training Phase
Below is an overview of the phases and key elements for pre-prosthetic training.
3.1.1 Acute Pre-Prosthetic Training Phase
Evaluation
In the early acute phase of pre-prosthetic training, the client’s therapist should complete a standard functional and orthopedic-based
evaluation. Your evaluation should address functional difficulties in activities of daily living (ADL), instrumental activities of daily living
(IADL), work, and leisure tasks. The therapist should also assess wound healing, edema, sensation, pain, body symmetry, and the range
of motion and strength of all remaining joints. If the involved side was the dominant one, the therapist should also assess sound-side
prehension and dexterity. Subjectively, it is also important to understand the client’s previous level of function, individual goals, home
environment and whether or not the client has access to psychosocial support. Depending on what this assessment uncovers, the
therapist may need to recommend home modifications or adaptive equipment to improve the client’s independence. Also, the loss
of a limb has been equated psychologically with the loss of a sibling; therefore a strong support system is essential and additional
psychosocial intervention may be necessary (Forducey, Ruwe, & Kaur, 2006).
ADL Training
When the client’s limb loss or deficiency has affected his or her feeding, oral hygiene, and toilet hygiene, these are typically the first
priority (Smurr, et al., 2008). Additional ADLs can be prioritized based on the client’s goals and functional level. When possible, continue
to incorporate the affected side during training. This prevents individuals from becoming too reliant on their sound side and helps
them think about tasks in a bilateral manner.
3.1.2 Subacute Pre-Prosthetic Training Phase
In the subacute pre-prosthetic training phase, the therapist should continue many of the interventions begun in the acute phase such
as body symmetry, ROM, strength, desensitization and edema management. During this phase, many of these interventions can be
transitioned to home therapy programs to make room for additional in person pre-prosthetic training with the therapist.
Progression of ADL Training: In this phase, ADL training and the use of adaptive equipment should progress to allow for more
independence with ADL and IADL tasks. These tasks should be determined according to client preference.
Myosite Testing and Training
In order to effectively operate a myoelectric controlled prosthesis, the clinician must first identify the appropriate myosites on the
individual’s residual limb. Conducting myosite testing early on in the process has been shown to greatly benefit training and improve
outcomes overall. For this reason, military facilities typically conduct myosite testing and training within three weeks of the amputation
(Smurr et al., 2008).
Myotesting helps to determine the sites that will provide the most strength and control for operating the prosthesis effectively. The
biofeedback from myotesting helps to further strengthen and build endurance in these identified sites, providing optimal results for
the user.
Part number: MA01243: Issue No. 1, July 2014
13 of 46
The virtu-limb, Touch Bionics’ wireless simulation and training tool for myolectric upper limb prostheses, assists clinicians with the
myosite testing and training process. The virtu-limb can be used with i-limb products or several other myoelectric devices, and is
compatible with remote electrodes, compact electrodes and FSR touchpads. By placing electrodes on top of a patient’s myosites, the
virtu-limb can measure the myoelectric signals to determine the best muscle sites for the prosthesis. The virtu-limb also assists with
training patients on how to control their muscle signals and how to use the myoelectric device’s features. The practitioner has the
option to use either an on-screen representation of an i-limb ultra revolution, or connect the myoelectric terminal device to the virtulimb to create a simulated environment for training purposes (see figure 4). The virtu-limb provides the added benefit of helping to
establish realistic user expectations around the prosthesis’ capabilities.
Figure 4
Top Image: i-limb ultra connected to
the virtu-limb docking station. Close
signal closes the i-limb hand.
Bottom Image: Computer screen
simulation. Open signal is reflected on
the screen.
Part number: MA01243: Issue No. 1, July 2014
14 of 46
Instructions for Myosite Testing
A detailed overview of myosite testing is provided below. A team approach in this phase can improve user success (Smurr, et al.,
2008). Typically the prosthetist selects ideal sites for the therapist to train with during sessions. As training continues, the therapist
may identify issues isolating muscle contractions, relaxing the muscles in certain positions, or challenges with overall control. By
communicating this information back to the prosthetist prior to the final fitting, adjustments can be made to improve ease of use for
the individual being fit.
Step 1: Prepare the Client
1.
2.
3.
4.
Once the prosthetist has identified the myosite you would like to test/train, lightly clean the skin surface with an isopropyl
alcohol swab. This will remove any oils that could interfere with testing.
Palpate antagonistic muscle groups for two-site control, or a single usable muscle group for single-site control. (See common
muscle sites below.) Once you have identified the middle of the muscle belly, make a small mark on the area with an indelible pencil or a permanent
marker.
Moisten the skin with a wet paper towel to improve electrode conductivity.
Common myosites used to control the i-limb hand include:
Transhumeral Level
•
Bicep and tricep muscles
Transradial Level:
•
Wrist flexors
•
Wrist Extensors
Step 2: Begin Myotesting
1.
2.
3.
Begin by rotating the dial on the back of the electrode to
set the electrode gain between 4 and 5. Place the electrode
over one of the marked locations established in step
1. Make sure the electrode runs longitudinally with the
muscle belly.
If using the virtu-limb, establish a wireless connection
between the virtu-limb and the biosim software
by connecting the provided Bluetooth dongle (or
“Handshake”) to the USB port on your computer and
following the three easy steps on the biosim home page.
Alternatively you may connect to the biosim app on
various mobile devices. Once you have successfully connected, select the “myotesting” link in the biosim program home page. This takes
you to the analog gauges screen. Instruct your client to
contract his or her muscles, aiming to produce open and
close signals between 25 and 75 each. If the individual
is struggling, you can coach them to contract the same
muscle(s) on the sound side (if applicable) in order to help
them identify what the movement should feel like. The
therapist can further assist by applying manual resistance
to the contralateral side while mirroring the desired
motion.
Part number: MA01243: Issue No. 1, July 2014
4. Once the individual is able to establish a strong enough
signal, ensure you have established the optimal site by
moving the electrode proximal to the initial site while
instructing the patient to continue to contract and relax
the muscle as you move the electrode to new locations.
Once the signal strength begins to decrease, mark a line
along the proximal edge of the electrode. 5. Next, move the electrode distally from the initial site and,
when the signal begins to decrease, mark the client’s skin
along the distal border of the electrode.
15 of 46
6.
7.
Repeat these steps in the radial and ulnar directions from your initial mark so you end up with a border around the proposed
electrode site. The ideal electrode site should now be in the center of this outlined area. If multiple electrode sites are to be used, repeat 1 through 6 for these locations.
Step 3: Verify Isolated Control
1.
2.
3.
4.
Now that you have established the proper electrode placement, you will need to ensure the client can independently isolate
each muscle contraction to establish good separation between the open and close signals. Open the real-time graph tab at the bottom of the myo-testing page. This provides excellent biofeedback for isolated control
training. To begin, instruct your client to contract the “open” muscle group, relax, and then contract the “close” muscle group.
The red lines that show up on the graph upon contraction refer to the open signals and the blue lines refer to the close signals.
While your client repeats these muscle contractions, verify that the opposing muscle group remains relaxed or, at least does not
overtake the active muscle group.
Ensure that the electrodes are in the ideal locations and are not picking up interference from other muscle groups or from
general motion at remaining joints.
The prosthetist can make gain adjustments to the electrodes to provide appropriate separation of signals, but at least 40%
signal strength should be obtainable from each electrode site. Ideal gain settings are between 3 and 5 on the dial on the back
of the electrode. Higher gains settings may indicate too weak of a muscle. A higher than desired gain setting will often decrease
as the client’s muscle and control are strengthened and refined from the training process.
Coach your client to relax all muscle signals while moving in various planes of motion to ensure muscle signals stay at a minimal
level (less than 0.5). Also ensure that the client is able to activate the muscle groups across various planes of motion by creating
a range of signal strengths in various positions.
Optimal Graph: Red (open signal) and blue (close signal) stay
isolated with one always stronger than the other
To the right is a graph demonstrating poor control. When the
red (open signal) and blue (close signal) mix, the hand will
jump back and forth, causing frustration to the user.
Part number: MA01243: Issue No. 1, July 2014
16 of 46
Once myosites have been selected, the therapist can begin
training with either games or by using the on-screen virtual
representation of the i-limb ultra revolution. These training
games are found by selecting the “training” link on the home
page of biosim.
The bottom right corner of the virtual hand screen allows the
therapist to watch the strength of each muscle contraction while
the client works to open and close the virtual hand. The client
can also practice triggers to engage the various features of the
hand such as the tripod pinch and precision pinch modes. The
virtual hand can be rotated around on the screen to the client’s
preference by clicking and dragging with the mouse.
Games can work on signal strength, signal separation, or any of
the triggers required to activate the hand’s features.
Part number: MA01243: Issue No. 1, July 2014
17 of 46
3.2 Prosthetic Training Phase
Basic Training with the Prosthesis
Orientation to the hand opening and closing is important to review and reinforce. If adequate myoelectric testing and training
has been accomplished, this should be an easy exercise. It may also be quite meaningful for the patient to view his or her new
hand responding to this thought of open/close. Practice positioning of the thumb is also important to discuss and practice prior to
engagement in tasks.
Achieving Independence in Donning and Doffing the Prosthesis
When training the patient to don and doff the prosthesis on their own, it is important to establish independence as early as possible.
The therapist should carefully review donning and doffing with the prosthetist before training the client. Donning a transradial
socket is typically achieved by push-in, pull sock or silicone liner-assisted methods (Figure 5). The therapist and client should be
familiar with the method of choice and practice it during each visit.
Figure 5
Silicone Liner Method
Push- in Method
Pull-in Sock Method
Understanding Device Componentry
If there are additional components to the terminal device, the therapist should review each one to ensure the individual
understands how to use it. For example, with the flex wrist, you can show your client how to flex or extend the wrist by pressing
the button on the volar aspect of the wrist using either the contralateral hand or the edge of a table. The wrist will move into
flexion or extension with gravity or by manually positioning with the contralateral hand. The therapist should also discuss the
benefits of each position. For example, wrist flexion helps with tasks completed at midline while wrist extension can help to
decrease compensation at the shoulder for certain tasks.
Part number: MA01243: Issue No. 1, July 2014
18 of 46
Orientation to Prosthetic Wearing Schedule
It is extremely important to review a prosthesis wearing schedule early in the training process, ideally within the first few visits. This is
often prescribed by the prosthetist. By the end of the first week, the individual may be wearing his/her prosthesis all day, barring any
complications. It is also important to keep in mind that muscle endurance will build up over time, so frequent rest breaks will help
avoid the frustration and loss of control often associated with muscle fatigue. Educate the patient to be aware of the signs of fatigue
so they can start to become responsible for their own wearing schedule.
Care of the Prosthesis
Since at this point, your client will be taking his/her prosthesis home each day, it is a good time to address “Warnings and Precautions”
and “Charging the Battery” , which can be found in the i-limb ultra revolution User Manual within the website’s document library:
www.touchbionics.com/downloads/document-library. “Warnings and Precautions” is also available in the Appendix.
Care of the prosthesis should be followed according to the prosthetist’s directions. Oftentimes this is accomplished with a dish soap
and damp towel. Other times, the prosthetist might prefer rubbing alcohol to help prevent bacteria buildup on the inside of the
socket.
Evaluation of Progress with Prosthesis
The therapist is often re-evaluating progress in ADL/IADL function as well as ROM, strength, and other initially evaluated body
functions and structures. It is also helpful at this phase to evaluate baseline data on prosthesis control. The Patient Care Pathway is
a unique platform designed by Touch Bionics to measure the progress of patients, through validated outcome measures. Pre fitting
scores are established from the Disabilities of the Arm, Shoulder, and Hand questionnaire (DASH) and the Trinity Amputation and
Prosthesis Experience Scales – Revised (TAPES-R). Refer to the Patient Care Pathway literature on www.touchbionics.com for more
information and guidance for use.
The biosim software can also assist in tracking usage data and watching muscle signals during functional training. More information
on biosim can be found in section 4 of this manual.
Education on Pre-positioning the Prosthesis for Function
Appropriately positioning the prosthesis to achieve different functional tasks is key to avoiding compensatory movements at
remaining joints. Thus, the individual should be taught to appropriately supinate or pronate the hand based on the task.
Part number: MA01243: Issue No. 1, July 2014
19 of 46
Orientation to Grasp and Release Activities
1) Objects of various sizes including cones and blocks can be used to orient the user to basic grasp and release patterns. A Form Board
is another useful training tool during the preparatory pre-ADL task training.
By placing a variety size and shaped objects in corresponding size and shaped spaces on the form board, the client is able to practice
and perfect pre-positioning and control of the hand. While going through this exercise, pay special attention to any awkward or
compensatory body motions as the client approaches or releases an object. These movements include hiking up the shoulders,
winging out the elbow, awkward neck positions, excessive internal/external shoulder rotation, and trunk compensation. If you notice
any awkward or compensatory movements, remind your patient not to adjust his/her body when approaching a task. By utilizing
a variety of objects, the individual will learn how to pre-position the thumb to achieve different grips, eventually mastering lateral,
pinch, tripod and spherical grasps. This will also help the patient to understand why certain grips are appropriate for different objects,
and allow them to choose the most functional grip for the task. Teaching the individual how to transition between the various grip
patterns prior to the ADL training makes these movements more natural once the time for ADL training has arrived.
The following items can be incorporated into the basic grasp/release activity:
•
•
•
•
•
Blocks
Balls
Dice
Triangular piece of foam
Styrofoam and/or paper cup
Part number: MA01243: Issue No. 1, July 2014
•
•
•
•
•
Stones or marbles
Soda can, bottle or cones
Coins
Pencil or pen
Paper clip/safety pin
20 of 46
•
•
•
•
•
•
Nail/Nut/Bolt
Fork/spoon
Small candies
Checkers
Keys
Credit card or playing cards
2) Grasp and Release in Various Planes
After mastering grasp and release at midline, you can begin mixing things up, placing the objects at various heights and angles.
Increasing the variability of training tasks has been shown to allow improved functional outcomes and greater improve application
of skills to novel functional tasks (Weeks et al, 2003). Learning to relax the muscles can sometimes prove more challenging for the
client than grasping and releasing. It is natural for the client to feel he/she must sustain the close signal in order to maintain a firm
hold on an object. However, the i-limb ultra revolution is built so that once the hand has grasped an object, the wearer can relax the
muscle without having to worry about dropping it. This ensures the wearer does not exhaust his or her muscles in the process. The
weight of the prosthesis and movement of the residual limb can also make it more difficult to maintain a relaxed signal. Practicing
grasping and releasing objects at various heights will help to ensure the wearer can activate and relax muscle signals across all
planes of motion and with different loads placed onto the prosthesis.
The therapist may begin incorporating purposeful functional activities at this time; however, perfection and skill of how to approach,
position, and release an object are of utmost importance, and should be the focus during this phase of training. After mastering
basic grasp and release patterns, you can begin shifting your focus to more unilateral and bilateral grasping tasks. By appropriately
grading activities, the therapist can provide a “just right” challenge for the client. The therapist should continue to provide verbal
cueing to avoid compensatory motions and to pre-position appropriately for the task.
3) Stacking Plastic Cups:
Another excellent activity for reinforcing grasp and release is to have your client stack large plastic or Styrofoam drinking cups
into a pyramid formation. This task helps to train proportional control as it forces the user to give small, concise muscle signals
to avoid crushing the cups. Mastering this task will result in the individual’s ability to hold a cup of coffee or any other beverage
without crushing the cup.
4) Training with Games:
Jenga (Hasbro, Inc.), Connect 4 (Hasbro, Inc.), Dominoes, and Mancala--Games can be a fun and challenging way to practice
incorporating multiple grasp patterns throughout a task. The therapist should be confident that the client is ready for this
challenge to avoid unnecessary frustration.
Unilateral ADL Task Training
To minimize frustration and enhance learning, task-based activities should begin only when the client is completely familiar
with the control site operation and can control grasp and release.
Unilateral task training includes ADL and IADL grasping tasks. For individuals with unilateral involvement, the prosthesis will
act as a functional assist to the sound hand for these types of tasks. For example, when pouring a drink the individual will most
likely use the prosthesis to stabilize the cup while pouring with the sound side. It may be helpful to practice both ways so the
individual can practice control and also determine the manner in which they find the most benefit of the prosthesis. For those
individuals with bilateral involvement, control should be mastered on each side independently before progressing to having
one hand stabilize while the other side engages with the task.
Again, attention should be given to the client’s posture and positioning to ensure that the task is performed in a natural
manner. Each of these tasks reinforces the different grasping possibilities of the i-limb ultra revolution and i-limb ultra. There
are numerous other tasks as well, and those listed are simply examples.
Part number: MA01243: Issue No. 1, July 2014
21 of 46
Unilateral Tasks performed while sitting may include:
•
•
•
•
•
•
•
•
•
•
•
•
Bringing a glass, bottle, or can to mouth (Note: Factors
such as socket design and residual limb length might
limit elbow movement, making this task more difficult for
some to achieve).
Writing with a pen or pencil (or stabilizing the paper)
Picking up Skittles, M&Ms, or grapes to eat or put in a
bowl
Grasping a fork, spoon, or knife
Using a salt or pepper shaker
Using a mouse or keyboard
Putting on a sock
Picking up a coin
Holding a cell phone
Eating potato chips or crackers
Playing cards using a card holder
Turning pages of a book or newspaper
Unilateral Tasks performed while standing may include:
•
•
•
•
Carrying a glass, bottle or can
Walking while carrying a bag or briefcase
Using a key in a lock or turning a doorknob
Retrieving items from shelf or refrigerator
Part number: MA01243: Issue No. 1, July 2014
22 of 46
Bilateral ADL Task Training
For the unilateral amputee, the bilateral ADL task training reinforces the real value of the i-limb ultra revolution hand as a
“functional assist” in bilateral activities. The selection of activities will be based, in part, on the client’s preference, depending
on his or her interests. A variety of activities should be used to expose the client to a wide range of grasping patterns. Creative
thinking and planning, on the part of both the therapist and patient, can make this a fun and engaging part of the therapy
process.
Bilateral Tasks performed while sitting may include paper and pencil tasks:
1.
2.
3.
4.
5.
Use a ruler to draw a 4 x 4 square; cut out the square using scissors
Wrap a gift box (or paperback book) use scissors, scotch tape, and tie a bow
Fold a letter in an envelope, seal the envelope, open the envelope, and remove the letter
Remove an ink cap from a pen or marker
Use a paper clip to secure papers together
1
2
3
4
5
Part number: MA01243: Issue No. 1, July 2014
23 of 46
Home activities
•
•
•
•
•
•
•
•
•
•
•
Cut a length of thread with scissors;
thread needle
Use a cell phone and make a call
Open a variety of bottles and containers
Handle money (bills in wallet, coins in
purse)
Use knife and fork to cut food
Butter a slice of bread
Playing cards
Sew button
Strike match
Serve food onto a plate buffet style
Tie up garbage bag
Bathroom activities
•
•
•
•
•
•
•
Shaving
Brushing teeth (putting toothpaste
on toothbrush)
Fastening and unfastening
clothing
Toileting
Putting on deodorant
Styling hair
Cutting Nails
Dressing activities
•
•
•
•
•
•
•
•
•
Put on shirt
Fasten buttons
Put on trousers and belt
Fasten pants, pull up zipper
Put on shoes
Tie shoe laces
Put on glasses
Pull on socks
Put on jacket and zip or button
Kitchen activities
•
•
•
•
•
•
•
Cut fruit or vegetable on a cutting
board
Meal preparation
Open milk/juice container
Pour liquid from pitcher into
different sized glasses/bowls
Open a bag of chips or zip-lock bag
Open jar
Eat banana
Part number: MA01243: Issue No. 1, July 2014
24 of 46
Household maintenance activities
•
•
•
•
•
•
•
Iron clothes
Sweep floor with broom
Use dust pan and brush
Remove file from drawer, open file, remove paper, and
replace file in drawer
Replace book on shelf
Fold Laundry
Make bed
Advanced ADL Task Training
The Advanced ADL task training phase is the final stage of
training and focuses on helping the client to achieve their
personal, leisure, recreational, and/or vocational goals.
Community re-integration training is also common in this
phase. The personalized nature of this phase makes it
important to focus these sessions on the specific interests of
the client, whenever possible.
Activities might include:
•
Preparing a full meal
•
Using light tools and completing a small and simple
woodworking project
•
Simple repairs or home “fix-it” projects
•
Grocery shopping
•
Visiting a mall/shopping/negotiating a food court
•
Visiting a local home store to test out various tools
TRAINING TIP: When performing these tasks the user may find
the need to activate ‘vari-grip’ to improve performance. When
utilizing ‘vari-grip’, if the user has any difficulty, the therapist
should use the biosim graph of myosite signals to provide
feedback. The closing signal must be maintained above 1 on
the myo-testing graph for a preset amount of time (default =
500ms) before the vari-grip will activate.
Discharge from Therapy
The therapist can begin to lessen the frequency and intensity of training once the client has mastered proper use of the prosthesis
and has begun to integrate the prosthesis into their daily life. At this point, you can consider taking a month hiatus from training,
asking your client to continue to use the prosthesis daily and schedule a 30 day follow up appointment to ensure no new challenges
have arisen. If at the follow up, the user is able to continue adapting tasks and using the prosthesis appropriately then it may be
time to discharge them from therapy.
When discharging a client from therapy, make sure to remind your client that he or she should continue to follow up with
their prosthetist with any concerns. Also, consider any additional services your client might benefit from such as Vocational
Rehabilitation or Driver’s Rehabilitation. Use this final visit to answer any outstanding questions for your client such as charging
the battery, troubleshooting problems, and safety/efficiency guidelines for use. For more information about these subjects, please
refer to the i-limb ultra revolution User Manual under the document library of our website: www.touchbionics.com/downloads/
document-library.
Part number: MA01243: Issue No. 1, July 2014
25 of 46
4.0 biosim Overview for Therapists
4.1 biosim Overview
biosim is the software for programming the set up and personalization of the i-limb ultra revolution and i-limb ultra as well as
the control software for the virtu-limb. The i-limb ultra revolution and the i-limb ultra are fitted with a Bluetooth® receiver
enabling them to work with biosim. biosim-pro is the clinician’s
version of biosim and biosim-i is the version designed for patient
users. biosim makes it possible to make changes to the functionality of the hand. biosim-i, the simplified patient user version of
the software, provides access to training and games features
along with some basic changes to settings.
The biosim software, working through the Bluetooth wireless
connection, provides access to a range of control options, training features, real time display of impulses, battery status and
health check.
Occasionally updates to the biosim software will be provided.
An automated notification will advise you when this is needed.
Follow the steps as advised in the notification.
4.2 Connecting to biosim
The biosim software program must be downloaded from the
Touch Bionics website at: http://www.touchbionics.com/downloads/biosim. After downloading the software, load biosim by
clicking on the biosim icon (fig. 6) which should be clearly visible
on the biosim home screen. The biosim Handshake device (fig. 7)
must also be inserted into a USB port to allow the Bluetooth signal to be received by the i-limb prosthetic device. The Handshake
Bluetooth receiver will pick up signals within a 10 meter range.
The opening welcome screen will load. The language can now
be changed from the default English to either German, Spanish
French or Italian. This is done by clicking on the language indicator at the bottom right hand side of the screen and scrolling to the
required language. The first numerical icon “insert handshake” request will flash. On insertion of the handshake (biosim device) the
icon will be constantly lit, the “handshake installed and ready” box
will then self-tick. The second icon will now be constantly lit and
the third icon “Connecting to device” will flash. The tab marked
“connect” must now clicked for the connection to be made, this
will take approximately 15 seconds.
If there is more than one i-limb device within range of the Bluetooth receiver then a box will appear listing all devices by serial
number. The correct i-limb device can then be selected from the
list. The hand serial number is located at the wrist portion of the
hand at the base of the thumb.
Part number: MA01243: Issue No. 1, July 2014
26 of 46
Figure. 6
Figure. 7
4.3 Navigating biosim
The areas of biosim that are important for therapists to know
about are listed below. A more comprehensive overview of biosim
can be found in the i-limb ultra revolution Clinician’s Manual at
www.touchbionics.com/documents/document-library.
The “You’re now connected” screen will now be showing with eight
options as illustrated, this is the homepage and can be accessed at
any time from subsequent pages.
Myotesting icon provides a quick and easy myosite test along with
a more detailed analysis screen. This is excellent for providing
biofeedback during therapy sessions.
Control strategy details the choice and information around the
range of control options as well the logging of user information.
This is mostly used by the prosthetist to set up the hand.
Features allows the set-up of the i-limb ultra revolution by linking
triggers with grip patterns and gestures. The therapist might find
it beneficial to explore different feature options in therapy and
communicate needs and/or changes with the prosthetist.
Training provides access to the training suite and a selection of
games to improve overall hand control. These may be used in the
pre-prosthetic training phase or if the individual is struggling with
control.
Hand health check icon provides a quick and easy diagnostic
check of the hand.
Usage icon provides access to a tally of individual movements
with additional analysis. This may be helpful to review to see how
much the individual is using the hand outside of therapy.
Exit icon draws the session to a close, exiting the program.
Don or Doff icon positions the i-limb ultra revolution for putting
on or taking off a cover.
Don or Doff
Part number: MA01243: Issue No. 1, July 2014
27 of 46
4.3.1 Myo-testing
The details of myo-testing can be found in the
Pre-Prosthetic training section. In the Prosthetic
training phase, the real -time graph is beneficial
for providing biofeedback during functional
training.
The Real-time graph screen plots a graph of impulses in realtime, with open impulses in red and closed impulses in blue.
Gain and Threshold levels are set by the prosthetist.
Training mode option enables training with specific triggers.
The graph below shows good separation of inputs with the
opposing channel remaining below the threshold level.
Ideal signals are between 1.5 and 2.5 in order to obtain full
speed of the hand.
Part number: MA01243: Issue No. 1, July 2014
Start/stop
graph
Save graph
Rewind History
28 of 46
View Saved
Graph
Zoom in
Clear graph
Zoom Out
The graph to the right shows poor signal separation with both
signals being activated together.
Training Tip for better signal separation:
1. Start by having your client rest his or her prosthesis on the
table for support.
2. Mirror motions with contralateral side (if applicable).
3. Provide resistance to the contralateral side motion for
additional feedback.
4. Try different ways to activate the muscles such as having
your client extend wrist and fingers rather than just the wrist or
relaxing the fingers and just moving the wrist.
4.3.2 Features
Click on the features icon to enter the features
suite. The ‘Features’ tab allows for the selection
of what features (grip patterns of the hand) the
user has programmed and what trigger (the
signal used to change modes) the client will
use to activate that feature. Typically for a new
user, only one feature will be programmed
until that is mastered upon which point, additional features will
be added.
When training the user, it is helpful to set up the feature and
trigger(s) and then return to the myo-testing tab to observe
signals using the “training modes”. The therapist should ensure
the user can enter and exit the feature and that they do not
accidentally enter the feature during normal motion. If training
doesn’t improve function, the therapist should consult with the
prosthetist so that he or she can make trigger adjustments.
Linking Triggers with Features
In order to link a trigger with a feature simply click on to the
desired feature, the feature will now be highlighted in Touch
Bionics lime green. Select and click the desired trigger which has
been selected to link with the highlighted feature. Both feature
and trigger should now be highlighted and the descriptive label
will now appear. The illustration indicates the Standard Precision
Pinch Open feature linked to the precision pinch open feature.
Part number: MA01243: Issue No. 1, July 2014
29 of 46
4.3.3 Triggers
A trigger is the signal sensed by the electrode. Four potential
triggers are available, Hold open, Co-contraction, Double
impulse and Triple impulse.
1
Hold open (a prolonged open signal), this is preset to 2,000ms
(2 seconds) and can be customized from 2,000 to 5,000ms.
The graph shows a good hold open trigger, the signal strength
is well above 1.0V and the signal duration is around 3 seconds.
The user should be able to maintain a strong prolonged signal
to successfully use this trigger.
2
Co-contraction is the creation of quick simultaneous open and closed signals. Co-contraction may be customized if
a patient has difficulty with activation within the default time.
The therapist should work to have the individual fire both muscles strong (above 1 on the graph) and quickly.
Training strategies include having the user think about making a tight fist, flicking water off his or her fingers, or making a “hang ten” gesture.
If the individual was struggling with signal isolation, this
trigger should be avoided until they master control.
3
Double impulse (two quick uninterrupted open signals) the
impulse duration is the period of time that the impulse is above
the threshold. It is preset at 300ms and can be customized
from 30 to 3,000ms. The impulse period, or period within
which the impulse must occur to be recognized, is preset at
1,000ms and can be customized from 500 to 3,000ms.
Additionally you may adjust the threshold used to detect
an impulse. This is beneficial to weed out inadvertent open
signals that may be detected as impulses. If your patient is
reporting accidentally jumping into the feature associated
with an impulse trigger, consider raising this threshold after
consulting with the prosthetist.
Part number: MA01243: Issue No. 1, July 2014
30 of 46
Threshold level
The graph to the right shows an optimal double impulse. Both
impulses are of sufficient strength to break the threshold, the
first impulse drops below the threshold to allow recognition
of the second impluse. Both impulses are activated within the
preset impulse period.
The hand must first be fully opened before impulsing. the
therapist should train the client to hold open for half a second
before impulsing.
The therapist can begin by training quick open signals. Users
will often fire the close signal when trying to relax quickly. The
therapist should encourage “open”, “relax”, “open”, “relax.”
4
Triple impulse (three quick uninterrupted open signals)
settings are the same as with the Double impulse trigger
The graph shows an optimal triple impulse. In a similar manner to
the double impulse, the three impulses are of sufficient strength to
break the threshold. The first and second impulses drop below the
threshold to allow recognition of subsequent impulses. All three
impulses are activated within the preset impulse period (impulse
period is not indicated on the graph).
The i-limb hand must be fully opened prior to performing the
impulses. Using the “training mode” on the myo-testing graph
provides feedback on when the hand is fully open and ready for
impulses.
Once the trigger is linked to a feature the settings tab appears,
providing the option to make changes to timings. In addition
the feature is now labeled with the relevant trigger. Any of the
above four potential triggers can be linked with any of the above
features. Some users are able to perform activities of daily life
(ADL’s) without the use of any triggers. In many cases users initially
set one or two triggers while familiarity and control is gained.
Part number: MA01243: Issue No. 1, July 2014
31 of 46
Impulse period
Impulse duration
4.3.4 Training
The training suite contains a variety of short
training exercises aimed at developing control
of the i-limb ultra revolution. The opening
screen highlights the series of exercises which
can be selected individually and in any order.
Both open and close signals can be practiced.
An indication of difficulty is provided by the 5
point scale on each module.
4.3.5 Usage
The Usage suite provides usage information
on the number of power cycles (the number
of times the hand has been switched on), the
total number of runtime in hours, as well as the
number of open and close motions for each
digit overall.
Feature count gives the number of times the open and
closed command has been used with in a specific grip
pattern.
The therapist may wish to review this during sessions
to see how much the hand is being used as well as
common grip patterns used.
Part number: MA01243: Issue No. 1, July 2014
32 of 46
4.4 Mobile Apps
Mobile apps are available for both clinicians and i-limb users.
The app for clinicians is called biosim, and the app for users is
called my i-limb. The therapist may download biosim onto any
compatible Apple device, such as:
•
•
•
•
iPod 5 or newer
iPhone 4s or newer
iPad 4th generation or newer
iPad mini
The i-limb wearer can access the my i-limb mobile app with the
iPod 5, which is provided as part of the package with both the
i-limb ultra revolution and the i-limb ultra. The therapist should
encourage the user to bring this tool to therapy.
For more detailed instructions on how to use and operate both
the patient and clinician versions of the app, visit the my i-limb
app, biosim app & biosim software section of the Document
Library on Touch Bionics’ website:
www. touchbionics.com/downloads/document-library.
Part number: MA01243: Issue No. 1, July 2014
33 of 46
5.0 Appendix
5.1 Warnings and Precautions
i-limb ultra revolution
Batteries
Do not use without an approved cover.
Do not bend or exert excessive pressure on the battery.
Do not use under water.
Do not pierce the battery.
Do not use to operate heavy / industrial machinery.
Do not use with machinery with moving parts that may cause
personal injury or damage.
Do not disassemble.
Do not expose to high temperatures.
Users must comply with local regulations on the operation of
automobiles, aircraft, sailing vessels of any kind and any other
motorized vehicle or device.
Do not incinerate batteries.
Do not use for extreme activities that may cause injury to a natural
hand.
Do not short circuit the battery.
Do not expose to excessive moisture, liquid, dust, vibration or
shock.
Do not alter battery terminal wires.
Do not store batteries inside a vehicle.
Dispose of batteries in accordance with US, European or local
Do not expose to high temperatures.
regulations.
Do not expose to flames.
Only use the appropriate Touch Bionics charger to charge Touch
Do not use or expose to explosive atmospheres.
Bionics batteries.
Do not disassemble componentry or modify in any way.
If the battery has visibly ballooned or swelled:
Maintenance, repairs and upgrades may only be performed by
qualified Touch Bionics technicians and technical partners.
• discontinue the charging process immediately
Do not use with a damaged cover.
• disconnect the battery
Damaged covers must be replaced or repaired by a qualified
Touch Bionics technician or technical partner.
• remove to a safe area
• leave and observe for 15 minutes
Only approved Touch Bionics accessories and tooling may be
used with the i-limb ultra revolution.
If utilizing a multi-flex wrist, the hand should be locked if carrying an object.
Failure to comply with the above guidelines will invalidate the
warranty.
• replace the battery
• do not re-use
• dispose of any leaking batteries in an appropriate manner
Failure to comply with the above guidelines will invalidate the
warranty.
Part number: MA01243: Issue No. 1, July 2014
34 of 46
5.2 Usage Do’s and Don’ts
DO
DON’T
Do not allow thumb to block index
from closing
Push thumb to the side
Hold handles or similarly shaped objects securely in palm near the base of the fingers. Move the thumb to the side so that it
doesn’t block the index from closing
Ensure all digits are
fully closed around
objects. Do not lift
objects with the tips or
sides of the digits
Hold objects close to palm with all
fingers fully closed
Do not hold objects
with fingertips
Do not hold objects
with side of fingers
Apply the same rules
to opening appliances
and pulling handles
(refridgerators, ovens,
car doors, etc.)
Do not pull objects with figertips
Grasp objects close to palm with all
fingers fully closed
Use palm up position when
lifting/holding heavy objects
Part number: MA01243: Issue No. 1, July 2014
Do not lift heavy objects with
palm-down position
35 of 46
Do not lift with
fingertips
5.2 Usage Do’s and Don’ts Continued...
DO
DON’T
Do not push with fingers
open. Do not push with
fingertips
Push up with fully closed fist with
force at knuckes
Part number: MA01243: Issue No. 1, July 2014
36 of 46
5.3 References and Recommended Reading
Atkins DJ: "Prosthetic Training," Atlas of Amputation and Limb Deficiencies : Surgical, Prosthetic and Rehabilitation Principles, 3rd
Edition, Eds. Smith, DG, Micheal, JW, and Bowker JH, AAOS, 2004.
Biddiss, E.A. & Chau, T.T. (2007). Upper limb prosthesis use and abandonment: A survey of the last 25 years. Prosthetics and
Orthotics International, 31 (3): 236-257.
Bowker, J.H. (2004). The art of prosthesis prescription. In: Smith, D.G., Michael, J.W., & Bowker, J.H. eds. Atlas of Amputations and
Limb Deficiencies: Surgical, Prosthetics, and Rehabiliation Principles (3rd ed.). Rosemont, Il: American Academy of Orthopaedic
Surgeons: 742.
Datta D, Kingston J, Ronald J. 1989. Myoelectric prosthesis for below-elbow amputees: the Trent experience. Int Disabil Studies 11
(4): 167-170.
Durance JP, O'Shea BJ. Upper-limb amputees: a clinical profile. Int Disabil Stud. 1988;10:68-72.
Fletchall, S. Returning upper-extremity amputees to work. The O&P Edge. 2005; 4:28-33.
Lake, C. Effects of prosthetic training on upper-extremity prosthesis use. JPO. 1997; 9(1): 3-9.
Light, C.M., Chappell, P.H., Kyberd, P.J. Establishing a standardized clinical assessment tool of pathologic and prosthetic hand
function: Normative data, reliability, and validity. Archives of Physical Medicine and Rehabilitation, 2002; 83: 776-783.
Malone, J.M., Fleming, L.L., Roberson, J., Whitesides, T.E., Leal, J.M., Poole, J.U., Sternstein-Grodin, R. (1984). Immediate, early, and
late postsurgical management of upper-limb amputation. J Rehabilitation Research and Development, 21:33–41.
McFarland, L.V., Hubbard Winkler, S.L., Heinemann, A.W., Jones, M., & Esquenzai, A. (2010). Unilateral upper-limb loss: Satisfaction
and prosthetic-device use in veterans and servicemembers from Vietnam and OIF/OEF conflicts. Journal of Rehabilitation Research
& Development, 47(4): 299-316.
Resnik, L. Meucci, MR, Lieberman-Klinger, S, Fantini, C, Kelty, DL, Disla,R, Sasson, N. Advanced upper limb prosthetic devices:
Implications for uppper limb prosthetic rehabilitation. Arch Phys Med Rehabil. 2012; 93: 710-717.
Smurr, L.M., Yancosek, K., Gulick, K., Ganz, O., Kulla, S., Jones, M., Ebner, C., & Esquenazi, A. (2009). Occupational therapy for the
polytrauma casualty with limb loss. In: Pasquina, P.F., & Cooper, R.A. eds. Care of the Combat Amputee. Washington, D.C.: Borden
Institute.
van Lunteren A, van Lunteren-Gerritsen GHM, Stassen HG, Zuithoff MJ. A field evaluation of arm prostheses for unilateral amputees.
Prosthet Orthot Int. 1983;7:141-151.
Weeks, DL, Anderson, DI, & Wallace, SA. The role of variability in practice structure when learning to use an upper-extremity
prosthesis. J Prosthet Orthot. 2003;15: 84 –92.
Part number: MA01243: Issue No. 1, July 2014
37 of 46
North American Customers
(Canada, Mexico and US)
Touch Bionics
35 Hampden Road
Mansfield MA 02048
USA
Tel: +1 855 MY iLIMB (694 5462)
International Customers
Touch Bionics
Unit 3, Ashwood Court
Oakbank Park Way
Livingston EH53 0TH
Scotland
Tel: +44 1506 438 556
Email: [email protected]
For address details and further information
please visit www.touchbionics.com
Third party products and brand names
may be trademarks or registered
trademarks of their respective owners
© Copyright 2014 Touch Bionics Inc. and Touch Bionics Ltd. All rights reserved.
MA 01243: Issue No. 1, July 2014