1
S.A.G.E.
SCOTI ADAMS GRAPHICS EDITOR
by Scott Adams
For ATARI 400, 800
and 1200 Systems
October 1983
Published by
Adventure International
A Subsidiary of
Scott Adams, Inc.
P.O. Box 3435
Longwood, FL 32750
(305) 862-6917
Copyright 1983 by Scott Adams, Inc.
User's Manual Written by Mark S. Murley
Special Technical Assistance by Pat Henderson
LIMITED WARRANTY
S.A.G.E. and all instructional materials included with the system
are sold "as is" without warranty as to their performance or suitability
for any use or application.
The Author and Adventure International shall have no liability to
the customer or any other user with respect to, but not limited to, any
direct, indirect, special, incidental, or consequential losses or
damages, including but not limited to any interruption of service, loss
of business, anticipatory profits or benefits caused or allegedly caused
by S.A.G.E.
This product will be exchanged if defective in manufacture.
Except for such replacement, the sale of this material is without
warranty or liability.
Before relying on any new data processing system, a parallel
mode of operation (old method and new method) should be used to
develop familiarity with and confidence in the new system. Consistent
backup procedures should be established to avoid loss of valuable
electronically stored data.
COPYRIGHT
This product is copyrighted and all rights are reserved . The
distribution and sale of this product are intended for the personal use
of the original user only and for use only on the computer system(s)
specified.
Except to reproduce the number of backup copies required for
the customer's computer, copying , duplicating, selling or otherwise
distributing this product is hereby expressly forbidden.
SCOTT ADAMS GRAPHICS EDITOR USER'S MANUAL
Table of Contents
A Word From Scott Adams . .. . ... ........ . ....................... .
Chapter One
Introduction
Chapter Two
The Bare Necessities:
Required Equipment, Tape and Disk Loading
Instructions and Monitor Adjustment ............ 2-1
Chapter Three
The Command Keys . . .. ... .. .... .. . . ... ... . . 3-1
Chapter Four
Let's Draw Something! ..... . ... . ............. 4-1
Chapter Rve
Solid Fills, Colors, and More . . .. ..... . . .... .. .. 5-1
Chapter Six
Delete Delight, the Buffer and
Saving Your Picture .......................... 6-1
Chapter Seven
Two Color Fills : . . . ... . ...................... 7-1
Chapter Eight
The U Command and Color 15 .. . ............ . . 8-1
Chapter Nine
The S.A.G.E. Color Palette .................... 9-1
Chapter Ten
Putting the Editor in Graphics Editor . . ........ .. 10-1
Chapter Eleven
A Look (and more) At A Finished Picture ........ 11-1
Chapter Twelve
The Command Keys Expanded ...... . . .. ...... 12-1
Chapter Thirteen
Taking It From Here ... ... .. .... .... .. ....... 13-1
••
•
•
0
•••
0
0
•••
0
•
••
0.
0
.
0
•••••••••
0
1-1
TECHNICAL SECTION
Appendix A
Creating a Duplicate Disk .. .. . ................ A-1
Appendix B
Creating a Duplicate Tape ........... . ......... B-1
Appendix C
Program Commands: Technfcallnformation .. . ... C-1
Appendix D
Using S.A.G.E. in Your Programs
A. Machine Language .... . ........... .. . D-1
D-2
B. BASIC
•
..)
•••••••••••••••••••••••
0
••••
Appendix E
The Color Generator ... ... ..... ..... . . . . . . .. . E-1
Appendix F
Listing Picture Commands .. .. . ...... . ... . .... F-1
Appendix G
The S.A.G.E. Color Palette - A
Detachable Reference ........................ G-1
Index
A Word From Scott Adams
Dear User,
Thanks for buying S.A.G.E.
Adventure International feels that the
Scott Adams Graphics Editor is truly a breakthrough program in terms of price
and program content. We hope you enjoy using S.A.G.E. as much as we do.
Please note that out of all the jazzy copy-protection schemes available for
the Atari, we used perhaps the most controversial method: our trust in you, the
user. Not only is S.A.G .E. not copy-protected, we encourage you to make
your own backup copy and describe how you may incorporate portions of
S.A.G.E. into your own programs.
As explained on the package exterior, the following licensing
arrangements are available should you elect to use S.A.G.E. within your own
program:
If S.A.G.E. is used in developing any graphics routine within a program
intended for publication, the prograr.1 must first be offered to Scott Adams,
Inc. for publication under our standard software contract. If the program is not
accepted for publication by Scott Adams, Inc. and is then published by,
another company, an annual fee of $50 will be levied to license S.A.G.E. within
the program . Additionally, the following credit line must appear both on the
packaging and in the opening screen of the program: GRAPHICS CREATED
WITH S.A.G.E. LICENSED FROM SCOTT ADAMS, INC.
Programs that are published by Scott Adams, Inc. using S.A.G.E. in any
of its graphics routines will have the licensing fee waived and will receive our
usual high royalty rate.
There are, of course, no obligating constraints regulating any programs
intended for your own private use whic;h utilize S.A.G.E.
Please, don't give copies of S.A.G.E. to your friends. If they like, it,
encourage them to buy a copy for themselves. Remember: We published
S.A.G.E. in an unprotected format as a service to you.
Thank you, and again, we hope you enjoy S.A.G.E.
~
Scott Adams
Adventure International
r-"\
CHAPTER 1
INTRODUCTION
S.A.G.E. - The Scott Adams Graphics Editor
,..........._
Nearly everyone loves to draw. And even if you haven't artistically
touched pen or pencil since high school, the product you have just purchased
is going to give you the opportunity to create graphics in style - and have a
little fun in the process.
Scott Adams, creator of the popular Adventure Series, has developed an
exciting tool for creating and storing do-it-yourself pictures with an ATARI
Home Computer. We call it S.A.G.E. - Scott Adams Graphic Editor.
S.A.G.E. IS A GRAPHICS EDITOR, EH. WHAT'S THAT?
A graphics editor is exactly what it sounds like: Software which gives the
user control over on-screen graphics. S.A.G.E. lets you 'draw' and color
pictures with your ATARI using an ordinary joystick and special keyboard
commands. The pictures can then be stored onto a tape or disk for later
retrieval. And it's very easy to use - nearly every command is initiated by
pressing a single key. Want to change a color? Just press C. How about saving
a picture? Pressing S will do the job. And you create pictures with a simple
ATARI joystick. How's that for ease of use?
S.A.G.E. is a lot more than making and storing pictures. For example, you
may choose from a full range of editing commands that give you complete
control over the creation of your picture. You can also select from a variety of
"fill" patterns to detail your art, and create and save special color palettes, too.
In fact, each picture can be given its own special color palette.
S.A.G.E. IS PERFECT FOR ADVENTURES
You say you write Adventure-type programs? Then you'll find S.A.G.E.
perfect for adding top-quality, high-resolution graphics to your own Basic or
machine-language programs. Scott developed S.A.G.E. specifically for his
popular Scott Adams Graphic Adventure Series. Hundreds of screens of
superb graphics were created for the ATARI S.A.G.A.'s using this program .
. . . AND PERFECT FOR "NON-ADVENTURES," TOO
S.A.G.E. can also be used to insert pictures into "non-Adventure" Basic
or machine-language programs. In short, we think you'll find S.A.G.E.'s
applications to be as varied as your own imagination.
1-1
NO PROGRAMMING EXPERIENCE? NO PROBLEM.
Even if you don't know a FOR NEXT loop from a GOTO statement,
S.A.G.E. will have you electronically sketching like a pro in no time at all. All
you need is a properly equipped ATARI400, 600, 800 or 1200 Home Computer
and this package. Chapter 2 describes the special memory and equipment
requirements.
ABOUT THIS MANUAL
How many of us have vigorously fallen to the task of assembling a new
10-speed bicycle or model airplane, only to find too late tha~ Whizdangle A
should've been installed BEFORE Heliosprocket B? As someone who'd
probably been through the situation himself said, "If all else fails, read the
instructions."
You'll be happy to know that if you DON'T follow this manual to the
letter, the worst that will probably happen is the loss of a little time. Or perhaps
you'll accidentally exile a picture you've worked on for a couple of days into
ionic oblivion. Nothing really serious, though.
On the other hand, time invested now in reading this manual and stepping
through the examples will return much: familiarity with the program,
confidence in your own abilities, and most importantly, competence.
So how about it? Good. See you in Chapter 2.
1-2
CHAPTER 2
THE BARE NECESSITIES:
REQUIRED HARDWARE, TAPE AND DISK LOADING INSTRUCTIONS
AND MONITOR ADJUSTMENT
Before we plunge into the joys of electronic art, let's make sure that you
have all the necessary equipment to operate your version of S.A.G.E. In
addition to an ATARI 400, 600, 800 or 1200 Home Computer, you'll need the
peripherals and accessories listed on the chart below. Check the column that
applies to your system.
I
Memory
Peripherals
Basic Cart.
Joystick
Color Monitor
Or TV
I
HARDWARE REQUIRED
S.A .G.E. TAPE
S.A.G.E. DISK
48K
ATARI Cassette Player
Yes
One Required
Yes
48K
ATARI 810 Disk Drive
Yes
One Required
Yes
LOADING THE 48K DISK VERSION OF S.A.G.E.
The 5~ inch disk version of S.A.G.E. comes with a version of ATARI
DOS (Disk Operating System) 2.0S. This means that your S.A.G.E. disk can
be used without any additional Disk Operating System.
Follow these instructions to load the disk version of S.A.G.E.
Notched Side Left
FIGURE 1
.J
1.
2.
3.
Insert your ATARI Basic Cartridge into the computer.
Turn on your disk drive.
Place the S.A.G.E. disk label side up, notched side to the left, into Drive 1
and close the ·drive door.
2-1
4.
5.
Turn on the computer. The power switch is located on the right side panel
of the computer.
When the READY message appears carefully type:
~lH!H~IIii:JD~!:JDDCi.J~!Illtil~lli Press~
AFTER S.A.G.E. LOADS
. There will .be a short pause after~ is pressed. The screen will read :
SCOTI ADAMS GRAPHIC EDITOR
COPYRIGHT 1983 BY AI
File Name? (Press RETURN if No File Name)
Later, we'll explain how you can assign a special file name to a picture.
This file name will allow you to save and reload a picture. For the moment,
press ~· The screen will display the Screen Canvas - the upper half of
your monitor or TV screen where your pictures will take shape.
LOADING THE 48K TAPE VERSION OF S.A.G.E.
· The tape version of S.A.G.E. contains four separate programs which
must be loaded into your ATARI's memory before they can be used. We'll be
loading the first two shortly. The programs are:
a)
b)
c)
d)
S.A.G.E. Machine Language
S.A.G.E. BASIC
S.A.G.E. Multi-Palette
S.A.G.A. Sample Picture
Each of the four programs is recorded on both sides of your S.A.G.E.
cassette. If you have a problem with loading the programs from one side of the
cassette, try the other side.
The first two programs, S.A.G.E. Machine Language and S.A.G.E.
BASIC, comprise the main S.A.G.E. program. The S.A.G .E. Multi-Palette and
S.A.G.A. Sample Picture will be loaded later as separate files.
Proper Connections Are A Must
Make sure that your ATARI Cassette Player is connected properly to your
computer and closely follow the instructions below. If you have any doubts
about what plug goes where, check the manual that came with your ATARI
Cassette Player. The manual will illustrate . the correct cassette player-tocomputer hook-up procedure.
1)
2)
Rewind the S.A.G.E. cassette if necessary and place it into the ATARI
Cassette Player.
Insert your ATARI BASIC Cartridge into the port on top of your 400 or 800
Home Computer, or. into the left side port on the ATARI1200.
2-2
~
3)
4)
5)
Press PLAY on the ATARI Cassette Player.
Press and hold~ while turning on the computer.
Press Wimlll on your computer.
The S.A.G.E. Machine Language program will load at this time. After it
loads, the READY prompt will appear on your screen. When it does:
6)
7)
Type: ~~~~~
Press Wimlll on your computer.
The S.A.G.E. BASIC program will load at this time. The READY prompt
will appear on your screen after the BASIC program has loaded. When it does:
8)
9)
Type: !lJl!J~ and press Wimlll.
Follow the directions under AFTER S.A.G.E. LOADS above.
Color Adjustment
Disk users: Skip ahead to MONITOR ADJUSTMENT, which follows this
section, and follow the color adjustment instructions.
Tape users: A bit more expertise is required for you to set up a color
adjustment situation. Make the best of what you have until you've read
through Chapter 6, then return to MONITOR ADJUSTMENT, below.
MONITOR ADJUSTMENT
S.A.G.E. achieves a greater range of colors than is normally available by
quickly flipping between two screens of colors. This unique toggling effect
results in a slightly exaggerated degree of screen flicker. For this reason, proper
color adjustment is crucial for a "flicker-free" picture and true colors.
THE TEST PALETTE
Disk users: A special Test Palette, similar to the color bars used by
television technicians, is included on your S.A.G.E. disk. You can load the Test
Palette by typing~~~~~ and pressing Wimlll· After the Test Palette appears,
follow the ADJUSTING THE MONITOR CONTROLS section below.
Tape users: You will have to create a Test Palette. Just follow the
directions below.
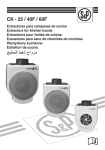
CREATING A TEST PALETTE
1) Recreate Figure 2 on your screen as shown below.
2) Use the Fill command to color each bar. From left to right the colors
are white (Color 10), brown (Color 2), orange (Color 11), yellow (Color 0), blue
(Color 4) and green (Color 1). Adjust your set using these color bars for
reference.
2-3
C. Repeat steps A and B until
you have 6 distinct bars.
A. Position cursor here.
Press N.
B. Move cursor to here.
Press L.
I
I
I
I
I
__JI
[
(Colors) Color 1: 0
Fill: Sold
X:1 6
Color 2: 0
Y:O
Llne:O
Len:O
Pos:O
I
D. Use the Fill command to color
each bar as listed.
FIGURE 2
ADJUSTING THE MONITOR CONTROLS
1) Adjust the Color Intensity control until the color bar is black and white.
Turn the intensity control back slightly until the color first begins to appear.
2) Adjust the Tint control (or 'hue' on some sets) until the orange and
yellow color bars are true. The white bar will have a slightly bluish tinge. This
color is normal.
3) Adjust the Contrast and Brightness controls until as much flicker as
possible has been eliminated. If necessary, go back and readjust the Tint
control slightly.
4) Using the _
w hite and blue color bars for reference, adjust the Color
Intensity control until any final flicker is removed.
5) Readjust the Brightness control to suit.
The screen colors should be true if you followed the color adjustment
procedure properly. Don't expect intense, vivid colors, but you should see
clear, distinct pastels. If you wish to sacrifice color intensity for flicker, increase
the color intensity control to brighten the color range.
IF IT STILL DOESN'T LOOK RIGHT
Bear in mind that the eye is the best and final judge. If the above
. procedure doesn't produce satisfactory results, adjust your monitor or
television controls until the screen colors look good to you.
2-4
AFTER ADJUSTING YOUR MONITOR
Press~ llWij. Type rllWm when the READY message appears on
your screen. When the FILE NAME? message is displayed, press~· The
Screen Canvas will appear and we'll be ready to begin working on our first
picture.
2-5
CHAPTER 3
THE COMMAND KEYS: A DETATCHABLE LISTING
User friendly. Ease of use. Accessibility. Each of these catch phrases
describes a consumer-oriented approach to software. The first order of
business in developing S.A.G.E. was one of creating a graphics editor that
could be used by novice and pro alike. The next step was user friendliness- it
had to be easy to operate.
We mentioned in the Introduction that most of S.A.G.E.'s editing fuctions
are engaged with a single keypress. These special Command keys are listed in
this manual in two forms: (1) An abridged, detachable chart version of this
chapter featuring a brief description of each Command key, and (2) an
expanded, glossary-style listing in Chapter 12 that adds an expanded
description to each Command key.
The abridged chart showing the Command keys and their respective
functions is listed on the reverse side of this page. Look at it carefully before
going on to the next chapter, and don't let the unfamiliar terms throw you we'll be covering each of them shortly. ·
3-1
EDITING KEYS
ALTER FILL type
Bye-bye Palette (erases palette)
CHANGE Color/Fill information
DELETE Commands from buffer
EDIT Mode (clears screen, resets pointer to beginning of
buffer)
FILL
GET Palette (saved to disk or tape)
HUNT (searches for specific commands in buffer)
IDENTIFY color cursor is positioned on
JUMP through buffer (backward or forward)
LINE (draw to)
NEW line (plot first point)
Load file ONTO current picture
PALETTE edit
QUICK clear
REMEMBER current palette to tape or disk
SAVE picture onto disk
TEST mode (does not store entries into buffer)
Fill UNTIL boundary encountered
Changes Color 1 lines to Color 2 in buffer
WAIT X seconds, then continue
EXit edit mode and Draw to end
Set Color 1 = 15, Color 2=9, then executes V
Straighten horizontal/vertical lines
Steps through buffer from current position (Edit Mode
only)
Dumps S.A.G.E. object code to Cassette tape
Disk Directory when asked file name
** Move Command. Moves entire picture on screen
* Commands are saved in buffer (except T mode) **
Changes commands already in buffer
3-2
CHAPTER 4
LET'S DRAW SOMETHING!
r---
The preliminaries are almost behind us. This chapter will give some
background on how S.A.G.E. operates and describe the fundamentals you
need to start creating a picture.
CHECK YOUR MONITOR
The monitor screen on your ATAR I should resemble Figure 2 below if you
correctly followed the instructions in Chapter 2. If you haven't loaded S.A.G.E.
yet, or the screen doesn't look like Figure 2, go back to Chapter 2, re-read the
instructions and correct the problem.
While you're at it, hook up a joystick to Port 1. Port 1 is located on the
front bottom edge of ATARI 400 and 800 computers. The ATARI 1200 joystick
port can be found on the left side of that system.
Cursor will blink
here when S.A.G.E.
is first run
~·
Screen Canvas
-
--:::::
IL
Fill: Sold
llne:O
Color 2: 0
(Colors) Color 1: 0
X:16
Y:O
Color Palette
Len:O
Pos:O
I
Editing Bar
FIGURE 3
SCREEN DIVISION
What your screen now shows is the heart and soul of S.A.G.E. You'll
notice that the screen is split into three distinctive zones or areas. From the top
of the screen down, the zones are:
,-..
(1) The open, blank area that occupies the top half of the screen. This is where
you will create your pictures. We'll refer to this area as the Screen Canvas.
(2) The double blocks of color bars that comprise the primary Color Palette.
(3) The Editing Bar, which displays important information such as cursor
position, colors used, and Color Fill type.
4-1
SCREEN CANVAS
PROFESSOR SAGE SEZ:
If you hit [liJ!JJ by accident, typ e
continue!
tlHlliJtll ~iJrilliliJ to
Remember "connect-the-dot"
coloring books? S.A.G.E. operates
in a similar fashion. You plot points
on the Screen Canvas and then connect them using
a special line-drawing command. Once your drawing
is complete, it can be enhanced with any of the
available colors and fill patterns, including solid,
diamond, vertical, horizontal and checkerboard.
COLOR PALETTE
The Color Palette you see on the screen is actually a visual reference, and
is akin to an artist's hand-held palette. Instead of dipping a paintbrush into
paint, though, a movable screen cursor is positioned over the object to be
colored and a special Command key is pressed.
The on-screen colors correspond to a set of numbers between 0 and 15.
By typing a number when asked, S.A.G.E. executes the color you've selected.
THE EDITING BAR
The Editing Bar updates and lists information as a picture is created. A
facsimile of the Editing Bar as it appears during the Normal Mode is reproduced
below. ("Normal Mode" means that no Command functions are engaged.)
Refer to Rgure 4 below for an explanation of the Editing Bar's functions.
A. Co lor 1
B. Color 2
I
(Colors) Color 1: 0
Fill: Sold
I
Color 2: 0
X:16
Y:O
I
0 . Fill Type
C. Line Color
I
I
E. X and Y Coordi nate s
Llne:O
Len:O
I
F. LEN
Pos:O
I
G. POS
A. CO LOR 1. Number In dicates Color selection (0· 15). Used for solid fills.
B. COLOR 2. Number indicates Color selection (0·15). Used for flll·color p atterns
when filling w ith diamond, horizontal, Yertlcal or checkerboard patterns.
C. LINE Color. Number In dicates Color selection (0·15). Used for line color.
0 . FILL Type. Indicate s type of fill pattern being used.
E. X and Y Coordinates. Indicates position of cursor on Screen Canvas. Updates
only when certain commands are entered.
F. LEN . Buffer length. Indicates the number of commands t hat c ompose the curre nt
picture.
G. POS. Position. Ind icates the current buffer position .
FIGURE 4
YELLOW, YELLOW EVERYWHERE
S .A. G. E.'s color registers always reset to Color 0 when the program is first
used. This means that any colors you draw or fill will be yellow unless a color
change has been entered.
As mentioned before, each color in the Color Palette is assigned a number
between 0 and 15. This· helps us locate and choose colors more easily. A
4-2
~
glance at the Editing Bar will show that COLOR 1, COLOR 2 and LINE have all
reset to Color 0, yellow.
The subject of changing colors will be covered shortly. In the meantime,
we'll be working with Color 0, yellow.
THE CURSOR AND THE X ANDY AXES (Relax, No Algebra Required)
Look at the upper portion of your screen. A small dot is flashing. This is
the cursor, a movable reference that acts as your electronic pen tip. The cursor
is quite small - only one pixel in size - but changes color to counterpoint
itself as it is moved across different colored areas. Right now, it appears as a
white dot flashing against a dark background of the Screen Canvas.
Got your joystick hooked up? If so, push the handle to the right: the cursor
will respond by slowly moving towards screen right. Now pull the .handle
towards you - the cursor will move towards the bottom of the screen.
Pressing the joystick trigger button and joystick handle at the same time will
increase the cursor's speed.
Push Joystick Handle to
tho Right. .
. . And the Cursor Moves to the Right
- ---~
·I
I
•
. . And the Cu rsor Moves towa rd the bottom
of the screen
,., u Joystick Handle
towa rds yourself . ..
L
Color 2: 0
(Colora) Color 1: 0
Fill: Sold
X:16
Y:O
]
Llno:O
Len:O
Po5:01
FIGURE 5
When the cursor moves horizontally, we say that it moves along the X
axis. Vertical movement is along the Y axis. By referencing the cursor with X
and Y coordinates, S.A.G.E. can "track" the cursor's position anywhere on
the screen.
The X andY positions are displayed in the second line of the Editing Bar,
as two separate numbers. Note, too, that the X and Y coordinates are only
updated when certain commands are pressed. Since no Commands keys have
been pressed, the X and Y coordinates are still set to their original positions,
even though the cursor was moved around the screen some.
4-3
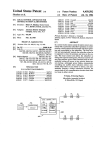
DRAWING THE SQUARE
PROFESSOR SAGE SEZ:
Don 't be alarmed if the X and Y
Let's get down to business.
Pick a point somewhere near the
center of the screen with the
joystick. Now press I::J on your ATARI keyboard.
Notice that the Editing Bar updates the X and Y
coordinates, as well as LEN and POS, each time N is
pressed. Move the joystick handle forward until the
cursor is positioned about an inch above its last
position. Press~ now. You've just drawn your first
line!
c
-----
A. Use the N command
to plot your lnltal
point here.
B. Move the cursor to
here and press l.
C. Move cursor to here
and press L.
A
D. Move cursor to here
and press L.
E. Move cursor to here
D
0
(your starting point)
and press L. Our
square Is complete !
l
Color 2: 0
(Colors) Color 1: 0
Fill: Sold
X:77
Y:59
llne:O
Lan:S
Poo:sl
FIGURE 6
Move the cursor about an inch to the right and press~· Follow this pattern
until you 've completed the entire square.
Oops. My Line's Not Straight. What Happened?
Rest assured, nothing serious. If the cursor is not positioned precisely in a
straight line from its last position, the line will 'correct' itself by jumping the
number of pixels necessary to compensate. This occurs because your ATARI,
as brilliant as it is, cannot draw a curve. To correct the problem, carefully type
[lJ and then Dand press lail!1lllJ. (We'll explain this process later.) Use the
joystick to reposition the cursor slightly and try again.
That's Better. Now, How Did S.A.G.E. Draw the Square?
Simple. N is the command for starting a New Line. When the cursor was
positioned and N pressed, a point was plotted internally, causing S.A.G.E. to
"remember" that point. ~e-positioning the cursor and pressing L drew a line
from the first point to the second point. Using the N and L commands, you can
4-4
draw and connect lines anywhere on the screen. The artistic possibilities are
endless!
Don't Touch That Joystick!
If at all possible, resist the urge to experiment at this time. We'll be using
our square to demonstrate many other things during the next few chapters,
,........, and any additional screen "movements" will cause us to lose our editing
position . Everything will be explained shortly, and we'll show you how to save
that square to tape or disk so that you can work on a little extra curricular
artwork.
4-5
CHAPTER 5
FILLS, COLORS AND MORE
We've seen that the N and L commands provide basic line drawing
functions, but there's much more to S.A.G.E. than doing fancy "electronic
pencil" impressions. You are about to discover a feature that would turn
Rubens green with envy - the Color Fill.
DON'T LOSE THAT SQUARE
We'll be using the square to illustrate a few things in this and upcoming
chapters, so don't turn off your computer just yet.
FILL 'ER UP
If the N and L commands constitute your electronic pencil, the Color Fill
certainly fits a similar role as an electronic paintbrush. The Color Fill uses one or
two colors that you select from the on-screen Color Palette. You may choose:
1) A Solid Fill (single color)
or
2) A Two Color Fill (pattern)
We'll be taking a detailed look at two-color fills in Chapter 7. For now, our
square is going to get a basic one-color, no-frill fill.
COLORS AND FILLS - WHAT'S THE DIFFERENCE?
Actually, very little. There are three color types available with S.A.G.E. COLOR 1, which is used for solid fills or the main color in a Two-Color Fill;
COLOR 2, which is the "pattern" color in any type of fill other than solid; and
finally, LINE, which is, as you might guess, the color used for line drawing.
When we refer to a "fill color," we're only referring to its application.
5-1
THE SOLID FILL
Any of the palette colors, except for Color 15, may be used as a Color Fill.
Each palette color has a corresponding number. Take a look at the chart below.
S.A.G.E. STANDARD COLOR PALETTE
* 0 YELLOW
* 1 GREEN (lime)
* 9 BLACK
* 10 WHITE (lt. purple)
2 BROWN
11 ORANGE
3 AVOCADO
12 MEDIUM BROWN
* 4 LIGHT BLUE
13 TAN (background)
5 PURPLE
14 MED. GREEN (bkgd)
6 MEDIUM BLUE
15 DARK RED (used only
* 7 ORANGE-RED
with U command for
8 MAROON
opaque fills)
* These colors have a minimum of flicker. Other colors
vibrate in varying degrees, and can be used for special
effects, e.g., red for flames.
The chart above lists the colors you may use. Let's go with Medium Blue,
Color #6 on the palette chart above, to re-color our square.
Follow these instructions:
1) You type:~
The Editing Bar says:
CHANGE COLORS :
(1 )FILL, (2) =COLOR 2, (3) =LINE
2) You type:
D
The Editing Bar says:
COLOR? (0-15)
3) You type: ~and press~
The Editing Bar says:
CHANGE COLORS :
(1 )FILL, (2) =COLOR 2, (3) =LINE
4) You press: ~
The Editing Bar says:
FILL TYPE NOW: SOLD
O=SOLD 1 = DIAM 2=HORZ3=VERT 4=CHEC
5) You type: ~
The Editing Bar says:
(COLORS) COLOR 1:6 COLOR 2:0 LINE:O
FILL:SOLD X:77 Y:59 LEN :6 POS:6
5-2
After typing the last command
PROFESSOR SAGE SEZ:
(OJ, the cursor will blink at its last
Always re-c heck the Ed iti ng Bar
after enterin g a Command things ch ange !
position on the Screen Canvas, which
should be right about where you first
used theN command.
MERE SECONDS AWAY ... THE
BIG FILL
Take the joystick and position
the cursor in the upper center of the
square. (Remember: Pressing the red trigger button on the joystick and
pushing the joystick handle at the same time will speed the cursor movement.)
Now, take a deep breath and press F. The square will quickly fill with Color #6,
Medium Blue.
Position the c ursor Here
and Press F. Instant Bl ue!
I
IL
•
I
(Color$) Color 1: 6
Color 2: 0
Fill: Sold
Y:5
X:77
Line:O
Len:6
Pos:6
I
FIGURE 7
BACK TO THE EDITING BAR
Now that our square no longer looks so drab, let's check the Editing Bar
and see what's changed.
Looking at Figure 7, we can see that COLOR 1 is now 6, the X and Y
coordinates have updated to 82 and 52 respectively, and that the LEN and POS
indicators both read 7. COLOR 2 and LINE are still set at 0, yellow, since we
have yet to enter different information.
A good rule of thumb: Always check the Editing Bar after entering a
command.
COMING UP - THE FINE ART OF ERASING
While your heart is still palpitating from the thrill of "instant coloring," let's
set aside the joystick for the moment and learn how to "erase" - a function
touched on briefly in the last chapter. We'll get back to our square shortly.
5-3
CHAPTER 6
DELETE DELIGHT,
THE BUFFER AND SAVING YOUR PICTURE
To Err Is Human, To Erase, Divine.
Well, we may have taken a little creative license with the original
quotation, but erasing and changing your picture whenever necessary are as
important as actually creating the picture itself. Our electronic eraser will be
S.A.G.E.'s Delete command.
To best understand the Delete command, some background on what
occurs as a picture is created would be helpful. Herewith, a short primer on the
buffer.
THE BUFFER
The buffer in your ATARI may be thought of as a holding area for our
picture information. As each command is entered, it is stored sequentially much like cards in a card file. New instruction "cards" can be inserted or
deleted as necessary.
Each picture can be composed of up to 1350 separate commands. This
information can be found on the Editing Bar as LEN, for buffer LENgth. For
example, a LEN indicator reading of 567 means that the buffer is currently 567
separate commands from start to finish . POS is the current buffer position.
THE POINTER
Figure 8
NEw
Command 1
LINE
Command2
LINE
Command3
LINE
Command4
LINE
CommandS
CHANGE
CommandS
FILL
Command7
- Next Available
Buffer Space .
6-1
Those who are wellversed in all things
technical might define a
pointer as a variable that
references an individual
piece of datum within a
large body of data. For
our purposes, let's think
of the pointer as a little internal arrow that "points"
at a command in
S.A.G.E.'s buffer and
says, "You're next!" We
never actually see the
pointer, but it's always
hard at work referencing
commands.
USING THE DELETE COMMAND
Perhaps, let's suppose, you've decided to change the blue fill in our
square to green. Thanks to the Delete command, the instruction given to the
computer to color the square blue can be canceled, and we can "refill" the
square with green. Keep in mind that the picture and palette are composed of
single lines of YOUR instructions concerning color, fill type, and other
information.
Follow these instructions closely:
1) You type:~
The Editing Bar says:
WARNING!
WILL DELETE LAST INSTRUCTION DONE
HOW MANY INSTRUCTIONS?
( 0 BACKWARDS)
2) You type: II~
and press lllii!liDJ
The Editing Bar says:
(COLORS) COLOR 1:6 COLOR 2:0 LINE:O
FILL:SOLD X:82 Y:52 LEN:5 POS:5
3) You type: ~
The Editing Bar says:
CHANGE COLORS:
(1) =FILL, (2) =COLOR (3) =LINE
4) You type:
D
The Editing Bar says:
COLOR? (0-15)
5) You type:
Dand press lllii!liDJ
The Editing Bar says:
CHANGE COLORS :
(1)=FILL, (2J=COLOR, (3)LINE
6) You type: ~and press lllii!liDJ
The Editing Bar says:
FILL TYPE NOW:SOLD
O=SOLD 1 = DIAM 2= HORZ 3=VERT 4=CHEC
7) You type: ~
The Editing Bar says:
(COLORS) COLOR 1:1 COLOR 2:0 LINE:O
FILL:SOLD X:82 Y:52 LEN:6 POS:6
8) Now position the cursor in the square, if necessary. Press~· The square
instantly fills with green: Here's what happened:
6-2
1) Typing~ engaged the Delete Command.
2) Typing llfl made the pointer back up and "forget" the last two commands:
Fill and color change.
3) Typing~ engaged the " Change Color" mode.
4) Typing Dselected Fill from the menu.
5) Typing Dselected Color 1, Green, from the Palette.
6) Typing~ selected the Solid Fill pattern.
7) Typing ~ advanced the Editing Bar and returned the cursor.
8) Typing~ filled the square with green.
SAVING THE SQUARE (OR ANY OTHER PICTURE)
Any picture created with S.A.G.E. can be saved for later recall and future
fun. To start the saving sequence, press S. The screen will show:
ORIGINAL NAME: D: PICTURE
WHAT NAME TO USE? (ENTER FOR SAME!)
Let's name our picture and save it to the S.A.G.E. program disk. It's
sound practice to periodically save a picture you're working on; this may save
you hours of tedious "reconstruction" if a problem develops.
Disk Users, type: D:SQUARE. You may preface the file name with D1 :,
D2:, D3:, or D4 to save to Drive 1, 2, 3 or 4 in that order. Example: To save our
square to Drive 4, type: D4:SQUARE. Before you press RETURN, be sure your
disk is in the correct drive. If disk and drive are in order, press RETURN. The
picture will be stored onto your disk. If no name is assigned to a picture, it will
be automatically saved as D:PICTURE.
Tape Users, type: C:. Before you press RETURN, be sure that your
cassette is properly cued and REC and PLAY are pressed. If so, press
RETURN. The picture will be stored onto your tape.
When creating other file names: You may enter any name up to 8
characters in length.
RECALLING A PICTURE
To recall a saved picture, press t1'f)W,Iilf1ji and then type~~~- When
the FILE NAME? prompt appears, type the name of the picture you wish to
recall and press ~-
6-3
CHAPTER 7
TWO-COLOR FILLS
Although S.A.G.E. is not capable of reproducing shades and textures per
se, these effects can be achieved with two-color fill patterns.
TWO-COLOR FILLS
A two-color fill combines two colors from the Color Palette, and fills an
object in one of four patterns that you select: horizontal, vertical, diamond or
checkered. Any color may be used from the palette, except for Color 15 which
is reserved for special object outlines (discussed in Chapter 8).
SELECTING COLORS AND FILL TYPE
You can create a two-color fill by choosing:(a) two separate colors for the
fill and (b) the type of pattern you wish to fill with. This procedure is very similar
to the solid fill we used in Chapter 5.
THE SQUARE RETURNS
;---..
We are now going to Delete the current fill within our square and
substitute a two-color diamond fill using Color 5, Purple, for the first color and
Color 7, Orange-Red, for the second color. If the square is not on your screen,
load it from your cassette tape or disk at this time, or redraw it from scratch
following the directions in Chapter 4.
When the square is ready, closely follow the instructions below.
1) You type : ~
The Editing Bar says:
WARNING!
WILL DELETE LAST INSTRUCTION DONE
HOW MANY INSTRUCTIONS?
(0 BACKWARDS)
2) You type: II~ and press lll1I!ml
The Editing Bar says:
(COLORS) COLOR 1:1 COLOR 2:0 LINE:O
FILL:SOLD X:82 Y:52 LEN:5 POS:5
3) You type: ~
The Editing Bar says:
CHANGE COLORS:
(1) =FILL, (2)= COLOR, (3)= LINE
4) You type: D
The Editing Bar says:
COLOR? (0-15)
7-1
PROFESSOR SAGE SEZ :
Pressing the joystick button
while pushing the joystick handle wiii .SPEED things along!
5) You type: ~ and press ~
The Editing Bar says:
CHANGE COLORS:
(1) =FILL, (2) =COLOR, (3) =LINE
6) You type: ~
The Editing Bar says:
COLOR? (0-15)
7) You type: ~and press ~
The Editing Bar says:
CHANGE COLORS:
(1)=FILL, (2)=COLOR, (3)=LINE
8) You press ~
The Editing Bar says:
FILL TYPE NOW:SOLD
O=SOLD 1 =DIAM 2=HORZ 3=VERT 4=CHEC
9) You type:
D
The Editing Bar says:
(COLORS) COLOR 1:7 COLOR 2:5 LINE:O
FILL:DIAM X:82 Y:52 LEN:6 POS:6
After typing the last command (1), the cursor will blink at its last point on
the Screen Canvas. As before, use the joystick to position the cursor in the
upper middle portion of the square if the cursor is not already there. Press ~·
The square will quickly fill with a purple/orange-red diamond pattern.
Here's a breakdown of what each instruction did.
1) Typing ~engaged the Delete Command.
2) Typing II~ caused S.A.G.E. to "back up" two steps and erase those
commands; in this case, the instructions that colored the square Green.
3) Typing~ engaged the "Change Color" mode.
4) Typing Dselected (1) =FILL from the menu.
5) Typing~ selected Color 5, Purple, from the palette.
6) Typing~ selected (2) =COLOR from the menu. This allows selection of a
second color.
.
7) Typing ~~selected Color 7, Orange-Red, from the palette.
8) Typing~ a second time called up the FILL TYPE menu.
9) Typing Dselected 1 = DIAM, the diamond fill pattern, from the FILL TYPE
menu.
10) Typing ~executed the Fill function and the square filled with our new
colors and pattern.
BEYOND PURPLE/ORANGE-RED DIAMOND FILLS
Arriving at other fills and patterns is a simple matter of substitution.
Replacing the 7 with an 11 during the Color 2 selection would fill the square
7-2
~
./
with a Purple/Orange-Red diamond fill when the F key was pressed. Replacing
the 1 with a 4 during the Fill Type selection would change the pattern to a
checkered one.
What would our square look like if we: (a) Entered a 2 for Color 1; (b)
Entered a 10 for Color 2; and (c) Entered a 3 for the Pattern type? (Answer: Our
square would be brown and white with a vertical pattern. If you answered
correctly, go to the head of the class; if not, you should go back to Chapter 5
and examine the Color Chart and re-read this section until you're comfortable
with the concept of two-color fills.)
THE NUTS AND BOLTS OF THE FILL COMMAND
The Fill command was designed for speed and not "smartness."
Therefore, in some instances, you may find that several Fill commands are
required to completely color an unusually shaped object.
When executed, the Fill effect moves straight up from the cursor until
another color is encountered. From this point it sweeps from left to right,
reversing position and moving down one line each time it encounters another
color. For the best and quickest results, position the cursor directly under the
highest point of the object. This method is illustrated below.
Position Cursor Here to Fill
Position Cursor Here to Fill
... then fin ish wilh a Second Fill
Entire Obj ect
Most ol Object . .
From Hare
FIGURE 9
Take some time to practice with the Fill command at this time. Try
creating some unusual patterns and objects on the screen using the N and L
commands, and experiment by placing the cursor within different points in the
objects and pressing ~- Refer to THE SQUARE RETURNS section at the
beginning of this chapter if you need some assistance in creating a two-color
fill.
To clear the screen: Press ~ lllEij. Type ~[!l~ when the READY
message appears. Press~ when the FILE NAME? message is displayed.
7-3
CHAPTER 8
PROFESSOR SAGE SEZ:
Remove the Command Key
Listing from this manual and
keep it handy while you work on
your pictures!
THE U COMMAND
AND COLOR 15
,.,.--..,
One of the quirks of the Fill
command, you will remember, is that
it is persnickity about filling over a
second color. The mechanics of the
Rll command dictate that the fill
effect stops when another color is
encountered. But we can use a special function, the U command, to fill right
over any of the palette colors except for Color 15, a special color designed to
contain the U command's runaway fill effect.
Let's try the U command in a test situation. Follow the instructions below
closely.
a) Press mmJ Don your ATARI. Type: l:iJWW and then press CIIi!ImJ.
When the FILE NAME? prompt appears, press CIIi!ImJ.
b) Draw a square at the center of the Screen Canvas as you did in Chapter 4.
c) Color and fill the square using the instructions below.
1) You type:~
The Editing Bar says:
CHANGE COLOR:
(1) =FILL, (2) =COLOR 2, (3) =LINE
2) You type:
D
The Editing Bar says:
COLOR? (0-15)
3) You type: ~and press CIIi!ImJ
The Editing Bar says:
CHANGE COLOR:
(1) =FILL, (2) =COLOR, (3) =LINE
4) You type: ~
The Editing Bar says:
COLOR? (0-15)
5) You type: ~and press CIIi!ImJ
The Editing Bar says:
CHANGE COLOR:
(1)=FILL, (2)=COLOR, (3)=LINE
6) You press:
CIIi!ImJ
The Editing Bar says:
FILL TYPE NOW: SOLD
0-SOLD 1-DIAM 2-HORZ 3-VERT 4-CHEC
8-1
7) You type:
D
The Editing Bar says:
(COLORS) COLOR 1:4 COLOR 2:7 LINE :0
FILL:DIAM X:82 Y:Sl LEN:6 POS:6
d) Position the cursor within the square and press ~· The square will fill with
the blue-green diamond pattern.
e) Position the cursor directly above the square. Press ~· Move the cursor
down and to the right and position it within the narrow strip that did not fill with
the two-color diamond pattern. Press~ once more.
The Screen Canvas should now be filled with the two-color diamond
pattern. The square should be filled with the same pattern, but its yellow
outline still discernible within the overall two-color diamond pattern.
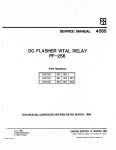
TRACING WITH COLOR 15 AND LOCATING A MISSING CURSOR
We are now going to trace over the yellow borders of the square using the
N and L commands and Color 15. This will replace the yellow borders with
Color 15 (red); the existing blue-green diamond pattern can then be filled over
once two new colors are selected and implemented . We'll be using the U
command to fill the square instead of the F command.
Keep in mind that we're following this process for example's sake only .
. Normally, one would draw the square with Color 15 and skip the tracing
entirely.
To engage Color 15, follow the instructions below.
1) You type:~
The Editing Bar says:
CHANGE COLOR:
(1) =FILL, (2)COLOR 2, (3) =LINE
2) You type:~
The Editing Bar says:
COLOR? (0-15)
3) You type: D~ and press
mmJ
The Editing Bar says:
THIS IS AN OBJECT COLOR. OK?
Y/N
4) You type:
iJ and press mmJ twice.
The Editing Bar says:
(COLORS) COLOR 1:4 COLOR 2:7 LINE:15
FILL= DIAM X:109 Y:55 LEN:10 POS:10
8-2
Diamond Fill
Square still visible
within 1111 pattern
FIGURE 10
The cursor should now be blinking at some point on the Screen Canvas.
You may experience some difficulty in locating the cursor when it's positioned
over certain colors. If you've completely lost track of the cursor, move the
joystick handle slightly - you should be able to spot the cursor when it moves.
Position the cursor over the lower left-hand corner of the square and press
~· (See Figure 10 above.) Move the cursor to the top of the square where the
J
lines intersect and press~· Continue to trace the perimeter of the square using
the L command until its entire yellow border has been replaced with red.
The Screen Canvas should now show a red-bordered square with a bluegreen, diamond-pattern interior. We are now going to fill the square with a
different color pattern using the U command. First, follow the color-changing
instructions below.
1) You type:~
The Editing Bar says:
CHANGE COLORS:
(1) =FILL, (2) =COLOR 2, (3) =LINE
2) You type:
D
The Editing Bar says:
COLOR? !0-15)
r-1 .
3) You type: ~and press ~
The Editing Bar says:
CHANGE COLORS:
(1)=FILL, (2)=COLOR 2, (3)=LINE
4) You type: ~
The Editing Bar says:
COLOR? (0-15)
8-3
5) You type:
Dand press Wl!IillJ
·
6) You press:
The Editing Bar says:
CHANGE COLORS:
(1)=FILL, (2)COLOR 2, (3)=LINE
Wl!IillJ
The Editing Bar says:
FILL TYPE NOW: DIAM
0= SOLD 1 = DIAM 2= HORZ 3=VERT 4= CHC
7) You press:
Wl!IillJ
The Editing Bar says:
(COLORS) COLOR 1:0 COLOR 2:1 LINE:15
FILL= DIAM X:77 Y:64 LEN:16 POS:16
Position the cursor inside the square and press l!J. The square will fill with
our new two-color fill, yellow-green.
THE Z COMMAND - CHANGING BLACK LINES TO RED
With a couple of keypresses you can change all Color 151ines in a picture
to Color 9 lines. The Z command will let you change red Color 15 lines to black
Color 9 lines, after the U command has been used.
This is how the Z command works. When Z is pressed, Color 15 is placed
into the Color 1 register and Color 9, black, is stored in the Color 2 register. A V
command is then automatically executed. When E and X are pressed (E and X
will be covered in Chapter 10), the screen is wiped and redrawn, replacing
Color 15 with Color 9.
Press fa and then ~ and tJ, and watch what happens to the square. The
yellow lines are replaced with black ones.
THE V COMMAND
The V command is similar to the Z command except that you may choose
the line color to be changed. To use the V command, press~ and enter the
two colors in the following order:
Color 1 is the color you wish to change.
Color 2 is the color you wish to add.
Here's how you would change the black border of the square to purple
using the V command.
1) You type:~
The Editing Bar says:
CHANGE COLORS:
(1) =FILL, (2) =COLOR 2, (3) =LINE
8-4
f"'\
2) You type:
D
The Editing Bar says:
COLOR? {0-15)
3) You type: ~ and press Wl.!IllJ
The Editing Bar says:
CHANGE COLORS:
(1)=FILL, (2)=COLOR 2, (3)=LINE
4) You type: ~
The Editing Bar says:
COLOR? {0-15)
5) You type: ~and press Wl.!IllJ
The Editing Bar says:
CHANGE COLORS:
(1) =FILL, (2) =COLOR 2, (3) =LINE
6) You press
Wl.!IllJ twice
The Editing Bar says:
(COLORS) COLOR 1:9 COLOR 2:5 LINE:15
FILL:DIAM X:83 Y:56 LEN:20 POS:20
7) Now press~ and then~ and
with Color 5, purple.
!J. The square's black borders will be replaced
Coming up in Chapter 9: wringing more color from the Color Palette.
8-5
CHAPTER 9
THE S.A.G.E. COLOR PALETTE
Chapters 5 and 7 touched on the process of selecting Fill and Line colors
using the on-screen Color Palette as a visual reference. Up to this point, what
you saw was definitely what you got.
This chapter outlines an alternative approach to color selection. Variations
can be made on the primary Color Palette by tapping into S.A.G.E.'s New
Palette function. In so doing, dramatic color changes can be produced - all
with a simple push or pull on your joystick. Once a new palette is created, it can
be stored to tape or disk for later use.
Each picture that is saved to tape or disk has its palette saved along with
it. This means that each picture can easily have its own special palette if you
wish.
CREATING A NEW PALETTE
Creating a new palette is a simple process of entering the P mode and
typing a value for the color register. The joystick is then used to sweep though
the different colors and degrees of brightness until you find something that you
like.
SELECTING A COLOR REGISTER
S.A.G.E. has eight color registers available. Once a color register is
selected, you may choose both the luminance (brightness) and color type by
pressing the joystick handle in the correct direction. You'll quickly discover that
the New Palette creation process is largely a matter of looking at what you've
produced on the screen and determining if it's usable.
Here's how to begin:
1) Press ~ on your keyboard. The screen will say:
REGISTER? (0-9)
The available registers are: 0, 1, 2, 3, 6, 7, 8, and 9. Registers 4 and 5 are
not used.
2) Press any number between 0 and 9 (except 4 or 5) to select a color register.
The screen will read:
REGISTER: XX COLOR: XX LM: XX
STICK= CHANGE, BUTTON= USE, KEY= ABORT
3) By pressing the joystick handle either left, right, up or down, the Color
Palette will reflect -different colors and degrees of luminance. Altering one color
9-1
register will change 4 different primary colors. Each primary color is composed
of two color registers for a total of 4 X 4= 16 primary colors.
The joystick positions are illustrated in Figure 11 below.
The Editing Bar numerically displays the color and luminance information
as you move the joystick. You may wish to note these figures for future
reference.
RETURNING TO THE NORMAL MODE
Press any key on your ATARI to return to the Normal Mode. Press the red
trigger button on your joystick to retain (but not save) a palette temporarily.
SAVING A PALETTE
When you 've discovered a pleasing color combination, type~· You may
then ~e the pa~tte a name. The name should begin with PAL and end with a
number. Examples: PAL5, PALETTE1, etc. Press~ after the New Palette
name has been entered.
Palettes are automatically stored along with your picture for later use. To
save a New Palette (and picture), ready your disk or tape and press~ (Save).
ERASING A NEW PALETTE
A New Palette can be erased from the screen by pressing I)J. Press ~ and fJ
to restore it to the screen.
Remember: Creating a palette is largely a matter of taste and what looks
good to YOU!
THE MULTI-PALETTE
Some of the fill patterns created with S.A.G.E. produce a flickering effect,
a by-product of the rapid shifting between two screens of colors. Flicker may
be desirable at times - flames or running water can look particularly
impressive when composed correctly, for example. But at other times, a
9-2
conspicuously flickering color can detract from the overall effect of your
picture.
A helpful aid is the Multi-Palette, an on-screen chart that lets you check
existing color combinations before using them in a picture. Do-it-yourselfers
can test additional color combinations in either of two special 'holes' that have
been left in the Multi-Palette.
MAKING THE BIG ONE INTO LITTLE ONES
The Multi-Palette is an assemblage of 72 small rectangles. Each rectangle
is filled with a different two-color fill pattern. This "fill-color billboard" illustrates
most of S.A.G.E.'s available non-flickering color combinations for the standard
T•y You• Fill Pa tterns H•••
Color Palette.
v
v
~
/
"
/
-
~
Multi-Palette
FIGURE 12
(Colors) Color 1: 15
Color 2: 9
Fill: Dlam
Y:O
X:16
line: 15
Len: 162
Pos: 162
USING THE MULTI-PALETTE
To view a fill pattern, select the colors and pattern type you wish to test.
Use the joystick to position the cursor inside one of the two empty rectangles
and press ~· Use the Delete Command to erase, and repeat the above
procedure to try a different combination of colors and fill types.
LOADING THE MULTI-PALETTE FROM YOUR TAPE OR DISK
Loading the Multi-Palette is a snap. Disk users, load S.A.G .E. as detailed
in Chapter 2. In response to the FILE NAME? prompt, type: [iiti]~~D and press
mm.
Tape users: The Multi-Palette is the third program recorded on your tape.
Just follow the tape loading instructions in Chapter 2.
Please note: Whenever the standard Color Palette is modified with the P
command (New Palette), the Multi-Palette will be affected as well.
9-3
CHAPTER 10
PUTTING THE EDITOR IN GRAPHICS EDITOR
Even Mr. Rubens would probably be stymied if he couldn't change an illdirected line or a color that didn't work out. Altering a previously entered
command - editing - is an integral part of S.A.G.E., and ties the Delete
Command in with two very important functions: Edit and Hunt.
EDITING AND THE BUFFER
Editing with S.A.G.E. is a simple matter of locating and manipulating the
commands stored in the buffer. Each command has a buffer position, and by
locating that position, the command can be altered or deleted with the Delete
Command.
BACK TO THE SQUARE
Let's return to our sturdy purple/orange-red square for the moment. If the
square is not on the screen, load it at this time. By checking POS on the Editing
Bar, we see that 7 commands were used to create the square. The commands
are:
1)
2)
3)
4)
5)
6)
7)
Plotting the initial point (N)
Drawing the left side
Drawing the top
Drawing the right side
Drawing the bottom
Color change
Using the two-color fill
YOUR EDITING TOOLS
There are three keys that will help you arrive at a previously entered
command for editing once~ (Edit) is pressed:
(1) The e1:l·SUl·1il which, when pressed, steps through the buffer (using
the pointer) one command at a time.
(2) Hunt(~). which offers a menu of special commands that will help you
locate a specific command by that command's function, e.g. Fill, Color, New
Line, and so on.
(3) Jump (~), which positions the pointer either forward or backward in the
buffer.
Once the command to be changed is reached, the Delete command
comes into play. Delete (I:J) works in chorus with either Edit(~) or Hunt(~). Rrst
we find the command; then we cancel that command and substitute a new
command. Let's take a closer look.
10-1
SPACEBAR
PROFESSOR SAGE SEZ:
Unless you 're in the Edit Mode,
pressing the~ will always
return the Editing Bar to the Normal Mode!
Pressing the spacebar lets you
step through the instructions in the
buffer until you reach the
command you wish to change with the Delete
command. Each time the spacebar is pressed, the
Edit command will advance one instruction. This is
reflected in the POS indicator on the Editing Bar.
(Don't forget: Each instruction that is used to create
a picture is stored in the buffer.)
Let's tinker with the square, and extend its bottom line by an inch or so.
(1) Press~ to place S.A.G.E. into the Edit mode. This clears the screen
and returns the internal pointer to the first instruction in your drawing. The
square will disappear from your screen, and the POS indicator on the Editing
Bar will return to zero. Press the fiq·XUO;l twice to view the first line.
(2) Press the SPACEBAR to step through the commands one by one until
Instruction 5 (the instruction that drew the square's bottom) is reached. You
will see the square "assemble" with each press of the spacebar. Watch the
POS indicator on the Editing Bar; when it reaches 5, stop pressing the
spacebar.
(3) Press [jJ (Delete) and then type
erased.
II Dand~·
Instruction 5 will be
(4) Reposition the cursor at the new point to which you wish to extend the
line. Press ~· The new line will be drawn.
(5) Press !J to move the pointer to the end of the buffer (in this case,
Instruction 7) and the new line will be inserted and executed. The revamped
picture will appear.
FIGURE 13
/
D
~
(Colors) Color 1: 1/
/ Il,_FIII: Sold
Color 2: 0
/ X:16
'f:O
Lan: 7
/
A. Stnt Wllh the
Square
I :------:
I
I
I
I
I
I
I
I
·------~
B. Pren E to Enter the
Pos: 1
I
[------1
I
I
I
I
------~
C. Preas the Space Bar;
Edit Mode. The Square
the Lelt Side of tha
Will Vanish.. Prus It'll
Square Will App. . r.
Space 81r. The Pas
Indicator Say s: 1
10-2
Pos: 2
FIGURE 13
(Cont.)
DODD
.001111
0. Press the Space Bar.
The Top WIU App.. r.
Pos: 3
E. Prell the Space Bar.
The Righi Side Will Appear
Poe: 4
F. Prell the Space Bar.
The Bollom Will Appear
Pol: 5
G. Preas 0 then - 1. The
Boltom Line Will be
Era~ed
Poe: -4
i
H. Move Cursor to Here
and Press l .. .
J . . .. The New Line
Appears.
Poe: 5
K. Pr.11 X to Ad't'ance
to the Buffer's End.
Pos: 7 •
L Can you Restore
Our Square lo
Normal?
Poa: ?
DELETE COMMAND
To recap our example above, the Edit command advanced the picture to
the instruction to be changed, and the Delete command canceled the
instruction.
Delete can erase forward as well as backward. In the example above, a
-1 was entered. This erased the LAST instruction executed. If a -2 were to
be entered, the last TWO instructions would be erased. A -5 would've erased
everything to the beginning of our square. Entering a positive number, 1,
would've erased the last instruction executed. In this case, Instruction 5 would
have been erased since we are positioned at Instruction 5. Entering a 2 would
delete Instructions 5 and 6. Delete always starts with the last instruction
executed .
AND NOW - A LITTLE RECONSTRUCTIVE SURGERY
Go back now and "correct" the extended line you just added to the
square's bottom. When you have finished restoring the square to normalcy,
press ~ to save the square onto your tape or disk.
HUNT
The Hunt function, though simple in execution, is one of the most
important editing functions of S.A.G.E.
The Hunt function may be thought of as a "short-cut sniffer." As
mentioned at the beginning of this chapter, engaging Hunt taps into a menu
that lists commands according to their function. Searching for a command by
function can save you time when working with complex pictures which often
contain hundreds of separate commands.
USING THE HUNT FUNCTION
The search itself is a simple process. First, press~ to display the menu of
command types, and then enter the number of the menu item to be located.
10-3
You may, for example, wish to locate the first Boundary Fill placed into a
picture. By pressing UJ (which displays the Hunt menu) and then r:t
BOUNDARY FILL from the menu, S.A.G .E. will search the buffer until the first
Boundary Fill is encountered.
The HUNT menu is listed below, and will appear in the Editing Bar when UJ
is pressed.
HUNT MENU
FOR WHAT ARE WE HUNTING?
(1)
(2)
(3)
(4)
(5)
(6)
(7)
WAIT/CHANGE- STOP AT FIRST FOUND
QUICK FILL
COLOR
NEW LINE
DRAW LINE
BOUNDARY FILL
REGULAR FILL
Each menu item above refers to one of the specialized drawing, coloring
or filling functions of S.A.G.E., except for (1). WAIT/CHANGE, which is a
time delay you can place into your picture at pre-determined intervals. (WAIT is
explained in detail in Chapter 10 under its own separate category.)
For example, to locate and change the first Regular Fill used in our square,
press~. REGULAR FILL. S.A.G.E. will search the buffer until the first Regular
Fill is located.
During the search, the square would be drawn up to the point where the
regular fill was found. If you were to press the spacebar at this point, the fill
would execute. Therefore, to change the Regular Fill command:
Press the ~iq·tUf.1;l. as above, and use the Delete key ([l"J and
II i]l to back up one instruction and substitute a new color
using the C (Change color) command.
Whenever using HUNT, the pointer will be moved to the instruction
immediately prior to one you wish to locate. If you press a wrong key during
the procedure, you can begin again by pressing UJ.
You'll find more information on HUNT in Chapter 11.
JUMP COMMAND -A REAL TIME-SAVER
Any time you are looking for a particular instruction in the buffer, pressing
(Jump) will greatly expedite the search. The Jump command jumps the
pointer forward in the buffer when a positive number is entered or backward if
a negative number (a number prefaced with a - sign) is entered.
~
10-4
r\
To use the Jump command, press !J, then type the number of commands
you wish to skip through. After you've entered the positive or negative
number, press~· The Jump command will skip over the number of
commands entered.
Example: To jump to the last command in our two-color square, press~·
answer to the HOW MANY INSTRUCTIONS TO JUMP? question
Type~ in
and press~.
INSERTING COMMANDS
Whenever S.A.G.E. is in the Edit mode, any standard command that is
used will be inserted in the buffer at that point. To insert, execute the
command. It will be automatically inserted at the current buffer position.
A FINAL NOTE ON EDITING
Editing can be a very creative process. We've pointed the way by
introducing you to the Edit and Hunt commands, but from here it's largely up
to you to organize an approach to editing your pictures. We don't wish to
sound like a stuck record, but experiment as much as possible: In so doing,
you'll develop short cuts, and just as importantly, style!
10-5
CHAPTER 11
A LOOK (AND MORE) AT A FINISHED PICTURE
After ten chapters of working with multi-colored squares, you will
probably enjoy seeing a picture which requires a little more ambition of its
creator. Let's take a look at an example from the Scott Adams Graphic
Adventure Series (S.A.G.A.l that is stored on your S.A.G.E. tape or disk.
LOADING THE S.A.G.A. PICTURE
Disk users: Press~ B. Type ~lU~ and press Wl!Illll when the
READY prompt appears. Type ~~0~! fil and pressWI!Illllwhen asked for the
File Name.
Tape users: The S.A.G.A. picture immediately follows the Multi-Palette
on your cassette. To load, cue the cassette to the fourth program on the tape
and follow the program loading instructions from Chapter 2. When asked for
the File Name, type ~D ~~~~and press Wl!Illll· The picture will appear on
your screen shortly.
ABOUT THE S.A.G.A. PICTURE
The other-worldly panorama on your screen is excerpted from S.A.G.A.
#6, Strange Odyssey, and dramatically illustrates what a little time and talent
can produce. You can see by the buffer length indicator (LEN) indicator on the
Editing Bar that 432 separate commands were used to create this picture.
TOYING WITH PERFECTION
The S.A.G.A. space-ship scene is safely stored on your program tape or
disk, so we can try a few alterations on Scott's picture without fear of
permanent damage to the stored picture. This "tampering session" will serve
as a review of sorts and provide an opportunity for you to see the Edit, Hunt
and Jump functions at work on a large-scale picture. We'll also show you how
to insert time delays into pictures for special effects, using the heretofore
unmentioned Wait function.
THE EDIT COMMAND ET AL REVISITED
The Screen Canvas should now display the space-ship picture if you've
correctly followed the loading instructions. If so, we're ready to begin.
You type:~
The Screen Canvas displays:
An empty screen with the cursor flashing. The POS
indicator has reset from 432 to 0.
11 - 1
You press the tW·XUt·1jl10 times
The Screen Canvas displays:
Several black lines against a light background. The
POS indicator will read 10.
Pressing the spacebar 10 times advanced the pointer 10 commands into
the picture, and demonstrates how each command is executed, one at a time,
when the Edit mode is engaged.
The first spacebar press advanced the pointer to the first command in the
buffer: an instruction to change the Color Fill type from yellow (the default
color) to white.
The second spacebar press initiated the Color Fill which changed the
Screen Canvas background from black to white. The subsequent commands
executed with each press of the spacebar are N and L line-drawing commands,
the beginnings of the space ship itself.
THE JUMP COMMAND
It would be time consuming to advance to the end of the buffer by
continually pressing the spacebar. The Jump command will help you avoid
unnecessary wear and tear on your thumb.
Let's "jump" a little way into the buffer and see what happens.
You type:
D
The Editing Bar says:
JUMP HOW MANY CMOS?
(0= BACKWARDS)
You type:~~ and press~
The Screen Canvas displays: The completed space
ship and the beginnings of some additional objects
Typing 50 advanced the pointer 50 commands into the 432-command
buffer, to the point that's now visible on the Screen Canvas. The POS indicator
shows that we have moved 60 commands into the 432-command picture.
CHANGING THE RINGS' COLOR
It's time to set aside our brief sightseeing tour with the Jump command
and take an active hand in changing a part of the existing picture. The planet
that hangs over the skyline to the right has blue-purple, diamond-pattern rings.
We are going to change them to a solid red.
The first step in changing the rings' color is locating the instructions in the
buffer that determined the Fill colors and pattern. We can locate these
instructions quickly with the Hunt command.
11-2
FINDING A COLOR CHANGE USING HUNT
Chapter 9 pointed out that the Hunt command narrows down the search
for specific instructions by searching for a particular type of instruction. We
can locate the rings' color-change instruction with a "color-change" search.
Here's how:
You type:
Ul
The Editing Bar says:
FOR WHAT ARE WE HUNTING?
(1)WAIT/CHANGE- STOP AT FIRST FOUND
(2)0UICK FILL
(3)COLOR
(4)NEW LINE
(5)DRAW LINE
(6)BOUNDARY FILL
(7)REGULAR FILL
You type : ~
The Editing Bar says:
HOW MANY 1 =STOP AT FIRST FOUND
We selected 3, COLOR, from the Hunt menu since we're searching for a
color change. A "guesstimate" would normally be entered here, since the
precise number of color changes to skip are not known. However, the number
that will advance the pointer to the color change we're looking for is 17. The
Color Hunt will skip past the first 16 color change instructions in the buffer, and
stop at Position (POS) 423 - the instruction immediately prior to the actual
17th color change instruction, 424.
You type: D~ and press I;JUI@!
The Screen Canvas displays:
The picture assembling one step at a time. The Editing
Bar will appear when the 17th Color Change is found
and the POS indicator will read 423. (This will take
about a minute.)
The pointer should now be positioned at the instruction immediately
before the one we wish to change if 17 was the correct number of color
changes we needed to skip.
We can find out if the upcoming instructions are the ones that determine
the color and fill type of the planet's rings with a simple test: executing the next
few instructions and watching the results on the screen.
You press: the
f1i·XUf.1;l three times.
The Screen Canvas shows:
No change with the first press (which is the
instruction that tells the program what color the rings
11-3
will be) and the appearance of the ring's color fill with
the next two fjlBUJ.!;l presses.
The POS indicator should now read 426. So, the total number of
instructions necessary to fill the rings with the blue-purple diamond fill is three.
The next step is to delete those three instructions and to substitute our new
instructions.
You type:
l!J
The Editing Bar says:
WARNING!
WILL DELETE LAST INSTRUCTION DONE
HOW MANY INSTRUCTIONS?
(0= BACKWARDS)
You type: II~ and press~
The Editing Bar says:
(COLORS) COLOR 1:9 COLOR 2:10 LINE:10
FILL:DIAM X:16 Y:O LEN :429 POS:423
By entering the -3 in the Delete mode, the old instructions have been
erased and the pointer is reset to POS 423 - the point in the buffer where the
new instructions can be entered .
You type:
t=
The Editing Bar says:
CHANGE COLORS:
(1) = FILL, (2)=COLOR, (3l=LINE
You type:
D
The Editing Bar says:
COLOR? (1-15)
You type:
fl and then
press~
The Editing Bar says:
CHANGE COLORS:
(1 l =FILL, (2) =COLOR, (3) =LINE
You press:~
The Editing Bar says:
FILL TYPE NOW: DIAM
O=SOLD 1 =DIAM 2=HORZ 3=VERT 4=CHEC
You type:~
The Editing Bar says:
(COLORS) COLOR 1:7 COLOR 2:10 LINE:10
FILL: SOLD X:16 Y:O LEN:430 POS:424
Take the joystick and position the cursor in the upper part of the rings.
Press ~· The upper section of the rings will fill with red. Position the cursor
slightly under where the red fill ended and press~ once again. The rings should
11-4
now be filled with solid red. If the
rings are not completely filled with
red, reposition the cursor as
necessary and press ~ again until the
coloring effect is complete.
PROFE SSOR SAGE SEZ:
Don't forget, some obj ect s re·
quire se veral fill c ommands
before they can be co lored !
THE WAIT COMMAND
The Wait command controls a
time delay you can place into the
buffer. This delay counts off a pre-determined interval of 1 to 31 seconds
before the pointer advances to the next instruction. We can, for example, place
a 10-second Wait into the buffer directly before the command that fills the
planet's rings with red. By inserting the 10-second delay at this point, the
instruction to color the planet's rings will not execute until 10 seconds have
elapsed.
INSERTING A WAIT INSTRUCTION
First, use the Jump command to return to POS 423. If the POS indicator
reads 426, type ~ and enter a ~~~~to the JUMP HOW MANY INSTRUCTIONS? message. If the POS indicator reads other than 426, enter
the correct number to return to position 423.
You type:~
The Editing Bar says:
HOW LONG? (1-31)
You type:
OW and
press~
The Editing Bar says:
(COLORS) COLOR 1:9 COLOR 2:10 LINE:10
FILL:SOLD X:121 Y:11 LEN:433 POS:424
You type:~ and
lJ
The Screen Displays:
The picture being quickly
beginning .
redrawn
from · the
The Wait instruction placed into the buffer at position 423 will create a
10-second pause before instruction 424 (and subsequent instruc~ions) are
executed. The interval of the pause may be changed by returning to POS 423
and entering a new number.
TAKING IT FROM HERE
Since the operative word is "experimentation," it is suggested that you
spend some as much time as possible practicing with the S.A.G.A. picture. Try
changing some additional colors; add a few more Wait instructions; take a stab
at erasing the space. ship. If the picture begins to look more messy than dressy,
you can reload the picture from your tape or disk for a "fresh" start.
11-5
CHAPTER 12
THE COMMAND KEYS EXPANDED
This chapter is an expanded version of Chapter 3. Here, you will find the
Command keys alphabetically listed along with a capsulized description of their
functions. Refer to the chapter listed at the end of each description for
additional information.
There are several special editing and control functions listed which were
not covered in the preceding chapters. Read through each Command
description carefully.
S.A.G.E. COMMAND KEYS
~ -
Change Fill type. Similar to the C function except changes Fill type only
and not color. Select either (0) SOLID, (1) DIAMOND, (2) HORIZONTAL, (3)
VERTICAL, (4) CHECKER. Please Note: The A command places no
information into the buffer until the next fill or U command is entered. Chapter
5.
Ill -
Palette Erase. Slowly erases on-screen palette. Use Palette Erase when
you wish to view the picture without the palette. Chapter 9.
~ -
Change Color and Fill type. Presents option of changing (1) FILL, (2)
COLOR 2, and (3) LINE. Entering this information will lead to the FILL TYPE
option. Chapter 5.
~- Delete commands from buffer. Type a positive number to Delete forward,
a negative number to Delete backward. The Delete command always deletes
the last command entered, so a - 1 is the same as a + 1. Chapter 6.
~ -
Edit Mode. Clears screen, reset buffer pointer to 0 (zero) . Press the
tV·XI!I:f·lj1 to step through each instruction. Pressing X jumps pointer to end of
buffer and executes all instructions. Chapter 10.
~-
Fill. Fills until another color is encountered. Several fill commands may be
required before and object is completely colored. The fill effect moves straight
up from the cursor position until it encounters a different color. From there, the
fill effect moves left and right, reversing position and moving down one line
each time it encounters another color. For best results, position the cursor
directly under the highest point in an object before pressing ~- Chapters 5 and
7.
~- Palette File Name. Use this to retrieve a palette that was saved to tape or
disk. Screen will say: PALElTE FILE NAME? ENTER FILE NAME. You may
type any name up to 8 characters in length. Use D:(name) to load from disk; C:
for loading from tape. Press RETURN when you've typed the name. Chapter
9.
12-1
UJ-
Hunt command. An editing function that allows speedy searches for the
Fill, Color arid Line commands that make up a picture. Functions searched for
include:
1)
2)
3)
4)
5)
6)
7)
Wait/Change Quick Fill
Color
New Line
Draw Line
Boundary Fill
Regular Fill
Stop at First Found
To search for an instruction in buffer, press the appropriate number. Chapter
9.
O- Identify Color Cursor is On. If you're not sure of a color, position the cursor
over the color in question and press 0. The primary color will be identified by
number at the lower left corner of the Editing Bar.
~-
Jump Command. Editing function that allows user to quickly jump forward
or backward through commands in the buffer. To use, press~ and then type
the number of commands you wish to skip through. A positive number skips
forward, a negative number, backward. Entering ~ will cancel the jump.
Chapter 10.
~- Draw Line (draw to). Draws a line from one point to another. To use, place
cursor at desired position on screen and press ~· Used in tandem with the N
command. Chapter 4.
~ -
New Line (plot). To use, place cursor at desired position on screen and
press ~· Chapter 4.
~ -
Load File Into Current Picture. This will place a picture (file) onto the one
currently on the screen. Tape users: Make sure that your file is cued and ready.
Disk users: Make sure your disk is installed properly in the drive. The screen will
say: OBJECT NAME (RETURN =ABORT) Type the name of the file to be
loaded and press~· The two pictures are NOT combined in the buffer,
only on the screen; this means that you cannot save combined pictures to tape
or disk. Pressing ~ !J will erase the previous picture.
~ - Palette Edit. Allows altering of the color register and luminance. Use with
joystick. Save new palette using R command. Chapter 9.
~ -
Remember Palette. Used after creating a new palette with P command to
save it to tape or disk. The current palette is always saved along with your
picture. Chapter 9.
~ -
Save Picture. Press ~· The screen will display: ORIGINAL NAME:
D:PICTURE WHAT NAME TO USE? (RETURN FOR SAME!) Type up to
eight characters and press ~· Chapter 6.
12-2
~ -
Test Mode. Allows user to experiment with picture without storing
commands in buffer. Press~ again to revert to Normal Mode.
[!J- Fill Until Color 15 Boundary is Met. This command was originally designed
to allow objects to be created and stored in separate files, and then loaded
individually into a picture using the 0 command. To fill an area that contains
more than one color, outline the area with Color 15, then use the U command
to fill (as with F above). When the picture is complete, use either the Z or V
command to remove Color 15 lines. Chapter 8.
~ -
Changes All Previous Lines in Color 1 to Color 2. Used to speedily change
one line color to another. Chapter 8.
i:i:j - Wait X seconds. The Wait command is a time delay that counts off an
interval of 1 to 31 seconds before it executes the next instruction. Putting a
time delay into your pictures at certain points can make the overall effect more
dynamic. Example: You might have a landscape of a house with a chimney
sitting on a hill. By placing a Wait command immediately before the command
that draws the smoke, you can cause the smoke to appear from the chimney
after the rest of the picture has appeared. Chapter 11.
f.:l-
EXit- draw To End of Buffer. Executes all commands in the buffer, and
exits the Edit mode. Chapter 10.
f3-
Sets Color 1 = 15 and Color 2=9, and then executes a V command. Turns
all Color 151ines to black when used with the standard Color Palette. Chapter
11.
g-
Straighten horizontal and vertical lines. This will "firm up" some of the
unevenness in the lines by one pixel size. To use, press g. When the FROM
message appears, enter the starting POS number that references the line to be
straightened and press~· The TO message will appear. Enter the ending
POS number that references the line to be straightened and press ~·
Example: If the line to be corrected was drawn starting at POS 234 to 241,
enter ~~~ @;Uilljllt] and ~~D @;!Jirljlm The corrected picture will be drawn
when the process is complete.
Move Picture. Moves entire picture left, right, up or down. Press il The
Editing Bar will read: X-OFFSET. Enter the number of pixels you wish to
corrrect by. Enter a positve number to move picture right, a negative number
to move picture left. When Y-OFFSET appears, enter a positive to move
picture down, a negative number to move picture up. Press~ to "skip" a
direction. Example: To move a picture 20 pixels to the right, type 20 in answer
to the X-OFFSET message. The corrected picture will be drawn when the
process is complete.
fl-
~- Dump Cassette Master. This will write the object code of S.A.G.E. onto a
cassette tape. This allows you to (1) Create a backup of your master tape and
(2) Create new t~pes with this as the first file. Follow on-screen prompts to
execute.
~- Displays Disk Directory when a File Name is requested.
12-3
CHAPTER 13
TAKING IT FROM HERE
r
Whether you're doing a little on-screen doodling or pursuing a serious
programming endeavor, we hope the discovery process of creating graphics
with S.A.G .E. and your ATARI Home Computer has been an enjoyable one.
You will find that the longer you work with S.A.G.E. , the easier the
"operation rhythm" will become. First-time users who often take a minute or
more to enter the information to perform a two-color Fill may expect, with a
little practice, to find themselves leaping through the same procedure in a few
seconds' time.
Here are a couple of tips to consider:
PUT IT ON PAPER FIRST
Just as an architect blueprints a new house before a single nail is driven, it
is likewise a good idea to plan your next masterpiece on paper. Sketching out
an idea gives you the freedom to change things around before too much time is
spent entering commands.
YOU CANT SAVE TOO MUCH
It's a sober fact that power surges and outages are the bane of computer
users everywhere. Don't fall victim to one of these indiscriminate killers! Get
into the habit of saving a picture in progress as often as time permits. If you
save your picture every 10 minutes, you'll only be out that much time should an
accident occur.
TECHNICAL SECTION FOR ADVANCED USERS
Finally, ATARI users with a good working knowledge of BASIC and/or
machine language will find the technical information listed in the appendices
helpful. You will find complete information on how to interface S.A.G.E. with
both BASIC and machine-language programs, and additional facts on how
S.A.G.E.'s commands are set up.
13-1
APPENDIX A
CREATING A BACKUP DISK
Prudence dictates that a minimum of one extra copy of your original
S.A .G.E. disk be mastered and safely stored away. The importance of having a
backup copy cannot be overemphasized. Dust, magnetic fields, heat, physical
wear, and the family dog: Disk hazards abound everywhere.
FORMATTING A DISK
Before S.A.G.E. can be copied, you'll need to format a blank disk. The
formatting process will place an electronic filing system onto the blank disk so
that S.A.G.E. can be written onto the disk. Follow the formatting instructions
below closely.
1) Your ATARI should be "ready to go": The BASIC cartridge installed,
and the video monitor and disk drive(s) turned on.
2) Insert the S.A.G.E. disk into Drive 1 and turn on your ATARI.
3) When the READY. prompt appears, type ~t!J~ and press
DOS Menu will appear as shown below.
Wl!WJ.
The
DISK OPERATING SYSTEM II VERSION 2.0S
COPYRIGHT 1980 ATARI
A.
B.
C.
D.
E.
F.
G.
H.
DISK DIRECTORY
RUN CARTRIDGE
COPY FILE
DELETE FILE(S)
RENAME FILE
LOCK FILE
UNLOCK FILE
WRITE DOS FILES
I.
FORMAT DISK
DUPLICATE DISK
K. BINARY SAVE
L. BINARY LOAD
M. RUN AT ADDRESS
N. CREATE MEM. SAVE
0 . DUPLICATE FILE
J.
4) Remove your S.A.G .E. disk from Drive 1 and insert your blank disk.
5) Type D. The screen will show: WHICH DRIVE TO FORMAT? Type 0.
6) The screen will show: TYPE Y TO FORMAT DISK 1. Type
iJ.
7) The blank disk will be formatted at this time. When the formatting
process is complete, the screen will say: SELECT ITEM OR RETURN TO
MENU.
DUPLICATING A DISK
Now that the formatting is complete, we can copy S.A.G.E. onto the
formatted disk. Here's the procedure:
A-1
1) Follow Steps 1 though 3 under FORMATTING A DISK above.
2) Remove the formatted disk from Drive 1 and insert the S.A.G .E. disk.
3) Type~ for "J. DUPLICATE DISK" from the DOS Menu. Press w::l!llllJ.
The screen will read: DUPLICATE DISK SOURCE, DEST DRIVES?
4) One-drive system owners: Type D!D then press
owners: Type 0!~, and press Wl!mJ.
w::l!llllJ. Two-drive system
5) The screen should now display: INSERT SOURCE DISK. Make sure that
the S.A.G.E. disk is properly inserted into the drive and the drive door is
secure. Press Wl!mJ.
6) The screen will read: INSERT DESTINATION DISK AND PRESS
RETURN. Replace the S.A.G.E. disk with your formatted disk and press
Wl!mJ.
7) One-drive system owners: "Swap" the formatted disk and the S.A.G.E.
disk according to the screen prompts. Two-drive system owners: The ATARI
DOS will automatically create a backup without any disk exchange. The
backup process usually takes about 8 minutes.
When the DOS Menu reappears, the backup process will be complete.
Don't forget: Store your original S.A.G.E. disk safely away.
A-2
APPENDIX B
CREATING A DUPLICATE TAPE
Making an extra copy of your S.A.G.E. tape is simply a matter of loading
the program into your computer and dumping it back out onto an extra
cassette. Follow the instructions below.
1) Load either the tape or disk version of S.A.G.E. into your ATARI's
memory. This includes both the machine-language and BASIC programs. Use
the loading instructions in Chapter 2 for reference, if necessary.
2) Load the Multi-Palette. If you're loading from tape, the Multi-Palette
follows the BASIC program. If you're loading from disk, the file name is:~·
3) Place a blank cassette into your Cassette Player. Rewind if necessary.
4) The screen should show the Multi-Palette and Editing Bar. If so, press:
C. The Editing Bar will say:
READY TO WRITE TO CASSETTE? Press iJ for
Yes.
5) Immediately press the PLAY and RECORD keys at the same time on
your Cassette Player.
6) Press
l:illl!Iilll on your ATARI.
The machine-language program, the first program recorded on the tape,
will load onto your tape at this time. You will hear a high-pitched sound as the
data load. After the program has loaded, the sound will stop and the cursor will
begin to blink on the Screen Canvas.
7) Press~ on your ATARI. The Editing Bar will say: STOPPED AT
LINE XXX. Type:~~~~~· Press l:illl!Iilll twice.
The BASIC program, which is the second program recorded on the tape,
will load onto your tape at this time. After it loads, the READY prompt will
appear. When it does, type: tijt:J~t:J ~~~Lil~ Press l:illl!Iilll· The Editing Bar will
revert to its normal mode (as illustrated in Figure 4 of this manual). When it
does:
8) Press~
9) In answer to WHAT NAME TO USE? message, type: ~DW~!j;jj~.
Press l:illl!Iilll twice.
The Multi-Palette will now be saved onto your tape.
B-1
APPENDIX C
PROGRAM COMMANDS: TECHNICAL INFORMATION
1) All of S.A.G.E.'s commands are three bytes long. They may be broken
down as follows
Byte 0
Bit's Name
3 Most Significant Bits = CMD # 0-7
5 Least Significant Bits = BO
Name
Byte 1 = B1 (Normally X)
Byte 2 = B2 (Normally Y)
2) CMOS (0-7)
0 1 -
End of Buffer
Wait BO seconds if BO 0
If BO = 0 Then Do V Command
Change all Color 1 lines to Color 2
Z - Quick Clear entire screen
BO, B1, B2 not used
4 - New Line B 1 = X, B2 = Y
5 - Draw Line to Here B1 =X, B2=Y
3 - Set Color
BO = · Line Color
B1 = Fill Color 1
B2 = Fill Color 2
6 - Fill Boundary
BO = Fill Type
B1 = X to Start
B2 = Y to Start
7 - Fill
BO = Fill Type
B1 = X to Start
B2 = Y to Start
FILL TYPE (Color Patterns)
0
1
2
3
4
-
SOLID
DIAMOND
HORIZONTAL LINES
VERTICAL LINES
CHECKERBOARD
C-1
APPENDIX D
USING S.A.G.E. IN YOUR PROGRAMS
I. MACHINE LANGUAGE (Disk Only)
,--.._
S.A.G.E. can be intertaced with your own machine-language programs.
You will need the ATARI Assembler Cartridge (available from your ATARI
dealer), and a blank, formatted disk onto which you can store the assembled
files.
Please note that this procedure is for advanced users who are comfortable
with machine language.
1) Insert the ATARI Assembly Cartridge into your computer. Place the
S.A.G.E. disk into the drive and turn on the system. The screen will read:
EDIT.
2) Type: ~~~~rilC~D~~~D~~!riJ~~ Press ~- The screen will read:
EDIT.
.
3) Place the blank, formatted disk
riJ~~!!C~D~~~D~~!~!lJD Press~-
into
your
drive.
Type:
4) Repeat Steps 2 and 3 above to load all of the modules listed below. In Step
3, you will drop the ASM suffix and append with OBJ.
GEDIT 1.
GEDIT 2.
GEDIT 3.
GEDIT 4.
5) To
load
each
of
ASM
ASM
ASM
ASM
the
-Artificial Instruction Set
- Jump Table
- Screen and Interrupts
- Main Graphic Routine
assembled
files
into
memory,
type:
~~riJ~C~D~~~D~~!riJ~~! Press~- Substitute 1, 2, 3, or 4 for 0 in the
LOAD statement for each module.
The assembler files above compose the machine-language part of the
program and the screen memory. They are storeq in the ATARI Assembler
Cartridge format.
Program resides from:
5BA3 to 6E93
Screen resides from:
7000 to 9FFF
See GEDIT 3. ASM (above) for screen setups
TECHNICAL INFORMATION ON SCREENS
What you see on your screen is achieved by flickering between two
screens every ver:tical blank. The two screens are in BASIC 7 ~ Mode or
D-1
ANTIC 14 Mode. Each screen uses 12 lines on the display and 4K of memory
for a total of 8K. A text window is set up to interface with BASIC's Graphic 7
screen, leaving onfy four lines of text. The remaining four lines are used to
display the Primary Palette.
The source can be modified, at your discretion, to allow twelve lines of
picture and twelve lines of text.
The text normally resides from 9F60 - 9FFF.
The palette resides in screens 9000- 95FF and 9600 - 9BFF.
II. BASIC
Let's assume that you 've written a program called Acme Coupon
Manager. ACM is a text program, but you want to insert a flashy title screen at
the program's beginning to break up the monotony of all that text. Here's how
you would set it up:
1) Draw your title screen using S.A.G.E.
2) Save the title screen to tape or disk. Disk users: Type l!jDDDD~~ and
press~· Tape users: Type ~DDDD~~ and press~·
3) Load the S.A.G.E. machine-language file from your tape on disk. On
the disk version, it's AUTORUN.SYS and loads automatically when the
program is first run . On the tape version , it's the first program recorded on the
tape.
4) Disk users: When the READY prompt appeal'S, type: ~tiJti]l!j
press ~· Tape users: Carefully type in
PROGRAM 1 listed below.
lfil!jD~~{:JWUlJtil~lli and
5) PROGRAM 1, below, may be entered as a subroutine in your own
program (our theoretical Acme Coupon Manager). Therefore, you may change
the program numbering to fit your own program.
6) Disk users, change Line 40 to: 40 OPEN #1,4,0,"D:TITLE" Tape users,
change Line 40 to: 40 OPEN #1,4,0,"C:TITLE"
7) Change Line 450 to RETURN. This assumes that you used a GOSUB
to enter PROGRAM 1. If a GOTO statement was used, use another GOTO to
return to your program.
8) Type ~W~ and press~9) Disk users: Make sure the disk you saved your title screen to is in Drive
1. Tape users: The cassette onto which your picture was saved should be
ready. After ~W~ is typed in Step 8 above, a "beep" will sound; press PLAY
on your cassette player. The picture will load into your program and appear on
the screen.
D-2
PROGRAM 1
5 REM (C ) 1983 SCOTT ADAMS INC.
6 REM CLEAR SCREEN (ESC.CRTL-CLEAR>
7 "? H } U
8 REM CHECK IF MACHINE LANGUAGE IS
9 REM IN MENORY.
10 IF PE.:E1<<25856) <> i62 THEN ? "I'IACHINE LANGUA
GE PROGF:AM NOT LOADED":: END
2 0 DIM BUFFR$ C4050>.NAME$(15)
3 0 REM BUFFR$ IS OUR VARIABLE NAME
3 1 REM BUT YOU CAN USE YOUR OWN.
40 OPEN # 1 • 4 , IZI • " C: NAt""!E"
5 0 GET # l ,L:GET #l,K
60 S I ZE=I<)I·L56+L
70 REM SIZE IS THE SIZE OF THE
7 1 REM PICTURE TO LOAD. NEXT WE
7 2 REI'-1 TRANSFER THE PRIMARY PALETTE
73 REM l~AT IS IN OUR PICTURE.
80 FOR l<=fli TO 9
90 GET #l~L
10 ~ POKE 25862+K 7 L
1 10 NEX T K
120 REM WE USE A HIGH SPEED READ FOR
130 REM THE REST OF THE PICTURE.
140 K=USR(24784,ADR<BUFFR$),SIZE,7>
150 IF K>3 THEN PRINT "I/0 ERROR":STOP
16i21 BUFFR$(SIZE+ 1)=""
17 0 CLOSE #1
180 I F ASC ( BUFFR$(SIZE,SIZE> )<>0 THEN PRINT "
BAD FILE " :STdP
190 REM ONCE A PICTURE IS IN THE
191 REM BUFFER WE CAN DRAW IT.PUT THE
192 F:EN FOLLOW I NG AT THE START OF YOUR
193 REt·1 PROGRAM.
194 REM OPEN UP A GRAPHICS 7 SCREEN.
200 8=2 347 2
2 11ZJ GRAPHICS 7 :I=USR ( 25859)
220 REM SET HIMEM TO BOTTOM OF MACHINE
22 1 REM LANGUAGE PROGRAM.
230 I=G-· 14
2 40 POKE 741,1 - INTCI/256)*256
2 50 POKE ?42,INT ( I/256>
260 REM DO THE FOLLOWING TO SETUP THE
2 61 REt"! PI CTURE.
270 J=ADR<BUFFR$)
280 POKE G+3,J-INT(J/256>*256
D-3
290 POKE G+4,INT(J / 256)
312HZ! ,J=J - 1 +SIZE
310 POKE G+5,J-INT(J/256)*256
320 PQKE G+6,INTCJ i 256 )
330 REM NOW DRAW IT!!
:340 I =USR <G >
41ZHa ·=' "
4UZI ? "
42fll ? II
4?? DIM
ll
PRESS RETURN TO CONTINUEu
ll
A$(5)
425 INPUT A$
426 REM THIS PUTS THE SCREEN BACK
427 REM INTO GRAPHICS MODE 0
44~ POKE 54286,fll:POKE 546~PEEK<26!ll25>:POKE 54
7,PEEK<26026 >:POKE 54286.192:GRAPHICS Ill
You will note that there is ample room for text at the bottom of the screen
- four line's worth. You may clear this area for your own text (example: JOHN
JOHNSON PRESENTS - ACME COUPON MANAGER) by placing PRINT
statements at the appropriate point in your program. DO NOT use a Graphics 0
command once your are in Graphics 7 above to clear the graphics screen.
Instead, re-execute program lines 160 through 250 above.
You may use the above procedure to enter pictures at any point in your
program. After each picture appears, the screen will read: PRESS RETURN TO
CONTINUE. Press~ to continue execution of your program.
D-4
APPENDIX E
THE COLOR GENERATOR
Once the standard Color Palette has been modified, you will want to find
out which textures and patterns do ·and do not flicker.
The Color Generator lists values for Color .1, Color 2, and Fill type, and
places a test bar on the screen that can demonstrate all possible combinations
of patterns and textures. You may then inspect the test bar for flicker as well as
for aesthetic value.
LOADING THE COLOR GENERATOR - Disk Users
1. Insert the S.A.G.E. disk into Drive 1 and press Wiiii:jJ Wllj.
2. When the screen says, READY, type: ~tlJ~I!Jil:lJD~I:lJDDtlJ~!~~~~ and
press~.
3. When the screen says, READY, type: ~~D~~i[llD~tlJ~tlJ!D~!~~DiB!liJand
press~.
4. When the screen says, READY, type: ~[!]~and press~5. The FILE NAME? message will appear. When it does, press
Wl!Iilll.
6. When the Screen Canvas appears, use the ~ command to get the Palette
you wish to test.
7. Press~- The screen will say: STOPPED AT LINE XXX.
7. Type: ~tlJDtlJ ~~~~and press~Your screen should now resemble Figure 14 below. The horizontal test bar
is at the top of the screen; at. the bottom are three numbers spaced several
inches apart. From left to right, the numbers represent:
1. Color 1
2. Color 2
3. Fill Type
VIEWING A TEST COLOR OR FILL TYPE
To examine the various color and Fill combinations, just press~·
Each time ~ is pressed the test bar steps through a color or pattern
change, beginning with patterns first, and then Color 2 and then Color 1. When
you find a pleasing combination, make a note of the three numbers listed at the
bottom of the screen. The numbers may be entered later when you use your
new-found color scheme in a picture.
E-1
-Test Bar
STOPPED AT LINE XXX
GO TO 8000
0
Register
Color 1
Color 2
FIGURE 14
LOADING THE COLOR GENERATOR - Tape Users
A little additional work will be required of tape users. Here's what you'll
need to do:
1. Follow instructions 1-7 under LOADING THE 48K VERSION OF S.A.G.E. in
Chapter 2. You will be loading the Machine Language and Basic programs at
this time.
2. When the READY message appears, type the Color Generator program
listed below.
PROGRAM 2
0 REM <C> 1983 SCOTT ADAMS INC.
1 REM WRITTEN BY PAT HENDERSON
6 REM CLEAR SCREEN <ESC~CRTL-CLEARj
7 ?
UJ-ff
8 REM SEE IF MACHINE LANGUAGE IS IN
9 REI'-1 11EMORY.
1121 IF PEEK ( 25856 >< >162 THEN ? "t1ACH I NE LANGUA
GE PROGRAM NOT LOADED";:END
2121 DIM BUFFR$(405IZI>~NAME$(15)
30 REM BUFFR$ IS OUR VARIABLE NAME
31 REM BUT YOU CAN USE YOUR OWN.
35 ? "WHAT IS YOUR PICTURE'S NAME"
-3 6? "\EX: D:PICTURE, D2:ROOM.PIC)"
37 INPUT NAI'lE$
40 OPEN #1 , 4,0,NAME$
50 GET #l,L:GET #1,K
6121 SIZE=K*256+L
70 REM SIZE IS THE SIZE OF THE
E-2
~
71 REM PICTURE TO LOAD. NEXT WE
72 REM TRANSFER THE PRIMARY PALETTE
73 REM THAT IS IN OUR PICTURE.
80 FOR 1<=(21 TO 9
9121 GET # 1 , L
100 POKE 25862+K.L
11121 NEXT K
120 REM WE USE A HIGH SPEED READ FOR
130 REM THE REST OF THE PICTURE.
140 I<=USR(24784,ADR<BUFFRS>,SIZE,7J
150 IF K>3 THEN PRINT "I/0 ERROR":STOP
160 BUFFR$(SIZE+l!=""
170 CLOSE #1
181lJ IF ASC<BUFFR$(SIZE,SIZE>> <>0 THEN PRINT"
BAD FILE":STOP
190 DIM BIN<B>:BIN<7>=224:BIN<6>=192:BIN<5>=1
60:BIN<4>=128:BIN(3)=96:BIN(2)=64:BIN<1>=32:B
IN (0)=0
192 DIN FILL$(20/:FILLS="SOLDDIAMHORZVERTCHEK
193 ? "}":? "LISTING COMMANDS FOR ";NANE$
195 COUNTER=0
19 7 LPRINT "COMMAND LIST FOR ";NAME$
198 LPRINT "*******************************"
199 LPRINT " "
200 FOR F=l TO LEN<BUFFR$)-1 STEP 3
210 B0=ASC(BUFFR$<F,F>>
220 Bl=ASC(BUFFR$(F+1,F+l))
230 B2=ASC<BUFFRS<F+2,F+2))
260 FOR G=7 TO 0 STEP -1:IF B0-BIN<G> >=0 THEN
CMD=G:B0=B0-BIN<G>:GOTO 280
2 7 0 NE XT G
280 LINE=<CMD*10)+1000
2 90 COUNTER=COUNTER+1
292 POSITION 5,10:? "PRINTING LINE #";COUNTER
295 LPRINT "COMMAND #";CND:GOSUB LINE
300 B0=0:B1=0:B2=0:NEXT F
9 99 END
100~ LPR I NT " END OF BUFFER"
1009 RETURN
1010 I F B0 }0 THEN 1015
1012 LPRINT "EXECUTE ' V' COMMAND.":GOTO 1019
1015 LPRINT " WAIT ";BilJ; " SECOND<S> "
1019 RETURN
1020 LPRINT "QUICI< CLEAR THE SCREEN"
1029 RETURN
E-3
1030 LPF:Ih/T "SET COLOR: LINE COLOR=";BIZI:",FIL
L COLOR 1=";B1: " ,FILL COLOR 2=";B2
lld39 RETURN
1040 LPR I NT NE~J LINE BEGINNING AT
X;
y
U2149 RETURN
1i2150 LPRINT "DRAW LINE TO:";B1;",";B2
1059 RETUHN
1 iZI61Zl LPRINT "FILL TO BOUt•JDRY. FILL TYPE=";FIL
L$(B0*4+l,BIZI*4+4);". X POS=";Bl:", Y POS=";B2
1069 RETURN
1071Zl LPRINT "REGULAR FILL. FILL TYPE=":FILL$(
B121*4+l,BIZI*4+4i;". X POS=";Bl;", Y POS=";B2
1079 RETURN
II
II :;
II '
!I :
3. After you've carefully typed the above program and checked it for errors,
type ~ l!J ~ and press ~·
4. Follow the instructions from Step 5 above under LOADING THE COLOR
GENERATOR - DISK USERS. All of the information up to this section applies
to tape users as well.
E-4
APPENDIX F
LISTING PICTURE COMMANDS
(Disk Users Only)
The list of commands used to create your picture can be printed. This will
provide a hard-copy backup in case your original disk is damaged or lost.
USING THE PICTURE LISTING FEATURE
To use the Picture Listing feature, type ~l!J~il:JD~~D~~!UJ~~~ and
press Wl!ml when the READY prompt is visible. The screen will display:
WHAT IS YOUR PICTURE'S NAME?
(EX: D:PICTURE, D2:ROOM PIC)
Make sure your printer is properly connected and that the paper is at the
top of the form. If so, type the name of the picture you previously saved and
wish to list. Press Wl!ml. The screen will display:
PRINTING AT LINE XXX
" XXX" is, of course, a variable number, and it will increment as the
picture commands list out on your printer.
THE PRINTED COMMANDS
Each command will be printed in a format similar to the examples below:
COMMAND #3
SET COLOR: LINE COLOR= 10, FILL COLOR 1 =0, FILL COLOR 2=0
COMMAND #4
NEW LINE BEGINNING AT 0,0
COMMAND #5
DRAW LINE TO : 81,95
Refer to Appendix C, PROGRAM
INFORMATION for more information.
COMMANDS : TECHNICAL
AFTER LISTING A PICTURE
Turn off your printer. Press tllilL~HlilDJ and type ~l!J~ (and press Wl!.Illlll
to return to the Screen Canvas.
F-1
APPENDIX G
THE S.A.G.E. COLOR PALETTE A DETATCHABLE REFERENCE
0
1
2
3
4
5
6
7
YELLOW
GREEN ILime)
BROWN
AVOCADO
LIGHT BLUE
PURPLE
MEDIUM BLUE
ORANGE-RED
9
10
11
12
UI!lliJ
13 TAN {Background)
14 MEDIUM GREEN {Background)
UI!lliJ
15 DARK RED
8 MAROON
[
BLACK
WHITE (Light Purple)
ORANGE
MEDIUM BROWN
(Colors) Color 1: 0
Color 2:0
Fill: Sold
Y:O
X:16
G-1
Line:O
Len:O
Pos:O
INDEX
A Note to Index users: Information contained in Chapter 12 is not indexed.
Please refer to Chapter 12 directly for a detailed summary of each of the
S.A.G.E commands.
Adventure-type programs, 1-1
Basic Cartridge, 2-1
Buffer, 6-1 , 10-1
Cassette Player, connection of, 2-2
Color 15, 8-2
Color Adjustment, 2-3 - 2-5
Color Generator, E-1
Color Palette
creation of, 9-1
detachable Reference, G-1
listing of, 5-2
Color Registers, 9-1
Command Keys
abbreviated listing, 3-1
detailed listing, 12-1, 12-2, 12-3
Crooked lines, correction of, 4-4
Cursor
general, 4-3
locating, 8-2
movement of, 4-3
Delete, 6-2- 6-3, 10-1, 10-3
DOS, 2-1, A-1
Duplicating a disk, A-1 - A-2
Duplicating a tape, B-1
Editing, 10-1 - 10-5, 11-1 , 11-2
Editing Bar, 4-1-4-2, 10-1, 10-5
Editing Keys, listing of, 3-2
Equipment (hardware) Requ ired , 2-1
Erasing Palette, 9-2
Fills (F)
differences, 5-1
mechanics of, 7-3
selection of, 7-1
solid, 5-1 - 5-2
two-color, 7-1, 7-2
using with unusual shapes, 7-2, 7-3
Formatting a disk, A-1
Hunt, 10-1, 10-3- 10-4, 11-3
Insertion
of commands, 10-5
of S.A.G.E. into Basic programs, D-2
of S.A.G .E. into Machine-language programs, D-1
Joystick, connection of, 4-1
Jump Command, 10-1, 10-4, 10-5, 11-2, 11-5
L Command, 4-4
Listing Picture Commands, F-1
Loading
color generator, E-2
disk version 'of S.A.G.E., 2-1, 2-2
multi palette, 9-3
picture, 6-3
S.A.G.A. sample picture, 11-1
tape version of S.A.G.E., 2-2
Memory ( K), 2-1
Multi Palette, 9-2, 9-3
N Command, 4-4
Pointer, 6-1, 11-3
Program Commands, technical, C-1
Saving
palette, 9-2
picture, 6-3
Screen Canvas, 4-2
Screen Division, 4-1
Spacebar, 10-1 - 10-2
U Command, 8-1
V Command, 8-4, 8-5
Wait, 11 -5
X andY Axes, 4-3
Z Command, 8-4