1
PSU
PSU
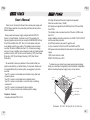
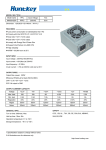
86 .0 0
O ut p ut
c ab l e
150
.00
160
.00
14cm F AN
V O LTA G E SW I TC H
AC INPUT
POWER SWITCH
Dimension: 150×86×160 mm (W×H×L) 14cm Fan
Chapter B: Installation
1.Turn off your computer; unplug the power cord from your old
power supply.
2.Open your computer case following your case manual.
3.Disconnect all PSU connectors from the motherboard and the
peripherals, such as cooler, HDD, DVD, CDR, FDD, etc.
4.Remove the old power supply from your computer case and install
your new power supply.
5.Connect the 20+4 pin main power connector to your motherboard.
Note: Use the separated 20 pin if your motherboard requires 20 pin
power connector.
6.Connect the Serial-ATA connectors to the peripherals.
7.Connect the peripheral 4 pin power connectors if you are still using
IDE hard drives or optical drives.
8.Connect the PCI EXPRESS power connector to your PCI EXPRESS
graphic card.
03
9.Connect your cooler to the regular 4 pin peripheral connectors if
you have.
10.Close your computer case and connect the AC power cord to the
power supply.
Chapter C: Booting the system
1.Main power connector (24 pin configuration) is properly connected
2.CPU +12V power connector (4 or 4+4 pin configuration) is properly
connected
3.PCIe connector (if required by GPU) is properly connected
4.All other needed connectors are properly connected
Incorrect insertion might cause your PC unable to boot and some
components might even be damaged!
5.AC cord is properly connected to wall plug and power supply AC
inlet
6.Then close your computer chassis
7.Turn on the power supply by setting the I/O switch to “I” position;
your system is ready to go.
8.You can turn on your PC now by pushing power button on your PC
case!
Chapter D: Specification
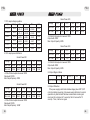
1.0 AC input voltage
Parameter
Vin (115VAC)
Vin (230VAC)
Vin Frequency
Minimum
90
180
47
Nominal
115
230
—
Maximum
132
264
63
Unit
VRMS
VRMS
Hz
04