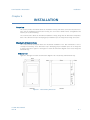
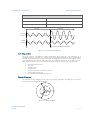
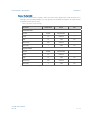
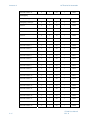
1
Instruction Manual FCOMP Complete Solution for Feeder Protection Rev. B Release Date – January 2015 The content of this publication is subject to change without notice. Larsen & Toubro Limited reserves the Right to make product-improvement changes which may or may not be reflected in this publication. Larsen & Toubro Limited is not responsible for any inadvertent admissions, omissions, or errors. Larsen & Toubro Limited assumes no liability for damages arising out of, or in connection with, the application or use of any Product or application described herein. © 2015 Larsen & Toubro Limited. All rights reserved. This Page is left blank intentionally L&T Electrical & Automation Contents CONTENTS Chapter 1: Preface Manual Overview .................................................................................................................................. 1-1 Version ............................................................................................................................................ 1-1 Purpose of This Manual ................................................................................................................... 1-1 Safety and General Information ............................................................................................................. 1-2 Conventions and Nomenclature............................................................................................................. 1-2 Conventions .................................................................................................................................... 1-2 Nomenclature .................................................................................................................................. 1-2 Suggestions for Improving this Manual .................................................................................................. 1-3 Chapter 2: Introduction About L&T ............................................................................................................................................ 2-1 Numerical Relays ................................................................................................................................... 2-1 Need for Feeder Protections & Relay................................................................................................. 2-1 About FCOMP ................................................................................................................................. 2-1 FCOMP Overview ............................................................................................................................ 2-2 Getting Started ............................................................................................................................... 2-3 FCOMP Order Code .............................................................................................................................. 2-4 Selection of Relay Configuration ...................................................................................................... 2-5 Chapter 3: Specification General Specifications ........................................................................................................................... 3-1 Mechanical Specifications ...................................................................................................................... 3-4 Type Test .............................................................................................................................................. 3-4 Certifications ......................................................................................................................................... 3-5 Environmental Conditions ..................................................................................................................... 3-5 Protection Elements............................................................................................................................... 3-6 Metering & Monitoring ....................................................................................................................... 3-11 Chapter 4: Installation Overview ............................................................................................................................................... 4-1 Mechanical Installations......................................................................................................................... 4-1 Dimensions ...................................................................................................................................... 4-1 FCOMP User Manual REV. B C -1 Contents L&T Electrical & Automation Mounting ........................................................................................................................................ 4-2 Electrical Installations ............................................................................................................................. 4-4 Relay Wiring .................................................................................................................................... 4-4 Rear Panel Connections ................................................................................................................... 4-5 Auxiliary Supply connection ............................................................................................................. 4-6 3-Phase Voltage Connection ............................................................................................................ 4-6 3-Phase Current Connections........................................................................................................... 4-8 DIO Connection ............................................................................................................................... 4-9 Communication Port Connections .................................................................................................. 4-10 RS 485 Port for Modbus RTU ................................................................................................. 4-10 RS 485 Port for Modbus TCP/IP.............................................................................................. 4-10 RJ45 Port for Profibus ............................................................................................................ 4-11 Labels and Terminal Numbers ........................................................................................................ 4-12 Chapter 5: Metering & Monitoring Overview ............................................................................................................................................... 5-1 Metering ............................................................................................................................................... 5-1 Current Metering ............................................................................................................................. 5-1 Voltage Metering ............................................................................................................................. 5-2 Symmetrical Components ................................................................................................................ 5-4 Harmonics Distortion ....................................................................................................................... 5-4 Frequency Metering ......................................................................................................................... 5-6 Demand Metering ........................................................................................................................... 5-6 Power & Energy Metering ................................................................................................................ 5-7 Hour Meter...................................................................................................................................... 5-8 DIO Status ....................................................................................................................................... 5-8 Monitoring ............................................................................................................................................ 5-9 Event Log ........................................................................................................................................ 5-9 Oscillography ................................................................................................................................. 5-10 Self Diagnostics ............................................................................................................................. 5-11 Phasor Diagram ............................................................................................................................. 5-11 Chapter 6: Protections Overview ............................................................................................................................................... 6-1 Current Based Protections ..................................................................................................................... 6-2 Instantaneous Overcurrent (50P/50N/50G/50Q) ................................................................................ 6-2 Timed Overcurrent (51P/51N/51Q/51G) ............................................................................................ 6-2 Thermal Overload (49) ..................................................................................................................... 6-4 C-2 FCOMP User Manual REV. B L&T Electrical & Automation Contents Phase Undercurrent (37P) ................................................................................................................ 6-4 Restricted Earth Fault (64) ................................................................................................................ 6-5 Sensitive Ground Instantaneous Overcurrent Fault (50SG) ................................................................ 6-6 Sensitive Ground Timed Overcurrent Fault (51SG) ............................................................................ 6-6 Voltage Based Protections ..................................................................................................................... 6-8 Overvoltage (59P) ............................................................................................................................ 6-8 Undervoltage (27P) .......................................................................................................................... 6-8 Residual Overvoltage (59N)..... ......................................................................................................... 6-9 Sync Undervoltage (25U)................................................................................................................ 6-10 Sync Overvoltage (25O).................................................................................................................. 6-10 Directional Protections......................................................................................................................... 6-11 Directional Phase Instantaneous Overcurrent (67PI) ........................................................................ 6-11 Directional Phase Timed Overcurrent (67PT) ................................................................................... 6-12 Directional Neutral Instantaneous Overcurrent (67NI) ..................................................................... 6-12 Directional Neutral Timed Overcurrent (67NT) ................................................................................ 6-13 Frequency Based Protections ............................................................................................................... 6-14 Underfrequency (81U) ................................................................................................................... 6-14 Overfrequency (81O) ..................................................................................................................... 6-15 Frequency Gradient (df/dt Protection) (81R).................................................................................... 6-15 Power Based Protections ..................................................................................................................... 6-16 Under/Over Power (32P) ................................................................................................................ 6-16 Reverse Power (32R) ...................................................................................................................... 6-16 Power Factor (55) .......................................................................................................................... 6-17 Ancillary Protections ............................................................................................................................ 6-18 Synchrocheck ................................................................................................................................ 6-18 Second Harmonic Blocking ............................................................................................................ 6-18 Cold Load Pickup ........................................................................................................................... 6-19 Breaker Failure ............................................................................................................................... 6-20 Auto-Recloser ................................................................................................................................ 6-20 CT Supervision ............................................................................................................................... 6-21 Loss of Phase or Fuse Failure .......................................................................................................... 6-21 Chapter 7: Communication Overview ............................................................................................................................................... 7-1 Communication Interface ...................................................................................................................... 7-1 Communication Protocols ..................................................................................................................... 7-2 Modubus RTU ................................................................................................................................. 7-2 Overview................................................................................................................................. 7-2 Supported Modbus Function Code .......................................................................................... 7-3 FCOMP User Manual REV. B C -3 Contents L&T Electrical & Automation Modbus RTU Settings .............................................................................................................. 7-9 Modbus Memory Map........................................................................................................... 7-10 Modbus TCP/IP .............................................................................................................................. 7-10 Overview ............................................................................................................................... 7-10 Modbus TCP/IP Settings ......................................................................................................... 7-11 Profibus DP .................................................................................................................................... 7-11 Overview ............................................................................................................................... 7-11 Profibus Settings ................................................................................................................... 7-12 Profibus Memory Map ........................................................................................................... 7-12 IEC 61850 ..................................................................................................................................... 7-12 Overview ............................................................................................................................... 7-12 Structure Of IEC61850 .......................................................................................................... 7-13 IEC 61850 Configuration ....................................................................................................... 7-18 Chapter 8: Setting Sheet Overview ............................................................................................................................................... 8-1 Product Setup ....................................................................................................................................... 8-1 Communication Settings ....................................................................................................................... 8-2 System Settings ..................................................................................................................................... 8-4 Protection Settings ................................................................................................................................ 8-5 Chapter 9: User Interface Overview ............................................................................................................................................... 9-1 Front Panel ............................................................................................................................................ 9-1 Overlay Design................................................................................................................................. 9-2 Display Menu navigation .................................................................................................................. 9-4 Settings ................................................................................................................................... 9-4 Actual Values .......................................................................................................................... 9-7 Commands ............................................................................................................................. 9-9 User Display ............................................................................................................................ 9-9 COMPfiguratorTM ................................................................................................................................. 9-11 Installation Guide ........................................................................................................................... 9-11 Operational Guide ......................................................................................................................... 9-13 COMPlogicTM ................................................................................................................................. 9-24 Oscillography ................................................................................................................................. 9-29 C-4 FCOMP User Manual REV. B L&T Electrical & Automation Contents Chapter 10: Testing & Troubleshooting Overview ............................................................................................................................................. 10-1 Relay Testing ....................................................................................................................................... 10-1 Functional Testing ......................................................................................................................... 10-1 Measurements & Accuracy .................................................................................................... 10-1 Protection Testing ................................................................................................................. 10-2 Commissioning testing .................................................................................................................. 10-2 Troubleshooting .................................................................................................................................. 10-3 Miscellaneous ..................................................................................................................................... 10-4 Annexure A : Mapping Modbus Memory Mapping ................................................................................................................... A-1 Profibus Mapping ............................................................................................................................... A-40 IEC 61850 Logical Nodes .................................................................................................................... A-46 Annexure B : Certificates FCOMP User Manual REV. B C -5 L&T Electrical & Automation List Of Figures LIST OF FIGURES Chapter 4 Installation Figure 4-1: Vertical Relay Dimensions..................................................................................................... 4-1 Figure 4-2: Horizontal Relay Dimensions ................................................................................................ 4-2 Figure 4-3: Vertical Relay Installation...................................................................................................... 4-2 Figure 4-4: Horizontal Relay Installation ................................................................................................. 4-3 Figure 4-5: Typical wiring Diagram......................................................................................................... 4-4 Figure 4-6: Rear Panel Connection ......................................................................................................... 4-5 Figure 4-7: Auxiliary supply Connection ................................................................................................. 4-6 Figure 4-8: Direct Voltage Input Connection .......................................................................................... 4-6 Figure 4-9: Voltage Input Connection with Y-Y external VT.................................................................... 4-7 Figure 4-10: Voltage Input Connection with Open delta VT ................................................................... 4-7 Figure 4-11: 3-phase CT Connection with Neutral CT ............................................................................ 4-8 Figure 4-12: 3-phase CT Connection with CBCT .................................................................................... 4-8 Figure 4-13: Digital Input/Output connection and variants ..................................................................... 4-9 Figure 4-14: Modbus RTU Connection with RS485 Port ....................................................................... 4-10 Figure 4-15: Profibus connection with D-connector.............................................................................. 4-11 Figure 4-16: Modbus TCP/IP connection with RJ45 port ....................................................................... 4-11 Figure 4-17: Labels and Terminal Numbers .......................................................................................... 4-12 Chapter 5 Metering and Monitoring Figure 5-1: Current & voltage phasors ................................................................................................... 5-2 Figure 5-2: Symmetrical components during fault condition ................................................................... 5-4 Figure 5-3: Different Harmonics in voltage /current Waveform ............................................................... 5-5 Figure 5-4: Effect of Harmonic on voltage /current Waveform ................................................................ 5-5 Figure 5-5: Four quadrant Power Operation ........................................................................................... 5-7 Figure 5-6: Power Triangle ..................................................................................................................... 5-8 Figure 5-7: Oscillography Recording..................................................................................................... 5-11 Figure 5-8: Phasor Diagram ................................................................................................................. 5-11 Chapter 7 Communication Figure 7-1: Modbus RTU Serial Message ................................................................................................ 7-2 Figure 7-2: System architecture with IEC61850 .................................................................................... 7-13 Figure 7-3: Communication Profiles ..................................................................................................... 7-14 Figure 7-4: COMPmanager Main Window ........................................................................................... 7-20 Figure 7-5: Project Editor Window ....................................................................................................... 7-20 Figure 7-6: IEDs in SCL file ................................................................................................................... 7-21 Figure 7-7: IED functions in COMPmanager ......................................................................................... 7-21 FCOMP User Manual REV. B C -6 List Of Figures L&T Electrical & Automation Figure 7-8: IED communication properties............................................................................................ 7-21 Figure 7-9: Goose Mapping Window ................................................................................................... 7-22 Figure 7-10: Data Mapping Window .................................................................................................... 7-23 Figure 7-11: Removal of data mapping ................................................................................................ 7-23 Figure 7-12: Goose control block configuration ................................................................................... 7-24 Figure 7-13: Addition of Goose control block....................................................................................... 7-24 Figure 7-14: Adding Goose details ....................................................................................................... 7-24 Figure 7-15: Report Control Blocks ...................................................................................................... 7-25 Figure 7-17: Bit indication in RCB Optional fields ................................................................................. 7-26 Figure 7-18: Bit indication in RCB trigger fields .................................................................................... 7-26 Figure 7-19: Addition of report control block ....................................................................................... 7-26 Figure 7-20: Datasets configuration window ........................................................................................ 7-27 Figure 7-21: Addition of Datasets ........................................................................................................ 7-28 Figure 7-22: Deletion of Datasets ......................................................................................................... 7-28 Figure 7-23: Cloning of Datasets ......................................................................................................... 7-29 Figure 7-24:IED template ..................................................................................................................... 7-29 Figure 7-25: Importing IED................................................................................................................... 7-29 Figure 7-26: Browsing .icd file ............................................................................................................. 7-29 Figure 7-27: Log Window .................................................................................................................... 7-30 Chapter 9 User Interface Figure 9-1: Front Panel .......................................................................................................................... 9-2 Figure 9-2: Numeric Keypad .................................................................................................................. 9-2 Figure 9-3: Nevigation Keypad ............................................................................................................... 9-2 Figure 9-4: Pushbuttons......................................................................................................................... 9-3 Figure 9-5: LED Indicators ...................................................................................................................... 9-3 Figure 9-6: Main Menu nevigation ......................................................................................................... 9-4 Figure 9-7: Setting Nevigation Chart ...................................................................................................... 9-6 Figure 9-8: Metering display screen ....................................................................................................... 9-7 Figure 9-9: Event Log Summery ............................................................................................................. 9-8 Figure 9-10: Event Log details ................................................................................................................ 9-8 Figure 9-11: Actual Values Nevigation Chart .......................................................................................... 9-8 Figure 9-12: Commands Nevigation Chart ............................................................................................. 9-9 Figure 9-13: Single Line Diagram ........................................................................................................... 9-9 Figure 9-14: Annunciator screen ............................................................................................................ 9-9 Figure 9-15: Oscillography Screens ...................................................................................................... 9-10 Figure 9-16: User Display Nevigation chart ........................................................................................... 9-10 Figure 9-17: COMPfigurator main screen ............................................................................................. 9-13 Figure 9-18: Communication Settings .................................................................................................. 9-14 Figure 9-19: Login Window ................................................................................................................. 9-15 F-2 FCOMP User Manual REV. B L&T Electrical & Automation List Of Figures Figure 9-20: Online Window ............................................................................................................... 9-15 Figure 9-21: Product Setup Screen ....................................................................................................... 9-16 Figure 9-22: System Setting screen ...................................................................................................... 9-17 Figure 9-23: Protection Setting window 1 ............................................................................................ 9-17 Figure 9-24: Protection Setting window 2 ............................................................................................ 9-18 Figure 9-25: Protection Setting window 3 ............................................................................................ 9-18 Figure 9-26: Actual Values Window ..................................................................................................... 9-18 Figure 9-27: Input output settings ....................................................................................................... 9-24 Figure 9-28: Event Log Settings ........................................................................................................... 9-19 Figure 9-29: Online Settings Backup .................................................................................................... 9-22 Figure 9-30: New user Creation ........................................................................................................... 9-22 Figure 9-31: User access Configuration ................................................................................................ 9-22 Figure 9-32: COMPlogic main Window ................................................................................................ 9-24 Figure 9-33: Designed logic in COMPlogic ........................................................................................... 9-27 Figure 9-34: Offline simulation ............................................................................................................ 9-28 Figure 9-35: Oscillography settings ...................................................................................................... 9-30 Figure 9-36: Oscillography Waveform .................................................................................................. 9-30 FCOMP User Manual REV. B C -8 L&T Electrical & Automation List Of Tables LIST OF TABLES Chapter 1 Preface Table 1-1: Safety Information ................................................................................................................ 1-2 Table 2-2: Nomenclature and Description .............................................................................................. 1-2 Chapter 2 Introduction Table 2-1: FCOMP Card Selection & Part No. generation ........................................................................ 2-4 Table 2-2: Relay Configuration .............................................................................................................. 2-5 Chapter 3 Specifications Table 3-1: Current Inputs ...................................................................................................................... 3-1 Table 3-2: Voltage Inputs ...................................................................................................................... 3-1 Table 3-3: Auxiliary supply Inputs........................................................................................................... 3-2 Table 3-4: Output Contacts ................................................................................................................... 3-2 Table 3-5: Optoisolated digital Inputs .................................................................................................... 3-3 Table 3-6: Communication Ports............................................................................................................ 3-3 Table 3-7: Enclosure Specification .......................................................................................................... 3-4 Table 3-8: Terminal Connection ............................................................................................................. 3-4 Table 3-9: Type Test .............................................................................................................................. 3-4 Table 3-10: Environmental Conditions ................................................................................................... 3-5 Table 3-11: Certifications ...................................................................................................................... 3-5 Table 3-12: Current Based Protections specifications .............................................................................. 3-6 Table 3-13: Voltage Based Protections specifications .............................................................................. 3-7 Table 3-14: Directional Protections specifications ................................................................................... 3-8 Table 3-15: Power & Frequency Based Protections specifications ............................................................ 3-9 Table 3-16: Ancillary Protections specifications ...................................................................................... 3-9 Table 3-17: Metering & Monitoring specifications ................................................................................ 3-11 Table 3-18: Data Recording ................................................................................................................. 3-12 Table 3-19: Processing......................................................................................................................... 3-12 Chapter 5 Metering And Monitoring Table 5-1: Event Log Characteristics....................................................................................................... 5-9 Table 5-2: Oscillography Characteristics ............................................................................................... 5-10 Chapter 6 Protections Table 6-1: Instantaneous Overcurrent Settings ....................................................................................... 6-2 Table 6-2: IEC & IEEE curve contants ...................................................................................................... 6-3 Table 6-3: Timed Overcurrent Settings ................................................................................................... 6-3 Table 6-4: Thermal Overload Settings .................................................................................................... 6-4 Table 6-5: Phase Undercurrent Settings ................................................................................................. 6-5 FCOMP User Manual REV. B C -9 List Of Tables L&T Electrical & Automation Table 6-6: Restricted Earth Fault Settings ............................................................................................... 6-5 Table 6-7: Sensitive Instantaneous ground fault Setting ......................................................................... 6-6 Table 6-8: IEC & IEEE Constant for SEF protections ................................................................................. 6-7 Table 6-9: Sensitive Timed ground fault Setting ..................................................................................... 6-7 Table 6-10: Overvoltage Settings ........................................................................................................... 6-8 Table 6-11: Undervoltage Settings ......................................................................................................... 6-9 Table 6-12: Residual Overvoltage Settings .............................................................................................. 6-9 Table 6-13: Sync Undervoltage Settings ............................................................................................... 6-10 Table 6-14: Sync Overvoltage Settings ................................................................................................. 6-10 Table 6-15: Directional Phase IOC Settings ........................................................................................... 6-11 Table 6-16: Directional Phase TOC Settings .......................................................................................... 6-12 Table 6-17: Directional Neutral IOC Settings ........................................................................................ 6-13 Table 6-18: Directional Neutral TOC Settings ....................................................................................... 6-13 Table 6-19: Underfrequency Settings ................................................................................................... 6-14 Table 6-20: Overfrequency Settings ..................................................................................................... 6-15 Table 6-21: Frequency Gradient Settings .............................................................................................. 6-15 Table 6-22: Over/Under Power Settings................................................................................................ 6-16 Table 6-23: Reverse Power Settings ..................................................................................................... 6-16 Table 6-24: Power Factor Settings ........................................................................................................ 6-17 Table 6-25: Synchrocheck Settings ....................................................................................................... 6-18 Table 6-26: Second harmonic blocking Settings ................................................................................... 6-19 Table 6-27: Cold Load Pickup Settings ................................................................................................. 6-19 Table 6-28: Breaker Failure Settings ..................................................................................................... 6-20 Table 6-29: Auto-reclosure Settings ..................................................................................................... 6-21 Table 6-30: CT Supervision Settings ..................................................................................................... 6-21 Table 6-31: LOP or Fuse Fail Settings .................................................................................................... 6-21 Chapter 7 Communication Table 7-1: Communication Interface & Protocols .................................................................................... 7-1 Table 7-2: 5-wire screw terminal for modbus RTU .................................................................................. 7-2 Table 7-3: Modbus Function Code ......................................................................................................... 7-3 Table 7-4: Read Coil Query .................................................................................................................... 7-3 Table 7-5: Read Coil Response ............................................................................................................... 7-4 Table 7-6: Read Holding Register Query ................................................................................................. 7-4 Table 7-7: Read Holding Register Response ............................................................................................ 7-5 Table 7-8: Read Input Register Query ..................................................................................................... 7-5 Table 7-9: Read Input Register Response ................................................................................................ 7-6 Table 7-10: Force Coil Query ................................................................................................................. 7-6 Table 7-11: Force Coil Response ............................................................................................................ 7-7 Table 7-12: Write Single Register Query ................................................................................................. 7-7 & - FCOMP User Manual REV. B L&T Electrical & Automation List Of Tables Table 7-13: Write Single Register Response............................................................................................ 7-8 Table 7-14: Write Multiple Register Query ............................................................................................. 7-8 Table 7-15: Write Single Register Response............................................................................................ 7-9 Table 7-16: Modbus RTU settings .......................................................................................................... 7-9 Table 7-17: Modbus TCP/IP Connection ............................................................................................... 7-10 Table 7-18: Modbus Function Code ..................................................................................................... 7-11 Table 7-19: Profibus Port Connection .................................................................................................. 7-11 Table 7-20: Profibus Setting ................................................................................................................ 7-12 Table 7-21: Object Model Example ...................................................................................................... 7-14 Table 7-22: FCOMP Logical devices...................................................................................................... 7-15 Table 7-23: FCOMP Data Sets .............................................................................................................. 7-16 Table 7-24: FCOMP Reports type ......................................................................................................... 7-17 Chapter 9 User Interface Table 9-1: Functions of navigation keys ................................................................................................. 9-3 Chapter 10 Testing And Troubleshooting Table 10-1: Basic protections testing.................................................................................................... 10-2 Table 10-2: Troubleshooting of relay ................................................................................................... 10-3 FCOMP User Manual REV. B C -11 L&T Electrical & Automation Preface Chapter 1 PREFACE Manual Overview FCOMP Instruction Manual provides complete information necessary to install, operate, and maintain FCOMP Relay. An overview of this manual is as follows: Preface: Describes the manual organization, safety & general Information and conventions & nomenclatures used. Introduction: Provides a brief overview of the product and the manual. Specifications: Lists Relay specifications. Installation: Describes mechanical installation and electrical wiring of Relay. Metering & Monitoring: Describes the operation and calculation of each metering functions. Protection: Describes the operating characteristics of each protection element provided in Relay. Communication: Describes communication interface and protocols supported by Relay. Setting Sheet: Provides information about all settings available within Relay for field usage. User Interface: Describes how to enter and record settings for basic protection, and also provides the information about Relay configuration through local interface using COMPfiguratorTM. Testing & Troubleshooting: Describes the common problems encountered during testing & commissioning of Relay and various troubleshooting techniques. Version This is revision B release of the manual by Larsen & Toubro Ltd. Purpose of This Manual This manual intends to help the following users of the FCOMP Relay, to operate, maintain and troubleshoot the device. Design Engineers System Integrators Maintenance Engineers FCOMP User Manual REV. B 1 -1 Preface L&T Electrical & Automation Safety and General Information This manual uses following safety statements: Table 1-1: Safety Information Immediate Hazard. SEVERE personal injury or death WILL result. DANGER Hazards or unsafe practices. WARNING SEVERE personal injury or death MAY result. Hazards or unsafe practices. MINOR personal injury or damage to products or property MAY result. CAUTION IMPORTANT NOTE Essential advisory information. Additional or explanatory information. Conventions and Nomenclature Conventions In this manual, Relay refers to FCOMP Unit Nomenclature Following are the different Nomenclature and their descriptions used in this Manual. Table 1-2: Nomenclature and description Nome nc lat ure s 1-2 Descriptions Nome nc lat ure s Descriptions AC Alternating Current DO Digital Output CB Circuit Breaker ETH Ethernet Protocol CBCT Core Balanced Current Transformer FO Fiber Optic CT Current Transformer FSC Fiber Optic Subscriber Connector DC Direct Current FST Fiber Optic Subscriber Terminator DCS Distributed Control System GPS Global Positioning System DI Digital Input HMI Human Machine Interface FCOMP User Manual REV. B L&T Electrical & Automation No me nc la tu re s Preface De sc ri ptio ns No me nc la tu re s D e s cri p ti ons HV/MV High Voltage / Medium Voltage RT Resistance at temperature T IDMT Inverse Definite Minimum Time RTC Real Time Clock IEC International Electrotechnical Commission RTD Resistance Temperature Detector IED Intelligent Electronic Devices RTU Remote Terminal Unit IEEE Institute of Electrical and Electronics Engineers SC Subscriber Connector I0 Zero sequence Current SCADA Supervisory Control and Data Acquisition I1 Positive Sequence Current PMS Power Management System I2 Negative Sequence Current SCR Silicon Controlled Rectifier LCD Liquid Crystal Display SEF Sensitive Earth Fault LED Light Emitting Diode SNTP Simple Network Time Protocol O/C Over Current ST Subscriber Terminator O/L Overload THD Total Harmonic Distortion OV Over Voltage TMS Time Multiplier Setting PLC Programmable Logic Controller TOC Timed Over Current PT Potential Transformer USB Universal Serial Bus PTC Positive Temperature Co efficient UV Under Voltage R0 Nominal Resistance V0 Zero sequence voltage REF Restricted Earth Fault V1 Positive Sequence Voltage RMS Root Mean Square V2 Negative Sequence Voltage Suggestions for Improving this Manual For any feedback to improve this manual and its contents, kindly contact our L&T Representatives at ESE- [email protected]. FCOMP User Manual REV. B 1 -3 L&T Electrical & Automation Introduction Chapter 2 INTRODUCTION About L&T Larsen & Toubro (L&T) is a technology-driven company that infuses engineering with imagination. The Electrical & Automation Group of L&T offers a wide range of advanced solutions through its state-of-theart products, backed by world-class in-house capabilities in technology development and customer support. Numerical Relays The concept of employing numerical Relays for substation switchgear protection has existed since three decades. This has now matured into a stable alternative to conventional Electromechanical & Electromagnetic Relays. Historically, the need for numerical has evolved, and is driven by the following factors: Numerical Relay provides closer and more accurate protection to Switchgear Feeder assemblies. Earlier models of Numerical Relays were basically Electronic Microcontroller-based single function devices. With the advent of Microprocessor technology, such Relays now come with Microprocessors, which can be programmed to support multi-stage protections, to monitor the behavior of feeders under starting, short or prolonged running & inrush due to Cold Load pickup and various other anomalous conditions of feeder operation. These Relays come with Digital Inputs & Digital Outputs, which monitor the status of various wired inputs (DI) approaching Relay from external points, and exiting from Relay to the coil of the Circuit Breaker as Digital Outputs. Today, multiple combinations of interlocking the Digital Inputs & Digital Outputs through logic gates help substitute and achieve conventional interlocks & complex scheme logics, thereby eliminating intensive wiring, and usage of external & discrete coil-operated functional devices. With such an evolution, Numerical Relays became truly Intelligent Electronic Devices (IED). In the previous decade, the direct interface of IEDs to upper level control became possible with monitoring masters like DCS & SCADA on various industrial communication protocols such as Modbus, Profibus, IEC 60870-101/103, etc. IEC 61850 is the recent enhancement under draft review - IEC 62439. Need for Feeder Protections & Relay Today, with the increase in loads, voltages and short-circuit function of distribution substation feeders, electrical protection has become more significant. To meet these requirements Numerical Relays are considered to be the right solution, as it comes with the following characteristics-Sensitivity, Selectivity, Speed, Reliability, Repetitive operations and Efficient Communication About FCOMP FCOMP is a comprehensive Feeder Control Metering Protection Controller designed for complete feeder protection of air, vacuum or gas-insulated Circuit Breaker-operated Feeders in Medium & Low Voltage Switchgear assemblies. FCOMP User Manual REV. B 2-1 Introduction L&T Electrical & Automation FCOMP encompasses the ruggedness of conventional feeder protection, versatility of advanced feeder protection features, annunciations and metering in Medium & Low Voltage Switchgear assemblies into one, with a simple-to-configure, compact communicating module with a large color display. It is scalable, modular and right-sized with vertical as well as horizontal orientation with common form factor to cater various feeder protection requirements. The hardware within FCOMP comes with conformal coating, thereby making it suitable for installation in dusty & corrosive substation environments, which may be present in process industries petrochemical complexes and marine applications. This ensures that FCOMP does not require a conditioned environment as a pre-requisite, and thus can function in any kind of surroundings. The chapters in this manual are structured in a way to lead a user through various features of the product, and to provide them comprehensive direction for maximizing benefits derived from the efficient usage of the same. The FCOMP is the output of many engineers in L&T Switchgear who have combined their field experience, application knowledge & learning of integrating various Switchgear mounted IEDs with higher level interface systems such DCS & SCADA PMS in various geographies under some arduous site conditions. FCOMP Overview FCOMP comes with the following user-friendly options and features: Universal auxiliary power supply Industrial operating temperature range Monitoring of different electrical parameters Current-based metering & protections with optional scalability for Voltage-based metering & protection, in-built into a single unit Varied combinations of Digital Inputs & Digital Outputs to reduce the dependency on auxiliary components in different electrical schematics. This enables reduction and simplification of physical wiring in electrical schematics, especially in case of Auto Bus transfer schemes. It also allows easier reconfiguration of interlocks, configuration of Load Shedding & Load Sharing, Reverse interlocking, Conditions for Tripping & Closing of Circuit Breaker, Annunciation and Status exchange. Configurable pushbuttons for control Configurable LEDs for indication Conformal coated PCB boards. FCOMP possesses the following advanced substation communication protocol options: Modbus RTU, Profibus, Modbus TCP/IP, IEC 61850 Options for substation IED communication are available through Dual RJ45 and Dual FO (SC or ST) ports for Ethernet communication, and Dual RS485 ports for serial communication. This makes possible upscaling of substation communication network architecture with redundancy. 2-2 FCOMP User Manual REV. B L&T Electrical & Automation Introduction Relay is provided with four Setting groups, having multiple stages in each protection settings, wherein a user can select the option of protection source between Fundamental metering and True RMS metering. Also, it comes with one default USB 2.0 front port for easy connection, with a handheld, Laptop or PC. In addition, Relay comes with its own interface software COMPfigurator to configure the Relay. This software is provided with Configuration settings, Communication settings, Protection settings, Gate logic, Latches, Timers, Event recording and Disturbance recording. It allows online & offline creation of setting files for uploading to & downloading from Relay. Getting Started A basic knowledge is required to understand the complete functionality of Relay, which includes its powering-up, and setting date & time for recording of events/trip records. The steps to be followed are shown below1. To power-up Relay, check for power supply requirement mentioned on the side label: 85264@50/60Hz V AC or 110-250 V DC. 2. Check for polarity of power supply as L/+ (Relay terminal A03), N/- (Relay terminal A02) and E (Relay terminal A01) on the Relay rear panel. 3. Once powered-on, the Display glows. 4. After connection, the Display shows logo screen, followed by main screen. 5. Set date and time of Relay from Display Menu or from special commands in COMPfiguratorTM (Refer chapter User Interface). FCOMP User Manual REV. B 2-3 Introduction L&T Electrical & Automation FCOMP Order Code Table 2-1: FCOMP Card Selection & Part No. generation FCOM P PART NO FCOM P PART NO SELECTION OPTIONS PSU CPU FCOMP A B XXX Aux Supply A Proce s s or Card COM M X IO1 IO2 IO3 VT XXX 1XX X 2XX X 3XX X XX 85-265V A C@50/60Hz,110-250V DC 1 RS485,Modbus RTU+2DI+2DO B ETH 2 RJ-45,Modbus TCP/IP 1 FO+SC,Modbus TCP/IP X IO Slots V oltage I/P C1 FCOM PABXXXXXXX1XXX2XXX3XXXXXC1 B XXX B FSC Com m unication Card CT XXX No card P XXX 1 RS485,Profibus X ETH 2 RJ-45,IEC61850 X FSC 2 FO+SC,IEC61850 1XX X 2XX X 3XX X No Card 1D2 230/110V A C/DC I/P(DIO Card) 2D2 3D2 1 1 1 7DI+2DO Form C 2 2 2 4DI+2DO Form C+3DO Form A 3 3 3 9DI 4 4 4 6DI+2DO Form C+1DO Form A 5 5 5 6DO Form C+1DO Form A XX No Card V1 3 Ph V olt+V sync,10‐ 132V A C V2 3 Ph V olt+V sync,90‐ 300V A C C1 1A (R,Y ,B,N)+REF Curre nt I/P C2 5 A (R,Y ,B,N)+REF C3 1A (R,Y ,B)+1A CBCT + REF C4 5A (R,Y ,B)+5A CBCT +REF 2-4 FCOMP User Manual REV. B L&T Electrical & Automation Introduction Selection of Relay Configuration Table 2-2: Relay Configuration Basic Configuratio n Va ri an t op ti on s Avai la bl e Aux. Power Supply 80-300@50/60Hz V AC or 110250 V DC 24-48 V DC Communication Modbus Serial, Modbus TCP/IP Profibus Front Port USB IEC 61850 (Ethernet/FO) 2 DI + 2 DO 7 DI + 2 DO (Form C) Input + Outputs 4 DI + 2 DO (Form C) + 3 DO (Form A) 9 DI 6 DI + 2 DO (Form C) + 1 DO (Form A) 6 DO (Form C) + 1 DO (Form A) Voltage Input - 10-132V : R+Y+B+N+Sync 90-300V : R+Y+B+N+Sync Current Input Deafult, Selected from available Variants 1A : R+Y+B+N+REF 5A : R+Y+B+N+REF 1A : R+Y+B+SEF+REF 5A : R+Y+B+SEF+REF Protections FCOMP User Manual REV. B 50P, 50N, 50G, 50Q, 51P, 51N, 51G, 51Q, 37, 48, 49, 64 27P, 59P, 59N, 59Q, 81O, 81U, 81R, 25,27S, 59S, 50SG, 51SG, 55, 60, 51V, 32, 32R, 67IP, 67TP, 67IN, 67TN, 67TG, 67IG 2-5 L&T Electrical & Automation Specifications Chapter 3 SPECIFICATIONS General Specifications Table 3-1: Current Input Cu rre nt I np ut In (Nominal Current) 1A 5A Rated Range 0.1 - 20 A 0.5 - 100.00 A Continuous Rating 4A 20 A 1 Second Thermal 100 A 500 A VA Burden < 0.05VA < 0.1 VA Rated Frequency 50/60 ±5 Hz 50/60 ±5 Hz Accuracy (10-200% of In) ±1% of reading ±1% of reading Sensitive Current CBCT REF Rated Range 0.0025 – 1.6 A 0.02 – 1 A Continuous Rating 1A 1A 1 Second Thermal 100 A 100 A VA Burden 0.001 VA 0.001 VA Rated Frequency 50/60 ±5 Hz 50/60 ±5 Hz Accuracy (10-200% of In) ±1% of reading ±1% of reading Voltage level 110 V 230V Rated Operating Voltage (Ph-N) 10-132 V AC 90-300 V AC Rated Continuous Voltage (Ph-N) 110 V AC 240 V AC 10 Second Thermal (Ph-N) 26 5 V A C 6 00 V A C VA Burden < 0 . 05 V A < 0.1 VA Rated Frequency 50/60 ±5 Hz 50/60 ±5 Hz Accuracy (24-300V) ±1% of reading ±1% of reading Table 3-2: Voltage Input V ol ta ge I np ut FCOMP User Manual REV. B 3-1 Specifications L&T Electrical & Automation Table 3-3: Auxiliary Supply Input Aux il i ar y Sup pl y AC Voltage Range 85-264 V AC @ 50/60 Hz DC Voltage Range 110-250 V DC Supply voltage fluctuation ±10% of nominal voltage Supply Voltage Interruption 80 mS Power Consumption < 35 VA (AC) < 30 W (DC) Fre qu en c y System Frequency 50/60 Hz Accuracy (40-70 Hz) ±0.01 Hz Table 3-4: Output Contacts Digita l Outputs Heavy Duty Contacts (Default CPU) Breaking Capacity 10 A at 250/110 V AC/DC (at L/R = 40 ms) 10 A at 250/110 V AC/DC (at L/R = 20 ms) 3-2 Continuous Current 8A Maximum operate time 15 ms Maximum release time 5 ms Dielectric strength 4 KV for 1 min Rated Insulation Voltage 450 V Maximum Operating VA rating 4500 VA Normal Contact (Add-On Card) Form A (NO) Form C (NO/NC) Breaking Capacity 8 A at 250 V AC 8 A at 250 V AC 5 A at 30 V DC, 5 A at 30 V DC, 0.2 A at 100 V DC 0.3 A at 300 V DC Continuous Current 5A 5A Maximum operate time 1 0 ms 10 ms Maximum release time 5 ms 5 ms Dielectric strength 5 KV 5 KV Rated Insulation Voltage 300 V 300 V Maximum Operating VA rating 2000 VA 2000 VA FCOMP User Manual REV. B L&T Electrical & Automation Specifications Table 3-5: Optoisolated Digital Input V ol ta ge I np ut 220 V AC 220 V DC 110 V AC 110 V DC 48 V AC CPU Card Add-On Card ON for 150-265 V AC ON for 150-265 V AC OFF below 95 V AC OFF below 95 V AC ON for 176-242 V DC ON for 176-242 V DC OFF below 132 V DC OFF below 132 V DC ON for 75-132 V AC ON for 75-132 V AC OFF below 46 V AC OFF below 46 V AC ON for 88-121 V DC ON for 88-121 V DC OFF below 66 V DC OFF below 66 V DC ON for 38.5-265 V DC - OFF below 32 V DC 48 V DC ON for 38.5-265 V DC - OFF below 32 V DC Impulse Withstand Voltage 2.5 KV 2.5 KV Current Drawn 2.2 mA (In case of 110/220V DC) 1.16 mA (In case of 110/220V DC) 2.5 mA (In case of 110/220V AC) 1.50 mA (In case of 110/220V AC) Table 3-6: Communication Ports Seria l Po rts Front Panel USB 2.0 port (Modbus RTU) Data speed (Baud Rate) 9600, 19200, 38400 bps RS 485 Rare Port (5 Pin) (Modbus RTU) Data speed (Baud Rate) 9600, 19200, 38400 bps 9 Pin D- Connector Profibus Data Speed (Baud Rate) 9.6 Kbps – 12 Mbps Eth ern et Ports RJ-45 Connectors Dual 10/100BASE-T copper Data Speed (Baud Rate) 100 Mbps FCOMP User Manual REV. B 3-3 Specifications L&T Electrical & Automation Mechanical Specifications Table 3-7: Enclosure specifications D im en si on s (Ho ri z ontal & V ert i ca l Pro to type ) Relay Enclosure (H x W x D) 254mm (10 in.) X 141mm (5.5 in.) X 244mm (9.6 in) Front collar (H x W x D) 285mm (11.22 in.) X 160mm (6.2 in) X 22mm (0.87 in) Display (H x W) 62mm (2.44 in) X 108mm (4.25 in) We ig ht complete Relay 3.8 Kg Table 3-8: Terminal Connection Curre n t in put co nnec ti on Connecting terminal Ring Lug Connection Tightening Torque 1.5 N-m (Max) Vol ta ge / Di git al i np ut c onne ct i on Connecting terminal 6/10 Pin compression connector Tightening Torque 1 N-m (Max) Type Test Table 3-9: Type Test En vir on me nt Te s t Enclosure Protection IEC 60529: 2001 IP65 enclosed in panel IP20 for terminals Shock test IEC 60255-21-2: 1988 Class 1 Cold test IEC 60068-2-1: 1990 -40 C, 16 hours Damp Heat, Steady State IEC 60068-2-78: 2001 40 C, 93% relative humidity, 4-days Temperature Cyclic test IEC 60068-2-30: 1980 25-55 C, 6-cycles, 95% relative humidity Dry Heat IEC 60068-2-2: 1993 85 C, 16 hours 0 0 0 0 D ie le c tric Stre ng th & Im puls e T es t Dielectric (HIPOT) IEC 60255-5: 2000, 2.5 kV AC on current inputs 2.0 kV AC on ac voltage inputs, contact I/O 1.0 kV AC on analog output 2.5 kV DC on power supply 3-4 FCOMP User Manual REV. B L&T Electrical & Automation Specifications Impulse IEC 60255-5: 2000 0.5 J, 4.7 kV on power supply, contact I/O, ac current and voltage inputs, 0.5 J, 530 V on analog output RFI & In te rfere n ce T es t Electrostatic Discharge Immunity IEC 61000-4-2: 2001, Severity Level 4 Radiated RF Immunity IEC 61000-4-3: 2002 10 V/m, 35 V/m Fast Transient, Burst Immunity IEC 61000-4-4: 2001 4 kV @ 2.5 kHz (All >40 V and excl.comm) Surge Immunity IEC 61000-4-5: 2001 2 kV line-to-line, 4 kV line-to-earth Surge Withstand Capability Immunity IEC 60255-22-1: 1988 2.5 kV common mode, 2.5 kV differential mode 8 kV contact discharge, 15 kV air discharge 2 kV @ 5.0 kHz for comm. Ports 1 kV common mode on comm. Ports 2.5 kV oscillatory, 4 kV fast transient Conducted RF Immunity IEC 61000-4-6: 2003, 10 V RMS Magnetic Field Immunity IEC 61000-4-8: 2001 1000 A/m for 3 sec, 100 A/m for 1 min Conducted Emissions CISPR 22 Radiated Emissions CISPR 22 Environmental Conditions Table 3-10: Environmental Conditions T yp ic a l c onditi ons und er w hic h the Re la y i s de sig ned to o pe ra te Temperature 0 0 0 0 ‐20 C to 70 C (Operating) ‐40 C to 85 C (Storage) Relative humidity 5‐95% Certifications Table 3-11: Certifications Re l ay Ce rtific a tes ISO Relay is designed and manufactured using ISO 9001 certified quality program. PNO Profibus DPV0 conformance test certified UCA IEC 61850 conformance test certified FCOMP User Manual REV. B 3-5 Specifications L&T Electrical & Automation Protection Elements Table 3-12: Current Based Protections specifications In st an ta ne ous O ve r Curre n t (5 0P/5 0 N/50Q/ 50 G) Pickup (* In) 0.10 to 20.00 *In (in steps of 0.01* In) Time Delay 0 to 600 sec (in steps of 0.01 sec) Ti me d Ove r Curren t (5 1P/ 51N/ 51Q/ 51 G) Pickup (PSM) (*In) Curve Type 0.10 to 3.2 In (in steps of 0.01) IEEE: Extremely Inverse, Moderately Inverse, Very Inverse IEC: IEC Curve A, IEC Curve B, IEC Curve C TMS 0.05 to 15.00 (in steps of 0.01 sec) Th erm al Ove r l oa d (4 9) Pickup (* In) 0.1 to 4 In (in steps of 0.01* In) Delay 60 to 30000 sec K-factor 0.1 to 4 (in steps of 0.1) Pickup Time Accuracy 3% or 75 mA/15 mA 2% class acc. to IEC 60255-8 Timing Accuracy 3% or 1 sec for I/(k·INOM) > 1.25 Phase Under Current (37P) Pickup (* In) 0.10 to 3.2 In (in steps of 0.01 In) Time Delay 0 to 600 sec (in steps of 0.01 sec) R es tri cte d Earth F au lt (64) Pickup (* In) 0.02 to 1 In (in steps of 0.01 In) Time Delay 0 to 1 sec (in steps of 0.01 sec) Sen si t ive Gro u nd F ault In st an ta ne ous Ove r Curren t (5 0SG) Pickup 0.0025 to 1.6 A (in steps of 0.001) Time Delay 0 to 600 sec (in steps of 0.01 sec) Sensitive Ground fault Ti me d Over Current (51SG) Pickup (PSM) 0.0025 to 1.6 A (in steps of 0.001) TMS 0.05 to 15.00 (in steps of 0.01 sec) Curve type IEEE: Extremely Inverse, Moderately Inverse, Very Inverse IEC: IEC Curve A, IEC Curve B, IEC Curve C Accuracy in all Current Based Protections 3-6 Pickup Accuracy 3% of setting value Time Accuracy 1.5% of setting value or 30 mSec (whichever is maximum) FCOMP User Manual REV. B L&T Electrical & Automation Specifications Table 3-13: Voltage Based Protections specifications U n de r Vol ta ge (27P) Pickup 5 V to 1.2 *Vnom Dropout Level 103% of Pickup Time Delay 0.01-600 sec (in steps of 0.01 sec) Blocking Voltage 0 to 75% Vn (in steps of 1%Vn) Over Voltage (59P) Pickup 5 V to 1.2 *Vnom Dropout Level 97% of Pickup Time Delay 0.01-600 sec (in steps of 0.01 sec) Blocking Voltage 0 to 75% (in steps of 1%) R es id ua l o ve r Vol ta ge (5 9N) Pickup 5 V to 1.2 VNOM Time Delay 0.01-600 sec (in steps of 0.01 sec) S yn c Sup pl y U n de r Vol ta ge (27S) Pickup Range 0-100% Vn Time Delay 0-600 Sec Syn c Sup pl y O ver Vo ltag e (59 S) Pickup Range 0-120% Vn Time Delay 0-600 Sec Ac c ura cy in a l l Vo lt age Ba se d Pro te ct io ns Pickup Accuracy FCOMP User Manual REV. B 2% of setting value 3-7 Specifications L&T Electrical & Automation Table 3-14: Directional Protections specifications Dire c ti on al Pha se In st an tane ou s O ve r Curren t (6 7PI) Maximum Torque angle/Characteristic angle -180 to 180 (in steps of 1 deg) Directionality Co-existing forward and reverse Polarisation Voltage Threshold 0 to 1.2 Vn (in steps of 0.01) Pickup 0.10 In to 20.00 In (in steps of 0.01 A) Time Delay 0.01-600 sec (in steps of 0.01 sec) Directional Phase Ti me d Over Cur ren t (6 7PT) Maximum Torque angle/Characteristic angle -180 to 180 (in steps of 1deg) Polarisation Voltage Threshold 0 to 1.2 Vn (in steps of 0.01) Directionality Co-existing forward and reverse Pickup 0.10 In to 3.2 In (in steps of 0.01 A) TMS 0.05- 15.00 (in steps of 0.01) Curve Type IEEE: Extremely Inverse, Moderately Inverse, Very Inverse IEC: IEC Curve A, IEC Curve B, IEC Curve C D ir ec ti on al Neu tra l I ns ta ntan e ous Ove r C u rre nt ( 67 NI) Maximum Torque angle/Characteristic angle -90 to 90 (in steps of 1 deg) Directionality Co-existing forward and reverse Polarisation Voltage Threshold 0 to 1.2 Vn (in steps of 0.01) Pickup 0.10 In to 20.00 In (in steps of 0.01 A) Time Delay 0.01-600 sec (in steps of 0.01 sec) D ir ec ti on al Neu tra l Tim ed O ver C u rre nt ( 67 N T) Maximum Torque angle/Characteristic angle -90 to 90 (in steps of 1deg) Polarisation Voltage Threshold 0 to 1.2 Vn (in steps of 0.01) Directionality Co-existing forward and reverse Pickup (PSM) 0.10 In to 3.2 In (in steps of 0.01 A) TMS 0.05- 15.00 (in steps of 0.01) Curve Type IEEE: Extremely Inverse, Moderately Inverse, Very Inverse IEC: IEC Curve A, IEC Curve B, IEC Curve C Acc ur ac y i n al l D i rect i onal B as ed Prot ec ti on s 3-8 Pickup Accuracy 2% of setting value Time Accuracy 1.5% of setting value or 30 mSec (whichever is maximum) Angle Accuracy ±3 electrical 0 FCOMP User Manual REV. B L&T Electrical & Automation Specifications Table 3-15: Power & Frequency Based Protections specifications Under / O ver Pow e r Pickup Setting Range, VAR, W Secondary • 5 A models 1.0‐6500.0 VAR, W (in steps of 0.1) • 1 A models 0.2‐1300.0 VAR, W (in steps of 0.1) Overpower Drop‐off 0.95 x setting ±10% Underpower Drop‐off 1.05 x setting ±10% Time Delay 0.00 to 600 sec (in steps of 0.01 sec) Re verse Pow er Pickup Setting Range, VAR, W Secondary • 5 A models 1.0 ‐ 6500.0 VAR, W (in steps of 0.1) • 1 A models 0.2 ‐ 1300.0 VAR, W (in steps of 0.1) Time Delay 0 to 600 sec (in steps of 0.01 sec) Pow e r F ac t or Lead/Lag PF Pickup Range 0.05 to 0.95 Lead/Lag PF Trip Delay 1 to 240 sec Unde r / O ver Freq ue nc y Pickup 20.00 to 70.00 Hz (in steps of 0.01) Time Delay 0.01 to 100 sec (in steps of 0.01) Minimum Signal 0.6 to 1.25 Vn or 60 V, which is minimum (in steps of 0.01) Pickup Accuracy ±0.01 Hz Dropout Level Pickup ± 0.03 Hz Fre qu en cy Grad ie nt Pickup 0.01 to 20.00 Hz/Sec Time Delay 0.00 to 100.00 Sec Min/Max frequency range 20.00 to 70.00 Hz Pickup Accuracy ±0.01 Hz/Sec Table 3-16: Ancillary Protections specifications S yn ch roc he c k (25) Voltage Difference 0 to 150 V Angle difference 0 to 120 deg Frequency difference 0 to 3 Hz FCOMP User Manual REV. B 3-9 Specifications L&T Electrical & Automation Cold Load Pickup Open Delay 0 to 1500 sec (in steps of 0.01) Active Delay 10 to 15000 sec (in steps of 0.01) Second Harmonic Blocking Pickup 10% to 70% Breaker Failure DI requirement (Yes/No) No DI selection 0 to 30 Auto-Reclosure No. Of shots 1 to 4 Dead Time 0.1 to 100 sec Reclaim time 0.1 to 100 sec CT Supervision Threshold setting (* In) 0 -1.00 Inhibit setting (* In) 0 -1.00 Time delay 0 - 500 sec VT Supervision Function Enable/Disable 3 - 10 FCOMP User Manual REV. B L&T Electrical & Automation Specifications Metering & Monitoring Table 3-17: Metering specifications Cu rre nts Range 0.1 to 20 INOM Phase Currents ±1% Accuracy Neutral & REF current (using CBCT) ±1% Accuracy Sequence Components ±1% Accuracy Vol ta ge s Range 5 to 300V L-L & L-N Voltages ±1% Accuracy Sequence Components ±1% Accuracy Fre qu en cy Range 20 to 70 Hz with ±1% Accuracy Pow e r 3 Phase Real Power (kW) ±2% Accuracy 3 Phase Reactive Power (kVAR) ±2% Accuracy 3 Phase Apparent Power (kVA) ±2% Accuracy Pow e r F ac to r Range Lead/Lag measurement with ±2% Accuracy Ene rgy 3 Phase Real Energy (kWh) ±2% Accuracy 3 Phase Reactive Energy (kVARh) ±2% Accuracy 3 Phase Apparent Energy (kVAh) ±2% Accuracy FCOMP User Manual REV. B 3 - 11 Specifications L&T Electrical & Automation Table 3-18: Data Recording Even t Lo g Event information Event Cause, Event Date -Time stamping Capacity 1024 Time‐tag (Resolution) Event Records 1 msec Osc ill og rap hy Sampling Rate 16 (128 Cycles) / 32 (64 Cycles) / 64 (32 Cycles) Maximum Records 64 Data (User Configurable) AC input channels, Protection state, DI/ DO Status Processing Table 3-19: Processing Proc e ss i ng AC Voltage and Current Inputs 64 samples per power system cycle Frequency Tracking Range 20 to 70 Hz Protection & Control Processing 3 times per power system cycle (every 6 mSec) Analog quantity processing is in every 100 msec. Selectable filtering for protection base (Fundamental or True RMS) 3 - 12 FCOMP User Manual REV. B L&T Electrical & Automation Installation Chapter 4 INSTALLATION Overview This section provides information about the installation of Relay and various connections attached to its ports. Prior to installation and connection of Relay, the user must be familiar with its configurations and features, for its safe functioning. The section describes about the Mechanical Installation of Relay, along with the dimensions and product labels. These dimensions help in identifying proper installation space for Relay and its wiring connections. Mechanical Installations This section provides description about the Mechanical Installation of the both horizontal as well as vertically oriented Relays. These dimensions help in identifying proper installation space for the Relay and its wiring connections. Figure 4–1 and figure 4-2 shows the dimension diagram of the vertical Relay and horizontal relay. Dimensions Figure 4–1 and figure 4-2 shows the dimension diagram of the vertical Relay and horizontal relay. Figure 4-1: Vertical Relay Dimension FCOMP User Manual REV. B 4- 1 Installation L&T Electrical & Automation Figure 4-2: Horizontal Relay Dimensions Mounting The Relay is mounted in a cut-out on the front of the panel and fixed by using mounting screws. Figure 4– 3 and figure 4-4 shows the Relay installation for both the form factor. Figure 4-3: Vertical Relay Installation 4-2 FCOMP User Manual REV. B L&T Electrical & Automation Installation Figure 4-4: Horizontal Relay Installation Procedure to mount the Relay in panel: Ensure that Relay is free from all rear connections. Insert Relay from front of the panel cut-out. Hold Relay in alignment with the mounting holes. Fix Relay with panel with four mounting screws from rear. Procedure to un-mount relay from panel Ensure that Relay is free from all rear connections. Loosen the four mounting screws. Detach Relay from the panel. FCOMP User Manual REV. B 4- 3 Installation L&T Electrical & Automation Electrical Installations This section describes complete electrical wiring of the relay with connectors’ arrangement for Current input, voltage input, and digital input termination. Relay Wiring Figure 4–5 shows the overview of the Relay wiring with the electrical system. Figure 4-5: Typical wiring Diagram 4-4 FCOMP User Manual REV. B L&T Electrical & Automation Installation Rear Panel Connections Figure 4-6 shows the rear panel connection of the relay. 1 4 2 5 3 6 7 8 9 Figure 4-6: Rear Panel Connection 1 Power supply connector 6 Profibus Port 2 Earthing 7 Add-On DIO connector 3 Basic DIO connector 8 VT Connector 4 Modbus RTU connector 9 CT Connector 5M FCOMP User Manual REV. B odbus TCPIP port 4- 5 Installation L&T Electrical & Automation Auxiliary Supply connection To power up Relay, auxiliary power supply is a requisite. Universal power supply ranging from 85 to 265 V AC @ 50/60 Hz or 110V-250 V DC is employed as an auxiliary supply. Over Current, Over Voltage and Under Voltage protection are provided through power supply input card. Figure 4-7: Auxiliary supply Connection Procedure to wire the auxiliary supply connector: Check the connector cable for proper operation. Loosen the terminal screws. Insert the supply wires in their respective terminals. Make note of the power supply rating of Relay before inserting the supply wires in. Tighten the terminal screws. Anchor the auxiliary supply connector by using two connector screws. Procedure for removal of the connector: Ensure that Relay is free from all possible power connections. Loosen the two connector screws. Remove the auxiliary supply connector from Relay. 3-Phase Voltage Connection With the voltage inputs option, the AC voltages may be directly connected, or by WYE-WYE VT or opendelta VT can be used. Figure 4-8: Direct Voltage Input Connection 4-6 FCOMP User Manual REV. B L&T Electrical & Automation Installation Figure 4-9: Voltage Input Connection with Y-Y external VT Figure 4-10: Voltage Input Connection with Open delta VT Procedure to wire the voltage connector: Ensure that Relay is free from all power connections. Check the connector cable for proper operation. Loosen terminal screws of the connector. Insert the RYB wires in their respective terminals. Tighten the terminal screws. Anchor the connector by using two connector screws. Procedure for removal of the voltage connector: Ensure that the Relay is free from all power connections. Loosen the two connector screws. Detach the connector from the Relay. FCOMP User Manual REV. B 4- 7 Installation L&T Electrical & Automation 3-Phase Current Connections The connection to the Relay current input port is shown in Figure 4–11 with CBCT and other safety accessories. Figure 4-11: 3-phase CT Connection with Neutral CT Figure 4-12: 3-phase CT Connection with CBCT Procedure to wire the current connector: Ensure that the Relay is free from all power connections. Insert the RYB wires in their respective terminals (use fork lugs for more safety). Tighten the terminal screws. Procedure for removal of the current connector: 4-8 Ensure that the Relay is free from all power connections. Loosen the two connector screws. Detach RYB cables from the Relay. FCOMP User Manual REV. B L&T Electrical & Automation Installation DIO Connection Relay has two Digital Inputs and two heavy-duty Digital output contacts as basic configuration within its Processor card. Relay has three card slots for optional DIO inputs. Mentioned below are the card options in each slot: 7 Digital I/P + 2 Digital O/P (Form C) 4 Digital I/P + 2 Digital O /P (Fo rm C) + 3 Digital O/P (Form A) 9 Digital I/P 6 Digital I/P + 2 Digital O /P (Fo rm C) + 1 Digital O/P (Form A) 6 Digital O/P (Form C) + 1 Digital O/P (Form A) Figure 4-13: Digital Input/output connection and variant The two types of digital output contacts are as mentioned below: Normally open: It is the two-point contact (NO, C - FORM A), which is generally open, and is closed when activated. Changeover: It is three-point contact (NO, C, NC - FORM C), which changes its state from NO to NC, from and NC to NO when activated. These outputs can be programmed to any of the output functions like trip, alarm, latch, command, annunciation, etc. Procedure to wire the connector: Check the connector cable for proper operation. Loosen the terminal screws. Insert the wires in their respective terminals. Tighten the terminal screws. Anchor the DIO connector cable by using two connector screws. FCOMP User Manual REV. B 4- 9 Installation L&T Electrical & Automation Procedure for removal of the connector: Make sure that the Relay is free from all the power connections. Loosen the two connector screws. Detach DIO connector from the Relay. Communication Port Connections RS485, RJ45 and FO ports are available for communication. These ports are used to communicate with the upper level systems such as EWS/DCS/SCADA on either Modbus RTU/Profibus/Modbus TCP/IP/IEC 61850 protocols. Figure 4–13 to Figure 4–17 show the communication connection with looping diagrams. RS 485 Port for Modbus RTU RS485 can address up to 32 slaves using either a two wire (half duplex) or four wire system (full duplex) and has a distance capacity of 4000 m. 4 Wired Communication 2 Wired communication Figure 4-14: Modbus RTU Connection with RS485 Port RJ45 Port for Modbus TCP/IP The IP address of each device in a Modbus TCP/IP communication should be different from other. 4 - 10 FCOMP User Manual REV. B L&T Electrical & Automation Installation Figure 4-15: Modbus TCP/IP connection with RJ45 port RS 485 Port for Profibus Figure 4-16 shows the connection for profibus communication. Each device should have different Node address. Figure 4-16: Profibus connection with D-connector FCOMP User Manual REV. B 4- 11 Installation L&T Electrical & Automation Labels and Terminal Numbers Relay comprises multiple optional units. The user can choose a unit, depending on the application while ordering for Relay. Figure 4–20 shows example of the optional units generally used in the Relay. Marking on the label represents that selected variant card is available in the ordered relay. Figure 4-16: Labels and Terminal Numbers 4 - 12 FCOMP User Manual REV. B L&T Electrical & Automation Metering & Monitoring Chapter 5 Metering & Monitoring Overview Relay includes metering functions to display the real time values of current, voltage, and other electrical parameters as well as digital input & output status. Relay takes 64 samples per cycle for measurement of RMS current and RMS voltage parameters. Metering & monitoring can be done local as well as remotely through Front Panel Display COMPfiguratorTM Software SCADA/DCS Metering Relay is able to measure the following quantities True RMS Values of Current & Voltages Fundamental and 3 phase Average of Current & Voltages Maximum values of currents & voltages Positive, Negative, Zero Sequence Components of current & Voltage Active, Reactive, Apparent Power & Energy Power factor & System Frequency Harmonic Distortion (Upto 25th Harmonics) Demand Metering (Current & Power) Current Metering Line Current Relay measures magnitudes (in Amps) and angles (in deg) of R, Y, B Phase currents. R phase current Phasor is considered as a reference for angle measurement if voltage card present in relay else R phase voltage phasor is considered as reference. IR : Current flowing through R phase IY : Current flowing through Y phase IB : Current flowing through B phase Ground Current Ground current IG is the earth leakage current in case of 3 phases 4 Wire system calculated by vector sum of 3 phase currents: IG IR IY IB Neutral Current Neutral current IN is the earth leakage current in case of 3 phase 4 Wire systems (Star Connection) measured with neutral/Residual CT connection. FCOMP User Manual REV. B 5-1 Metering & Monitoring L&T Electrical & Automation SEF Current CBCT (Core Balance Current Transformer) is applied for Earth leakage measurement in sensitive Earth Fault conditions. The 3-phase supply passes through CBCT, which senses the Earth Fault current under abnormal conditions. REF Current REF Current is differential Earth leakage current measured in a defined region with REF CT. It is used to sense internal fault of transformer. In scheme with REF protection, common terminal of the phase currents is connected to secondary of the neutral CT such that secondary unbalance of phase currents opposes secondary of Neutral CT. In no fault condition, REF current is ideally equal to zero Average Current Average Current (Iavg) is a average of the magnitude of the currents in all three phases calculated as: IAVG IR IY 3 IB Fundamental Current True RMS currents of all phases consist of disturbance in fundamental pure sine waveform due to harmonics. Relay provides fundamental metering at fundamental frequency (50/60 Hz) for all three phase & Neutral currents with ease to calculate the distortion in the system. Maximum Current It measures and stores the maximum current of each phase, whenever peak occurs in the system. It replaces and updates the value with every peak instance recorded by the relay. CTs used for measurement (5 CTs): Rph + Yph + Bph + N/SEF + REF Measurement Accuracy = ±1% with resolution 0.001A Note: Current measurements are displayed in amperes in accordance with Current Ratio. Voltage Metering Ph-N and Ph-Ph Voltages Relay measures magnitudes (in Volts) and angles (in deg) of R, Y, B Phase to neutral Voltages as well as Phase to Phase voltages. VR : R phase voltage with respect to neutral VY : Y phase voltage with respect to neutral VBR VB VRY IB VB : B phase voltage with respect to neutral VRY : R and Y Phase to Phase Voltage VYB : Y and B Phase to Phase Voltage VBR : B and R Phase to Phase Voltage IY IR VR VYB VY Figure 5-1: Phasor Diagram 5-2 FCOMP User Manual REV. B L&T Electrical & Automation Metering & Monitoring Average Voltage It is an average of the magnitude of the Phase to neutral voltages in all three phases calculated as: VAVG VR VY 3 VB Residual Voltage Residual Voltage indicates the neutral point voltage with respect to earth & is equal to the vector sum of the Phase to neutral voltages in all three phases. Residual voltage protection is provided in case of open delta connection (Neutral Displacement) VN VR VY VB Sync Voltage It is the phase to phase or phase to neutral voltage tapped from Second source or bus, to check synchronism between two voltage sources. A connection with two pins is provided for measurement where potential difference between two phases is calculated. Angle is measured with respect to R Phase voltage of Line 1. Fundamental Voltage True RMS voltages of all phases consist of distortion in fundamental pure sine waveform due to harmonics. Relay provides fundamental metering at fundamental frequency (50/60 Hz) for all three phase & Neutral voltages as well as Phase to Phase voltages with ease to calculate the distortion in the system. Maximum Voltage It measures and stores the maximum voltage of each phase, whenever peak occurs in the system. It replaces and updates the value with every peak instance recorded by the relay. Phase Sequence Relay detects the presence of each phase and checks in which sequence / roatation phases are connected i.e. RYB or RBY. It declares phase loss in case voltage is not detected in any of the phase. Voltage Unbalance: The unbalance due to harmonics or due to sags, swells, over-voltages, under-voltages, impulses, transients, surges and interruptions (outages) is calculated with respect to balanced system. Voltage inputs for measurement (6 No.): R + Y + B + N + Sync 1 + Sync 2 Measurement Accuracy = ±1% with resolution 0.001A Note: All Voltage measurements are displayed in volts in accordance with Voltage Ratio and star delta setting. FCOMP User Manual REV. B 5-3 Preface L&T Electrical & Automation Symmetrical Components The electrical power system normally operates in a balanced 3-phase sinusoidal steady-state mode. However, there are certain fault situations that can cause unbalanced operations. By the method of symmetrical co-ordinates, a set of unbalanced voltages (or currents) may be resolved into systems of balanced voltages (or currents) equal in number to the number of phases involved. These sequence components are known as Positive, Negative and Zero sequence components. VY2 VB1 VR0 VR2 VR1 VY0 VB0 VY1 VB2 ωt Positive Sequence ωt Negative Sequence Zero Sequence Figure 5-2: Symmetrical components during fault condition All the sequential components can be calculated as follow. Voltage components V V V 1 1/3 X 1 1 1 1 VR VY VB 1 IR IY IB Where V0 : Zero sequence Voltage V1 : Positive Sequence Voltage V2 : Negative Sequence Voltage Current components I I I 1 1/3 X 1 1 1 Where I0 : Zero sequence Current I1 : Positive Sequence Current I2 : Negative Sequence Current; α = 1 120 0 Harmonics Distortion Relay analyses the distortion of waveform of an electrical parameters due to harmonics. Harmonics are current or voltage components in an electrical system due to non-linear loads such as rectifiers, transformers, Inductive loads, variable speed drives etc. Current harmonics have an effect on the electrical distribution equipment, causes increase in heating of the equipment. Voltage harmonics arise when current harmonics are able to create sags in the voltage supply. The amount of sag depends on many factors like transformer impedance, wire size, etc. The magnitude of the voltage harmonics depend on the stiffness of the electrical distribution system impedance. For example, considering system of 50Hz, In ideal system current & voltages have pure sine wave with only fundamental frequency 50Hz, But in practical case as none of the system is ideal, It consists frequency components which are integral multiple of the fundamental (2f =100Hz, 3f =150Hz, 4f= 200Hz……nf= n*50Hz). Thus, harmonic distortion is the degree to which a wave form deviates from 5-4 FCOMP User Manual REV. B L&T Electrical & Automation Metering & Monitoring its pure sinusoidal values as a result of the summation of all harmonic elements. The distortion due to nth harmonic frequency is calculated w.r.t. fundamental frequency as Nth Harmonic Distortion % Nth Harmonic Component X100 Fundamental Component Figure 5-4 elaborates the different components due to harmonics. Figure 5-3: Different Harmonics in voltage /current Waveform Figure 5-5 explains how the pure sine wave is distorted due to 4th harmonic component. Pure Sine Waveform th 4 Harmonic Waveform Distorted Waveform Figure 5-4: Effect of Harmonic on voltage /current Waveform Total Harmonic Distortion Total harmonic distortion (THD) is the summation of all harmonic components of the voltage or current waveform compared to the fundamental component of the voltage or current wave as shown in Figure 5–5 and is calculated using the following formulae. Voltage THD V V V ..... V V X 100 Where V1 = Fundamental harmonic of voltage V2, V3, ……., Vn = other voltage harmonic components Current THD FCOMP User Manual REV. B I I I I ..... I X 100 5-5 Metering & Monitorin L&T Electrical & Automation Where I1 = Fundamental harmonic of current I2, I3, ……., In = Other current harmonic components Frequency Metering Relay measures the frequency of 3-phase supply voltage. Frequency is the total number of cycles per unit time. Frequency is measured in number of cycles per second. The relationship between frequency and time is given by f 1 T Demand Metering Demand (kW) is the optimum amount of energy required by the consumer in specific interval of time. Demand metering is the measurement of average power requirements during a certain predefined time interval. Demand billing consists of measuring a customer's maximum average load during any demand interval of the billing period. Demand calculation can be done by the following methods: Block demand (with optional sub-intervals) Maximum demand is based on the highest average demand during any one demand interval. The interval length shall be set by the user from 1-60 minutes in 1 minute intervals. The user shall be able to set the sub-interval length from 1-60 minutes in 1-minute intervals. The following Block methods are available: Sliding Block that calculates demand in every 15 seconds with intervals less than 15 minutes, and every 60 seconds with an interval between 15 and 60 minutes. Fixed Block that calculates demand at the end of the interval. Rolling demand The calculation of rolling demand allows the interval used for calculating demand to be subdivided into even subintervals to determine the maximum or minimum interval. Rolling demand will always be equal or greater than Block demand. The advantage of employing this method is that it accurately measures the true peak. Maximum demand is based on the highest three consecutive demand subintervals. 5-6 FCOMP User Manual REV. B L&T Electrical & Automation Metering & Monitoring Power & Energy Metering FCOMP Relay uses the IEEE convention for power measurement. The implications of this convention are depicted in Figure 5–2. • • • • Reactive Power Q+ (VAR) Current leads Voltage Active Power (-) Reactive Power (+) Power Factor lead Current lags Voltage Active Power (-) Reactive Power (-) Power Factor lag Current lags Voltage Active Power (+) Reactive Power (+) Power Factor lag Active Power P+ (W) Active Power P- (W) • • • • • • • • • • • • Reactive Power Q- (VAR) Current leads Voltage Active Power (+) Reactive Power (-) Power Factor lead Figure 5-5: Four quadrant Power Operation Power Active power is also known as real power, which gives the information about the load on any of the electrical system at that instant of time. It is calculated using the following formulae: Active Power in R-Phase (W) = VR x IR x cos Active Power in Y-Phase (W) = VY x IY x cos Active Power in B-Phase (W) = VB x IB x cos Total Active Power (W)=(VR x IR x cos ) + (VY x IY x cos ) + (VB x IB x cos ) Reactive Power is required by inductive loads caused due to magnetizing current component. It is calculated using the following formulae: Reactive Power in R-Phase (VAR) = VR x IR x sin Reactive Power in Y-Phase (VAR) = VY x IY x sin Reactive Power in B-Phase (VAR) = VB x IB x sin Total Reactive Power (VAR) = (VR x IR x sin ) + (VY x IY x sin ) + (VB x IB x sin ) Apparent power is total power utilized by the electrical system. Total Apparent power VA VR x I R VY x I Y VB x IB It also calculates maximum active reactive as well as apparent power drawn by the system when peak demand is recorded in system. Measurement Accuracy = ±2% with resolution 0.001KW/KVAR/KVA Energy Total Energy consumed by the load is measured using the following formulae: Total Active Energy (Wh) FCOMP User Manual REV. B = Total Active Power x No. of hours run 5-7 Metering & Monitoring L&T Electrical & Automation Total Reactive Energy (VARh) = Total Reactive Power x No. of hours run Total Apparent Energy (VAh) = Total Apparent Power x No. of hours run Measurement Accuracy = ±2% with resolution 0.001 KWh/KVARh/KVAh Power Factor Power factor is the cosine of the angle between the phase currents and phase voltages. It can also be represented as the absolute value of the ratio of Active Power to Apparent Power. Power factor is calculated using the below-mentioned formulae: Power Factor cos Where Total Active Power Total Apparent Power is phase angle between current & voltage phasors j (Im) (S) S Q P Real (S) Figure 5-6: Power Triangle Measurement Accuracy = ±2% with resolution 0.01 Hour Meter It measures from how much time in hours the feeder is in operation i.e relay is protecting the feeder. The time can be displayed up to 7 digits. DIO Status Relay provides ON/OFF status for all digital inputs & Close/ Open status for all digital Outputs of default DIDO’s available in basic relay as well as add-on card DIDO’s. 5-8 FCOMP User Manual REV. B L&T Electrical & Automation Metering & Monitoring Monitoring Relay is able to monitor following data Event Log Oscillography Data Recorder Self-Diagnostics Phasor Diagram Event Log Relay can also generate sequence of events based on their individual protection elements and digital, analog or contact inputs. It can be programmed to recognize and record events and alarms. Triggering of the recording function within the Relay is programmable and based on the internal measuring elements within the device. Its function is to gather operational data from substation equipment (for example, Relays, circuit breakers, transformers), control schemes (manual and automatic) as they react to a system event, along with date and time. This series of sequential, individual events can be from a switching operation, fault, or disoperation and can be contained within a single substation, a line & associated substations, a utility system, or several interconnected systems. This data allows the chain of events to be studied for the cause (or causes) of the disoperation and the linkages between individual actions & effects. Time tagging can be synchronised with the use of Global Positioning System (GPS) and Universal Time Code (UTC). Table 5-1: Event Log Characteristics Even t In fo rma ti on Trigger Points (Configurable) Pickup / Dropout Alarm / Trip / Trip Reset Digital input change of state Digital output change of state Self-test events Data Parameters Event Cause Event Date and time Status of 8 User Selectable Parameters Time tag(Resolution) FCOMP User Manual REV. B 1 msec 5-9 Metering & Monitoring L&T Electrical & Automation Oscillography Oscillography records contain waveforms captured at the predefined sampling rate as well as other preset Relay data at the point of trigger. For example, fault triggered in R-phase due to over current is shown in Figure 5–9. The purpose of this record is to provide a general understanding of the occurred fault and related errors due to the characteristics of analog or digital inputs to carry out a cause analysis of the fault. In addition, the required inputs necessary to effectively capture a power system event can be programmed. Typical four types of disturbances that can be categorised by the fault/event duration are as follows:. Transient: These are very short in duration and include faults that are cleared immediately by circuit breaker operation. These events are generally no longer than 8 cycles for high-speed clearing, and 16 cycles for sequential line clearing. These events are usually analysed to determine correct protection operation, fault location, or verification of system model parameters. Short Term: These generally include all other time-delayed fault clearing and reclosing events where the system operation (stability) is not affected. These events are typically 20 to 60 cycles in length, but may be longer if multiple protection operations are required to clear the fault. These events are generally analysed to determine the correct protection operation, fault location or verification of system model parameters. Long Term: These include those events that affect system stability such as power swings, frequency variations and abnormal voltage issues. These events are usually analysed to determine causes of incorrect system operations. Data management techniques are employed to process a number of samples and record the value for the parameter of interest. Record length parameters may be defined. Steady State: During steady state disturbances, system operation is not threatened, but the power quality is affected. This may include harmonics or produced by the load and/or the interaction between power system's components. Depending on the type of phenomena being analysed, high sample rates may be required to capture the events and data of interest. Record length parameters may be defined. The three primary types of recording are: High-speed disturbance recording: This type is used to capture the individual samples of the currents and voltages measured by the Relay with a high-sampling frequency to display electrical system faults and transients. Low-speed disturbance recording: Low-speed recording is typically used to capture shortterm and long-term disturbances. Data is typically captured at a rate between 2 times per cycle, and once in every 2 cycles. The data captured is in the form of Phasor or RMS data, and not sampled data. Steady State (continuous) recording: Steady state or continuous recording captures average analog quantities such as maximum and minimum values. Relay works on high speed recording concept Table 5-2: Oscillography Characteristics Osc i ll og ra phy In fo rma ti on Trigger Points (Configurable) Pickup / Dropout Alarm / Trip / Trip Reset Digital input / Output change of state Self-test events Data Parameters (Configurable) AC input channels Protection element state Digital input state/ Digital output state Data Parameters Channels 5 - 10 8 No. FCOMP User Manual REV. B L&T Electrical & Automation Metering & Monitoring Osc ill og rap hy In forma ti on Sampling Rate 16 (128 Cycles) / 32 (64 Cycles) / 64 (32 Cycles) Maximum Records 64 Pre-trigger/Post trigger duration Programmable Pre-Fault Post-Fault R Phase Voltage Y Phase Voltage Trigger Point (R Phase Overvoltage) Figure 5-7: Oscillography Recording Self Diagnostics The Relay performs self-diagnostics during initialization (after power-up), and continuous as a background task to ensure that every testable unit of the hardware & software is alive and functioning correctly. There are two types of self-test warnings indicating either a minor or a major problem. Minor issues indicate the one with the Relay that does not compromise protection of the power system. Major problems indicate severe issues with the Relay that comprises all aspects of Relay operation. CAN communication error RTC error Hardware Error Software error Power on self test & on demand test results Code (FLASH) memory test Configuration Data (FRAM) memory test Phasor Diagram The relay plots Phasor diagram for all current and voltage parameters according to the real time measurement of the magnitudes and angles. VB IB IY I VR VY Figure 5-8: Phasor Diagram FCOMP User Manual REV. B 5 - 11 L&T Electrical & Automation Protections Chapter 6 PROTECTIONS Overview This section provides a detailed description about various electrical faults in the electrical system, as well as its causes, and preventive measures taken by L&T Relay to protect the feeder. Alarm is an indication that requires immediate attention. It indicates the need for a corrective action to prevent occurrence of any fault. It may result in severe implications, if unnoticed. The alarm-related parameters can be configured for most of the protection functions. Relay stores data regarding the cause of fault, along with the parameters such as time of fault, source of fault and corresponding values of current, voltage, earth leakage current, power, power factor and frequency. Relay output contact or LED can be configured to operate in any condition for more than one protection function. Logical equation can be derived with protection functions, input status, and timer & latch bits to get the required alarm & trip indications. Protection function is classified on the basis of following parameters: Current based Protections Voltage based Protections Directional Protections Frequency based Protections Power based Protections Ancillary Protections Relay detects fault condition, and thereby generates: Pickup bit high when an electrical parameter reaches above the set pickup value. An alarm bit high when an electrical parameter reaches above the alarm set value. Trip bit high if the parameter is above the set pickup value for predefined interval of time (Trip Delay). In Relay, 4 Groups of protections are available. Changeover of group is possible through any of the command defined in COMPlogic. FCOMP User Manual REV. B 6-1 Protections L&T Electrical & Automation Current Based Protections Instantaneous Overcurrent (50P/50N/50G/50Q) Overcurrent fault is a condition, wherein current passing through the conductor (power circuit) exceeds its pre-set value. This fault is usually caused due to short circuit, overload, improper connection or fault at ground. In case of FCOMP, four stages of overcurrent settings are available, which can be enabled individually or all at once, depending on the usage. This protection comprises Phase overcurrent 50P, Neutral overcurrent 50N, Negative sequence overcurrent 50Q and Ground (calculated) overcurrent 50G for respective applications. Phase Overcurrent (50P) is to protect the feeder whenever any phase current exceeds the configured pickup value. Neutral Overcurrent (50N) is to protect the feeder in case of any leakage current flowing through the neutral CT for star connected feeders with 3phase 4 wired systems. Ground Overcurrent (50G) is to protect the feeder from earth leakage current flowing through the feeder in 3 phase systems without Neutral or SEF CT. Earth fault current flowing is calculated by vector summation of 3-phase currents. Negative sequence Overcurrent (50Q) is to protect the feeder from any unbalance in the phase currents measured from the three phases. Table 6–1 enlists the Instantaneous Overcurrent settings available in the Relay. Table 6-1: Instantaneous Overcurrent Settings Parameters Default Value Range Disable Enable-Disable 1 0.10-20.00 (xIn) Amp Stage1 Delay* 0.3 0.00-600.00 Seconds Alarm Function Enable Enable-Disable - 80 25-80 % Stage1 Function* Stage1 Pickup (xIn)* Alarm (% pickup) Unit - * The similar settings available for other 3 stages & 3 groups. Timed Overcurrent (51P/51N/51Q/51G) This protection functions when the AC input current exceeds a predetermined value, and in which the input current & operating time are inversely related to a substantial portion of the performance range. The time to trip is derived from standard Time Inverse Curves. Curve type available in L&T relay: IEC : IEC Curve A, IEC Curve B, IEC Curve C IEEE : Extremely Inverse, Moderately Inverse, Very Inverse The operating & reset time for IEEE & IEC curves are derived with common formula as 6-2 FCOMP User Manual REV. B L&T Electrical & Automation Protections Operating Time t k TMS Reset Time t I IP C 1 tR TMS I IP 1 Where k, C, tR, α are constants characterizing different the curves I : Actual Real time current flowing through feeder IP : Pickup Setting TMS: Time Multiplier Settings Table 6-2: IEC & IEE constants Operating Time Reset Time Curve k C α tR α IEC Curve A – Standard Inverse 0.14 0.02 0 9.3 2 IEC Curve B – Very Inverse 13.5 1 0 43.2 2 80 2 0 58.2 2 IEEE Moderately Inverse 0.0515 0.02 0.114 4.85 2 IEEE Very Inverse 19.61 2 0.491 21.6 2 IEEE Extremely Inverse 28.2 2 0.1217 29.1 2 IEC Curve C – Extremely Inverse Table 6–3 enlists the Instantaneous Overcurrent settings available in the Relay. Table 6-3: Timed Overcurrent Settings Parameters Stage1 Function* Stage1Curve Type* Stage1 Pickup (xIn)* Stage1 Voltage restrain* Stage1 Reset* Stage1 TMS Alarm Function Alarm (% pickup) Default Value Range Disable Enable-Disable IEC Type A IEC Type A,B,C Unit - IEEE Moderately Inverse, Extremely Inverse, Very Inverse - 1 0.10-3.20 (In) Amp Disable Enable-Disable - Instantaneous Instantaneous/Auto - 0.1 0.05-15 - Enable Enable-Disable - 80 25-80 % * : The similar settings available for other 1 stage & All 4 groups. FCOMP User Manual REV. B 6-3 Protections L&T Electrical & Automation Thermal Overload (49) Thermal capacity of the feeder is the tolerable capacity that can withstand under overload conditions. In normal conditions, the temperature will eventually stabilise at some steady state temperature (within the limit) due to flow of steady current. Under transient and overload conditions, the thermal capacity of the feeder rises, but only within the corresponding limits. When the overload persists for a considerable amount of time, the temperature and thermal capacity will rise. A trip occurs when the thermal capacity used reaches 100%. There are many reasons for the increase in the temperature and thermal capacity of the feeder. Fault occurs mainly due to overload, operation on unbalanced condition, poor ventilation, single phasing, short circuits, fault in earthing etc,.The thermal capacity applied is calculated by the following equation for hot and cold curves, respectively. Cold Curve: A general curve for thermal overload, based on the heating effect and time constant, operating time is derived by the following formula: . ln t Where, k: Constant I I k. IB τ: Time constant IB: Base current I: Actual Real time current flowing through feeder Hot Curve: With regard to preheating on Relay with a total memory function, the hot curve is relevant. For example, the equation obtained by modification of the general cold curve is indicated by the following formula: t . ln I I IP k. IB Where IP : Specified Load current before overload occurs Table 6-4: Thermal Overload Settings Parameters Default Value Range Unit Disable Enable-Disable - Pickup (x In) 0.1 0.1-4.0 - Pickup Delay 60 60-30000 Seconds Enable Enable-Disable - Alarm (% pickup) 80 25-80 % K constant 100 0.1-4.0 - Function Alarm Function Each setting is available for All 4 groups. Phase Undercurrent (37P) Undercurrent fault is a state wherein current passing through the conductor (power circuit) reaches below its rated set value. This state is observed mainly during 'No-load'. Table 6–5 enlists the Phase Undercurrent settings available in the Relay. 6-4 FCOMP User Manual REV. B L&T Electrical & Automation Protections Table 6-5: Phase Undercurrent Settings Parameters Default Value Range Unit Disable Enable-Disable - Pickup (x In) 0.4 0.1-3.2 - Delay 0.3 0.00-600.00 Seconds Enable Enable-Disable - 80 25-80 % Function Alarm Function Alarm (% pickup) Each setting is available for All 4 groups. Restricted Earth Fault (64) A Restricted Earth Fault (REF) means an earth fault in a restricted/localized zone of a circuit. The term ‘REF protection method’ signifies: not to sense any earth fault outside this restricted zone. It is a type of ‘unit protection’ applied to transformers or generators, and is more sensitive than the method known as 'differential protection'. The principal of the REF is based on the detection of zerosequence current. This detection is only possible in case of fault(s) to ground. For faults inside the protected zone, the protection has to react (switch-off); and for faults outside the protected zone, a reaction is not requisite. Further, REF has to be able to recognise effects like saturation of a current transformer - in consequence of a large short-circuit current, or aftermath of an inrush current from a power transformer - to avoid any undesirable switch-off command of the protection. Current transformers are utilized similar to a measuring instrument to reduce current to an acceptable level. A REF Relay functions by measuring the actual current flowing to earth from the frame of the unit. If this exceeds a certain preset maximum value of milliamps (mA), the Relay trips to cut-off the system supply to the unit. In case of FCOMP, one CT is dedicated for REF, which is sensitive for low values of current, and ranges from 0.02In to 1.2In with+1% accuracy. Table 6–6 enlists the Restricted Earth Fault settings available in the Relay. Table 6-6: Restricted Earth Fault Settings Parameters Default Value Range Unit Disable Enable-Disable - Pickup (x In) 0.05 0.02-1 - Delay 0.3 0.00-1.00 Seconds Enable Enable-Disable - 80 25-80 % Function Alarm Function Alarm (% pickup) Each setting is available for All 4 groups. FCOMP User Manual REV. B 6-5 Protections L&T Electrical & Automation Sensitive Ground Instantaneous Overcurrent Fault (50SG) Sensitive ground fault is a condition wherein current passing through the CBCT exceeds its pre-set value. This fault is usually caused due to ground fault. Table 6–8 enlists the Sensitive Ground fault Instantaneous Overcurrent settings available in the Relay. Table 6-7: Sensitive Instantaneous ground fault Settings Parameters Default Value Range Unit Function Disable Enable-Disable - Pickup (x In) 0.0025 0.0025-1.6 - 0.3 0.00-600.00 Seconds Enable Enable-Disable - 80 25-80 % Delay Alarm Function Alarm (% pickup) Sensitive Ground Timed Overcurrent (51SG) This protection functions when CBCT current exceeds a predetermined value, and in which the input current & operating time are inversely related to a substantial portion of the performance range. The time to trip is derived from standard Time Inverse Curves. Curve type available in L&T relay: IEC : IEC Curve A, IEC Curve B, IEC Curve C IEEE : Extremely Inverse, Moderately Inverse, Very Inverse The operating & reset time for IEEE & IEC curves are derived with common formula as Operating Time t Reset Time t k TMS I IP C 1 tR TMS 1 I IP Where k, C, tR, α are constants characterizing different the curves I : Actual Real time current flowing through feeder IP : Pickup Setting TMS: Time Multiplier Settings 6-6 FCOMP User Manual REV. B L&T Electrical & Automation Protections Table 6-8: IEC & IEE constants for SEF Operating Time Reset Time Curve k C α tR α IEC Curve A – Standard Inverse 0.14 0.02 0 9.3 2 IEC Curve B – Very Inverse 13.5 1 0 43.2 2 80 2 0 58.2 2 IEEE Moderately Inverse 0.0515 0.02 0.114 4.85 2 IEEE Very Inverse 19.61 2 0.491 21.6 2 IEEE Extremely Inverse 28.2 2 0.1217 29.1 2 IEC Curve C – Extremely Inverse Table 6–9 enlists the Sensitive Timed Overcurrent settings available in the Relay. Table 6-9: Sensitive ground fault Settings Parameters Default Value Range Unit Function Disable Enable-Disable - Pickup (x In) 0.0025 0.0025-1.6 - IEC Curve A IEC Type A,B,C Stage1Curve Type* TMS Alarm Function Alarm (% pickup) FCOMP User Manual REV. B IEEE Moderately Inverse, Extremely Inverse, Very Inverse - 0.1 0.05 - 15 Seconds Enable Enable-Disable - 80 25-80 % 6-7 Protections L&T Electrical & Automation Voltage Based Protections Overvoltage (59P) Overvoltage is a condition wherein the voltage in the power circuit rises above its pre-set value. Normally, overvoltage occurs due to internal causes like switching surges, insulation failure, arcing ground and phase loss. Various causes of overvoltage conditions are as follows: Switching surges, produced by switching operations of a loaded as well as unloaded line. Arcing ground, which is intermittent arc taking place in line to ground fault in case of a 3-phase system with consequent production of transients. Resonance occurs due to 5th or higher harmonics, and in case of underground cables as well, because of distortion of generated EMF wave that causes high voltages in the power system. Defective operation of automatic voltage regulator when the generator is in isolated operation. Sudden loss of load due to the tripping of outgoing feeders. Leaving the generator isolated or feeding a very small load can cause a sudden rise in the terminal voltage due to the trapped flux and over-speed. Operation under manual control, while the voltage regulator out of service. A sudden variation of load, the reactive power component in particular, contributes to a substantial fluctuation in voltage because of the large voltage regulation inherent in a typical alternator. Table 6-10: Overvoltage Settings Parameters Default Value Range Unit Disable Enable-Disable - 1.1 0.02-2 - 2 0.00-600.00 Seconds Definite time Definite Time/Inverse Time - Stage1 Reset* 0 0.00-600.00 Seconds Alarm Function Enable Enable-Disable - 80 25-80 % Stage1 Function* Stage1 Pickup (x Vn)* Stage1 Delay* Stage1 Curve Type* Alarm (% pickup) * The similar settings available for other 2 stages & All 4 groups. Undervoltage (27P) Undervoltage is a condition wherein the voltage in the power circuit drops below 90 per cent of its normal voltage. Generally, undervoltage occurs during heavy electrical demand (during peak hours). Various causes of undervoltage conditions are as follows: 6-8 Overloaded circuits can result in undervoltage. Interruptions due to power system faults, equipment failures and control malfunction. FCOMP User Manual REV. B L&T Electrical & Automation Protections Short circuits, often as phase to earth faults (unsymmetrical voltage decrease). Due to open circuit fault at delta side of the distribution transformer. Starting large loads can cause sag. Malfunctioning of voltage regulator or wrong settings under manual control (symmetrical voltage decrease). Nature of loads that are being served by utilities. For example, single phase small airconditioning motors. These small motors tend to stall when subjected to voltage dips caused by transmission system short circuits Table 6-11: Under voltage Settings Parameters Default Value Range Unit Disable Enable-Disable - 0.8 0.02-1.2 - 2 0.00-600.00 Seconds Definite time Definite Time/Inverse Time - Stage1 Block Voltage (%Vn)* 0 0-75 % Stage1 Reset* 0 0-600 Seconds Alarm Function Enable Enable-Disable - 80 25-80 % Stage1 Function* Stage1 Pickup (x Vn)* Stage1 Delay* Stage1 Curve Type* Alarm (% pickup) * The similar settings available for other 2 stages & All 4 groups. Residual Overvoltage (59N) Relay provides three residual overvoltage elements with independent settings. These elements are used to detect if neutral to earth voltage is measured in an electrical system. Table 6-12: Residual Overvoltage Settings Parameters Default Value Range Unit Disable Enable-Disable - 0.05 0.02-1.2 - 2 0.00-600.00 Seconds Definite time Definite Time/Inverse Time - Stage1 Reset* 0 0-600 Seconds Alarm Function Enable Enable-Disable - 80 25-80 % Stage1 Function* Stage1 Pickup (x Vn)* Stage1 Delay* Stage1 Curve Type* Alarm (% pickup) * The similar settings available for other 2 stages & All 4 groups. FCOMP User Manual REV. B 6-9 Protections L&T Electrical & Automation Sync Under voltage The Sync input under voltage is used to check the healthiness of the Sync input i.e voltage of other bus or line used in applications like synchronism check, existence of live line or dead bus, and Dead line or Live bus. Sync Undervoltage bit goes high, If sync voltage drops below the pickup value. Table 6-13: Sync Under voltage Settings Parameters Default Value Range Unit Disable Enable-Disable - 0.8 0.02-1.2 - Stage1 Delay* 2 0.00-600.00 Seconds Alarm Function Enable Enable-Disable - 80 25-80 % Stage1 Function* Stage1 Pickup (x Vn)* Alarm (% pickup) Each setting is available for All 4 groups. Sync Overvoltage The Sync input overvoltage is used to check the healthiness of the Sync input i.e voltage of other bus or line. Sync Overvoltage bit goes high, If sync voltage exceeds above the pickup value. Table 6-14: Sync Overvoltage Settings Parameters Default Value Range Unit Disable Enable-Disable - 1.10 0.02-1.2 - Stage1 Delay* 2 0.00-600.00 Seconds Alarm Function Enable Enable-Disable - 80 25-80 % Stage1 Function* Stage1 Pickup (x In)* Alarm (% pickup) Each setting is available for All 4 groups. 6 - 10 FCOMP User Manual REV. B L&T Electrical & Automation Protections Directional Protections The directional Overcurrent element is made by combining the criteria for Overcurrent element, and the phase displacement between the current and the polarization variable. It provides a selective protection that can be operated in both forward and reverse directions. Directional Phase Instantaneous Overcurrent (67PI) Relay provides two phase directional overcurrent elements with independent settings that can operate in either direction. Relay detects the overcurrent condition, and thereby generates: An alarm when the phase current exceeds the alarm set value. Trip signal when, 1. The current is greater than threshold (i.e, the forward or reverse pickup) 2. The phase displacement between current and the polarization variable is in/outside the zone between +90° and -90°, respectively, from the characteristic angle, for the reverse and forward directions. This protection utilises the phase-to-phase voltage as the polarising quantity, as the phase-to-neutral voltage varies greatly when a fault occurs to earth due to the displacement offset of the neutral point. These elements have wide applications field for the short circuit faults in the closed ring system or networked system. The presence of two directional elements is an added advantage that can be configured to operate for the forward and reverse faults. To detect the 3-phase faults close to the Relay, it incorporates the voltage memory feature that stores the three cycles of pre-fault voltage data as the polarising voltage. And, it uses this stored voltage to detect the direction. Table 6-15: Directional Phase instantaneous overcurrent Settings Parameters Default Value Range Unit Stage1 Function* Disable Enable-Disable - Stage1 Direction Forward Forward/Reverse - Stage1 Characteristic angle -180 -180 to 180 Degree Stage1 Voltage Polarisation 0 0-1.2 - Stage1 Forward Pickup (x In)* 0.1 0.1-20 Amp Stage1 Reverse Pickup (x In)* 0.1 0.1-20 Amp Stage1 Forward Delay* 0.00 0-600 Sec Stage1 Reverse Delay* 0.00 0-600 Sec Enable Enable-Disable - 80 25-80 % Alarm Function Alarm (% pickup) * The similar settings available for other 1 stages & All 4 groups FCOMP User Manual REV. B 6 - 11 Protections L&T Electrical & Automation Directional Phase Timed Overcurrent (67PT) Relay provides two phase directional timed overcurrent elements with independent settings, which can operate in either direction. This protection functions when the AC input current exceeds a predetermined value and the phase displacement between the current and voltage lies in/outside the zone between +90° to -90°, respectively, from the characteristic angle, and in which the input current and operating time are inversely related through a substantial portion of the performance range. The time to trip is derived from standard Time Inverse Curves as follows: IEC : IEC Curve A, IEC Curve B, IEC Curve C IEEE : Extremely Inverse, Moderately Inverse, Very Inverse Table 6-16: Directional Phase Timed overcurrent Settings Parameters Default Value Range Unit Stage1 Function* Disable Enable-Disable - Stage1 Direction Forward Forward/Reverse - Stage1 Characteristic angle -180 -180 to 180 Degree Stage1 Voltage Polarisation 0 0-1.2 - Stage1 Forward Curve type IEC curve A IEC Type A,B,C IEEE Moderately Inverse, Extremely Inverse, Very Inverse Stage1 Reverse Curve type IEC curve A - IEC Type A,B,C IEEE Moderately Inverse, Extremely Inverse, Very Inverse - Stage1 Forward Pickup (x In)* 0.1 0.1-20 Amp Stage1 Reverse Pickup (x In)* 0.1 0.1-20 Amp Stage1 Forward Delay* 0.00 0-600 Sec Stage1 Reverse Delay* 0.00 0-600 Sec Enable Enable-Disable - 80 25-80 % Alarm Function Alarm (% pickup) * : The similar settings available for other 1 stages & All 4 groups Directional Neutral Instantaneous Overcurrent (67NI) Relay provides two Neutral directional overcurrent elements with independent settings. In this case, the directionality is co-existing, i.e; it operates in both forward and the reverse direction. The residual current and residual voltage is considered in the Neutral directional overcurrent protection. The latter is used as the polarization quantity. 6 - 12 FCOMP User Manual REV. B L&T Electrical & Automation Protections Relay detects the neutral overcurrent conditions, and thereby generates: An alarm when the residual current exceeds the threshold value Pickup when the residual current exceeds the pickup level and the residual voltage lies in/or outside the zone between +90° to -90°, respectively, from the characteristic angle. And if the pickup flag persists to be 1 till the trip delay expires, it trips. Table 6-17: Directional Phase instantaneous overcurrent Settings Parameters Default Value Range Unit Stage1 Function* Disable Enable-Disable - Stage1 Direction Forward Forward/Reverse - Stage1 Characteristic angle -90 -90 to 90 Degree Stage1 Voltage Polarisation 0 0-1.2 - Stage1 Forward Pickup (x In)* 0.1 0.1-20 Amp Stage1 Reverse Pickup (x In)* 0.1 0.1-20 Amp Stage1 Forward Delay* 0.00 0-600 Sec Stage1 Reverse Delay* 0.00 0-600 Sec Enable Enable-Disable - 80 25-80 % Alarm Function Alarm (% pickup) * The similar settings available for other 1 stages & All 4 groups Directional Neutral Timed Overcurrent (67GT) Relay provides two neutral directional timed overcurrent elements with independent settings. This protection functions when the AC input current exceeds a predetermined value, and the phase displacement between the current and voltage lies in/outside the zone between +90° to -90°, respectively, from the characteristic angle, and in which the input current and operating time are inversely related through a substantial portion of the performance range. Time to trip is derived from standard Time Inverse Curves. Curve type available in L&T relay: IEC : IEC Curve A, IEC Curve B, IEC Curve C IEEE : Extremely Inverse, Moderately Inverse, Very Inverse Table 6-18: Directional Neutral Timed overcurrent Settings Parameters Default Value Range Unit Stage1 Function* Disable Enable-Disable - Stage1 Direction* Forward Forward/Reverse - FCOMP User Manual REV. B 6 - 13 Protections L&T Electrical & Automation Stage1 Characteristic angle -90 -90 to 90 Degree Stage1 Voltage Polarisation 0 0-1.2 - Stage1 Forward Curve type IEC curve A IEC Type A,B,C - IEEE Moderately Inverse, Extremely Inverse, Very Inverse Stage1 Reverse Curve type IEC curve A IEC Type A,B,C - IEEE Moderately Inverse, Extremely Inverse, Very Inverse Stage1 Forward Pickup (x In)* 0.1 0.1-20 Amp Stage1 Reverse Pickup (x In)* 0.1 0.1-20 Amp Stage1 Forward Delay* 0.00 0-600 Sec Stage1 Reverse Delay* 0.00 0-600 Sec Enable Enable-Disable - 80 25-80 % Alarm Function Alarm (% pickup) *: The similar settings available for other 1 stage & All 4 groups Frequency Based Protections The steady state frequency is the main criteria for stability and security in variable interconnected networks within the power system. It is an indicator of the existing balance between the generated power and the load. Underfrequency (81U) There will be a reduction in system frequency due to unbalance in the system with the power demand being more than generation. The underfrequency protection effectively detects this situation and helps in load shedding to stabilize the system frequency.For underfrequency protection; the frequency of voltage samples is used for computation and comparison. The blocking voltage concept is used for mal-operation of underfrequency protection when the source is in dead condition.The Relay provides 6 stages of underfrequency elements with independent settings. Table 6-19: Under frequency Settings Parameters Default Value Range Unit Disable Enable-Disable - Stage1 Pickup* 49.00 20.00-70.00 Hz Stage1 Delay* 2 0.00-100.00 Seconds Alarm Function Enable Enable-Disable - 80 25-80 % Stage1 Function* Alarm (% pickup) 6 - 14 FCOMP User Manual REV. B L&T Electrical & Automation Protections Over frequency (81O) There will be an increase in system frequency due to the unbalance in the system through the loss of load with the generation being surplus. The overfrequency protection effectively detects this situation and helps in load restoration to stabilize the system frequency. Table 6-20: Over frequency Settings Parameters Default Value Range Unit Disable Enable-Disable - Stage1 Pickup* 51 20.00-70.00 Hz Stage1 Delay* 2 0.00-100.00 Seconds Alarm Function Enable Enable-Disable - 80 25-80 % Stage1 Function* Alarm (% pickup) * The similar settings available for other 5 stages & All 4 groups Frequency Gradient (df/dt Protection) (81R) The frequency gradient proportionally reflects the severity disorder, which can be utilised effectively in load-shedding plans. The overload is estimated on the basis of average frequency drop gradient. As it provides indication at an early stage, load can be shed in the very first step, thus preventing further frequency drop and its consequential hazards. Relay provides 6 stages of rate of change of frequency elements with independent settings. Relay detects any increase or decrease in frequency, or any change in frequency in either direction, depending on the option chosen for the parameter ‘Trend’. Table 6-21: Frequency Gradient Settings Parameters Default Value Range Unit Disable Enable-Disable - Stage1 Trend* Increasing Increasing/Decreasing/Both - Stage1 Pickup* 0.05 00.01-20.00 Hz/sec Stage1 OV Supervision (*Vn)* 1.2 0.10-1.20 V Stage1 Minimum* 20 20-70 Hz Stage1 Maximum* 70 20-70 Hz Stage1 Delay* 2 0.00-100.00 Seconds Alarm Function Enable Enable-Disable - 80 25-80 % Stage1 Function* Alarm (% pickup) *: The similar settings available for other 5 stages & All 4 groups FCOMP User Manual REV. B 6 - 15 Protections L&T Electrical & Automation Power Based Protections Under/Over Power (32P) Relay provides Over/Underpower element which can be utilised in the feeder protection to detect the excessive load or loss of load in the distribution systems. 3 stages of operation are provided to check the variations in active as well as reactive power. Overpower drop off: 1.05 x setting Underpower drop off: 0.95 x setting Table 6-22: Over/Under Power Settings Parameters Default Value Range Unit Stage1 Function* Disable Enable-Disable - Stage1 Under/Over* Under Under/Over Stage1 Pickup Parameter (W/VAR)* W W/VAR Stage1 Pickup* 0.3 0.20-1300.00 Stage1 Delay* 2 0-600 Alarm Function Enable Enable-Disable - 80 25-80 % Alarm (% pickup) KW/KVAR *: The similar settings available for other 2 stages & All 4 groups Reverse Power (32R) Reverse power is also called a backfeeding occurs when the power flows in opposite direction of its usual flow. In reverse power condition, the power station delivers power to the power grid in positive cycle of voltage, and inducing it to flow out of the power grid in negative cycle of voltage. Table 6-23: Reverse Power Settings Parameters Default Value Range Unit Disable Enable-Disable - Pickup Parameter (W/VAR) W W/VAR Pickup 0.3 0.20-1300.00 Delay 2 0-600 Function KW/KVAR Each setting is available for All 4 groups. 6 - 16 FCOMP User Manual REV. B L&T Electrical & Automation Protections Power Factor (55) If in case of inductive load or capacitive load if the power factor dropps below certain specified level in both lag as well as leading conditions, the relay generates the alarm/trip bit indications for required action to approach power factor to unity. Table 6-24: Power Factor Settings Parameters Default Value Range Unit Disable Enable-Disable - Pickup 0.9 0.05-0.95 - Delay 10 1-240 sec Alarm Pickup 0.05 0.05-0.95 - Alarm Delay 1 1-240 sec Disable Enable-Disable - Pickup 0.9 0.05-0.95 - Delay 10 1-240 sec Alarm Pickup 0.05 0.05-0.95 - Alarm Delay 1 1-240 sec Lead Power factor Function Lag Power factor Function Each setting is available for All 4 groups. FCOMP User Manual REV. B 6 - 17 Protections L&T Electrical & Automation Ancillary Protections Synchrocheck SynchroCheck is a basic synchronism check carried out between two voltage sources in a power system before closing of a circuit breaker interconnecting both voltage sources. Voltage difference, frequency difference and phase angle difference between the two voltage vectors are checked before allowing the interconnecting circuit breaker to close. If the difference exceeds a certain range, it may lead to loss of power system stability, and may damage the interconnected machines. A typical example is a two incomer one bus coupler scheme with manual changeover of incoming supply. When any of the two breakers are ON and user want to close third breaker followed by opening of any one of the breaker, Synchrocheck is used to check existing supply with new supply voltage. It generates closing command to the third breaker if supplies are in sync and thereby generates trip command to any one of the breaker by checking momentary paralleling condition. To undergo SynchroCheck, a fourth input on the VT card is needed for phase-to-phase voltage. The following settings allow selection of the combination of dead and live sources (5 modes; 0-None, 1- Live1 and Dead2, 2- Dead1 and Live2, 3- Dead1 or Dead2, 4- Dead1 Xor Dead2, 5-Dead1 and Dead2) that will bypass SynchroCheck function and permit to close the breaker: Dead 1 Threshold: Source 1 is ‘Dead’, If the voltage is below this threshold. Dead 2 Threshold: Source 2 is ‘Dead’, If the voltage is below this threshold. Live 1 Threshold: Source 1 is ‘Live’, If the voltage is above this threshold Live 2 Threshold: Source 1 is ‘Live’, If the voltage is above this threshold. Table 6-25: Synchrocheck Settings Parameters Default Value Range Unit Disable Enable-Disable - Phase to Phase Ph-N/Ph- Ph - None 0-5 - Stage1 Voltage Difference 10 1-240 V Stage1 Angle Difference 10 0-120 deg Stage1 Frequency Difference 1 0-3.00 Hz Stage1 Function Stage1 Measurement type Stage1 Mode * The similar settings available for other 1 stages & All 4 groups Second Harmonic Blocking The second harmonic feature is needed in feeder protection relays for feeders connected to transformers. Whenever a transformer connected to a feeder is energized, it draws a large initial magnetizing current, which may be several times more than the rated current of a transformer. This current is known as the magnetizing inrush current. Due to heavy magnitude of the inrush current, it may be above the pickup level of the OverCurrent elements, which causes trip. So, once the inrush condition is detected, all OverCurrent elements are blocked. 6 - 18 FCOMP User Manual REV. B L&T Electrical & Automation Protections The harmonic contents in the inrush current are different from those of a normal fault current. The DC offset range varies from 40 to 60%; the second harmonic content varies from 15 to 70%; and the third harmonic content varies from 10 to 30%. Other harmonics are progressively less. The third harmonic and its multiples do not appear in the CT leads, as these circulate in the delta winding of the transformer and the delta connected CTs connected on the star winding of the transformer. Hence, the second harmonic content is utilized for detecting the inrush condition. The second harmonic level may not be same for all the phases during inrush, and therefore, phase inrush blocking is used where blocking signal being will be transmitted if any one of the phases detects second harmonic content above the threshold value. The ratio of second harmonic current to the fundamental current is being applied for detection. Table 6-26: Second harmonic blocking Settings Parameters Function Pickup Default Value Range Unit Disable Enable-Disable - 20 10-70 - Cold Load Pickup Cold load settings group is required at all stages of non-directional and directional OverCurrent elements. The term ‘cold load pickup’ refers to the increased level of currents due to restoration of power after a long interruption. Generally, when a distribution circuit is restored after an extended outage, demand is greater than what it was before the outage. Attempting to pickup this load can be tough because the initial load demand after an outage can exceed the load demand that is observed at any time before the outage. This cold load condition can be caused due to loss of diversity following an extended outage, opening of the circuit breaker, or loss of supply, even if the breaker remains closed. Diversity refers to the percentage of independently controlled, cyclic loads that may be energized at any given time during normal circuit operation - 1 of 2 would be 50% diversity. Loss of load diversity is a part of cold load pickup that occurs when distribution circuits are restored, following sustained outages of several minutes to several hours. After the load is energized, current level shoots up instantly around 5-6 times the normal level due to magnetizing inrush currents in transformers, thereby accelerating currents in motors and enduring current due to loss of normal load diversity. The factors that determine the magnitude and duration of cold load pickup are: outage duration, types of connected load, weather, restoration mode, outage causes & the presence of distributed generation and/or automatic transfer schemes, time of day, and load level. In most cases, as cold load pickup current is greater than percentage current, it affects fault detection. In other words, protective Relays can misinterpret the cold load pickup condition as a fault and initiate de-energisation of a non-faulty circuit. Cold load pickup current can be high enough to cause instantaneous OverCurrent and/or timed OverCurrent protection to maloperate. To prevent this, cold load condition is set. Table 6-27: Cold Load Pickup Settings Parameters Default Value Range Unit Disable Enable-Disable - Open delay 0 0-1500 - Active delay 10 10-15000 sec Function FCOMP User Manual REV. B 6 - 19 Protections L&T Electrical & Automation Breaker Failure During faulty conditions in a power system, the breaker needs to be tripped to isolate the faulty part of the power system network. At times, the circuit breaker may fail to trip. The method to detect breaker failure condition is as follows: Breaker auxiliary contacts detecting the breaker status closed (breaker is closed) even after the timer (timer value = breaker tripping time + a buffer) has expired and fault current keep flowing concludes that the breaker has not tripped resulting in failure of clearing the fault. The solution for this is LBB protection (Local Breaker Backup protection). If the downstream breaker fails to clear the fault, a DO is fed from the downstream breaker as DI of the upstream breaker to trip it. A user-configurable provision for breaker failure alarm is available. Table 6-28: Breaker Failure Settings Parameters Function DI selection Requirement DI Selection Default Value Range Unit Disable Enable-Disable - No Yes-No - 1 0-30 - Auto-Recloser As the name suggests, auto-reclosure denotes reclosing of circuit breaker contacts automatically once it gets tripped or opened due to any fault in the system. It is recommended to be used in the feeders where the frequency of transient faults such as insulator flash over or semi-permanent faults such as a tree branch falling on the line are more. In case of semi-permanent occurrence, the fault would not be removed by immediate tripping of the breaker, but could be burnt away during a time delayed trip. Tentatively, 80% of the overhead line faults are transient in nature, and in such cases autoreclosing is beneficial, as it eliminates loss of supply from such faults, and allows a particular substation run unattended. Thus, the number of visits by personnel to reclose a circuit breaker manually, after a fault occurs, could be substantially reduced - which is an important consideration for substations in remote areas. For feeders where a significant portion of faults are permanent, for example, broken conductors, transformer faults, cable faults or machine faults, auto-reclosure is not considered as the right alternative, since reclosing on to a faulty cable is likely to aggravate the damage. On HV/MV distribution networks, auto-reclosure is applied mainly to radial feeders where system stability issues do not generally arise. The system conditions to be met for closing are: whether the system voltages are in synchronism or dead line/live bus or live line/dead bus conditions exist, indicated by the internal check synchronizing element; and that the circuit breaker closing spring, or other energy source, is fully charged. Auto-reclosure may be of single phase or 3-phase type. Mostly, single phase auto reclosing breakers are preferred, as most of the transmission faults are of single phase to ground faults. Auto-reclosure improves stability, as power is transmitted through the two healthy phases when one phase is interrupted. 6 - 20 Dead timer: It is the time between the breakers tripping and reclosing again. This time should be sufficient enough to be allowed after tripping for the fault arc to de-energise prior to reclosing, or the arc will re-strike. The dead time depends on the line voltage, breaker and type of fault occurring in the line frequently. Reclaim timer: It is the time delay provided once the breaker closes, which should be in excess of the time delayed protection operating time to ensure that the protection can operate before the auto-reclosure function is reset. During this time, if the breaker is tripped due to protection or FCOMP User Manual REV. B L&T Electrical & Automation Protections manually, the Auto-reclosure (A/R) either advances to the next shot (if it is programmed for multi-shots), or goes to lockout if all programmed reclose attempts have been made. The reclaim timer starts once the CB has physically closed. If there is no trip before the reclaim timer expires, the A/R function resets at the end of the timer. Lockout: Lockout means the breaker is opened permanently and auto-reclosure is blocked. It can be set either manually or get set after all the A/R shots are completed. It is necessary to reset from lockout to reset the autoreclose function. Table 6-29: Auto-reclosure Settings Parameters Default Value Range Unit Disable Enable-Disable - 4 0-4 - Dead Time 0.1 0.1-100 Sec Reclaim time 0.1 0.1-100 Sec Function No. Of shots CT Supervision The intent of CT supervision feature is to detect if any issue occurs in current transformer secondary circuits. In case of CT failure in one or multiple phases, faulty information about current flow in the Relay, leads to mal-operation of main protection functions. The supervision function must be sensitive & fast to detect the condition and prevent unwanted tripping of some sensitive protections. On detection of a CT failure condition, the protection elements that work on derived values (differential, ground fault, negative sequence OverCurrent and broken conductor) are blocked. An alarm is generated if configured. Table 6-30: CT Supervision Settings Parameters Function Inhibit setting (* In) Time delay Threshold setting (* In) Default Value Range Unit Disable Enable/Disable - 0.2 0 -1.00 A 0 0 - 500 sec Sec 0.7 0 -1.00 A Loss of Phase or Fuse Failure The Relay declares an LOP if there is 25% drop for 60 cycles in the measured positive-sequence volt with no corresponding magnitude or angle change in positive or negative or zero sequence currents. This provides information if the VT fuse of one or more than one phase blown out. Table 6-31: LOP or Fuse Fail Settings Parameters Function Default Value Range Unit Disable Enable-Disable - FCOMP User Manual REV. B 6 - 21 L&T Electrical & Automation Communication Chapter 7 COMMUNICATION Overview Relay consists of multiple ports for communication. The front port is the local configuration utilised to communicate with COMPfigurator & COMPlogic. This communication is carried out on Modbus RTU protocol. The rear ports are to communicate with the system on a higher level, such as EWS /DCS/SCADA. In this case, communication is carried out on Modbus RTU, Modbus TCP/IP, Profibus, IEC 61850 protocols. Communication interface is the physical connection on a device. Once the physical connection is established, Relay communicates with the master on a protocol. The section below provides a detailed description of Communication Interface, Communication Protocols and Communication Architecture of different protocols applied in the Relay. Communication Interface Relay communicates with DCS/SCADA using Different communication protocols with different communication interfaces Listed in Table 7-1. Selection of communication protocol & Interface is depending on application. Table 7-1: Communication Interface & Protocols Communication Interface Protocol Connector Type Location Serial Modbus RTU USB B type Relay Front panel Serial Modbus RTU RS-485, 5 - Screw terminal Processor card Ethernet Modbus TCP/IP Dual RJ45/1 no. FO Processor card Serial Modbus RTU or Profibus Dual RS-485, 5 -screw terminals (Modbus)/ 1 no. 9Pin D Connector (Profibus) Communication card Ethernet IEC 61850 Dual RJ45/Dual FO Communication card FCOMP User Manual REV. B 7-1 Communication L&T Electrical & Automation Communication Protocols Modubus RTU Overview Modbus is a serial protocol that supports communication between a single master device and multiple slave devices. In a Modbus network, the protocol governs how each IED shall know its device address, recognise a message addressed to it, determine the kind of action to be taken, and extract any data or other information contained in the message. If a reply is required, the IED will construct the reply message and send it using Modbus protocol. Table 7–2 shows Relay Modbus RTU port connections. Table 7-2: 5-wire screw terminal for modbus RTU Pin No. Standard RS‐485 Signal for DB9 Connector Description Connection Required 5 Wire Screw terminal connection: Pins for the respected terminals 1 GND Common Ground Yes 5 2 CTS+ Clear to Send+ NA NA 3 RTS+ Ready to Send+ NA NA 4 RxD+ Receive Data+ Yes 4 5 RxD‐ Receive Data- Yes 3 6 CTS‐ Clear to Send- NA NA 7 RTS‐ Ready to Send- NA NA 8 TxD+ Transmitted Data+ Yes 1 9 TxD‐ Transmitted Data- Yes 2 The Modbus RTU message is a simple 8-bit binary code which allows more data exchange for the same baud rate as compared to ASCII message indicated in Figure 7-1 Address Function Code Data Number Data 1 ---- Data n CRC Low Order Byte CRC High Order Byte Figure 7-1: Modbus RTU Serial Message In case of Relay, Modbus communication allows a Modbus Master device to: 7-2 Acquire metering, monitoring and event data from the Relay. Control Relay output contacts. Aquire Relay files system data for diagnostic. FCOMP User Manual REV. B L&T Electrical & Automation Communication Supported Modbus Function Code Table 7–3 lists the function codes supported by the Relay on Modbus: Table 7-3: Modbus Function Code Codes Discriptions 01 Read Coil Status 03 Read Input Status 04 Read Input Registers 05 Force Single Coil 06 Single Coil register write 16 Multiple parameter writing 41 Event Log (User defined Function Code) 42 Data Recorder (User defined Function Code) 43 Oscillography (User defined Function Code) Relay Coil Status - 01 Description - Reads the ON/OFF status of discrete outputs (0X references, coils) in the Slave. Query - The query message specifies the starting coil and quantity of coils to be read. Coils are addressed starting at zero: coils 1-16 are addressed as 0-15. Table 7–4 below is an example of a request to read coils 20-56 from Slave device 17. Table 7-4: Read Coil Query Field Name (Hex) Slave Address 11 Function 01 Starting Address High 00 Starting Address Low 13 No. of Points High 00 No. of Points Low 25 Error Check (LRC or CRC) - Response - The coil status in the response message is packed as one coil per bit of the data field. Status is indicated as: 1 = ON; 0 = OFF. The LSB of the first data byte contains the coil addressed in the query. The other coils follow towards the high order end of this byte, and from ‘low order to high order’ in subsequent bytes. FCOMP User Manual REV. B 7-3 Communication L&T Electrical & Automation If the returned coil quantity is not a multiple of eight, the remaining bits in the final data byte will be padded with zeros (towards the high order end of the byte). The Byte Count Field specifies the quantity of complete bytes of data. The Table 7–5 below shows the Read Coil Status response to the query. Table 7-5: Read Coil Response Field Name (Hex) Slave Address 11 Function 01 Byte Count 05 Data (Coils 27-20) CD Data (Coils 35-28) 6B Data (Coils 43-36) B2 Data (Coils 51-44) 0E Data (Coils 56-52) 1B Error Check (LRC or CRC) ‐ The status of coils 27-20 is shown as the byte value CD hex, or binary 1100 1101. Coil 27 is the MSB of this byte and coil 20 is the LSB. From left to right, the status of coils 27 through 20 is: ON-ON-OFF-OFFON-ON-OFF-ON. By convention, bits within a byte are shown with MSB to the left and LSB to the right. Thus the coils in the first byte are '27 through 20', from left to right. The next byte has coils '35 through 28', left to right. As bits are transmitted serially, these flow from LSB to MSB: 20 . . . 27, 28 . . . 35 and so on. In the last data byte, status of coils 56-52 is shown as byte value 1B hex, or binary 0001 1011. Coil 56 is in the fourth bit position from the left and coil 52 is the LSB of this byte. The status of coils 56 through 52 is: ON-ON-OFF-ON-ON. Here, note how the three remaining bits (toward the high order end) are zero-filled. Read Holding Registers - 03 Description - It reads the binary contents of holding registers (4X references) from Slave device. Query - The query message specifies the starting register and quantity of registers to be read. Registers are addressed starting from zero: Registers 1-16 are addressed as 0-15. Table 7–6 below shows an example of a request to read registers 40108-40110 from Slave device 17. Table 7-6: Read Holding Register Query Field Name 7-4 (Hex) Slave Address 11 Function 03 Starting Address High 00 Starting Address Low 6B FCOMP User Manual REV. B L&T Electrical & Automation Communication No. of Points High 00 No. of Points Low 03 Error Check (LRC or CRC) - Response - The register data in the response message is packed as two bytes per register with the binary contents aligned as right-justified within each byte. For each register the first byte contains high-order bits, and the second comprises of low order bits. Data is scanned from the Slave device at the rate of 125 registers per scan for 984-X8X controllers (984-685, etc,.) and at the rate of 32 registers per scan for all other controllers. The response is returned when the data is completely assembled. Table 7–7 shows an example of a response to the query. Table 7-7: Read Holding Register Response Field Name (Hex) Slave Address 11 Function 01 Byte Count 05 Data (Coils 27-20) CD Data (Coils 35-28) 6B Data (Coils 43-36) B2 Data (Coils 51-44) 0E Field Name Data (Coils 56-52) Error Check (LRC or CRC) (Hex) 1B ‐ The contents of register 40108 are shown as the two byte values of 02 2B hex or 555 decimal. The contents of registers 40109-40110 are 00 00 and 00 64 hex or 0 and 100 decimal. Read Input Registers - 04 Description - Reads the binary contents of input registers (3X references) from Slave device. Query - The query message specifies the starting register and quantity of registers to be read. Registers are addressed starting from zero: Registers 1-16 are addressed as 0-15. Table 7–8 shows an example of a request to read register 30009 from Slave device 17. Table 7-8: Read Input Register Query Field Name FCOMP User Manual REV. B (Hex) Slave Address 11 Function 04 Starting Address High 00 Starting Address Low 08 7-5 Communication L&T Electrical & Automation No. of Points High 00 No. of Points Low 01 Error Check (LRC or CRC) - Response - The register data in the response message are packed as two bytes per register, with the binary contents as right-justified within each byte. For each register, the first byte contains the high-order bits, and the second contains the low- order bits. Data is scanned from the Slave device at the rate of 125 registers per scan for 984-X8X controllers (984685, etc,.) and at the rate of 32 registers per scan for all other controllers. The response is returned when the data is completely assembled. Table 7–9 shows the Read Holding Register response to the query. Table 7-9: Read Input Register Response Field Name (Hex) Slave Address 11 Function 04 Byte Count 02 Data High (Register 30009) 00 Data Low (Register 30009) 0A Error Check (LRC or CRC) - The contents of register 30009 are shown as two byte values of 00 0A hex or of 10 decimal. Force Coil – 05 Description - Forces a single coil (0X reference) either to ON or OFF mode. When broadcast, the function forces the same coil reference in all attached Slave device. Query - The query message specifies the coil reference to be forced. Coils are addressed starting from zero: coil 1 is addressed as 0. The requested ON/OFF state is specified by a constant in the query data field. A value of FF 00 hex requests the coil to be turned ON. A value of 00 00 requests it to be turned OFF. All other values are illegal and will not affect the coil. Table 7–10 shows an example of a request to force coil 173 ON in slave device 17. Table 7-10: Force Coil Query Field Name 7-6 (Hex) Slave Address 11 Function 05 Coil Address High 00 Coil Address Low AC Force Data High FF FCOMP User Manual REV. B L&T Electrical & Automation Communication Force Data Low Error Check (LRC or CRC) 00 - Response - The normal response is an echo of the query, returned after the coil state has been forced. Table 7–11 shows a response to the query. Table 7-11: Force Coil Response Field Name (Hex) Slave Address 11 Function 05 Coil Address High 00 Coil Address Low AC Force Data High FF Force Data Low 00 Error Check (LRC or CRC) - Write Single Register -06 Description – writes a value into single holding register. Query - The request message specifies the register reference to be written. Registers are addressed starting from zero: Register 1 is addressed as 0. The requested Write value will be specified in the request data field. Table 7–12 shows an example of a request to write register 40002 to 00 03 Hex in slave device 17. Table 7-12: Write Single Register Query Field Name Header FCOMP User Manual REV. B (Hex) None Slave Address 11 Function 6 Register Address High 0 Register Address Low 1 Write Data High 0 Write Data Low 3 Error Check Low 9A Error Check High 9B 7-7 Communication L&T Electrical & Automation Response - The normal response is an echo of the request, returned after the register contents have been written. Table 7–13 shows a response to the query. Table 7-13: Write Single Register Response Field Name Header (Hex) None Slave Address 11 Function 06 Coil Address High 00 Address Low 01 Write Data High 00 Write Data Low 03 Error Check Low 9A Error Check High 9B Write Multiple Registers -16 Description - Writes values into a sequence of holding registers Query - The request message specifies the register references to be written. Registers are addressed starting from zero: Register 1 is addressed as 0. The requested Write values are specified in the request data field. Data is packed as two bytes per register. Table 7–14 shows an example of a request to write two registers starting at 40002 to 00 0A and 01 02 hex, in slave device 17. Table 7-14: Write Multiple Register Query Field Name Header 7-8 (Hex) None Slave Address 11 Function 10 Starting Address High 00 Starting Address Low 01 Quantity of Registers High 00 Quantity of Registers Low 02 Byte Count 04 Data High 00 Data Low 0A FCOMP User Manual REV. B L&T Electrical & Automation Communication Data High 01 Data Low 02 Error Check Low C6 Error Check High F0 Response -The normal response returns the slave address, function code, starting address, and quantity of registers written. Table 7–15 shows an example of a response to the request. Table 7-15: Write Single Register Response Field Name Header (Hex) None Slave Address 11 Function 10 Starting Address High 00 Starting Address Low 01 Quantity of Registers High 00 Quantity of Registers Low 02 Error Check Low 12 Error Check High 98 Modbus RTU Settings Modbus requires communication parameters such as baud rate, parity, node address, etc, to be set for establishing a successful communication with the master. Table 7–16 shows Modbus RTU communication protocol settings. The communication parameter settings available in Relay are shown below: Mode: It defines the mode of communication (ASCII or RTU). The Relay supports only RTU mode. Node Address: It defines the node address of Relay. Baud Rate: It defines the speed at which Relay communicates with Modbus Master. Parity: Parity can be set as even, odd or none. Stop Bits: Number of Stop Bits used can be set as one or two. Table 7-16: Modbus RTU settings Parameter Setting Range Step Increase Factory Setting Mode RTU - RTU Node Address 1-247 1 1 FCOMP User Manual REV. B 7-9 Communication L&T Electrical & Automation Baud rate Parity Stop bit 19200-38400 19200 38400 Even, Odd, None - None 1, 2 - 2 Modbus Memory Map Modbus RTU memory map enlists all metering parameters, trip & event record parameters, DI/DO status and coil status. Function codes for different registers are also mentioned. The Modbus RTU memory map shows the addresses for slow scan parameters. The addresses for fast scan parameters will range from 30001 to 30016, which cannot be changed. Different parameters can be configured as fast scan parameters at these addresses through COMPfigurator. Please refer Annexture A for modbus memory map. Modbus TCP/IP Overview Modbus TCP/IP shares the same application layer as the Modbus RTU, however, with a different physical layer (Ethernet). Transmission Control Protocol (TCP) and Internet protocol (IP) govern the data traffic control on the Ethernet media. In other words, Modbus TCP/IP uses a Modbus RTU message transmitted with a TCP/IP envelope, which is send over a network instead of serial lines. The Server does not have a Slave ID, instead it uses an IP Address. The table below shows Modbus TCP/IP port connections in Relay. Relay communicates on Modbus TCP/IP using RJ45 port. Category 5 (Cat 5) cables, which support speed up to 100 Mbps are generally utilised for connection. Table 7–25 shows Relay Modbus TCP/IP port connection. Table 7-17: Modbus TCP/IP Connection 7 - 10 Pin No. Standard Signal Description Connection Required Relay Pin Relay Signal 1 Tx+ Transmit Data + Yes 1 Tx+ 2 Tx- Transmit Data - Yes 2 Tx- 3 Rx+ Receive Data+ Yes 3 Rx+ 4 NC Not Connected No 4 NA 5 NC Not Connected No 5 NA 6 Rx- Receive Data- Yes 6 Rx- 7 NC Not Connected No 7 NA 8 NC Not Connected No 8 NA FCOMP User Manual REV. B L&T Electrical & Automation Communication Modbus TCP/IP Settings Modbus TCP/IP requires certain communication parameters to be set for establishing a successful communication with the master. The table below shows Modbus TCP/IP communication protocol settings available in Relay. Relay supports Time synchronisation using Simple Network Time protocol (SNTP). To utilise this feature, the SNTP server address and the proper time zone must be entered in Relay settings as shown in the table below. The time zone is set as per the location of the user. In India, the time zone applied is GMT+5h 30m. Table 7–26 shows Modbus TCP/IP communication protocol settings. Table 7-18: Modbus Function Code Parameter Setting Range Step Increase Factory Setting Enable/Disable - Enable IP Address 0.0.0.0 to 255.255.255.255 1 10.7.212.135 Subnet Mask 0.0.0.0 to 255.255.255.255 1 255.255.255.0 Default Gateway 0.0.0.0 to 255.255.255.255 1 0.0.0.0 SNTP Server Address 0.0.0.0 to 255.255.255.255 1 0.0.0.0 Mode (DHCP) ± 0 to 13 hours & 0‐59 minutes Time Zone Profibus DP Overview Profibus is an open, vendor-independent, field bus protocol. The Relay supports Profibus DP-V0 protocol for cyclic data exchanges between master and slave devices. The Profibus DP-V1 protocol for acyclic data exchange is supported by the Relay as an optional feature. PROFIBUS DP is a network that consists of two types of devices connected to the bus, master devices and slave devices. It is a bi-directional network, meaning that one device, a master, sends a request to a slave, and the slave responds to that request. Table 7-19: Profibus Port Connection Pin No. Standard Signal Description Connection Required Relay Pin Relay Signal 1 GND Common Ground No 1 NA 2 CTS+ Clear To Send+ No 2 NA 3 RTS+ Ready To Send+ No 3 NA 4 RxD+ Received Data+ Yes 4 D+ 5 RxD‐ Received Data- Yes 5 D 6 CTS‐ Clear To Send- No 6 NA 7 RTS‐ Ready To Send- No 7 NA FCOMP User Manual REV. B 7 - 11 Communication L&T Electrical & Automation 8 TxD+ Transmitted Data+ No 8 NA 9 TxD‐ Transmitted Data- No 9 NA Profibus Settings Profibus requires communication parameters to be set for establishing Successful communication with the master having following setting ranges. Table 7-20: Profibus Setting Parameter Mode Node Address Setting Range Step Increase Factory Setting Enable/Disable - Enable 1-126 1 110 The communication parameter settings available are shown below: Node Address: To define the node address of the Relay. Baud Rate: Baud rate is governed by the Profibus. Profibus Memory Map Table 8–22 shows Profibus memory map of the Relay used during parameterization in Profibus mater. The parameters can be selected from the GSD file provided by the manufacturer of the Relay. GSD modules are discussed in Modules available in GSD file. Please refer Annexture A for modbus memory map. IEC 61850 Overview IEC 61850 is the international standard originally designed for the integration of electric utility substation devices. It supports multivendor IEDs that are networked to perform functions like protection, metering, automation and control. Over here IED refers to microcontrollers for power system equipment that are classified by their functions such as relays, circuit breakers, recloser etc. IEC 61850 provides a comprehensive model which contains object oriented data and the method for its data transfer. The transfer is carried over TCP/IP networks or substation LANs using high speed switched Ethernet. Key Points - 7 - 12 Cost effective solution due to reduced physical wiring No external protocol converters are required Easy to upgrade Flexible programming Lower installation cost Eliminate procurement ambiguity Highly interoperable between systems of different vendors Less Latency FCOMP User Manual REV. B L&T Electrical & Automation Communication Common data storage format i.e. Substation configuration description language (SCL) This appendix provide details of IEC 61850 standard from a conceptual point of view. We present our understanding of the IEC 61850 standard, the implementation of the protocol in FCOMP relay and use of our L&T configuration tool for transferring the Substation Configuration Language (SCL)/Configured IED Description (CID) file to the FCOMP relay. Structure of IEC61850 The standard IEC 61850 has an impact on all activities related to the field of protection and substation automation, but the main issues are how to implement the standard in practice and how to benefit from the potential the standard has. Substation Architecture & ACSI Figure 7-2: System architecture with IEC61850 In the above figure, IEC 61850 envisions a substation network connected to the outside wide area network via a secure gateway. Outside remote operators and control centers can use the abstract communication service interface (ACSI) to query and control IEDs in the substation. One or more substation buses, in the form of medium bandwidth Ethernet network connect all the IEDs inside the substation. The substation bus carries all ACSI requests and responses as well as generic substation events messages (GSE).A separate, high bandwidth Ethernet process bus handles communication inside each bay and connect the IEDs to any dumb devices. A substation would typically have a single global substation bus and multiple process buses, one for each bay. Communication inside a substation automation system involves monitoring, reporting and event logging. To accomplish this, the structure. There are four communication profiles in addition to substation event profile (GOOSE), the generic substation status event multicast profile (SMV) and the time synchronization profile. FCOMP User Manual REV. B data gathering and setting, data standard defines a communication ACSI: the generic object oriented (GSSE), the sampled measured value 7 - 13 Communication L&T Electrical & Automation Figure 7-3: Communication Profiles ACSI services enable client-server interaction between applications and servers. GOOSE provides a fast way to exchange data on the substation bus. GSSE provides a method for substation-level status exchange. Applications request all ACSI services and servers respond to them. The server is a common point that links physical devices and logical objects. Object Modeling The Abstract Communication Service Interface (ACSI) model defines a set of service and the responses to those services. These abstract models are used to create objects (data items) and services that exist independently of any underlying protocols. A data is assigned to a logical node that produces or consumes the values of the data object, this means for example: Data consisting of calculated values of current and voltage are assigned to the logical node “measurement unit”. The composition of DATA is based on common templates (the common data class, CDC), which describes the type and structure of each element within a logical node. Common data classes provide useful means to reduce the size of data definitions. The data definition does not need to list all the attributes but needs to just reference the common data class. CDCs for status, measurement, controllable analog and status and settings have unique CDC attributes. Each physical device can contain many logical devices and each logical device can contain many logical nodes. Each logical node represents a group of data (controls, status, measurements, etc.) associated with a particular function. For example, the MMXU logical node (measurement unit) contains measurement data and other points associated with three-phase metering including voltages and currents. Each IED may contain many functions such as protection, metering, and control. Multiple logical nodes represent the functions in multifunction devices. Table 7-21: Object Model Example Object Mode l 7 - 14 Components Object Name Description Logical Device FCOMP_PRO Protection Logical Node XCBR1 Circuit-breaker 1 Data Pos Position Data attributes stVal Status value FCOMP User Manual REV. B L&T Electrical & Automation Communication Data Mapping The FCOMP logical nodes are grouped under Logical Devices based on function. Table 7-3 shows Logical Devices in FCOMP. Chapter- Logical Nodes depicts LNs that make up these Logical Devices. Table 7-22: FCOMP Logical devices Lo gi cal De vic e D escripti on FCOMP_CFG Configuration elements-datasets and report control blocks FCOMP_PRO Protection related parameters FCOMP_MET Metering related parameters FCOMP_ANN Annunciation related parameters FCOMP_CON Control related parameters MMS (Manufacturing Message Specification) MMS (Manufacturing Message Specification) includes services for the application-layer exchange of realtime data indications, control operations & report notifications. A protocol that implements ACSI must be able to do a few basic things, such as reading, writing, spontaneously sending reports, and naming data using text strings. MMS or Manufacturing Message Specification (ISO 9506) was the first protocol for which an implementation of ACSI was defined. GSE (Generic Substation Events) The IEC 61850 standard allows for communication between devices within a substation where a peer-topeer model for Generic Substation Events (GSE) services is used for fast and reliable communication between Intelligent Electronic Devices (IEDs). GSE is again subdivided into GOOSE & GSSE. For time-critical events such as protection, messages known as Generic Object-Oriented Substation Event (GOOSE) messages are exchanged between devices by means of a local Ethernet network. Generic Substation State Event (GSSE) provides the capability to convey state change information. Virtual bits (VB001–VB128) are control inputs that you can map to GOOSE receive messages using the L&T configuration software. If you intend to use any FCOMP virtual bits for controls, you must create COMPlogic equations to define these operations. File Services The File system provides a means for the devices to transfer data as files. The File system supports FTP (File Transfer Protocol). SCL (Substation Configuration Language) Substation Configuration Language (SCL) is an XML-based configuration language used to support the exchange of database configuration between different tools, which may come from different manufacturers. There are four types of SCL files: IED Capability Description file (ICD) The ICD file described the capabilities of an IED, including information on Logical node and GOOSE support System Specification Description file (SSD) The SSD file describes the single-line diagram of the substation. FCOMP User Manual REV. B 7 - 15 Communication L&T Electrical & Automation Substation Configuration Description file (SCD) SCD file contains information on all IEDs, configuration data, and a substation description Configured IED Description file (CID) CID file describes a single instantiated IED within the project, and includes various address information Dataset We have thirteen predefined datasets in FCOMP. However with the help of L&T Configuration tool, User can configure datasets by either editing or deleting them. The default list of datasets for FCOMP is as given below: Table 7-23: FCOMP Data Sets Datasets 7 - 16 De sc ri ptio n DSet01 Metering DSet02 Virtual bits DSet03 Contact Outputs DSet04 Contact Outputs DSet05 Contact Outputs DSet06 Contact Outputs DSet07 Contact Outputs DSet08 Protection DSet09 Metering DSet10 Contact Outputs DSet11 Metering DSet12 Metering DSet13 Metering FCOMP User Manual REV. B L&T Electrical & Automation Communication Reports FCOMP supports both buffered and unbuffered report control blocks in the report model as defined in IEC61850. There are 12 report control blocks- six buffered reports and six unbuffered reports. Unique dataset is assigned for each report control block. Table 7-24: FCOMP Reports type Name Descrip ti on Data Set BRep01 Predefined Buffered Report 01 DSet01 BRep02 Predefined Buffered Report 02 DSet02 BRep03 Predefined Buffered Report 03 DSet03 BRep04 Predefined Buffered Report 04 DSet04 BRep05 Predefined Buffered Report 05 DSet05 BRep06 Predefined Buffered Report 06 DSet06 URep01 Predefined Unbuffered Report 01 DSet07 URep02 Predefined Unbuffered Report 02 DSet08 URep03 Predefined Unbuffered Report 03 DSet09 URep04 Predefined Unbuffered Report 04 DSet10 URep05 Predefined Unbuffered Report 05 DSet11 URep06 Predefined Unbuffered Report 06 DSet12 FCOMP User Manual REV. B 7 - 17 Communication L&T Electrical & Automation IEC 61850 Configuration Steps to install configuration software 7 - 18 1. Click on the software setup icon for installation as shown in the figure below 2. Next screen appears as shown below. Now click on “Next”. 3. Below screen shall appear. Select the path to install software. Click on “install”. 4. Software is installed now. Click on “Finish” to complete the process. FCOMP User Manual REV. B L&T Electrical & Automation 5. FCOMP User Manual REV. B Communication Double click on the icon of installed software on your desktop. You will be prompted for password of the software. Enter the password and click on “ok”. 7 - 19 Communication L&T Electrical & Automation L&T Configuration Software-COMPmanagerTM The L&T IEC 61850 Configuration Tool will be used to configure L&T IEC 61850 based devices for substation automation. Tool helps User to map data from remote Goose into L&T IED data. L&T IEC 61850 Configuration Tool has split based window layout. Configuration Tool has project creation, editing and saving. Windows can be resized for convenience. Figure 7-4: COMPmanager Main Window The Configurator screen is divided into four parts. Project Editor- It lists all the local and remote IEDs. Configuration Editor- It contains IED Properties editor, GOOSE subscription mapping, IED Configuration and Startup properties editor. IED Template Library- IED template library shall store and display SCL files for project creation. Log window - It displays history of events and error for the present project. Project Editor: Project Editor lists all the local and remote IEDs added for a project created in the Configuration tool. A new project in Configuration tool shall open an empty project editor. Figure 7-5: Project Editor Window 7 - 20 FCOMP User Manual REV. B L&T Electrical & Automation Communication IEDs can be added to Project from IED Palette. After you add a new IED, configuration tool displays an icon representing the new IED in the Project Editor. Adding IED to Project: You can add IEDs to the project by dragging IED product from IED template library and dropping it in the project editor. After dropping into project editor user will be asked for selecting the IED as shown below. Figure 7-6: IEDs in SCL file User shall click Ok to finish the process. Now the all IEDs will be added to project and shown in the project editor. If the manufacturer of the IED is Larsen & Toubro it will be added under the node Local IEDs otherwise under the node Remote Publisher. You can distinguish between Local IEDs and Remote Publisher by the different icons. Functions available for an IED in project: User has the functions Send SCD, Export SCD for all local IEDs. Send SCD shall send the SCD file of selected IED with all subscription to IED via ftp. Figure 7-7: IED functions in COMPmanager Configurations Editor Properties: Each IEDs added to project have a set of properties. These include Name, Type, Manufacturer, Description etc. The IP Address indicates the IP Address of L&T IED. All ftp related operations of an IED will be referring to this address. Figure 7-8: IED communication properties FCOMP User Manual REV. B 7 - 21 Communication L&T Electrical & Automation Goose Mapping This configuration screen allows the user to map the desired data from GOOSE publication to 61850 inputs of the selected IED in the project editor. Figure 7-9: Goose Mapping Window In the GOOSE Publication section the display is in the following format Level1 - <IEDName> Level2-<LogicalDeviceName>.<GOOSE Name> Level3 -<DataSet> Level4 -<LogicalDeviceName>/<FCDA> FCDA: Functionally Constraint Data Attribute In the GOOSE Subscription-Mapping section the listview displays boolean data items from any logical node with lnClass="GGIO" and inst=”1” 7 - 22 FCOMP User Manual REV. B L&T Electrical & Automation Communication Data Mapping User can browse through the GOOSE publication to identify the desired data item then drag it and drop on the desired 61850 input on the GOOSE Subscription Mapping section. Figure 7-10: Data Mapping Window User can remove the mapping of a data item by right clicking the mapped data item and using the function Remove Mapping. Figure 7-11: Removal of data mapping FCOMP User Manual REV. B 7 - 23 Communication L&T Electrical & Automation Goose Control Blocks configuration This displays the GOOSE control blocks' details. The publisher part shows the GOOSE control blocks details in the selected IED in project editor. Figure 7-12: Goose control block configuration Adding a GOOSE Control Block: Click on the Add button in the GOOSE Control Blocks Configuration screen which will display the screen shown below from which user has to select the logical device to which GOOSE control block has to be added. Figure 7-13: Addition of Goose control block After selecting the logical device, below shown screen will be displayed. Figure 7-14: Adding Goose details 7 - 24 FCOMP User Manual REV. B L&T Electrical & Automation Communication Editing a GOOSE Control Block: Select the GOOSE Control Block from GOOSE Control Block Configuration screen. Now either double clicking on the selected GOOSE or clicking Edit button will display the Edit GOOSE screen where user can edit the GOOSE details. Deleting a GOOSE Control Block: Select the GOOSE Control Block from GOOSE Control Block Configuration screen and click on delete button. Note: If the selected GOOSE Control Block is used for mapping purpose in other IEDs the delete request will be rejected as shown below. Report Control Blocks Configuration This screen shows the buffered and unbuffered reports of the selected IED. This also provides the user to add, edit, and delete Report control blocks. Figure 7-15: Report Control Blocks Bitstring format for displaying RCB Options fileds and Trigger Options: In IED Configurator the RCB Options fields are displayed in bitstring format as shown below Figure 7-16: Fields in Report Control Blocks FCOMP User Manual REV. B 7 - 25 Communication L&T Electrical & Automation RCB Options Fields are displayed in the following order of bits Figure 7-17: Bit indication in RCB Optional fields RCB Trigger options are displayed in the following order of bits Figure 7-18: Bit indication in RCB trigger fields Adding a Report Control Block To add a Report Control Block, click on Add button. Below shown screen will be displayed. Figure 7-19: Addition of report control block User can enter the Report Control Block details in this screen. User can select to which logical device report control block has to be added. Datasets from the LLN0 of selected the logical device will be listed in the dataset drop down. After entering the details, user has to click Ok button. Please note that all report control block shall be created in LLN0 of logical device. 7 - 26 FCOMP User Manual REV. B L&T Electrical & Automation Communication Field Name Min Max Buffer Time 0 ms 3600000 ms Integrity Period 0 ms 1800000 ms Number Of Instances 1 16 Table 7-4: Read Coil Query Editing a Report Control Block Select the Report Control Block from Report Control Block Configuration screen. Now either double clicking on the selected Report Control Block or clicking Edit button will display the Edit RCB screen where user can edit the Report control block details. Deleting a Report Control Block Select the Report Control Block from Report Control Block Configuration screen and click on delete button. User will be asked to confirm the action. Printing Report Control Blocks information User shall print report control blocks information using Print button. Datasets Configuration This configuration screen displays all the datasets in a list, IED Data Items of the selected IED and the dataset items of the selected dataset. Figure 7-20: Datasets configuration window FCOMP User Manual REV. B 7 - 27 Communication L&T Electrical & Automation Adding a Dataset: User can add a new dataset by clicking on Add button. User shall enter the dataset details and click on Ok button. The data set will be added to the selected logical node (logical node is fixed as LLN0) in selected logical device. (Note that while adding the dataset user is not selecting the data items (FCDA/FCD) for the dataset. This can be later configured from the Datasets Configuration screen). Figure 7-21: Addition of Datasets Configuring a Dataset User can select the dataset to be edited from the list. Dataset Items (FCDA/FCD) section shows the data items present in the selected dataset. IED Data items shows the Logical devices and logical nodes in the logical device. User can select the desired data object or data attribute from the logical node and drag it and drop in the Dataset items (FCDA/FCD) section. Editing a Dataset User can change the description of a dataset by editing the dataset. Deleting a Dataset User shall select the desired dataset from the list and click on Delete button. User will be asked to confirm the action. If the dataset is referenced by a GOOSE control block or Report control block it cannot be deleted. Figure 7-22: Deletion of Datasets Cloning a Dataset: This functionality is for creating a dataset from an existing dataset. User can select the desired dataset from the drop down list to be cloned and click on Clone button. User can see the below shown screen in which the dataset name and description are entered. 7 - 28 FCOMP User Manual REV. B L&T Electrical & Automation Communication Figure 7-23: Cloning of Datasets COMPmanager Settings IED Template Library: IED Template Library shall store and display L&T IED templates as well as other remote IEDs. ICD files will be allowed to be imported as templates. Figure 7-24:IED template You can import new IED template to IED Palette using the functionality Import IED. User will get the below shown menu when right clicking on the IED Palette. Figure 7-25: Importing IED You can browse the desired file to be added to the IED Palette. Figure 7-26: Browsing .icd file FCOMP User Manual REV. B 7 - 29 Communication L&T Electrical & Automation Log Window: This window will show the different information and errors related to IED Configurator. Figure 7-27: Log Window 7 - 30 FCOMP User Manual REV. B L&T Electrical & Automation Setting Sheet Chapter 8 SETTING SHEET Overview These settings sheets include the definition and input range for each setting in the Relay. You can access the settings from the Relay front panel and the Communication protocols. Product Setup Date & Time Parameters Default Value Range Unit Date 1 1-31 =________________ Month 1 1-12 =________________ Year 2010 2010-2999 =________________ Hour 0 0-23 =________________ Minute 0 0-59 =________________ Second 0 0-59 =________________ Millisecond 0 0-999 =________________ Demand Parameters Current Demand Method Default Value Thermal Exponential Range Thermal Exponential/ Unit =________________ Block Interval/ Rolling Demand Power Demand Method Thermal Exponential Thermal Exponential/ =________________ Block Interval/ Rolling Demand Interval Time 15 15/45/60 min =________________ Sliding Window 5 5/10/15 min =________________ FCOMP User Manual REV. B 8-1 Setting Sheet L&T Electrical & Automation Communication Settings Modbus Serial Setting Parameters Default Value Range Unit Node Address 1 1-247 =________________ Parity None None/Odd/Even =________________ Baud Rate 38400 300//600/1200/2400 =________________ Stop Bits 1 /4800/9600/19200/38400 1-2 =________________ Modbus TCP/IP Setting Parameters Default Value Range Unit IP Address 0 (Low) 135 0-255 =________________ IP Address 1 212 0-255 =________________ IP Address 2 7 0-255 =________________ IP Address 3 (High) 10 0-255 =________________ IP Subnet Mask 0 0 0-255 =________________ IP Subnet Mask 1 255 0-255 =________________ IP Subnet Mask 2 255 0-255 =________________ IP Subnet Mask 3 255 0-255 =________________ Gateway IP Address 0 1 0-255 =________________ Gateway IP Address 1 212 0-255 =________________ Gateway IP Address 2 7 0-255 =________________ Gateway IP Address 3 10 0-255 =________________ OSI Network Address 0 0 0-255 =________________ OSI Network Address 1 0 0-255 =________________ OSI Network Address 2 0 0-255 =________________ OSI Network Address 3 0 0-255 =________________ 8-2 FCOMP User Manual REV. B L&T Electrical & Automation Setting Sheet Profibus Setting Parameters Default Value Range Unit Function Disable Enable/Disable =________________ Node Address 1 1-126 =________________ IEC 61850 Setting Parameters Default Value Range Unit IP Address 0 (Low) 0 0-255 =________________ IP Address 1 0 0-255 =________________ IP Address 2 0 0-255 =________________ IP Address 3 (High) 0 0-255 =________________ IP Subnet Mask 0 0 0-255 =________________ IP Subnet Mask 1 255 0-255 =________________ IP Subnet Mask 2 255 0-255 =________________ IP Subnet Mask 3 255 0-255 =________________ Gateway IP Address 0 0 0-255 =________________ Gateway IP Address 1 0 0-255 =________________ Gateway IP Address 2 0 0-255 =________________ Gateway IP Address 3 0 0-255 =________________ OSI Network Address 0 0 0-255 =________________ OSI Network Address 1 0 0-255 =________________ OSI Network Address 2 0 0-255 =________________ OSI Network Address 3 0 0-255 =________________ FCOMP User Manual REV. B 8-3 Setting Sheet L&T Electrical & Automation System Settings Current Ratio Parameters Default Value Range Unit Phase CT Primary 1 1-50000 =________________ Phase CT Secondary 1A 1A/5A =________________ SEF/Neutral CT Primary 1 1-50000 =________________ SEF/Neutral CT Secondary 1A 1A/5A =________________ REF CT Primary 1 1-50000 =________________ REF CT Secondary 1A 1A/5A =________________ Neutral/ SEF Selection Neutral Neutral/SEF =________________ Voltage Ratio Parameters Default Value Range Unit Phase VT Connection Star Star/Open Delta =________________ Phase VT Primary (Ph-N) 239.60 1-24000 =________________ Phase VT Secondary (Ph-N) 63.5 1-300 =________________ Nominal Frequency 50 50/60 =________________ Phase Rotation RYB RYB/RBY =________________ Group Settings Parameters 8-4 Default Value Range Unit Setting Group Change Delay 60 60-400 sec =________________ Setting Group 1 ON ON/OFF/Control Equation =________________ Setting Group 2 OFF ON/OFF/Control Equation =________________ Setting Group 3 OFF ON/OFF/Control Equation =________________ Setting Group 4 OFF ON/OFF/Control Equation =________________ FCOMP User Manual REV. B L&T Electrical & Automation Setting Sheet Protection Settings Current Based Protections Parameters Default Value Range Unit Phase Instantaneous OverCurrent (50P) Stage1 Function Disable Enable/Disable =________________ Stage1 Pickup 1.00 In 0.1-20 In A =________________ Stage1 Delay 0.3 0.00-600.00 =________________ Stage2 Function Disable Enable/Disable =________________ Stage2 Pickup 1.00 In 0.1-20 In A =________________ Stage2 Delay 0.3 0.00-600.00 =________________ Stage3 Function Disable Enable/Disable =________________ Stage3 Pickup 1.00 In 0.1-20 In A =________________ Stage3 Delay 0.3 0.00-600.00 =________________ Stage4 Function Disable Enable/Disable =________________ Stage4 Pickup 1.00 In 0.1-20 In A =________________ Stage4 Delay 0.3 0.00-600.00 =________________ Alarm Function Enable Enable/Disable =________________ Alarm (% Pickup) 80 25-80% =________________ Neutral Instantaneous OverCurrent (50N) Stage1 Function Disable Enable/Disable =________________ Stage1 Pickup 0.10 In 0.1-20 In A =________________ Stage1 Delay 0.3 0.00-600.00 =________________ Stage2 Function Disable Enable/Disable =________________ Stage2 Pickup 0.10 In 0.1-20 In A =________________ Stage2 Delay 0.3 0.00-600.00 =________________ Stage3 Function Disable Enable/Disable =________________ Stage3 Pickup 0.10 In 0.1-20 In A =________________ Stage3 Delay 0.3 0.00-600.00 =________________ Stage4 Function Disable Enable/Disable =________________ FCOMP User Manual REV. B 8-5 Setting Sheet L&T Electrical & Automation Parameters Default Value Range Neutral Instantaneous OverCurrent (50N) Unit Continued… Stage4 Pickup 0.10 In 0.1-20 In A =________________ Stage4 Delay 0.3 0.00-600.00 =________________ Alarm Function Enable Enable/Disable =________________ Alarm (% Pickup) 80 25-80% =________________ Ground Instantaneous OverCurrent (50G) Stage1 Function Disable Enable/Disable =________________ Stage1 Pickup 0.10 In 0.1-20 In A =________________ Stage1 Delay 0.3 0.00-600.00 =________________ Stage2 Function Disable Enable/Disable =________________ Stage2 Pickup 0.10 In 0.1-20 In A =________________ Stage2 Delay 0.3 0.00-600.00 =________________ Stage3 Function Disable Enable/Disable =________________ Stage3 Pickup 0.10 In 0.1-20 In A =________________ Stage3 Delay 0.3 0.00-600.00 =________________ Stage4 Function Disable Enable/Disable =________________ Stage4 Pickup 0.10 In 0.1-20 In A =________________ Stage4 Delay 0.3 0.00-600.00 =________________ Alarm Function Enable Enable/Disable =________________ Alarm (% Pickup) 80 25-80% =________________ Negative Sequence Instantaneous OverCurrent (50Q) 8-6 Stage1 Function Disable Enable/Disable =________________ Stage1 Pickup 0.10 In 0.1-20 In A =________________ Stage1 Delay 0.3 0.00-600.00 =________________ Stage2 Function Disable Enable/Disable =________________ Stage2 Pickup 0.10 In 0.1-20 In A =________________ Stage2 Delay 0.3 0.00-600.00 =________________ FCOMP User Manual REV. B L&T Electrical & Automation Parameters Setting Sheet Default Value Range Unit Negative Sequence Instantaneous OverCurrent (50Q) Continued… Stage3 Function Disable Enable/Disable =________________ Stage3 Pickup 0.10 In 0.1-20 In A =________________ Stage3 Delay 0.3 0.00-600.00 =________________ Stage4 Function Disable Enable/Disable =________________ Stage4 Pickup 0.10 In 0.1-20 In A =________________ Stage4 Delay 0.3 0.00-600.00 =________________ Alarm Function Enable Enable/Disable =________________ Alarm (% Pickup) 80 25-80% =________________ Sensitive Instantaneous OverCurrent (50SG) Function Disable Enable/Disable =________________ Pickup 0.0025 In 0.0025-1.6 In A =________________ Delay 0.3 0.00-600.00 =________________ Alarm Function Enable Enable/Disable =________________ Alarm (% Pickup) 80 25-80% =________________ Stage1 Function Disable Enable/Disable =________________ Stage1 Curve type IEC Type A IEC Type A,B,C =________________ Phase Time OverCurrent (51P) IEEE Moderately Inverse, Extremely Inverse, Very Inverse Stage1 Pickup 1 In 0.1-3.2 In A =________________ Stage1 Voltage Restrain Disable Enable/Disable =________________ Stage1 Reset Instantaneous Instantaneous/Timed =________________ Stage1 TMS 0.1 0.05-15 =________________ Stage2 Function Disable Enable/Disable =________________ Stage2 Curve type IEC Type A IEC Type A,B,C =________________ IEEE Moderately Inverse, Extremely Inverse, Very Inverse Stage2 Pickup FCOMP User Manual REV. B 1 In 0.1-3.2 In A =________________ 8-7 Setting Sheet L&T Electrical & Automation Parameters Default Value Range Phase Time OverCurrent (51P) Unit Continued… Stage2 Voltage Restrain Disable Enable/Disable =________________ Stage2 Reset Instantaneous Instantaneous/Timed =________________ Stage2 TMS 0.1 0.05-15 =________________ Alarm Function Enable Enable/Disable =________________ Alarm (% Pickup) 80 25-80% =________________ Enable/Disable =________________ IEC Type A,B,C =________________ Neutral Time OverCurrent (51N) Stage1 Function Disable Stage1 Curve type IEC Type A IEEE Moderately Inverse, Extremely Inverse, Very Inverse Stage1 Pickup 0.1 In 0.1-3.2 In A =________________ Stage1 Voltage Restrain Disable Enable/Disable =________________ Stage1 Reset Instantaneous Instantaneous/Timed =________________ Stage1 TMS 1 0.05-15 =________________ Stage2 Function Disable Enable/Disable =________________ Stage2 Curve type IEC Type A IEC Type A,B,C =________________ IEEE Moderately Inverse, Extremely Inverse, Very Inverse Stage2 Pickup 0.1 In 0.1-3.2 In A =________________ Stage2 Voltage Restrain Disable Enable/Disable =________________ Stage2 Reset Instantaneous Instantaneous/Timed =________________ Stage2 TMS 1 0.05-15 =________________ Alarm Function Enable Enable/Disable =________________ Alarm (% Pickup) 80 25-80% =________________ Ground Time OverCurrent (51G) Stage1 Function Disable Enable/Disable =________________ Stage1 Curve type IEC Type A IEC Type A,B,C =________________ IEEE Moderately Inverse, Extremely Inverse, Very Inverse 8-8 FCOMP User Manual REV. B L&T Electrical & Automation Parameters Setting Sheet Default Value Range Ground Time OverCurrent (51G) Unit Continued… Stage1 Pickup 0.1 In 0.1-3.2 In A =________________ Stage1 Voltage Restrain Disable Enable/Disable =________________ Stage1 Reset Instantaneous Instantaneous/Timed =________________ Stage1 TMS 1 0.05-15 =________________ Stage2 Function Disable Enable/Disable =________________ Stage2 Curve type IEC Type A IEC Type A,B,C =________________ IEEE Moderately Inverse, Extremely Inverse, Very Inverse Stage2 Pickup 0.1 In 0.1-3.2 In A =________________ Stage2 Voltage Restrain Disable Enable/Disable =________________ Stage2 Reset Instantaneous Instantaneous/Timed =________________ Stage2 TMS 1 0.05-15 =________________ Alarm Function Enable Enable/Disable =________________ Alarm (% Pickup) 80 25-80% =________________ Enable/Disable =________________ IEC Type A,B,C =________________ Negative Sequence Time OverCurrent (51Q) Stage1 Function Disable Stage1 Curve type IEC Type A IEEE Moderately Inverse, Extremely Inverse, Very Inverse Stage1 Pickup 0.1 In 0.1-3.2 In A =________________ Stage1 Voltage Restrain Disable Enable/Disable =________________ Stage1 Reset Instantaneous Instantaneous/Timed =________________ Stage1 TMS 1 0.05-15 =________________ Stage2 Function Disable Enable/Disable =________________ Stage2 Curve type IEC Type A IEC Type A,B,C =________________ IEEE Moderately Inverse, Extremely Inverse, Very Inverse Stage2 Pickup 0.1 In 0.1-3.2 In A =________________ Stage2 Voltage Restrain Disable Enable/Disable =________________ Stage2 Reset Instantaneous Instantaneous/Timed =________________ FCOMP User Manual REV. B 8-9 Setting Sheet L&T Electrical & Automation Parameters Default Value Range Negative Sequence Time OverCurrent (51Q) Unit Continued… Stage2 TMS 1 0.05-15 =________________ Alarm Function Enable Enable/Disable =________________ Alarm (% Pickup) 80 25-80% =________________ Function Disable Enable/Disable =________________ Pickup 0.4 In 0.1-20 In A =________________ Delay 2 0.00-600.00 =________________ Alarm Function Enable Enable/Disable =________________ Alarm (% Pickup) 80 25-80% =________________ Function Disable Enable/Disable =________________ Pickup 0.02 In 0.02-1 In A =________________ Delay 0.3 0.00-600.00 =________________ Alarm Function Enable Enable/Disable =________________ Alarm (% Pickup) 80 25-80% =________________ Function Disable Enable/Disable =________________ Pickup 0.1 In 0.1-4 In A =________________ Delay 60 60-30000 Seconds =________________ K-Constant 0.10 0.1-4.00 =________________ Alarm Function Enable Enable/Disable =________________ Alarm (% Pickup) 80 25-80% =________________ Phase UnderCurrent (37P) Restricted Earth Fault Thermal Overload (49) 8 - 10 FCOMP User Manual REV. B L&T Electrical & Automation Setting Sheet Voltage Based Protections Parameters Default Value Range Unit Phase Undervoltage (27P) Stage1 Function Disable Enable/Disable =________________ Stage1 Pickup 0.8 Vn 0.02-1.2 %Vn V =________________ Stage1 Pickup Delay 2 0.00-600.00 =________________ Stage1 Curve type Definite Time Definite Time/Inverse Time =________________ Stage1 Block Voltage 0 0-75 %Vn V =________________ Stage1 Reset Delay 0 0.00-600.00 =________________ Stage2 Function Disable Enable/Disable =________________ Stage2 Pickup 0.8 Vn 0.02-1.2 %Vn V =________________ Stage2 Delay 2 0.00-600.00 =________________ Stage2 Curve type Definite Time Definite Time/Inverse Time =________________ Stage2 Block Voltage 0 0-75 %Vn V =________________ Stage2 Reset 0 0.00-600.00 =________________ Stage3 Function Disable Enable/Disable =________________ Stage3 Pickup 0.8 Vn 0.02-1.2 %Vn V =________________ Stage3 Delay 2 0.00-600.00 =________________ Stage3 Curve type Definite Time Definite Time/Inverse Time =________________ Stage3 Block Voltage 0 0-75 %Vn V =________________ Stage3 Reset 0 0.00-600.00 =________________ Alarm Function Disable Enable/Disable =________________ Alarm (% Pickup) 80 25-80% =________________ Stage1 Function Disable Enable/Disable =________________ Stage1 Pickup 1.1 Vn 0.02-2 %Vn V =________________ Stage1 Pickup Delay 2 0.00-600.00 =________________ Stage1 Curve type Definite Time Definite Time/Inverse Time =________________ Stage1 Block Voltage 0 0-75 %Vn V =________________ Phase OverVoltage (59P) FCOMP User Manual REV. B 8 - 11 Setting Sheet L&T Electrical & Automation Parameters Default Value Range Phase OverVoltage (59P) Unit Continued… Stage1 Reset Delay 0 0.00-600.00 =________________ Stage2 Function Disable Enable/Disable =________________ Stage2 Pickup 1.1 Vn 0.02-2 %Vn =________________ Stage2 Delay 2 0.00-600.00 =________________ Stage2 Curve type Definite Time Definite Time/Inverse Time =________________ Stage2 Block Voltage 0 0-75 %Vn V =________________ Stage2 Reset 0 0.00-600.00 =________________ Stage3 Function Disable Enable/Disable =________________ Stage3 Pickup 1.1 Vn 0.02-2 %Vn =________________ Stage3 Delay 2 0.00-600.00 =________________ Stage3 Curve type Definite Time Definite Time/Inverse Time =________________ Stage3 Block Voltage 0 0-75 %Vn V =________________ Stage3 Reset 0 0.00-600.00 =________________ Alarm Function Disable Enable/Disable =________________ Alarm (% Pickup) 80 25-80% =________________ Stage1 Function Disable Enable/Disable =________________ Stage1 Pickup 0.05 Vn 0.02-2 %Vn =________________ Stage1 Pickup Delay 2 0.00-600.00 =________________ Stage1 Curve type Definite Time Definite Time/Inverse Time =________________ Stage1 Block Voltage 0 0-75 %Vn =________________ Stage1 Reset Delay 0 0.00-600.00 =________________ Stage2 Function Disable Enable/Disable =________________ Stage2 Pickup 0.05 Vn 0.02-2 %Vn =________________ Stage2 Delay 2 0.00-600.00 =________________ Stage2 Curve type Definite Time Definite Time/Inverse Time =________________ Stage2 Block Voltage 0 0-75 %Vn V =________________ Residual OverVoltage (59N) 8 - 12 FCOMP User Manual REV. B L&T Electrical & Automation Parameters Setting Sheet Default Value Range Residual OverVoltage (59N) Unit Continued… Stage2 Reset 0 0.00-600.00 =________________ Stage3 Function Disable Enable/Disable =________________ Stage3 Pickup 0.05 Vn 0.02-2 %Vn V =________________ Stage3 Delay 2 0.00-600.00 =________________ Stage3 Curve type Definite Time Definite Time/Inverse Time =________________ Stage3 Block Voltage 0 0-75 %Vn V =________________ Stage3 Reset 0 0.00-600.00 =________________ Alarm Function Disable Enable/Disable =________________ Alarm (% Pickup) 80 25-80% =________________ Function Disable Enable/Disable =________________ Stage1 Pickup 0.8 Vn 0.02 1.2 %Vn V =________________ Stage1 Delay 2 0 600 Seconds =________________ Alarm Function Disable Enable/Disable =________________ Alarm (% Pickup) 80 25 80% =________________ Function Disable Enable/Disable =________________ Stage1 Pickup 1.1 Vn 0.02‐2 %Vn V =________________ Stage1 Delay 2 0 600 Seconds =________________ Alarm Function Disable Enable/Disable =________________ Alarm (% Pickup) 80 25 80% =________________ Sync Under Voltage (27S) Sync OverVoltage (59S) FCOMP User Manual REV. B 8 - 13 Setting Sheet L&T Electrical & Automation Directional Protections Parameters Default Value Range Unit Directional Phase Instantaneous overcurrent (67PI) Stage1 Function Disable Enable/Disable =________________ Stage1 Direction Forward Forward/Reverse =________________ Stage1 Characteristic angle -180 -180 to 180 =________________ Stage1 Voltage Polarisation 0 0-1.2 =________________ Stage1 Forward Pickup (*In) 0.1 0.1-20 =________________ Stage1 Reverse Pickup (*In) 0.1 0.1-20 =________________ Stage1 Forward Delay 0.00 0-600 =________________ Stage1 Reverse Delay 0.00 0-600 =________________ Stage2 Function Disable Enable/Disable =________________ Stage2 Direction Forward Forward/Reverse =________________ Stage2 Characteristic angle -180 -180 to 180 =________________ Stage2 Voltage Polarisation 0 0-1.2 =________________ Stage2 Forward Pickup (*In) 0.1 0.1-20 =________________ Stage2 Reverse Pickup (*In) 0.1 0.1-20 =________________ Stage2 Forward Delay 0.00 0-600 =________________ Stage2 Reverse Delay 0.00 0-600 =________________ Alarm Function Disable Enable/Disable =________________ Alarm (% Pickup) 80 25-80% =________________ Directional Phase Timed overcurrent (67PT) 8 - 14 Stage1 Function Disable Enable/Disable =________________ Stage1 Direction Forward Forward/Reverse =________________ Stage1 Characteristic angle -180 -180 to 180 =________________ Stage1 Voltage Polarisation 0 0-1.2 =________________ Stage1 Forward Pickup (*In) 0.1 0.1-20 =________________ Stage1 Reverse Pickup (*In) 0.1 0.1-20 =________________ FCOMP User Manual REV. B L&T Electrical & Automation Parameters Stage1 Forward Curve type Setting Sheet Default Value IEC curve A Range IEC Type A,B,C Unit =________________ IEEE Moderately Inverse, Extremely Inverse, Very Inverse Stage1 Reverse Curve type IEC curve A IEC Type A,B,C =________________ IEEE Moderately Inverse, Extremely Inverse, Very Inverse Stage1 Forward TMS 0.00 0-600 =________________ Stage1 Reverse TMS 0.00 0-600 =________________ Stage2 Function Disable Enable/Disable =________________ Stage2 Direction Forward Forward/Reverse =________________ Stage2 Characteristic angle -180 -180 to 180 =________________ Stage2 Voltage Polarisation 0 0-1.2 =________________ Stage2 Forward Pickup (*In) 0.1 0.1-20 =________________ Stage2 Reverse Pickup (*In) 0.1 0.1-20 =________________ Stage2 Forward Curve type IEC curve A IEC Type A,B,C =________________ IEEE Moderately Inverse, Extremely Inverse, Very Inverse Stage2 Reverse Curve type IEC curve A IEC Type A,B,C =________________ IEEE Moderately Inverse, Extremely Inverse, Very Inverse Stage2 Forward TMS 0.00 0-600 =________________ Stage2 Reverse TMS 0.00 0-600 =________________ Alarm Function Disable Enable/Disable =________________ Alarm (% Pickup) 80 25-80% =________________ Directional Neutral Instantaneous overcurrent (67NI) Stage1 Function Disable Enable/Disable =________________ Stage1 Direction Forward Forward/Reverse =________________ Stage1 Characteristic angle -90 -90 to 90 =________________ Stage1 Voltage Polarisation 0 0-1.2 =________________ Stage1 Forward Pickup (*In) 0.1 0.1-20 =________________ Stage1 Reverse Pickup (*In) 0.1 0.1-20 =________________ FCOMP User Manual REV. B 8 - 15 Setting Sheet L&T Electrical & Automation Parameters Default Value Range Unit Stage1 Forward Delay 0.00 0-600 =________________ Stage1 Reverse Delay 0.00 0-600 =________________ Stage2 Function Disable Enable/Disable =________________ Stage2 Direction Forward Forward/Reverse =________________ Stage2 Characteristic angle -90 -90 to 90 =________________ Stage2 Voltage Polarisation 0 0-1.2 =________________ Stage2 Forward Pickup (*In) 0.1 0.1-20 =________________ Stage2 Reverse Pickup (*In) 0.1 0.1-20 =________________ Stage2 Forward Delay 0.00 0-600 =________________ Stage2 Reverse Delay 0.00 0-600 =________________ Alarm Function Disable Enable/Disable =________________ Alarm (% Pickup) 80 25-80% =________________ Directional Neutral Timed overcurrent (67NT) Stage1 Function Disable Enable/Disable =________________ Stage1 Direction Forward Forward/Reverse =________________ Stage1 Characteristic angle -90 -90 to 90 =________________ Stage1 Voltage Polarisation 0 0-1.2 =________________ Stage1 Forward Pickup (*In) 0.1 0.1-20 =________________ Stage1 Reverse Pickup (*In) 0.1 0.1-20 =________________ Stage1 Forward Curve type IEC curve A IEC Type A,B,C =________________ IEEE Moderately Inverse, Extremely Inverse, Very Inverse Stage1 Reverse Curve type IEC curve A IEC Type A,B,C =________________ IEEE Moderately Inverse, Extremely Inverse, Very Inverse 8 - 16 Stage1 Forward TMS 0.00 0-600 =________________ Stage1 Reverse TMS 0.00 0-600 =________________ Stage2 Function Disable Enable/Disable =________________ Stage2 Direction Forward Forward/Reverse =________________ Stage2 Characteristic angle -90 -90 to 90 =________________ FCOMP User Manual REV. B L&T Electrical & Automation Parameters Setting Sheet Default Value Range Unit Stage2 Voltage Polarisation 0 0-1.2 =________________ Stage2 Forward Pickup (*In) 0.1 0.1-20 =________________ Stage2 Reverse Pickup (*In) 0.1 0.1-20 =________________ Stage2 Forward Curve type IEC curve A IEC Type A,B,C =________________ IEEE Moderately Inverse, Extremely Inverse, Very Inverse Stage2 Reverse Curve type IEC curve A IEC Type A,B,C =________________ IEEE Moderately Inverse, Extremely Inverse, Very Inverse Stage2 Forward TMS 0.00 0-600 =________________ Stage2 Reverse TMS 0.00 0-600 =________________ Alarm Function Disable Enable/Disable =________________ Alarm (% Pickup) 80 25-80% =________________ Frequency Based Protections Parameters Default Value Range Unit Underfrequency (81U) Stage1 Function Disable Enable/Disable =________________ Stage1 Pickup 49 20-70 Hz =________________ Stage1 Delay 2 0-100 =________________ Stage2 Function Disable Enable/Disable =________________ Stage2 Pickup 49 20-70 Hz =________________ Stage2 Delay 2 0-100 =________________ Stage3 Function Disable Enable/Disable =________________ Stage3 Pickup 49 20-70 Hz =________________ Stage3 Delay 2 0-100 =________________ Stage4 Function Disable Enable/Disable =________________ Stage4 Pickup 49 20-70 Hz =________________ Stage4 Delay 2 0-100 =________________ Stage5 Function Disable Enable/Disable =________________ FCOMP User Manual REV. B 8 - 17 Setting Sheet L&T Electrical & Automation Parameters Default Value Range Unit Stage5 Pickup 49 20-70 Hz =________________ Stage5 Delay 2 0-100 =________________ Stage6 Function Disable Enable/Disable =________________ Stage6 Pickup 49 20-70 Hz =________________ Stage6 Delay 2 0-100 =________________ Alarm Function Disable Enable/Disable =________________ Alarm (% Pickup) 80 25-80% =________________ Stage1 Function Disable Enable/Disable =________________ Stage1 Pickup 51 20-70 Hz =________________ Stage1 Delay 2 0-100 =________________ Stage2 Function Disable Enable/Disable =________________ Stage2 Pickup 51 20-70 Hz =________________ Stage2 Delay 2 0-100 =________________ Stage3 Function Disable Enable/Disable =________________ Stage3 Pickup 51 20-70 Hz =________________ Stage3 Delay 2 0-100 =________________ Stage4 Function Disable Enable/Disable =________________ Stage4 Pickup 51 20-70 Hz =________________ Stage4 Delay 2 0-100 =________________ Stage5 Function Disable Enable/Disable =________________ Stage5 Pickup 51 20-70 Hz =________________ Stage5 Delay 2 0-100 =________________ Stage6 Function Disable Enable/Disable =________________ Stage6 Pickup 51 20-70 Hz =________________ Stage6 Delay 2 0-100 =________________ Alarm Function Disable Enable/Disable =________________ Alarm (% Pickup) 80 25-80% =________________ Over frequency (81U) 8 - 18 FCOMP User Manual REV. B L&T Electrical & Automation Parameters Setting Sheet Default Value Range Unit Frequency Gradient (81R) Stage1 Function Disable Enable/Disable =________________ Stage1 Trend Increasing Increasing/Decreasing/Both =________________ Stage1 Pickup (x In) 0.05 00.01-20.00 =________________ Stage1 OV Supervision (*Vn) 1.2 0.10-1.20 =________________ Stage1 Minimum 20 20-70 =________________ Stage1 Maximum 70 20-70 =________________ Stage1 Delay 2 0.00-100.00 =________________ Stage2 Function Disable Enable/Disable =________________ Stage2 Trend Increasing Increasing/Decreasing/Both =________________ Stage2 Pickup (x In) 0.05 00.01-20.00 =________________ Stage2 OV Supervision (*Vn) 1.2 0.10-1.20 =________________ Stage2 Minimum 20 20-70 =________________ Stage2 Maximum 70 20-70 =________________ Stage2 Delay 2 0.00-100.00 =________________ Stage3 Function Disable Enable/Disable =________________ Stage3 Trend Increasing Increasing/Decreasing/Both =________________ Stage3 Pickup (x In) 0.05 00.01-20.00 =________________ Stage3 OV Supervision (*Vn) 1.2 0.10-1.20 =________________ Stage3 Minimum 20 20-70 =________________ Stage3 Maximum 70 20-70 =________________ Stage3 Delay 2 0.00-100.00 =________________ Stage4 Function Disable Enable/Disable =________________ Stage4 Trend Increasing Increasing/Decreasing/Both =________________ Stage4 Pickup (x In) 0.05 00.01-20.00 =________________ Stage4 OV Supervision (*Vn) 1.2 0.10-1.20 =________________ Stage4 Minimum 20 20-70 =________________ Stage4 Maximum 70 20-70 =________________ Stage4 Delay 2 0.00-100.00 =________________ FCOMP User Manual REV. B 8 - 19 Setting Sheet L&T Electrical & Automation Parameters Default Value Range Unit Stage5 Function Disable Enable/Disable =________________ Stage5 Trend Increasing Increasing/Decreasing/Both =________________ Stage5 Pickup (x In) 0.05 00.01-20.00 =________________ Stage5 OV Supervision (*Vn) 1.2 0.10-1.20 =________________ Stage5 Minimum 20 20-70 =________________ Stage5 Maximum 70 20-70 =________________ Stage5 Delay 2 0.00-100.00 =________________ Stage6 Function Disable Enable/Disable =________________ Stage6 Trend Increasing Increasing/Decreasing/Both =________________ Stage6 Pickup (x In) 0.05 00.01-20.00 =________________ Stage6 OV Supervision (*Vn) 1.2 0.10-1.20 =________________ Stage6 Minimum 20 20-70 =________________ Stage6 Maximum 70 20-70 =________________ Stage6 Delay 2 0.00-100.00 =________________ Alarm Function Disable Enable/Disable =________________ Alarm (% Pickup) 80 25-80% =________________ Power Based Protections Parameters Default Value Range Unit Under/Over Power Protection (32P) 8 - 20 Stage1 Function Disable Enable/Disable =________________ Stage1 Under/Over Under Under/Over =________________ Stage1 Pickup Parameter W W/VAR =________________ Stage1 Pickup 0.3 0.20-1300.00 =________________ Stage1 Delay 2 0-600 =________________ Stage2 Function* Disable Enable/Disable =________________ Stage2 Under/Over Under Under/Over =________________ Stage2 Pickup Parameter W W/VAR =________________ FCOMP User Manual REV. B L&T Electrical & Automation Setting Sheet Stage2 Pickup 0.3 0.20-1300.00 =________________ Stage2 Delay 2 0-600 =________________ Alarm Function Disable Enable/Disable =________________ Alarm (% Pickup) 80 25-80% =________________ Function Disable Enable/Disable =________________ Pickup Parameter (W/VAR) W W/VAR =________________ Pickup 0.3 0.20-1300.00 =________________ Delay 2 0-600 =________________ Function Disable Enable/Disable =________________ Pickup 0.95 0.05-0.95 =________________ Delay 2 1-240 =________________ Alarm Pickup 0.95 0.05-0.95 =________________ Alarm Delay 1 1-240 =________________ Function Disable Enable/Disable =________________ Pickup 0.95 0.05-0.95 =________________ Delay 2 1-240 =________________ Alarm Pickup 0.95 0.05-0.95 =________________ Alarm Delay 1 1-240 =________________ Reverse Power (32P) Lag Power Factor (55) Lead Power Factor (55) FCOMP User Manual REV. B 8 - 21 L&T Electrical & Automation User Interface Chapter 9 User Interface Overview This section provides a detailed description of local interfacing methods available with FCOMP Relay to update the all the protection, system settings etc. as well as metering and monitoring. Two local human machine interface options are available in the FCOMP relay as follows Front Panel COMPfiguratorTM Software Front Panel Front panel of the relay provides advanced user friendly navigation technique. It includes of Liquid Crystal Display (LCD), Numeric Keypad, control Pushbuttons, LED indicators and USB 2.0 port for communication Modbus serial protocol with COMPfiguratorTM software. Key points: Quick access to all the functions Password protected access to display Measurement of all electrical parameters Updating of system and protection setting Monitor Status of the digital Input/output Quick message of trip through LED indication and Display pop-up. Monitor event trip records & disturbance records Single line diagram, Phasor diagram as default screens FCOMP User Manual REV. B 9-1 User Interface L&T Electrical & Automation Overlay Design LCD Display Keypad Pushbuttons (Configurable) LEDs (Configurable) Modbus RTU Communication Port Figure 9-1: Front Panel Figure 9-1 divides relay front panel into five different areas as follows. LCD Display: 5'' thin film transistor multicolor liquid crystal display (TFT LCD) with high resolution for configuration and monitoring of the system in a sigle view. Keypad: consists of numerical keypad & navigation keys for easy access to read and write the data values of functions provided. Numeric Keypad – a 12 buttons keypad comprising of 0 to 9 digits and decimal point to enter any decimal value. Figure 9-2: Numeric Keypad Figure 9-3: Navigation Keypad Navigation keys -These keys can be used to navigate between the menus. 9-2 FCOMP User Manual REV. B L&T Electrical & Automation User Interface The function of navigation keys are listed in the table 9-1 Table 9-1: Functions of navigation keys Keys Symbol Function Up To m ove up in m enus display . To increment the value of selected option b y predefined step of value. Down To move down in menus display. To decrement the value of selected option by predefined step of value. Left To move left or the previous option. Right To move right or the next option. Enter To enter into particular menu and to edit value of function. Escape To exit from the selected menu window to the earlier screen. Reset To reset the data values of the selected display window. Pushbuttons: Six pushbuttons are provided on the front panel that can be configured by the user to perform different functions as per his requirements, through COMPlogicTM software. These pushbuttons can be used for functions like to Trip/close breaker contact, local/remote operations, etc. Whenever the pushbuttons are programmed, it is required to insert print label describing the function of the pushbutton for which it is assigned. LEDs are provided alongwith the pushbuttons to check the status of the assigned functionality. Figure 9-4: Pushbuttons LED Indicators: Relay gives quick message for Relay pickup/alarm/trip, DI status and status of any other bits through sigle color LED indicators. Twelve reprogrammable LED’s can be configured through COMPlogicTM in the COMPfigurator software. Figure 9-5: LED Indicators FCOMP User Manual REV. B 9-3 User Interface L&T Electrical & Automation Communication Port: USB 2.0 port on modbus RTU protocol is provided for the local communication of Relay with COMPfiguratorTM software. For Modbus connection, communication parameters such as baud rate, parity, stop bit etc. must be matching. The speed of the communication is limited to the range of 300 to 38400 bps. Display Menu navigation When Relay is energised by power supply, L&t Logo screen will be displayed followed by the main screen with iconic view of following menus for quick navigation. Main Menu Settings Actual Values Commands User Display Figure 9-6: Main menu navigation On display to get into a particular Menu, user must use the ENTER button; to go back to the previous Menu, the Escape button can be utilised. The Arrow buttons are used for navigation between all available options. By using the numerical keypad, user can enter the data values such as pickup value of selected parameter, delay time, nominal value, etc. The top bar indicates, date and time, User access level and user editable text describing for which feeder the relay is used. Settings The setting flow chart shown in fig 9-7 with all read write type of settings. Product Settings User Access Level - Relay is provided with three user levels L1 (User), L2 (Supervisor), L3 (Administrator). L1 access is by default having only read settings, user not allowed to change any settings. Access to L2 and L3 is password protected with both read write rights. ( There will be automatic changeover from L2/L3 to L1, if navigation is not done for more than 10 mins) Communication settings – Default settings for modbus, profibus, IEC61850 are mentioned in setting sheet Set Date and time of RTC. System Settings CT/VT Ratio – Settings for Primary and secondary values of current and phase to neutral voltage. The secondary value of current and voltage is taken as nominal current and nominal voltage for all protections. DI voltage level – Voltage selection for digital inputs as per the control supply used. Protection Elements 9-4 Four different groups of protections settings are provided with different stages of protections. More than one stage from same group can be kept enable, but only one group is available at a time. The settings for all current based, voltage based and directional protections can be entered. FCOMP User Manual REV. B L&T Electrical & Automation User Interface Control Elements Setting group – Defining which protection group is enabled. Settings for control protections such as cold load pickup, second harmonic blocking and auto recloser. Monitoring Elements FCOMP User Manual REV. B Settings for monitoring elements such as breaker failure, VT fuse fail, Synchrocheck and CT supervision. 9-5 User Interface L&T Electrical & Automation Settings Product Setup Date Time System Settings User Access Level Communication Control Elements CT Ratio Setting Group Synchrocheck VT Ratio Cold Load pickup Breaker Failure DI Voltage Level Modbus Serial Monitoring Elements CT Supervision Second Harmonic blocking Network VT Fuse Fail Auto-Recloser Profibus IEC 61850 Protection Elements Group 1 Current Based Group 2* Voltage Based Group 3* Group 4* Directional IOC Phase Undervoltage Dir Phase IOC IOC Neutral Overvoltage Dir Phase TOC IOC Ground Res.OV Dir Neutral IOC IOC Sensetive Gnd Sync UV Dir Neutral TOC TOC Phase Sync OV Dir Ground IOC TOC Neutral Under frequency Dir Ground TOC TOC Ground Over frequency TOC Sensetive Gnd Freq Grandient REF Under/Over Power Phase UC Reverse Power Thermal OL Power Factor Figure 9-7 Settings Navigation Chart 9-6 FCOMP User Manual REV. B L&T Electrical & Automation User Interface Actual Values Actual Value flowchart is shown in fig 9-10 with all readable parameters. Status ON/ OFF status of digital inputs and open /close status of digital outputs of CPU card and Add-On cards are displayed. Green color represents ON/Close while red color represents OFF/Open. Card B- CPU card DIDOs Card D/E/F : Add-On card DIDOs Metering Current Metering – Measurements of magnitude and phase angle of fundamental, RMS, maximum value of 3 phase currents, Neutral and ground currents, symmetrical components and average current are displayed in single screen. Voltage Metering – Measurements of magnitude and phase angle of fundamental, RMS, maximum value of 3 phase to neutral and phase to phase voltages, Residual Voltage, symmetrical components, frequency and average voltage are displayed in single screen. Power/ Energy – Measurements of Active, reactive and apperent power and energy. Demand – Measurement of continuous load on the system and peak demand in terms of current and voltages. THD- Measurements of individual harmonic distortion in percentage upto 25th harmonic as well as total harmonic distortion Figure 9-8: Metering screen Event Records Summery sheet of last 20 events recorded by the relay. Detailed report (Cause, Date time, Data on 8 user selectable parameters) of each record is provided when we select the perticulat event. FCOMP User Manual REV. B 9-7 User Interface L&T Electrical & Automation Figure 9-9: Event log summery Figure 9-10 Event log detailed view Hour meter Displays time period for which feeder is in operation. Product Info Information about card varients available in the relay. Information about firmware version present in the relay. Actual Values Status Metering Hour Meter Product Info Event Log Card B Currents Summery Card D Voltages Detaied report Card E Frequency Card F Demand Power-Energy Figure 9-11 Actual Values navigation Chart THD 9-8 FCOMP User Manual REV. B L&T Electrical & Automation User Interface Commands Commands to clear different data records stored in the relay such as event reports, oscillographic record, maximum metering values etc. Commands Clear Oscillography Clear Event record Reset Hour Meter Clear Data logger Clear max value, and energy Clear thermal theta Figure 9-12 Commands navigation Chart User Display There are four different monitoring screens are available asPhasor Diagram – Current and voltage phasors with R- phase voltage as a reference phasor. Single line Diagram – SLD showing Breaker ON/OFF status with information about on which feeder relay is used, voltage level of the feeder and current and voltage metering value. Figure 9-13 Single Line Diagram Annunciator – Indicates status of 12 user configurable parameters such as protection trip alarm pickup bits, DI status etc. Figure 9-14 Annunciator screen FCOMP User Manual REV. B 9-9 User Interface L&T Electrical & Automation Oscillography – Wave nature of 8 user- selectable parameters of last recorded fault in the system. Figure 9-15 Oscillography Screen User Display Phasor Diagram Single Line Diagram Annunciator Oscillography Figure 9-16 User Display navigation Chart 9 - 10 FCOMP User Manual REV. B L&T Electrical & Automation User Interface COMPfiguratorTM COMPfiguratorTM is the PC HMI software of L&T relay which provides flexibility to configure, monitor and troubleshoot the relay operations in online (Relay connected to PC) as well as in offline mode (relay disconnected) modes. Key Points – User friendly parameterisation Quick access to all the functions and protection settings Password protected access to software Online monitoring of parameters Monitor Status of the digital Input/Output Quick message of trip through pop-up. Monitor event trip records, Oscillographic records and data recorder Designing of control logic with drag-drop technolodgy Offline saving of setting files Software Pre-requisites: Operating Systems: Windows XP/Vista/7/8. Microsoft .NET Framework 4.0 Service Pack 3 Windows Installer 4.5 Hardware Pre-requisites: Minimum hard disk space 500MB. Processor: 1 GB RAM with 1 GHz speed. Ethernet interface. Installation Guide COMPfiguratorTM Installation 1. To install COMPfiguratorTM, apply the following procedure: 2. Double-click on COMPfiguratorTM setup file. 3. Click on ‘Next’ button to start installation. FCOMP User Manual REV. B 9 - 11 User Interface 9 - 12 L&T Electrical & Automation 4. Choose the installation folder path to install setup and select user access level. Click on ‘Next’ button to proceed further. 5. Once the license agreement is accepted by the user, Windows will automatically start installing the setup. The progress of the installation can be tracked at the Status bar. FCOMP User Manual REV. B L&T Electrical & Automation 6. User Interface When the installation is completed, press Close button to finish the setup. This will create a shortcut icon for COMPfiguratorTM, COMPlogicTM and oscillography on the desktop of the user. Operational Guide Access to COMPfiguratorTM main window 1. Double-click on the COMPfiguratorTM short-cut icon to launch the application. 2. Offline window of the program will appear on screen as follows. Figure 9-17 Configurator Main window FCOMP User Manual REV. B 9 - 13 User Interface L&T Electrical & Automation 3. Click on ‘Mode’ menu from menu bar and select online window. The user can change protection settings in the offline window also. To connect Device 1. To connect Relay device to the PC, click on ‘Connect’ icon from main window tool bar. The setup window will appear. Figure 9-18 Communication Settings 9 - 14 2. Select Serial or TCPIP Protocol as per the communication cable connected. 3. Default TCP/IP Address: 10.7.212.135 4. Select proper communication port in case of serial communication. Match the other properties such as baud rate, parity, stop bits etc. 5. Click ‘OK’ to proceed further. Message will be displayed on successful communication. FCOMP User Manual REV. B L&T Electrical & Automation 6. User Interface User need to login to get access to configure the relay. There are three user access levels administrator, Supervisor and user. Administrator will have all read/write access. The user access level and supervisor access level will have rights which are defined by administrator. Figure 9-19 Login Window 7. After successful login, the main configuration window will appear on screen as shown below with options to configure and monitor the relay. Figure 9-20 Online Window FCOMP User Manual REV. B 9 - 15 User Interface L&T Electrical & Automation To configure the relay There are 3 options available to configure the relay. 1. Product Settings : It includes basic settings as mentioned below – Date and time – Time synchronization with SNTP server Demand – Methods to calculate demand. Single line diagram – Selection of text and six electrical parameters which are displayed on SLD screen. Communication settings - Modbus serial, Modbus TCP/IP, Profibus, IEC 61850 communication protocols. Clear Relay Records – Commands to clear stored data in relay and to reset the relay Figure 9-21 Product Setup 2. 9 - 16 System Settings: It includes all the system settings in which relay are connected. Current – CT Primary and secondary Voltage – VT Primary and secondary, Connection type Setting groups – Defined which group is enabled if one or more group is enabled at the same time it takes the settings of group which comes first by numerical order. Option control equation indicates that protection group changeover is defined by designed gate logic through COMPlogicTM. User defined memory map – It gives flexibility to directly access only required monitoring data in SCADA/DCS communication. FCOMP User Manual REV. B L&T Electrical & Automation User Interface Figure 9-22 System Settings Window 3. FCOMP User Manual REV. B Protection Settings: All feeder protections are included. Each of four groups include same no of current, voltage, frequency and power based protections with number of stages in each protection. Any one group will be enabled at a time, but more than one stage can be possible to enable with different pickup level and delay. To download the settings into relay in online mode click on save tab situated on toolbar at bottom of the each protection window. User can able to restore original settings or can able to set default settings as per the setting sheet. 9 - 17 User Interface L&T Electrical & Automation Figure 9-24 Protections Settings Window 2 Figure 9-25 Protections Settings Window 3 9 - 18 FCOMP User Manual REV. B L&T Electrical & Automation User Interface To monitor the relay Actual Values : It displays the metering data of all the electrical parameters as stated in measurement chapter. Figure 9-26 Actual Values Window Input output: Defines voltage level of all the Digital inputs as well as gives the status of each digital input and output. Green color indicates that Digital input is high/ Digital output is closed while red color indicates that Digital input is low/ Digital output is opened. Figure 9-27 Input Output Window FCOMP User Manual REV. B 9 - 19 User Interface L&T Electrical & Automation Event Log: Selection of channels (electrical parameters) whose status will be displayed in detailed view of event report. Parameter selection – which event should be captured by the relay. View event log – displays summery and detailed report of events recorded after fetching the events from the relay. Figure 9-28 Event Log setting Window To create backup of the settings 1. 9 - 20 Select ‘Export existing device settings’ from online menu. FCOMP User Manual REV. B L&T Electrical & Automation User Interface Figure 9-29 Online Backup of settings 2. Save the file in .xml format in destination folder. 3. It will read all the data from the relay and create backup file. 4. Completion message will be displayed on the screen after successful backup. FCOMP User Manual REV. B 9 - 21 User Interface L&T Electrical & Automation To create new user 1. Click on ‘Security’ tab and select ‘Add user’. 2. Define username and password under proper user group. Figure 9-30 Create new user Window 3. Provide rights to respective user through ‘configure user’ option. Figure 9-31 User access configuration Window To create configuration file in offline mode 1. Click Offline option from menu bar. 2. Select Create New setting File. This option will create new setting file with all protection settings, system settings and product setting. User can able to open existing setting file as well as able to compare the file with another saved file. i. 9 - 22 3. Save all the individual settings as per the configuration required. Individual setting files will be automatically saved into master file at the time of clicking save tab. 4. To download all the settings into the relay, select icon download to relay from toolbar. Below selection window will appear. FCOMP User Manual REV. B L&T Electrical & Automation User Interface 5. Select the protections which user wants to download into relay. 6. Whenever download is completed, completion message and status will be displayed on screen. FCOMP User Manual REV. B 9 - 23 User Interface L&T Electrical & Automation COMPlogicTM This application provides flexibility to the user to design the programmable logic with drag and drop technolodgy using different input and output elements (operands) with basic AND, OR and NOT gates (operators) alongwith timers, Latches and counters. The user can design any complex logic with more than 80 no. of operators which can be processed sequentially. The basic advantage of designing program logic is to reduce the hardwiring of the switchboards. To communicate relay with COMPlogicTM 1. Double click on COMPlogicTM icon from desktop. Main window will appear. Connect/ Disconnect Connection Status ToolBar Workspace Figure 9-32: COMPlogic Main Window 2. 9 - 24 Click on ‘Connect’ icon. The following window will appear showing communication options. FCOMP User Manual REV. B L&T Electrical & Automation 3. 4. User Interface Select the configuration as per the comunication protocol selected. Proceed by clicking ‘connect’ tab. To Design logic as per scheme 1. Click on input button from toolbar. Now click on are on workspace where the input need to be placed. Double click on the input to select its properties. 2. Type and Syntax defines the exact type of the input selected 3. Click on gate (AND/OR) then click on workspace available. Now to join input and gate through link first click on the blue point then second click on gate. Links will be added as follow. 4. Select output same as input and provide a link. User can define the text for the inputs/Outputs also as per the electrical scheme. 5. To add not gate in particular path, right click on the end point of the link and select ‘Not’ gate. User can remove link or able to trace connection with options provided. FCOMP User Manual REV. B 9 - 25 User Interface L&T Electrical & Automation To add Latch/timer/counter click on the latch icon, then click in workspace where Latch, counter or timer need to be placed. Double click on the Latch/timer/counter to set properties. Timers - There are 32 timers are provided. Each timer can be operated in two modes – Pickup mode and Drop Out mode. The timer starts counting when the external input is HIGH and sets an Operate bit HIGH after the specified delay, only if the external input is continuously HIGH during the delay period. If the external input goes LOW before the Operate bit is set HIGH, the timer is reset. Timer Settings: Timer mode defines the unit for the delay value held in Pickup/Drop out Delay registers. Type 0: Millisecond Type 1: Second Type 2: Minute Delay: Holds the delay value for the Timer when it is operated pickup/dropout mode. Latch – There are 32 latches are provided. The Set & Reset input of the latch can be mapped into any two inputs. The operation of latch is as follows. Set Reset Output 00 Last State 01 0 10 1 11 Last state Volatile - Latch output state will not retained after Power recycle of relay. Non-Volatile - Latch output state will retained after Power recycle of relay. 9 - 26 FCOMP User Manual REV. B L&T Electrical & Automation User Interface Counters – There are 32 Counters have been provided. Each counter can be operated in two different modes: Up mode & Down mode. Each counter can be configured to respond to any input. The counter counts the number of LOW to HIGH transitions of the external input and sets an Operate bit HIGH when count has reached a pre-specified value. Count value: Holds the maximum value for the counter when the counter is operated in up mode. Preset Value: Holds the Starting count for the counter when it is operated in down mode. Similar way one can design any complex logic with the help of number of gates. Figure 9-33 Logic designed in COMPlogic FCOMP User Manual REV. B 9 - 27 User Interface L&T Electrical & Automation To save the file 1. Click on save icon. Save the file into .xml format Offline simulation: 1. User can verify the logic by using concept of offline simulation. 2. Click on ‘offline simulation’; open the saved .xml logic file. 3. Double click on any input it will trace the complete path of the operation of the input. Figure 9-34 Offline Simulation 9 - 28 FCOMP User Manual REV. B L&T Electrical & Automation User Interface To download equation into relay 1. Click ‘Download to relay’ icon. Equation will get automatically downloaded into the relay. 2. After completion of download, message will be displayed. Oscillography Oscillography records contain waveforms captured at the predefined sampling rate as well as other preset Relay data at the point of trigger. Sample per cycle and no. of cycles are user selectable.User can defined a trigger point with the help of prefault and post fault division of the wave in terms of number of cycles. To communicate relay with COMPlogicTM 1. Double click on oscillography icon from desktop. The main screen will apear as follows. 2. Click on ‘Connect’ icon. The following window will appear showing communication options. 3. Select the configuration as per the comunication protocol selected. 4. Proceed by clicking ‘connect’ tab. 5. After establishing connection, click on setting tab to select the events for which oscillography should trigger and channel. Number of cycles and number of samples per cycle are can be also configured. FCOMP User Manual REV. B 9 - 29 User Interface L&T Electrical & Automation Figure 9-35 Oscillography Setting 9 - 30 6. Click on fetch oscillography button to fetch all 64 records from the relay. 7. Select the record and proceed with show record, following window will open. With the waveform one can able to analyse the nature of the fault. FCOMP User Manual REV. B L&T Electrical & Automation Testing & Troubleshooting Chapter 10 Testing & Troubleshooting Overview This section allows the user to acknowledge and troubleshoot any problems encountered during testing and commissioning of Relay. A complete functional check and calibration has been performed in each unit before it is shipped. This helps to ensure that received Relay unit is fully functional or not. Commissioning tests confirm that the Relay is properly installed and logically working fine. Relay Testing The following connection tests help to enter settings into the Relay and verify that the Relay is properly connected or not. Brief functional tests ensure that the Relay settings are correct. Modify the procedure as necessary to conform to your standard practices. You need not repeat it unless major changes are made to the Relay electrical connections. Functional Testing Functional test is performed by the Larsen & Toubro to ensure that the Relay is properly functioning before site installation or can be done by the customer for validation during commissioning activities. Measurements & Accuracy Phase current Connect R-Y-B phases and neutral current cables of testing kit to CT connector of relay. Inject balanced/Unbalanced currents on the three phase CTs of Relay. Observe the current magnitude & angle in all phases and neutral, compare with the expected metering by taking CT ratio into consideration. Current in neutral metering should be zero in case of balanced system. Voltage Connect R-Y-B phases and neutral Voltage cables of testing kit to VT connector of relay. Set the magnitude & phase angles of the voltage. Observe the voltage metering on the display. Compare the values of phase to neutral as well as phase to phase voltages with the injected voltage considering PT ratio. Measure the frequency of the system. Power & Power factor Connect both current as well as voltage source to the Relay. Set the magnitude of the voltage and current. Connect voltage in star or delta connection. Observe the Real, Reactive & Apparent power metering values on the display and compare them with the expected values by taking CT & PT ratio into consideration. Observe Power factor depending on angle difference of current and voltage phasor. FCOMP User Manual REV. B 10 - 1 Testing & Troubleshooting L&T Electrical & Automation Protection Testing Perform following test by enabling the particular protection Table 10-1: Basic protections testing Protection Settings Applied Input Expected Result 50P Pickup = 1.00* In I = 1.2 A (Any one of phase) Trip after 1.2 sec I0 = 0.3 A (neutral phase) Trip after 0.6 sec I = 5 A (Any one of phase) Trip after 2.7 sec I = 1 A (Any one of phase) Trip after 0.69 sec V = 30V (Any one of phase) Trip after 2 sec V = 138V (Phase to phase) Trip after 2 sec I0 = 0.03 A (REF CT) Trip after 0.3 sec Delay = 1.2 Sec 50N Pickup = 0.10* In Delay = 0.6 Sec 51P Pickup = 1.00* In TMS = 0.8 Sec Observations IEC curve B 51N Pickup = 0.1* In TMS = 0.8 Sec IEC curve C 27P Pickup = 0.7* Vn Delay = 2 Sec Vs =110V (P-P) 59P Pickup = 1.2* Vn Delay = 2 Sec Vs =110V 64 Pickup = 0.02* In Delay = 0.3 Sec Communication test Make the port connection as per the protocol selected. (Refer Chapter 4) Connect relay to the SCADA/DCS system with communication cable. (Cable selection is as per protocol selected) To connect Relay to PC with COMPfiguratorTM use front port USB. Confirm that Relay front port driver is installed in your PC. Check the configuration settings at relay end and at SCADA/DCS end. Commissioning testing Commissioning testing is performed to ensure that control logic working satisfactory with protection of the system. designed for the particular system To perform commissioning test: 10 - 2 1. Open the MCB or remove fuses to de-energise the control supply. 2. Isolate the Relay contact assigned to the TRIP output. FCOMP User Manual REV. B L&T Electrical & Automation Testing & Troubleshooting 3. Assure the connection of contact inputs and outputs cable by performing continuity test. 4. Energize the Relay and apply control supply voltage signals to the contact inputs and outputs. 5. Connect Relay to PC using proper communication interface and protocol. 6. Communicate the relay with COMPfiguratorTM software by using administrator login. 7. Enter the Relay settings as per the provided settings guide. 8. Define the control supply voltage level and system settings for the system through COMPfiguratorTM. 9. Verify the Relay voltage IP and current IP connections. 10. Connect the AC test source current or voltage to appropriate Relay terminals. 11. Inject the rated current 1 or 5 A depending upon current CT secondary ratio and rated voltage, and considering CT & VT ratios, measure the values of current and voltage through metering menu of display. Verify that the Relay is measuring the magnitude and phase angle correctly. 12. Verify contact inputs status through display. 13. Download the control logic into relay, designed for the system using COMPlogicTM. 14. Verify output contact operation as well as protections as per the logic. 15. Check all the metering parameters. 16. Clear all history events, data recorder, oscillography data. 17. Energize the feeder after all the functions testing are performed. Troubleshooting Table 10-2: Troubleshooting of relay Problem Condition How to troubleshoot Relay is de-energised. Power input is not present. Check the fuse continuity to test if the fuse is blown Thermal shutdown due to overvoltage in auxiliary control supply. Check the supply voltage multi-meter. The relay will energise automatically again after defined period. Loss of cable connection. Cable not properly connected / Due to breaking of the cable. Front port USB driver not installed Install front port USB driver when USB is detected. Communication settings not matching between master and slave Check communication settings at relay end and at PC end. Keep baud rate, stop bit, parity same in case of serial communication. Communication port is not selected property. Check communication port from device manager, & select it properly in Device setup. Loose Wiring Check the wiring and connectivity of the cables as per the schematics. Relay unable to communicate with PC HMI. The Relay does not measure/display accurate FCOMP User Manual REV. B 10 - 3 Testing & Troubleshooting values of voltages and currents The Relay is not responding to a fault. The Relay is not behaving as per new settings. L&T Electrical & Automation Incompatibility between the Relay and Display Firmware. Consult the Relay manufacturer. Improper settings Protection might be not enabled. Ensure proper settings in the test source. Also, verify if current injection is as per the range. Connection not proper Check the wiring and connections. New settings are not saved. Ensure if new settings are saved. If settings are done through the Display or through the TM COMPfigurator . Miscellaneous How to assign trip to breaker from Relay? Need to assign contact output for protection trip bit through COMPlogicTM. The trip signal to breaker can be provided in local as well as remote mode. Local: Through Pushbuttons available on Relay front panel or through digital input signal given to relay configured as trip to breaker. Remote: Through communication protocol. How to assign close to breaker from Relay? Need to assign contact output for protection close bit through COMPlogicTM. The close signal to breaker can be provided in local as well as remote mode. Local: Through Pushbuttons available on Relay front panel or through digital input signal given to relay configured as close to breaker. Remote: Through communication protocol. How to reset the lockout condition Relay? Need to assign contact input for reset of the latch functionality through COMPlogicTM. The reset signal to relay can be provided in local as well as remote mode. Local: Through Pushbuttons available on Relay front panel or through digital input signal given to relay configured as reset to relay. Remote: Through communication protocol. 10 - 4 FCOMP User Manual REV. B L&T Electrical & Automation Annexure A Annexure A MAPPING Modbus memory mapping Modbus memory map enlists all metering parameters, trip & event record parameters, DI/DO status and coil status. Function codes for different registers are also mentioned. The Modbus memory map shows the addresses for slow scan parameters for both modbus RTU and TCPIP. Different parameters can be configured as fast scan parameters at these addresses through COMPfiguratorTM. General Settings Table A-1: Product Settings Map Size (bytes) Min. Value Max. Value Multiplier Memory address Date 2 1 31 1 48345 Month 2 1 12 1 48346 Year 2 2010 2999 1 48347 Hour 2 0 23 1 48348 Minute 2 0 59 1 48349 Second 2 0 59 1 48350 Millisecond 2 0 999 1 48351 Function 2 0 1 1 48210 Server IP Address 0 (Low) 2 0 255 1 48211 Server IP Address 1 2 0 255 1 48212 Server IP Address 2 2 0 255 1 48213 Server IP Address 3 (High) 2 0 255 1 48214 Valid IP Address 0 (Low) 2 0 255 1 48215 Valid IP Address 1 2 0 255 1 48216 Valid IP Address 2 2 0 255 1 48217 Valid IP Address 3 (High) 2 0 255 1 48218 Attribute Name Date & Time SNTP Settings FCOMP User Manual REV. B A-1 Annexure A L&T Electrical & Automation UDP Port Number 2 1 65535 1 48219 Node Address 2 1 247 1 48166 Parity 2 0 2 1 48167 Baud Rate 2 0 7 1 48168 Stop Bits 2 1 2 1 48169 IP Address 0 (Low) 2 0 255 1 48172 IP Address 1 2 0 255 1 48173 IP Address 2 2 0 255 1 48174 IP Address 3 (High) 2 0 255 1 48175 IP Subnet Mask 0 (Low) 2 0 255 1 48176 IP Subnet Mask 1 2 0 255 1 48177 IP Subnet Mask 2 2 0 255 1 48178 IP Subnet Mask 3 (High) 2 0 255 1 48179 Gateway IP Address 0 (Low) 2 0 255 1 48180 Gateway IP Address 1 2 0 255 1 48181 Gateway IP Address 2 2 0 255 1 48182 Gateway IP Address 3 (High) 2 0 255 1 48183 OSI Network Address 0 (Low) 2 0 255 1 48184 OSI Network Address 1 2 0 255 1 48185 OSI Network Address 2 2 0 255 1 48186 OSI Network Address 3 (High) 2 0 255 1 48187 Function (Profibus En /D) 2 0 1 1 48393 Node Address 2 1 126 1 48394 IP Address 0 (Low) 2 0 255 1 48500 IP Address 1 2 0 255 1 48501 Modbus RTU settings Modbus TCPIP Settings Profibus Settings IEC 61850 Settings A-2 FCOMP User Manual REV. B L&T Electrical & Automation Annexure A IP Address 2 2 0 255 1 48502 IP Address 3 (High) 2 0 255 1 48503 IP Subnet Mask 0 (Low) 2 0 255 1 48504 IP Subnet Mask 1 2 0 255 1 48505 IP Subnet Mask 2 2 0 255 1 48506 IP Subnet Mask 3 (High) 2 0 255 1 48507 Gateway IP Address 0 (Low) 2 0 255 1 48508 Gateway IP Address 1 2 0 255 1 48509 Gateway IP Address 2 2 0 255 1 48510 Gateway IP Address 3 (High) 2 0 255 1 48511 OSI Network Address 0 (Low) 2 0 255 1 48512 OSI Network Address 1 2 0 255 1 48513 OSI Network Address 2 2 0 255 1 48514 OSI Network Address 3 (High) 2 0 255 1 48515 Parameter Selection 1 2 1 911 1 48397 Parameter Selection 2 2 1 911 1 48398 Parameter Selection 3 2 1 911 1 48399 Parameter Selection 4 2 1 911 1 48400 Parameter Selection 5 2 1 911 1 48401 Parameter Selection 6 2 1 911 1 48402 Parameter Selection 7 2 1 911 1 48403 Parameter Selection 8 2 1 911 1 48404 Parameter Selection 9 2 1 911 1 48405 Parameter Selection 10 2 1 911 1 48406 Parameter Selection 11 2 1 911 1 48407 Parameter Selection 12 2 1 911 1 48408 40 0 65535 1 48410 Annunciator SLD Settings Label 1 FCOMP User Manual REV. B A-3 Annexure A L&T Electrical & Automation Label 2 40 0 65535 1 48430 Parameter 1 2 0 57 1 48450 Parameter 2 2 0 57 1 48451 Parameter 3 2 0 57 1 48452 Parameter 4 2 0 57 1 48453 Parameter 5 2 0 57 1 48454 Parameter 6 2 0 57 1 48455 Current Demand Method 2 0 2 1 48321 Power Demand Method 2 0 2 1 48322 Interval Time 2 0 2 1 48323 Slidding Window 2 0 2 1 48324 8 0 65535 1 48550 Size (bytes) Min. Value Max. Value Multiplier Memory address Channel 1 2 0 57 1 48352 Channel 2 2 0 57 1 48353 Channel 3 2 0 57 1 48354 Channel 4 2 0 57 1 48355 Channel 5 2 0 57 1 48356 Channel 6 2 0 57 1 48357 Channel 7 2 0 57 1 48358 Channel 8 2 0 57 1 48359 Parameter Selection 1 2 1 911 1 48360 Parameter Selection 2 2 1 911 1 48361 Demand User Passward Password Table A2: Disturbance Records Settings Map Attribute Name Event Log A-4 FCOMP User Manual REV. B L&T Electrical & Automation Annexure A Parameter Selection 3 2 1 911 1 48362 Parameter Selection 4 2 1 911 1 48363 Parameter Selection 5 2 1 911 1 48364 Parameter Selection 6 2 1 911 1 48365 Parameter Selection 7 2 1 911 1 48366 Parameter Selection 8 2 1 911 1 48367 Parameter Selection 9 2 1 911 1 48368 Parameter Selection 10 2 1 911 1 48369 Parameter Selection 11 2 1 911 1 48370 Parameter Selection 12 2 1 911 1 48371 Parameter Selection 13 2 1 911 1 48372 Parameter Selection 14 2 1 911 1 48373 Parameter Selection 15 2 1 911 1 48374 Parameter Selection 16 2 1 911 1 48375 Parameter Selection 17 2 1 911 1 48376 Parameter Selection 18 2 1 911 1 48377 Parameter Selection 19 2 1 911 1 48378 Parameter Selection 20 2 1 911 1 48379 Parameter Selection 21 2 1 911 1 48380 Parameter Selection 22 2 1 911 1 48381 Parameter Selection 23 2 1 911 1 48382 Parameter Selection 24 2 1 911 1 48383 Parameter Selection 25 2 1 911 1 48384 Parameter Selection 26 2 1 911 1 48385 Parameter Selection 27 2 1 911 1 48386 Parameter Selection 28 2 1 911 1 48387 Parameter Selection 29 2 1 911 1 48388 Parameter Selection 30 2 1 911 1 48389 Parameter Selection 31 2 1 911 1 48390 FCOMP User Manual REV. B A-5 Annexure A L&T Electrical & Automation Parameter Selection 32 2 1 911 1 48391 Oscillography Trigger Position 2 0 100 1 48256 Oscillography Total Cycle 2 0 3 1 48257 Channel 1 2 0 61 1 48260 Channel 2 2 0 61 1 48261 Channel 3 2 0 61 1 48262 Channel 4 2 0 61 1 48263 Channel 5 2 0 61 1 48264 Channel 6 2 0 61 1 48265 Parameter Selection 1 2 1 911 1 48268 Parameter Selection 2 2 1 911 1 48269 Parameter Selection 3 2 1 911 1 48270 Parameter Selection 4 2 1 911 1 48271 Parameter Selection 5 2 1 911 1 48272 Parameter Selection 6 2 1 911 1 48273 Parameter Selection 7 2 1 911 1 48274 Parameter Selection 8 2 1 911 1 48275 Parameter Selection 9 2 1 911 1 48276 Parameter Selection 10 2 1 911 1 48277 Parameter Selection 11 2 1 911 1 48278 Parameter Selection 12 2 1 911 1 48279 Parameter Selection 13 2 1 911 1 48280 Parameter Selection 14 2 1 911 1 48281 Parameter Selection 15 2 1 911 1 48282 Parameter Selection 16 2 1 911 1 48283 Parameter Selection 17 2 1 911 1 48284 Parameter Selection 18 2 1 911 1 48285 Parameter Selection 19 2 1 911 1 48286 Oscillography A-6 FCOMP User Manual REV. B L&T Electrical & Automation Annexure A Parameter Selection 20 2 1 911 1 48287 Parameter Selection 21 2 1 911 1 48288 Parameter Selection 22 2 1 911 1 48289 Parameter Selection 23 2 1 911 1 48290 Parameter Selection 24 2 1 911 1 48291 Parameter Selection 25 2 1 911 1 48292 Parameter Selection 26 2 1 911 1 48293 Parameter Selection 27 2 1 911 1 48294 Parameter Selection 28 2 1 911 1 48295 Parameter Selection 29 2 1 911 1 48296 Parameter Selection 30 2 1 911 1 48297 Parameter Selection 31 2 1 911 1 48298 Parameter Selection 32 2 1 911 1 48299 Data Logger Rate (seconds) 4 15 3600000 1 48301 Channel 1 2 0 57 1 48303 Channel 2 2 0 57 1 48304 Channel 3 2 0 57 1 48305 Channel 4 2 0 57 1 48306 Channel 5 2 0 57 1 48307 Channel 6 2 0 57 1 48308 Channel 7 2 0 57 1 48309 Channel 8 2 0 57 1 48310 Channel 9 2 0 57 1 48311 Channel 10 2 0 57 1 48312 Channel 11 2 0 57 1 48313 Channel 12 2 0 57 1 48314 Channel 13 2 0 57 1 48315 Channel 14 2 0 57 1 48316 Data Recorder Settings FCOMP User Manual REV. B A-7 Annexure A L&T Electrical & Automation Channel 15 2 0 57 1 48317 Channel 16 2 0 57 1 48318 Size (bytes) Min. Value Max. Value Multiplier Memory address Phase CT Primary 2 1 50000 1 48327 Phase CT Secondary 2 1 5 1 48328 SEF/Ground CT Primary 2 1 50000 1 48329 SEF/Ground CT Secondary 2 1 5 1 48330 REF CT Primary 2 1 50000 1 48331 REF CT Secondary 2 1 5 1 48332 Phase VT connection 2 0 1 1 48333 Phase VT Primary 4 100 40000000 1/100 48334 Phase VT secondary 2 500 30000 1/100 48336 Nominal Frequency 2 0 1 1 48337 Phase rotation 2 0 1 1 48338 Enable Demand Metering 2 0 1 1 48339 SEF Selection 2 0 1 1 48342 Table A-3: System Settings Map Attribute Name Protection Settings Table A-4: Protection Settings Map Attribute Name Size (bytes) Min. Value Max. Value Multiply Address Group 1 Address Group 2 Address Group 3 Address Group 4 41911 43821 45731 41912 43822 45732 Instantaneous Phase Overcurrent A-8 Stage1 Function 2 0 1 1 40001 Stage1 Measurement type 2 0 1 1 40002 Stage1 Pickup (xIn) 2 100 20000 1/1000 40004 41914 43824 45734 Stage1_Delay 4 0 600000 1/1000 40005 41915 43825 45735 FCOMP User Manual REV. B L&T Electrical & Automation Annexure A Stage2 Function 2 0 1 1 40010 41920 43830 45740 Stage2 Measurement type 2 0 1 1 40011 41921 43831 45741 Stage2 Pickup (xIn) 2 100 20000 1/1000 40013 41923 43833 45743 Stage2_Delay 4 0 600000 1/1000 40014 41924 43834 45744 Stage3 Function 2 0 1 1 40019 41929 43839 45749 Stage3 Measurement type 2 0 1 1 40020 41930 43840 45750 Stage3 Pickup (xIn) 2 100 20000 1/1000 40022 41932 43842 45752 Stage3_Delay 4 0 600000 1/1000 40023 41933 43843 45753 Stage4 Function 2 0 1 1 40028 41938 43848 45758 Stage4 Measurement type 2 0 1 1 40029 41939 43849 45759 Stage4 Pickup (xIn) 2 100 20000 1/1000 40031 41941 43851 45761 Stage4_Delay 4 0 600000 1/1000 40032 41942 43852 45762 Alarm Function 2 0 1 1 40037 41947 43857 45767 Alarm (% pickup) 2 25 80 1 40038 41948 43858 45768 41950 43860 45770 41951 43861 45771 Instantaneous Neutral Overcurrent Stage1 Function 2 0 1 1 40040 Stage1 Measurement type 2 0 1 1 40041 Stage1 Pickup (xIn) 2 100 20000 1/1000 40043 41953 43863 45773 Stage1_Delay 4 0 600000 1/1000 40044 41954 43864 45774 Stage2 Function 2 0 1 1 40049 41959 43869 45779 Stage2 Measurement type 2 0 1 1 40050 41960 43870 45780 Stage2 Pickup (xIn) 2 100 20000 1/1000 40052 41962 43872 45782 Stage2_Delay 4 0 600000 1/1000 40053 41963 43873 45783 Stage3 Function 2 0 1 1 40058 41968 43878 45788 Stage3 Measurement type 2 0 1 1 40059 41969 43879 45789 Stage3 Pickup (xIn) 2 100 20000 1/1000 40061 41971 43881 45791 FCOMP User Manual REV. B A-9 Annexure A L&T Electrical & Automation Stage3_Delay 4 0 600000 1/1000 40062 41972 43882 45792 Stage4 Function 2 0 1 1 40067 41977 43887 45797 Stage4 Measurement type 2 0 1 1 40068 41978 43888 45798 Stage4 Pickup (xIn) 2 100 20000 1/1000 40070 41980 43890 45800 Stage4_Delay 4 0 600000 1/1000 40071 41981 43891 45801 Alarm Function 2 0 1 1 40076 41986 43896 45806 Alarm (% pickup) 2 25 80 1 40077 41987 43897 45807 41989 43899 45809 41990 43900 45810 Instantaneous Ground Overcurrent Stage1 Function 2 0 1 1 40079 Stage1 Measurement type 2 0 1 1 40080 Stage1 Pickup (xIn) 2 100 20000 1/1000 40082 41992 43902 45812 Stage1_Delay 4 0 600000 1/1000 40083 41993 43903 45813 Stage2 Function 2 0 1 1 40088 41998 43908 45818 Stage2 Measurement type 2 0 1 1 40089 41999 43909 45819 Stage2 Pickup (xIn) 2 100 20000 1/1000 40091 42001 43911 45821 Stage2_Delay 4 0 600000 1/1000 40092 42002 43912 45822 Stage3 Function 2 0 1 1 40097 42007 43917 45827 Stage3 Measurement type 2 0 1 1 40098 42008 43918 45828 Stage3 Pickup (xIn) 2 100 20000 1/1000 40100 42010 43920 45830 Stage3_Delay 4 0 600000 1/1000 40101 42011 43921 45831 Stage4 Function 2 0 1 1 40106 42016 43926 45836 Stage4 Measurement type 2 0 1 1 40107 42017 43927 45837 Stage4 Pickup (xIn) 2 100 20000 1/1000 40109 42019 43929 45839 Stage4_Delay 4 0 600000 1/1000 40110 42020 43930 45840 Alarm Function 2 0 1 1 40115 42025 43935 45845 Alarm (% pickup) 2 25 80 1 40116 42026 43936 45846 Instantaneous negative sequence overcurrent A - 10 FCOMP User Manual REV. B L&T Electrical & Automation Annexure A Stage1 Function 2 0 1 1 40118 42028 43938 45848 Stage1 Pickup (xIn) 2 100 3200 1/1000 40120 42030 43940 45850 Stage1_Delay 4 0 600000 1/1000 40122 42032 43942 45852 Stage2 Function 2 0 1 1 40126 42036 43946 45856 Stage2 Pickup (xIn) 2 100 3200 1/1000 40128 42038 43948 45858 Stage2 Delay 4 0 600000 1/1000 40130 42040 43950 45860 Stage3 Function 2 0 1 1 40134 42044 43954 45864 Stage3 Pickup (xIn) 2 100 3200 1/1000 40136 42046 43956 45866 Stage3 Delay 4 0 600000 1/1000 40138 42048 43958 45868 Stage4 Function 2 0 1 1 40142 42052 43962 45872 Stage4 Pickup (xIn) 2 100 3200 1/1000 40144 42054 43964 45874 Stage4 Delay 4 0 600000 1/1000 40146 42056 43966 45876 Alarm Function 2 0 1 1 40150 42060 43970 45880 Alarm (% pickup) 2 25 80 1 40151 42061 43971 45881 Function 2 0 1 1 40292 42202 44112 46022 Pickup (xIn) 2 100 4000 1/1000 40293 42203 44113 46023 T1 Pickup Delay 4 60000 3000000 0 1/1000 40296 42206 44116 46026 Alarm Function 2 0 1 1 40298 42208 44118 46028 Alarm (% pickup) 2 25 80 1 40299 42209 44119 46029 K constant 2 10 400 1/100 40300 42210 44120 46030 Function 2 0 1 1 40265 42175 44085 45995 Measurement Type 2 0 1 1 40266 42176 44086 45996 Pickup (xIn) 2 100 3200 1/1000 40268 42178 44088 45998 Delay 4 0 600000 1/1000 40269 42179 44089 45999 Alarm Function 2 0 1 1 40271 42181 44091 46001 Alarm (% pickup) 2 25 80 1 40272 42182 44092 46002 Thermal Overload Phase Undercurrent Restricted Earth Fault FCOMP User Manual REV. B A - 11 Annexure A L&T Electrical & Automation Function 2 0 1 1 40283 42193 44103 46013 Measurement Type 2 0 1 1 40284 42194 44104 46014 Pickup (xIn) 2 20 1000 1/1000 40286 42196 44106 46016 Delay 2 0 1000 1/1000 40287 42197 44107 46017 Alarm Function 2 0 1 1 40288 42198 44108 46018 Alarm (% pickup) 2 25 80 1 40289 42199 44109 46019 Sensitive Ground Instantaneous overcurrent Function 2 0 1 1 40153 42063 43973 45883 Measurement type 2 0 1 1 40154 42064 43974 45884 Pickup (xIn) 2 25 16000 1/10000 40156 42066 43976 45886 Delay 4 0 600000 1/1000 40157 42067 43977 45887 Alarm Function 2 0 1 1 40161 42071 43981 45891 Alarm (% pickup) 2 25 80 1 40162 42072 43982 45892 Stage1 Function 2 0 1 1 40389 42299 44209 46119 Stage1 Mode 2 0 1 1 40391 42301 44211 46121 Stage1 Pickup (xVn) 2 20 1200 1/1000 40392 42302 44212 46122 Stage1 Delay 4 0 600000 1/1000 40393 42303 44213 46123 Stage1 Curve Type 2 0 1 1 40395 42305 44215 46125 Stage1 Block voltage (%Vn) 2 0 75 1 40396 42306 44216 46126 Stage2 Function 2 0 1 1 40401 42311 44221 46131 Stage2 Mode 2 0 1 1 40403 42313 44223 46133 Stage2 Pickup (xVn) 2 20 1200 1/1000 40404 42314 44224 46134 Stage2 Delay 4 0 600000 1/1000 40405 42315 44225 46135 Stage2 Curve Type 2 0 1 1 40407 42317 44227 46137 Stage2 Block voltage (%Vn) 2 0 75 1 40408 42318 44228 46138 Stage2 Reset 4 0 600000 1/1000 40409 42319 44229 46139 Phase Over Voltage A - 12 FCOMP User Manual REV. B L&T Electrical & Automation Annexure A Stage3 Function 2 0 1 1 40413 42323 44233 46143 Stage3 Mode 2 0 1 1 40415 42325 44235 46145 Stage3 Pickup (xVn) 2 20 1200 1/1000 40416 42326 44236 46146 Stage3 Delay 4 0 600000 1/1000 40417 42327 44237 46147 Stage3 Curve Type 2 0 1 1 40419 42329 44239 46149 Stage3 Block voltage (%Vn) 2 0 75 1 40420 42330 44240 46150 Stage3 Reset 4 0 600000 1/1000 40421 42331 44241 46151 Alarm Function 2 0 1 1 40425 42335 44245 46155 Alarm (% pickup) 2 25 80 1 40426 42336 44246 46156 Stage1 Function 2 0 1 1 40350 42260 44170 46080 Stage1 Mode 2 0 1 1 40352 42262 44172 46082 Stage1 Pickup (xVn) 2 20 1200 1/1000 40353 42263 44173 46083 Stage1Delay 4 0 600000 1/1000 40354 42264 44174 46084 Stage1 Curve Type 2 0 1 1 40356 42266 44176 46086 Stage1 Block voltage (%Vn) 2 0 75 1 40357 42267 44177 46087 Stage1 Reset 4 0 600 1/1000 40358 42268 44178 46088 Stage2 Function 2 0 1 1 40362 42272 44182 46092 Stage2 Mode 2 0 1 1 40364 42274 44184 46094 Stage2 Pickup (xVn) 2 20 1200 1/1000 40365 42275 44185 46095 Stage2 Delay 4 0 600000 1/1000 40366 42276 44186 46096 Stage2 Curve Type 2 0 1 1 40368 42278 44188 46098 Stage2 Block voltage (%Vn) 2 0 75 1 40369 42279 44189 46099 Stage2 Reset 4 0 600 1/1000 40370 42280 44190 46100 Stage3 Function 2 0 1 1 40374 42284 44194 46104 Stage3 Mode 2 0 1 1 40376 42286 44196 46106 Phase Undervoltage FCOMP User Manual REV. B A - 13 Annexure A L&T Electrical & Automation Stage3 Pickup (xVn) 2 20 1200 1/1000 40377 Stage3 Delay 4 0 600000 1/1000 Stage3 Curve Type 2 0 1 Stage3 Block voltage (%Vn) 2 0 Stage3 Reset 4 Alarm Function Alarm (% pickup) 42287 44197 46107 40378 42288 44198 46108 1 40380 42290 44200 46110 75 1 40381 42291 44201 46111 0 600 1/1000 40382 42292 44202 46112 2 0 1 1 40386 42296 44206 46116 2 25 80 1 40387 42297 44207 46117 Stage1 Function 2 0 1 1 40428 42338 44248 46158 Stage1 Mode 2 0 1 1 40430 42340 44250 46160 Stage1 Pickup (xVn) 2 20 1200 1/1000 40431 42341 44251 46161 Stage1 Delay 4 0 600000 1/1000 40432 42342 44252 46162 Stage1 Curve Type 2 0 1 1 40434 42344 44254 46164 Stage1 Block voltage (%Vn) 2 0 75 1 40435 42345 44255 46165 Stage1 Reset 4 0 600000 1/1000 40436 42346 44256 46166 Stage2 Function 2 0 1 1 40440 42350 44260 46170 Stage2 Mode 2 0 1 1 40442 42352 44262 46172 Stage2 Pickup (xVn) 2 20 1200 1/1000 40443 42353 44263 46173 Stage2 Delay 4 0 600000 1/1000 40444 42354 44264 46174 Stage2 Curve Type 2 0 1 1 40446 42356 44266 46176 Stage2 Block voltage (%Vn) 2 0 75 1 40447 42357 44267 46177 Stage2 Reset 4 0 600000 1/1000 40448 42358 44268 46178 Stage3 Function 2 0 1 1 40452 42362 44272 46182 Stage3 Mode 2 0 1 1 40454 42364 44274 46184 Stage3 Pickup (xVn) 2 20 1200 1/1000 40455 42365 44275 46185 Stage3 Delay 4 0 600000 1/1000 40456 42366 44276 46186 Residual Overvoltage A - 14 FCOMP User Manual REV. B L&T Electrical & Automation Annexure A Stage3 Curve Type 2 0 1 1 40458 42368 44278 46188 Stage3 Block voltage (%Vn) 2 0 75 1 40459 42369 44279 46189 Stage3 Reset 4 0 600000 1/1000 40460 42370 44280 46190 Alarm Function 2 0 1 1 40464 42374 44284 46194 Alarm (% pickup) 2 25 80 1 40465 42375 44285 46195 Positive Sequence Overvoltage Stage1 Function 2 0 1 1 40467 42377 44287 46230 Stage1 Mode 2 0 1 1 40469 42379 44289 46232 Stage1 Pickup (xVn) 2 20 1200 1/1000 40470 42380 44290 46233 Stage1 Delay 4 0 600000 1/1000 40471 42381 44291 46234 Stage1 Reset 4 0 600000 1/1000 40473 42383 44293 46236 Stage2 Function 2 0 1 1 40477 42387 44297 46240 Stage2 Mode 2 0 1 1 40479 42389 44299 46242 Stage2 Pickup (xVn) 2 20 1200 1/1000 40480 42390 44300 46243 Stage2 Delay 4 0 600000 1/1000 40481 42391 44301 46244 Stage2 Reset 4 0 600000 1/1000 40483 42393 44303 46246 Stage3 Function 2 0 1 1 40487 42397 44307 46250 Stage3 Mode 2 0 1 1 40489 42399 44309 46252 Stage3 Pickup (xVn) 2 20 1200 1/1000 40490 42400 44310 46253 Stage3 Delay 4 0 600000 1/1000 40491 42401 44311 46254 Stage3 Reset 4 0 600000 1/1000 40493 42403 44313 46256 Alarm Function 2 0 1 1 40497 42407 44317 46260 Alarm (% pickup) 2 25 80 1 40498 42408 44318 46261 Protection Function 2 0 1 1 40566 42476 44386 46296 Stage1 Pickup 2 20 1200 1 40569 42479 44389 46299 Stage1 Delay 4 0 600000 1/1000 40570 42480 44390 46300 Sync Undervoltage FCOMP User Manual REV. B A - 15 Annexure A L&T Electrical & Automation Alarm Function 2 0 1 1 40572 42482 44392 46302 Alarm (% pickup) 2 25 80 1 40573 42483 44393 46303 Stage1 Block voltage (%Vn) 2 0 75 1 40574 42484 44394 46304 Protection Function 2 0 1 1 40575 42485 44395 46305 Stage1 Pickup (xVn) 2 20 1200 1 40578 42488 44398 46308 Stage1 Delay 4 0 600000 1/1000 40579 42489 44399 46309 Alarm Function 2 0 1 1 40581 42491 44401 46311 Alarm (% pickup) 2 25 80 1 40582 42492 44402 46312 Stage1 Block voltage (%Vn) 2 0 75 1 40583 42493 44403 46313 Stage1 Function 2 0 1 1 40584 42494 44404 46314 Stage1 Pickup 2 2000 7000 1/100 40586 42496 44406 46316 Stage1Delay 4 0 100000 1/1000 40588 42498 44408 46318 Stage2 Function 2 0 1 1 40590 42500 44410 46320 Stage2 Pickup 2 2000 7000 1/100 40592 42502 44412 46322 Stage2Delay 4 0 100000 1/1000 40594 42504 44414 46324 Stage3 Function 2 0 1 1 40596 42506 44416 46326 Stage3 Pickup 2 2000 7000 1/100 40598 42508 44418 46328 Stage3Delay 4 0 100000 1/1000 40600 42510 44420 46330 Stage4 Function 2 0 1 1 40602 42512 44422 46332 Stage4 Pickup 2 2000 7000 1/100 40604 42514 44424 46334 Stage4Delay 4 0 100000 1/1000 40606 42516 44426 46336 Stage5 Function 2 0 1 1 40608 42518 44428 46338 Stage5 Pickup 2 2000 7000 1/100 40610 42520 44430 46340 Stage5Delay 4 0 100000 1/1000 40612 42522 44432 46342 Stage6 Function 2 0 1 1 40614 42524 44434 46344 Stage6 Pickup 2 2000 7000 1/100 40616 42526 44436 46346 Sync Overvoltage Underfrequency A - 16 FCOMP User Manual REV. B L&T Electrical & Automation Annexure A Stage6Delay 4 0 100000 1/1000 40618 42528 44438 46348 Minimum voltage (Vn) 2 600 1250 1/1000 40620 42530 44440 46350 Alarm Function 2 0 1 1 40622 42532 44442 46352 Alarm (% pickup) 2 1250 7000 1/100 40623 42533 44443 46353 Stage1 Function 2 0 1 1 40625 42535 44445 46355 Stage1 Pickup 2 2000 7000 1/100 40627 42537 44447 46357 Stage1Delay 4 0 100000 1/1000 40629 42539 44449 46359 Stage2 Function 2 0 1 1 40631 42541 44451 46361 Stage2 Pickup 2 2000 7000 1/100 40633 42543 44453 46363 Stage2Delay 4 0 100000 1/1000 40635 42545 44455 46365 Stage3 Function 2 0 1 1 40637 42547 44457 46367 Stage3 Pickup 2 2000 7000 1/100 40639 42549 44459 46369 Stage3Delay 4 0 100000 1/1000 40641 42551 44461 46371 Stage4 Function 2 0 1 1 40643 42553 44463 46373 Stage4 Pickup 2 2000 7000 1/100 40645 42555 44465 46375 Stage4Delay 4 0 100000 1/1000 40647 42557 44467 46377 Stage5 Function 2 0 1 1 40649 42559 44469 46379 Stage5 Pickup 2 2000 7000 1/100 40651 42561 44471 46381 Stage5Delay 4 0 100000 1/1000 40653 42563 44473 46383 Stage6 Function 2 0 1 1 40655 42565 44475 46385 Stage6 Pickup 2 2000 7000 1/100 40657 42567 44477 46387 Stage6Delay 4 0 100000 1/1000 40659 42569 44479 46389 Minimum voltage (Vn) 2 600 1250 1/1000 40661 42571 44481 46391 Alarm Function 2 0 1 1 40663 42573 44483 46393 Alarm (% pickup) 2 1250 7000 1/100 40664 42574 44484 46394 42576 44486 46396 Overfrequency Frequency Gradient Stage1 Function FCOMP User Manual REV. B 2 0 1 1 40666 A - 17 Annexure A A - 18 L&T Electrical & Automation Stage1 Trend 2 0 2 1 40668 42578 44488 46398 Stage1 Pickup 2 10 20000 1/1000 40669 42579 44489 46399 Stage1 OV Supervision 2 100 1200 1/1000 40670 42580 44490 46400 Stage1 Minimum 2 2000 7000 1/100 40672 42582 44492 46402 Stage1 Maximum 2 2000 7000 1/100 40673 42583 44493 46403 Stage1 Pickup Delay 4 0 100000 1/1000 40674 42584 44494 46404 Stage2 Function 2 0 1 1 40678 42588 44498 46408 Stage2 Trend 2 0 2 1 40680 42590 44500 46410 Stage2 Pickup 2 10 20000 1/1000 40681 42591 44501 46411 Stage2 OV Supervision 2 100 1200 1/1000 40682 42592 44502 46412 Stage2 Minimum 2 2000 7000 1/100 40684 42594 44504 46414 Stage2 Maximum 2 2000 7000 1/100 40685 42595 44505 46415 Stage2 Pickup Delay 4 0 100000 1/1000 40686 42596 44506 46416 Stage3 Function 2 0 1 1 40690 42600 44510 46420 Stage3 Source 2 0 0 1 40691 42601 44511 46421 Stage3 Trend 2 0 2 1 40692 42602 44512 46422 Stage3 Pickup 2 10 20000 1/1000 40693 42603 44513 46423 Stage3 OV Supervision 2 100 1200 1/1000 40694 42604 44514 46424 Stage3 Minimum 2 2000 7000 1/100 40696 42606 44516 46426 Stage3 Maximum 2 2000 7000 1/100 40697 42607 44517 46427 Stage3 Pickup Delay 4 0 100000 1/1000 40698 42608 44518 46428 Stage4 Function 2 0 1 1 40702 42612 44522 46432 Stage4 Trend 2 0 2 1 40704 42614 44524 46434 Stage4 Pickup 2 10 20000 1/1000 40705 42615 44525 46435 Stage4 OV Supervision 2 100 1200 1/1000 40706 42616 44526 46436 Stage4 Minimum 2 2000 7000 1/100 40708 42618 44528 46438 FCOMP User Manual REV. B L&T Electrical & Automation Annexure A Stage4 Maximum 2 2000 7000 1/100 40709 42619 44529 46439 Stage4 Pickup Delay 4 0 100000 1/1000 40710 42620 44530 46440 Alarm Function 2 0 1 1 40714 42624 44534 46444 Alarm (% pickup) 2 25 80 1 40715 42625 44535 46445 Stage1 Function 2 0 1 1 40930 42840 44750 46660 Pickup parmater (W/VAR) 2 0 1 1 40931 42841 44751 46661 Over/Under power selection 2 0 1 1 40932 42842 44752 46662 Pickup 4 20 130000 1/100 40934 42844 44754 46664 Stage2 Function 2 0 1 1 40936 42846 44756 46666 Pickup parmater (W/VAR) 2 0 1 1 40937 42847 44757 46667 Over/Under power selection 2 0 1 1 40938 42848 44758 46668 Pickup 4 20 130000 1/100 40940 42850 44760 46670 Stage3 Function 2 0 1 1 40942 42852 44762 46672 Pickup parmater (W/VAR) 2 0 1 1 40943 42853 44763 46673 Over/Under power selection 2 0 1 1 40944 42854 44764 46674 Pickup 4 20 130000 1/100 40946 42856 44766 46676 Stage4 Function 2 0 1 1 40948 42858 44768 46678 Pickup parmater (W/VAR) 2 0 1 1 40949 42859 44769 46679 Over/Under power selection 2 0 1 1 40950 42860 44770 46680 Pickup 4 20 130000 1/100 40952 42862 44772 46682 Block Voltage 2 0 75 1 40954 42864 44774 46684 Block Current 2 100 550 1/1000 40955 42865 44775 46685 2 0 1 1 40957 42867 44777 46687 Under/Over Power Reverse Power Function FCOMP User Manual REV. B A - 19 Annexure A L&T Electrical & Automation Pickup Parameter (W/VAR) 2 0 1 1 40958 Pickup 4 20 130000 1/100 Block Voltage 2 0 75 Block Current 2 100 Function 2 Pickup Setting 42868 44778 46688 40959 42869 44779 46689 1 40961 42871 44781 46691 550 1/1000 40962 42872 44782 46692 0 1 1 40971 42881 44791 46701 2 5 95 1/100 40972 42882 44792 46702 Trip Delay 4 1000 240000 1/1000 40973 42883 44793 46703 Alarm Function 2 0 1 1 40975 42885 44795 46705 Alarm (%Pickup) 2 5 95 1/100 40976 42886 44796 46706 Alarm Delay 4 1000 240000 1/1000 40977 42887 44797 46707 Function 2 0 1 1 40993 42903 44813 46723 Pickup Setting 2 5 95 1/100 40994 42904 44814 46724 Trip Delay 4 1000 240000 1/1000 40995 42905 44815 46725 Alarm Function 2 0 1 1 40997 42907 44817 46727 Alarm (%Pickup) 2 5 95 1/100 40998 42908 44818 46728 Alarm Delay 4 1000 240000 1/1000 40999 42909 44819 46729 Stage 1 Function 2 0 1 1 40724 42634 44544 46454 Stage 1 Measurement Type 2 0 1 1 40725 42635 44545 46455 Stage 1 Characteristic angle 2 -180 180 1 40726 42636 44546 46456 Stage 1 Direction 2 0 1 1 40728 42638 44548 46458 Stage 1 Polarisation 2 0 0 1 40729 42639 44549 46459 Stage 1 Voltage polarisation 2 0 1200 1/1000 40730 42640 44550 46460 Stage1 Forward Pickup (xIn) 2 100 20000 1/1000 40732 42642 44552 46462 Lead Power Factor Lag Power Factor Directional Phase IOC A - 20 FCOMP User Manual REV. B L&T Electrical & Automation Annexure A Stage 1 Reverse Pickup 2 100 20000 1/1000 40733 Stage1 Forward Delay 4 0 600000 1/1000 40734 Stage 1 Reverse Delay 4 0 600000 1/1000 40736 Stage 2 Function 2 0 1 1 40740 Stage 2 Measurement Type 2 0 1 1 40741 Stage 2 Characteristic angle 2 -180 180 1 40742 Stage 2 Direction 2 0 1 1 40744 Stage 2 Polarisation 2 0 0 1 40745 Stage 2 Voltage polarisation 2 0 1200 1/1000 40746 Stage 2 Forward Pickup (xIn) 2 100 20000 1/1000 40748 Stage 2 Reverse Pickup 2 100 20000 1/1000 40749 Stage 2 Forward Delay 4 0 600000 1/1000 40750 Stage 2 Reverse Delay 4 0 600000 1/1000 40752 Alarm Function 2 0 1 1 Alarm (%Pickup) 2 25 80 Stage 1 Function 2 0 Stage 1 Measurement Type 2 Stage 1 Characteristic angle 42643 44553 46463 42644 44554 46464 42646 44556 46466 42650 44560 46470 42651 44561 46471 42652 44562 46472 42654 44564 46474 42655 44565 46475 42656 44566 46476 42658 44568 46478 42659 44569 46479 42660 44570 46480 42662 44572 46482 40756 42666 44576 46486 1 40757 42667 44577 46487 1 1 40759 42669 44579 46489 0 1 1 40760 42670 44580 46490 2 -180 180 1 40761 42671 44581 46491 Stage 1 Direction 2 0 1 1 40763 42673 44583 46493 Stage 1 Polarisation 2 0 0 1 40765 42675 44585 46495 Stage 1 Voltage polarisation 2 0 1200 1/1000 40766 42676 44586 46496 Stage 1 Forward 2 0 5 1 40767 42677 44587 46497 Directional Phase TOC FCOMP User Manual REV. B A - 21 Annexure A L&T Electrical & Automation Curve type Stage1 Forward Pickup (xIn) 2 100 3200 1/1000 40768 Stage1 Forward Delay 4 0 600000 1/1000 40769 Stage 1 Reverse Curve type 2 0 5 1 40771 Stage1 Reverse Pickup (xIn) 2 100 3200 1/1000 40772 Stage1 Reverse Delay 4 0 600000 1/1000 40773 Stage 2 Function 2 0 1 1 40777 Stage 2 Measurement Type 2 0 1 1 40778 Stage 2 Characteristic angle 2 -180 180 1 40779 Stage 2 Direction 2 0 1 1 40781 Stage 2 Polarisation 2 0 0 1 40783 Stage 2 Voltage polarisation 2 0 1200 1/1000 40784 Stage 2 Forward Curve type 2 0 5 1 40785 Stage 2 Forward Pickup (xIn) 2 100 3200 1/1000 40786 Stage 2 Forward Delay 4 0 600000 1/1000 40787 Stage 2 Reverse Curve type 2 0 5 1 40789 Stage 2 Reverse Pickup (xIn) 2 100 3200 1/1000 40790 Stage 2 Reverse Delay 4 0 600000 1/1000 40791 Alarm Function 2 0 1 1 Alarm (%Pickup) 2 25 80 Stage 1 Function 2 0 Stage 1 Characteristic angle 2 -90 42678 44588 46498 42679 44589 46499 42681 44591 46501 42682 44592 46502 42683 44593 46503 42687 44597 46507 42688 44598 46508 42689 44599 46509 42691 44601 46511 42693 44603 46513 42694 44604 46514 42695 44605 46515 42696 44606 46516 42697 44607 46517 42699 44609 46519 42700 44610 46520 42701 44611 46521 40795 42705 44615 46525 1 40796 42706 44616 46526 1 1 40798 42708 44618 46528 90 1 40799 42709 44619 46529 Directional Neutral IOC A - 22 FCOMP User Manual REV. B L&T Electrical & Automation Annexure A Stage 1 Voltage polarisation thershold 2 Stage 1 Positive sequence current restrain 2 Stage1 ForwardPickup (xIn) 2 Stage 1 ReversePickup(xIn) 2 100 20000 1/1000 40804 Stage 1 Forward Delay 4 0 600000 1/1000 40806 Stage 1 Reverse Delay 4 0 600000 1/1000 40808 Stage 2 Function 2 0 1 1 40812 Stage 2 Characteristic angle 2 -90 90 1 40813 Stage 2 Voltage polarisation thershold 2 0 1200 1/1000 40815 Stage 1 Positive sequence current restrain 2 Stage1 ForwardPickup (xIn) 2 Stage 2 ReversePickup(xIn) 2 100 20000 1/1000 40818 Stage 2 Forward Delay 4 0 600000 1/1000 40820 Stage 2 Reverse Delay 4 0 600000 1/1000 40822 Alarm Function 2 0 1 1 Alarm (%Pickup) 2 25 80 Stage 1 Function 2 0 Stage 1 Characteristic angle 2 Stage 1 Source Stage 1 Voltage 0 1200 1/1000 40801 42711 44621 46531 42712 44622 46532 42713 44623 46533 42714 44624 46534 42716 44626 46536 42718 44628 46538 42722 44632 46542 42723 44633 46543 42725 44635 46545 42726 44636 46546 42727 44637 46547 42728 44638 46548 42730 44640 46550 42732 44642 46552 40826 42736 44646 46556 1 40827 42737 44647 46557 1 1 40829 42739 44649 46559 -90 90 1 40830 42740 44650 46560 2 0 1 1 40831 42741 44651 46561 2 0 1200 1/1000 40832 42742 44652 46562 100 100 100 100 3200 20000 3200 20000 1/1000 1/1000 1/1000 1/1000 40802 40803 40816 40817 Directional Neutral TOC FCOMP User Manual REV. B A - 23 Annexure A L&T Electrical & Automation polarisation thershold A - 24 Stage 1 Positive sequence current restrain 2 Stage1 ForwardPickup (xIn) 2 Stage 1 Forward curve type 2 0 5 1 40836 Stage 1 Forward Delay 4 0 600000 1/1000 40837 Stage 1 ReversePickup(xIn) 2 100 20000 1/1000 40839 Stage 1 Reverse curve type 2 0 5 1 40840 Stage 1 Reverse Delay 4 0 600000 1/1000 40841 Stage 2 Function 2 0 1 1 40845 Stage 2 Characteristic angle 2 -90 90 1 40846 Stage 2 Voltage polarisation thershold 2 0 1200 1/1000 40848 Stage 1 Positive sequence current restrain 2 Stage2 ForwardPickup (xIn) 2 Stage 2 Forward curve type 2 0 5 1 40852 Stage 2 Forward Delay 4 0 600000 1/1000 40853 Stage 2 ReversePickup(xIn) 2 100 20000 1/1000 40855 Stage 2 Reverse curve type 2 0 5 1 40856 Stage 2 Reverse Delay 4 0 600000 1/1000 40857 Alarm Function 2 0 1 1 Alarm (%Pickup) 2 25 80 1 100 100 100 100 3200 20000 3200 20000 1/1000 1/1000 1/1000 1/1000 40833 42743 44653 46563 42745 44655 46565 42746 44656 46566 42747 44657 46567 42749 44659 46569 42750 44660 46570 42751 44661 46571 42755 44665 46575 42756 44666 46576 42758 44668 46578 42759 44669 46579 42761 44671 46581 42762 44672 46582 42763 44673 46583 42765 44675 46585 42766 44676 46586 42767 44677 46587 40861 42771 44681 46591 40862 42772 44682 46592 40835 40849 40851 FCOMP User Manual REV. B L&T Electrical & Automation Annexure A Directional Ground IOC Stage 1 Function 2 0 1 1 40864 Stage 1 Meassurement Type 2 0 1 1 40865 Stage 1 Characteristic angle 2 -90 90 1 40866 Stage 1 Voltage polarisation thershold 2 0 1200 1/1000 40868 Stage 1 Positive sequence current restrain 2 Stage1 ForwardPickup (xIn) 2 Stage 1 ReversePickup(xIn) 2 100 20000 1/1000 40871 Stage 1 Forward Delay 4 0 600000 1/1000 40872 Stage 1 Reverse Delay 4 0 600000 1/1000 40874 Stage 2 Function 2 0 1 1 40878 Stage 2 Meassurement Type 2 0 1 1 40879 Stage 2 Characteristic angle 2 -90 90 1 40880 Stage 2 Voltage polarisation thershold 2 0 1200 1/1000 40882 Stage 1 Positive sequence current restrain 2 Stage 2 ForwardPickup (xIn) 2 Stage 2 ReversePickup(xIn) 2 100 20000 1/1000 40885 Stage 2 Forward Delay 4 0 600000 1/1000 40886 Stage 2 Reverse Delay 4 0 600000 1/1000 40888 FCOMP User Manual REV. B 100 100 100 100 3200 20000 3200 20000 1/1000 1/1000 1/1000 1/1000 42774 44684 46594 42775 44685 46595 42776 44686 46596 42778 44688 46598 42779 44689 46599 42780 44690 46600 42781 44691 46601 42782 44692 46602 42784 44694 46604 42788 44698 46608 42789 44699 46609 42790 44700 46610 42792 44702 46612 42793 44703 46613 42794 44704 46614 42795 44705 46615 42796 44706 46616 42798 44708 46618 40869 40870 40883 40884 A - 25 Annexure A L&T Electrical & Automation Alarm Function 2 0 1 1 40892 42802 44712 46622 Alarm (%Pickup) 2 25 80 1 40893 42803 44713 46623 Stage 1 Function 2 0 1 1 40895 42805 44715 46625 Stage 1 Measurement Type 2 0 1 1 40896 42806 44716 46626 Stage 1 Characteristic angle 2 -90 90 1 40897 42807 44717 46627 Stage 1 Voltage polarisation thershold 2 0 1200 1/1000 40899 42809 44719 46629 Stage 1 Positive sequence current restrain 2 42810 44720 46630 Stage1 ForwardPickup (xIn) 2 42811 44721 46631 Stage 1 Forward curve type 2 0 5 1 40902 42812 44722 46632 Stage 1 Forward Delay 4 0 600000 1/1000 40903 42813 44723 46633 Stage 1 ReversePickup(xIn) 2 100 20000 1/1000 40905 42815 44725 46635 Stage 1 Rverse curve type 2 0 5 1 40906 42816 44726 46636 Stage 1 Reverse Delay 4 0 600000 1/1000 40907 42817 44727 46637 Stage 2 Function 2 0 1 1 40911 42821 44731 46641 Stage 2 Meassurement Type 2 0 1 1 40912 42822 44732 46642 Stage 2 Characteristic angle 2 -90 90 1 40913 42823 44733 46643 Stage 2 Voltage polarisation thershold 2 0 1200 1/1000 40915 42825 44735 46645 Stage 1 Positive sequence current restrain 2 42826 44736 46646 Stage2 ForwardPickup (xIn) 2 42827 44737 46647 Directional Ground TOC A - 26 100 100 100 100 3200 20000 3200 20000 1/1000 1/1000 1/1000 1/1000 40900 40901 40916 40917 FCOMP User Manual REV. B L&T Electrical & Automation Annexure A Stage 2 Forward curve type 2 0 5 1 40918 Stage 2 Forward Delay 4 0 600000 1/1000 40919 Stage 2 ReversePickup(xIn) 2 100 20000 1/1000 40921 Stage 2 Rverse curve type 2 0 5 1 40922 Stage 2 Reverse Delay 4 0 600000 1/1000 40923 Alarm Function 2 0 1 1 Alarm (%Pickup) 2 25 80 1 42828 44738 46648 42829 44739 46649 42831 44741 46651 42832 44742 46652 42833 44743 46653 40927 42837 44747 46657 40928 42838 44748 46658 Metering Map Table A-5: Metering Map Max. Value Multiplie r Memory address 0 1000000000 1/1000 30001 4 0 1000000000 1/1000 30003 Bph RMS Current 4 0 1000000000 1/1000 30005 Nph/SEF RMS Current 4 0 1000000000 1/1000 30007 Gph RMS Current 4 0 1000000000 1/1000 30009 REF RMS Current 4 0 1000000000 1/1000 30011 Rph RMS Voltage 4 0 720000000 1/100 30013 Yph RMS Voltage 4 0 720000000 1/100 30015 Bph RMS Voltage 4 0 720000000 1/100 30017 RYph RMS Voltage 4 0 1248000000 1/100 30019 YBph RMS Voltage 4 0 1248000000 1/100 30021 BRph RMS Voltage 4 0 1248000000 1/100 30023 Sync RMS Voltage 4 0 1248000000 1/100 30025 Residual RMS Voltage 4 0 720000000 1/100 30027 Rph current angle 2 0 360 1 30029 Attribute Name Size (bytes) Min. Value Rph RMS Current 4 Yph RMS Current FCOMP User Manual REV. B A - 27 Annexure A A - 28 L&T Electrical & Automation Yph current angle 2 0 360 1 30030 Bph current angle 2 0 360 1 30031 Nph current angle 2 0 360 1 30032 Gph current angle 2 0 360 1 30033 REFph current angle 2 0 360 1 30034 Rph voltage angle 2 0 360 1 30035 Yph voltage angle 2 0 360 1 30036 Bph voltage angle 2 0 360 1 30037 RYph voltage angle 2 0 360 1 30038 YBph voltage angle 2 0 360 1 30039 BRph voltage angle 2 0 360 1 30040 Residual voltage angle 2 0 360 1 30041 Sync voltage angle 2 0 360 1 30042 Fundamental Rph RMS Current 4 0 1000000000 1/1000 30043 Fundamental Yph RMS Current 4 0 1000000000 1/1000 30045 Fundamental Bph RMS Current 4 0 1000000000 1/1000 30047 Fundamental Nph/SEF RMS Current 4 0 1000000000 1/1000 30049 Fundamental Gph RMS Current 4 0 1000000000 1/1000 30051 Fundamental REF RMS Current 4 0 1000000000 1/1000 30053 Fundamental Rph RMS Voltage 4 0 720000000 1/100 30055 Fundamental Yph RMS Voltage 4 0 720000000 1/100 30057 Fundamental Bph RMS Voltage 4 0 720000000 1/100 30059 Fundamental RYph RMS Voltage 4 0 1248000000 1/100 30061 Fundamental YBph RMS Voltage 4 0 1248000000 1/100 30063 Fundamental BRph RMS Voltage 4 0 1248000000 1/100 30065 Rph Demand Current 4 0 1000000000 1/1000 30067 FCOMP User Manual REV. B L&T Electrical & Automation Annexure A Yph Demand Current 4 0 1000000000 1/1000 30069 Bph Demand Current 4 0 1000000000 1/1000 30071 Nph/SEF Demand Current 4 0 1000000000 1/1000 30073 Gph Demand Current 4 0 1000000000 1/1000 30075 REF Demand Current 4 0 1000000000 1/1000 30077 Rph MAX Current 4 0 1000000000 1/1000 30079 Yph MAX Current 4 0 1000000000 1/1000 30081 Bph MAX Current 4 0 1000000000 1/1000 30083 Nph/SEF MAX Current 4 0 1000000000 1/1000 30085 Gph MAX Current 4 0 1000000000 1/1000 30087 REF MAX Current 4 0 1000000000 1/1000 30089 Rph MAX RMS Voltage 4 0 720000000 1/100 30091 Yph MAX RMS Voltage 4 0 720000000 1/100 30093 Bph MAX RMS Voltage 4 0 720000000 1/100 30095 RYph MAX RMS Voltage 4 0 1248000000 1/100 30097 YBph MAX RMS Voltage 4 0 1248000000 1/100 30099 BRph MAX RMS Voltage 4 0 1248000000 1/100 30101 Rph MIN Current 4 0 1000000000 1/1000 30103 Yph MIN Current 4 0 1000000000 1/1000 30105 Bph MIN Current 4 0 1000000000 1/1000 30107 Nph/SEF MIN Current 4 0 1000000000 1/1000 30109 Gph MIN Current 4 0 1000000000 1/1000 30111 REF MIN Current 4 0 1000000000 1/1000 30113 Rph MIN RMS Voltage 4 0 720000000 1/100 30115 Yph MIN RMS Voltage 4 0 720000000 1/100 30117 Bph MIN RMS Voltage 4 0 720000000 1/100 30119 RYph MIN RMS Voltage 4 0 1248000000 1/100 30121 YBph MIN RMS Voltage 4 0 1248000000 1/100 30123 BRph MIN RMS Voltage 4 0 1248000000 1/100 30125 FCOMP User Manual REV. B A - 29 Annexure A A - 30 L&T Electrical & Automation Average Current 4 0 1000000000 1/1000 30127 RYBph Average RMS Voltage 4 0 720000000 1/100 30129 Voltage Unbalance 4 0 720000000 1/100 30131 Phase sequence 2 0 2 1 30133 Positive Sequence RMS Magnitude 4 0 1000000000 1/1000 30134 Negative Sequence RMS Magnitude 4 0 1000000000 1/1000 30136 Zero Sequence RMS Magnitude 4 0 1000000000 1/1000 30138 Positive Sequence RMS voltage Magnitude 4 0 720000000 1/100 30140 Negative Sequence RMS voltage Magnitude 4 0 720000000 1/100 30142 Zero Sequence RMS voltage Magnitude 4 0 720000000 1/100 30144 Positive Sequence Angle 2 0 360 1 30146 Negative Sequence Angle 2 0 360 1 30147 Zero Sequence Angle 2 0 360 1 30148 Positive Sequence Angle 2 0 360 1 30149 Negative Sequence Angle 2 0 360 1 30150 Zero Sequence Angle 2 0 360 1 30151 Rph Active Power 4 -2147483647 2147483647 1/100 30152 Yph Active Power 4 -2147483647 2147483647 1/100 30154 Bph Active Power 4 -2147483647 2147483647 1/100 30156 Rph Reactive Power 4 -2147483647 2147483647 1/100 30158 Yph Reactive Power 4 -2147483647 2147483647 1/100 30160 Bph Reactive Power 4 -2147483647 2147483647 1/100 30162 Rph Apparent Power 4 -2147483647 2147483647 1/100 30164 Yph Apparent Power 4 -2147483647 2147483647 1/100 30166 Bph Apparent Power 4 -2147483647 2147483647 1/100 30168 Total Active Power 4 -2147483647 2147483647 1/100 30170 FCOMP User Manual REV. B L&T Electrical & Automation Annexure A Total Reactive Power 4 -2147483647 2147483647 1/100 30172 Total Apparent Power 4 -2147483647 2147483647 1/100 30174 Total Max Active Power 4 -2147483647 2147483647 1/100 30176 Total Max Reactive Power 4 -2147483647 2147483647 1/100 30178 Total Max Apparent Power 4 -2147483647 2147483647 1/100 30180 Total Min Active Power 4 -2147483647 2147483647 1/100 30182 Total Min Reactive Power 4 -2147483647 2147483647 1/100 30184 Total Min Apparent Power 4 -2147483647 2147483647 1/100 30186 MD Rph Active Power 4 -2147483647 2147483647 1/100 30188 MD Yph Active Power 4 -2147483647 2147483647 1/100 30190 MD Bph Active Power 4 -2147483647 2147483647 1/100 30192 MD Rph Reactive Power 4 -2147483647 2147483647 1/100 30194 MD Yph Reactive Power 4 -2147483647 2147483647 1/100 30196 MD Bph Reactive Power 4 -2147483647 2147483647 1/100 30198 MD Rph Apparent Power 4 -2147483647 2147483647 1/100 30200 MD Yph Apparent Power 4 -2147483647 2147483647 1/100 30202 MD Bph Apparent Power 4 -2147483647 2147483647 1/100 30204 Rph Active Power scale factor 2 0 9 1 30206 Yph Active Power scale factor 2 0 9 1 30207 Bph Active Power scale factor 2 0 9 1 30208 Rph Reactive Power scale factor 2 0 9 1 30209 Yph Reactive Power scale factor 2 0 9 1 30210 Bph Reactive Power scale factor 2 0 9 1 30211 Rph Apparent Power scale factor 2 0 9 1 30212 Yph Apparent Power scale factor 2 0 9 1 30213 Bph Apparent Power scale factor 2 0 9 1 30214 FCOMP User Manual REV. B A - 31 Annexure A A - 32 L&T Electrical & Automation Total Active Power scale factor 2 0 9 1 30215 Total Reactive Power scale factor 2 0 9 1 30216 Total Apparent Power scale factor 2 0 9 1 30217 Total Max Active Power scale factor 2 0 9 1 30218 Total Max Reactive Power scale factor 2 0 9 1 30219 Total Max Apparent Power scale factor 2 0 9 1 30220 Total Min Active Power scale factor 2 0 9 1 30221 Total Min Reactive Power scale factor 2 0 9 1 30222 Total Min Apparent Power scale factor 2 0 9 1 30223 MD Rph Active Power scale factor 2 0 9 1 30224 MD Yph Active Power scale factor 2 0 9 1 30225 MD Bph Active Power scale factor 2 0 9 1 30226 MD Rph Reactive Power scale factor 2 0 9 1 30227 MD Yph Reactive Power scale factor 2 0 9 1 30228 MD Bph Reactive Power scale factor 2 0 9 1 30229 MD Rph Apparent Power scale factor 2 0 9 1 30230 MD Yph Apparent Power scale factor 2 0 9 1 30231 MD Bph Apparent Power scale factor 2 0 9 1 30232 Rph Power Factor 2 -100 100 1/100 30233 Yph Power Factor 2 -100 100 1/100 30234 Bph Power Factor 2 -100 100 1/100 30235 System PF 2 -100 100 1/100 30236 FCOMP User Manual REV. B L&T Electrical & Automation Annexure A Rph Frequency 4 0 7000 1/100 30237 Yph Frequency 4 0 7000 1/100 30239 Bph Frequency 4 0 7000 1/100 30241 Average Frequency 4 0 7000 1/100 30243 Total Active Energy 8 -2147483647 2147483647 1/1000 30245 Total Reactive Energy 8 -2147483647 2147483647 1/1000 30249 Total Apparent Energy 8 -2147483647 2147483647 1/1000 30253 Total Active Energy Scale Factor 2 0 9 1 30257 Total Reactive Energy Scale Factor 2 0 9 1 30258 Total Apparent Energy Scale Factor 2 0 9 1 30259 MD Active Power 4 -2147483647 2147483647 1/100 30260 MD Reactive Power 4 -2147483647 2147483647 1/100 30262 MD Apparent Power 4 -2147483647 2147483647 1/100 30264 MD Active Power Scale Factor 2 0 9 1 30266 MD Reactive Power Scale Factor 2 0 9 1 30267 MD Apparent Power Scale Factor 2 0 9 1 30268 THDIr 2 0 1000 1/10 30269 THDIy 2 0 1000 1/10 30270 THDIb 2 0 1000 1/10 30271 THDI ( System THD ) 2 0 1000 1/10 30272 THDVr 2 0 1000 1/10 30273 THDVy 2 0 1000 1/10 30274 THDVb 2 0 1000 1/10 30275 THDV ( System THD ) 2 0 1000 1/10 30276 HDIr1 2 0 1000 1/10 30277 HDIr2 2 0 1000 1/10 30278 HDIr3 2 0 1000 1/10 30279 FCOMP User Manual REV. B A - 33 Annexure A A - 34 L&T Electrical & Automation HDIr4 2 0 1000 1/10 30280 HDIr5 2 0 1000 1/10 30281 HDIr6 2 0 1000 1/10 30282 HDIr7 2 0 1000 1/10 30283 HDIr8 2 0 1000 1/10 30284 HDIr9 2 0 1000 1/10 30285 HDIr10 2 0 1000 1/10 30286 HDIr11 2 0 1000 1/10 30287 HDIr12 2 0 1000 1/10 30288 HDIr13 2 0 1000 1/10 30289 HDIr14 2 0 1000 1/10 30290 HDIr15 2 0 1000 1/10 30291 HDIr16 2 0 1000 1/10 30292 HDIr17 2 0 1000 1/10 30293 HDIr18 2 0 1000 1/10 30294 HDIr19 2 0 1000 1/10 30295 HDIr20 2 0 1000 1/10 30296 HDIr21 2 0 1000 1/10 30297 HDIr22 2 0 1000 1/10 30298 HDIr23 2 0 1000 1/10 30299 HDIr24 2 0 1000 1/10 30300 HDIr25 2 0 1000 1/10 30301 HDIy1 2 0 1000 1/10 30302 HDIy2 2 0 1000 1/10 30303 HDIy3 2 0 1000 1/10 30304 HDIy4 2 0 1000 1/10 30305 HDIy5 2 0 1000 1/10 30306 HDIy6 2 0 1000 1/10 30307 HDIy7 2 0 1000 1/10 30308 FCOMP User Manual REV. B L&T Electrical & Automation Annexure A HDIy8 2 0 1000 1/10 30309 HDIy9 2 0 1000 1/10 30310 HDIy10 2 0 1000 1/10 30311 HDIy11 2 0 1000 1/10 30312 HDIy12 2 0 1000 1/10 30313 HDIy13 2 0 1000 1/10 30314 HDIy14 2 0 1000 1/10 30315 HDIy15 2 0 1000 1/10 30316 HDIy16 2 0 1000 1/10 30317 HDIy17 2 0 1000 1/10 30318 HDIy18 2 0 1000 1/10 30319 HDIy19 2 0 1000 1/10 30320 HDIy20 2 0 1000 1/10 30321 HDIy21 2 0 1000 1/10 30322 HDIy22 2 0 1000 1/10 30323 HDIy23 2 0 1000 1/10 30324 HDIy24 2 0 1000 1/10 30325 HDIy25 2 0 1000 1/10 30326 HDIb1 2 0 1000 1/10 30327 HDIb2 2 0 1000 1/10 30328 HDIb3 2 0 1000 1/10 30329 HDIb4 2 0 1000 1/10 30330 HDIb5 2 0 1000 1/10 30331 HDIb6 2 0 1000 1/10 30332 HDIb7 2 0 1000 1/10 30333 HDIb8 2 0 1000 1/10 30334 HDIb9 2 0 1000 1/10 30335 HDIb10 2 0 1000 1/10 30336 HDIb11 2 0 1000 1/10 30337 FCOMP User Manual REV. B A - 35 Annexure A A - 36 L&T Electrical & Automation HDIb12 2 0 1000 1/10 30338 HDIb13 2 0 1000 1/10 30339 HDIb14 2 0 1000 1/10 30340 HDIb15 2 0 1000 1/10 30341 HDIb16 2 0 1000 1/10 30342 HDIb17 2 0 1000 1/10 30343 HDIb18 2 0 1000 1/10 30344 HDIb19 2 0 1000 1/10 30345 HDIb20 2 0 1000 1/10 30346 HDIb21 2 0 1000 1/10 30347 HDIb22 2 0 1000 1/10 30348 HDIb23 2 0 1000 1/10 30349 HDIb24 2 0 1000 1/10 30350 HDIb25 2 0 1000 1/10 30351 HDVr1 2 0 1000 1/10 30352 HDVr2 2 0 1000 1/10 30353 HDVr3 2 0 1000 1/10 30354 HDVr4 2 0 1000 1/10 30355 HDVr5 2 0 1000 1/10 30356 HDVr6 2 0 1000 1/10 30357 HDVr7 2 0 1000 1/10 30358 HDVr8 2 0 1000 1/10 30359 HDVr9 2 0 1000 1/10 30360 HDVr10 2 0 1000 1/10 30361 HDVr11 2 0 1000 1/10 30362 HDVr12 2 0 1000 1/10 30363 HDVr13 2 0 1000 1/10 30364 HDVr14 2 0 1000 1/10 30365 HDVr15 2 0 1000 1/10 30366 FCOMP User Manual REV. B L&T Electrical & Automation Annexure A HDVr16 2 0 1000 1/10 30367 HDVr17 2 0 1000 1/10 30368 HDVr18 2 0 1000 1/10 30369 HDVr19 2 0 1000 1/10 30370 HDVr20 2 0 1000 1/10 30371 HDVr21 2 0 1000 1/10 30372 HDVr22 2 0 1000 1/10 30373 HDVr23 2 0 1000 1/10 30374 HDVr24 2 0 1000 1/10 30375 HDVr25 2 0 1000 1/10 30376 HDVy1 2 0 1000 1/10 30377 HDVy2 2 0 1000 1/10 30378 HDVy3 2 0 1000 1/10 30379 HDVy4 2 0 1000 1/10 30380 HDVy5 2 0 1000 1/10 30381 HDVy6 2 0 1000 1/10 30382 HDVy7 2 0 1000 1/10 30383 HDVy8 2 0 1000 1/10 30384 HDVy9 2 0 1000 1/10 30385 HDVy10 2 0 1000 1/10 30386 HDVy11 2 0 1000 1/10 30387 HDVy12 2 0 1000 1/10 30388 HDVy13 2 0 1000 1/10 30389 HDVy14 2 0 1000 1/10 30390 HDVy15 2 0 1000 1/10 30391 HDVy16 2 0 1000 1/10 30392 HDVy17 2 0 1000 1/10 30393 HDVy18 2 0 1000 1/10 30394 HDVy19 2 0 1000 1/10 30395 FCOMP User Manual REV. B A - 37 Annexure A A - 38 L&T Electrical & Automation HDVy20 2 0 1000 1/10 30396 HDVy21 2 0 1000 1/10 30397 HDVy22 2 0 1000 1/10 30398 HDVy23 2 0 1000 1/10 30399 HDVy24 2 0 1000 1/10 30400 HDVy25 2 0 1000 1/10 30401 HDVb1 2 0 1000 1/10 30402 HDVb2 2 0 1000 1/10 30403 HDVb3 2 0 1000 1/10 30404 HDVb4 2 0 1000 1/10 30405 HDVb5 2 0 1000 1/10 30406 HDVb6 2 0 1000 1/10 30407 HDVb7 2 0 1000 1/10 30408 HDVb8 2 0 1000 1/10 30409 HDVb9 2 0 1000 1/10 30410 HDVb10 2 0 1000 1/10 30411 HDVb11 2 0 1000 1/10 30412 HDVb12 2 0 1000 1/10 30413 HDVb13 2 0 1000 1/10 30414 HDVb14 2 0 1000 1/10 30415 HDVb15 2 0 1000 1/10 30416 HDVb16 2 0 1000 1/10 30417 HDVb17 2 0 1000 1/10 30418 HDVb18 2 0 1000 1/10 30419 HDVb19 2 0 1000 1/10 30420 HDVb20 2 0 1000 1/10 30421 HDVb21 2 0 1000 1/10 30422 HDVb22 2 0 1000 1/10 30423 HDVb23 2 0 1000 1/10 30424 FCOMP User Manual REV. B L&T Electrical & Automation Annexure A HDVb24 2 0 1000 1/10 30425 HDVb25 2 0 1000 1/10 30426 Current Hour 4 0 99999 1 30427 Current minute 2 0 59 1 30429 Thermal Theta R 4 0 10000 1/100 30430 Thermal Theta Y 4 0 10000 1/100 30432 Thermal Theta B 4 0 10000 1/100 30434 FCOMP User Manual REV. B A - 39 Annexure A L&T Electrical & Automation Profibus Communication Profibus DPV0 Table A-5: Profibus DPV0 Attribute Name Size (bytes) Offset Offset Hex Multiplier 0 1 Type Module 1 IOC Stage1 Phase Trip 0 .0 IOC Stage2 Phase Trip 0.1 IOC Stage1 neutral Trip 0.2 0 IOC Stage2 neutral Trip 0.3 0 IOC Stage1 Ground Trip 0.4 0 IOC Stage2 Ground Trip 0.5 0 IOC Stage1 NegSeq Phase Trip 0.6 0 IOC Stage2 NegSeq Phase Trip 0.7 0 TOC Stage1 Phase Trip 0 .0 1 TOC Stage2 Phase Trip 0.1 0 TOC Stage1 neutral Trip 0.2 0 TOC Stage2 neutral Trip 0.3 0 0 Protection 1 0 1 Protection TOC Stage1 Ground Trip 0.4 0 TOC Stage2 Ground Trip 0.5 0 TOC Stage1 NegSeq Phase Trip 0.6 0 TOC Stage2 NegSeq Phase Trip 0.7 0 TOC Stage1 Sensitive Ground Trip 0 .0 2 Thermal Overload R Phase Trip 0.1 0 Under Current Stage1 Phase Trip 0.2 0 Breaker Arcing phaseTrip 0.3 0 2 A - 40 1 Protection Breaker Re-strike Stage1 Rphase Trip 0.4 0 Breaker Failure Re-trip Ground Trip 0.5 0 AR lockout 0.6 0 FCOMP User Manual REV. B L&T Electrical & Automation Annexure A Over Voltage Stage1 phase Trip 0.7 0 Over Voltage Stage2 phase Trip 0 .0 3 Under Voltagr Stage1 phase Trip 0.1 0 Under Voltagr Stage2 phase Trip 0.2 0 Res Over Voltage Stage 1 Neutral Trip 0.3 0 NEG SEQ Over Voltage Stage1 Phase Trip 0.4 0 Under frequency Stage1 phase Trip 0.5 0 Over frequency Stage1 phase Trip 0.6 0 AUX Over Voltage 0.7 0 AUX Under Voltage 0 .0 4 ZSI Gnd- Trip 0.1 0 ZSI ST- Trip 0.2 0 DIRECTIONAL IOC FORWARD Phase STAGE 1_Trip 0.3 0 DIRECTIONAL IOC REVERSE Phase STAGE 1_Trip 0.4 DIRECTIONAL IOC NEUTRAL STAGE1 FORWARD_Trip 0.5 0 DIRECTIONAL IOC GROUND STAGE1 FORWARD_Trip 0.6 0 DIRECTIONAL TOC FORWARD Phase STAGE 1_Trip 0.7 0 DIRECTIONAL TOC REVERSE Phase STAGE 1_Trip 0 .0 5 DIRECTIONAL TOC NEUTRAL STAGE1 FORWARD_Trip 0.1 0 DIRECTIONAL TOC GROUND STAGE1 FORWARD_Trip 0.2 0 Over Power Stage1 Phase Trip 0.3 0 Rev Power Stage1 Phase Trip 0.4 0 Power Factor Stage1 Phase Trip 0.5 0 Phase Seq Monitoring_ Trip 0.6 0 FCOMP User Manual REV. B 1 3 4 Protection 1 Protection 0 5 1 Protection A - 41 Annexure A L&T Electrical & Automation Freq Gradient stage 1 _ Trip 0.7 0 VT Fuse - Trip 0 .0 6 6 1 Protection Any Major Error 1 7 7 1 Watchdog Total Active Power Scaling Factor 1 8 8 1 MD Active Power Scaling Factor 1 9 9 1 MD Reactive Power Scaling Factor 1 10 A 1 Total Active Energy Scaling Factor 1 11 B 1 DI status (DI1-DI16) 2 12 C 1 DI status (DI7-DI27) 2 14 E 1 DO Status (DO17-DO21) 2 16 10 1 DO Status (DO1-DO16) 2 18 12 1 CPU DIDO Settings 2 20 14 1 CPU DIDO Status 2 22 16 1 System PF 2 24 18 1/100 THDI ( System THD ) 2 26 1A 1/10 THDV ( System THD ) 2 28 1C 1/10 Rph RMS Current 4 30 1E 1/1000 Yph RMS Current 4 34 22 1/1000 Bph RMS Current 4 38 26 1/1000 Nph/SEF RMS Current 4 42 2A 1/1000 Gph RMS Current 4 46 2E 1/1000 Rph RMS Voltage 4 50 32 1/100 Yph RMS Voltage 4 54 36 1/100 Bph RMS Voltage 4 58 3A 1/100 Sync RMS Voltage 4 62 3E 1/100 Total Active Power 4 66 42 1/100 Average Frequency 4 70 46 1/100 MD Active Power 4 74 4A 1/100 MD Reactive Power 4 78 4E 1/100 Scaling factors Status Metering A - 42 FCOMP User Manual REV. B L&T Electrical & Automation Annexure A Total Active Energy 8 82 52 1/1000 Module 2 Protection Byte 0 1 0 0 1 Protection Byte 1 1 1 1 1 Protection Byte 2 1 2 2 1 Protection Byte 3 1 3 3 1 Protection Byte 4 1 4 4 1 Protection Byte 5 1 5 5 1 Any Major Error 1 6 6 1 Total Active Power Scaling Factor 1 7 7 1 Total Active Energy Scaling Factor 1 8 8 1 DI status (DI1-DI16) 2 9 9 1 DO Status (DO1-DO16) 2 11 B 1 System PF 2 13 D 1/100 THDI ( System THD ) 2 15 F 1/10 THDV ( System THD ) 2 17 11 1/10 CPU DIDO Settings 2 19 13 1 CPU DIDO Status 2 21 15 1 Total Active Power 4 23 17 1/100 Average Frequency 4 27 1B 1/100 Average Current 4 31 1F 1/1000 RYBph Average RMS Voltage 4 35 23 1/100 Total Active Energy 8 39 27 1/1000 Protection Watchdog Scaling factor Status Metering Module 3 Protection Byte 0 1 0 0 1 Protection Byte 1 1 1 1 1 Protection Byte 2 1 2 2 1 Any Major Error 1 3 3 1 Watchdog Total Active Power Scaling Factor 1 4 4 1 Scaling factor FCOMP User Manual REV. B Protections A - 43 Annexure A L&T Electrical & Automation DI status (DI1-DI16) 2 5 5 1 DO Status (DO1-DO16) 2 7 7 1 System PF 2 9 9 1/100 THDI ( System THD ) 2 11 B 1/10 CPU DIDO Settings 2 13 D 1 CPU DIDO Status 2 15 F 1 Total Active Power 4 17 11 1/100 Average Current 4 21 15 1/1000 status Metering Module 4 Protection Byte 0 1 0 0 1 Protections Any Major Error 1 1 1 1 watchdog DI status (DI1-DI16) 2 2 2 1 DO Status (DO1-DO16) 2 4 4 1 THDI ( System THD ) 2 6 6 1/10 CPU DIDO Settings 2 8 8 1 CPU DIDO Status 2 10 A 1 Average Current 4 12 C 1/1000 Status Metering Module 5 CPU DIDO Settings 2 0 0 1 CPU DIDO Status 2 2 2 1 Average Current 4 4 4 1/1000 Status Metering Module 6 CPU DIDO Settings 2 0 0 1 CPU DIDO Status 2 2 2 1 status Module 7 CPU DIDO Status 2 0 0 1 status Output data Parameter A - 44 Value Set the bit in command as 1 FCOMP User Manual REV. B L&T Electrical & Automation Annexure A 0.0 ON 0.1 OFF 0.2 RESET 0.3 Reserved 0.4 Reserved 0.5 Reserved 0.6 Reserved 0.7 Reserved Commands byte FCOMP User Manual REV. B A - 45 Annexure A L&T Electrical & Automation IEC 61850 Logical Nodes Logical Nodes for Metering Table A-6: Logical nodes for Metering A - 46 Logical Node Attribute Name Description METMMTR1 supWh.mag Energy Real (MWh) Supply direction flows toward Bus Bar METMMTR1 supVArh.mag Energy Reactive(Mvarh) Supply direction towards Bus Bar METMMTR1 DmdWh.mag Energy Real(MWh) Demand direction flows away from Bus Bar METMMTR1 DmdVArh.mag Energy Reactive(MVArh) Demand direction away from Bus Bar METMMXU1 TotW.mag Three Phase Real Power P Magnitude METMMXU1 TotVAr.mag Three Phase Reactive Power Q Magnitude METMMXU1 TotVA.mag Three Phase Apparent Power S Magnitude METMMXU1 TotPF.mag Three Phase Power Factor METMMXU1 Hz.mag Measured Frequency METMMXU1 PPV.phsAB.cValmag AB Phase voltage magnitude METMMXU1 PPV.phsAB.cVal.ang AB Phase voltage angle METMMXU1 PPV.phsBC.cValmag BC Phase voltage magnitude METMMXU1 PPV.phsBC.cVal.ang BC Phase voltage angle METMMXU1 PPV.phsCA.cValmag CA Phase voltage magnitude METMMXU1 PPV.phsCA.cVal.ang CA Phase voltage angle METMMXU1 PhV.phsA.cVal.mag A-Phase Voltage Magnitude METMMXU1 PhV.phsA.cVal.ang A-Phase Voltage angle METMMXU1 PhV.phsB.cVal.mag B-Phase Voltage Magnitude METMMXU1 PhV.phsB.cVal.ang B-Phase Voltage angle METMMXU1 PhV.phsC.cVal.mag C-Phase Voltage Magnitude METMMXU1 PhV.phsC.cVal.ang C-Phase Voltage angle METMMXU1 A.phsA.cVal.mag A-Phase Current Magnitude METMMXU1 A.phsA.cVal.ang A-Phase Current angle FCOMP User Manual REV. B L&T Electrical & Automation Annexure A Logical Node Attribute Name Description METMMXU1 A.phsB.cVal.mag B-Phase Current Magnitude METMMXU1 A.phsB.cVal.ang B-Phase Current angle METMMXU1 A.phsC.cVal.mag C-Phase Current Magnitude METMMXU1 A.phsC.cVal.ang C-Phase Current angle METMMXU1 A.neut.cVal.mag Neutral current magnitude METMMXU1 A.neut.cVal.ang Neutral current angle METMMXU1 A.res.cVal.mag Residual current magnitude METMMXU1 A.res.cVal.ang Residual current angle METMMXU1 W.phsA.mag A-Phase real power magnitude METMMXU1 W.phsB.mag B-Phase real power magnitude METMMXU1 W.phsC.mag C-Phase real power magnitude METMMXU1 Var.phsA.mag A-Phase reactive power magnitude METMMXU1 Var.phsB.mag B-Phase reactive power magnitude METMMXU1 Var.phsC.mag C-Phase reactive power magnitude METMMXU1 VA.phsA.mag A-phase apparent power magnitude METMMXU1 VA.phsB.mag B-phase apparent power magnitude METMMXU1 VA.phsC.mag C-phase apparent power magnitude METMMXU1 PF.phsA.mag A-Phase Power Factor METMMXU1 PF.phsB.mag B-Phase Power Factor METMMXU1 PF.phsC.mag C-Phase Power Factor METMSQI1 SeqA.c1.cVal.mag Positive Sequence Current Magnitude METMSQI1 SeqA.c1.cVal.ang Positive Sequence Current Angle METMSQI1 SeqA.c2.cVal.mag Negative Sequence Current Magnitude METMSQI1 SeqA.c2.cVal.ang Negative Sequence Current Angle METMSQI1 SeqA.c3.cVal.mag Zero Sequence Current Magnitude METMSQI1 SeqA.c3.cVal.ang Zero Sequence Current Angle METMSQI1 SeqV.c1.cValmag Positive Sequence Voltage Magnitude METMSQI1 SeqV.c1.cValang Positive Sequence Voltage angle FCOMP User Manual REV. B A - 47 Annexure A A - 48 L&T Electrical & Automation Logical Node Attribute Name Description METMSQI1 SeqV.c2.cValmag Negative Sequence Voltage Magnitude METMSQI1 SeqV.c2.cValang Negative Sequence Voltage angle METMSQI1 SeqV.c3.cValmag Zero Sequence Voltage Magnitude METMSQI1 SeqV.c3.cValang Zero Sequence Voltage angle METMSQI1 MaxImbA.mag Current Imbalance METMSQI1 MaxImbV.mag Voltage Imbalance METMSTA1 AvAmps.mag Average current magnitude METMSTA1 MaxA.phsA.mag A-Phase current maximum magnitude METMSTA1 MaxA.phsB.mag B-Phase current maximum magnitude METMSTA1 MaxA.phsC.mag C-Phase current maximum magnitude METMSTA1 MaxA.neut.mag Neutral current maximum magnitude METMSTA1 MaxA.res.mag Residual current maximum magnitude METMSTA1 MinA.phsA.mag A-Phase current minimum magnitude METMSTA1 MinA.phsB.mag B-Phase current minimum magnitude METMSTA1 MinA.phsC.mag C-Phase current minimum magnitude METMSTA1 MinA.neut.mag Neutral current minimum magnitude METMSTA1 MinA.res.mag Residual current minimum magnitude METMSTA1 AvVolts.mag Average voltage magnitude METMSTA1 Maxphv.phsA.mag A-Phase voltage maximum magnitude METMSTA1 Maxphv.phsB.mag B-Phase voltage maximum magnitude METMSTA1 Maxphv.phsC.mag C-Phase voltage maximum magnitude METMSTA1 Minphv.phsA.mag A-Phase voltage minimum magnitude METMSTA1 Minphv.phsB.mag B-Phase voltage minimum magnitude METMSTA1 Minphv.phsC.mag C-Phase voltage minimum magnitude METMSTA1 MaxVA.mag 3-Phase VA maximum magnitude METMSTA1 MinVA.mag 3-Phase VA minimum magnitude METMSTA1 MaxW.mag 3-Phase W maximum magnitude METMSTA1 MinW.mag 3-Phase W minimum magnitude FCOMP User Manual REV. B L&T Electrical & Automation Annexure A Logical Node Attribute Name Description METMSTA1 MaxVAr.mag 3-Phase Var maximum magnitude METMSTA1 MinVAr.mag 3-Phase Var minimum magnitude METMHAI HA1.phsA.cVal.mag A-Phase Current Harmonics METMHAI HA1.phsB.cVal.mag B-Phase Current Harmonics METMHAI HA1.phsC.cVal.mag C-Phase Current Harmonics METMHAI HA2.phsA.cVal.mag A-Phase Current Harmonics METMHAI HA2.phsB.cVal.mag B-Phase Current Harmonics METMHAI HA2.phsC.cVal.mag C-Phase Current Harmonics METMHAI HA3.phsA.cVal.mag A-Phase Current Harmonics METMHAI HA3.phsB.cVal.mag B-Phase Current Harmonics METMHAI HA3.phsC.cVal.mag C-Phase Current Harmonics METMHAI HA4.phsA.cVal.mag A-Phase Current Harmonics METMHAI HA4.phsB.cVal.mag B-Phase Current Harmonics METMHAI HA4.phsC.cVal.mag C-Phase Current Harmonics METMHAI HA5.phsA.cVal.mag A-Phase Current Harmonics METMHAI HA5.phsB.cVal.mag B-Phase Current Harmonics METMHAI HA5.phsC.cVal.mag C-Phase Current Harmonics METMHAI HA6.phsA.cVal.mag A-Phase Current Harmonics METMHAI HA6.phsB.cVal.mag B-Phase Current Harmonics METMHAI HA6.phsC.cVal.mag C-Phase Current Harmonics METMHAI HA7.phsA.cVal.mag A-Phase Current Harmonics METMHAI HA7.phsB.cVal.mag B-Phase Current Harmonics METMHAI HA7.phsC.cVal.mag C-Phase Current Harmonics METMHAI HA8.phsA.cVal.mag A-Phase Current Harmonics METMHAI HA8.phsB.cVal.mag B-Phase Current Harmonics METMHAI HA8.phsC.cVal.mag C-Phase Current Harmonics METMHAI HA9.phsA.cVal.mag A-Phase Current Harmonics METMHAI HA9.phsB.cVal.mag B-Phase Current Harmonics FCOMP User Manual REV. B A - 49 Annexure A A - 50 L&T Electrical & Automation Logical Node Attribute Name Description METMHAI HA9.phsC.cVal.mag C-Phase Current Harmonics METMHAI HA10.phsA.cVal.mag A-Phase Current Harmonics METMHAI HA10.phsB.cVal.mag B-Phase Current Harmonics METMHAI HA10.phsC.cVal.mag C-Phase Current Harmonics METMHAI HA11.phsA.cVal.mag A-Phase Current Harmonics METMHAI HA11.phsB.cVal.mag B-Phase Current Harmonics METMHAI HA11.phsC.cVal.mag C-Phase Current Harmonics METMHAI HA12.phsA.cVal.mag A-Phase Current Harmonics METMHAI HA12.phsB.cVal.mag B-Phase Current Harmonics METMHAI HA12.phsC.cVal.mag C-Phase Current Harmonics METMHAI HA13.phsA.cVal.mag A-Phase Current Harmonics METMHAI HA13.phsB.cVal.mag B-Phase Current Harmonics METMHAI HA13.phsC.cVal.mag C-Phase Current Harmonics METMHAI HA14.phsA.cVal.mag A-Phase Current Harmonics METMHAI HA14.phsB.cVal.mag B-Phase Current Harmonics METMHAI HA14.phsC.cVal.mag C-Phase Current Harmonics METMHAI HA15.phsA.cVal.mag A-Phase Current Harmonics METMHAI HA15.phsB.cVal.mag B-Phase Current Harmonics METMHAI HA15.phsC.cVal.mag C-Phase Current Harmonics METMHAI HA16.phsA.cVal.mag A-Phase Current Harmonics METMHAI HA16.phsB.cVal.mag B-Phase Current Harmonics METMHAI HA16.phsC.cVal.mag C-Phase Current Harmonics METMHAI HA17.phsA.cVal.mag A-Phase Current Harmonics METMHAI HA17.phsB.cVal.mag B-Phase Current Harmonics METMHAI HA17.phsC.cVal.mag C-Phase Current Harmonics METMHAI HA18.phsA.cVal.mag A-Phase Current Harmonics METMHAI HA18.phsB.cVal.mag B-Phase Current Harmonics METMHAI HA18.phsC.cVal.mag C-Phase Current Harmonics FCOMP User Manual REV. B L&T Electrical & Automation Annexure A Logical Node Attribute Name Description METMHAI HA19.phsA.cVal.mag A-Phase Current Harmonics METMHAI HA19.phsB.cVal.mag B-Phase Current Harmonics METMHAI HA19.phsC.cVal.mag C-Phase Current Harmonics METMHAI HA20.phsA.cVal.mag A-Phase Current Harmonics METMHAI HA20.phsB.cVal.mag B-Phase Current Harmonics METMHAI HA20.phsC.cVal.mag C-Phase Current Harmonics METMHAI HA21.phsA.cVal.mag A-Phase Current Harmonics METMHAI HA21.phsB.cVal.mag B-Phase Current Harmonics METMHAI HA21.phsC.cVal.mag C-Phase Current Harmonics METMHAI HA22.phsA.cVal.mag A-Phase Current Harmonics METMHAI HA22.phsB.cVal.mag B-Phase Current Harmonics METMHAI HA22.phsC.cVal.mag C-Phase Current Harmonics METMHAI HA23.phsA.cVal.mag A-Phase Current Harmonics METMHAI HA23.phsB.cVal.mag B-Phase Current Harmonics METMHAI HA23.phsC.cVal.mag C-Phase Current Harmonics METMHAI HA24.phsA.cVal.mag A-Phase Current Harmonics METMHAI HA24.phsB.cVal.mag B-Phase Current Harmonics METMHAI HA24.phsC.cVal.mag C-Phase Current Harmonics METMHAI HA25.phsA.cVal.mag A-Phase Current Harmonics METMHAI HA25.phsB.cVal.mag B-Phase Current Harmonics METMHAI HA25.phsC.cVal.mag C-Phase Current Harmonics METMHAI HV1.phsA.cVal.mag A-Phase Voltage Harmonics METMHAI HV1.phsB.cVal.mag B-Phase Voltage Harmonics METMHAI HV1.phsC.cVal.mag C-Phase Voltage Harmonics METMHAI HV2.phsA.cVal.mag A-Phase Voltage Harmonics METMHAI HV2.phsB.cVal.mag B-Phase Voltage Harmonics METMHAI HV2.phsC.cVal.mag C-Phase Voltage Harmonics METMHAI HV3.phsA.cVal.mag A-Phase Voltage Harmonics FCOMP User Manual REV. B A - 51 Annexure A A - 52 L&T Electrical & Automation Logical Node Attribute Name Description METMHAI HV3.phsB.cVal.mag B-Phase Voltage Harmonics METMHAI HV3.phsC.cVal.mag C-Phase Voltage Harmonics METMHAI HV4.phsA.cVal.mag A-Phase Voltage Harmonics METMHAI HV4.phsB.cVal.mag B-Phase Voltage Harmonics METMHAI HV4.phsC.cVal.mag C-Phase Voltage Harmonics METMHAI HV5.phsA.cVal.mag A-Phase Voltage Harmonics METMHAI HV5.phsB.cVal.mag B-Phase Voltage Harmonics METMHAI HV5.phsC.cVal.mag C-Phase Voltage Harmonics METMHAI HV6.phsA.cVal.mag A-Phase Voltage Harmonics METMHAI HV6.phsB.cVal.mag B-Phase Voltage Harmonics METMHAI HV6.phsC.cVal.mag C-Phase Voltage Harmonics METMHAI HV7.phsA.cVal.mag A-Phase Voltage Harmonics METMHAI HV7.phsB.cVal.mag B-Phase Voltage Harmonics METMHAI HV7.phsC.cVal.mag C-Phase Voltage Harmonics METMHAI HV8.phsA.cVal.mag A-Phase Voltage Harmonics METMHAI HV8.phsB.cVal.mag B-Phase Voltage Harmonics METMHAI HV8.phsC.cVal.mag C-Phase Voltage Harmonics METMHAI HV9.phsA.cVal.mag A-Phase Voltage Harmonics METMHAI HV9.phsB.cVal.mag B-Phase Voltage Harmonics METMHAI HV9.phsC.cVal.mag C-Phase Voltage Harmonics METMHAI HV10.phsA.cVal.mag A-Phase Voltage Harmonics METMHAI HV10.phsB.cVal.mag B-Phase Voltage Harmonics METMHAI HV10.phsC.cVal.mag C-Phase Voltage Harmonics METMHAI HV11.phsA.cVal.mag A-Phase Voltage Harmonics METMHAI HV11.phsB.cVal.mag B-Phase Voltage Harmonics METMHAI HV11.phsC.cVal.mag C-Phase Voltage Harmonics METMHAI HV12.phsA.cVal.mag A-Phase Voltage Harmonics METMHAI HV12.phsB.cVal.mag B-Phase Voltage Harmonics FCOMP User Manual REV. B L&T Electrical & Automation Annexure A Logical Node Attribute Name Description METMHAI HV12.phsC.cVal.mag C-Phase Voltage Harmonics METMHAI HV13.phsA.cVal.mag A-Phase Voltage Harmonics METMHAI HV13.phsB.cVal.mag B-Phase Voltage Harmonics METMHAI HV13.phsC.cVal.mag C-Phase Voltage Harmonics METMHAI HV14.phsA.cVal.mag A-Phase Voltage Harmonics METMHAI HV14.phsB.cVal.mag B-Phase Voltage Harmonics METMHAI HV14.phsC.cVal.mag C-Phase Voltage Harmonics METMHAI HV15.phsA.cVal.mag A-Phase Voltage Harmonics METMHAI HV15.phsB.cVal.mag B-Phase Voltage Harmonics METMHAI HV15.phsC.cVal.mag C-Phase Voltage Harmonics METMHAI HV16.phsA.cVal.mag A-Phase Voltage Harmonics METMHAI HV16.phsB.cVal.mag B-Phase Voltage Harmonics METMHAI HV16.phsC.cVal.mag C-Phase Voltage Harmonics METMHAI HV17.phsA.cVal.mag A-Phase Voltage Harmonics METMHAI HV17.phsB.cVal.mag B-Phase Voltage Harmonics METMHAI HV17.phsC.cVal.mag C-Phase Voltage Harmonics METMHAI HV18.phsA.cVal.mag A-Phase Voltage Harmonics METMHAI HV18.phsB.cVal.mag B-Phase Voltage Harmonics METMHAI HV18.phsC.cVal.mag C-Phase Voltage Harmonics METMHAI HV19.phsA.cVal.mag A-Phase Voltage Harmonics METMHAI HV19.phsB.cVal.mag B-Phase Voltage Harmonics METMHAI HV19.phsC.cVal.mag C-Phase Voltage Harmonics METMHAI HV20.phsA.cVal.mag A-Phase Voltage Harmonics METMHAI HV20.phsB.cVal.mag B-Phase Voltage Harmonics METMHAI HV20.phsC.cVal.mag C-Phase Voltage Harmonics METMHAI HV21.phsA.cVal.mag A-Phase Voltage Harmonics METMHAI HV21.phsB.cVal.mag B-Phase Voltage Harmonics METMHAI HV21.phsC.cVal.mag C-Phase Voltage Harmonics FCOMP User Manual REV. B A - 53 Annexure A L&T Electrical & Automation Logical Node Attribute Name Description METMHAI HV22.phsA.cVal.mag A-Phase Voltage Harmonics METMHAI HV22.phsB.cVal.mag B-Phase Voltage Harmonics METMHAI HV22.phsC.cVal.mag C-Phase Voltage Harmonics METMHAI HV23.phsA.cVal.mag A-Phase Voltage Harmonics METMHAI HV23.phsB.cVal.mag B-Phase Voltage Harmonics METMHAI HV23.phsC.cVal.mag C-Phase Voltage Harmonics METMHAI HV24.phsA.cVal.mag A-Phase Voltage Harmonics METMHAI HV24.phsB.cVal.mag B-Phase Voltage Harmonics METMHAI HV24.phsC.cVal.mag C-Phase Voltage Harmonics METMHAI HV25.phsA.cVal.mag A-Phase Voltage Harmonics METMHAI HV25.phsB.cVal.mag B-Phase Voltage Harmonics METMHAI HV25.phsC.cVal.mag C-Phase Voltage Harmonics Logical Nodes For Protections Table A-7: Logical nodes for Protection A - 54 Logical Node Attribute Name Description PPIOC1 Str.general (50P1P) IOC Phase Stage1 Alarm PPIOC1 Op.general (50P1T) IOC Phase Stage1 Trip PPIOC2 Str.general (50P2P) IOC Phase Stage2 Alarm PPIOC2 Op.general (50P2T) IOC Phase Stage2 Trip PPIOC3 Str.general (50P3P) IOC Phase Stage3 Alarm PPIOC3 Op.general (50P3T) IOC Phase Stage3 Trip PPIOC4 Str.general (50P4P) IOC Phase Stage4 Alarm PPIOC4 Op.general (50P4T) IOC Phase Stage4 Trip NPIOC1 Str.general (50N1P) IOC Stage1 N Phase Alarm NPIOC1 Op.general (50N1T) IOC Stage1 N Phase Trip NPIOC2 Str.general (50N2P) IOC Stage2 N Phase Alarm NPIOC2 Op.general (50N2T) IOC Stage2 N Phase Trip FCOMP User Manual REV. B L&T Electrical & Automation Annexure A Logical Node Attribute Name Description NPIOC3 Str.general (50N3P) IOC Stage3 N Phase Alarm NPIOC3 Op.general (50N3T) IOC Stage3 N Phase Trip NPIOC4 Str.general (50N4P) IOC Stage4 N Phase Alarm NPIOC4 Op.general (50N4T) IOC Stage4 N Phase Trip GPIOC1 Str.general (50G1P) IOC Stage1 G Phase Alarm GPIOC1 Op.general (50G1T) IOC Stage1 G Phase Trip GPIOC2 Str.general (50G2P) IOC Stage2 G Phase Alarm GPIOC2 Op.general (50G2T) IOC Stage2 G Phase Trip GPIOC3 Str.general (50G3P) IOC Stage3 G Phase Alarm GPIOC3 Op.general (50G3T) IOC Stage3 G Phase Trip GPIOC4 Str.general (50G4P) IOC Stage4 G Phase Alarm GPIOC4 Op.general (50G4T) IOC Stage4 G Phase Trip QPIOC1 Str.general (50Q1P) IOC Stage1 NegSeq Phase Alarm QPIOC1 Op.general (50Q1T) IOC Stage1 NegSeq Phase Trip QPIOC2 Str.general (50Q2P) IOC Stage2 NegSeq Phase Alarm QPIOC2 Op.general (50Q2T) IOC Stage2 NegSeq Phase Trip QPIOC3 Str.general (50Q3P) IOC Stage3 NegSeq Phase Alarm QPIOC3 Op.general (50Q3T) IOC Stage3 NegSeq Phase Trip QPIOC4 Str.general (50Q4P) IOC Stage4 NegSeq Phase Alarm QPIOC4 Op.general (50Q4T) IOC Stage4 NegSeq Phase Trip SPIOC1 Str.general (50S1P) IOC Stage1 Sensitive Ground Alarm SPIOC1 Op.general (50S1T) IOC Stage1 Sensitive Ground Trip SPIOC2 Str.general (50S2P) IOC Stage2 Sensitive Ground Alarm SPIOC2 Op.general (50S2T) IOC Stage2 Sensitive Ground Trip SPIOC3 Str.general (50S3P) IOC Stage3 Sensitive Ground Alarm SPIOC3 Op.general (50S3T) IOC Stage3 Sensitive Ground Trip SPIOC4 Str.general (50S4P) IOC Stage4 Sensitive Ground Alarm SPIOC4 Op.general (50S4T) IOC Stage4 Sensitive Ground Trip FCOMP User Manual REV. B A - 55 Annexure A A - 56 L&T Electrical & Automation Logical Node Attribute Name Description PPTOC1 Str.general (51P1P) TOC Stage1 Alarm PPTOC1 Op.general (51P1T) TOC Stage1 Trip PPTOC2 Str.general (51P2P) TOC Stage2 Alarm PPTOC2 Op.general (51P2T) TOC Stage2 Trip PPTOC3 Str.general (51P3P) TOC Stage3 Alarm PPTOC3 Op.general (51P3T) TOC Stage3 Trip PPTOC4 Str.general (51P4P) TOC Stage4 Alarm PPTOC4 Op.general (51P4T) TOC Stage4 Trip GPTOC1 Str.general (51G1P) TOC Stage1 G Phase Alarm GPTOC1 Op.general (51G1T) TOC Stage1 G Phase Trip GPTOC2 Str.general (51G2P) TOC Stage2 G Phase Alarm GPTOC2 Op.general (51G2T) TOC Stage2 G Phase Trip GPTOC3 Str.general (51G3P) TOC Stage3 G Phase Alarm GPTOC3 Op.general (51G3T) TOC Stage3 G Phase Trip GPTOC4 Str.general (51G4P) TOC Stage4 G Phase Alarm GPTOC4 Op.general (51G4T) TOC Stage4 G Phase Trip NPTOC1 Str.general (51N1P) TOC Stage1 N Phase Alarm NPTOC1 Op.general (51N1T) TOC Stage1 N Phase Trip NPTOC2 Str.general (51N2P) TOC Stage2 N Phase Alarm NPTOC2 Op.general (51N2T) TOC Stage2 N Phase Trip NPTOC3 Str.general (51N3P) TOC Stage3 N Phase Alarm NPTOC3 Op.general (51N3T) TOC Stage3 N Phase Trip NPTOC4 Str.general (51N4P) TOC Stage4 N Phase Alarm NPTOC4 Op.general (51N4T) TOC Stage4 N Phase Trip QPTOC1 Str.general (51Q1P) TOC Stage1 NegSeq Phase Alarm QPTOC1 Op.general (51Q1T) TOC Stage1 NegSeq Phase Trip QPTOC2 Str.general (51Q2P) TOC Stage2 NegSeq Phase Alarm QPTOC2 Op.general (51Q2T) TOC Stage2 NegSeq Phase Trip FCOMP User Manual REV. B L&T Electrical & Automation Annexure A Logical Node Attribute Name Description QPTOC3 Str.general (51Q3P) TOC Stage3 NegSeq Phase Alarm QPTOC3 Op.general (51Q3T) TOC Stage3 NegSeq Phase Trip QPTOC4 Str.general (51Q4P) TOC Stage4 NegSeq Phase Alarm QPTOC4 Op.general (51Q4T) TOC Stage4 NegSeq Phase Trip SPTOC1 Str.general (51S1P) TOC Stage1 Sensitive Ground Alarm SPTOC1 Op.general (51S1T) TOC Stage1 Sensitive Ground Trip SPTOC2 Str.general (51S2P) TOC Stage2 Sensitive Ground Alarm SPTOC2 Op.general (51S2T) TOC Stage2 Sensitive Ground Trip SPTOC3 Str.general (51S3P) TOC Stage3 Sensitive Ground Alarm SPTOC3 Op.general (51S3T) TOC Stage3 Sensitive Ground Trip SPTOC4 Str.general (51S4P) TOC Stage4 Sensitive Ground Alarm SPTOC4 Op.general (51S4T) TOC Stage4 Sensitive Ground Trip PPTUV Str.general (27P) Under Current Stage1 Phase Alarm PPTUV Op.general (27T) Under Current Stage1 Phase Trip NPTUV Str.general (27P) Under current Stage1 N Phase Alarm NPTUV Op.general (27T) Under current Stage1 N Phase Trip PDIF Str.general (87P) REF Alarm PDIF Op.general (87T) REF Trip PTTR Str.general (49P) Thermal Overload Phase Alarm PTTR Op.general (49T) Thermal Overload Phase Trip PTUV1 Str.general (27P1P) Under Voltagr Stage 1 phase Alarm PTUV1 Op.general (27P1T) Under Voltagr Stage 1 phase Trip PTUV2 Str.general (27P2P) Under Voltagr Stage 2 phase Alarm PTUV2 Op.general (27P2T) Under Voltagr Stage 2 phase Trip PTUV3 Str.general (27P3P) Under Voltagr Stage 3 phase Alarm PTUV3 Op.general (27P3T) Under Voltagr Stage 3 phase Trip PTOV1 Str.general (59P1P) Over Voltage Stage 1 phase Alarm PTOV1 Op.general (59P1T) Over Voltage Stage 1 phase Trip FCOMP User Manual REV. B A - 57 Annexure A A - 58 L&T Electrical & Automation Logical Node Attribute Name Description PTOV2 Str.general (59P2P) Over Voltage Stage 2 phase Alarm PTOV2 Op.general (59P2T) Over Voltage Stage 2 phase Trip PTOV3 Str.general (59P3P) Over Voltage Stage 3 phase Alarm PTOV3 Op.general (59P3T) Over Voltage Stage 3 phase Trip RPTOV1 Str.general (59N1P) Res Over Voltage Stage 1 Alarm RPTOV1 Op.general (59N1T) Res Over Voltage Stage 1 Trip RPTOV2 Str.general (59N2P) Res Over Voltage Stage 2 Alarm RPTOV2 Op.general (59N2T) Res Over Voltage Stage 2 Trip RPTOV3 Str.general (59N3P) Res Over Voltage Stage 3 Alarm RPTOV3 Op.general (59N3T) Res Over Voltage Stage 3 Trip PQPTOV1 Str.general (59Q1P) POS SEQ Over Voltage Stage1 Alarm PQPTOV1 Op.general (59Q1T) POS SEQ Over Voltage Stage1 Trip PQPTOV2 Str.general (59Q2P) POS SEQ Over Voltage Stage2 Alarm PQPTOV2 Op.general (59Q2T) POS SEQ Over Voltage Stage2 Trip PQPTOV3 Str.general (59Q3P) POS SEQ Over Voltage Stage3 Alarm PQPTOV3 Op.general (59Q3T) POS SEQ Over Voltage Stage3 Trip NQPTOV1 Str.general (59N1P) NEG SEQ Over Voltage Stage1 Alarm NQPTOV1 Op.general (59N1T) NEG SEQ Over Voltage Stage1 Trip NQPTOV2 Str.general (59N2P) NEG SEQ Over Voltage Stage2 Alarm NQPTOV2 Op.general (59N2T) NEG SEQ Over Voltage Stage2 Trip NQPTOV3 Str.general (59N3P) NEG SEQ Over Voltage Stage3 Alarm NQPTOV3 Op.general (59N3T) NEG SEQ Over Voltage Stage3 Trip PQPTUV1 Str.general (27Q1P) POS SEQ Under Voltage Stage1 Alarm PQPTUV1 Op.general (27Q1T) POS SEQ Under Voltage Stage1 Trip PQPTUV2 Str.general (27Q2P) POS SEQ Under Voltage Stage2 Alarm PQPTUV2 Op.general (27Q2T) POS SEQ Under Voltage Stage2 Trip PQPTUV3 Str.general (27Q3P) POS SEQ Under Voltage Stage3 Alarm PQPTUV3 Op.general (27Q3T) POS SEQ Under Voltage Stage3 Trip FCOMP User Manual REV. B L&T Electrical & Automation Annexure A Logical Node Attribute Name Description AUXPTUV Str.general (27AP) AUX Under Voltage Alarm AUXPTUV Op.general (27AT) AUX Under Voltage Trip AUXPTOV Str.general (27AP) AUX Over Voltage Alarm AUXPTOV Op.general (27AT) AUX Over Voltage Trip PTUF1 Str.general (81U1P) Under frequency Stage1 phase Alarm PTUF1 Str.general (81U1P) Under frequency Stage1 phase Trip PTUF2 Str.general (81U2P) Under frequency Stage2 phase Alarm PTUF2 Op.general (81D2T) Under frequency Stage2 phase Trip PTUF3 Str.general (81U3P) Under frequency Stage3 phase Alarm PTUF3 Op.general (81U3T) Under frequency Stage3 phase Trip PTUF4 Str.general (81U4P) Under frequency Stage4 phase Alarm PTUF4 Op.general (81U4T) Under frequency Stage4 phase Trip PTUF5 Str.general (81U5P) Under frequency Stage5 phase Alarm PTUF5 Op.general (81U5T) Under frequency Stage5 phase Trip PTUF6 Str.general (81U6P) Under frequency Stage6 phase Alarm PTUF6 Op.general (81U6T) Under frequency Stage6 phase Trip PTOF1 Str.general (81O1P) Over frequency Stage1 phase Alarm PTOF1 Op.general (81O1T) Over frequency Stage1 phase Trip PTOF2 Str.general (81O2P) Over frequency Stage2 phase Alarm PTOF2 Op.general (81D2T) Over frequency Stage2 phase Trip PTOF3 Str.general (81O3P) Over frequency Stage3 phase Alarm PTOF3 Op.general (81O3T) Over frequency Stage3 phase Trip PTOF4 Str.general (81O4P) Over frequency Stage4 phase Alarm PTOF4 Op.general (81O4T) Over frequency Stage4 phase Trip PTOF5 Str.general (81O5P) Over frequency Stage5 phase Alarm PTOF5 Op.general (81O5T) Over frequency Stage5 phase Trip PTOF6 Str.general (81O6P) Over frequency Stage6 phase Alarm PTOF6 Op.general (81O6T) Over frequency Stage6 phase Trip FCOMP User Manual REV. B A - 59 Annexure A A - 60 L&T Electrical & Automation Logical Node Attribute Name Description DPIOC1 Str.general (67D1P) Directional Phase IOC Stage 1 Alarm DPIOC1 Op.general (67D1T) Directional Phase IOC Stage 1 Trip DPIOC2 Str.general (67D2P) Directional Phase IOC Stage 2 Alarm DPIOC2 Op.general (67D2T) Directional Phase IOC Stage 2 Trip DPTOC1 Str.general (67D1P) Directional Phase TOC Stage 1 Alarm DPTOC1 Op.general (67D1T) Directional Phase TOC Stage 1 Trip DPTOC2 Str.general (67D2P) Directional Phase TOC Stage 2 Alarm DPTOC2 Op.general (67D2T) Directional Phase TOC Stage 2 Trip DNPIOC1 Str.general (67DN1P) Directional Phase IOC Stage 1 Alarm DNPIOC1 Op.general (67DN1T) Directional Phase IOC Stage 1 Trip DNPIOC2 Str.general (67DN2P) Directional Phase IOC Stage 2 Alarm DNPIOC2 Op.general (67DN2T) Directional Phase IOC Stage 2 Trip DNPTOC1 Str.general (67DNT1P) Directional Phase TOC Stage 1 Alarm DNPTOC1 Op.general (67DNT1T) Directional Phase TOC Stage 1 Trip DNPTOC2 Str.general (67DNT2P) Directional Phase IOC Stage 2 Alarm DNPTOC2 Op.general (67DNT2T) Directional Phase IOC Stage 2 Trip DGPIOC1 Str.general (67DG1P) Directional Phase IOC Stage 1 Alarm DGPIOC1 Op.general (67DG1T) Directional Phase IOC Stage 1 Trip DGPIOC2 Str.general (67DG2P) Directional Phase IOC Stage 2 Alarm DGPIOC2 Op.general (67DG2T) Directional Phase IOC Stage 2 Trip DGPTOC1 Str.general (67DGT1P) Directional Phase TOC Stage 1 Alarm DGPTOC1 Op.general (67DGT1T) Directional Phase TOC Stage 1 Trip DGPTOC2 Str.general (67DGT2P) Directional Phase TOC Stage 2 Alarm DGPTOC2 Str.general (67DGT2P) Directional Phase TOC Stage 2 Trip PDOP1 Str.general (37P1P) Over Power Stage1 Phase Alarm PDOP1 Str.general (37P1P) Over Power Stage1 Phase Trip PDOP2 Str.general (37P2P) Over Power Stage2 Phase Alarm PDOP2 Op.general (37P2T) Over Power Stage2 Phase Trip FCOMP User Manual REV. B L&T Electrical & Automation Annexure A Logical Node Attribute Name Description PDOP3 Str.general (37P3P) Over Power Stage3 Phase Alarm PDOP3 Op.general (37P3T) Over Power Stage3 Phase Trip PDOP4 Str.general (37P4P) Over Power Stage4 Phase Alarm PDOP4 Op.general (37P4T) Over Power Stage4 Phase Trip RPODP Str.general (37PRP) Rev Power Stage1 Phase Alarm RPODP Op.general (37PRT) Rev Power Stage1 Phase Trip POPF Str.general (55OP) Lead Power Factor Stage1 Phase Alarm POPF Op.general (55OT) Lead Power Factor Stage1 Phase Trip PUPF Str.general (55UP) Lag Power Factor Stage1 Phase Alarm PUPF Op.general (55UT) Lag Power Factor Stage1 Phase Trip RREC Str.general (RRECP) AR reclose Alarm RREC Op.general (RRECT) AR reclose Trip RBRF Str.general (RBF) Breaker Failure Re-trip Ground Alarm RSYN Str.general (RYN) Sync Stage 1 Alarm Logical Nodes For Control Table A-8: Logical nodes for Control Logical Node Attribute Name Description RBGGIO1 SPC01.StVal Remote Input1 RBGGIO1 SPC02.StVal Remote Input2 RBGGIO1 SPC03.StVal Remote Input3 RBGGIO1 SPC04.StVal Remote Input4 RBGGIO1 SPC05.StVal Remote Input5 RBGGIO1 SPC06.StVal Remote Input6 RBGGIO1 SPC07.StVal Remote Input7 RBGGIO1 SPC08.StVal Remote Input8 RBGGIO1 SPC01.ctlVal Remote Output1 FCOMP User Manual REV. B A - 61 Annexure A A - 62 L&T Electrical & Automation Logical Node Attribute Name Description RBGGIO1 SPC02.ctlVal Remote Output2 RBGGIO1 SPC03.ctlVal Remote Output3 RBGGIO1 SPC04.ctlVal Remote Output4 RBGGIO1 SPC05.ctlVal Remote Output5 RBGGIO1 SPC06.ctlVal Remote Output6 RBGGIO1 SPC07.ctlVal Remote Output7 RBGGIO1 SPC08.ctlVal Remote Output8 RBGGIO2 SPC01.StVal Remote Input9 RBGGIO2 SPC02.StVal Remote Input10 RBGGIO2 SPC03.StVal Remote Input11 RBGGIO2 SPC04.StVal Remote Input12 RBGGIO2 SPC05.StVal Remote Input13 RBGGIO2 SPC06.StVal Remote Input14 RBGGIO2 SPC07.StVal Remote Input15 RBGGIO2 SPC08.StVal Remote Input16 RBGGIO2 SPC01.ctlVal Remote Output9 RBGGIO2 SPC02.ctlVal Remote Output10 RBGGIO2 SPC03.ctlVal Remote Output11 RBGGIO2 SPC04.ctlVal Remote Output12 RBGGIO2 SPC05.ctlVal Remote Output13 RBGGIO2 SPC06.ctlVal Remote Output14 RBGGIO2 SPC07.ctlVal Remote Output15 RBGGIO2 SPC08.ctlVal Remote Output16 RBGGIO3 SPC01.StVal Remote Input17 RBGGIO3 SPC02.StVal Remote Input18 RBGGIO3 SPC03.StVal Remote Input19 RBGGIO3 SPC04.StVal Remote Input20 RBGGIO3 SPC05.StVal Remote Input21 FCOMP User Manual REV. B L&T Electrical & Automation Annexure A Logical Node Attribute Name Description RBGGIO3 SPC06.StVal Remote Input22 RBGGIO3 SPC07.StVal Remote Input23 RBGGIO3 SPC08.StVal Remote Input24 RBGGIO3 SPC01.ctlVal Remote Output17 RBGGIO3 SPC02.ctlVal Remote Output18 RBGGIO3 SPC03.ctlVal Remote Output19 RBGGIO3 SPC04.ctlVal Remote Output20 RBGGIO3 SPC05.ctlVal Remote Output21 RBGGIO3 SPC06.ctlVal Remote Output22 RBGGIO3 SPC07.ctlVal Remote Output23 RBGGIO3 SPC08.ctlVal Remote Output24 RBGGIO4 SPC01.StVal Remote Input25 RBGGIO4 SPC02.StVal Remote Input26 RBGGIO4 SPC03.StVal Remote Input27 RBGGIO4 SPC04.StVal Remote Input28 RBGGIO4 SPC05.StVal Remote Input29 RBGGIO4 SPC06.StVal Remote Input30 RBGGIO4 SPC07.StVal Remote Input31 RBGGIO4 SPC08.StVal Remote Input32 RBGGIO4 SPC01.ctlVal Remote Output25 RBGGIO4 SPC02.ctlVal Remote Output26 RBGGIO4 SPC03.ctlVal Remote Output27 RBGGIO4 SPC04.ctlVal Remote Output28 RBGGIO4 SPC05.ctlVal Remote Output29 RBGGIO4 SPC06.ctlVal Remote Output30 RBGGIO4 SPC07.ctlVal Remote Output31 RBGGIO4 SPC08.ctlVal Remote Output32 FCOMP User Manual REV. B A - 63 Annexure A L&T Electrical & Automation Logical Nodes For Annunciation Table A-9: Logical nodes for Annunciation A - 64 Logical Node Attribute Name Description INAGGIO1 Ind01 Contact Input1 INAGGIO1 Ind02 Contact Input2 INAGGIO1 Ind03 Contact Input3 INAGGIO1 Ind04 Contact Input4 INAGGIO1 Ind05 Contact Input5 INAGGIO1 Ind06 Contact Input6 INAGGIO1 Ind07 Contact Input7 INAGGIO1 Ind08 Contact Input8 INAGGIO1 Ind09 Contact Input9 INAGGIO1 Ind10 Contact Input10 INAGGIO1 Ind11 Contact Input11 INAGGIO1 Ind12 Contact Input12 INAGGIO1 Ind13 Contact Input13 INAGGIO1 Ind14 Contact Input14 INAGGIO1 Ind15 Contact Input15 INAGGIO1 Ind16 Contact Input16 INAGGIO1 Ind17 Contact Input17 INAGGIO1 Ind18 Contact Input18 INAGGIO1 Ind19 Contact Input19 INAGGIO1 Ind20 Contact Input20 INAGGIO1 Ind21 Contact Input21 INAGGIO1 Ind22 Contact Input22 INAGGIO1 Ind23 Contact Input23 INAGGIO1 Ind24 Contact Input24 INAGGIO1 Ind25 Contact Input25 INAGGIO1 Ind26 Contact Input26 FCOMP User Manual REV. B L&T Electrical & Automation Annexure A Logical Node Attribute Name Description INAGGIO1 Ind27 Contact Input27 OUTAGGIO2 Ind01 Contact Output1 OUTAGGIO2 Ind02 Contact Output2 OUTAGGIO2 Ind03 Contact Output3 OUTAGGIO2 Ind04 Contact Output4 OUTAGGIO2 Ind05 Contact Output5 OUTAGGIO2 Ind06 Contact Output6 OUTAGGIO2 Ind07 Contact Output7 OUTAGGIO2 Ind08 Contact Output8 OUTAGGIO2 Ind09 Contact Output9 OUTAGGIO2 Ind10 Contact Output10 OUTAGGIO2 Ind11 Contact Output11 OUTAGGIO2 Ind12 Contact Output12 OUTAGGIO2 Ind13 Contact Output13 OUTAGGIO2 Ind14 Contact Output14 OUTAGGIO2 Ind15 Contact Output15 OUTAGGIO2 Ind16 Contact Output16 OUTAGGIO2 Ind17 Contact Output17 OUTAGGIO2 Ind18 Contact Output18 OUTAGGIO2 Ind19 Contact Output19 OUTAGGIO2 Ind20 Contact Output20 OUTAGGIO2 Ind21 Contact Output21 VTGGIO1 Ind01 Timer1 VTGGIO1 Ind02 Timer2 VTGGIO1 Ind03 Timer3 VTGGIO1 Ind04 Timer4 VTGGIO1 Ind05 Timer5 VTGGIO1 Ind06 Timer6 FCOMP User Manual REV. B A - 65 Annexure A A - 66 L&T Electrical & Automation Logical Node Attribute Name Description VTGGIO1 Ind07 Timer7 VTGGIO1 Ind08 Timer8 VTGGIO1 Ind09 Timer9 VTGGIO1 Ind10 Timer10 VTGGIO1 Ind11 Timer11 VTGGIO1 Ind12 Timer12 VTGGIO1 Ind13 Timer13 VTGGIO1 Ind14 Timer14 VTGGIO1 Ind15 Timer15 VTGGIO1 Ind16 Timer16 VTGGIO1 Ind17 Timer17 VTGGIO1 Ind18 Timer18 VTGGIO1 Ind19 Timer19 VTGGIO1 Ind20 Timer20 VTGGIO1 Ind21 Timer21 VTGGIO1 Ind22 Timer22 VTGGIO1 Ind23 Timer23 VTGGIO1 Ind24 Timer24 VTGGIO1 Ind25 Timer25 VTGGIO1 Ind26 Timer26 VTGGIO1 Ind27 Timer27 VTGGIO1 Ind28 Timer28 VTGGIO1 Ind29 Timer29 VTGGIO1 Ind30 Timer30 VTGGIO1 Ind31 Timer31 VTGGIO1 Ind32 Timer32 LBGGIO1 Ind01 Operate Latch1 LBGGIO1 Ind02 Operate Latch2 FCOMP User Manual REV. B L&T Electrical & Automation Annexure A Logical Node Attribute Name Description LBGGIO1 Ind03 Operate Latch3 LBGGIO1 Ind04 Operate Latch4 LBGGIO1 Ind05 Operate Latch5 LBGGIO1 Ind06 Operate Latch6 LBGGIO1 Ind07 Operate Latch7 LBGGIO1 Ind08 Operate Latch8 LBGGIO1 Ind09 Operate Latch9 LBGGIO1 Ind10 Operate Latch10 LBGGIO1 Ind11 Operate Latch11 LBGGIO1 Ind12 Operate Latch12 LBGGIO1 Ind13 Operate Latch13 LBGGIO1 Ind14 Operate Latch14 LBGGIO1 Ind15 Operate Latch15 LBGGIO1 Ind16 Operate Latch16 LBGGIO1 Ind17 Operate Latch17 LBGGIO1 Ind18 Operate Latch18 LBGGIO1 Ind19 Operate Latch19 LBGGIO1 Ind20 Operate Latch20 LBGGIO1 Ind21 Operate Latch21 LBGGIO1 Ind22 Operate Latch22 LBGGIO1 Ind23 Operate Latch23 LBGGIO1 Ind24 Operate Latch24 LBGGIO1 Ind25 Operate Latch25 LBGGIO1 Ind26 Operate Latch26 LBGGIO1 Ind27 Operate Latch27 LBGGIO1 Ind28 Operate Latch28 LBGGIO1 Ind29 Operate Latch29 LBGGIO1 Ind30 Operate Latch30 FCOMP User Manual REV. B A - 67 Annexure A A - 68 L&T Electrical & Automation Logical Node Attribute Name Description LBGGIO1 Ind31 Operate Latch31 LBGGIO1 Ind32 Operate Latch32 TLEDGGIO1 Ind01 LED1 TLEDGGIO1 Ind02 LED2 TLEDGGIO1 Ind03 LED3 TLEDGGIO1 Ind04 LED4 TLEDGGIO1 Ind05 LED5 TLEDGGIO1 Ind06 LED6 TLEDGGIO1 Ind07 LED7 TLEDGGIO1 Ind08 LED8 TLEDGGIO1 Ind09 LED9 TLEDGGIO1 Ind10 LED10 TLEDGGIO1 Ind11 LED11 TLEDGGIO1 Ind12 LED12 TLEDGGIO1 Ind13 LED13 TLEDGGIO1 Ind14 LED14 TLEDGGIO1 Ind15 LED15 TLEDGGIO1 Ind16 LED16 TLEDGGIO1 Ind17 LED17 TLEDGGIO1 Ind18 LED18 PBLEDGGIO1 Ind01 LED1 PBLEDGGIO1 Ind02 LED2 PBLEDGGIO1 Ind03 LED3 PBLEDGGIO1 Ind04 LED4 PBLEDGGIO1 Ind05 LED5 PBLEDGGIO1 Ind06 LED6 VBGGIO1 Ind01 Virtual Bit1 VBGGIO1 Ind02 Virtual Bit2 FCOMP User Manual REV. B L&T Electrical & Automation Annexure A Logical Node Attribute Name Description VBGGIO1 Ind03 Virtual Bit3 VBGGIO1 Ind04 Virtual Bit4 VBGGIO1 Ind05 Virtual Bit5 VBGGIO1 Ind06 Virtual Bit6 VBGGIO1 Ind07 Virtual Bit7 VBGGIO1 Ind08 Virtual Bit8 VBGGIO1 Ind09 Virtual Bit9 VBGGIO1 Ind10 Virtual Bit10 VBGGIO1 Ind11 Virtual Bit11 VBGGIO1 Ind12 Virtual Bit12 VBGGIO1 Ind13 Virtual Bit13 VBGGIO1 Ind14 Virtual Bit14 VBGGIO1 Ind15 Virtual Bit15 VBGGIO1 Ind16 Virtual Bit16 VBGGIO1 Ind17 Virtual Bit17 VBGGIO1 Ind18 Virtual Bit18 VBGGIO1 Ind19 Virtual Bit19 VBGGIO1 Ind20 Virtual Bit20 VBGGIO1 Ind21 Virtual Bit21 VBGGIO1 Ind22 Virtual Bit22 VBGGIO1 Ind23 Virtual Bit23 VBGGIO1 Ind24 Virtual Bit24 VBGGIO1 Ind25 Virtual Bit25 VBGGIO1 Ind26 Virtual Bit26 VBGGIO1 Ind27 Virtual Bit27 VBGGIO1 Ind28 Virtual Bit28 VBGGIO1 Ind29 Virtual Bit29 VBGGIO1 Ind30 Virtual Bit30 FCOMP User Manual REV. B A - 69 Annexure A A - 70 L&T Electrical & Automation Logical Node Attribute Name Description VBGGIO1 Ind31 Virtual Bit31 VBGGIO1 Ind32 Virtual Bit32 VBGGIO2 Ind01 Virtual Bit1 VBGGIO2 Ind02 Virtual Bit2 VBGGIO2 Ind03 Virtual Bit3 VBGGIO2 Ind04 Virtual Bit4 VBGGIO2 Ind05 Virtual Bit5 VBGGIO2 Ind06 Virtual Bit6 VBGGIO2 Ind07 Virtual Bit7 VBGGIO2 Ind08 Virtual Bit8 VBGGIO2 Ind09 Virtual Bit9 VBGGIO2 Ind10 Virtual Bit10 VBGGIO2 Ind11 Virtual Bit11 VBGGIO2 Ind12 Virtual Bit12 VBGGIO2 Ind13 Virtual Bit13 VBGGIO2 Ind14 Virtual Bit14 VBGGIO2 Ind15 Virtual Bit15 VBGGIO2 Ind16 Virtual Bit16 VBGGIO2 Ind17 Virtual Bit17 VBGGIO2 Ind18 Virtual Bit18 VBGGIO2 Ind19 Virtual Bit19 VBGGIO2 Ind20 Virtual Bit20 VBGGIO2 Ind21 Virtual Bit21 VBGGIO2 Ind22 Virtual Bit22 VBGGIO2 Ind23 Virtual Bit23 VBGGIO2 Ind24 Virtual Bit24 VBGGIO2 Ind25 Virtual Bit25 VBGGIO2 Ind26 Virtual Bit26 FCOMP User Manual REV. B L&T Electrical & Automation Annexure A Logical Node Attribute Name Description VBGGIO2 Ind27 Virtual Bit27 VBGGIO2 Ind28 Virtual Bit28 VBGGIO2 Ind29 Virtual Bit29 VBGGIO2 Ind30 Virtual Bit30 VBGGIO2 Ind31 Virtual Bit31 VBGGIO2 Ind32 Virtual Bit32 VBGGIO3 Ind01 Virtual Bit1 VBGGIO3 Ind02 Virtual Bit2 VBGGIO3 Ind03 Virtual Bit3 VBGGIO3 Ind04 Virtual Bit4 VBGGIO3 Ind05 Virtual Bit5 VBGGIO3 Ind06 Virtual Bit6 VBGGIO3 Ind07 Virtual Bit7 VBGGIO3 Ind08 Virtual Bit8 VBGGIO3 Ind09 Virtual Bit9 VBGGIO3 Ind10 Virtual Bit10 VBGGIO3 Ind11 Virtual Bit11 VBGGIO3 Ind12 Virtual Bit12 VBGGIO3 Ind13 Virtual Bit13 VBGGIO3 Ind14 Virtual Bit14 VBGGIO3 Ind15 Virtual Bit15 VBGGIO3 Ind16 Virtual Bit16 VBGGIO3 Ind17 Virtual Bit17 VBGGIO3 Ind18 Virtual Bit18 VBGGIO3 Ind19 Virtual Bit19 VBGGIO3 Ind20 Virtual Bit20 VBGGIO3 Ind21 Virtual Bit21 VBGGIO3 Ind22 Virtual Bit22 FCOMP User Manual REV. B A - 71 Annexure A A - 72 L&T Electrical & Automation Logical Node Attribute Name Description VBGGIO3 Ind23 Virtual Bit23 VBGGIO3 Ind24 Virtual Bit24 VBGGIO3 Ind25 Virtual Bit25 VBGGIO3 Ind26 Virtual Bit26 VBGGIO3 Ind27 Virtual Bit27 VBGGIO3 Ind28 Virtual Bit28 VBGGIO3 Ind29 Virtual Bit29 VBGGIO3 Ind30 Virtual Bit30 VBGGIO3 Ind31 Virtual Bit31 VBGGIO3 Ind32 Virtual Bit32 VBGGIO4 Ind01 Virtual Bit1 VBGGIO4 Ind02 Virtual Bit2 VBGGIO4 Ind03 Virtual Bit3 VBGGIO4 Ind04 Virtual Bit4 VBGGIO4 Ind05 Virtual Bit5 VBGGIO4 Ind06 Virtual Bit6 VBGGIO4 Ind07 Virtual Bit7 VBGGIO4 Ind08 Virtual Bit8 VBGGIO4 Ind09 Virtual Bit9 VBGGIO4 Ind10 Virtual Bit10 VBGGIO4 Ind11 Virtual Bit11 VBGGIO4 Ind12 Virtual Bit12 VBGGIO4 Ind13 Virtual Bit13 VBGGIO4 Ind14 Virtual Bit14 VBGGIO4 Ind15 Virtual Bit15 VBGGIO4 Ind16 Virtual Bit16 VBGGIO4 Ind17 Virtual Bit17 VBGGIO4 Ind18 Virtual Bit18 FCOMP User Manual REV. B L&T Electrical & Automation Annexure A Logical Node Attribute Name Description VBGGIO4 Ind19 Virtual Bit19 VBGGIO4 Ind20 Virtual Bit20 VBGGIO4 Ind21 Virtual Bit21 VBGGIO4 Ind22 Virtual Bit22 VBGGIO4 Ind23 Virtual Bit23 VBGGIO4 Ind24 Virtual Bit24 VBGGIO4 Ind25 Virtual Bit25 VBGGIO4 Ind26 Virtual Bit26 VBGGIO4 Ind27 Virtual Bit27 VBGGIO4 Ind28 Virtual Bit28 VBGGIO4 Ind29 Virtual Bit29 VBGGIO4 Ind30 Virtual Bit30 VBGGIO4 Ind31 Virtual Bit31 VBGGIO4 Ind32 Virtual Bit32 FCOMP User Manual REV. B A - 73 L&T Elecctrical & Automation Annexxure B Annexure B CERT TIFICA ATES Profibus P DPV0 PNO Certificate C e FCOMP User Manual REV. B A - 74 Annexure B L&T Electriccal & Automation IEC 61850 CPRI Certificate e A - 75 FCO OMP User Man nual REV. B L&T Elecctrical & Automation FCOMP User Manual REV. B Annexxure B A - 74 India Gate no. 5, TC-II, Level - 7 Saki-Vihar Road, Powai Mumbai 400 072 Tel: +91-22-6705 2813 Fax: +91-22-6705 1024 E-mail: [email protected] Indonesia PT. TAMCO Indonesia F-36, Jalan Jababeka Raya Jababeka Industrial Estate Cikarang Utara, Bekasi, 17530, Indonesia Tel: +62 21 893 5070 Fax: +62 21 893 5071 E-mail: [email protected] www.tamco.co.id Malaysia TAMCO SWITCHGEAR (MALAYSIA) SDN BHD Sub lot 24, Lot 16505, Jalan Keluli 1 PO Box 2100, Bukit Raja Industrial Area, Section 7 40802 ShahAlam, Selangor, Malaysia Tel: +603 3361 8200 Fax: +603 3341 6200 E-mail: [email protected] www.tamco.co.my Larsen & Toubro Limited, Electrical Systems & Equipment - Head Office Gate no. 5, TC-II, Level - 7, Saki-Vihar Road, Powai, Mumbai 400 072, INDIA Tel: +91-22-6705 2813, Fax: +91-22-6705 1024 E-mail: [email protected]; Web: www.Lntebg.com 8