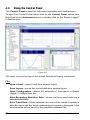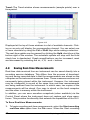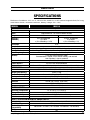
1
AC CURRENT • AC/DC VOLTAGE AC VOLTAGE Simple Logger ® II Data Loggers (Bluetooth Edition) ENGLISH User Manual Statement of Compliance Chauvin Arnoux®, Inc. d.b.a. AEMC® Instruments certifies that this instrument has been calibrated using standards and instruments traceable to international standards. We guarantee that at the time of shipping your instrument has met its published specifications. An NIST traceable certificate may be requested at the time of purchase, or obtained by returning the instrument to our repair and calibration facility, for a nominal charge. The recommended calibration interval for this instrument is 12 months and begins on the date of receipt by the customer. For recalibration, please use our calibration services. Refer to our repair and calibration section at www.aemc.com. Serial #: _________________________________ Catalog #:________________________________ Model #:_________________________________ Please fill in the appropriate date as indicated: Date Received: __________________________________ Date Calibration Due: ________________________ Chauvin Arnoux®, Inc. d.b.a AEMC® Instruments www.aemc.com Table of Contents 1.INTRODUCTION................................................................................ 4 1.1 1.2 1.3 1.4 Symbols Used............................................................................5 Definition of Measurement Categories......................................5 Receiving Your Shipment...........................................................6 Ordering Information..................................................................6 1.4.1 Recommended Probes for Models L104 & L564...........6 1.4.2 Accessories and Replacement Parts.............................7 2. PRODUCT FEATURES....................................................................... 8 2.1 Description.................................................................................8 2.2 Control Features........................................................................9 3.OPERATION................................................................................... 11 3.1 LED Control Operation and Status Indication.......................... 11 3.2 Connecting the Simple Logger® II to a Computer....................13 3.2.1 Bluetooth Connection..................................................13 3.2.2 Pairing using Windows Vista/Windows 7.....................14 3.2.3 Pairing using Windows XP...........................................16 3.3 Turning Bluetooth ON/OFF......................................................19 3.4 Recording Data........................................................................19 3.4.1 Starting a Recording Session......................................19 3.4.2 Stopping a Recording Session....................................20 3.5 Downloading Recorded Data...................................................20 3.6 Clearing Alarm Indication.........................................................20 3.7 Erasing Data from Memory......................................................21 3.8 Data Storage............................................................................22 3.8.1 Trend Measurements...................................................22 3.9 Logger Operation.....................................................................22 3.9.1 Recording with Memory Cleared.................................23 3.9.2 Recording with a Partial or Full Memory......................23 3.9.3 Memory Filled During Recording Session...................23 3.9.4 Battery Power Insufficient for a Full Recording............24 3.9.5 Recording Session has Ended....................................24 2 Simple Logger® II (Bluetooth Edition) Series 3.10 Reset Switch Operation...........................................................25 3.11 Flash Upgrade Switches..........................................................26 4. SOFTWARE INSTALLATION............................................................. 27 Installing DataView®.................................................................27 Opening the Control Panel......................................................31 Using the Control Panel...........................................................32 Configuring the Simple Logger® II............................................35 4.4.1 Setting Recording Options...........................................37 4.4.2 Setting Scales Options................................................40 4.4.3 Setting Alarm Options..................................................41 4.4.4 Configuring and Recording Data.................................43 4.4.5 Saving and Recalling a Configuration..........................44 4.5 Displaying Real-time Status Information..................................45 4.6 Resizing and Saving Real-time Window Layouts.....................46 4.7 Displaying Real-time Graphs and Text....................................47 4.8 Saving Real-time Measurements.............................................48 4.9 Downloading Recorded Instrument Data.................................51 4.10Simple Logger® II Templates....................................................51 4.1 4.2 4.3 4.4 5.MAINTENANCE.............................................................................. 58 5.1 Replacing the Batteries............................................................58 5.2 Cleaning...................................................................................58 6.SPECIFICATIONS........................................................................... 59 APPENDIX: TROUBLESHOOTING........................................................... 65 APPENDIX: GLOSSARY......................................................................... 66 Repair and Calibration............................................................................67 Technical and Sales Assistance.............................................................67 Limited Warranty....................................................................................68 Warranty Repairs....................................................................................68 Simple Logger® II (Bluetooth Edition) Series 3 CHAPTER 1 INTRODUCTION WARNING These instruments comply with safety standard EN 61010-1 (Ed 2-2010) or EN 61010-2-032 (2002) for voltages and categories of installation, at an altitude below 2000m and indoors, with a degree of pollution at most equal to 2. • Do not use in explosive atmosphere or in the presence of flammable gases or fumes. • Do not use on voltage networks greater than categories mentioned above. • Observe the maximum voltages and intensities assigned between terminals and earth. • Do not use it if appears damaged, incomplete or improperly closed. • Before each use, check the condition of the insulation of cables, case and accessories. Anything which appears damaged (even partially) must be reported for repair or scrapping. • Use leads and accessories of voltages and categories at least equal to those of the instrument. • Observe the environmental conditions of use. • Do not modify the instrument and use only original replacement parts. Repairs or adjustments must be performed by authorized personnel. • Replace the batteries when the “Low Bat” LED is blinking. Disconnect all cables from the instrument or remove the clamp on from the cable before opening the access door to the batteries. • Use protective equipment when security conditions are required. • Keep your hands away from unused terminals of the device. • When handling probes, probe tips, current sensors and alligators clips, keep fingers behind the guards. • For measurements of dangerous voltages, first connect the black lead to the black terminal of the instrument and then connect this lead to the low voltage point of the source to measure (potential closer to Earth). Then connect the red lead to the red terminal of the instrument and connect the lead to the hot source to measure. Disconnection must be done respecting the reverse order, first disconnect the hot lead and then red then black lead. 4 Simple Logger® II (Bluetooth Edition) Series 1.1 Symbols Used Signifies that the instrument is protected by double or reinforced insulation. CAUTION - Risk of Danger! Indicates a WARNING and that the operator must refer to the user manual for instructions before operating the instrument in all cases where this symbol is marked. Risk of electric shock. The voltage at the parts marked with this symbol may be dangerous. Refers to a type A current sensor. This symbol signifies that application around and removal from HAZARDOUS LIVE conductors is permitted. Ground/Earth Important instructions to read and understand completely. Important information to acknowledge. Battery Fuse USB socket Compliance with the Low Voltage & Electromagnetic Compatibility European directives (73/23/CEE & 89/336/CEE) In the European Union, this product is subject to a separate collection system for recycling electrical and electronic components In accordance with directive WEEE 2002/96/EC 1.2 Definition of Measurement Categories CAT I: For measurements on circuits not directly connected to the AC supply wall outlet such as specially protected lines (mains) derived circuits. CAT II: For measurements performed on circuits directly connected to the electrical distribution system (AC supply wall outlet). Examples are measurements on household appliances or portable tools. CAT III: For measurements performed in the building installation at the distribution level such as on hardwired equipment in fixed installation and circuit breakers. CAT IV: For measurements performed at the primary electrical supply (< 1000V) such as on primary overcurrent protection devices, ripple control units, or meters. Simple Logger® II (Bluetooth Edition) Series 5 1.3 Receiving Your Shipment Upon receiving your shipment, make sure that the contents are consistent with the ordering information. Notify your distributor of any missing items. If the equipment appears to be damaged, file a claim immediately with the carrier and notify your distributor at once, giving a detailed description of any damage. Save the damaged packing container to substantiate your claim. 1.4 Ordering Information Simple Logger® II Model L104.......................................... Cat. #2126.10 (4-Channel, TRMS, Bluetooth, 0-1VAC) Includes Bluetooth USB adapter, mounting hardware, DataView® software, 4x1.5V C-cell alkaline batteries and user manual. Probes purchased separately. Simple Logger® II Model AL834........................................ Cat. #2126.14 (4-Channel, TRMS, Bluetooth, Captive AmpFlex® 300/3000AAC) Includes Bluetooth USB adapter, mounting hardware, DataView® software, 4x1.5V C-cell alkaline batteries and user manual. Simple Logger® II Model L264.......................................... Cat. #2126.23 (4-Channel, TRMS, Bluetooth, 600VAC/DC) Includes Bluetooth USB adapter, set of 5 color-coded (4-red/1-black) 5 ft leads with colorcoded alligator clips, twelve color-coded input ID markers, mounting hardware, DataView® software, 4x1.5V C-cell alkaline batteries and user manual. Simple Logger® II Model L564.......................................... Cat. #2126.36 (4-Channel, TRMS, Bluetooth, Voltage & Current) Includes Bluetooth USB adapter, set of 3 color-coded (red/black/white) 5 ft leads with colorcoded alligator clips, twelve color-coded input ID markers, mounting hardware, DataView® software, 4x1.5V C-cell alkaline batteries and user manual. Probes purchased separately. Simple Logger® II Model ML914....................................... Cat. #2126.40 (4-Channel, TRMS, Bluetooth, Captive MiniFlex® 100/1000AAC) Includes Bluetooth USB adapter, mounting hardware, DataView® software, 4x1.5V C-cell alkaline batteries and user manual. 1.4.1 Recommended Probes for Models L104 & L564 (see § 6 for probe specifications) AC Current Probe Model MN93-BK (200A)............................ Cat. #2140.32 AC Current Probe Model SR193-BK (1000A)......................... Cat. #2140.33 AC Current Probe Model MN193-BK (5A/100A)...................... Cat. #2140.36 6 Simple Logger® II (Bluetooth Edition) Series 1.4.2 Accessories and Replacement Parts Type A to 5-pin mini-B 2M USB Firmware Upgrade Cable ..Cat. #2126.49 Bluetooth USB Adapter Class 2........................................... Cat. #2126.45 Small Classic Carrying Bag.................................................. Cat. #2133.72 Replacement - Set of 12, Color-coded Input ID Markers..... Cat. #2140.45 Lead - Replacement Set of 3, Color-coded (Red/Black/White) 5 ft with Color-coded Alligator Clips (L564).......................... Cat. #2152.03 Lead - Replacement Set of 5, Color-coded (4-Red/1-Black) 5 ft with Color-coded Alligator Clips (L264).......................... Cat. #2152.04 Order Accessories and Replacement Parts Directly Online Check our Storefront at www.aemc.com/store for availability Simple Logger® II (Bluetooth Edition) Series 7 CHAPTER 2 PRODUCT FEATURES Throughout the content of this user manual, the Simple Logger® II may be referred to as the “SLII”. 2.1Description The Simple Logger® II Bluetooth Series of loggers are four channel recording devices powered by alkaline batteries. Frequency tracking is performed such that 64 samples over one line cycle are taken. Frequency tracking is performed around the nominal frequency of 50/60Hz. Harmonic measurements are calculated from these 64 samples (harmonics are only available from the SLII Control Panel within the DataView® software). The Simple Logger® II records at a rate of up to eight times per second. Samples are taken at a user defined storage rate. This means that the input(s) are ignored between measurement intervals. The SLII’s battery operation allows operation without the need for external power. A series of front panel LEDs provide a quick status of the logger’s state, memory usage and low battery indication. The main advantage of the logger is its ability to perform a variety of recording tasks with easy and intuitive setup from a computer using DataView® software, Bluetooth communication and long battery life. Analog information on the input is sampled and converted to a digital value. This digital signal is processed and stored along with scale and time information. An integrated Bluetooth module provides for the transfer of data from the instrument’s internal memory to the computer for analysis. 8 Simple Logger® II (Bluetooth Edition) Series 2.2 Control Features 1 2 3 DISCONNECT ALL INPUTS BEFORE OPENING BATTERY COMPARTMENT RECORDING CONTROL STATUS ALARM MEMORY BLUETOOTH START STOP CLEAR ERASE ON/OFF Stand-By (1) Recording (2) Overload (1) Triggered (1) Active (2) Empty (0) Partial (1) Full (2) Enabled (1) 4 Low Battery 5 6 1 2 3 4 600V CAT IV 7 Figure 2-1 1. Reset Switch The RESET switch resets the CPU. To access this switch, disconnect all inputs and remove the battery compartment cover. The reset switch is located on the exposed PCB (refer to § 3.10). 2. Flash Upgrade Switches These three switches (accessible from under the battery cover), the RESET switch and upgrade software are used to recover from a failed flash upgrade procedure (refer to § 3.11). 3. Female Type Mini-B USB Connector This connector is located under the battery cover and is used for performing firmware upgrades when available. 4. Low Battery Indicator The instrument contains protection circuitry to prevent it from being turned on when the battery voltage is below 1.7V. Simple Logger® II (Bluetooth Edition) Series 9 There are two thresholds for the battery voltage: • The first is used to indicate low battery. The low battery indicator (Red LED single blink) will blink when the battery voltage drops below 2.2V. • The second is used to determine when to terminate recording and turn the unit off. The shutdown threshold is when the battery voltage drops below 1.7V. Communication from the instrument to DataView® is disabled below 2.2V. 5. Five LED Indicators The LEDs on the logger serve two functions: Control Operation and Status Indication. • The control operation (when holding down the button) is indicated with text above each LED. • The status indication (when the button is not being held down) associated with each LED is indicated with text below each LED. • Refer to § 3.1 for detailed descriptions of each LED. 6. CONTROL Button This button selects the mode of operation. Use this button to start or stop recordings, erase the memory, clear alarms and turn the Bluetooth ON/OFF. 7. Input (model dependent) AL834: Four captive AmpFlex® flexible sensors ML914: Four captive MiniFlex® flexible sensors L264: Five 4mm banana plugs L564: Three 4mm banana plugs and two custom CA connectors for current inputs L104: Four custom CA connectors for current inputs WARNING: If the RESET switch is pressed when the logger is recording, data in memory may be lost. 10 Simple Logger® II (Bluetooth Edition) Series CHAPTER 3 OPERATION 3.1 LED Control Operation and Status Indication The ON/SLEEP state of the SLII can be determined by pressing the CONTROL button for less than 0.5 seconds. If the instrument is ON, the status of the instrument will be shown by the LEDs. If the instrument is in the SLEEP mode, all the status LEDs will light until the CONTROL button is released. Once released, the status indication resumes. Control of the instrument is performed by pressing and holding the CONTROL button until the control LED corresponding to the desired operation lights. Releasing the CONTROL button when the desired control LED is illuminated results in the corresponding operation being performed. When pressing the CONTROL button each LED will light in sequence. Continuing to press the CONTROL button will result in all LEDs being off after the last LED lights. If you continue to hold the CONTROL button down, the sequence will repeat with the first LED. Releasing the CONTROL button after the last LED turns off and before the first LED turns on will result in no action being taken by the instrument. This provides a mechanism to cancel (or ignore) the button press. The Instrument will turn ON from the SLEEP mode if a recording is sched uled to start. Simple Logger® II (Bluetooth Edition) Series 11 The Control and Status Operation of each LED is as follows: GREEN LED CONTROL STATUS Starts a Recording Single-blink Logger is in Standby Mode (and not recording) Double-blink Logger is in Record Mode AMBER LED CONTROL STATUS Stops a Recording OFF Logger is not in an Overload condition Single-blink One or more inputs are in an Overload condition YELLOW LED CONTROL STATUS Clears the Alarm State (see § 3.6) OFF No alarm has been seen on any input Single-blink At least one channel has seen an alarm at least once Double-blink At least one channel is currently in an alarm condition Fast-blink Armed to clear alarm indication RED LED CONTROL STATUS Erases the Memory (See § 3.7) OFF No data in memory Single-blink Memory is partially filled Double-blink Memory is full Fast-blink Armed to erase memory Slow-blink Erase memory in process BLUE LED CONTROL STATUS Turns the Bluetooth ON or OFF OFF Bluetooth Disabled Single-blink Bluetooth Enabled RED LED (Low Battery) STATUS 12 OFF Single-blink Batteries OK Low Battery Condition. Batteries should be replaced Simple Logger® II (Bluetooth Edition) Series Overload occurs when any input is 10% above its input range. When the battery voltage goes below 1.7 volt the instrument will shut down (terminating and saving the recording, if it is recording). • SLEEP mode: The instrument enters the low power state if the button is not pressed for one minute. It will remain in this state until either the button is pressed or the internal clock reaches the start time for a scheduled recording. • RECORD mode: The instrument enters the low power state between sample sets. The slower the storage rate, the greater the portion of time the instrument is in the low power state. Thus, the slower the storage rate, the longer the instrument can record. 3.2 Connecting the Simple Logger® II to a Computer ® INSTALL DATAVIEW BEFORE CONNECTING TO THE COMPUTER. The SLII comes with both USB and Bluetooth connectivity. The USB connector is located underneath the battery cover and is used for firmware updates and may not be used for realtime measurements. WARNING: The USB is not isolated from the inputs for safety. Connecting to a computer while the inputs are connected may damage your computer and/or your person. The instrument must never be operated with the battery cover removed. The logger can be connected to the computer via Bluetooth during a recording session, however, an additional drain on the batteries will occur to support the communications. 3.2.1 Bluetooth Connection The SLII is designed to connect to a computer wirelessly via Bluetooth for real-time measurements, data downloads and instrument setup. The instrument is supplied with a Bluetooth USB adapter for computers without Bluetooth capability. If this is the case, connect it to an available Simple Logger® II (Bluetooth Edition) Series 13 USB port on your computer. The default Windows driver will automatically install the device. The pairing procedure varies depending on your operating system, Bluetooth equipment and driver software. NOTE: The information in the following sections are only necessary the first time an instrument is connected, or when the Bluetooth USB adapter has been removed then reconnected. 3.2.2 Pairing using Windows Vista/Windows 7 1. Make sure Bluetooth is enabled on the instrument (see § 3.3). 2. Begin by connecting the included Bluetooth USB Adapter into an available USB port. Windows will install any necessary drivers automatically. 3. A Bluetooth symbol, similar to this once the driver is installed. , will appear in the system tray 4. Right click on the icon and select “Add a Device”. 5. In the “Add a Device” window, select the Simple Logger® II model you wish to connect to and select “Next”. Figure 3-1 14 Simple Logger® II (Bluetooth Edition) Series NOTE: Depending on the Bluetooth setup and operating systems, it may be necessary to enter a passkey to finalize the instrument connection. If so, the default passkey is: 1234. 6. Once the instrument has been successfully added to the computer, a window like the one below will be displayed. Select “Close”. Figure 3-2 7. Launch the SLII Control Panel using the icon placed on the desktop during the Dataview® software installation. The instrument should automatically connect if only one instrument is paired. If more than one instrument is paired, select the instrument you wish to connect to from the drop-down list in the connection window. 8. Selecting OK will establish the connection between the SLII and the Control Panel software. It is now possible to configure the instrument, view real time measurements, and download stored data. Simple Logger® II (Bluetooth Edition) Series 15 3.2.3 Pairing using Windows XP 1. Make sure Bluetooth is enabled on the instrument (see § 3.3). 2. Connect the included Bluetooth USB Adapter into an available USB port. Windows will install any necessary drivers automatically. 3. From the “Start” menu select Settings > Control Panel > Bluetooth devices. Figure 3-3 4. In the “Bluetooth Devices” window select “Add…” Figure 3-4 16 Simple Logger® II (Bluetooth Edition) Series 5. In the “Add Bluetooth Device Wizard” window, check the box next to “My device is set up and ready to be found”, then select “Next”. Figure 3-5 6. The computer will search for any available Bluetooth equipment to pair with. Once the software locates the relevant Simple Logger® II, select the instrument you wish to pair with and select “Next”. Figure 3-6 Simple Logger® II (Bluetooth Edition) Series 17 6. When prompted for a passkey, select “Let me choose my own passkey” and enter the default code 1234 used for all Bluetooth enabled Simple Logger® II models. Figure 3-7 7. When the computer is finished pairing with the Simple Logger® II, a window indicating its success will be displayed. The computer is now set up to communicate via Bluetooth. Select “Finish” to close the window. 8. Launch the SLII Control Panel using the icon placed on the desktop during the DataView® software installation. The instrument should automatically connect if only one instrument is paired. If more than one instrument is paired, select the instrument you wish to connect to from the drop-down list in the connection window. 9. Selecting OK will establish the connection between the SLII and the Control Panel software. It is now possible to configure the instrument, view real time measurements and download stored data. Windows is a registered trademark of Microsoft Corporation in the United States and other countries. 18 Simple Logger® II (Bluetooth Edition) Series 3.3 Turning Bluetooth ON/OFF By default, Bluetooth is enabled. To conserve battery power, Bluetooth can be turned OFF. To turn Bluetooth OFF, press and hold the Control button until the Blue LED turns on solid, then release the button. Repeat this step to turn Bluetooth back ON. If all LEDs light instantaneously, the instrument was in SLEEP mode. Releasing the Control button will show the status (every 5 seconds). 3.4 Recording Data The Simple Logger® II must first be configured before a recording can be performed (see § 4.4 - Configuring the Simple Logger). Once a configuration is written to the instrument, the logger will no longer need to be connected to DataView® to start the scheduled recording. When data is stored in the memory, the user may download the information onto a hard-disk (see § 4.9 - Downloading Recorded Instrument Data). A scheduled recording will still start even if the logger is in SLEEP mode. 3.4.1 Starting a Recording Session A new recording cannot be started if the memory is full. 1. Connect the instrument to the measurement source. 2. Press and hold the CONTROL button. When the START (GREEN) LED lights up, release the button. 3. The GREEN LED double-blinks every 5 seconds when the logger is recording. It may take a few seconds before the instrument starts recording. The recording status LED will single blink during this period. Simple Logger® II (Bluetooth Edition) Series 19 3.4.2 Stopping a Recording Session 1. Press and hold the CONTROL button. When the STOP (AMBER) LED lights up, release the button. 2. The GREEN LED will change from a double-blink to a single-blink, indicating STANDBY mode. The data will be retained, even if the instrument is in SLEEP mode. The recorded data is stored in Flash memory (maintained even in the absence of batteries). The recorded data may be downloaded to a computer. 3.5 Downloading Recorded Data Recorded measurements stored in the instrument are transferred to a computer via the download command in the SLII Control Panel. For instructions on downloading data, see § 4.9 - Downloading Recorded Instrument Data. 3.6 Clearing Alarm Indication Clearing alarms can be performed in the STANDBY or RECORD mode. 1. Press and hold the CONTROL button. When the ALARM (YELLOW) LED lights up, release the button. The YELLOW LED will blink at a fast rate for a period of five seconds. 2. Press the CONTROL button for another 0.5 second to complete the operation. This does not clear any stored alarms, only indications. Stored alarms can only be cleared when memory is erased (see § 3.7 - Erasing Data from Memory). 20 Simple Logger® II (Bluetooth Edition) Series 3.7 Erasing Data from Memory Erasing data from the instrument’s memory can only be performed while in the STANDBY mode. There are two ways to erase the memory: Erasing the Memory using the Control Button: 1. Press and hold the CONTROL button. When the ERASE (RED) LED lights up, release the button. This will arm the instrument for an erase operation (when not in record mode). While armed to erase memory, the RED LED will blink at a fast rate for a period of five seconds. 2. Press the CONTROL button for another 0.5 seconds to start the erase operation. During the erase operation the LED will blink once every second. Erasure takes about 1 minute to complete. If the button is not pressed within five seconds of arming, the erase oper ation will automatically disarm and memory will be maintained. For this reason, if you do not intend to erase memory, simply wait until the RED LED stops blinking at the fast rate. Erasing the Memory using the SLII Control Panel: 1. Connect the instrument to the computer and launch the SLII Control Panel. 2. Select Erase Memory from the Instrument menu. 3. A dialog box will appear asking to confirm the erasure of the instrument’s memory. Select Yes to confirm or No to cancel the operation. Erasing the memory will also clear any stored alarms. Simple Logger® II (Bluetooth Edition) Series 21 3.8 Data Storage The logger captures Trend measurements. The following are definitions of terms used in this section: Input Channel: Source for the measurement channel of the instrument. Measurement Channel: Measurement of input. This can be a simple direct measurement, the result of complex mathematical operations on a single or multiple input, or other channels. Sample Rate: The rate at which the instrument measures inputs. Storage Rate: The rate at which channel measurements are stored. 3.8.1 Trend Measurements The logger stores the measurement of each of the inputs. In addition, the user can define the storage rate, recording period and measurement format using the Configure Instrument dialog box in the SLII Control Panel software. Control Panel trend measurements are stored at this fixed storage rate. 3.9 Logger Operation When the instrument is in use, the following occurs (provided there is sufficient battery voltage and no data is stored in the instrument’s memory): 22 • The GREEN LED single-blinks every 5 seconds (STANDBY mode is active and the logger is not recording). • The RED LED is OFF, indicating there is no data in memory. • The CONTROL button is used to Start/Stop a Recording Session. • If the CONTROL button is not pressed for a period of one minute, the instrument will enter SLEEP mode and wait for either another button press or the recording start time to arrive (if a recording is scheduled). While in SLEEP mode, the LEDs will not blink. • A button press of 0.5 seconds will return the unit back to the normal STANDBY mode. Simple Logger® II (Bluetooth Edition) Series 3.9.1 Recording with Memory Cleared When a recording starts, the logger will continue to record until one of the following occurs: • The Session is complete. • The Memory is full and the recording mode is Start/Stop or Alarm. • The CONTROL button is pushed until the STOP (AMBER) LED lights up and is released before the next LED lights. • The Stop Recording command from the SLII Control Panel is sent to the unit. • The battery voltage falls below 1.7V. 3.9.2 Recording with a Partial or Full Memory If the RED LED is double-blinking every 5 seconds, the memory is full and must be erased before any further recording can be performed. If the RED LED is single-blinking every 5 seconds prior to starting a New Recording Session, the memory is partially full. To save, clear or check memory availability, use the SLII Control Panel software. There may be instances where the GREEN LED is also double-blinking every 5 seconds indicating that the logger is still recording. The user can choose to stop the Recording Session and download the session and/or erase the memory. The logger memory cannot be erased while in the Record mode. The recording must be stopped first. 3.9.3 Memory Filled During Recording Session (Start/Stop Mode) If the logger is recording using the Start/Stop or Store on Alarm mode and the memory is filled before the Recording Session has finished, the session will end. The following happens after the CONTROL button is pushed for 0.5 seconds: • • The GREEN LED single-blinks (standby mode). The RED LED double-blinks (full memory). At this time: • The memory can be downloaded and erased. Simple Logger® II (Bluetooth Edition) Series 23 • A new recording can be started or scheduled once memory is erased. If in either the XRM or FIFO mode, the recording will continue even after memory becomes full. Memory will be freed to make room for new samples. The method of freeing memory will depend on the recording mode. 3.9.4 Battery Power Insufficient for a Full Recording Duration If the battery voltage drops below 1.7V, the following will occur: • • • The Recording Session will terminate. The Data will be saved. The GREEN and RED LED will turn OFF. The logger continues to record until the battery voltage drops below 1.7V. Pressing the CONTROL button will have no effect. The battery voltage may rise slightly after the unit turns itself off. In this event, the unit may turn on momentarily as a result of a button press. The batteries must be replaced before the recorded session(s) can be downloaded from the instrument (refer to § 5.1). Replacing the batteries while the unit is in SLEEP mode will not result in the loss of data memory. The internal backup capacitor will maintain the clock and memory while the batteries are being replaced. If the battery level falls below the usable level or if the batteries have been removed for an extended period of time, the clock time will be lost. However, the recorded memory will be maintained. 3.9.5 Recording Session has Ended The logger will be in STANDBY mode if one of the following occurs: • The session terminates due to recording end time being reached. • The recording in START/STOP or Store on Alarm mode fills the memory. • The user terminates the session by pressing the CONTROL button until the STOP (AMBER) LED lights up and releasing the button before the next LED lights, or issues a Stop Recording command from the SLII Control Panel. The logger is now ready for a New Session or Download. Pressing the CONTROL button until the START (GREEN) LED lights up and releasing the button before the next LED lights, will start a New Session depending on the available memory. 24 Simple Logger® II (Bluetooth Edition) Series 3.10 Reset Switch Operation CAUTION: Risk of electric shock. Disconnect the unit from any input source before opening the battery cover. Resetting the instrument takes about 10 seconds, at which time the instrument will be non responsive. The RESET button resets the CPU and is located under the battery cover. To access it, remove the battery compartment cover. The reset button is located on the exposed PCB (see § 2.2 for location). It is recommended to only press the RESET switch when the logger stops responding to a normal press button control when not connected to DataView®. It is not recommended to reset the instrument when the logger is recording, downloading or being configured. If the logger is not responding to a button press, make sure the unit has sufficient battery power. If the battery voltage is below 1.7V, the unit will not respond to a button press. In this condition, pressing the RESET button will not restart the unit. It is recommended to download any desired session and erase the memory before starting a new recording. The resumption of the logger operation in the above situations assumes that the RESET button cleared the fault(s). The logger will not resume normal operation if the fault condition still exists. The instrument will try to recover normally. However, under certain conditions, the clock and memory full state may reset, meaning that the memory is marked as full and the clock date/time is lost. Simple Logger® II (Bluetooth Edition) Series 25 3.11 Flash Upgrade Switches CAUTION: Risk of electric shock. Disconnect the unit from any input source before opening the battery cover. The Flash Upgrade Switches are used to recover from a failed flash upgrade. To access them, remove the battery compartment cover. The Flash Upgrade Switches are located on the exposed PCB (see § 2.2 for location). All three switches should be turned to the ON position in order to flash upgrade the instrument using the “Fail Safe” method of upgrade from within the “SLIIFlashUp1xx” utility program. All switches MUST be set to the OFF position once the upgrade has completed. Failure to set the Flash Upgrade Switches OFF after the upgrade will pre vent the instrument from operating properly and deplete the batteries. Check for firmware and software updates at www.aemc.com. Download and read instructions before proceeding. 26 Simple Logger® II (Bluetooth Edition) Series CHAPTER 4 SOFTWARE INSTALLATION 4.1 Installing DataView® DO NOT CONNECT THE INSTRUMENT TO THE PC BEFORE INSTALLING THE SOFTWARE AND DRIVERS. Minimum Computer Requirements: • Windows XP / Windows Vista & Windows 7/8 (32/64 bit) • 256MB of RAM for Windows XP 1GB of RAM for Windows Vista & Windows 7/8 (32 bit) 2GB or RAM for Windows Vista & Windows 7/8 (64 bit) • 80MB of hard disk space (200MB recommended) • USB port Windows is a registered trademark of Microsoft Corporation in the United States and other countries. USB Flash Drive Install 1. Insert the USB stick into an available USB port (wait for driver to be installed). 2. If Autorun is enabled then an AutoPlay window should appear as shown. Simple Logger® II (Bluetooth Edition) Series 27 NOTE: If Autorun is disabled, it will be necessary to open Windows Explorer, then locate and open the USB stick drive labeled “DataView” to view the files on the drive. 3. In the AutoPlay window, select Open Folder to view Files. 4. Double-click on Setup.exe from the opened folder view to launch the DataView setup program. NOTE: If installing onto a Vista based computer the User Account Control dialog box will be displayed. Select the Allow option to proceed. 5. A Set-up window, similar to the one below, will appear. Figure 4-1 There are several different options to choose from. Some options(*) require an internet connection. 28 • DataView, Version x.xx.xxxx - Installs DataView® onto the PC. • *Adobe Reader - Links to the Adobe® website to download the most recent version of Adobe® Reader to the computer. Adobe® Reader is required for viewing PDF documents supplied with DataView®. • *DataView Updates - Links to the online DataView® software updates to check for new software version releases. Simple Logger® II (Bluetooth Edition) Series • *Firmware Upgrades - Links to the online firmware updates to check for new firmware version releases. • Documents - Shows a list of instrument related documents that you can view. Adobe® Reader is required for viewing PDF documents supplied with DataView®. 6. DataView, Version x.xx.xxxx option should be selected by default. Select the desired language and then click on Install. 7. The Installation Wizard window will appear. Click Next. 8. To proceed, accept the terms of the license agreement and click Next. 9. In the Customer Information window, enter a Name and Company, then click Next. 10. In the Setup Type window that appears, select the “Complete” radio button option, then click Next. 11. In the Select Features window that appears, select the instrument’s control panel that you want to install, then click Next. NOTE: The PDF-XChange option must be selected to be able to generate PDF reports from within DataView®. Figure 4-2 12. In the Ready to Install the Program window, click on Install. Simple Logger® II (Bluetooth Edition) Series 29 13. If the instrument selected for installation requires the use of a USB port, a warning box will appear, similar to Figure 4-3. Click OK. Figure 4-3 NOTE: The installation of the drivers may take a few moments. Windows may even indicate that it is not responding, however it is running. Please wait for it to finish. 14. When the drivers are finished installing, the Installation Successful dialog box will appear. Click on OK. 15. Next, the Installation Wizard Complete window will appear. Click on Finish. 16.A Question dialog box appears next. Click Yes to read the procedure for connecting the instrument to the USB port on the computer. NOTE: The Set-up window remains open. You may now select another option to download (e.g. Adobe® Reader), or close the window. 17. Restart your computer, then connect the instrument to the USB port on the computer. 18. Once connected, the Found New Hardware dialog box will appear. Windows will complete the driver installation process automatically. Shortcuts for DataView® and each instrument control panel selected during the installation process have been added to your desktop. NOTE: If you connected your instrument to the computer before installing the software and drivers, you may need to use the Add/Remove Hardware utility to remove the instrument driver before repeating the process. 30 Simple Logger® II (Bluetooth Edition) Series 4.2 Opening the Control Panel To open the Simple Logger® II Control Panel: • Double-click the Simple Logger II icon that was created during installation, located on the desktop. • The Connection window will appear (see Figure 4-4). When connecting using the Simple Logger II icon and only one Simple Logger II is connected to the computer, it will be selected and a connection will be established automatically. Figure 4-4 The Connection window lists the connected instrument in the Instrument drop-down list. If multiple units are attached, select the desired unit with its associated serial number from the drop-down list. Once the desired instrument has been selected, click OK and the Simple Logger® II Control Panel and Real-time windows will be displayed (see Figure 4-5). NOTE: The default layout can be changed by moving and resizing each window. TIP: Click on the Arrange Window icon located at the top right of the toolbar to expand and arrange all the windows evenly, all at once. TIP: For complete instructions and information on using DataView®, refer to the Help Menu within the software. Simple Logger® II (Bluetooth Edition) Series 31 4.3 Using the Control Panel The Control Panel is used for instrument operation and configuration. To open the Control Panel either click on the Control Panel option from DataView’s main Instrument menu or double-click on the Simple Logger® II desktop icon. Figure 4-5 The main menu at the top of the screen lists the following commands: File Load Layout - loads a real-time window layout. Save Layout - saves the current real-time window layout. Open Configuration - allows the selection of, and opens, a Simple Logger II configuration file. Start Recording Real-time Data - stores real-time trend data into a specified database. Save Trend Data - When selected, the user will be asked to specify a data file name and the trend measurements currently displayed in the trend window will be saved in the specified database file. 32 Simple Logger® II (Bluetooth Edition) Series Print - prints the selected real-time window. Print Preview - provides a preview of the real-time window to be printed. Print Setup - displays a Print Setup window allowing you to select a destination printer and change various printing options. Exit - closes the control panel. View Trend - opens a real-time trend graph window. Waveform - opens a real-time waveform window. Harmonic - opens a real-time harmonic bar graph window. Status - opens a real-time window displaying status information about the connected Simple Logger® II. Instrument Connect - establishes a connection. Disconnect - closes a connection. Configure - displays the instrument configuration window. Download - downloads recorded data stored in the Simple Logger® II. Start/Stop Recording - if the instrument is not recording, this menu option will read as Stop Recording and when selected sets the recording start time to now. The stop time will be set to the current time plus the original recording duration. If the instrument is recording, this menu option will read as Stop Recording and will terminate the recording when selected. Set Clock - when selected, the Date/Time dialog box is displayed allowing you to change the date and time in the connected instrument. Erase Memory - erases all recorded data stored in the instrument. Clear Alarms - resets the alarm indication on the instrument, as well as in the status window of the Control Panel. Tools Channel Trace Colors - allows the user to specify the default colors to be assigned to graph traces associated with specific trend measurements. Simple Logger® II (Bluetooth Edition) Series 33 Input Trace Colors - allows the user to specify the default colors to be assigned to graph traces associated with specific hardware input channels. Decode Data File - allows the user to load a download.dat file. Default Templates - when selected it allows the user to specify a different default template when creating DataView® reports from the downloaded recordings. Window Cascade - arranges all windows into a stack, with each window offset slightly. Tile - displays all windows equally sized without overlapping. Arrange Windows - arranges the real-time windows into a default layout based on the size of the main control panel window. In addition, a list of open real-time windows is displayed at the bottom of the Window menu. Selecting one of these options will activate the associated real-time window. This is useful when other windows hide a desired window. Help Control Panel - displays the main Control Panel help topic. Contents - displays the help contents dialog box. How To - displays the How To help topic. About - displays the About dialog box. 34 Simple Logger® II (Bluetooth Edition) Series 4.4 Configuring the Simple Logger® II To Configure the Simple Logger® II, perform the following steps: 1. Open the SLII Control Panel and connect to an instrument (refer to § 4.2 if you are unsure how to open the Control Panel). 2. Next, select Configure from the Instrument menu. The Configure Instrument dialog box, similar to Figure 4-6, will be displayed. The configuration of an instrument cannot be changed while a recording is in progress. You must click on Stop Recording before proceeding. Figure 4-6 This Recording tab allows you to define: Storage Rate: rate at which sampled data is stored in the recording. Recording Period: duration of the recording. Start Time of Recording: time to start and end the recording. Schedule Recording: this option must be selected to specify the start and end date/times of a scheduled recording. Simple Logger® II (Bluetooth Edition) Series 35 Record Now: forces a recording to start as soon as the configuration is applied (date/time fields are grayed when this is selected). Reset Date/Time: sets the start and end date and time. Erase: pressing this button will erase all measurements and alarms that are stored in memory. Storage Mode: how to handle data storage when memory becomes full. • Start/Stop - will cause the recording to start at the specified time and continue until memory becomes full or the recording end time is reached (which ever occurs first). • FIFO - will cause the recording to start at the specified time and continue until the recording end time is reach. If memory becomes full before the end time, the oldest samples are discarded until the recording terminates. This results in a duration that is dependent on the amount of memory and the storage rate. (e.g. if the storage rate and available memory allows for an 8 hour recording, and a 24 hour period was selected to record, the samples stored will cover the last 8 hours in that 24 hour period.) • XRMTM - will cause the recording to start at the specified time and continue until the recording end time is reached. If memory becomes full before the end time, every other sample is discarded (freeing up half of the memory), the storage rate is cut in half and storage continues. This repeats until the recording end time is reached. This results in a recording that contains samples covering the desired recording period with the sample rate adjusted to accommodate that period. • ALARM - Trend measurements are saved only while one or more of the measurement channels are in alarm. This storage mode requires that the alarms for one or more channels are enabled and configured. This recording mode terminates when the recording end time is reached or when memory becomes full. See the Alarms configuration tab for configuring alarms. Starting Mode: how to start a recording, without regard for storage rate or synchronized to the storage rate. 36 • Normal - will cause the recording to start at the specified starting time without regard for storage rate. • Synchronous - will cause the recording to start synchronized to the storage rate. For example, if the storage rate is set to once every 5 seconds, the recording will start at 0, 5, 10, 15, 20, 25, 30, 35, 40, 45, 50 or Simple Logger® II (Bluetooth Edition) Series 55 seconds on the minute. The recording will start at the next synchronous starting point after the specified starting time. If the start time falls at a synchronous boundary then the recording will start at the specified time. The start time is different from the specified time only when it is not at a synchronous boundary. Set Clock: displays the Date/Time dialog box for setting the date/time in the instrument. Measurement Setup: lists the channels available to be recorded. Input Range: Allows the selection of the available ranges for the connected instrument. Record: if more than one channel is listed in the measurement setup, you can enable/disable the recording of each channel by selecting/deselecting the Record checkbox. At least one channel must be selected for recording. 4.4.1 Setting Recording Options Start/Stop Recording Mode Select the Start/Stop radio button. Recording Start: Specify a start date and time by performing one of the following: • Select the Record Now check box. Enabling this option will cause the instrument to start to record when the configuration is written to the instrument. • Enable the Schedule recording check box option, then enter the start date and time in the associated edit boxes. Recording End: Specify an end date and time by performing one of the following: • Select a time under Recording Length. This will set the Recording End date and time to the Recording Start date and time plus the selected time duration. • Enable the Schedule recording check box option, then enter the end date and time in the associated edit boxes. Simple Logger® II (Bluetooth Edition) Series 37 FIFO Recording Mode The FIFO mode operates much like the Start/Stop mode with the exception that the recording does not stop when memory becomes full. When this happens, the oldest sample set is discarded to make room for the new sample set. The instrument will record the most recent samples until the user stops it or the recording end time is reached. Select the FIFO radio button. Recording Start Specify a start date and time by performing one of the following: • Select the Record Now check box. Enabling this option will cause the instrument to start to record when the configuration is written to the instrument. • Enable the Schedule recording check box option, then enter the start date and time in the associated edit boxes. Recording End: Specify an end date and time by performing one of the following: • Select a time under Recording Length. This will set the Recording End date and time to the Recording Start date and time plus the selected time duration. • Enable the Schedule recording check box option, then enter the end date and time in the associated edit boxes. XRM™ Recording Mode The XRM™ mode operates much like Start/Stop mode with the exception that the recording does not stop when memory becomes full. When this happens, every other sample is discarded, memory is compacted and storage continues at 1/2 the storage rate. This mode of recording adjusts the storage rate in order to keep the recording going. The instrument will continue to record until the user stops it or the recording end time is reached. Select the XRM™ radio button. Recording Start Specify a start date and time by performing one of the following: • 38 Select the Record Now check box. Enabling this option will cause the instrument to start to record when the configuration is written to the instrument. Simple Logger® II (Bluetooth Edition) Series • Enable the Schedule recording check box option, then enter the start date and time in the associated edit boxes. Recording End: Specify an end date and time by performing one of the following: • Select a time under Recording Length. This will set the Recording End date and time to the Recording Start date and time plus the selected time duration. • Enable the Schedule recording check box option, then enter the end date and time in the associated edit boxes. Alarm Recording Mode Trend measurements are saved only while one or more of the measurement channels are in alarm. This storage mode requires that the alarms for one or more channels are enabled and configured. This recording mode terminates when the recording end time is reached or when memory becomes full. See the Alarms configuration tab for configuring alarms. Select the Alarm radio button. Recording Start Specify a start date and time by performing one of the following: • Select the Record Now check box. Enabling this option will cause the instrument to start to record when the configuration is written to the instrument. • Enable the Schedule recording check box option, then enter the start date and time in the associated edit boxes. Recording End: Specify an end date and time by performing one of the following: • Select a time under Recording Length. This will set the Recording End date and time to the Recording Start date and time plus the selected time duration. • Enable the Schedule recording check box option, then enter the end date and time in the associated edit boxes. Simple Logger® II (Bluetooth Edition) Series 39 Common Recording Options Read - reads the configuration inside the attached Simple Logger® II and resets the field options based on the instrument’s current configuration. Load - allows the user to select a previously saved configuration file. Save - saves the current configuration to a file. The Configure Instrument window also contains a memory status area. This area displays the amount of memory used, the amount of available memory and the amount of memory required for the selected configuration. 4.4.2 Setting Scales Options The second tab “Scales” (Figure 4-7) allows you to configure a channel. Select the desired channel from the list and specify the following options for that channel. Input scale - for inputs that have fixed scales this option is disabled. For inputs that are not fixed (current clamps for example) you can specify a scale for the input. For example 1V = 1000A. Figure 4-7 40 Simple Logger® II (Bluetooth Edition) Series 4.4.3 Setting Alarm Options The third tab (Alarms) allows you to define: Alarms - each channel is configured independent of each other. Only channels selected to be recorded are available for alarm testing. Alarms are set by selecting the desired channel, selecting the alarm type and specifying the alarm limits. Selecting the Inclusive check box will trigger the alarm if the channel level is equal to the specified limits. Example: If you select the Above upper limit alarm type and don’t select Inclusive, the alarm is triggered if the measured value is greater than the specified upper limit. Selecting Inclusive will cause the alarm to be triggered if the measured value is greater than or equal to the specified upper limit. NOTE: Each channel is independent and can have different alarm settings. Figure 4-8 Simple Logger® II (Bluetooth Edition) Series 41 If you want to start the recording, click on the Recording tab, then select Record Now followed by the OK button. This will write the configuration to the instrument and begin a recording (provided enough memory is available). To save the configuration to the instrument and close the dialog box, click the OK button. Selecting the Cancel button will close the Configure Instrument dialog box discarding the configuration changes. Selecting the Help button will display the associated help topic. 42 Simple Logger® II (Bluetooth Edition) Series 4.4.4 Configuring and Recording Data The following is intended as an example. You will configure the instrument to measure (and record) at a storage rate of 5 Seconds over a recording period of 15 minutes with no alarms. Note: The instrument’s clock should be set to the proper time as the clock may vary due to time zones. 1. If a recording is active, stop it by selecting the Stop Recording menu option. 2. Open the Configure Instrument window and select the Recording tab to display the Recording page. 3. Select 5 Seconds from the Storage rate drop-down list (you may need to use the vertical scroll bar to see this option). 4. Select the Start/Stop recording mode. 5. Select a 15-minute recording duration by selecting the 15 Minutes option from the Recording period drop-down list. At this point the Recording page should look similar to Figure 4-9. Figure 4-9 Simple Logger® II (Bluetooth Edition) Series 43 6. Select the Scales tab to display the Scales page. 7. Select the Input scale, if available. 8. Select the Alarms tab to display and configure Alarm settings. 9. To save the configuration before recording, see § 4.4.5. 10. To record, click on the Recording tab and check the Record Now checkbox, then press OK. This will write the configuration to the instrument and begin a recording (provided enough memory is available in the instrument). 4.4.5 Saving and Recalling a Configuration Open the Configure Instrument window by selecting Configure from the Instrument menu. To Save the Current Configuration to Disk: • Select the Save button. The Save As window will be displayed. • Specify a name for the file and type it into the File name field, then specify a location to save it to. • Once the file name and directory have been specified, select the Save button. To Recall (Load) a Saved Configuration from Disk: • Select the Load button. The Open window will be displayed. • Specify the name of the file by typing it into the File name field, or select it from the location where the configuration was originally saved. • Once the file name and directory have been specified, select the Open button. The configuration will be read from disk and the Configure Instrument window will reset accordingly. Selecting the Read button will read the configuration in the attached instrument and reset the dialog fields, accordingly. 44 Simple Logger® II (Bluetooth Edition) Series 4.5 Displaying Real-time Status Information Real-time data and instrument status is displayed in the Control Panel. Figure 4-10 Connection Status - shows if instrument is connected/disconnected. Instrument Identification: Model - instrument’s model identification number. Serial # - instrument’s serial identification number. Firmware Rev - firmware revision of the attached instrument. Memory: Capacity - total amount of memory available for recorded data. Used - amount of recording memory currently used. Recording: State - instrument’s recording state (Idle or Active). Session - number of sessions currently stored in the instrument. Time Remaining - amount of time remaining for the current recording session (if one is active). Simple Logger® II (Bluetooth Edition) Series 45 Recording Storage Rate - time between storage of measurement data. Recording Mode - storage mode (Start/Stop, FIFO, XRM™ or Alarm). Configuration: Channel 1-4 - shows the configuration of each channel. Battery: Main battery - voltage of the main battery. Status: Overload - displays the overload status. No alarms have occurred - displays the alarm status. Inst date/time - displays the date and time read from the instrument. 4.6 Resizing and Saving Real-time Window Layouts A quick and easy way to arrange window layouts is done by clicking the Arrange Windows icon the window layout for you. in the toolbar. This will automatically arrange Real-time windows can also be resized and arranged to suit your needs by using the mouse pointer. To move a window, simply click and hold on the title bar, then drag to the desired location. To resize a window, click and drag the corner of the window. Once you have all of your windows in a desired location, you can save your layout for future use. To Save a Layout: • Go to File > Save Layout. Type in a name for the layout and select the folder that you wish to save it in. Click on Save. To Load a Layout: • 46 Go to File > Load Layout. Locate and select a previously saved layout file. Click on Open. Simple Logger® II (Bluetooth Edition) Series 4.7 Displaying Real-time Graphs and Text The following real-time windows can be opened and closed from the View menu or the toolbar. Waveform: The Waveform window displays line cycle snapshots. This window displays the actual waveform relative to time. Figure 4-11 Harmonic: The Harmonic window shows the harmonic content of an associated line cycle using a bar graph or tabular textual summary. Depending on the selected radio button (Bar or Text). Figure 4-12 Simple Logger® II (Bluetooth Edition) Series 47 Trend: The Trend window shows measurements (sample points) over a time period. Figure 4-13 Displayed at the top of these windows is a list of available channels. Clicking on an entry will display the corresponding channel. You can select one or more channels by using the Ctrl or Shift keys while making a selection. The real-time update can be paused by clicking the Hold check box at the bottom right of the window. The automatic update will stop until the Hold check box is deselected. Graph magnifications can be increased, reset and decreased by selecting the ++, +, 0, - and -- buttons. 4.8 Saving Real-time Measurements Real-time data received from an instrument can be saved directly into a recording session database. This differs from the process of downloading and saving recorded data in that the measurements are stored on the computer as the instrument measures them. These measurements are not necessarily being stored within the instrument. However, the instrument may be configured to record at the same time real-time measurements are being received from the instrument. In which case, two copies of the measurements will be stored. One copy is stored on the local computer and the other in memory within the instrument. In addition, you can save waveform snapshots (when available) via the Control Panel where the instrument does not capture and store waveforms. This provides functionality that extends the capabilities of the SLII. To Save Real-time Measurements: 1. To begin recording real-time measurements, select the Start recording real-time data option from the File menu. When the Start recording 48 Simple Logger® II (Bluetooth Edition) Series real-time data option is selected, a dialog box will be displayed asking for the name of the database to save the measurements into. 2. Specify the name of the database file by typing it into the File name field or by selecting one from the displayed list. Next, select the desired location to save the file. Select Save to save the file or Cancel to return to the Control Panel. 3. If Save was selected, the Session Properties window displays. Figure 4-14 The Session Properties dialog allows you to specify Operator, Site and Custom parameters that are to be saved with recorded data. These parameters are used when generating reports. The Operator and Site tabs allow you to maintain lists of operators and sites, saving you time when specifying parameters for reports. On the left of the Operator and Site tabs is the list of previously defined Operators and Sites. On the right of the Operator and Site tabs is the individual parameters that will be saved in an associated database. Only a single set of operator and site fields are saved in the recording database. The Custom tab contains a list of user defined parameters. Along-side each user defined parameter is a check box. Items that are checked will be added to an associated database. Only a single set of Custom parameters can be maintained (unlike the Operator and Site lists). The Custom tab allows you to specify any user defined parameters (in addition to the comments field of the Site tab) that are to be used in displaying a report. Simple Logger® II (Bluetooth Edition) Series 49 4. Type the appropriate information into the fields, then click OK. 5. Measurement data will be saved until the Stop recording real-time data option is selected from the File menu. When you stop recording real-time data, you will be asked if you want to open the database. 6. Answering Yes will bring the main DataView® window to the foreground and the Create Report from Template window will be displayed. Figure 4-15 This window allows the user to specify a template for the database that was just downloaded and saved. A suggested template will be selected. Either accept this template or select another one. 7. After selecting a template to use, select the OK button. A report will be displayed in the main DataView® window containing the recorded sample data in the format associated with the template. 8. To save the report, go to File > Save and save the file in the desired location. 50 Simple Logger® II (Bluetooth Edition) Series 4.9 Downloading Recorded Instrument Data Recorded measurements stored in the instrument are transferred to a database on the PC using the download command. Assuming a recording session has been started and stopped, the instrument should have at least one recorded measurement inside it. To Download a Recording: • Select Download from the SLII’s Instrument menu or click the Download button on the toolbar. This begins the transfer of recorded data to the computer. A window displaying the transfer progress will be displayed. • Once the transfer is complete, the Save As dialog box will be displayed. • In the Save As dialog box, specify the name of the database in which to save the recorded data. If a database exists with the name you specify, a dialog box asking if it should be overwritten will be displayed. Selecting the No button will allow you to specify another database name. Selecting the Yes button will overwrite the database. • Once a database file name is specified, the Session Properties dialog box will be displayed. Complete the information in this dialog box, then click OK. • Once the download has completed successfully, you will be asked if you want to open it. Selecting Yes will open DataView® (if not already open) and bring it to the foreground. The Create View from Template will be displayed with a default template already selected and the downloaded database specified as the database to be opened. You can accept the defaults by selecting OK or select a different template. 4.10 Simple Logger® II Templates Refer to the DataView® Help files for detailed information about using the logger templates. Trend Summary Report Template The Trend Summary Report template is for use with the Simple Logger® II and generates a view with four worksheets. The worksheets contained in this report include the following: • Cover Sheet Simple Logger® II (Bluetooth Edition) Series 51 • Trend List • Alarms • Instrument Configuration You can move between the worksheets by selecting the desired worksheet from the worksheet tabs at the bottom of the view (just above the status bar). The first worksheet is the Cover Sheet and provides information about the recording session. The following illustrates the Cover Sheet: Figure 4-16 52 Simple Logger® II (Bluetooth Edition) Series The Cover Sheet is used as a cover sheet for the report and contains the following frames: • • • • • • Text Box - containing the text “Trend Summary Report”. Session Summary - containing the name of the database used to generate the report. Session Summary - containing operator information. Session Summary - containing test site information. Session Summary - containing operator comments. OLE - containing the AEMC® Instruments logo. Using the associated properties window customizes each of these frames. The properties window for a frame is displayed by selecting the frame, then selecting the Properties command from the Frame menu. The second worksheet is used to view the recorded trend channels and contains the following frames: • Channel List • Channel Graph • Trend Summary • Meter The following illustrates the Trend List worksheet: Figure 4-17 Simple Logger® II (Bluetooth Edition) Series 53 The third worksheet is for displaying alarms that were recorded. Figure 4-18 The Alarms worksheet (Figure 4-18) allows you to select a channel from the channel list. The Exception List will then be updated to list the exceptions (if any) that occurred on the selected channel. You can then select an exception and the graph time frame will be adjusted to display the trend samples in the associated exception period. The last work sheet (Figure 4-19) is used to display the configuration of the instrument at the time the session data was recorded. This is the configuration of the instrument while it was recording this data. Figure 4-19 54 Simple Logger® II (Bluetooth Edition) Series Channel Graph Frame A Channel Graph frame provides a graphical look into the database it is attached to. The database is attached to the Trend Graph frame when it is created. This can be done manually by placing a graph frame or automatically when using a template. The graph frame provides additional tools for viewing the underlying database. These tools provide zoom and pan operations. In addition, individual traces and waveform snapshots can be selected using the Select Frame tool. Normally, the Select Frame tool is used to select a frame for modification. In addition to selecting the Graph frame, this tool is used to select individual traces. A trace is selected if any part of it is drawn within a few screen pixels of where the selection tool is when the left mouse button is pressed. When a trace is selected, handles similar to those of the frame handles are drawn over the trace. If more than one trace is drawn within the proximity of the selection tool, when clicked again, the next trace will be selected. This will continue until all traces within the selection tools proximity have been selected. At which point, clicking the left mouse button again will select the first trace and the process will repeat. Frames can be linked together so that when you select a trace or line in one frame another frame shows additional information about the selection. For example when selecting a trace in the graph the trend summary list will be updated to list the sample points for the selected trace. Linking frames can create a complex interaction between frames. For additional information refer to the DataView® users guide accessible from the help menu of the main DataView® application. This template contains the following linked frame types: • Session Summary • Channel List • Meter • Trend Summary List The channels selected for display and the display properties can be changed at any time using the Channel Graph Properties window. The Channel Graph Properties window can be displayed by right-clicking the mouse pointer while positioned over the Graph frame, then selecting Properties from the pop-up menu. The display extents of the Channel Graph frame can be changed by using zoom and pan operations. By zooming and panning you change the starting and ending times of the displayed data. By changing the starting and ending display times, you can zoom in, zoom out, pan left and right, pan to start and pan to the end of the measurement data. Simple Logger® II (Bluetooth Edition) Series 55 To change the display extents of a graph frame, select the frame using either the frame selection tool or Zoom Tool . Next, use a zoom or pan command from the Zoom menu, or from the toolbar. By clicking and dragging the Zoom Tool across the desired area of the graph, you can select an area to zoom in on. Channel List Frame The Channel List frame is a frame attached to either a Channel Graph or Micro-Graph frame. In the case of this template, the parent is a Channel Graph frame. The Channel List frame displays a textual list summary of the channels available in the recording. Each summary line contains userspecified parameters of a specific channel recording. You can specify the displayed parameters and general display options using the Channel List Properties dialog box. You can step between list entries. Selecting Pan To Start, displays the first list entry. Selecting Pan To End, displays the last list entry. Selecting the Step Right or Step Left, displays the next or previous list entry. When stepping through the list entries, the selection will move from each entry for the associated channel. In addition to stepping through the list with the tool bar, you can select a specific entry listed using the mouse pointer. The text for the selected entry will be highlighted, indicating which entry in the list is currently selected. Session Summary Frame The Session Summary frame is a frame attached to the Channel Graph frame. This frame displays a textual summary of its parent frame. You can customize the summary text displayed, using the Session Summary Properties dialog box. This dialog box is displayed by right-clicking on the frame and selecting Properties from the pop-up menu, or by doubleclicking on the frame. The Trend template contains Session Summary frames displaying the following information: • • • • • 56 Start time and duration of the recorded data and the instrument’s identification codes. This frame is in the upper right corner of the first worksheet. Database containing the file name and location of the recording data Operator information Test site information Operator comments Simple Logger® II (Bluetooth Edition) Series The text displayed in the session summary frames is static as long as the data within the associated database remains static. Session Summary frames do not provide the interactive operations available in the Channel Graph and Trend Summary List frames. Meter Frame The Meter frame is a frame linked to the Channel Graph frame. The Meter frame displays the values of samples at a specific location on the graph. Left-clicking on the graph displays a black vertical bar. The sample values displayed in the meter frame are associated with the time at the location of this vertical bar. Left-clicking at other areas of the graph will move the vertical bar and update the Meter frame accordingly. Text Box Frame A Text Box frame displays text at a given location on the page. The text within the frame is static, in that it does not change. It only changes when you change it. This template contains a Text Box located at the top of the worksheet. The text displayed within this frame is the title of this report (Trend Summary Report). The text, font and other frame properties can be changed using the Text Box Properties dialog box. For more information on using the Simple Logger® II Control Panel or DataView®, refer to the Help Files within the software. Simple Logger® II (Bluetooth Edition) Series 57 CHAPTER 5 MAINTENANCE Use only factory specified replacement parts. AEMC® will not be held responsible for any accident, incident, or malfunction following a repair done other than by its service center or by an approved repair center. 5.1 Replacing the Batteries CAUTION: Risk of electric shock. Disconnect all input(s) from the unit or remove the current sensors from any conductor before opening the battery cover to change the batteries. Terminate any recordings before changing the batteries or loss of recorded data may occur. • Remove the two screws from the battery cover. • Slide and lift up the cover to remove. • Replace the four 1.5V C-cell (LR14) alkaline batteries (the backup capacitor provides backup power for approximately 10 seconds while the main batteries are being changed). • Replace the cover and the screws. NOTE: When changing the batteries, always replace both sets of batteries. If the instrument is stored without the batteries installed, the internal clock will need to be reset using the SLII Control Panel software once the batteries are installed. Only store the unit with the batteries installed for short periods of time. For prolonged storage of the unit, it is recommended to remove the batteries. 5.2Cleaning CAUTION: Risk of electric shock. Remove the clamp from any conductor or disconnect all input(s) from the unit. The body of the logger should be cleaned with a damp and soapy cloth. Do not submerge the logger in water. Do not use solvent. 58 Simple Logger® II (Bluetooth Edition) Series CHAPTER 6 SPECIFICATIONS Reference Conditions: 23°C ± 3°C, 30-50% RH, 50/60 Hz, no AC external magnetic field, DC magnetic field ≤ 40A/m, centered conductor, battery voltage: 3V ± 10%. MODEL ML914 ELECTRICAL Channels Input Range Accuracy (50/60Hz) Resolution Sample Rate Storage Rate Storage Modes Recording Length Memory Communication Power Source** Battery Life Four Captive MiniFlex® AC Current Flexible Sensors 100AAC 1000AAC 0 to 1A unspecified 1 to 100A: ±(1% of Reading + 0.5A) 0 to 5A unspecified 5 to 1000A: ±(1% of Reading + 1A) 0.1A 64 samples/cycle Programmable from 125ms to 1 per day Start/Stop, FIFO and Extended Recording Mode* (XRM™), Store on Alarm 15 minutes to 8 weeks, programmable using DataView® 1,000,000 measurements (2MB). Recorded data is stored in non-volatile memory and retained even if battery is low or removed. Bluetooth (Class 2) 4x1.5V C-cell alkaline batteries >200hrs at 125ms up to 180 days (dependent on storage rate/recording length) MECHANICAL Dimensions Weight (with battery) Sensor/Cable Length Maximum Conductor Cover/Case Vibration Shock Drop 5.904 x 5.904 x 3.568" (150 x 150 x 91mm) w/o Sensor 2.4lbs (1.1kg) Sensor: 6" (152mm) / Cable: 6.5 ft (2m) Ø 1.77" (45mm) Cover: UL94-V0 / Case: UL94-5VB IEC 68-2-6 (1.5mm, 10 to 55Hz) IEC 68-2-27 (30G) IEC 68-2-32 (1m) ENVIRONMENTAL Operating Temperature Storage Temperature Relative Humidity Altitude 14° to 122°F (-10° to 50°C) -4° to 140°F (-20° to 60°C) Up to 85% at 95°F (35°C), Non-condensing 2000m SAFETY & ELECTRO-MAGNETIC COMPATIBILITY Safety Rating Protection Degree Electro-Magnetic Compatibility CE Approved EN61010-1; EN61010-2-32; 600V CAT IV, 1000V CAT III; Pollution Degree 2 IP50 (cover closed) EN 61326-1; 07/1997 (+A1 10/1998, +A2 09/2001, +A3 05/2004) Simple Logger® II (Bluetooth Edition) Series Yes 59 MODEL AL834 ELECTRICAL Channels Input Four Captive AmpFlex® AC Current Flexible Sensors Range Accuracy (50/60Hz) 300AAC 0 to 5A unspecified 5 to 300A: ±(1% of Reading + 0.5A) Resolution 0.1AAC Sample Rate Storage Rate Storage Modes Recording Length Memory Communication Power Source** Battery Life 3000AAC 0 to 15A unspecified 15 to 3000A: ±(1% of Reading + 1A) 0.5AAC 64 samples/cycle Programmable from 125ms to 1 per day Start/Stop, FIFO and Extended Recording Mode* (XRM™), Store on Alarm 15 minutes to 8 weeks, programmable using DataView® 1,000,000 measurements (2MB). Recorded data is stored in non-volatile memory and retained even if battery is low or removed. Bluetooth (Class 2) 4x1.5V C-cell alkaline batteries >200hrs at 125ms up to 180 days (dependent on storage rate/recording length) MECHANICAL Dimensions Weight (with battery) Sensor/Cable Length Maximum Conductor Cover/Case Vibration Shock Drop 5.904 x 5.904 x 3.568" (150 x 150 x 91mm) w/o Sensor 3.9lbs (1.77kg) Sensor: 24" (610mm) / Cable: 6.5 ft (2m) Ø 8" (203mm) Cover: UL94-V0 / Case: UL94-5VB IEC 68-2-6 (1.5mm, 10 to 55Hz) IEC 68-2-27 (30G) IEC 68-2-32 (1m) ENVIRONMENTAL Operating Temperature Storage Temperature Relative Humidity Altitude 14° to 122°F (-10° to 50°C) -4° to 140°F (-20° to 60°C) Up to 85% at 95°F (35°C), Non-condensing 2000m SAFETY & ELECTRO-MAGNETIC COMPATIBILITY Safety Rating Protection Degree Electro-Magnetic Compatibility CE Approved 60 EN61010-1; EN61010-2-32; 600V CAT IV, 1000V CAT III; Pollution Degree 2 IP65 (cover closed) EN 61326-1; 07/1997 (+A1 10/1998, +A2 09/2001, +A3 05/2004) Yes Simple Logger® II (Bluetooth Edition) Series NOTE: The native measurement of the Model L104 is voltage. This voltage is scaled to displace current by a factor that corresponds to the users probe selection. This accuracy specification does not account for probe errors. MODEL L104 ELECTRICAL Channels Input Four One connector per channel Range Resolution Accuracy (50/60Hz) Maximum Input Voltage*** Input Impedance Sample Rate Storage Rate Storage Modes Recording Length Memory Communication Power Source** Battery Life 0 to 1VAC 0.1A (1mV/A scale) 0 to 10mV unspecified 10 to 50mV: ±(0.5% of Reading + 1mV) 50 to 1000mV: ±(0.5% of Reading + 0.5mV) 5Vrms (-7.07Vpeak to +7.07Vpeak) 100KW 64 samples/cycle Programmable from 125ms to 1 per day Start/Stop, FIFO and Extended Recording Mode* (XRM™), Store on Alarm 15 minutes to 8 weeks, programmable using DataView® 1,000,000 measurements (2MB). Recorded data is stored in non-volatile memory and retained even if battery is low or removed. Bluetooth (Class 2) 4x1.5V C-cell alkaline batteries >200hrs at 125ms up to 180 days (dependent on storage rate/recording length) MECHANICAL Dimensions Weight (with battery) Cover/Case Vibration Shock Drop 5.904 x 5.904 x 3.568" (150 x 150 x 91mm) w/o Sensor 2.1 lbs (0.95kg) Cover: UL94-V0 / Case: UL94-5VB IEC 68-2-6 (1.5mm, 10 to 55Hz) IEC 68-2-27 (30G) IEC 68-2-32 (1m) ENVIRONMENTAL Operating Temperature Storage Temperature Relative Humidity Altitude 14° to 122°F (-10° to 50°C) -4° to 140°F (-20° to 60°C) Up to 85% at 95°F (35°C), Non-condensing 2000m SAFETY & ELECTRO-MAGNETIC COMPATIBILITY Safety Rating Protection Degree Electro-Magnetic Compatibility CE Approved EN61010-1; 600V CAT IV, 1000V CAT III; Pollution Degree 2 IP50 (cover closed) EN 61326-1; 07/1997 (+A1 10/1998, +A2 09/2001, +A3 05/2004) Simple Logger® II (Bluetooth Edition) Series Pending 61 NOTE: The native measurement of the Model L564 is voltage. This voltage is scaled to displace current by a factor that corresponds to the users probe selection. This accuracy specification does not account for probe errors. MODEL L564 ELECTRICAL Channels Input Range Resolution Accuracy (50/60Hz) Maximum Input Voltage*** Input Impedance Sample Rate Storage Rate Storage Modes Recording Length Memory Communication Power Source** Battery Life Four (two voltage and two current) Two Three Recessed Banana Jacks 0 to 600VAC 0 to 1VAC 0.1mV (1mV/A scale) 0.1V 0 to 10mV unspecified 10 to 50mV: ±(0.5% of R + 1mV) 50 to 1000mV: ±(0.5% of R + 0.5mV) 0 to 5V unspecified 5 to 50V: ±(0.5% of R + 1V) 50 to 600V: ±(0.5% of R + 0.5V) 5Vrms (-7.07Vpeak to +7.07Vpeak) 1.2 x 600V 100KW 16MW 64 samples/cycle Programmable from 125ms to 1 per day Start/Stop, FIFO and Extended Recording Mode* (XRM™), Store on Alarm 15 minutes to 8 weeks, programmable using DataView® 1,000,000 measurements (2MB). Recorded data is stored in non-volatile memory and retained even if battery is low or removed. Bluetooth (Class 2) 4x1.5V C-cell alkaline batteries >200hrs at 125ms up to 180 days (dependent on storage rate/recording length) MECHANICAL Dimensions Weight (with battery) Cover/Case Vibration Shock Drop 5.904 x 5.904 x 3.568" (150 x 150 x 91mm) w/o Sensor 2.1lbs (0.95kg) Cover: UL94-V0 / Case: UL94-5VB IEC 68-2-6 (1.5mm, 10 to 55Hz) IEC 68-2-27 (30G) IEC 68-2-32 (1m) ENVIRONMENTAL Operating Temperature Storage Temperature Relative Humidity Altitude 14° to 122°F (-10° to 50°C) -4° to 140°F (-20° to 60°C) Up to 85% at 95°F (35°C), Non-condensing 2000m SAFETY & ELECTRO-MAGNETIC COMPATIBILITY Safety Rating Protection Degree Electro-Magnetic Compatibility CE Approved 62 EN61010-1; 600V CAT IV, 1000V CAT III; Pollution Degree 2 IP50 (cover closed) EN 61326-1; 07/1997 (+A1 10/1998, +A2 09/2001, +A3 05/2004) Pending Simple Logger® II (Bluetooth Edition) Series MODEL L264 ELECTRICAL Channels Input Four Five Recessed Banana Jacks Range Resolution Accuracy (50/60Hz) Maximum Input Voltage*** Input Impedance Sample Rate Storage Rate Storage Modes Recording Length Memory Communication Power Source** Battery Life 0 to 600VAC/DC 0.1V 0 to 5V unspecified 5 to 50V: ±(0.5% of Reading + 1V) 50 to 600V: ±(0.5% of Reading + 0.5V) 1.2 x 600V 16MW 64 samples/cycle Programmable from 125ms to 1 per day Start/Stop, FIFO and Extended Recording Mode* (XRM™), Store on Alarm 15 minutes to 8 weeks, programmable using DataView® 1,000,000 measurements (2MB). Recorded data is stored in non-volatile memory and retained even if battery is low or removed. Bluetooth (Class 2) 4x1.5V C-cell alkaline batteries >200hrs at 125ms up to 180 days (dependent on storage rate/recording length) MECHANICAL Dimensions Weight (with battery) Cover/Case Vibration Shock Drop 5.904 x 5.904 x 3.568" (150 x 150 x 91mm) w/o Sensor 2.1 lbs (0.95kg) Cover: UL94-V0 / Case: UL94-5VB IEC 68-2-6 (1.5mm, 10 to 55Hz) IEC 68-2-27 (30G) IEC 68-2-32 (1m) ENVIRONMENTAL Operating Temperature Storage Temperature Relative Humidity Altitude 14° to 122°F (-10° to 50°C) -4° to 140°F (-20° to 60°C) Up to 85% at 95°F (35°C), Non-condensing 2000m SAFETY & ELECTRO-MAGNETIC COMPATIBILITY Safety Rating Protection Degree Electro-Magnetic Compatibility CE Approved EN61010-1; 600V CAT IV, 1000V CAT III; Pollution Degree 2 IP50 (cover closed) EN 61326-1; 07/1997 (+A1 10/1998, +A2 09/2001, +A3 05/2004) Pending *This unique recording mode provides the opportunity to continuously record over long periods of time by reducing the storage resolution of the stored data and maintaining matching resolution for the newest data. Each time the memory fills up using XRM™, every other of the oldest stored samples is discarded making room for newer samples. This process continues until the recording is manually stopped. **A memory backup capacitor provides backup power while batteries are being changed. This backup capacitor will maintain the instrument for up to 10 sec. without batteries installed. After 10 seconds the date and time will need to be reset (data and configuration will be maintained). If the unit is connected to DataView® via a PC, the battery life is 100 hours regardless of the storage rate. ***Voltages beyond this range may damage the instrument. Simple Logger® II (Bluetooth Edition) Series 63 NOTE: When installing probes, face the arrow on the probe in the direction of the load. Model SR193 Nominal Range 1000A AC for f ≤1kHz Measurement Range 1A to 1000A AC max (I >1000A not continuously) Probe Output Signal 1mVAC / A AC Maximum Clamping Diameter Safety 2" (52mm) EN 61010-2-032, Pollution Degree 2, 600V CAT IV, 1000V CAT III Model MN93 Nominal Range Measurement Range 200A AC for f ≤1kHz 2A to 200A AC max (I >200A not permanent) Probe Output Signal 5mVAC / A AC Maximum Clamping Diameter 0.8" (20mm) Safety EN 61010-2-032, Pollution Degree 2, 300V CAT IV, 600V CAT III NOTE: Currents <0.5A will be displayed as zero. Neutral current measures down to 0A. Model MN193 Nominal Range 5A and 100AAC Measurement Range 5A: 0.005A to 6A AC max (1A to 1000A with ratio 1000/5 selected) 100A: 0.1A to 100A AC max Probe Output Signal 5A: 200mV/A AC; 100A: 10mV/A AC Maximum Clamping Diameter Safety 0.8" (20mm) EN 61010-2-032, Pollution Degree 2, 300V CAT IV, 600V CAT III The 5A range of the MN193 is designed to work with secondary current transformers. Best accuracy is available when entering the transformer ratio (e.g. 1000/5A). When used to measure 5A direct, the resolution will be limited to 0.1A max. Specifications are subject to change without notice. 64 Simple Logger® II (Bluetooth Edition) Series APPENDIX A TROUBLESHOOTING Symptom: After being in a damp, cold environment, the logger does not function. Cause, Correction: Condensation may have formed inside the logger, shorting out the circuitry and discharging the battery. Allow the circuit board to dry thoroughly in a warm location. Symptom: Simple Logger® II does not start recording. Cause, Correction: Make sure battery power is present. Make sure the PRESS button is pushed long enough to light the GREEN LED and released before the next LED lights. Make sure the RED LED is not double- blinking. If it is, memory is full and you need to erase the data (see § 4.7). Make sure the SLII is properly configured so that you have Storage Rate, Recording Period and at least one Measurement Channel specified. Symptom: Cannot find the instrument when pairing the Bluetooth connection. Cause, Correction: Make sure the Blue LED is single blinking, indicating that the instrument Bluetooth module is active. Symptom: Even though the pairing of the Bluetooth is established and the LED indication is active, the instrument will not connect to the SLII Control Panel. Cause, Correction: Make sure the Low Battery LED is not blinking. If the batteries are below 2.2V the instrument will have enough power to run the circuit but not enough to maintain a stable connection. Replace the batteries. Simple Logger® II (Bluetooth Edition) Series 65 APPENDIX B GLOSSARY Some general terminology associated with the data collection process is listed here for convenience. Bps: Bits Per Second, a unit of signal transfer speed equal to the number of elements per second. The Simple Logger® II transfers data at the rate of 115200 bps. Button: An actual key on the logger or computer keyboard or a soft key in the program on the computer screen. Data logger: A device used to sample and store electrical signals that may be representative of physical phenomena such as temperature, pressure and flow, for long periods of time in an unattended environment. Download: The process of transferring data from the logger to the computer. Hz: Hertz, a unit of measure of frequency equivalent to cycles per second. I/O: Input/output, a device or port capable of sending or receiving digital information. Port: A name given to any connector allowing input or output of information. Processor: A computing device used to calculate and run a set of instructions. Recording session: A recording session is defined as the time and data contained within the starting and ending of a recording. Resolution: The last significant digit of the measurement. Zoom: The ability to select a section of the graph and magnify it for better readability. Bluetooth: Wireless communications device used to access the logger via a computer program (Dataview®). USB: Universal Serial Bus, a communications port used to access the logger via a computer program (Dataview®). 66 Simple Logger® II (Bluetooth Edition) Series Repair and Calibration To ensure that your instrument meets factory specifications, we recommend that it be sent back to our factory Service Center at one-year intervals for recalibration, or as required by other standards or internal procedures. For instrument repair and calibration: You must contact our Service Center for a Customer Service Authorization Number (CSA#). This will ensure that when your instrument arrives, it will be tracked and processed promptly. Please write the CSA# on the outside of the shipping container. If the instrument is returned for calibration, we need to know if you want a standard calibration, or a calibration traceable to N.I.S.T. (Includes calibration certificate plus recorded calibration data). Ship To: Chauvin Arnoux®, Inc. d.b.a. AEMC® Instruments 15 Faraday Drive Dover, NH 03820 USA Phone:(800) 945-2362 (Ext. 360) (603) 749-6434 (Ext. 360) Fax: (603) 742-2346 or (603) 749-6309 E-mail:[email protected] (Or contact your authorized distributor) Cost for repair, standard calibration, and calibration traceable to N.I.S.T. are available. NOTE: You must obtain a CSA# before returning any instrument. Technical and Sales Assistance If you are experiencing any technical problems, or require any assistance with the proper operation or application of your instrument, please call, mail, fax or e-mail our technical support team: Chauvin Arnoux®, Inc. d.b.a. AEMC® Instruments 200 Foxborough Boulevard Foxborough, MA 02035 USA Phone:(800) 343-1391 (508) 698-2115 Fax: (508) 698-2118 E-mail:[email protected] www.aemc.com NOTE: Do not ship instruments to our Foxborough, MA address. Simple Logger® II (Bluetooth Edition) Series 67 Limited Warranty The Simple Logger® II is warranted to the owner for a period of one year from the date of original purchase against defects in manufacture. This limited warranty is given by AEMC® Instruments, not by the distributor from whom it was purchased. This warranty is void if the unit has been tampered with, abused or if the defect is related to service not performed by AEMC® Instruments. Full warranty coverage and product registration is available on our website at www.aemc.com/warranty.html. Please print the online Warranty Coverage Information for your records. What AEMC® Instruments will do: If a malfunction occurs within the one-year period, you may return the instrument to us for repair, provided we have your warranty registration information on file or a proof of purchase. AEMC® Instruments will, at its option, repair or replace the faulty material. REGISTER ONLINE AT: www.aemc.com Warranty Repairs What you must do to return an Instrument for Warranty Repair: First, request a Customer Service Authorization Number (CSA#) by phone or by fax from our Service Department (see address below), then return the instrument along with the signed CSA Form. Please write the CSA# on the outside of the shipping container. Return the instrument, postage or shipment pre-paid to: Ship To: Chauvin Arnoux®, Inc. d.b.a. AEMC® Instruments 15 Faraday Drive • Dover, NH 03820 USA Phone:(800) 945-2362 (Ext. 360) (603) 749-6434 (Ext. 360) Fax: (603) 742-2346 or (603) 749-6309 E-mail:[email protected] Caution: To protect yourself against in-transit loss, we recommend you insure your returned material. NOTE: You must obtain a CSA# before returning any instrument. 68 Simple Logger® II (Bluetooth Edition) Series 01/13 99-MAN 100357 v6 Chauvin Arnoux®, Inc. d.b.a. AEMC® Instruments 15 Faraday Drive • Dover, NH 03820 USA • Phone: (603) 749-6434 • Fax: (603) 742-2346 www.aemc.com