1
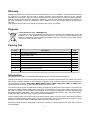
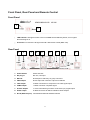
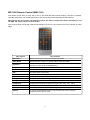
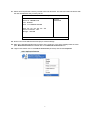
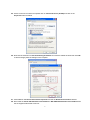
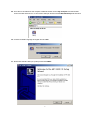
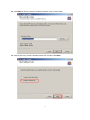
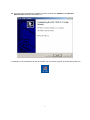
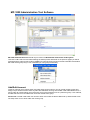
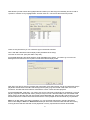
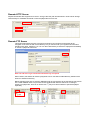
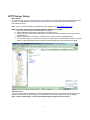
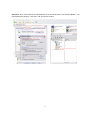
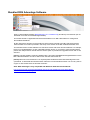
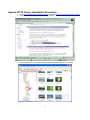
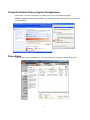
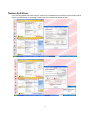
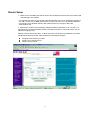
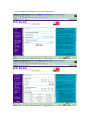
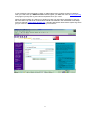
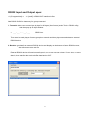
Network Media Player MP-1000 INSTRUCTION MANUAL http:// www.datavideo-tek.com Rev 030809 Contents Warnings and Precautions .................................................................................. 1 Warranty ............................................................................................................. 2 Disposal .............................................................................................................. 2 Packing List ........................................................................................................ 2 Introduction ......................................................................................................... 2 Front Panel, Rear Panel and Remote Control .................................................... 3 Front Panel ................................................................................................. 3 Rear Panel ................................................................................................. 3 MP-1000 Remote Control (RMC-160) ........................................................ 4 MP-1000 Unit initial Setup .................................................................................. 5 MP-1000 Installation ................................................................................... 5 MP-1000 Start up sequence ....................................................................... 5 MP-1000 SETUP Menu Map .............................................................................. 6 MP-1000 STORAGE Menu ........................................................................ 6 ‘Network’ Setup options .............................................................................. 7 ‘Time’ Setup options ................................................................................... 7 ‘Device’ Setup options ................................................................................ 8 Auto Start options ....................................................................................... 8 Language / Character set options .............................................................. 8 Factory Default settings .............................................................................. 9 CF Card based files and media .......................................................................... 9 MP-1000 Compatible Media Files .............................................................. 9 Permanent Autoconfig.mia File................................................................... 9 Temporary Autoconfig.mib File ................................................................... 9 Autoconfig file contents ............................................................................ 10 On screen scrolling text / ticker ................................................................ 10 CF card based playlist.mpl File ................................................................ 11 MP-1000 Configuration Options ........................................................................ 11 Planning and Preparing your MP-1000 set up .......................................... 12 Discovering your IP address on an existing DHCP network ............................. 13 Simple Static IP Network Set Up ....................................................................... 14 Add/Edit Account: ..................................................................................... 20 Enable AutoPlay: ...................................................................................... 21 Sever Setup Utility: ................................................................................... 21 Client Setup Utility: ................................................................................... 22 Playlist Commander .......................................................................................... 23 Group Playlist Files: ................................................................................. 24 Playlist Scheduler ............................................................................................. 26 Group Icons - MP-1000 Administration Tool ............................................. 28 Single Client Icons - MP-1000 Administration Tool ................................... 29 Remote HTTP Server ............................................................................... 30 Remote FTP Server.................................................................................. 30 HTTP Server Setup........................................................................................... 31 Bundled RSS Advantage Software ................................................................... 33 Apache HTTP Server Installation Procedure: ................................................... 34 Firewall and Anti-Virus program Configuration .................................................. 35 Zone Alarm: ...................................................................................................... 35 Norton Anti-Virus: .............................................................................................. 36 Router Setup ..................................................................................................... 37 RS232 Input and Output spec:.......................................................................... 40 Service & Support ............................................................................................. 41 Warnings and Precautions 1. Read all of these warnings and save them for later reference. 2. Follow all warnings and instructions marked on this unit. 3. Unplug this unit from the wall outlet before cleaning. Do not use liquid or aerosol cleaners. Use a slightly damp cloth for cleaning. 4. Do not use this unit in or near water. 5. Do not place this unit on an unstable surface, cart, stand, or table. The unit may fall, causing serious damage. 6. Any slots and openings on the case top, back, and bottom are provided for ventilation. To ensure safe and reliable operation of this unit, and to protect it from overheating, do not block or cover these openings. Do not place this unit on a bed, sofa, rug, or similar surface, as the ventilation openings may become blocked. This unit should never be placed near or over a heat source or radiator. This unit should not be placed in a built-in installation unless proper ventilation is provided. 7. This product should only be operated from the type of power source indicated on the marking label of the AC adapter. If you are not sure of the type of power available, consult your Datavideo dealer or your local power company. 8. Do not allow anything to rest on the power cord. Do not locate this unit where the power cord will be walked on, rolled over, damaged or otherwise stressed. 9. If an extension cord must be used with this unit, make sure that the total of the ampere ratings on the products plugged into the extension cord do not exceed the extension cord’s rating. 10. Make sure that the total amperes of all the units that are plugged into a single wall outlet do not exceed 15 amperes. 11. Never push objects of any kind into this unit through the case ventilation slots, as they may touch dangerous voltage points or short out parts that could result in risk of fire or electric shock. Never spill liquid of any kind onto or into this unit. 12. Except as specifically explained elsewhere in this manual, do not attempt to service this product yourself. Opening or removing covers that are marked “Do Not Remove” may expose you to dangerous voltage points or other risks, and will void your warranty. Refer all service issues to qualified service personnel. 13. Unplug this product from the wall outlet and refer to qualified service personnel under the following conditions: a. When the power cord is damaged or frayed; b. When liquid has spilled into the unit; c. When the product has been exposed to rain or water; d. When the product does not operate normally under normal operating conditions. Adjust only those controls that are covered by the operating instructions in this manual; improper adjustment of other controls may result in damage to the unit and may often require extensive work by a qualified technician to restore the unit to normal operation; e. When the product has been dropped or the case has been damaged; f. When the product exhibits a distinct change in performance, indicating a need for service. NB: The MP-1000 network is limited to 100 client devices being logged onto the PC/Server. Please contact your supplier or local Datavideo office for assistance with the creation of client/server networks in excess of 100 units. PC Monitors: Please be aware that not all PC Monitors can handle PAL or NTSC resolutions please check your monitor user manual or specifications page for confirmation of compatibility. This MP-1000 unit outputs at the following resolution and refresh rates on its VGA connector: PAL: Resolution:800*600 (720x576) V.Frequency:50Hz NTSC: Resolution:640*480 V.Frequency:59.94Hz Ensure you have the legal permission to display or play any copyrighted media. This includes but is not limited to photographs, images, video, music, spoken word or text. In most cases royalty fees may need to be negotiated, agreed and paid to the appropriate creative party or organizations prior to use. 1 Warranty Datavideo warrants that the equipment it manufactures shall be free from defects in material and workmanship for a period of 12 months from the date of product purchase. If this equipment fails due to such defects, Datavideo will, at its option, repair or provide a replacement for the defective part or product. Equipment that fails after the warranty period, has been operated or installed in a manner other than that specified by Datavideo, or has been subjected to abuse or modification, will be repaired for time and material charges at the Buyer’s expense. This warranty does not affect your statutory rights within the Country of purchase. Disposal For EU Customers only - WEEE Marking This symbol on the product indicates that it should not be treated as household waste. It must be handed over to the applicable take-back scheme for the recycling of Waste Electrical and Electronic Equipment. For more detailed information about the recycling of this product, please contact your local Datavideo office. Packing List Items Description Q’ty 1 BNC to BNC cable 1.2M 3 2 S-Video cable 1.2M 1 3 2RCA to 2RCA audio cable 1.8M 1 4 RJ-45 Ethernet Patch cable 8P to 8P 1M 1 5 2GB CF Card 1 6 MP-1000 Remote controller 1 7 MP-1000 Software CD 1 8 Switching Adaptor DC 12V / 0.5A 1 9 User’s Manual 1 Introduction The Datavideo MP-1000 is a versatile Digital Media player with LAN and Internet connectivity. Various media files can be stored and played back from its removable Compact Flash (CF) media card. These files can be remotely managed via an IP network connection using the built-in Ethernet port and supplied PC only Client/Server software. DVD (.VOB), MPEG (.MPEG / .MPG), JPEG (.JPG), Wave (.WAV) and MP3 quality content play lists can be set up and scheduled either remotely or locally. The unit also offers support for RSS feeds, enabling automatically updated text to be scrolled on screen like the news tickers used by leading broadcasters. This text is customizable in its size, speed, colour and opacity. The MP-1000 is a rugged 12V DC powered unit and stands up to the rigorous challenges of today’s Digital Signage and Media playback applications. The compact design makes the MP-1000 ideal for use in information kiosks, display advertising, and other small footprint point of sale installations. Loading media into the unit can be as simple as drag and drop transfer to the CF card for stand alone operation. However, the MP-1000 works best as part of an IP network whether it be a Local Area Network (LAN) in a single building or a multiple site Wide Area Network (WAN) operating over the internet. Distributing quality content to multiple MP-1000 units or displays at various locations has never been easier or more affordable! 2 Front Panel, Rear Panel and Remote Control Front Panel 1 2 1. LED indicator: LED light in Green color for POWER ON and Stand by status, and no light in disconnecting DC in. 2. IR receiver: To receive the IR signal from MP-1000 remote control (RMC-160). Rear Panel 1 2 3 4 5 6 7 8 1. Power Switch: Power ON/ OFF 2. DC plug in: DC 12V, 0.5A input 3. RS-232: D-sub 9pin for data entry for group command 4. VGA Output: D-sub 15pin VGA connector output to PC Monitor 5. YUV Output: 3 x BNC connectors for component YUV video signal output 6. CVBS Output: 1 x BNC connector composite signal 7. S-Video Output: 1x 4-Pin mini DIN Plug connector for S-Video (Y/C) signal output 8. Audio output: 2x RCA connectors for Stereo unbalance audio outputs 9. RJ-45 (Ethernet port): 100/10M base Ethernet Network interface 3 9 MP-1000 Remote Control (RMC-160) The remote control offers an easy way to set up the initial MP-1000 network settings, username, password, internally stored date, time, display parameters, auto start and keyboard language/character settings. NB: Remove the clear plastic anti-drainage tab from the battery compartment before attempting to use the RMC-160 remote control for the first time. Care must be taken with the MP-1000 manual settings if the unit is to be controlled over an IP network at a later stage. Key Legend Key Function Main Menu Switch to main menu screen from Smart Navi screen Video Mode Switch between S-Video, Composite Video ,VGA,YUV output Keyboard Only available in Setup menu screens to enter or exit virtual keyboard page (use key ‘0 / zero’ as the erase/delete key) MUTE Mute or Restore audio output VOL + Increase audio volume level VOL - Decrease audio volume level Position + Change position of scrolling text bar (down) Position - Change position of scrolling text bar (up) Background Color Background colour for scrolling text bar (8 colours) Foreground Color Foreground (text) colour for scrolling text bar (white and black) Transparent Scrolling text transparency/opacity level (0%, 25%, 50%, 75%, 100%) Speed Scrolling text speed settings (fast, normal and slow) Scroll Bar Clock Turn On/Off Clock display on the scrolling text bar EZ-Play Do auto download/playback files in A-Z order from CF card or execute “playlist.mpl” file in the CF card 4 MP-1000 Unit initial Setup MP-1000 Installation A High speed CF (Compact Flash) memory card is required to use this product. A Scandisk Ultra II 2GB card is already fitted internally but larger capacity cards upto 16GB can be used. If not already done format the CF card to FAT32 using a PC this will ensure better performance. Remove or Fit the CF card into the MP-1000 using the CF card slot on the left hand side of the unit. Connect the MP-1000 via Ethernet LAN cable to your PC, Local Area Network or Internet router. Connect video and audio cables between the MP-1000 and your monitor or connect the VGA output to a compatible PC monitor (see Warnings and Precautions page). Power on the MP-1000 unit. MP-1000 Start up sequence 1. When the unit is first set up with a monitor, speakers and is powered on it will go through the following sequence. 2. It will display a picture to the monitor saying Network Digital Signage Player. 3. It will then send an audible PING sound to the attached audio speakers. 4. If there is a configuration file on the CF card then the unit will display AUTO UPDATING… 5. It will then look for a network connection through the RJ-45 port and display INTIALIZING LAN … 6. NB: “Connecting to DHCP Server” may take longer depending on the speed of the network router in assigning an IP address to the MP-1000(s). 7. If the unit finds no network then it will check its internally fitted Compact Flash (CF) card for media, miaticker and playlist files. 8. If the CF card in the unit is blank then the unit will display the initial MP-1000 Setting Menu as below and then wait for user intervention. MP-1000 SETTING MENU [ V 2.9.87.0106U ] Device Local IP : 192.168.1.11 Server IP : 192.168.1.10 User : NDSP01 Time : YYYY/MM/DD HH:MM SETUP STORAGE MAC : XX - XX - XX - XX - XX – XX Server Connection : OFF Storage : 1952 MB Note : [ V 2.9.87.0106U ] = firmware revision 5 MP-1000 SETUP Menu Map The table below represents the different SETUP menu options available on screen when using the RMC-160 remote control. The left hand column is the first level of menu options the second column to the right is the next level of menu options and so on. Network Device Name Password IP Address Host Name DHCP Static IP Device IP Address Server IP Subnet Mask Address DNS Server Port Gateway Number Time Device Auto Start Language ( On Screen ) ( Keyboard ) Time Server URL Date If taken from a www based source Stored within unit Time Stored within unit Time Zone GMT + / - DST Daylight Saving Time (Time +1 hr if ON) Date Format For Ticker Display Restart Time Device Schedule HH:MM (then check network for new playlist files) Time ON & OFF per day MPEG2(16:9) PS (4:3) / LB (16:9) / WIDE (WS ZOOM) TV Type NTSC / PAL Main Menu Show / Hide – the Hide setting is not recommended CAT CF Card Refers unit to network Auto Playlist stored within server Refers unit to CF card for Playlist Http URL Refers unit to Http URL for FTP based playlist iCAT Similar to CAT but not currently available at time of printing English Turkish $ sign only No £ or € sign No £ or € sign Western European € sign only € sign only East South European If revision # on main menu ends with ‘U’ this means European RSS ticker text fonts are installed. Options are ‘English’, ‘EastSouth European’, ‘Western European’, and ‘Turkish’. Use with caution Factory Default Yes No Save and Reboot Saves current changes and restarts unit with these settings Yes No Back to initial SETUP and STORAGE menu options Return MP-1000 STORAGE Menu The Storage menu only allows confirmation of the CF card contents and playback of the media files already on the CF card. Press the Main Menu button on the RMC-160 remote control to return to the MP-1000 Setting Menu. 6 ‘Network’ Setup options User Name and Password: Use the “Keyboard” key on the RMC-160 remote to open the virtual keyboard. Move cursor to any letter and press ENTER, or use ‘0’ (zero) to erase an incorrectly typed letter. Once finished, press the “Keyboard” key again to exit virtual keyboard mode. Press ENTER key on ‘user name’ or ‘password’ to proceed to the next network set up page. Server IP and Host Name: Move the cursor using the arrow keys on the RMC-160 to select ‘Static IP’ or ‘Host Name’ on the Server IP page. Use the numeric key pad of the remote to type in the digits of the static IP or use the virtual keyboard button to type the ‘Host Name’. Press ENTER to move onto the next network set up page. (Server IP is the PC’s IP where your MP-1000 ADMINISTRATION TOOL program is running. The Host Name is for connection to an Internet server) Server Port: The default port is 5021. This port number must match with the port number in the MP1000 Administration Tool program. Please go to MP-1000 Administration Tool’s Server Setup Utility to check or modify the server’s port number. After changing the port number, close the MP-1000 Administration Tool and re-open it again to make the newly assigned port number active. If any changes are made to the MP-1000’s SETUP options then use the Save and Reboot menu option to store these in the unit. For now though press ENTER to move onto the next network set up page. Client DHCP or Static IP: Move the white cursor box to select either ‘DHCP’ or ‘Static IP’ and press ENTER. Your choice will take you to the Static IP set up page or DHCP Setup screen. (DHCP is recommended where a DHCP network already exists.) Enter the details for your chosen network type. Press ENTER to return to the SETUP main menu page. Save and Reboot: If you are making no further changes at this stage then highlight the Save and Reboot menu option to store these network settings in the unit. When the unit restarts the IP settings will become active if the unit is connected to the network or internet. ‘Time’ Setup options Time Server: Use cursor left or right to select ‘time.nist.gov’ or ‘windows.time.com’. Use the cursor up/down to then select the next item or key ENTER. If you are happy with the rest of the settings Press ENTER to return to the SETUP main menu page. Date: This selection is Optional as MP-1000 will get internet based time during power up initialization unless an IP connection is not available. Time: This selection is Optional as MP-1000 will get internet based time during power up initialization unless an IP connection is not available. Time Zone: Use cursor left or right to select your local GMT related time zone. DST: (Daylight Saving Time): Use cursor to select ON or OFF. If ON, it will add one hour to Time. Date Format: Change the format of the displayed Date when scrolling RSS or ticker text. If you are now happy with these settings Press ENTER to return to the SETUP main menu page. Save and Reboot: If you are making no further changes at this stage then highlight the Save and Reboot menu option to store these time settings within the unit. When the unit restarts the time settings will become active. 7 ‘Device’ Setup options Restart Time: Move cursor to select ‘OFF’ or type 2 digits for a daily reboot time. When time is reached, the MP-1000 will reboot itself. If auto start is set to a network mode, it will download the latest play list file. The MP-1000 will also send playback log data back to server for further usage. Device Schedule: Options OFF or ON. If ‘ON’ is selected, a line below will allow input of ON and OFF times as ‘HH MM to HH MM’. The Device ON time will turn on video and start playback from an existing play list file in the MP-1000 CF card. Device OFF time will stop playback. MPEG2(16:9): Options PS (4:3) / LB (16:9) / WIDE (WS ZOOM) TV Type: Options NTSC or PAL Main Menu: Options ON or OFF If you are now happy with these settings Press ENTER to return to the SETUP main menu page. Save and Reboot: If you are making no further changes at this stage then highlight the Save and Reboot menu option to store these time settings within the unit. When the unit restarts the time settings will become active. Auto Start options CAT: After power up, the MP-1000 will do nothing and wait for the RMC-160 remote or server’s command. Local CF: After power up, the MP-1000 will playback media files according to play list stored on the CF card or playback in A-Z order if no play list file is found. HTTP URL: Use the MP-1000 client admin tool to setup an internet URL path. After power up, the MP-1000 client will use this URL path to locate and download the play list file and action each item in the play list file. iCAT: Use the MP-1000 client admin tool to setup a LAN Server DHCP / IP network path. After power up, the MP-1000 client will use this path to locate and download the play list file and action each item in the play list file. Language / Character set options If revision / firmware number on the main menu ends with ‘U’ this means European character sets are installed. Example : V 2.9.87.0106U Selections are ‘English’, ‘East-South European’, ‘Western European’, and ‘Turkish’. This character set is used for the RSS and scrolling text or Instant message display. 8 Factory Default settings Yes will load standard default values into MP-1000 Setup settings. For example; Device Name: Password: Server Server Port: Device IP: TV Type: Main Menu: NDSP01 123 IP: 192.168.1.100 5021 DHCP* NTSC Show (Displayed) *Default Device IP will be 192.168.1.105 until the new IP is assigned by the DHCP server. Save and Reboot: Save all the current changes and reboot the MP-1000 to make the changes active. Return to menu: Return to the previous MP-1000 Setting Menu. CF Card based files and media There are various files which can be transferred by IP connection or by drag and drop transfer to the CF card from a PC CF card reader. This section will attempt to describe each of the files and what they do. MP-1000 Compatible Media Files The MP-1000 can playback the following types of standard definition media file. DVD MPEG 2 .vob .mpg / .mpeg These files can include video and audio These files can include video and audio JPEG .jpg Still photograph images Wave MP3 .wav .mp3 Audio files Audio files Ensure you have the legal permission to display or play any copyrighted media. This includes but is not limited to photographs, images, video, music, spoken word or text. In most cases royalty fees may need to be negotiated, agreed and paid to the appropriate creative party or organizations prior to use. Permanent Autoconfig.mia File All MP-1000 setup settings can be modified in the “Client Setup Utility” which is part of the MP-1000 Administration Tool software. You can store these settings into a text file called “autoconfig.mia” and then save this onto the MP-1000’s CF card. When powered up the MP-1000 will display an “Auto Updating” message and save the chosen settings from its CF card into the units EEPROM chip. After updating remove the CF card and delete this file from the CF card with a PC to avoid a reload and update of the unit again. Temporary Autoconfig.mib File If you save the settings in a file named “autoconfig.mib” it will do the same thing as above to update the EEPROM chip except this autoconfig.mib file will be automatically deleted from the CF card after the update is completed. 9 Autoconfig file contents The contents of the two types of Autoconfig file can be read with Windows Notepad as though it were a text file. An example of the contents of an autoconfig file could be : [Server] servername=192.168.1.10 serverport=5021 username=POS0001 pwd=123 [Network] dhcp=0 staticip=192.168.2.11 submask=255.255.255.0 gateway=192.168.1.1 dns=192.168.1.1 [Time] timezone=0 daylsaving=0 reboottime=OFF starttime=OFF stoptime=OFF [Preference] autoplay=1 videoout=1 tvmode=3 tvtype=2 On screen scrolling text / ticker If an IP related RSS feed is not to be used then a regular .txt file called miaticker.txt can be used to store any text data including English, Chinese or Japanese. This text file data will be scrolled like stock reference and price or news ticker at the same time as any jpeg photograph or compatible video file. NB: The scrolling text will only be played back if included in the Playlist on CF card or Auto Playlist if this file is held on a PC/Server. At the 1st line of the text file, the user can program some settings for the ticker using the syntax: osd_settings=[B/G colour], [F/G colour], [B/G Transparency], [Speed], [Font Size], [Clock] B/G colour: 0=blue, 1=grey, 2=red, 3=light blue, 4=green, 5=yellow, 6=magenta, 7=orange F/G colour: 0=white text, 1=black text B/G Transparency: 0=100% transparent effect (no B/G colour), 1=75%, 2=50%, 3=25%, 4=0% (solid colour B/G) Speed: 1=slow, 2=normal, 3=fast Font size: 1=small, 2=medium, 3=large Clock/Date: 0=Off, 1=On [Note:] Defaults are white text on a grey background if no osd_settings line included in the .txt file. Example miaticker.txt file contents could be : osd_settings=2,0,4,2,3,1 Mary had a little Lamb, its fleece was white as snow … 1 CF card based playlist.mpl File This simple play list file below describes the length of display time in seconds for a JPEG file. The transition number can be 0 for straight cuts or 1 for a random wipe or 2 for a standard dissolve. File0 is the ticker data as described on the previous page. It is important to try to match the length and speed of your text crawl with the duration of your play list so the ticker does not get cut off part way through a run. [configuration] globalinterval=5 transition=1 [file0] path=C:\Program Files\CAT\Samples\miaticker.txt size=1213 [file1] path=C:\Program Files\CAT\Samples\CAT1.JPG size=46167 [file2] path=C:\Program Files\CAT\Samples\CAT2.JPG size=37722 [file3] path=C:\Program Files\CAT\Samples\CAT3.JPG size=58131 [file4] path=C:\Program Files\CAT\Samples\CAT4.JPG size=35635 [file5] path=C:\Program Files\CAT\Samples\CAT5.JPG size=39338 MP-1000 Configuration Options Before configuration you need to decide which way you would prefer to work with the MP-1000 unit or group of MP-1000 units. The options are: Stand Alone Manual Mode You will program the units settings locally using the RMC-160 remote control and media files will be loaded to the units CF card via simple drag and drop PC transfer using a CF card reader or a single unit static IP connection via Ethernet crossover cable to the PC/Server. Local Area Network (LAN)* You will program the units settings remotely using the supplied software and media files will be downloaded to the unit (when unit is not in use) via an existing DCHP LAN or Static IP network. Wide Area Network (WAN)* You will program the units settings remotely using the supplied software and media files will be downloaded to the unit (when unit is not in use) via the internet to an existing WAN using DNS, FTP and or URL settings. *NB: The MP-1000 network is limited to 100 units (or client devices) being logged onto the PC/Server. Please contact your supplier or local Datavideo office for assistance with the creation of client/server networks in excess of 100 units. 1 Planning and Preparing your MP-1000 set up Step 1. Copy existing media files that you want to use into one logical drive or folder on your PC/Server. Remember: Keep your master copies of these media files backed up somewhere else so they are safe and so they cannot be permanently deleted by accident. 2. Ensure you have the legal permission to display or play any copyrighted media. This includes but is not limited to photographs, images, video, music, spoken word or text. In most cases royalty fees may need to be negotiated, agreed and paid to the appropriate creative party or organizations prior to use. 3. Ensure your chosen media files are compatible for playback on the MP-1000 unit – see the section entitled MP-1000 Compatible Media Files. 4. If any of your chosen media files are not compatible then you should look to convert these files using a media file conversion program such as the Datavideo DV File Converter, or Grass Valley ProCoder 3 or Rhozet Carbon Coder ( NB: these products are not supplied with the MP-1000 ). 5. Make sure the space taken up by your media files does not exceed the capacity of your MP-1000 CF card. The original CF card supplied within the MP-1000 unit has a capacity of 2GB (Giga Bytes). If you need more space on the CF card then you will need to purchase a larger capacity card for each unit. Please speak to your local dealer about the price and availability of larger CF cards for the MP1000. 6. If needed create a text file for the scrolling ticker feature using Windows Notepad – see the section entitled On Screen Scrolling text / ticker. Windows Notepad can be found on any Windows XP Professional PC by following the menu path Start > All Programs > Accessories > Notepad. Remember to save your text file in the same drive/folder as your media so it is easy to locate later on. It is important to try to match the length and speed of your text crawl with the duration of your media playback so the ticker does not get cut off part way through a run. 7. Set up your MP-1000 with a compatible monitor and, if required, active audio speakers and network connection. 8. Transfer the compatible media files and ticker .txt file to the CF card using a compatible CF card reader slot built into your PC or using a network set up as described later in this manual. 9. If using a Stand Alone set up return the programmed CF card with media files to the slot in the MP1000 unit. 10. Use the RMC-160 remote control (for Stand Alone set up) or the MP-1000 Administration Tool software (for Network setup) to start playback of the files. 11. Watch the unit playback the files in order until it repeats. Time the total length of playback if not already known and make a note of any obvious text playback or media order of play mistakes. 12. You can now review and adjust your configuration settings, text file content and media playback order to fine tune the set up. 1 Discovering your IP address on an existing DHCP network Before attempting to set up the MP-1000(s) on an existing DCHP network please consult your local I.T. support as this may effect the overall performance of data transfer on the existing network. They may also need to open certain communication ports and depending on your organization they may also need permission from higher level management before doing this too. To talk to your MP-1000 unit(s) over an existing DHCP Network you need to establish what the given IP Address is for the PC/Server as this will be running the MP-1000 Administration Tool software. From the PC/Server’s desktop click on START then choose RUN. Enter command and click OK A new window will open and at the MSDOS flashing cursor prompt type IPCONFIG /ALL and press the ENTER key. The system IP address will then be listed on screen. For the purposes of this manual we shall say this PC’s IP Address is returned as 192.168.1.10 and on each MP1000 Network SETUP menu we will use this IP address as the Servers IP address when setting it up for a DHCP network. Please note: The PC’s IP address on a DHCP network may change on a daily basis at start up so it may be wise to check this on a regular basis unless your Network Administrator or local I.T. support can fix the IP address or make it a Static IP address on your DHCP network. To exit the command / MSDOS window type EXIT at the flashing cursor and press the ENTER key. 1 Simple Static IP Network Set Up The easiest network set up is a single MP-1000 connected directly to a PC/Laptop running an XP Professional 32 bit Operating System. Please note : this set up requires an Ethernet crossover cable with RJ-45 connectors and this cable is not supplied with the MP-1000 unit. The RJ-45 cable supplied is a straight through network patch lead and this can only be used with an existing network wall socket or router socket. 1. Set up your MP-1000 with a compatible monitor and, if required, active audio speakers. 2. Connect the RJ-45 crossover cable between the PC/Laptop’s network port and the Ethernet port on the MP-1000. 3. Power on the MP-1000 and use the RMC-160 remote control to access the Main Menu on the MP1000. 4. Choose SETUP and press the enter key. 5. Choose Network and press the enter key. 6. Use the Keyboard button on the RMC-160 to launch the on-screen keyboard. 7. Using the arrow and enter keys on the RMC-160 remote select the letters and numbers required to make up the username of the MP-1000 unit. Choose something unique. This name is limited to a length of 8 characters. Use the 0 key (zero) on the RMC-160 remote control to delete an incorrectly typed character. 8. Once you are happy with the typed username press the Keyboard button again to exit the on-screen keyboard. 9. Move onto the password field using the arrow keys and use the Keyboard button on the RMC-160 to launch the on-screen keyboard. 10. Using the arrow and enter keys on the RMC-160 remote select the letters and numbers required to make up the password of the MP-1000 unit. Choose something unique. This password is limited to a length of 4 characters. 11. Now press the enter key to move onto the server details page. 12. Using the arrow keys on the RMC-160 remote highlight IP Address and then move down to type in the digits of the Server IP address using the number keys. Enter the following numbers 192, move across to the next octet and enter 168, move across again and enter 001, move across and enter 010. The screen should show 192.168.1.10. 13. Port Number – should already be 5021 as a default setting – leave this as it is. 14. Now press the enter key to move onto the next page. 15. Using the arrow keys on the RMC-160 remote highlight the Static IP option and then press the enter key. 16. Using the arrow keys on the RMC-160 remote move to type in the digits of the MP-1000 Device IP address using the number keys. Enter the following numbers 192, move across to the next octet and enter 168, move across again and enter 001, move across and enter 011. The screen should show 192.168.1.11. 17. Using the same process as step 16 set the Subnet Mask as 255.255.255.0 18. Using the same process set the DNS as 192.168.1.1 19. Using the same process set the Gateway as 192.168.1.1 20. Now press the enter key to go back to the SETUP menu. Move the highlight down through the menu options to Save and Reboot and then press the enter key on the RMC-160 remote control. 1 21. Select Yes and press the enter key. The MP-1000 unit will reboot. The start menu will look like this with the new IP addresses that you have just set. MP-1000 SETTING MENU [ V 2.9.87.0106U ] Device Local IP : 192.168.1.11 Server IP : 192.168.1.10 User : NDSP01 Time : YYYY/MM/DD HH:MM SETUP STORAGE MAC : XX - XX - XX - XX - XX – XX Server Connection : OFF Storage : 1952 MB 22. Now move onto the Stand alone PC/Laptop’s network settings. 23. Start up the Windows Stand Alone PC/Laptop in the usual way, once at the desktop follow the menu path: Start>Control Panel and double click on the Network Connections icon. 24. Right mouse button click on Local Area Connection (as below) and choose Properties 1 25. Under Local Area Connection Properties click on Internet Protocol (TCP/IP) and click on the Properties button as below. 26. Now click the selection for Use the following IP address and enter the details as below then click OK to store and apply these IP settings in the computer. 27. Click Close on Local Area Connection Properties and exit the Network Connections window. 28. Now install the Client Administration Tool Software or MP-1000 Administration Tool Software from the CD supplied with the MP-1000 unit. 1 29. Once the CD is loaded into the computer’s CD/DVD drawer click on My Computer and then double click on the MP-1000 CD Icon. A new window will open double click the MP-1000 Setup Icon as below. 30. Leave the installer language as English and click OK. 31. Now Follow the MP-1000 (v.2.0) setup wizard click NEXT. 1 32. Click NEXT to allow the wizard to install the software in the correct location. 33. Click the tick box to create a desktop shortcut icon and then click NEXT. 1 34. Once the wizard completes the installation process as below click FINISH and the MP-1000 Administration Tool will automatically run. A Desktop Icon for the Software will also be created. You can start the program by double clicking this Icon. 1 MP-1000 Administration Tool Software MP-1000 Administration Tool should only be used on a Windows XP Professional 32 bit system. Just click on MP-1000 Icon and after following the install process described on the previous pages you will be presented with a screen layout as above. Home in the Server Groups panel on the left hand side is the default MP-1000 device group but you can create/add your own groups if necessary. Add/Edit Account: Create or manage group names and/or user (MP-1000) account names. You can create multiple groups and assign unique account names. When any MP-1000 client/user unit logs into the MP-1000 Administration Tool, it will go under its corresponding group if the user account name matches one in a particular group. If not matched, the MP-1000 user account will be seen under the default Home group. Please note: The MP-1000 Client user account name must match the Device Name set up within the MP-1000 unit setup menu for it to show within the correct group. 2 Enable AutoPlay: When the MP-1000 powers up and logs into the MP-1000 Administration Tool the software will automatically send an autoplaylist.mpl file and its matching content media files. Instead of EZ-Play (manual mode), this AutoPlay mode can be more useful for users. For AutoPlay mode to work correctly, please make sure AutoStart=CAT onboard the MP-1000 otherwise it may conflict with AutoStart=http URL in the MP-1000 Administration Tool. Sever Setup Utility: Allows the administrator to make changes to the PC/Server. The default Server port 5021 is used for port forwarding on the network router to access the MP-1000 ADMINISTRATION TOOL program. NB: The network is limited to one hundred MP-1000 client devices being logged onto the PC/Server. Please contact your supplier or local Datavideo office for assistance with the creation of larger client / server networks. Note: MP-1000 Administration Tool needs to be shut down and re-started for any new port change to become active. 2 Client Setup Utility: Is an editor used to create or open an autoconfig.mia file. This file is used to update the MP-1000 client’s setup values. Save the autoconfig.mia file into a CF card, then fit this into an MP-1000 and power on. The MP-1000 will show an “Auto Updating” message and then re-start again with the new settings. IP or Hostname: Type in static IP for local LAN server or hostname for remote set Example: 192.168.1.100 or www.test.com Port: default is 5021. If 5021 is already used on the existing network, then change to different number. Make sure to change to the same port # in the MP-1000 setup, MP-1000 Administration Tool and any router’s port forwarding settings. Client Account Name and Password: Type in MP-1000’s unique user name and password for IP network set up. After the MP-1000 client powers up and logs into MP-1000 Administration Tool the PC/Server will show the MP-1000 client in its matching user defined group or the default home group. DHCP or Static IP: Select Dynamic IP if using a router/existing network or fixed static IP. Time Zone: Select your local GMT time zone. Daylight Saving: Check will add one hour to the current time set up. Reboot time: When this time is reached the unit will stop playing files and reboot itself so that the latest playlist or settings can be downloaded from the network or server. Device On: When this time is reached the unit will start playing files from the CF card according to the latest settings or playlist. Device Off: When this time is reached the unit will stop playing files and wait for further commands or a Device On time to be reached. Video Output: select S-Video(including Composite video), VGA, YPbPr output. [Note:]You can also use the “Video mode” key on RMC-160 remote control to switch between outputs. 2 Auto Start: Off: After power up, client will do nothing and wait for the remote or server’s command. CF card: After power up, the MP-1000 client will playback according to play list file stored in the CF card or playback files in A-Z order if no play list file is found. HTTP URL: Use CAT’s client setup utility to enter network URL path. After power up, the MP1000 client will go to this URL or IP path to download the play list file and execute the action items listed within the play list file. Update Client: is a remote command from the PC/Server to the MP-1000 clients. It will send the current settings to all the MP-1000 client devices in the selected group. The client devices will reboot after saving the settings into their EEPROM chips. It should take an MP-1000 upto 2 minutes to go from logging off the network PC/Server to logging back in again. Playlist Commander Local Directory: Loads media files from local PC’s directory. Alternatively you can select files from a HTTP Server or Remote FTP Server instead. Once files have been selected and are moved into the right hand client window, press ‘EZ-Play’ on selected group, server will transfer the selected files to the relevant MP-1000 clients. Remote HTTP Server: Type in URL address and filename to be downloaded from the remote HTTP server. Remote FTP Server: Allows FTP login and then browse and select files to create a play list. File Type: MPL filter check box is for playlist extension (.mpl) only. This feature is to support multiple playlist with time range settings. Open: Open an existing playlist file. This is so the playlist can be checked and amended. Save: Save a new playlist file or overwrite an existing one. >: move a single selected file to client playlist window on the right. >>: move all files to the client playlist window. Select Group: Highlight which client group is to execute via “EZ-Play” or “AutoPlaylist” using the relevant buttons. EZ-Play: All media files in the client playlist window will be downloaded to the MP-1000 clients and played back immediately. AutoPlay: Creates an Autoplaylist.mpl file under the selected group and enables Autoplay mode.This may not be effective until the client is rebooted using options under Group Icons or the next time the MP-1000 in that group is powered on. The User can pre-assign a different playlist file for each group of MP-1000 clients. 2 Group Playlist Files: Use the MP-1000 Playlist Commander window to create or select your own play list files. In the example below the File Type : mpl tick box is selected so that only .mpl play list files can be seen within the current files list for the selected folder. For autoplay mode you must save the play list file into a group folder so all of the Client MP-1000’s in that group are able to refer to and use this file. For example, below the modified AutoPlaylist.mpl file is being re-saved within the Home folder. Files already included in a play list can be highlighted and then deleted using the Del button. Files can also be moved up or down the play list order using the arrow buttons up and down. NB: Ticker Text files work best when set as the first item in a play list. All files in the play list can be deleted with the clear button. Note: After clearing a play list the new files would then need to be selected with the File Type: mpl tick box deselected so that all file types can be seen again as below. 2 Duration/Times: Enter a loop playback count for a video file or a duration time in seconds for a JPEG file. Time : From hhmm & To hhmm Example: clip2.mpg in below table shows the file plays in full 2 times in every loop between 08:00 and 10:00. Example: CAT1.JPG duration on screen is 30 seconds in every loop between 08:00 and 19:00. Del: Clear: Up/Down arrows: Removes a single selected file from the play list window Removes all files from the play list window and resets values in the Setting menu Move up or down to move a highlighted filename to another position in the play order Settings: Some useful settings for the play list file Picture Play Time: Picture Transition Mode: Mute Sound: Control the interval/transition time between JPEG files 3 modes available (Full screen, Random, and Cross Fade) Mute sound in the play list, all the content playback will be silent. 2 Delete Files: No Action: default value, do nothing. Format CF card: Will delete all files in the CF card then download new files based on playlist mpl. Files not in the playlist: If CF card has many files, the files not in the playlist will be deleted. If on the playlist, will be kept to avoid download again. Files in the playlist: This is like multiple file deletion command. It will only delete files in the playlist. Download schedule: will write the download time into the playlist file. When this time is reached the MP-1000 client will start to download content according to the specified playlist file. Note:The schedule download time depends on the PC/Server's time, not the MP-1000's time. Playlist Scheduler This feature allows user to manage an advanced and flexible playlist schedule, not just for time of day only. Users can program multiple playlist files with different date ranges and or weekday choices. The MP-1000 client will check its internal time clock against the group schedule file IE: <filename>.sch and then download today’s play list file from the HTTP server or local MP-1000 Administration Tools. Go to Tools and select Playlist Scheduler 2 Next Browse your MP-1000’s Group playlist files and select your date range and weekday and click “Add”or “Update” or ”Delete” for any highlighted file. And then save as a .sch file into the same Group folder. There are two places that you can create this type of advanced schedule. One is with MP-1000 Admin tools autoplay mode (AutoStart=Off in Setup) The other is HTTP URL path (Auto Start= Http URL). For the first case, MP-1000 tools autoplay mode (AutoStart=Off in Setup), you need to go in to Account Management and browse to the required .sch file and enable Autoplay mode. After demo.sch (above picture) is enabled, MP-1000 Admin Tools will read this .sch file and determine today’s playlist file and send this to the MP-1000 client(s) when it(/they) logs into the MP-1000 Admin Tool on the PC/Server. The MP-1000 client will then download the correct content and start playback. For the second case, (Http URL), you need to use an FTP client tool to upload all your scheduling (.sch) and playlist (.mpl) files to this Http URL folder. (example. http://192.168.1.60/1000 folder) Then use the MP-1000 Admin Tool to set the Http URL path into the MP-1000’s EEPROM chip. When the MP-1000 powers up, it will download the demo.sch file first and then determine the current playlist file and download any required files. Note: For an MP-1000 to get today’s playlist file, you can set a daily reboot time in the MP-1000 Setup Menu under Setup -> Device -> Restart Time. Example. When set to 06:30 the MP-1000 will reboot every morning at 06:30 and then start with a new playlist file once any required files have been downloaded. 2 Group Icons - MP-1000 Administration Tool The Icons for Play, Stop, Msg, Msg Off, RSS, Volume, Video and Options are all Icons which send commands to a group of MP-1000 clients. It is important to highlight the correct group before clicking an Icon. When activated the same command goes to all clients in the selected group, one by one. Account Icon: This allows creation of groups and MP-1000 Client user names for group management. Group Icons: Play: Sends a ‘Playback’ command manually to a group of MP-1000 clients. Stop: Sends ‘Stop’ command manually to a group of MP-1000 clients. Message: An instant message editor window will pop up. You can select any .txt file or manually type in a text message, then send this to a group of MP-1000 clients. An On Screen news ticker will scroll the given text from right to left at the bottom of the MP-1000 client screen until it is removed by a reboot or other command. Message Off: Sends a “Message Off” command to group of MP-1000 clients. Any current ticker will be removed from the display and other files will continue to play. RSS: Send a live RSS news ticker feed from the internet to a group of MP-1000 clients. See ‘Bundled RSS Advantage software’ section also, as this must be pre-installed with Microsoft .net Framework 1.1 or 2.0 for this feature to work correctly. Note : RSS Advantage is only compatible with Windows XP Professional 32bit OS. Volume: Has the ability to Mute the audio output from a group of MP-1000 clients or change the audio playout to 1 of 15 levels of audio volume. Video: Turns ON or OFF the video output from a group of MP-1000 clients. Options: Less frequent group commands are located here such as… Send Playlist: Download: Playback: Format: Similar to the Playlist button but sends the file to a group of MP-1000 clients. Only sends a Download command to the selected group of clients. Sends a Playback command to a group of clients. Sends a format CF card command to a group of clients. All files in CF card will be erased. Reboot: Sends a reboot device command to a group of clients. Good for adhoc playlist changes were only 1 or 2 files need to be changed. Group Status: Asks all MP-1000 clients in the same group to send their status back. Shutdown: Sends shutdown command to all clients in a group. All clients will then power OFF. [CAUTION:] The MP-1000 Administration Tool cannot remotely power a group of MP-1000 clients back on after using the shutdown option above. The only way to turn them back on is one by one with the remote control or by power cycling each unit in turn. 2 Single Client Icons - MP-1000 Administration Tool The Icons for Status, Capacity, CF Data and Playlist are all Icons which send commands to a single MP-1000 client. It is important to highlight the correct group and then client username before clicking an Icon. When activated only the selected MP-1000 client user will respond to the command. Account Icon: This allows the creation of Client groups and MP-1000 Client user names for group management. Single Client Icons: Status: Asks a single MP-1000 client to send back its current status data including time, current playback filename, music and instant message. Example: Playing [01:54:30] Deal_of_the_Day1.vob(5/11,16) 0:0:6, Scrolling Text: BOGOF.txt Capacity: Asks a single client to report back CF card capacity and firmware version #. Example: Storage Total Size: 1952MB, Free Space: 762MB. F/W version: V2.9.87.0106U CF Data: Asks a single client to report all the filenames on the CF card. Any filenames found will be displayed on the CF tab screen of MP-1000 Administration Tool. CF Data [Delete]: Click right mouse button on the CF window, a ‘Delete’ option will pop up. You can then check all the files to be deleted and then click this ‘Delete’ option. The MP-1000 Administration Tool will then send the delete command to the selected MP-1000 client to remove those checked files. The CF tab screen will then be updated to show the current CF Data. Playlist: Asks a single MP-1000 client to report its current play list file. It will then display the play list file order on the play list tab screen of MP-1000 Administration Tool. 2 Remote HTTP Server Playlist commander also supports HTTP server. Just type the URL path and filenames in HTTP server storage. Click EZ-Play for immediate download or save the playlist file for future use. Remote FTP Server This feature also allows the user to access an FTP server and create an FTP playlist. All the navigation is the same as with a local directory but you need to enter your regular FTP information including user name, password ..etc. You can then click EZ-Play to execute A-Z playback immediately or save to a playlist for future use. Enter the FTP user Login and Password details only if required When chosen, this feature will save the playlist file into an FTP Server folder/directory instead of the local PC’s hard drive directory. Below example shows how to save the ‘EZplaylist.mpl’ file and upload it to the the Remote FTP Server into a folder labelled 1000. This process can be combined with the Auto start=FTP url setting to update your playlist file. There is no need to use 3rd party FTP client software to upload the playlist separately. 3 HTTP Server Setup Microsoft IIS You need to setup your PC as HTTP server, so it can become a content server to send media files to client devices. Your Windows XP must be the Professional version. XP Home edition has no IIS (Internet Information Services). (Note: This can be downloaded as freeware http server software from http://httpd.apache.org/) Microsoft XP Pro IIS (Internet Information System) installation procedure: 1. Go to Control panel and select Add/Remove programs 2. Select Add/Remove Windows Components on the left column 3. Check “IIS (Internet Information Services)” and install, you may be asked to insert your Microsoft Installation CD. 4. After the installation is complete, a subfolder will be created under C:\inetpub\wwwroot 5. You can then create your subfolder to put all your media files in, also let wwwroot become a shared folder. So all the subfolders under wwwroot can be accessed by an MP-1000 client’s request. Important note: If you encounter a http download error on MP-1000 Administration Tool, it is possible that the anonymous access is not checked on the IIS property. Please follow the next screen grab to check your settings. Note : Please disable Skype, or other Instant Messaging programs before using IIS. 3 Procedure: Go to Control Panel->#1.Administrative Tools->#2.IIS Shortcut-> #3. shared subfolder -> #4 property/Directory Security -> #5. Edit -> #6. Anonymous Access 3 Bundled RSS Advantage Software Firstly, install the RSS software (RssAdvantage-1.0.2.3-miaticker.zip) bundled by manufacturer (Do not download it from the www.rssadvantage website). This is RSS Feeds 2.0 application allows the administrator of an MP-1000 network to manage their favorite RSS feeds/links. All the news tickers scrolling on the PC/Server screen will be mirrored to the MP-1000 client devices when the RSS Icon button is pressed in the Group Icons section of the MP-1000 Administration Tool. This bundled version of RSS software is a free basic version with some removed features. For example, there is no “Enable/Disable” on each individual RSS link chosen. If you prefer to have the full features, please click Help and then choose About to see the option to purchase an upgraded version with a 10% discount. [Note1]: The RSS software must be installed under C:\Program Files\RSS Advantage\Newsticker for the MP-1000 Administration Tool to be able to fetch the RSS news ticker file. [Note2]: Microsoft .net Framework 2.0 is required please install this before RSS Advantage becomes operational. To download this software search “Microsoft .net download framework 2.0” from any search engine or click the link below in this PDF document. Note: RSS Advantage is only compatible with Windows XP Professional 32bit OS. http://www.microsoft.com/downloads/details.aspx?FamilyID=0856EACB-4362-4B0D-8EDDAAB15C5E04F5&displaylang=en 3 Apache HTTP Server Installation Procedure: 1. Go to http://httpd.apache.org/download.cgi to download apache_2.2.4-win32-x86-no_ssl.msi 2. Follow the on screen instructions to install to software. 3. Copy content files to C:\Program Files\Apache Group\Apache\htdoc\ for download 3 Firewall and Anti-Virus program Configuration Please note : your anti-virus program or firewall may try to block the MIAICS program. Answer : Firewall: Set XP’s own Firewall to OFF, otherwise the MP-1000 clients may not be able to log in to MIAICS. Zone Alarm: If you use Zone Alarm, add MIAICS as a trusted program and IP range for the MP-1000 clients. 3 Norton Anti-Virus: If you are using Norton Anti-Virus program, make sure to add MIAICS as a trusted program and also set IP ranges for client devices to go through. Easiest way is to set Personal Firewall to OFF. 3 Router Setup 1. Make sure to set DMZ to ON and set its IP to the IP address of the PC that runs the MP-1000 Administration Tool software. For example if the PC that runs the MP-1000 Administration Tool has an assigned IP address of 192.168.1.10 then turn on DMZ and set the IP to match 192.168.1.10. This will allow data and commands to move between the MP-1000 clients and the PC running the MP-1000 Administration Tool. 2. Make sure to enable “Port Forwarding” settings as Start:80, End:5021 for IP: 192.168.1.10 Otherwise only commands between the MP-1000 clients and the PC can pass through, but not data files like playlist.mpl MIAICS uses port 80 and port 5021, so these two ports must be open to let MIAICS commands and files pass between the MP-1000 client devices and MIAICS program. Setup MP-1000 Client to port 5021 Setup FTP to ports 20 and 21 Setup HTTP to port 80 3 Turn on DMZ server and input your PC server’s IP address Turn on DHCP and set a valid IP range (optional) 3 If your PC/Server’s IP is assigned by ADSL or cable modem with a dynamic IP and not a static IP. Then you need to set up a DNS host name. Please register your DNS host name at www.dyndns.org and program your dyndns.org user name and password into your router. When the router powers up, it will log in to dyndns.org with your host name. Remember to set your MP-1000 client’s up with server as host name instead of IP address in the onboard MP-1000 Setup menu for example: www.miatech.blogdns.com . The MP-1000 Clients will check the dyndns.org site to get your router’s current IP address and that of your PC/Server. 3 RS232 Input and Output spec: <!--[if !supportLists]--> <!--[endif]-->RS232 CAT interface In/Out Add RS232 ICON for data entry for group command 1. Transmit: allow user to enter byte by byte for 20 bytes (Hex format) under Tools-> RS232 utility, and then pop up an input window. _ _ - _ _ - ….. _ _ - _ _ SEND icon Then send to each player of same group thru network and then player transmits data to external RS232 device 2. Receive: get data from external RS232 device and display on the bottom of same RS232 screen, also allow save as a text file. External RS232 device will send several bytes in, so we can use set a timer. If over 1sec, no more data in, then transfer the receive buffer data back to CAT. 4 Service & Support It is our goal to make your products ownership a satisfying experience. Our supporting staff is available to assist you in setting up and operating your system. Please refer to our web site www.datavideo-tek.com for answers to common questions, support requests or contact your local office below. Datavideo Global Website: www.datavideo-tek.com Datavideo Corporation Tel: +1 562 696 2324 Fax: +1 562-698-6930 E-Mail: [email protected] Datavideo Technologies Europe BV Tel: +31-30-261-96-56 Fax: +31-30 261-96-57 E-Mail: [email protected] Datavideo UK Limited Tel: +44 1457 851 000 E-Mail: [email protected] Fax: +44 1457 850 964 Datavideo Technologies Co., Ltd Tel: +886 2 8227 2888 Fax: +886-2-8227-2777 E-mail: [email protected] Datavideo Technologies China Co., Ltd Tel: +86 21-5603 6599 Fax:+86 21-5603 6770 E-mail: [email protected] Datavideo Technologies (S) PTE Ltd Tel: +65-6749 6866 Fax: +65-6749 3266 E-mail: [email protected] Datavideo HK Ltd Tel: +852 2833 1981 E-mail: [email protected] Fax: +852-2833-9916 All the trademarks are the properties of their respective owners. Datavideo Technologies Co., Ltd. All rights reserved 2018. G082060367B2 4