1
ICRTouch TMS
user manual
ICRTouch
TMS Manual
by ICRTouch LLP
This manual is designed as a guide to operating TMS.
For updates to this manual, and for further information
please visit the dealer's page on our website,
www.icrtouch.com
Contents
I
Table of Contents
Part I Introduction
1 Overview
6
................................................................................................................................... 6
Part II Communication
8
1 Program Send/Receive
................................................................................................................................... 8
2 X Read Terminals
................................................................................................................................... 9
3 Schedule Program
...................................................................................................................................
Changes
11
4 Z Read Terminals
................................................................................................................................... 12
Part III End of Day
14
1 Declare Totals
................................................................................................................................... 14
2 Configuration
................................................................................................................................... 15
Part IV Maintenance
1 PLU
18
................................................................................................................................... 18
Edit PLU
.......................................................................................................................................................... 18
PLU Activity
......................................................................................................................................................... 27
Edit Recipe .......................................................................................................................................................... 28
List PLU
.......................................................................................................................................................... 29
Department .......................................................................................................................................................... 30
PLU Group .......................................................................................................................................................... 31
Mix and Match
..........................................................................................................................................................
1
32
Mix and Match
..........................................................................................................................................................
2
35
2 System Programming
................................................................................................................................... 37
Fixed Totals .......................................................................................................................................................... 37
Non PLU table
.......................................................................................................................................................... 40
Batch Reports.......................................................................................................................................................... 41
System Flags.......................................................................................................................................................... 42
System Flags
......................................................................................................................................................... 42
Price Level Schedular
.......................................................................................................................................................... 43
Time Zones .......................................................................................................................................................... 44
Tax Table
.......................................................................................................................................................... 45
3 Clerk
................................................................................................................................... 46
Clerks
.......................................................................................................................................................... 46
Clerk Detail .......................................................................................................................................................... 49
4 Function Keys
................................................................................................................................... 50
Finalise Keys.......................................................................................................................................................... 50
Transaction Keys
.......................................................................................................................................................... 51
Status Keys .......................................................................................................................................................... 52
Keyboard Allocation
.......................................................................................................................................................... 53
5 Messages
................................................................................................................................... 55
Receipt Message
.......................................................................................................................................................... 55
Level Names .......................................................................................................................................................... 56
Error Message
.......................................................................................................................................................... 57
Fixed Character
.......................................................................................................................................................... 58
Scrolling Messages
.......................................................................................................................................................... 59
©2010, ICRTouch LLP
I
II
ICRTouch TMS
Check Text
6 Customer
.......................................................................................................................................................... 60
................................................................................................................................... 61
Customers .......................................................................................................................................................... 61
Customer Group
.......................................................................................................................................................... 62
Account Balances
.......................................................................................................................................................... 65
7 Suppliers
................................................................................................................................... 66
Suppliers
.......................................................................................................................................................... 66
8 Case Sizes ................................................................................................................................... 67
Case Sizes
.......................................................................................................................................................... 67
70
Part V Stock
1 Orders
................................................................................................................................... 70
2 Deliveries
................................................................................................................................... 72
3 Invoicing
................................................................................................................................... 74
4 Wastage
................................................................................................................................... 75
5 Shelf Edge Labels
................................................................................................................................... 76
6 StockTake ................................................................................................................................... 77
80
Part VI Reports
1 Reports
................................................................................................................................... 80
82
Part VII Utilities
1 View Live Journal
................................................................................................................................... 82
2 Send Message
...................................................................................................................................
to Terminals
84
3 Update Customer
...................................................................................................................................
Balances
85
4 UnZLock Terminals
................................................................................................................................... 86
5 Set Date and...................................................................................................................................
Time
87
6 Reindex Files................................................................................................................................... 88
7 Zeroise All Sales
................................................................................................................................... 89
8 Import
................................................................................................................................... 90
9 Export
................................................................................................................................... 91
10 View Log Files
................................................................................................................................... 93
11 View Check Totals
................................................................................................................................... 94
12 Change Date...................................................................................................................................
of Sales Data
95
13 Global Price ...................................................................................................................................
Change
96
14 Maintain Margins
................................................................................................................................... 97
15 Backup TMS................................................................................................................................... 98
16 View Journals
................................................................................................................................... 99
Part VIII Setup
102
1 Branch Details
................................................................................................................................... 102
2 PrinterSetup
................................................................................................................................... 105
3 Maintain Users
................................................................................................................................... 106
4 PLU User Fields
................................................................................................................................... 107
5 TMS Setup ................................................................................................................................... 108
©2010, ICRTouch LLP
Contents
III
110
Part IX HHT
1 User Interface
................................................................................................................................... 110
2 Stock Take ................................................................................................................................... 112
3 Product Check
................................................................................................................................... 113
4 Delivery
................................................................................................................................... 114
5 Orders
................................................................................................................................... 115
6 Wastage
................................................................................................................................... 116
7 Settings
................................................................................................................................... 117
8 Information................................................................................................................................... 118
9 Communications
................................................................................................................................... 119
Part X Interface
1 Sage
122
................................................................................................................................... 122
Posting
.......................................................................................................................................................... 122
Configuration
.......................................................................................................................................................... 123
Important Information
.......................................................................................................................................................... 125
2 Booker
................................................................................................................................... 126
Sync with Booker
.......................................................................................................................................................... 126
Booker Config
.......................................................................................................................................................... 127
3 Parent Pay ................................................................................................................................... 129
Part XI Report Designer
132
1 Getting Started
................................................................................................................................... 133
The User Interface
.......................................................................................................................................................... 133
The Workspace
.........................................................................................................................................................
(Design View)
133
The Workspace
.........................................................................................................................................................
(Preview View)
135
Keyboard
.........................................................................................................................................................
Shortcuts
136
Placing Data..........................................................................................................................................................
on the Report
137
Adding Database
.........................................................................................................................................................
Fields
137
Adding Formula
.........................................................................................................................................................
Fields
137
Adding Picture
.........................................................................................................................................................
Fields
139
Adding Special
.........................................................................................................................................................
Fields
140
Adding Text
.........................................................................................................................................................
Objects
140
2 Tutorials
................................................................................................................................... 142
Creating a Simple
..........................................................................................................................................................
Report
142
Editing the Shelf
..........................................................................................................................................................
Edge Label Report
144
Editing the Stock
..........................................................................................................................................................
Label Report
146
3 Advanced ................................................................................................................................... 147
TMS Report ..........................................................................................................................................................
Databases
147
TMS Special..........................................................................................................................................................
Formula Fields
149
Visual Linking
..........................................................................................................................................................
Expert
151
Index
153
©2010, ICRTouch LLP
III
Introduction
Part
I
6
ICRTouch TMS
1
Introduction
1.1
Overview
Welcome to ICRTouch TMS.
This software package has been developed in house at ICRTouch LLP to link to any version of
ICRTouch.
There are 3 main areas to the operation of TMS:
1) Maintaining the ICRTouch till system
2) Reporting
3) Stock Control
It is important to understand that there is no 'live link' between TMS and the ICRTouch based tills. Any
changes you make to the PLUs or Clerks for example in either software package needs to be manually
sent or received accordingly.
It is recommended to run the latest versions of ICRTouch TMS and ICRTouch together in a system.
©2010, ICRTouch LLP
Communication
Part
II
8
ICRTouch TMS
2
Communication
2.1
Program Send/Receive
This form is used to select which program files are sent to or received from the till(s).
Click on the box next to the files that you wish to communicate to the till(s) or click on the All Files Box
(a tick will appear in the box to show that the file has been selected)
Once you have selected all the file(s) click the send or receive button.
©2010, ICRTouch LLP
Communication
2.2
9
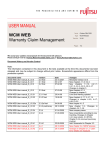
X Read Terminals
This allows the user to capture sales data for the ECR's without resetting the data (like with ZReads).
©2010, ICRTouch LLP
10
ICRTouch TMS
This is an example report:
©2010, ICRTouch LLP
Communication
2.3
11
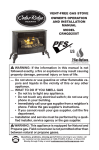
Schedule Program Changes
This form allows you to specify the sending of various parts of the system to ICRTouch at any given
time.
This would enable you, for example, to change your prices over the course of a week before they are
due and then set a time that they are automatically sent to the tills.
·
·
·
·
·
·
Click add.
Followed by selecting the part of the program you wish to send.
Specify a date.
Specify a time.
Select from the drop down which branch you wish to send to.
Then using the drop down specify the frequency of the event. eg. weekly, monthly or daily .
If you wish to remove an event you can do so by clicking into the range of cells on the line you wish to
remove and then click 'remove'
Command Line Switch
If you schedule a program send or a Zread then you can use the windows scheduler to start TMS prior
to the time (so you know the program will always be running). In this case its best to use the command
line switch /scheduled, this will stop TMS erroring that another instance is running if one is.
©2010, ICRTouch LLP
12
2.4
ICRTouch TMS
Z Read Terminals
This will Z read the till(s) that you have selected under Settings
This is the same process that is carried out with scheduled Z reading of the tills.
It is used to manually carry out the same actions if the back office PC is turned off, or the TMS
software was not running or you have not specified an automatic collection time.
When a Z read takes place - manual or automatic - this populates the sales data for the specified day
and adjusts the stock figures accordingly.
©2010, ICRTouch LLP
End of Day
Part
III
14
ICRTouch TMS
3
End of Day
3.1
Declare Totals
User is prompted for date of declaration (if set to 7 days, the whole week that contains the date will be
loaded)
Then the user can declare the user totals and the predefined totals will be automatically generated, the
subtotals are worked out as the pre defined and user defined totals or declared.
The user has to declare totals before any reports can be run.
©2010, ICRTouch LLP
End of Day
3.2
15
Configuration
User Defined
Allows the user to define totals like cash expenditure, non-POS revenue such as vending machine
takings, and banking details (eg. pool table takings etc)
Pre Defined
Fixed totals from ICRTouch like data on sales, lifts, floats and declarations (eg Cash in Drawer etc)
User Defined Sub Totals
Allow the user to add or subtract any of the user defined or pre defined totals together to get a subtotal
Sheet size
how many days are shown on the declaration sheet
Week Starts
The start day for a sheet size of 7 (has no effect if the sheet size is 1)
©2010, ICRTouch LLP
Maintenance
Part
IV
18
ICRTouch TMS
4
Maintenance
4.1
PLU
4.1.1
Edit PLU
The edit PLU form enables you to configure every part of an individual product.
The form is broken down into different tabs, Prices, Stock, Terminal flags, Product options, User fields.
You can navigate through various PLUs by using the 'Prior and Next' buttons or by clicking 'Search'
which allows you to look up products by name, bar code or PLU number.
The most basic detail you require for a PLU are Descriptor, Group, Department and the price.
Anything you see with a drop down combo box are created and populated else where within TMS, on
this screen you can specify which one is relevant to the item your editing.
In order for you to stock take items its required that the central section is completed as fully as
possible. The minimum suggested would be to specify a supplier, case Size (if relevant) and a case or
unit cost.
©2010, ICRTouch LLP
Maintenance
19
Below is an overview of the headings:
Descriptor
The name of the product.
Random Code
This is a 20 digit random number that can be used to access this PLU.
The PLU button needs to be programmed to search by random code for it to work, see Status Key
Programming.
The field can also be used for scanning – whilst the cursor is over this, scan a bar code it will
automatically be entered into here.
Prices
Price Level
Price level 1 - 9
This is where the retail value is set, you can have up to nine different price levels per product.
Each price level can also have a 2nd@ and 3rd@ sales value, this is accessed on the terminal by
pressing the appropriate price shift key.
2nd@ and 3rd@ values can be used for selling the same product at a different size and or value.
GP
Target%
This is the profit that you wish to make on the PLU. This is calculated with the average cost price and
the taxable status of the product.
TMS will show this price in the RRP field.
Actual%
This is how much profit is being made on the PLU as its current price.
RRP
This is the recommended retail price (to meet the Target%).
Average Cost
TMS works out the average cost per PLU
Qty of @'s
1st @ Qty
The qty of the PLU when sold at the 1st @ price.
When a 2nd @ price shift button is pressed, only products with a qty set here will appear on the
keyboard.
2nd @ Qty
The qty of the PLU when sold at the 2nd @ price.
When a 2nd @ price shift button is pressed, only products with a qty set here will appear on the
keyboard.
3rd @ Qty
The qty of the PLU when sold at the 3rd @ price.
©2010, ICRTouch LLP
20
ICRTouch TMS
When a 3rd @ price shift button is pressed, only products with a qty set here will appear on the
keyboard.
Stock
Current Stock
Displays how many units are in stock
Minimum Stock
Sets the minimum stock (used back office side)
Case size
how many you get to a case
Recipe
Links the PLU to a Recipe
Master PLU
Links PLU to another one so that the sales/stock figures are put into the figures for the master PLU
Qty
How much the stock figure of the Master PLU is adjusted when the PLU is sold (the figure is * by the
@ qty)
©2010, ICRTouch LLP
Maintenance
21
Case cost
Displays how much a case costs
Unit Cost
Displays how much a single unit costs to buy
Units to order
This is the quantity in units that will be ordered when you ask TMS to suggest an order based on
products being below minimum stock.
Days to order
Set here how long an order takes to arrive
GP as on the Prices tab
Target%
This is the profit that you wish to make on the PLU. This is calculated with the average cost price and
the taxable status of the product.
TMS will show this price in the RRP field.
Actual%
This is how much profit is being made on the PLU as its current price.
RRP
This is the recommended retail price (to meet the Target%).
Average Cost
TMS works out the average cost per PLU
Shelf
Shelf edge labels
Tick if shelf edge labels are required for this product
Location
Here you can enter a physical location for the shelf edge labels to aid staff in finding the correct shelf
for the label, this location code is printed on each of the labels.
Facings
How many labels are required? If more than one shelf edge label is required for the display the quantity
should be entered here.
Qty of type
Enter the conversion factor for the Unit being used. This tells TMS the relationship between the
quantity of each item that is sold compared to the unit quantity that is shown on the shelf edge label.
For example a can of cola sold in quantities of 250ml but shown on the shelf edge label with a unit of 1
litre, would have 0.250 in here.
Type
Used in conjunction with "Qty of type" this is the unit description.
Suppliers
©2010, ICRTouch LLP
22
ICRTouch TMS
Stock Labels
With this selected TMS will try to make a barcode out of the random code, if the random code field is 8
characters or less in length then an EAN 8 will be generated, greater than 8 and a EAN 13 will be
generated (This happens after a scroll of the PLU table). Stock Labels can be printed via the delivery
form
Supplier 1-4
Links the PLU to a supplier or suppliers
Supplier Stock Code
Stores the supplier stock code for the PLU
Unit Cost
Displays the last unit cost from this supplier
Terminal Flags
Status flags
Zero Price Sale
The product can be sold with a price of zero.
©2010, ICRTouch LLP
Maintenance
23
Negative Price
The price will be negated when it is sold.
Is Condiment PLU
The PLU will be sold as a condiment to the item before it.
Do not print on receipts
Stops the PLU from being printed on receipts and bills, usually used for cooking instructions.
Weight PLU
The price is per Kg not Qty.
Allow Manual Weight Entry
Allows the weight to be entered at time of sale.
Selective Item 1 to 5
This is used for selective discounts, with customer loyalty and discount buttons.
Print to ticket printer 1
Will print a ticket from ticket printer 1, this is configured in device connection on the terminal.
Print to ticket printer 2
Will print a ticket from ticket printer 2, this is configured in device connection on the terminal.
Enable Preset Override
When set, prices can be typed into the button, for misc buttons etc.
High digit limit
When "enable preset override" is enabled you can restrict the amount of digits that can be entered onto
the PLU, setting this value as 3 would allow prices up to £9.99 to be registered.
Prompt with Picture
A .jpg of the PLU can be displayed when sold or when enquired about
Print to KP1 – KP8
This selects which KP's the product will appear on.
Print in Red on KP
When set, the product will appear in red when printed on a kitchen printer.
Single item sale?
When set the PLU will automatically finalise the sale after registering. Only applies when it is the first
PLU registered in the sale. The finalise key record that is used can be preset in Maintenance - System
Programming - System Flags - PLU Control.
Set menu premium item? (uses 3rd @)
When this item is registered as part of a Set Menu then the 3rd @ price of this product is added to the
sale.
Update Keyboard Text?
If set to yes, any buttons with this product on will have their text updated with the text in the descriptor.
This will automatically change to yes whenever you change
the descriptor field. You can force the text to be updated by setting this to yes, you can also prevent it
being updated by setting it to no after you have changed the text in descriptor.
Prompt for Customer Verification 1&2
Used for age verification, nut allergies etc. These can be set in Maintenance - Message - Fixed
©2010, ICRTouch LLP
24
ICRTouch TMS
Character
Character 76 and 77.
Generate Range Servant Pin Code?
Indicates that this is a Range Servant Golf Ball Dispensing pin code generating PLU. You must also
have a ticket printer configured for printing the tickets out. You must have the PinCodeDLL.dll file
installed on the system and access to the appropriate database. Please contact Range Servant for
support on this.
Enable terminal SEL
Setting this to yes will enable shelf edge labels to be printed for this PLU at the point of sale from the
receipt printer.
Prompt with notes
Future use
Stock control (EPOS side only)
Maintain Stock
When set the product will perform stock control functions. Used mainly for the use of restricting the
sale of 'specials'.
Display stock on kb
When the PLU is on the keyboard, it's current stock level will be shown at the bottom of the button.
Minimum Stock
The minimum stock level.
Error at minimum stock
When the stock level reaches the minimum stock level, then the software will throw up an error
message.
Inhibit Sales Below Minimum
This prevents products from being sold when their stock counter falls below their minimum stock level.
Commission rates
Commission 1 to 4
Determines whether the clerk receives commission on this product based on the commission rates
stored against the clerk.
Kitchen printers
KP1-8
This selects which KPs the product will be printed to.
Print to KV1 & KV2
This selects which kitchen videos the product will be displayed to.
Print in Red on KP
When set, the product will appear in red when printed on a kitchen printer.
©2010, ICRTouch LLP
Maintenance
25
Product options
Department Link
This is the sales department that the product is linked to.
PLU Group Link
This is the sales group that the product is linked to.
KP Category
Products that print to a kitchen printer can be sorted into groups, ie all starters print together despite
the order in which they are sold.
Kp category's can be renamed in Maintenance - PLU - KP Category
Set Menu
Links a Set Menu to this PLU. See maintenance - PLU - Set Menu. Once set List box links no longer
apply
Mix and Match 1
Links the PLU to a Mix and Match within the Mix and Match table.
©2010, ICRTouch LLP
26
ICRTouch TMS
Tax Rate
This is used for tax calculation. See Tax Rates programming.
Option Box Link 1 to 6
These are drop down window links that can follow the product for cooking instructions etc.
These are set up in Maintenance - PLU - Edit list PLU
Windows stays until ESC?
When set option box's will stay on screen until escape is pressed, when not set they will disappear
once a choice is made.
Zero Price List Link 6
When set products in a list that are linked to option box link 6 will be sold at a zero value.
Userfields
User Fields 1-5
©2010, ICRTouch LLP
Maintenance
27
Allows user fields to be linked to the PLU (used in report filters)
4.1.1.1
PLU Activity
Each PLU has a stock activity history, this can be accessed via the Activity button on the Edit PLU
forms toolbar (there are also reports available under the PLU Activity header on the report form)
Each time the stock level of a PLU is changed via sales, order / delivery, transfers, stock takes, manual
input the current stock level is recorded along with date, time the quantity etc. This will allow you to
review all stock movements per PLU.
©2010, ICRTouch LLP
28
4.1.2
ICRTouch TMS
Edit Recipe
Recipes are items that are not held as stock items as a whole - but are made up of separate Stock
Items.
A PLU will need setting up to link to the recipe to allow it to be sold, the PLU will not hold a stock figure.
A very simple example can be seen below. It would enable the customer to sell a 'double vodka
redbull' at a price that differs from the parts individual price, while maintaining the correct stock on the
sperate items.
As you can see the Smirnoff vodka is set to reduce stock automatically by 2 and the Red Bull by 1.
©2010, ICRTouch LLP
Maintenance
4.1.3
29
List PLU
List PLUs are 'pop up' choices windows that allow you, for example, to prompt the staff to ask the
customer how a steak would be cooked.
Up to 50 items can be programmed in any List PLU window. And up to 99 Lists can be created.
List PLUs can be programmed to follow PLUs or to be allocated to the keyboard as a status key.
To add a PLU to a List PLU window, select a free space, then either;
Click on the down arrow, which will display a list of PLUs that can be scrolled through to be selected.
Or Enter the number of the PLU.
Each product that you create for the List PLU will need to be set for prices, or zero price accordingly.
©2010, ICRTouch LLP
30
4.1.4
ICRTouch TMS
Department
Department link names can be changed from here.
It is important to have a sufficient break down of different departments to make the reporting more
meaningful.
©2010, ICRTouch LLP
Maintenance
4.1.5
PLU Group
PLU Group link names can be changed from here.
©2010, ICRTouch LLP
31
32
4.1.6
ICRTouch TMS
Mix and Match 1
ICRTouch/TMS has 2 forms of mix and match table. Both operate discounts in the same fashion, the
difference lies in the way they are linked, type 1 has the table number specified in the PLU, ie the PLU
points at the mix and match table. Type 2 has the PLUs it is linked to in the table, with 5 buckets that
count PLUs linked to the table as they are registered with a quantity trip that kicks the table in. So with
type 2 tables, the table points to the PLU.
Discount types are not unique per product. ie. one set discount type can be used for many items, so a
BOGOF can be used for both apples or pears and would not need one creating for each.
In this example is set for 2 items to be bought for the collective price of £5.
In this example, if you buy 5 items of the same type you get 30% off - but only Mondays between 12pm
and 4pm.
©2010, ICRTouch LLP
Maintenance
Descriptor
Name of the Mix and Match.
Operation Type
The type of mix and match one of the following seven:
1.
2.
3.
4.
5.
6.
7.
Discount amount (amount to be reduced from total).
Discount % (the percentage to be reduced from total).
Set price (e.g. 3 for £5).
Discount amount cheapest (discounts the cheapest item).
Discount % cheapest (discounts the cheapest item by %).
Discount amount last item (discounts the last item).
Discount % last item (discounts the last item by %).
Qty required
The number of items needed to be sold before the discount is performed.
Amount/Discount Rate(%)
The amount to be discounted or the percentage to be discounted.
.
Affects tax table
Sets a tax table that the amounts come off of.
Include 2nd and 3rd @ items?
©2010, ICRTouch LLP
33
34
ICRTouch TMS
Includes item when used in 2nd and 3rd @.
Include items from checks?
If yes mix & match applies to check items.
This means that if you are using a check/table, items stored against that are counted with the current
m&m table
If no it's only the current sale.
Only available in this time range?
Allow a time range to be set for Mix and Match.
Start Time Range
Sets start time of range (24 hour clock).
End Time Range
Sets end time of range (24 hour clock).
©2010, ICRTouch LLP
Maintenance
4.1.7
35
Mix and Match 2
ICRTouch/TMS has 2 forms of mix and match table. Both operate discounts in the same fashion, the
difference lies in the way they are linked, type 1 has the table number specified in the PLU, ie the PLU
points at the mix and match table. Type 2 has the PLUs it is linked to in the table, with 5 buckets that
count PLUs linked to the table as they are registered with a quantity trip that kicks the table in. So with
type 2 tables, the table points to the PLU.
The example below shows if you buy a Fosters, Stella and a Guinness you will get them all for £6.
Descriptor
Name of the Mix and Match.
Operation Type
The type of mix and match one of the following seven:
1.
2.
3.
4.
5.
6.
7.
Discount amount (amount to be reduced from total).
Discount % (the percentage to be reduced from total).
Set price (e.g. 3 for £5).
Discount amount cheapest (discounts the cheapest item).
Discount % cheapest (discounts the cheapest item by %).
Discount amount last item (discounts the last item).
Discount % last item (discounts the last item by %).
Qty required for bucket 1 - 5
The number of items linked to each bucket that needs to be registered to activate the table. Only when
©2010, ICRTouch LLP
36
ICRTouch TMS
all 5 bucket quantities are fulfilled will the table activate, bucket quantities of zero mean that no items in
that bucket need to be registered to activate it.
Amount/Discount Rate(%)
The amount to be discounted or the percentage to be discounted.
.
Affects tax table
Sets a tax table that the amounts come off of.
Include 2nd and 3rd @ items?
Includes item when used in 2nd and 3rd @.
Include items from checks?
If yes mix & match applies to check items.
PLU No 1 - 30
Specify up to 30 PLUs in the table.
Applies to bucket no
Specifies the bucket quantity that this PLU adds to..
Only available in this time range?
Allow a time range to be set for Mix and Match.
Start Time Range
Sets start time of range (24 hour clock).
End Time Range
Sets end time of range (24 hour clock).
©2010, ICRTouch LLP
Maintenance
4.2
System Programming
4.2.1
Fixed Totals
37
These are the main financial totalisers that are used in reports.
Setting a totaliser to be non-resetable will mean that when a Z report of this file is taken, the totals in
this record will remain.
Setting a totaliser to not print will mean that when the report is printed, this record will be omitted.
©2010, ICRTouch LLP
38
ICRTouch TMS
No
Descriptive
Meaning
1
NET Sales
2
GROSS Sales
Total value of all finalised sales. Includes tax, premiums
and discounts. Minus corrections, refunds etc
Total value of all items registered. Minus any tax,
premiums, or discounts, refunds, voids, corrections etc
3
4
In Drawer 1
Money in drawer total, destination set on finalise keys, for
amounts
tendered and change amounts
5
In Drawer 2
6
In Drawer 3
7
In Drawer 4
8
In Drawer 5
9
In Drawer 6
10
In Drawer 7
11
In Drawer 8
12
Total in Drawer
Total for the above
13
Training Mode
14
REFUND Mode
Total of training mode sales, none of this total appears in
any other totals
Total of REFUND mode sales
15
Refund/Void Total
Total of Refund and void operations
16
Discount Total
Total of all discounts
17
EFT Cash back
Total cash back given on EFT sales
18
EFT Gratuity
Total of all gratuity given on EFT sales
19
Covers
Total covers and average sale per cover
20
Service Charge
Total of value of service charge
21
Cash Declared
Total of declared amounts
22
Cash Dec Over
Total of over declarations
23
Cash Dec Short
Total of under declarations
24
Sales < 10p
Total of all sale transactions made with a total of less than
10p
28
GT NET
Grand Total of NET Sales
29
GT GROSS
Grand Total of GROSS Sales
30
GT ALL
Grand Total of all positive sales, i.e. refunds etc do not
come off of this
25
26
27
©2010, ICRTouch LLP
Maintenance
31
EURO in Drw 1
32
EURO in Drw 2
33
EURO in Drw 3
34
EURO in Drw 4
35
EURO in Drw 5
36
EURO in Drw 6
37
EURO in Drw 7
38
EURO in Drw 8
39
EURO Tl in Drw
Total for the above
40
Cur Exchnge 1
Total in drawer of currency exchange 1 transactions
41
Cur Exchnge 2
Total in drawer of currency exchange 2 transactions
42
Cur Exchnge 3
Total in drawer of currency exchange 3 transactions
43
Cur Exchnge 4
Total in drawer of currency exchange 4 transactions
44
Commission 1
Total in drawer of commission 1
45
Commission 2
Total in drawer of commission 2
46
Commission 3
Total in drawer of commission 3
47
Commission 4
Total in drawer of commission 4
48
Reval Upload
Total value uploaded from an on the wall reval unit
©2010, ICRTouch LLP
Money in drawer totals for EURO (sub currency)
39
40
4.2.2
ICRTouch TMS
Non PLU table
Typically used for items where the price is set via the bar code. An example would be cheese where
its RRP is set by the manufacturer according to its weight.
This information forms part of the bar code and the till can recognise this and make use of it at the
point of sale.
Format String: Valid Characters 0-9,X,P,D
Made up of five parts;
1. Header normally 02 or 20 to 29
2. Code number this is represented with X's
3. Check digit for the price represented with a D
4. Price / weight represented with P's
5. Check digit for the price represented with a D
For Example 02XXXXDPPPPPD
Embedded value is Weight? (If No,price)
If not a weight bar code it is a price.
Decimal places of embedded value
Usually 2 for price or 3 for weight. Eg when set to 2, 1050 would be taken as 10.50
©2010, ICRTouch LLP
Maintenance
4.2.3
41
Batch Reports
This allows you to set up a report, consisting of more than one report 'strung together'.
For example, a standard end of day report may consist of Fixed Totalisers, Finalise Keys, Transaction
Keys, Departments and Clerks.
For each section of report, you can select which period of sales data will be used, and what type of
report will be issued.
©2010, ICRTouch LLP
42
ICRTouch TMS
4.2.4
System Flags
4.2.4.1
System Flags
These are settings which are predetermined by your dealer prior to installation.
See ICRTouch Programming manual for an indepth look into System Flags
©2010, ICRTouch LLP
Maintenance
4.2.5
43
Price Level Schedular
ICRTouch can process up to 12 price changes, for each day of the week.
The time for the price level change is specified in 24 hour format, in hours and minutes.
It is important to remember to change a price level back again, otherwise the touch screen will remain
on the last price level.
In this example below. The system is set to standard prices @ 9am to ensure that they start the day in
the right mode.
13:00 see's the first change to 'Happy Hour'
14:00 see's a change back to the default 'Std prices' level
22:00 see's a change to the 'Late Night' Price level where it remains till Monday's 9:00am change back.
©2010, ICRTouch LLP
44
4.2.6
ICRTouch TMS
Time Zones
Time zones are used for (as an example) hourly reporting. ICRTouch goes much further than just
hourly reporting and allows up to 50 time zones with any start and end time.
The data that is reported in the time zone is totally flexible, rather than just a straight sale total, in fact
up to 100 of any sales totaliser can be chosen to appear in the time zones. For example you can
configure your time zone to report for every half hour on all the department totals.
Time zones
In here configure that start and end time of each of the time zones in 24 hour HH:MM format. The start
time is included in the time zone, the time zone stops but doesn't include the end time.
For example, 22:00—23:00 will include sales from 22:00 up and including 22:59 but NOT 23:00.
Up to 50 time ranges can be set.
Detail Links
Select the sales information that you'd like to appear in the time zones here. Up 100 items can be
included.
In the example below, if added to the End of Day Z report, the customer would get a print showing NET
Sales in each and every hour.
©2010, ICRTouch LLP
Maintenance
4.2.7
45
Tax Table
Descriptor
Name used for the tax rate.
Rate %
This is the rate, 4 digits after the decimal point is assumed.
Add In (VAT), if no, Add On?
When set to yes, it is assumed that all amounts already have tax in them, and any calculated amount is
calculated out of that.
When set to no, it is assumed that all amounts do not include tax, and so it is added on by the till at the
end of each sale.
©2010, ICRTouch LLP
46
ICRTouch TMS
4.3
Clerk
4.3.1
Clerks
TMS is very useful for configuring what a clerk can or cant do on the system.
Every configurable option for each clerk is presented on one page, and represented by tick boxes.
It is simply a matter of ticking or un-ticking what you do or don't want the clerk to be able to do.
As we can see from the example below, the clerk has full access to the programming on the ICRTouch
system and is also able to carry out X/Z reads, as well as being able to carry out more basic functions
such as no sales, error corrects and voids.
This is the typical set up for a Manager or Supervisor.
Note they also have a 'Secret Sign on Number' in the event of not having their I-Button to hand.
This example below is typical for a new member of staff. Not allowed access to any modes other than
'Reg' (Sales) mode. Not allowed access to any programming and not allowed to do voids or cancels or
refunds.
In addition they do not have a secret sign on number, so would only be able to use their I-Button.
©2010, ICRTouch LLP
Maintenance
47
Clerk Name
This is the clerk name.
Secret Number
This is a 4 digit secret number used for signing on. If this is set to zero, then the clerk cannot be
signed on by using secret number.
Default menu level at sign on
When set, the clerk will go straight to a specific menu level when they are signed on, otherwise they go
to the default for that terminal.
Price level at sign on
When the clerk signs on it goes straight to a specific price level.
Defaults to floor plan at sign on?
When the clerk is first signed on at the beginning of a sale, the clerk will go straight to the floor plan.
Default floor plan level
Sets the level on the floor plan that this clerk defaults to when it enters the floor plan. A setting of zero
will mean that the clerk will go to the level set for that terminal.
Compulsory Order Number Entry
Means that the clerk has to supply an order number each time they do a sale.
©2010, ICRTouch LLP
48
ICRTouch TMS
Compulsory Number of Covers
Means that the clerk has to supply the number of covers each time they do a sale.
Compulsory Check Number
Means that a check or table number must be entered before beginning a sale.
Prompt for customer number
When set the unit will prompt for the operator to enter a customer (loyalty etc) number at sign on.
The customer can still be logged on using all the usual methods at this point, eg mag card.
Prompt for Eat In/Take Out
The system will prompt with a list of all Eat In/Take Out keys found in the status key file.
Sign Off Clerk at Close of Sale?
Means that when the clerk finalises a sale, they will automatically be signed off of the till.
Allow to Open Other Clerk's Checks?
Means that the clerk can open checks/tables that have been opened by other clerks.
Use 2nd Drawer?
Means that the clerk uses drawer 2.
Clerk is Manager?
This function is not implemented yet.
Clerk is Trainee?
When this clerk signs on, the register goes into training mode.
Allowed to correct items from checks?
When set the clerk is able to item correct items that have been previously rung into a check/table.
Last item error correct only?
When set the clerk is only able to correct the last item that they registered.
Commission Rate 1-4 (%)
Set in here the % commission that the clerk receives on products link to rates 1—4.
Typically used in hairdressing type applications, the commission totals appear in the main fixed
totaliser totals, and can be shown per clerk by adding them to the clerk detail report.
Prompt to clock in at sign on?
For time attendance, if the Employee is not clocked in when they sign on then the unit will prompt them
if they want to clock in at that point.
Compulsory clocked in?
For time attendance, means the employee cannot use the till unless they are clocked in.
Employee Job 1-4
For time attendance, specifies which jobs the clerk does. This then allows the system to work out what
hours they should be working etc. For more info on Time & Attendance see the time & attendance
settings in this manual, and the ICRTouch Reference Manual.
©2010, ICRTouch LLP
Maintenance
4.3.2
49
Clerk Detail
The clerk detail link file is used for clerk reporting.
All files that totalise sales data can be linked to the clerk detail file.
The report from the clerk detail file will consist of all sales data for each clerk on the specified link.
This way sales totals and function key data can be tracked for each clerk.
This is a typical addition to the End of Day Z at the bottom of the report, used to summarise daily
activity per clerk.
©2010, ICRTouch LLP
50
ICRTouch TMS
4.4
Function Keys
4.4.1
Finalise Keys
Finalise keys are used to complete sales. Examples are 'CASH' keys and 'CREDIT CARD' keys.
These are settings which are predetermined by your dealer prior to installation.
See ICRTouch Programming manual for an in depth look into Finalise Keys.
©2010, ICRTouch LLP
Maintenance
4.4.2
Transaction Keys
Examples of transaction keys are things such as discounts or error corrects.
These are settings which are predetermined by your dealer prior to installation.
See ICRTouch Programming manual for an in depth look into Transaction Keys.
©2010, ICRTouch LLP
51
52
4.4.3
ICRTouch TMS
Status Keys
Status key examples include menu level shifts and batch reports.
These are settings which are predetermined by your dealer prior to installation.
See ICRTouch Programming manual for an in depth look into Status Keys.
©2010, ICRTouch LLP
Maintenance
4.4.4
53
Keyboard Allocation
PLU
Allows PLUs to be allocated to the keyboard, next will follow a list of all PLUs.
Finalise Key
Allows payment keys, cash, cheque etc, to be allocated to the keyboard. This is a dynamic file – These
can be created in function keys - finalise keys.
Transaction Key
Allows transaction keys, error correct, discount etc, to be allocated to the keyboard. This is a dynamic
file – These can be created in function keys - transaction keys.
Status Key
Allows status keys, receipt print, clerk number etc, to be allocated to the keyboard. This is a dynamic
file – These can be created in function keys - status keys.
Department Key
ICRTouch currently does not support department buttons on the keyboard, use open PLUs linked to a
department.
Fixed Key
Allocates fixed keys such as numeric keys, multiply buttons etc. Not a programmable file.
No Function
Disables the button. The button will not function, and will not be drawn in normal sales mode.
Right Click (Drop down Menu)
If you right click on the keyboard you can cut copy or just copy the properties of a button.
If you have Selected buttons that are next to each other and then right click there will be a merge
option.
This will allow you to create large buttons.
©2010, ICRTouch LLP
54
ICRTouch TMS
©2010, ICRTouch LLP
Maintenance
4.5
Messages
4.5.1
Receipt Message
55
All receipt and slip messages are programmed from here, they are all a maximum of 40 characters.
Receipt Header
This text appears at the top of receipts & slips, just under the graphic logo.
Receipt Commercial Message
This appears at the top of receipts & slips just under the receipt header message.
Receipt Bottom Message
This appears at the bottom of receipts & slips.
EFT Docket Header
This appears at the top of EFT slips, site information MUST be set in here.
EFT Docket Bottom Message, Store Copy
This appears at the bottom of EFT slips, for the slip that is retained by the store. This MUST have the
declaration "Please Debit My Account As Shown", and MUST also have a signature line.
EFT Docket Bottom Message, Customer Copy
This appears at the bottom of EFT slips, for the slip that is given to the customer, this MUST have the
declaration "Please Debit My Account As Shown", and MUST also have "Please Keep This Copy For
Your Records".
Report Header
When selected to print, this appears at the top of all reports.
Signature Strip
Prints at the bottom receipts when an extra receipt is issued with signature strip, see finalise and
transaction key programming.
VAT Number
Single line VAT number that prints at the bottom of receipts and finalised bills.
©2010, ICRTouch LLP
56
4.5.2
ICRTouch TMS
Level Names
Menu Level Names 1 & 2
These are text names for the keyboard levels, they are only used for reference and appear at the top of
the screen in PGM4.
They make it easier to determine which level you are programming.
©2010, ICRTouch LLP
Maintenance
4.5.3
Error Message
Error messages are what pop up and alert you to incorrect operation. Examples include:
Sign on first
Misoperation
Sign Off First
Close Drawer
These are settings which are predetermined by your dealer prior to installation.
See ICRTouch Programming manual for an in depth look into Error Messages.
©2010, ICRTouch LLP
57
58
4.5.4
ICRTouch TMS
Fixed Character
Contained in here is user definable text that is used in places such as 'hlf' as a descriptor for 2nd @
Price and Locations for pop up for location for KP orders.
See ICRTouch Programming manual for an in depth look into Fixed Character
©2010, ICRTouch LLP
Maintenance
4.5.5
59
Scrolling Messages
During periods of inactivity, the touch screen scrolls advertising messages across the operator and
customer displays.
These are programmed here. Each message consists of 2 lines of 50 characters.
If the first line of 50 characters is full, then the 2nd line is added to it when the message is displayed.
Bottom Message (Pole Display Message)
This message can be up to 24 characters, depending on the type of customer display.
This message is shown on the bottom line of the customer display while messages are scrolled on the
top line.
©2010, ICRTouch LLP
60
4.5.6
ICRTouch TMS
Check Text
This file contains permanent names that are given to checks when the checks are first opened. For
example Checks that are rooms can be permanently given the name of the room, or tabs could be
permanently given the customers name.
Check Type
Select whether it is check or table.
Check Number
Enter the number of the check or table in here
Text
Enter up to 40 characters of text to be set on the check when it's open.
©2010, ICRTouch LLP
Maintenance
4.6
Customer
4.6.1
Customers
61
Forename
The forename of the customer is put in here. This will appear on customer reports, receipts etc.
Surname
The surname of the customer is put in here. This will appear on customer reports, receipts etc.
Title
The title of the customer is put in here.
Initials
This initials of the customer are put in here.
Number
This is a 15 digit random number that can be used to open the customer, using a customer number
button
flagged to look for the random number field.
Customer Group
This is the group that the customer is linked to for programming purposes.
Address 1 to 4
These are 24 character address lines, that can also be flagged to print on the receipt.
Postcode
This can be flagged to print on the receipt.
Phone
This can be flagged to print on the receipt.
Fax
This is stored back office PC side.
Mobile
This is stored back office PC side.
E-Mail
This is stored back office PC side.
Notes 1 to 4
Used to store additional information on the customer.
Blacklisted?
When set the customer can no longer be logged onto the till. Used with lost/stolen cards.
New customer?
Used in conjunction with the auto create customer flag in customer control. When the customer is
activated at point of sale, the system will prompt for the customer's details.
©2010, ICRTouch LLP
62
4.6.2
ICRTouch TMS
Customer Group
Customers are linked to groups. The group area is where all customer programming is done.
Group Name
Allows you to name the customer group, making reference easier for later on.
Loyalty Type
This gives a list of loyalty types that can be used for this customer group. There are various loyalty
types, discussed on the next few pages.
Account Customer?
When set to yes, balances can be paid onto the customer, and sales paid for using this. (prepaid).
Overdraft limit £
Specifies the amount the account customer can go over drawn in pounds, (no pence).
Prompt with picture if present?
Looks in the customer pictures directory to see if there is a picture associated with this customer, if
there is then the picture is displayed with a Yes/No? prompt. See the reference manual for more
information on how to setup customer pictures.
Print Last Transaction Date on Customer Receipt?
Specifies whether the last transaction date is printed on the bottom of the loyalty receipt.
Print Spend Today on Customer Receipt?
Specifies whether today's spend is printed on the bottom of the loyalty receipt.
Times Used Today on Customer Receipt?
Specifies whether the number of times this customer has been used today is printed on the bottom of
the loyalty receipt.
Spend To Date on Customer Receipt?
Specifies whether the total spend to date is printed on the bottom of the loyalty receipt.
Discount Total To Date on Customer Receipt?
Specifies whether the discount total to date is printed on the bottom of the loyalty receipt.
Print Customer Address on Customer Receipt?
Specifies whether the address and post code is printed on the bottom of the loyalty receipt.
Print Phone Number on Customer Receipt?
Specifies whether the telephone number is printed on the bottom of the loyalty receipt.
Print customer name on KP?
Specifies whether the customer name is printed on the bottom of the KP ticket.
Print customer address on KP?
Specifies whether the customer address and post code is printed on the bottom of the KP ticket.
Print account number on receipt?
Specifies whether the account number is printed on the receipt or not.
Loyalty Type 1 – Standard Discount
This loyalty scheme will give customers set discount rates on products, these discounts can either be
©2010, ICRTouch LLP
Maintenance
63
applied to the whole range of products, or to products with a set selective itemiser.
Discount Rate, All Products
% discount rate. When set all products are discounted by this rate.
Discount Rate, Selective Item 1 to 4?
% Discount Rate. When set, discounts are given only for PLUs that have the matching
selective itemiser set.
Loyalty Type 2 – Points
This loyalty scheme will give customers set points based on what they purchase, these points can
either be applied to the whole range of products, or to products with a set selective itemiser. When
enough points are accumulated, they can be used to pay for goods.
Points per Pound, All Products
Number of points awarded for every pound spent. When set all products are awarded points
at this rate.
Points per Pound, Selective Item 1 to 4?
Number of points awarded for every pound spent. When set, points are only awarded for
PLUs that have the matching selective itemiser set.
Loyalty Type 3 – Joes
This loyalty scheme will give customers set discount rates on products. Each discount rate has 2
rates, the first time in the week that the customer is used, they are awarded with the first discount rate.
The rest of the time the customer is used, during that week, they will be awarded with the second set of
rates.
Discount Rate(1), All Products
% discount rate. When set all products are discounted by this rate.
This is for the set of discounts that are used for the 1st visit during the week.
Discount Rate(1), Selective Item 1 & 2?
% Discount Rate. When set, discounts are given only for PLUs that have the matching
selective itemiser set. This is for the set of discounts that are used for the 1st visit during the
week.
Discount Rate(2), All Products
% discount rate. When set all products are discounted by this rate.
This is for the set of discounts that are used for all subsequent visits that week.
Discount Rate(2), Selective Item 1 & 2?
% Discount Rate. When set, discounts are given only for PLUs that have the matching
selective itemiser set. This is for the set of discounts that are used for all subsequent visits
that week.
Day to Reset to Rate (1)
This specifies which day of the week is classed as the start of the week.
Loyalty Type 4 – Borellis
This loyalty scheme will track the amount customers spend. When a certain level of spend is reached,
they are then credited with an amount that can subsequently used against future purchases. For
example you could set it that every time the customer has spent £100, not necessarily in one
transaction, that the till will credit their loyalty card with £5, which can then be used against future sales.
©2010, ICRTouch LLP
64
ICRTouch TMS
When a discount is due on their next sale, it is also printed in large at the bottom of the customer
receipt.
Discount Given
This is the amount in pounds that is awarded to the customer when they reach the spend limit.
Spend Required for Discount
This is the amount that the customer has to spend before they are awarded their discount.
Only Auto Receipt if Discount Due?
When receipt printing is set to automatic for all loyalty sales, the receipt will only automatically
print if they are to be awarded a discount on their next sale.
Loyalty Type 5 – School Meals
This loyalty scheme is aimed at schools/colleges. The customers account is incremented by the free
meal entitlement each day. If the customer doesn't use they entitlement in a day then the remainder is
removed at the end of the day. A customer is able to add to the account as normal which is unaffected
by the increment/decrement of the entitlement.
Free Meal Entitlement
The amount that is charge onto customer account each day.
Can Only Sign on During Time Zone?
If set to yes will allow start and end time to be set as well as which days it applies to for 4
different time zones.
Use morning spend limit?
When set there is a limit to what the customer can spend on their card in the morning.
Morning Spend Limit
Sets the morning spend limit.
Morning End Time
Specifies the end of 'morning'.
Use daily spend limit?
When set there is a limit to what the customer can spend on their card throughout the whole
day, this includes any spends in the morning.
Daily Spend Limit
Sets the daily spend limit.
Loyalty Type 6 – Price Levels
This loyalty scheme changes the current price level when a customer is logged on. It should be noted
that the price level becomes effective only when the customer is logged on, all previous items within
that sale will still be at their original price level.
Price Level
Select the price level to switch to.
©2010, ICRTouch LLP
Maintenance
4.6.3
65
Account Balances
Is used for account customers only allows management of balances.
#
Is the customer index number
First Name
the customers first name
Last Name
the customers last name
Bal
the current balance for customer
Adj
The amount that the balance is to be adjusted by (can be a minus)
New
What the balance will be after the adjustment
Update Bals From POS
Gets the customer balances from the tills
Send Bals
This will send the balance adjustment to the tills. What this means is if an account is in use, the new
final value will be determined by ICRTouch.
Therefore it is not essential to stop using the tills at the point of sending balances.
©2010, ICRTouch LLP
66
ICRTouch TMS
4.7
Suppliers
4.7.1
Suppliers
Reference
Is used in Stock Adjustments for filtering PLUs
Contact
Name of the contact within the company
The following are all details held on the back office PC with regard to Suppliers:
Name
Phone Number
Address
Fax Number
Email
URL
Postcode
Only contact and Reference are essential information.
©2010, ICRTouch LLP
Maintenance
4.8
Case Sizes
4.8.1
Case Sizes
67
Case Description
Name of the case
Case Size
How many items to a case
Case sizes are a very important part of TMS ordering and deliveries.
A case size acts as a 'multiplier' for the stock when a 'case' is delivered.
In the example above, the system will know to increase the stock by 88 when one 'case' of 11gallons
are delivered.
The more case sizes you set up the easier the system becomes longer term. Don't just think on the
lines of kegs - a case can be a number of things.
For example:
'pack of 24' - this could apply to many things depending on your business, bottles of beer or cigarettes.
'box of 100' - rizla papers or pencils.
'1.5 lire bottle' - can be used to add X amount of shots to your stock.
The more items you move onto case (keg/box/packet/tub) sizes the better, it will help reduce the
possibility of miss-counting.
©2010, ICRTouch LLP
Stock
Part
V
70
ICRTouch TMS
5
Stock
5.1
Orders
Before using TMS to make orders or deliveries it is important to get the background information set up
within the system first.
This means creating your suppliers and case sizes, assigning them to the products and inputting of
costs.
In the example below 4 cases of Fosters have been delivered. Due to the system already being told
that 1 case of fosters equates to 88 pints, TMS knows that it will need to increase the stock count by 4
x 88 - as represented in the TL Qty field by the 352.00.
You can save an order at any point and edit it, or reopen it. Only when you are 100% satisfied that its
completed should you 'post' the order.
This will then freeze the order and move it onto the next stage which is deliveries.
New
Will generate a new order
Open
Will open an order
©2010, ICRTouch LLP
Stock
71
Save
Will save the current order. This doesn't affect stock levels
Post
Will accept the order. Once the order has been post you will be unable to edit it
Cancel
Will cancel any changes made to a order
Print
Will print the current order
Build list for supplier
Once you have selected a supplier you can add all the PLUs linked to that supplier
Build List for All Suppliers
Will add all PLUs that have a link to a supplier
Add PLU
Allows a single PLU to be added to the order
Recommend Order
Will add PLUs by looking at their lead time and the previous 7 day. The amount it will 'order' will be
equal to what you have specified against the products 'units to order' field.
Re-Order
Will enable you to open a previously posted order and re-use it to save inputting the data a second
time.
Current < Min
Can be used as a simple reordering system. It will add PLUs where the current stock level is less than
the minium stock level. The difference is added in the items to order qty
Cur < Min Cases Only
Same as above apart from amount to order will be in cases.
©2010, ICRTouch LLP
72
5.2
ICRTouch TMS
Deliveries
As with all parts of the stock process, the cells in blue are the edit-able ones.
Here in this example various items have come in on the delivery and the delivered amounts have been
inputted.
You also have the opportunity at this stage to adjust costing's.
As before you can save and print the delivery at any point, the post button will lock the delivery so it
cant be changed.
When you press the post button it is at this point that the stock is adjusted within in the system.
New
Will generate a new delivery
Open
Will open an existing delivery
Save
Will save the current delivery. This doesn't affect stock levels
Post
Will accept the delivery the PLU qty will be added to the PLU stock level
©2010, ICRTouch LLP
Stock
73
Cancel
Will cancel any changes made to a delivery
Print
Will print the current delivery
Build list for supplier
Once you have selected a supplier you can add all the PLUs linked to that supplier
Build List for All Suppliers
Will add all PLUs that have a link to a supplier
Add PLU
Allows a single PLU to be added to the Delivery
Print stock labels
Allows you to print bar code labels for the delivered items if they have been flagged to do so within 'Edit
PLU'
©2010, ICRTouch LLP
74
5.3
ICRTouch TMS
Invoicing
Invoices are used to change the cost price of a PLU from a delivery.
You can use the open button to bring up an existing posted delivery.
The blue fields are the ones that you can edit. This is to tweak the final costs inline with your invoice
from your supplier.
When you post the invoice at this point it will recalculate the average costs on your products to show
gross profit percentage.
©2010, ICRTouch LLP
Stock
5.4
75
Wastage
The wastage section is quite simple to use. Purely add in the products you have
'wasted' and specify if it is a case or a single item.
Once you post the wastage report TMS will reduce your current stock accordingly.
Stock Adjustment
#
index number for PLU.
Random Code
This is a 20 digit random number that can be used to access this PLU.
Normally it is the PLUs bar code
.
Descriptor
The name of the product.
Current
Current stock level.
Stock In
amount of stock that has been delivered.
Stock Out
amount of stock sold.
New
The new amount of stock after adding Stock In and minus Stock Out.
Update>>> (button)
sends stock details to the till (must be done to change stock level on till).
Filter Dept (Drop down menu)
Filters the table by departments.
Filter PLU Groups (Drop down menu)
Filters the table by PLU group.
Filter Supplier (Drop down menu)
Filters the table by Supplier.
©2010, ICRTouch LLP
76
5.5
ICRTouch TMS
Shelf Edge Labels
Print pending labels
If a PLU has been flagged to have shelf edge labels then when the descriptor, random code or price 1
is changed to is added to a database of pending labels
Build a list
Allows manual select of PLU
Destination
You can view what will be printed allowing the user to select individual pages to be printed or have it
print straight away.
©2010, ICRTouch LLP
Stock
5.6
77
StockTake
ICRTouch TMS Stock Take Procedure
--------------------------------1) Print stock take sheets.
These can be found in the reporter generator and can have all the usual filters applied to them.
2) Start Stock Take.
This freezes the stock. At this point collections from the tills, deliveries etc no longer affect the stock
counter, they are instead stored in a temporary buffer where the adjustments will be held until after the
stock take is complete.
3) Count the stock, filling in the stock take sheets.
Ideally this needs to be done at the same time as the freezing of the stock.
4) Enter the counted stock into the system. Multiple stock takes can be entered, but you should ensure
that only one stock count is entered for each item otherwise the count of the last one entered will be
taken.
A stock variance report can be printed at any time by using print key on the stock take form.
5) Update Stock
This updates the stock in the system with the stock counts entered into the stock take. It then applies
all the adjustments (collections, deliveries etc) that have happened since the stock was frozen.
There are 2 methods of updating the stock after a stock take;
a) A full update of the stock file
This involves setting ALL stock counts to zero then applying the stock take and adjustments to file
b) A partial update of the stock file
This only zeroes the stock counts on the items entered in the stock take, then applies the stock
counted values and the file adjustments. Running a partial stock take would mean that you could stock
take say only 10 items without having any affect on the rest of the file.
©2010, ICRTouch LLP
Reports
Part
VI
80
ICRTouch TMS
6
Reports
6.1
Reports
You can print the reports from here. There are no set reports, reports can be removed or extra reports
can be added at anytime .
To run a report select the desired section such as 'PLU' this will then expand the section to show you
the reports on offer.
Click the report you require and then specify the date range that you wish to view.
You can look at all the information available or a subset of if by using various filters such as
'department' or 'group'.
Additional filters can be found under 'more filters' such as the ability to specify a single customer.
When your happy with the selections you have made click 'preview' and the report will display. At this
point you can print the report or export it to various file types such as .pdf or .xls.
Default reports are:
Batch Report
PLU Below min stock
Fixed totaliser
Clerk List
Clerk Sales
- Report with fixed totaliser, finalise key, transaction key, department , clerk detail.
- List of all the PLUs that are below there minimum stock level.
- Breakdown of Net sales, In drawer totalisers, refund totals, etc (Fixed Totals).
- List of all the current clerks with there log on number and assigned iButtons
- Breakdown per clerk of Net, Gross, Cash in Drawer etc.
Customer Balances
- List of all customers and there balance (to make sure that the balances are
up to date go to utilities->update customer balances)
- Customer Transaction with Detail, shows to item level
what customer have been buying over a date range
Cust Trans with Detail
Cust Trans No Detail
- Customer Transaction with Detail, shows to finalise level
Profit Report by Department - Breakdown per department of cost, qty sold, total sales value and profit
Profit Report by PLU Group - Same as above but for PLU Groups
Department Sales
- List of all department with a qty and total sales value for each
Finalise Key Sales
- Shows each finalise key (cash, chq, credit card, etc) usage and value
Fixed Totaliser Sales
- Fixed Totaliser Sales
PLU Group Sales - List of all PLU groups with a qty and total sales value for each
PLU Current Stock
- List of all PLUs and there stock level
PLU Price Level Sales
- Qty and sales value by price level
©2010, ICRTouch LLP
Utilities
Part
VII
82
ICRTouch TMS
7
Utilities
7.1
View Live Journal
This utility enable you to watch the live journals of up to six tills that are part of the network.
First select the till number in by clicking on the down arrow and selecting the number you want then
click start.
When you have finish click the Stop button.
Step 1. Chose tills that you what to watch by clicking on the drop down list and picking a till number
Step 2. Click start button. The following box will appear with the Terminal number of the till in the top
left box once it has confirmed communication with the till that will be replaced by the terminal name
(e.g. bar). The bottom left box is used for displaying current process or error messages
©2010, ICRTouch LLP
Utilities
Once you have finished click stop on each till
©2010, ICRTouch LLP
83
84
7.2
ICRTouch TMS
Send Message to Terminals
1.
Allows the user to select a number of terminals to send a text message to.
©2010, ICRTouch LLP
Utilities
7.3
85
Update Customer Balances
Updates the stored customer balances, allowing update to the minute reports on customer balances.
©2010, ICRTouch LLP
86
7.4
ICRTouch TMS
UnZLock Terminals
After Z reading the ECR's there maybe a time when the ECR doesn't unZlock if you run this it will send
unlock commands to all ECR's in the TMS terminal connection table
(the unlock command will not affect ECR's that are not Zlocked)
©2010, ICRTouch LLP
Utilities
7.5
Set Date and Time
Will set the date and time on all ECR's to the current date and time of the computer running TMS
©2010, ICRTouch LLP
87
88
7.6
ICRTouch TMS
Reindex Files
If the indexes become corrupt then run this utility to repair them. It will also check the integrity for the
data in the main databases if the record number is not valid or if there are two records with the same
record number the record will be deleted
©2010, ICRTouch LLP
Utilities
7.7
Zeroise All Sales
Clears ALL sales data back to zero.
You can select to zeroise the following data:
Stock
Sales
Customer Transaction History
Order
Time and Attendance
PLU Activity (All Branches)
©2010, ICRTouch LLP
89
90
7.8
ICRTouch TMS
Import
Allows Information to be imported into a database from a CSV file.
You can select to import into the following databases:
PLU
PLUDetails
Department
PLU Group
Clerk
Customer
Suppliers
Empty Target DB: Empties the target database before it imports the information from the CSV.
Ignore 1st line: Ignores the first line of the CSV. Used when the first line is the field headings.
First you select the CSV file using the Open file to import button. Once you have selected the file you
will see a preview of the data in the file. The next step is to select which columns of data you want to
import into the selected database by right clicking.
As demonstrated in the following example:
©2010, ICRTouch LLP
Utilities
7.9
91
Export
Allows Information in a database to be exported to a CSV file.
You can select from the following databases:
PLU
PLUDetails
Department
PLU Group
Clerk
Customer
Suppliers
Use Quotes: This will place quote mark at the start and end of each segment of the record.
with quotes "1","PLU 1","1.25",
without
1,PLU 1,1.25,
Include field headers: This will add field headers as the first line in the CSV file
With field headers
Number,Descriptor,Price1L1,
1,PLU 1,1.25,
Once a database has been selected then you select the field(s) you wish to export out of the database.
There are two methods of doing this option one is to select the fields from the available fields drop
down then click the add field button. Or option two which is if you right click in the preview box you will
see a list of the available fields. By left clicking on a field it will be added to the export list (box top
right).
Once you have selected the database and the fields you wish to export, you will see a preview of what
will be exported to the CSV file, such as below..
©2010, ICRTouch LLP
92
ICRTouch TMS
©2010, ICRTouch LLP
Utilities
7.10
93
View Log Files
Enables the user to view the following log files
TMS.log
- Shows start time, close down, dongle, user logged
on.
ICR_COMM.log
- Shows all TCP/IP, IPX , Serial/modem
communications and if it was successful or not
FTP.log
- Shows all ftp communications and if it was
successful or not
Last Send
- Contents of the file last sent
Last Receive
- Contents of the file last received
Z Reading File
- Contents of the last Zread
Customer Detail
- Customer sales information
Customer Balances
- A list of balance adjustments sent by TMS
Last Customer Bal Sent
- A copy of the last customer adjustments sent to the
customer master
Last Customer Bal Receive
- A copy of the last customer adjustments received
from the customer master
Parent Pay Customer bal send
- A list of all balances adjustments done via parent
pay
Unsent payment pay cust bal adj
- A list of all unsent balances adjustments done via
parent pay because the customer couldn't be located
Sage Interface
- Shows start times, sequence number and error
messages from the sage posting
©2010, ICRTouch LLP
94
7.11
ICRTouch TMS
View Check Totals
Will poll the check totals out of the check master (which is set in branch details)
Left hand section has a list of Checks C{CheckNumber} and Tables T{TableNumber} and the current
balance of the check or table.
If a check or table is selected (Left click) then the details of the check or table will appear in the right
hand section.
©2010, ICRTouch LLP
Utilities
7.12
95
Change Date of Sales Data
If you polled ICRTouch data into the wrong day, this enables you to extract it and re-enter it into the
right day.
Pick the date of the Z on the left
Then press the "Find Seq Num" button which displays the sequence numbers for that day - this is the
individual poll.
In the following example its 178 and 179.
Then you select the date you want to move it to then press Move Sales Data.
©2010, ICRTouch LLP
96
7.13
ICRTouch TMS
Global Price Change
Global price change enables you to change various sets of prices at all in one go, all by pre-determined
amounts.
You can 'add' PLUs by groups or departments and you can specify what @ price you change and by
how much. This can be done by +/- Amounts, +/- percentages, preset amounts or by copying from
existing price levels.
You can also determine how TMS will deal with the rounding of prices.
At any time you can clear the list or discard changes. Once you have completed the changes required
click 'post prices' to make the changes permeant.
In the example below products in the group 'drinks' have been added - but only those in the 'draught'
department.
To begin with the 1st @ price was changed by + 10% with 0.10 rounding, then the 2nd @ price was
changed by + 10% with 0.10 rounding.
©2010, ICRTouch LLP
Utilities
7.14
97
Maintain Margins
Maintain Margins
The maintain margins form allows you to globally adjust your target GP or average cost, you can filter
this by supplier, department or group.
Once an adjustment has been made the proposed changes will be displayed, you can then select
whether you would like to apply these changes or discard them per product.
The target GP or average cost can be adjusted by adding or subtracting a percentage, adding or
subtracting a set amount or simply using a set value.
Changes are only committed once the save and exit button is clicked.
©2010, ICRTouch LLP
98
ICRTouch TMS
7.15
Backup TMS
With this part of TMS you can backup, or restore the system.
You can specify the backup path the file name to backup to.
Also you have a choice of what information needs to be included within the backup - set by tick boxes.
Important - If you are restoring data then you should ensure that TMS is closed immediately prior to
this.
Command Line
The TMS Backup utility can be called from a command line for automated backups. Parameters are
/DOBACKUP
/NOERRORS
/INI:{filename}
DOBACKUP - Forces a backup and then close
NOERRORS - Tells it not to report errors to the display
/INI:{filename} - tells it to use the .ini file as sepcified by {filename} eg /INI:backup.ini
A new .ini file can be created by copying the contents under the [BACKUP] section from the TMS.ini file
- this is useful if you want to backup different files by schedule or to an alternative path.
©2010, ICRTouch LLP
Utilities
7.16
99
View Journals
This enables you to see the journal information from each till that's been posted into TMS.
They are stored in date and till order and you can view any day that TMS has polled the data, you can
filter by the ZRead sequence number.
©2010, ICRTouch LLP
Setup
Part
VIII
102
ICRTouch TMS
8
Setup
8.1
Branch Details
Form for entering details of the branch like commiuncation settings
If creating a new branch, a button will appear called 'Populate from head office' - this enables you to
automatically fill the branch with product and all other information.
UDP/IP
This is the standard setting and will work with all versions of ICRTouch from v2.48. This is supported
by both Win32 and WinCE.
You can set the IP address of each till in advanced, but usually don't need to as TMS will usually auto
detect the terminals (you may need to specify the broadcast address in advanced if you have multiple
network cards). Host/Domain names are supported in place of the ip address.
You would normally use this setting if TMS is on the same local network as the ICRTouch terminals.
TCP/IP
This is a new addition and will only work with ICRTouch v2.54.2 or later, this is supported by both
Win32 and WinCE. You must set the IP address of each till in advanced, the tills must have static ip
addresses assigned. Host/Domain names are supported in place of an ip address.
This option has been added to make it easier to communicate with ICRTouch terminals over a WAN
as there is no need to forward back the UDP port from the router to TMS, the TCP side of things
handles this automatically. ICRTouch now has in built support for DynDNS updating and UPNP for
automatic port forwarding so that there is no need for the dealer to get involved with configuring port
forwarding at either end of the router, or worry about maintaining some software for updating a
Dynamic DNS name.
A password can be configured in System Configuration in ICRTouch that restricts remote access to
this connection.
You would now normally use this setting if TMS is communicating with ICRTouch terminals over the
internet.
IPX
This is retained for legacy support with the 16 bit DOS version of ICRTouch and is also supported by
all Win32 versions, though not WinCE. You cannot configure IP addresses, ICRTouch terminals are
automatically detected.
You wouldn't normally use this method, though can be employed if for any reason you are having
trouble using IP. The IPX/SPX protocol must be installed at both ends.
Serial/Modem
You can connect TMS to ICRTouch using a NULL modem cable, though it wouldn't be a typical thing to
do. You would use this if you were connecting to ICRTouch using a PSTN modem.
FTP
ICRTouch can be configured to upload it's sales data to an FTP server at night, where TMS will collect
it next morning. The reverse also applies to program changes.
You would normally use this with a large multi branch estate of terminals.
Advanced
©2010, ICRTouch LLP
Setup
103
Configuring IP Addresses in Advanced
For UPD/IP and TCP/IP you may need to configure IP Addresses for each of your tills. This can be
either an ip address or a host name and can include a port number by specifying it using a colon to
seperate the 2. If no port number is specified then the standard ICRTouch port number is used, 5555.
examples are;
192.168.0.12
192.168.0.12:30101
mydomain.dyndns.org:30501
If you are using the standard configuration for ICRTouch's UPNP then the it's UDP & TCP ports are
mapped as follows;
3XX01, where XX is the till number, eg;
Till 1 - mydomain.dyndns.org:30101
Till 2 - mydomain.dyndns.org:30201
Till 21 - mydomain.dyndns.org:32101
Sales Data Period
Sets which period of sales data is polled from ICRTouch
Collect Journals
Collects and stores the terminals journal
Send Stock After Z
Will send the current stock level to the terminals
Till Num of Cust Master
Sets the number of the customer master
Comm with Cust Master Only
When collecting or send customer totals only the totals on the cust master are collected/send
Collect Customer Details
Collects Customer transaction history which allows statements to be printed for customers
(Zread)
Zreset Customer Details
Will reset file after it has been collected (cust transaction report will not be able to be run from till)
Collect Cust Balances at ZRead
Collects and stores cust balances allowing reports to be run
Till Number of Check Master
Sets the number of Check Master
Files not sent
A list of files not sent in an all program sent
©2010, ICRTouch LLP
104
ICRTouch TMS
©2010, ICRTouch LLP
Setup
8.2
PrinterSetup
Report Printer
Allows selection of a printer and paper, used for Reports printed.
Stock Labels Printer
Allows selection of a printer and paper, used when Stock Labels are printed.
Shelf Edge Labels
Allows selection of a printer and paper, used when Shelf Edge Labels are printed.
Customer Receipt Printer
Allows selection of a printer and paper, used when a customer receipt is required for a customer
account payment \ adjustment.
©2010, ICRTouch LLP
105
106
8.3
ICRTouch TMS
Maintain Users
In here you are able to configure individual user accounts allowing and restricting access to various
components of TMS. You can have as many users as you wish, it is also possible to have none by
deleting all the user accounts. When there are no users TMS runs fully unrestricted without prompting
for a user name each time it starts.
Username
The name of the user
Password
The password is caps specific if you forget the password you will be unable to gain access to the
software
Restrict Access
When checked users are restricted from accessing the corresponding menu item
©2010, ICRTouch LLP
Setup
8.4
107
PLU User Fields
Used as filters for PLU reports. Each PLU can be assigned 5 user fields under more filters on the
report screen you can pick the user fields
that you have defined. PLU which have the same user fields linked to them will be displayed those that
do not will be omitted.
©2010, ICRTouch LLP
108
8.5
ICRTouch TMS
TMS Setup
Sales for Child PLU go to Master PLU
The sales figures for a Child PLU (a PLU with a Master PLU link) are added to the Master PLU not the
Child
Barcode Ordering on PLU Reports
PLU report are order by the barcode number not the PLU name
Run as scanning system
when importing PLU file. PLUs outside of the set range are not imported
Touch screen resolution
Sets the keyboard allocation screen for 800x600 displays or 1024x768 screens
Prompt for Login at restore from (system) tray
If set then when restoring from the system tray TMS will prompt the user with the log on screen, failure
to supply a valid username and password will cause TMS to minimize back to the system tray.
©2010, ICRTouch LLP
HHT
Part
IX
110
ICRTouch TMS
9
HHT
9.1
User Interface
©2010, ICRTouch LLP
HHT
111
Menu navigation can be achieved by using the up and down arrow keys, the 2 enter keys and the clear
key to go back a menu. Direct entry into each menu can also be achieved by pressing it's
corresponding number.
Products can be called up using the built in scanner by pressing one of the 2 blue keys on the side.
The barcode can also be keyed into the Code box. Alternatively product entry can be achieved by
using PLU lookup number, to toggle between the 2 product lookup modes touch the F8 button.
©2010, ICRTouch LLP
112
9.2
ICRTouch TMS
Stock Take
Stock takes can be prepared on the TMS HHT by selecting the Stock Take option from the menu.
Enter any notes for the stock take, this can be edited later from within TMS if necessary.
Either scan or enter the barcode into the code box. The name of the product will be shown below, if
the product is unknown then unknown will be displayed here.
Enter the number of cases counted and number of units counted.
Selecting Save commits this item to the stock take and returns back to the code box ready for the next
item.
Pressing Cancel at anytime clears the form cancelling any changes to that item. If the code box is
empty when the cancel button is selected then this stock take is ended.
Multiple stock takes can be created and stored on the HHT, these will all be imported individually into
TMS where they can be edited prior to final processing.
©2010, ICRTouch LLP
HHT
9.3
113
Product Check
The product check function allows you to check the price and current stock level of an item. A shelf
edge label can be requested at this time if the price is found to be incorrect.
When Req SEL is ticked the product will be flagged to have a new shelf edge label generated by TMS.
To check a 2nd product simply scan or key a new code.
Clicking Finished close's the form and goes back to the main menu
©2010, ICRTouch LLP
114
9.4
ICRTouch TMS
Delivery
Deliveries can be prepared using the HHT by selecting the delivery option from the main menu.
The unit will ask for a delivery note number, if necessary this can be edited in TMS at a later date.
Scan or key in the item barcode, then enter how many cases and units have been delivered.
The save button commits the delivered item to the delivery ready for the next. Cancel clears the form,
if the code box is empty when the cancel button is selected then the form is closed and the delivery
finished.
Multiple deliveries can be created on the HHT. Deliveries can be edited once in TMS prior to
processing, these will be found in the Stock | Deliveries.
©2010, ICRTouch LLP
HHT
9.5
115
Orders
Orders can be prepared using the HHT by selecting the order option from the main menu.
Notes can be stored against the order, this can be edited at a later date once it's in TMS.
Scan or key in the item barcode or PLU number, then enter how many cases and units are required.
The save button commits the item to the order ready for the next item. Cancel clears the form, if the
code box is empty when the cancel button is selected then the form is closed and the order finished.
Multiple orders can be created on the HHT. Orders can be edited once in TMS prior to processing.
©2010, ICRTouch LLP
116
9.6
ICRTouch TMS
Wastage
Wastages can be prepared using the HHT by selecting the wastage option from the main menu.
Notes can be stored against the wastage, this can be edited at a later date once it's in TMS.
Scan or key in the item barcode, then enter how many cases and units have been wasted.
The save button commits the wasted item to the wastage ready for the next item. Cancel clears the
form, if the code box is empty when the cancel button is selected then the form is closed and the
wastage finished.
Multiple wastages can be created on the HHT. Wastages can be edited once in TMS prior to
processing.
©2010, ICRTouch LLP
HHT
9.7
117
Settings
Configuration for the HHT can be found in the Options | Settings page
Enforced Branch
This is used when you the HHT is used in a multibranch environment. When this is set the current
branch number in TMS is ignored, instead the branch number on the HHT is used.
Setting 0 in here means use current branch.
Merge Same PLU in Same Order
When the same Product is scanned more than once during a stock take, delivery etc then it's
quantities will be merged with the earlier product. This doesn't effect products across separate
deliveries etc
©2010, ICRTouch LLP
118
9.8
ICRTouch TMS
Information
The information screen gives info about the current state of the HHT
PLUs is the number of PLUs in memory.
Comms Recs shows the number of Communications Records in memory, this is a log of entries that
are ready to be sent back to TMS during a Sync.
Bytes used shows the amount of memory currently in use.
©2010, ICRTouch LLP
HHT
9.9
119
Communications
Currently the only methods of communications between TMS and the HHT (Casio DTX5) is IRDA and
the USB Cradle.
With the Casio DTX7 ethernet communications are used.
To synchronise data between the HHT and TMS select the menu option Communications | Sync with
HHT then click the Wait for Connection button.
On the HHT select the Communications menu, then select Connect to TMS.
Sync PLU will mean that the PLU file including prices, current stock and case sizes will be sent from
TMS to the HHT.
Collect Comms Log will extract the Stock Takes, Deliveries etc from the HHT and post them into TMS.
TMS automatically checks after communications to see if there is updated software for the HHT and
sends it down. HHT updates will be deployed with TMS updates.
©2010, ICRTouch LLP
Interface
Part
X
122
ICRTouch TMS
10
Interface
10.1
Sage
10.1.1 Posting
ICRTouch TMS can post end of day sales data into Sage Line 50. The currently supported versions
are:
Sage Line 50 2009 (v15)
Pollings can be posted manually by using the Sage | Post dialog, or automatically immediately after
each polling when configured to do so. End of day sales data is posted by sequence number, either for
the polling that was manually selected or for the polling that has just been performed. Pending
Customer Transaction data, however, is posted at that time regardless of which polling sequence
number was selected.
ICRTouch TMS can be configured to post end of day dept/group totals as NC journal adjustments, or it
can post end of day dept/group totals into an invoice. Cash, credit card takings etc can be posted
directly into the bank codes or can be posted as payment on accounts when using invoicing.
When using invoices they must be checked/printed/posted from within Sage itself.
©2010, ICRTouch LLP
Interface
123
10.1.2 Configuration
Connection Details
Username and Password - this is the user name and password that will used by TMS to access to
communicate with Sage. It is advisable to create a new user specifically for this purpose.
Username - Sage user name, if no name has been configured in Sage, enter Manager
Password - Sage password. If no password has been configured in Sage, leave blank.
SDO Ver - this is version number of Sage Data Objects that TMS is talking to. The Maximum number
indicates the latest version that your TMS licence allows you to use.
Enter 150 for 2009, 160 for 2010, 170 for 2011.
Sage Install Path - this is the installation directory for your copy of Sage.
This can be found in Sage under help - about - system information.
Click on directories, the path you need to enter is listed under data directory.
Options
©2010, ICRTouch LLP
124
ICRTouch TMS
Post EOD Sales - determines whether the end of day sales collected from the ICRTouch terminals is
posted into Sage.
Post to Account ID - When set end of day sales data is posted as invoices using this account id. If
this is left empty then end of day sales data is posted directly into Sage's journal as nominal code
adjustments.
This must have an account set if you are posting to Customer Transaction Detail into Customer
Accounts.
If you are posting to accounts dept/group sage codes should be product codes, if you are posting
directly as journal adjustments then they should be nominal codes.
Post in Drawer Totals - Posts the 8 in drawer totals into the bank accounts. The bank account codes
are set in Fixed Totaliser programming.
Use Polling Date - Records the date for transactions as the date that TMS has stored for the polling,
when not set transactions are posted as now.
Dept for Sales - For invoice posting overrides the revenue dept that is set on the product code, leave
as 0 to use the dept that's set. For nominal code posting this is the dept that the sales will be posted
as.
Details title for Sales - This doesn't do anything.
Post Customer Acc Details - Creates invoices using items sold in the customer transaction history.
Post using PLU Groups - posts using PLU groups sorting and codes, when not set department
sorting and codes are used.
Post Automatically - When set Sage posting is performed immediately at the end of each z reading
from the terminals. Note, if the polling is set by Schedule then no results dialog will be shown.
Tax Codes
Contains the ICRTouch TMS to Sage tax code mapping.
Email
Contains email settings to allow the Sage Interface to automatically dispatch an email containing the
results from each posting.
Codes used for Posting
Dept and PLU Group sales totals are posted using the codes configured on the Dept/PLU Group
window. If you are using journal transaction posting ie an empty Account ID field, then these codes
should be output nominal codes. If you have the system generating invoices then these need to be
valid sage product codes.
In Drawer totals are posted using bank codes eg 1200, 1250 etc. These can be configured in fixed
totaliser programming.
For creating invoices from customer transaction history information you need to set the account ref for
the customer in customer programming.
©2010, ICRTouch LLP
Interface
125
10.1.3 Important Information
Based on the testing done, the information contained in this document is assumed to be accurate and
the interface perform as expected. Please note that ICRTouch LLP and/or any of its resellers cannot
be held responsible for any issues with integration by ICRTouch products and Sage products whether
caused by; misuse, misconfiguration or software flaw.
The responsibility to ensure that invoices and postings that have been created in Sage product by
ICRTouch products are correct lies solely with the user.
©2010, ICRTouch LLP
126
10.2
ICRTouch TMS
Booker
10.2.1 Sync with Booker
Collect Booker Files:
First step is to sync the latest files from the booker server, this is done via a 3rd party piece of software
called NetPOS. Which is a broadband interface to bookers retail gateway, NetPOS allows the retailer
to exchange orders, price files, ENODS and other data directly (Currently we have only implemented
price file imports)
Import Booker Files:
Will process all files that have been downloaded from booker and copied to the download directory.
©2010, ICRTouch LLP
Interface
127
10.2.2 Booker Config
Organisation Number: Booker unique site number
Last Imported File Header: The name of the last import file
Supplier: The supplier that will be linked to new \ modified PLUs
New PLUs append: Sets if any new PLUs are created at the end of the PLU file or within the range
specified
Booker Category Code Link:
Booker Department Code Link:
Home Directory: Location of directory used to store upload and download directory's as well as the
winclient.cr settings file
Download Directory: Sub directory that stores files download through netpos before there imported
Upload Directory: Sub directory that store files prior to them being uploaded through netpos
Log File Directory: Sub directory where the netpos log file is stored
Tax Codes: Sets the relation between the booker tax codes (1 = 0%, 2 = 17.5%, 3 = 5%) and
©2010, ICRTouch LLP
128
ICRTouch TMS
ICRTouch's tax table
©2010, ICRTouch LLP
Interface
10.3
129
Parent Pay
TMS can be linked to Parent Pay (http://www.parentpay.com) for online customer balance payments.
Ref:
Is the unique transaction code given to a customer balance adjustment done
via parent pays website.
Account Num:
The customers account number has to be the same as the customers sims
student number.
Customer Name:
The name of the customer from sims.
Bal Adjust (p):
The balance adjustment in pence.
Date and Time:
Of the account adjustment.
Customer Num:
Customer number in ICRTouch/TMS.
Current Bal:
Current Balance according to the customer master terminal (balances will be
updated before getting the internet payments).
New Balance:
What the customer balance will be after the adjustment has be sent to the
customer master.
The ref number of the last balance adjustment sent is stored and any adjustments before with a ref
below this will not be sent to the customer master.
©2010, ICRTouch LLP
Report Designer
Part
XI
132
11
ICRTouch TMS
Report Designer
ICRTouch Report Designer is a stand-alone tool for creating / modifying reports for ICRTouch TMS
The Report Designer combines a design editor and a realtime preview in one window and has been
developed for use with our backoffice package TMS.
ICRTouch Reports are designed to work with your databases to help analyze and interpret important
information. ICRTouch Report Designer makes it easy to create simple reports, and, it also has the
comprehensive tools you need to produce complex or specialized reports.
©2010, ICRTouch LLP
Report Designer
11.1
133
Getting Started
11.1.1 The User Interface
11.1.1.1 The Workspace (Design View)
Below is the ICRTouch Report Designer workspace. Scroll down for a detailed description of each
section.
TABS
Once a report has been opened (or a new one created) two tabs will appear one the design viewer
(pictured above) the second is a real time preview of the report.
DESIGN TOOLBAR
©2010, ICRTouch LLP
134
ICRTouch TMS
Toggle Field View - Hides the field list on the left hand side of the designer
Select Expert
- This is used for generating filters for the report
TopN Expert
- This is used for creating a top or bottom N (Number) report as in top 20 sellers
etc.
Sort Order
- Select which field(s) to sort the report detail by with ascending or descending
options
FIELD SELECT
On the left hand side of the design view is a list of fields that can be added to the report.
By expanding the sections you can see which field have been added to the report (those that have a
red tick by them).
To add a field click on a field and drag it to a section of the report
REPORT LAYOUT
The report is broken into sections below is a list of section that you will see when you create or open a
report.
Report header
Any field or labels will only appear at the top of the report on the first page. Used normally for titles and
other information but can also be used for charts or cross-tabs that include the data for the whole
report.
Page Header
Will appear on the top of each page / the page header can be set to only appear on the first page. Can
be used to display field titles above the data on a report
Group Header
Anything in this section will be printed at the start of each group. A group is used to organise data into
related groups.
In the report above a group is used to put the PLU sales into PLU group order
Detail
This is were the main body of the report is designed and is printed once per record. The bulk of the
report data normally appears in this section
Group Footer
Will be printed at the bottom of each group
Report Footer
Will be printed at the bottom of each report
Page Footer
Will be printed at the bottom of each page usually contains page numbers etc
©2010, ICRTouch LLP
Report Designer
135
11.1.1.2 The Workspace (Preview View)
The designer will allow you to preview your report in real time my click on the preview tab
Group Tree Toggle
Toggle the Group Tree View on and off
Group Tree View
The Group Tree view can be shown or hidden using Toggle Group Tree on the toolbar.
The Group Tree view presents a split screen:
·
·
the right pane displays the report
the left pane displays a high level outline of the report, showing the hierarchy of groups in a
tree format.
The Group Tree normally displays the names of the groups you created in your report. You can,
however, customize these names using the Group Options section of the Insert Group or Change
Group Options dialog box.
When you click the tree node for the group that interests you, the program jumps immediately to the
part of the report that contains the information for that group.
Refresh Report Data
Will make sure that the data in the report is up to date
Scroll Records
Allows you to scroll through the pages of the report
©2010, ICRTouch LLP
136
ICRTouch TMS
11.1.1.3 Keyboard Shortcuts
General shortcuts
Shortcuts for general operations allow you to:
Crtl + N
Crtl + O
Crtl + S
Crtl + X
Creates a new blank report.
Open another Crystal reports 8.5 report.
Saves a Crystal reports 8.5 report.
Exits the program
©2010, ICRTouch LLP
Report Designer
137
11.1.2 Placing Data on the Report
11.1.2.1 Adding Database Fields
Much of the data placed on a report are database fields, displaying data as it is stored in the database.
Normally, database fields will be placed in the Detail section, but under certain circumstances, they will
be placed in other sections of the report.
Direct Access database files
ICRTouch Reports can access many of the most common PC database formats directly. In other
words, the program has the built-in capabilities needed to directly open database files and tables
designed in dBASE, FoxPro, Clipper, Btrieve, Paradox, and Microsoft Access, among others.
Adding a Database field
From the Field Select pane on the left hand side expand the Database Fields (left click on the +) select
the field that you wish to add (left click to highlight) then drag it to where you want it to appear on the
report
11.1.2.2 Adding Formula Fields
To display data that is a calculated value, you need to create a formula field and place that formula
field on the report. For example, if the database only stores the order date and lead time in days but
you need to display the date the order will be delivered, you must create a formula field that will
calculate the date of delivery.
Adding a formula to a report
If you what to include one of the formulas on your report, first highlight the formula Fields heading in
the Field Select pane, right click and select new from the drop down menu.
©2010, ICRTouch LLP
138
ICRTouch TMS
Give the formula a meaningful name (helps when editing / designing the report)
After you have given the formula a name the Formula Editor will be displayed. This is where you
program the formula in the example below tax is being added to the sales value
©2010, ICRTouch LLP
Report Designer
139
Once you have finished creating you formula expand the formula field list (by clicking on the +). Select
the formula (left click) and drag it onto the report (at which point a red tick will appear next to the
formula)
11.1.2.3 Adding Picture Fields
When designing reports, there will be times when you want to include a picture. For example, you may
wish to put a company logo in the report header.
To Insert a picture
Right Click on a blank part of the report, Insert | Picture
Select the desired picture file from the standard file dialog and click open to return to the report.
An object frame appears with the picture inside, ready to be positioned.
Final step is to position the picture object where you want it to appear in the report
©2010, ICRTouch LLP
140
ICRTouch TMS
11.1.2.4 Adding Special Fields
To display information such as Page Numbers, Print Date, and Report Comments.
To Insert a Special Fields
Expand the Special Fields header (click on the +) in the Field Select pane
Left click on the field you wish to add to the report and drag it to where you what it on the report.
11.1.2.5 Adding Text Objects
Text objects are used in reports for a multitude of purposes. They are a powerful way of inserting titles;
labeling summaries and other data on your report; and of easily combining database fields.
To insert a text object right click on a blank part of the report Insert | Text Object
©2010, ICRTouch LLP
Report Designer
141
Position the text object where you want it to appear in the report.
Click once on the border of the text object to select it for re sizing and moving.
Double-click inside the text object to select it for editing.
To Insert a database field into a text object
The primary function of a text object is to hold text.
However, text objects can hold database fields as well, making them ideal for creating custom form
letters.
Insert a text object in the report.
Type in the text and spaces that you want to appear before the first database field (if any).
Insert a Database Fields (Add Database Field)
Highlight the database field to be inserted and drag it into the text object. As you move the Drag and
Drop cursor over the text object,
the program displays a movable insertion point.
Drag the object so the insertion point is where you want the database field to appear and drop the field.
©2010, ICRTouch LLP
142
11.2
ICRTouch TMS
Tutorials
11.2.1 Creating a Simple Report
This is a step by step guide to creating a PLU Price List report for TMS
To create a new report
1 Select File | New (Crtl + N)
A blank Report will appear in the design tab
2 In the Field View select database fields, right click and select add database to report
3 Next select the database that you want to add to the report, from the prompt select Database Files |
Find Database Files. Find the plu.db (normally c:\program files\icr\tms\data) then double click in the
data explorer (so a green tick appears on the database overwise it will not be added to the report)
On closing the form the visual link expert will be displayed click ok for now (see later on for more info
on the visual linking expert).
4 Once the database has been added the next step is to add the fields to the report. In the field view
expanded the Database Fields and you should see the
PLU database
©2010, ICRTouch LLP
Report Designer
143
Expand the PLU database and select Number from the list of fields and drag it across to the detail
section of the report (A header will automatically been added to the report header section after you
place the field in the detail section). Do the same for Descriptor and Price1L1
At this point you can look at the preview of the report by accessing the preview tab.
5 The last step is to enter a title in the summary info (TMS uses the title in the summary info on the
report selection form as the name for the report). In the design view right click on a blank part of the
report Report | Summary info.... | Title
©2010, ICRTouch LLP
144
ICRTouch TMS
11.2.2 Editing the Shelf Edge Label Report
1. Open the shelf edge label report from c:\program files\icr\tms\reports\stock\Shelf Edge Label.rpt
(Multibranch version and installed in the default location)
2. To increase the width of the label right click on the report and select format section | details | layout.
Adjust the width to correspond with the size of the labels.
If there are any horizontal or vertical gaps between labels these can also be adjusted.
3. Extra fields can be added from the database fields on the left hand side, left click on the field you
wish to add and drag it to the section you wish to add it to
©2010, ICRTouch LLP
Report Designer
©2010, ICRTouch LLP
145
146
ICRTouch TMS
11.2.3 Editing the Stock Label Report
1. Open the stock Label report from c:\program files\icr\tms\sysrep\stock\stocklabels.rpt (default
location)
2. The detail section size is specified by the page size within the printer setup (part of the right click
menu).
3. Extra fields can be added from the database fields on the left hand side, left click on the field you
wish to add and drag it to the section you wish to add it to
©2010, ICRTouch LLP
Report Designer
11.3
147
Advanced
11.3.1 TMS Report Databases
TMS temporary report databases
There are a number of predefined temp report databases that TMS checks to see if there are linked to
the report. Depending on the database that has been linked the report data will be filtered by the Date
Range, Department, PLU Group etc
ClerkReport.db : Used for clerk detail sales reports
Filters:
Date Range
ECR
CustList.db : Used for customer reports includes all customers
If apply filters is tick on the Report filters form then the following customer account filters are applied:
From Customer Number, To Customer Number
CustReport.db : Used for customer report that use the normal filters
Filters:
Date Range
ECR
Also if apply filters is tick on the Report filters form then the following customer account filters are
applied:
From Customer Number, To Customer Number
DeptReport.db : Used for department sales reports
Filters:
Department Range
Date Range
ECR
FinaliseKeyReport.db : Used for finalise Key sales reports
Filters:
Date Range
ECR
FixedTotalizorReport.db : Used for Fixed totaliser sales reports
Filters:
"Does not print" setting (Maintenance | System Programming | Fixed Totals)
Date Range
ECR
PLULevelReport.db : Used for PLU sales reports by price level
Filters:
PLU Group Range
Department Range
Date Range
ECR
PLUListReport.db : Used for PLU Report includes all PLUs (e.g. PLU price list)
Filters:
PLU Group Range
Department Range
©2010, ICRTouch LLP
148
ICRTouch TMS
PLUReport.db : Used for PLU Sales Reports (consolidation of all Price Levels)
Filters:
PLU Group Range
Department Range
TaxReport.db : Used for Tax reports with totals taken direct from ICRTouch
Filters:
Date Range
TimeAttendanceAuditReport.db : Used for a list of time and attendance clock in /out
Filters:
Date Range
TimeAttendanceReport : Used for hours worked reports
Filters:
Date Range
TimeZoneReport : Used for sales report of the time zones (sent from ICRTouch)
Filters:
Date Range
ECR
TransactionKeyReport : Used for transaction key sales reports
Filters:
Date Range
ECR
UnpaidCustReport : Used for customer statements (unpaid list)
ReportList
This database holds a list of all the reports there name and location. Used by TMS to build the list of
reports on the report selection form not for use in reports.
Note, this list is not definitive as new report databases are added from time to time. Most databases
ending with the file name *report.db are temporary report databases.
©2010, ICRTouch LLP
Report Designer
149
11.3.2 TMS Special Formula Fields
When TMS builds a report it looks to see if the report contains any preset formula. If it does TMS will
pass the report different information depending on the formula. Below is a list of the predefined
formulas:
ReportParms
This contains what filters have been applied to the data on the report. The filters that can be applied to
a report depend which report database has been added to the report.
CurSymbol
When the report is run this formula contains the currency symbol that is set as default in windows
(Control Panel | Regional and Language Options | Customize | Currency | Currency Symbol)
DisplayBranch
This formula contains the branch name and number
FromBranch, ToBranch
This formula contains the branch number from the "from branch" and "to branch" combo box on the
report selector form
FromDate, ToDate
Contains the date range in the format dd/mm/yyyy
FromDept, ToDept
Contains the department range
FromPLUGroup, ToPLUGroup
Contains the PLU group range
FromCustomerNum, ToCustomerNum
Contains the customer range as a number
FromCustomer, ToCustomer
Contains the first and last customer selected as a name
Supplier
Contains the selected Supplier
UserField1, UserField2, UserField3, UserField4 & UserField5
Contains the contents of the selected user fields filter
LaunchExe
Is an advanced function that forces TMS to launch the application specified in the text of the formula
field prior to starting the report. This can be used for example for populating a temporary database
with extended information before building a report.
Adding a predefined formula to a report
If you what to include one of the formulas on your report, first highlight the formula Fields heading in
the Field Select pane, right click and select new from the drop down menu.
©2010, ICRTouch LLP
150
ICRTouch TMS
When your prompted for a name enter the name of the predefined formula that you wish to add to the
report, this is case sensitive
Once you have set a name then you can expand the formula field list (by clicking on the +). Select the
formula (left click) and drag it onto the report (at which point a red tick will appear next to the formula)
©2010, ICRTouch LLP
Report Designer
151
11.3.3 Visual Linking Expert
You link databases so records from one database will match related records from another. When you
link, a field is used that is common to both databases. The program uses the link to match up records
from one database with those from the other.
Use Visual Linking to link two or more databases together. When you choose the Add Database to
Report command from the Database menu, and select an additional database, The Visual Linking
Expert appears and displays the additional database.
To create links manually, drag a field from one table to a field in another table. If successful, a link line
is created. If unsuccessful, a error message will be displayed.
Note: You can link tables by table name or by secondary key information.
Visual Linking
This scroll box displays all the tables currently in your report along with any links and indexes.
Tables
When you click this button, the Choose Tables To Use In Visual Linking dialog box appears where you
can choose the desired tables you want to link in your report and whether smart linking is used.
Arrange Tables
When you click this button, the program will arrange the tables to fit in the most efficient manner inside
the Visual Linking scroll box.
Link
©2010, ICRTouch LLP
152
ICRTouch TMS
Click By Name to link tables by their names or By Key to use foreign key information. Click Link to link
tables automatically (not recommended as it has little success correctly linking tables).
Clear Links
Click this button to clear all the current table links.
Link Options
To activate this button, you must have a link line selected. Once you have a link selected, click this
button to open the Link Options dialog box where you can choose what type of index to use, allow
partial text matches, etc., for the selected link.
Delete Link
Click a link then click this button to remove it.
©2010, ICRTouch LLP
Index
Index
59
-E-
-002 Codes
Discounts 62
Display Messages
153
40
-AAccess Permissions 106
Account Balances 85
Account Customers 62, 65
-BBackup 98
Batch Price Changing 96
Batch Reports 41
BOGOF 32, 35
Booker 126, 127
Branch Details 102
Buy One Get One Free 32, 35
-CCases 67
Cash 50
Cash in Drawer 37
Change Sales Data Date 95
Check Text 60
Check Totals 94
Clerk Detail Reporting 49
Clerk Security 46
Clerks 46
Communication Settings 102
Communications Log 93
Configuration 108
CSV Export 91
CSV Import 90
Customer Groups 62
Customer Loyalty 61
Customer PLU Fields 107
-DData Backup 98
Date/Time set 87
Deliveries 72
Departments 30
©2010, ICRTouch LLP
Edit Clerks 46
Edit PLUs 18
End of Day Reports 41
End of Day Sales Collection
End of Day Sheet 14, 15
Error Messages 57
Export 91
12
-FFile Export 91
File Import 90
File Reindex 88
File Repair 88
Finalise Keys 50
Financial Reports 80
Fix Incorrect Date on Sale Collection
Fixed Character 58
Fixed Totalisers 37
Function Keys 51, 52
95
-GGenerating an Order 70
Global Price Changing 96
Groups 31
-HHand Held Terminal 110, 112, 113, 114, 115, 116,
117, 118, 119
Happy Hours 43
HHT 110, 112, 113, 114, 115, 116, 117, 118, 119
Hourly Reports 44
-IImport 90
Invoices 74
-JJournals
82, 99
154
ICRTouch TMS
-KKeyboard Programming
53
-L-
-S-
Level Names 56
List PLUs 29
Live Journals 82
Log Files 93
Sage line 50 122, 123, 125
Sales Reset 89
Scheduled Program Changes 11
Scrolling Messages 59
Send and Receive 8
Send Message to Terminals 84
Send program data 8
Setup 108
Shelf Edge Labels 76, 144
Status Keys 52
Stock Labels 146
Stock Movement 27
Stock Take Terminal 110, 112, 113, 114, 115, 116,
117, 118, 119
Stock Taking 77
Suppliers 66
System Flags 42
-MMaintain Margins 97
Menu Level Names 56
Mix and Match 32, 35
-NNon PLU
40
-OOpen Check Report
Orders 70
94
-T-
-PParent Pay 129
PLU Drop Down Windows 29
PLU File Maintenance 18
PLU Groups 31
PLU Lists 29
PLU Programming 18
PLU Reports 80
PLU Stock 18
PLU User Fields 107
Points 62
Price Embedded Barcodes 40
Price Level Schedular 43
Printers 105
Promotions 43
Purchases 74
Table Text 60
Tax Rates 45
Tax Table 45
Time Zone Reports 44
TMS Setup 108
Transaction Keys 51
-UUn Z Lock Terminals 86
User Access Rights 106
User Fields 107
Users 106
-VVAT 45
View Journals 99
View Open Tables 94
-RReceipt Logos 55
Receive program data
Recipies 28
Recomended Order 70
Reindex 88
Report Designer 132
Reports 80
Reset All Sales Data 89
8
©2010, ICRTouch LLP
Index
-WWastage 75
Weight Embedded Barcodes
Weighted PLU Codes 40
-XX Read
9
-ZZ Read Terminals 12
Zero All Sales Data 89
©2010, ICRTouch LLP
40
155