1
OPEN API
version 17.0.1
user guide
No Magic, Inc.
2011
All material contained herein is considered proprietary information owned by No Magic, Inc. and is not to be
shared, copied, or reproduced by any means. All information copyright 2003-2011 by No Magic, Inc. All Rights
Reserved.
0
CONTENTS
INTRODUCTION
PLUG-INS
8
10
How plug-ins work 10
Writing plug-in 11
Testing plug-in 13
Detail information 13
Plug-in descriptor 13
Plug-in classes 15
Plug-In class loading 16
Important notes for Unix systems 17
Resource dependent plug-in
17
Implementing ResourceDependentPlugin example
NEW! MagicDraw Plugin Integration with Eclipse
17
18
Extending Eclipse Main Menu with Plugin Command 18
NEW! DEVELOPING PLUG-INS USING IDE
MagicDraw Plug-in Development in Eclipse
20
20
Step 1: Create Java Eclipse Project for MagicDraw Plug-in 20
Step 2: Create Plug-in Main Class 21
Step 3: Prepare Plug-in Descriptor File 21
Step 4: Start MagicDraw From Eclipse Environment 22
Step 5: Run MagicDraw Tests Cases from Eclipse Environment
23
PLUGINS MIGRATION TO MAGICDRAW 15.0 AND LATER OPEN API
UML metamodel changes
25
25
UML specification changes 25
UML metamodel API implementation changes
25
Removed deprecated methods 26
Libraries jars changes 26
Package name change for build-in plug-ins 26
DISTRIBUTING RESOURCES 27
How to distribute resources 27
Creating required files and folders structure 27
Resource Manager descriptor file 33
JYTHON SCRIPTING
36
Creating script 36
Step 1: Create directory 36
Step 2: Write script descriptor 36
Step 3: Write script code 37
Variables passed to script 37
3
Copyright © 2003-2011 No Magic, Inc.
CONTENTS
Jython 38
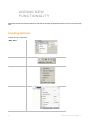
ADDING NEW FUNCTIONALITY 39
Invoking Actions 39
Creating a new action for MagicDraw 40
Step 1: Create new action class 40
Step 2: Specify action properties 42
Step 3: Describe enabling/disabling logic
Step 4: Configure actions 43
Step 5: Register configurator 45
42
Actions hierarchy 46
Predefined actions configurations 47
NEW! Selecting elements via element Selection dialog
UML MODEL
Project
47
48
48
Root Model
49
Accessing Model Element properties
Container properties
49
49
Collecting all children from all hierarchy levels
Visitors 51
InheritanceVisitor
Changing UML model
50
51
52
SessionManager 52
ModelElementsManager 52
Creating new model element 53
Editing model element 53
Adding new model element or moving it to another parent
Removing model element 54
NEW! Refactoring model elements 55
Creating Diagram 55
Creating new Relationship object 56
NEW! Copying elements and symbols 56
Working with Stereotypes and Tagged Values
Hyperlinks
53
57
58
PRESENTATION ELEMENTS
Presentation Element
60
60
Using set and sSet 61
Diagram Presentation Element 61
Shapes 62
Paths 62
Presentation Elements Manager 62
Creating shape element 63
Creating path element 63
Reshaping shape element 63
Changing path break points 64
Deleting presentation element 64
Changing properties of presentation element
4
64
Copyright © 2003-2011 No Magic, Inc..
CONTENTS
Notification of Presentation Element draw
NEW! Displaying Related Symbols 66
SYMBOLS RENDERING
65
67
Custom Renderer Provider 67
Registering Provider
67
Custom Symbol Renderer 67
Custom Renderers Sample 68
Creating Custom Renderers 68
Registering Custom Symbol Renderer Provider
DIAGRAM EVENTS
72
NEW! Diagram Listener Adapter
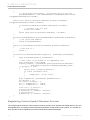
PATTERNS
70
72
73
Target concept 73
Using PatternHelper 73
Abstract Pattern 73
How to create my own pattern 75
Step 1: Create pattern properties class 75
Step 2: Create pattern panels class 76
Step 3: Create pattern class 76
Step 4: Create Description.html 77
Step 5: Create plug-in 77
PROPERTIES
79
NEW DIAGRAM TYPES
81
Diagram Types hierarchy 82
Adding a new diagram type for MagicDraw
PROJECTS MANAGEMENT
82
86
ProjectsManager 86
ProjectDescriptor 87
Project management 87
Module management 88
NEW! Merging and Differencing
PROJECT OPTIONS
90
92
Adding Own Project Options 92
Retrieving Project Option Value 93
5
NEW! ENVIRONMENT OPTIONS
94
Adding Custom Environment Options
94
Copyright © 2003-2011 No Magic, Inc..
CONTENTS
EVENT SUPPORT
95
Property Change Events
95
Property Names in MagicDraw
95
Listening to Property Change Events
96
Listening to Related Elements in Hierarchy Events
97
Listening to Transaction Commit Events 97
Event Listening Sample 97
Element’s Property Change Listening
TransactionCommitListener 98
SELECTIONS MANAGEMENT
97
100
Selection in diagrams 100
Selection in model browser 100
CREATING IMAGES
102
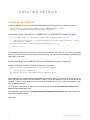
CREATING METRICS
Creating New Metric
103
103
Implementing calculateLocalMetricValue(ModelElement target) 103
Implementing acceptModelElement(BaseElement element) 103
Constructor 104
Adding new metrics to MagicDraw
Full example source code 106
105
Plugin descriptor file 106
MyMetricsPlugin class 106
MyMetric class 106
Metric framework structure
108
CONFIGURING ELEMENT SPECIFICATION
Adding Configuration
109
CUSTOM DIAGRAM PAINTERS
ANNOTATIONS
VALIDATION
109
110
111
112
Basic conceps 112
Validation rule developer’s roadmap 113
Create OCL2.0 Validation Rule 113
Binary Validation Rule 114
Create Binary Validation Rule - Case A 115
Create Binary Validation Rule - Case B 115
Create Binary Validation Rule - Case C 115
Create Binary Validation Rule - Case D 117
Binary validation rule in plugin 118
How to provide a solution for a problem found during validation?
6
118
Copyright © 2003-2011 No Magic, Inc..
CONTENTS
TEAMWORK
119
CODE ENGINEERING
Code Engineering Set
120
120
Forward Engineering 120
Reverse Engineering 121
Managing code engineering sets
Language specific options
121
122
Samples of the forward and reverse engineering
Performing the forward engineering
Performing the reverse engineering
122
122
123
ORACLE DDL GENERATION AND CUSTOMIZATION
124
Introduction to Oracle DDL generation in MagicDraw 124
Understanding Oracle DDL Template structure 124
Customizing template 125
Utility class 126
Example 131
RUNNING MAGICDRAW IN BATCH MODE
132
NEW! CREATING MAGIC DRAW TEST CASES
Creating MagicDraw JUnit Test Case
Comparing MagicDraw Projects
133
133
134
Working with Test Resources 135
Configure Test Environment 136
7
Copyright © 2003-2011 No Magic, Inc..
INTRODUCTION
This document describes MagicDraw Open Java API and provides instructions how to write your own plug-ins,
create actions in the menus and toolbars, change UML model elements, and create new patterns.
The following chapters are included in this document:
• “Plug-Ins” on page 10
• “Plugins migration to MagicDraw 15.0 and later OPEN API” on page 25
• “Distributing Resources” on page 27
• “Jython Scripting” on page 36
• “Adding New Functionality” on page 39
• “UML Model” on page 48
• “Presentation Elements” on page 60
• “Symbols Rendering” on page 67
• “Diagram events” on page 72
• “Patterns” on page 73
• “Properties” on page 79
• “New Diagram Types” on page 81
• “Projects Management” on page 86
• “Project Options” on page 92
• “NEW! Environment Options” on page 94
• “Event support” on page 95
• “Selections Management” on page 100
• “Creating Images” on page 102
• “Creating Metrics” on page 103
• “Configuring Element Specification” on page 109
• “Custom diagram painters” on page 110
• “Annotations” on page 111
• “Validation” on page 112
• “Teamwork” on page 119
• “Code Engineering” on page 120
• “Oracle DDL generation and customization” on page 124
• “Running MagicDraw in batch mode” on page 132
In the generated JavaDoc you will find detailed descriptions of classes, their attributes, and operations. JavaDoc is located in <MagicDraw installation directory>/openapi/docs.
All MagicDraw OpenAPI classes are packaged in these jar files:
• <MagicDraw installation directory>/lib/md_api.jar
• <MagicDraw installation directory>/lib/md_common_api.jar MagicDraw plugin's classes are
packed in the concrete plugin's jar file(s).
(E.g. classes of Model Transformation plugin - "<MagicDraw installation directory>plugins/
com.nomagic.magicdraw.modeltransformations/modeltransformations_api.jar")
8
Copyright © 2003-2011 No Magic, Inc.
INTRODUCTION
Do not forget to add all jar files recursively (except md_commontw.jar and md_commontw_api.jar) from
<MagicDraw installation directory>/lib directory into your (IDE) classpath and make sure the patch.jar is the first in
the classpath.
We provide a set of plug-ins samples in <MagicDraw installation directory>/openapi/examples directory. Examples sometimes is the best way to find out how to use some Open API.
9
Copyright © 2003-2011 No Magic, Inc..
PLUG-INS
Plug-ins are the only one way to change functionality of MagicDraw. The main purpose of plug-in architecture
is to add new functionality to MagicDraw although there is a limited ability to remove existing functionality using
plug-ins.
Plug-in must contain the following resources:
• Directory.
• Compiled java files, packaged into jar file.
• Plug-in descriptor file.
• Optional files used by plug-in.
Typically plug-in creates some GUI components allowing user to use plug-in functionality. Generally this is not
necessary because plug-in can listen for some changes in project and activate itself on desired changes.
How plug-ins work
MagicDraw on every startup scans plug-ins directory, and searches there for subdirectories:
• If subdirectory contains plug-in descriptor file, plug-ins manager reads descriptor file.
• If requirements specified in descriptor file is fulfilled, plug-ins manager loads specified class
(specified plug-in class must be derived from com.nomagic.magicdraw.plugins.Plugin class).
Then method init() of loaded class is called. init() method can add GUI components using
actions architecture or do other activities and return from the method. init() method is called
only if isSupported() returns true.
10
Copyright © 2003-2011 No Magic, Inc.
PLUG-INS
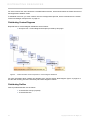
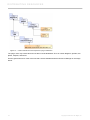
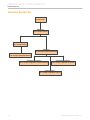
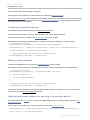
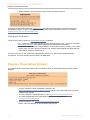
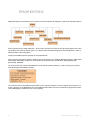
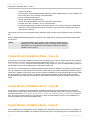
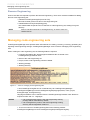
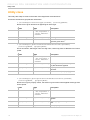
Writing plug-in
Plugins Manager
Plugin
Check directory
[no descriptor]
[descriptor exists]
Read descriptor file
[requirement does not meet]
Check requirements
[requirements meets]
Load plugin class
calling init() method
Writing plug-in
With this example we will create a plug-in that displays a message on MagicDraw startup.
To create plug-in you need to:
• Write plug-in descriptor.
Step 1: Create your plug-in directory in plugins directory
Create a myplugin directory in plugins directory in MagicDraw installation directory.
Step 2: Write plug-in code
Plug-in must contain at least one class derived from com.nomagic.magicdraw.plugins.Plugin class.
package myplugin;
public class MyPlugin extends com.nomagic.magicdraw.plugins.Plugin
{
public void init()
{
javax.swing.JOptionPane.showMessageDialog( null, "My Plugin init");
}
public boolean close()
{
11
Copyright © 2003-2011 No Magic, Inc..
PLUG-INS
Writing plug-in
javax.swing.JOptionPane.showMessageDialog( null, "My Plugin close");
return true;
}
public boolean isSupported()
{
//plugin can check here for specific conditions
//if false is returned plugin is not loaded.
return true;
}
}
This plug-in shows message when it is initialized, and another message when it is closed.
Step 3: Compile and pack plug-in to jar file
To compile the written code, add all .jar files recursively from <MagicDraw installation directory>/lib to java
classpath.
IMPORTANT!
Make sure that the first three .jar files are added in the following order:
1. patch.jar
2. brand.jar
3. brand_api.jar
Order is not important for the rest .jar files.
Compiled code must be packed to jar file.
To create jar file, use jar command in the plugins directory:
jar -cf myplugin\myplugin.jar myplugin\*.class
Step 4: Write plug-in descriptor
Plug-in descriptor is a file named plugin.xml. This file should be placed in myplugin directory.
<?xml version="1.0" encoding="UTF-8"?>
<plugin
id="my.first.plugin"
name="My First Plugin"
version="1.0"
provider-name="Coder"
class="myplugin.MyPlugin">
<requires>
<api version="1.0"/>
</requires>
<runtime>
<library name="myplugin.jar"/>
</runtime>
</plugin>
For detailed information about plug-in descriptor, see “Plug-in descriptor” on page 13.
12
Copyright © 2003-2011 No Magic, Inc..
PLUG-INS
Testing plug-in
Testing plug-in
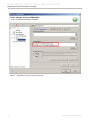
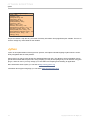
1. Restart MagicDraw. On startup message should appear:
`
2. Then close MagicDraw (File menu -> Exit). Another message should appear:
• Another way to check plug-in is to look at md.log file. This file is located in the <User home
directory>/.magicdraw/<version> directory.
Also all plugins and their status are listed in MagicDraw EnvironmentOptions Plugins tab.
After startup this file end should contain such information:
LOAD PLUGINS:
com.nomagic.magicdraw.plugins.PluginDescriptor@edf730[ id = my.first.plugin, name =
My First Plugin, provider = Coder, version = 1.0, class = myplugin.MyPlugin,
requires api = 1.0, runtime = [Ljava.net.URL;@ff94b1]
INIT PLUGINS:
com.nomagic.magicdraw.plugins.PluginDescriptor@edf730[ id = my.first.plugin, name =
My First Plugin, provider = Coder, version = 1.0, class = myplugin.MyPlugin,
requires api = 1.0, runtime = [Ljava.net.URL;@ff94b1]
TIP!
Looking at file is the best way to find problems when plug-in does not
work.
Detail information
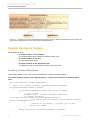
Plug-in descriptor
Plug-in descriptor is a file written in XML and named plugin.xml. Each descriptor contains properties of one
plug-in. Descriptor file should contain one plugin element definition.
In the table below, you will find the structure of plugin.xml.
13
Copyright © 2003-2011 No Magic, Inc..
PLUG-INS
Detail information
Element
Description
Name
plugin
Description
Attributes
id
Plug-in ID should be unique. Used to identify plug-in by
plug-ins manager internals and by requirements of other
plug-ins. Example: “my.first.plugin.0”
name
Plug-in name. No strict rules applied to this attribute.
Example: “Example plugin”
version
Plug-in version. Version can be used to check other
plug-ins dependencies. Allows numbers separated
with one dot value.
provider-name Plug-in provider name. Company or author name.
Example: "No Magic"
class
Full qualified class name. Class must be derived from
com.nomagic.magicdraw.plugins. Plugin and stored in
plug-in runtime library. This class will be loaded and initialized by plug-ins manager.
Example:”myplugin.MyPlugin”
ownClassload
er
Optional; default value - “false“.
class-lookup
Optional; possible values - “LocalFirst”, “GlobalFirst” default
value - “GlobalFirst“.
Indicate if to use plugin own (separate from other plugins) classloader. All MagicDraw plugins are loaded by
one classloader. If there are plugins that can not be
loaded by the same classloader (conflicts plugin libraries versions or etc.) their descriptors must define to use
own classloaders.
Specifies priority of “parent” class loader if plugin is using ownClassloader. LocalFirst forces to load classes from plugin
class loader even if such classes exists in MagicDraw core
class path. This option should be used if you want to use in
your plugin different versions of some libraries used in core.
Nested elements
requires
api
requires
MagicDraw API version required by plug-in. Plug-ins
and their versions required by plug-in.
runtime
Runtime libraries needed by plug-in.
Nested elements
api
Required MagicDraw API version.
requiredplugin
Required plug-in(s) to run plug-in.
Attributes
version
Required MagicDraw API version.
Example: “1.0”
14
Copyright © 2003-2011 No Magic, Inc..
PLUG-INS
Detail information
Element
Description
requiredplugin
Attributes
id
ID of required plug-in.
Example: “my.first.plugin.0”
version
Version of required plug-in.
Example: “1.1”
runtime
Nested elements
library
library
Runtime library for running plug-in.
Attributes
name
Name of the required library.
Example: "patterns.jar"
help
Attributes
name
Name of a compressed JavaHelp file (JAR file).
TIP! Adobe RoboHelp provides support for the JavaHelp format and automatically creates all Java-based
Help features and the HTML-based features such as
HTML content and hypertext links.
path
Relative path to the JavaHelp file.
Plug-in classes
Plugin is the base abstract class for any MagicDraw plug-in. User written plug-in must be extended from this
class. Every plug-in has its own descriptor set by plug-ins manager. Plug-in has two special methods:
• public abstract void init() method is called on MagicDraw startup. Plug-in must override this
method and implement there its own functionality.
• public abstract boolean close() method is called on MagicDraw shutdown. Plug-in must
override this method and return to true if plug-in is ready to shutdown or false in other case. If
plug-in returns false, MagicDraw shutdown will be canceled.
• public abstract boolean isSupported() method is called before plug-in init. If this method
returns false, plugin will not be initialized. isSupported() may be used to check if plugin can be
started for example on this OS.
15
Copyright © 2003-2011 No Magic, Inc..
PLUG-INS
Detail information
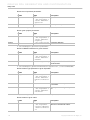
PluginDescriptor is the class that provides information loaded from plugin.xml file (plug-in descriptor) to plugin. Detail information about these classes can be found in javadoc.
Plugins Manager
MagicDraw Startup
1*[for all plugins]:
2: create()
descriptor : PluginDescriptor
3: create()
plugin : Plugin
4: setDescriptor( descriptor )
5*[for all plugins]:
6: init()
MagicDraw Shutdown
7*[for all plugins]:
8: result := close()
9[!result]: cancel shutdown
Plug-In class loading
All MagicDraw plug-ins (classes and runtime libraries) are loaded by one classloader. If there are plugins that can
not be loaded by the same classloader (conflicts plugin libraries versions or etc.) their descriptors should be defined to use
own classloaders. In this case the plug-in classes are loaded by separate classloader.
Optional property “class-lookup” controls how classes are loaded if plugin has its own classloader. If value of
this property is LocalFirst, class is loaded from plugin classpath even if such class is already loaded in global
MagicDraw core class loader. This property is important if you want to use different version of the same
classes(libraries) used in MagicDraw core.
16
Copyright © 2003-2011 No Magic, Inc..
PLUG-INS
Resource dependent plug-in
Important notes for Unix systems
• By default plug-in directory is placed in the MagicDraw installation directory (global plug-in
directory). For example if MagicDraw is installed in c:\MagicDrawUML plug-in directory will be
in c:\MagicDrawUML\plugins.
On Unix systems, plug-ins manager additionally uses special directory in user home directory
~/.magicdraw/<version>/plugins for plug-in loading.
For example for user “Bob” MagicDraw version 10.0 will use directory /home/bob/.magicdraw/
10.0/plugins for searching plug-in. Even on Unix systems global plug-in directory is used also.
This allows to have global and user plug-ins.
• Another issue on Unix systems, is related to permissions of a user to write. If MagicDraw is
installed by root, user will not be allowed to write in a global plug-in directory if a user has not
such permissions.
Resource dependent plug-in
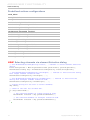
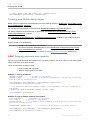
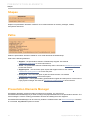
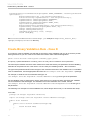
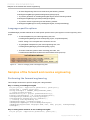
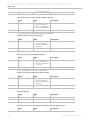
Starting with 16.6 version MagicDraw UML has new functionality to require loaded plug-ins for particular project. This feature was created to avoid incorrect data load because of missing plug-ins. Every plug-in can provide name and version of plug-in to be required for project correct load.
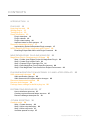
To become resource dependent plug-in, your plug-in class must implement com.nomagic.magicdraw.plugins.ResourceDependentPlugin interface (Figure 1 on page 17).
Figure 1 -- Interface for resouce dependent plug-in
ResourceDependentPlugin has three special methods:
• boolean isPluginRequired(Project project) method is called on project save. Plug-in
must return true if given project uses resources from plugin.
• String getPluginName() method should return plugin name.
• String getPluginVersion() method should return version of plugin.
Implementing ResourceDependentPlugin example
public String getPluginName()
{
return getDescriptor().getName();
}
public String getPluginVersion()
{
return getDescriptor().getVersion();
}
public boolean isPluginRequired(Project project)
{
Collection<ModuleDescriptor> collection =
project.getMountTable().getModules();
for (ModuleDescriptor moduleDescriptor : collection)
{
17
Copyright © 2003-2011 No Magic, Inc..
PLUG-INS
NEW! MagicDraw Plugin Integration with Eclipse
String projectName =
ProjectDescriptorsFactory.getProjectName(moduleDescriptor.getURI());
if (projectName != null &&
(projectName.equals(“my_profile_filename) ))
{
return true;
}
return false;
}
This plug-in will be required for projects if project contains module “my_profile_filename”. Plug-in name and version will be saved into project’s XMI file.
NEW! MagicDraw Plugin Integration with Eclipse
Extending Eclipse Main Menu with Plugin Command
Conventionally you do not need to write any additional code so that the main menu of MagicDraw was
extended with some specific commands brought by a plugin after the plugin is installed. However, this is necessary when the same plugin is installed on MagicDraw which is integrated with Eclipse.
If an additional command should appear on the main menu or an additional button should be placed on the
main toolbar in MagicDraw after plugin installation, you need to create an Eclipse bundle that tells Eclipse
where the command or the button should be placed.
Example: Extending the Eclipse main menu with an additional command brought by a MagicDraw
plugin
Lets say you have already created a MagicDraw plugin that extends the main menu of MagicDraw with a command whose id, for example, is “CUSTOM_ACTION_ID”.
To extend the Eclipse main menu with this command
1. Create a class for an Eclipse bundle to extend the “com.nomagic.magicdraw.integra-
tions.eclipse.rcp.actions.MDEclipseActionWrapper” class.
TIP!
This is an example of an Eclipse bundle class that connects to a
MagicDraw command by its id “CUSTOM_ACTION_ID”:
public class MyCustomActionWrapper extends
MDEclipseActionWrapper
{
public MyCustomActionWrapper()
{
super(CUSTOM_ACTION_ID);
}
}
NOTE: This is a general way of connecting to an Eclipse command
(“org.eclipse.ui.actions.ActionDelegate”) that should to be placed on
the Eclipse main menu.
18
Copyright © 2003-2011 No Magic, Inc..
PLUG-INS
NEW! MagicDraw Plugin Integration with Eclipse
2. Create a descriptor (plugin.xml file) for the Eclipse bundle to place the command on the Eclipse
main menu.
TIP!
This is an example of a descriptor that should place the command with id
“CUSTOM_ACTION_ID” under Diagrams > Diagram Wizards menu:
<!-- Define command and attach to category -->
<extension point="org.eclipse.ui.commands">
<command id="MyCustomActionWrapper.cmd"
name= "Command name"
categoryId="MagicDraw"/>
<!-- Attach command (action) to menu -->
<extension point="org.eclipse.ui.actionSets">
<actionSet id="Custom action set"
label="Custom action label"
visible="false">
<action class= "org.my.path.MyCustomActionWrapper"
label= "Custom action label"
id= "Custom_action_id"
menubarPath= "Diagrams/Diagram Wizards/group"
definitionId="MyCustomActionWrapper.cmd"/>
</actionSet>
</extension>
<!-- Attach to specific MagicDraw view and editor part -->
<extension name="Diagram or View Active"
point="org.eclipse.ui.actionSetPartAssociations">
<actionSetPartAssociation targetID="Custom_Action_Part">
<part
id="com.nomagic.magicdraw.integrations.eclipse.rcp.editors.
DiagramEditor"/>
<part id="CONTAINMENT_TREE"/>
<part id="INHERITANCE_TREE"/>
<part id="DIAGRAMS_TREE"/>
<part id="EXTENSIONS_TREE"/>
<part id="SEARCH_RESULTS_TREE"/>
<part id="DOCUMENTATION"/>
<part id="PROPERTIES"/>
<part id="MESSAGES_WINDOW"/>
</actionSetPartAssociation>
</extension>
NOTE: This is a general way of adding a command to the Eclipse main menu.
3. Pack the command class with the Eclipse bundle descriptor to an Eclipse bundle (.jar file) and
save the file in <MagicDraw installation directory>/plugins/eclipse/plugins.
4. Integrate MagicDraw with Eclipse.
5. Start Eclipse.
The new command will appear on the Eclipse main menu.
<MagicDraw installation directory>/plugins/eclipse/plugins contains MagicDraw plugins that have commands to
appear on the Eclipse main menu. Their plugin.xml files can be used as examples too.
19
Copyright © 2003-2011 No Magic, Inc..
NEW! DEVELOPING
PLUG-INS USING IDE
MagicDraw plug-ins can be effectively developed using popular IDEs (Integrated Development Environment)
such as Eclipse, IntelliJ, and others. Developers may use theirs favorite IDE for agile MagicDraw plug-in
coding, building, testing, and debugging. This chapter describes the MagicDraw plug-in development in Eclipse
(www.eclipse.org) IDE.
MagicDraw Plug-in Development in Eclipse
To configure the Eclipse environment for the MagicDraw plug-in developement, you need to perform the
following steps:
1. Create Java Eclipse Project for MagicDraw plug-in.
2. Create the plug-in main class.
3. Prepare the plug-in descriptor file.
4. Start MagicDraw from the Eclipse environment.
5. Run MagicDraw test cases from the Eclipse environment.
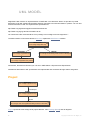
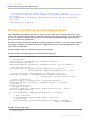
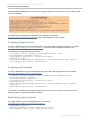
Step 1: Create Java Eclipse Project for MagicDraw Plug-in
The MagicDraw plug-in development in Eclipse begins with creating a new Java Project. It is recommended to
create separate Eclipse Java Project for each MagicDraw plug-in implementation.
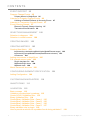
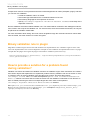
In order to access MagicDraw Open API classes, the MagicDraw libraries (jars) must be added to the Eclipse
project build path. It is recommended to create a path variable for the MagicDraw installation directory. The
path variable should be used to specify MagicDraw libraries in the Eclipse project build path (see Figure 2 on
page 21). Variable relative paths simplify switching between different MagicDraw versions, and make the
20
Copyright © 2003-2011 No Magic, Inc.
NEW! DEVELOPING PLUG-INS USING IDE
MagicDraw Plug-in Development in Eclipse
MagicDraw plug-in project environment independent. If the developed MagicDraw plug-in uses other
MagicDraw plug-ins or external libraries, those libraries should be also added to the project build path.
Figure 2 -- Eclipse Java Project build path with specified MagicDraw libraries
For more information how to create path variables, see at http://help.eclipse.org/indigo/topic/
org.eclipse.platform.doc.user/concepts/cpathvars.htm.
Step 2: Create Plug-in Main Class
Each MagicDraw plug-in main class must extend the com.nomagic.magicdraw.plugins.Plugin class
and implement its methods as described in the "Writing plug-in" on page 11 chapter. Eclipse automatically
generates a default implementation for abstract Plug-in class methods. However, please remember that the
Eclipse generated implementation for isSupported()and close()methods returns the false value which
should be changed to true for enabling the plug-in initialization and disposing.
Step 3: Prepare Plug-in Descriptor File
The plug-in descriptor XML file should be written as described in "Step 4: Start MagicDraw From Eclipse
Environment" on page 22 and placed to the <MagicDraw installation directory>\plugins\my_plugin_name
directory.
NOTE
Please note, that even plug-in descriptor file contains information about
runtime plug-in jar, it is not necessary to build and deploy this jar to
plug-in directory while plug-in is developed under Eclipse IDE.
If the created MagicDraw plug-in uses external libraries which conflict with the same MagicDraw libraries, the
ownClassload property value should be set as true in the plug-in descriptor as shown in the following example:
21
Copyright © 2003-2011 No Magic, Inc..
NEW! DEVELOPING PLUG-INS USING IDE
MagicDraw Plug-in Development in Eclipse
<?xml version="1.0" encoding="UTF-8"?>
<plugin
id="com.nomagic.magicdraw.emfuml2xmi.v3"
name="Eclipse UML2 (v3.x) XMI Export/Import"
version="1.0"
ownClassloader="true"
provider-name="No Magic"
class="com.nomagic.magicdraw.emfuml2xmi.v3.EmfUml2XmiPlugin">
</plugin>
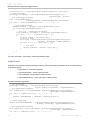
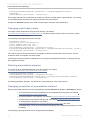
Step 4: Start MagicDraw From Eclipse Environment
The implementation code of the MagicDraw plug-in is directly loaded to MagicDraw (without building plug-in
jars) when MagicDraw starts from Eclipse environment. MagicDraw can be started from Eclipse as a regular
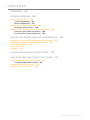
Java application. To start MagicDraw from Eclipse, configure start-up settings in the Eclipse Run
Configurations dialog. The com.nomagic.magicdraw.Main class should be specified as the main class
(see Figure 3 on page 22).
Figure 3 -- Eclipse Run Configuration settings for starting MagicDraw from Eclipse
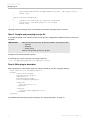
Moreover, the heap size configuration and the MagicDraw installation directory should be provided as Java
Virtual Machine (JVM) arguments in the Arguments tab of the Run Configuration dialog (see Figure 4 on
page 23). MagicDraw output can be redirected to Eclipse Console by specifying the -verbose key as the
MagicDraw program argument.
Some more MagicDraw environment properties can be added. For instance, if MagicDraw needs to be loaded
with custom plug-ins only, the custom directory for MagicDraw plug-ins can be specified as the
md.plugins.dir property value:
-Dmd.plugins.dir=C:\development\plugins
MagicDraw can be also started in the debug mode as a regular Java program. To use the standard Eclipse
Debug feature, on the Eclipse menu, click Run > Debug. In this case, the MagicDraw plug-in code can be
22
Copyright © 2003-2011 No Magic, Inc..
NEW! DEVELOPING PLUG-INS USING IDE
MagicDraw Plug-in Development in Eclipse
debugged using break points, watchers, and other Eclipse debugging features. Moreover, the body of
MagicDraw plug-in methods can be changed and reloaded (hot-swapped) while running MagicDraw in the
debug mode. It is not need to restart MagicDraw each time the body of plug-in method is changed. It is
recommended to run MagicDraw in the debug mode while developing MagicDraw plug-ins.
Figure 4 -- MagicDraw heap size and installation directory configuration as JVM arguments
Step 5: Run MagicDraw Tests Cases from Eclipse Environment
Developers may create JUnit 3.x based MagicDraw test cases for MagicDraw plug-in behavior testing.
MagicDraw Test Case development is described in "NEW! Creating Magic Draw Test Cases" on page 133.
MagicDraw test cases can be executed as regular JUnit test cases in the Eclipse environment. From the
Eclipse main menu, select Run > Run As > JUnit Test Cases. However, the MagicDraw installation directory
and heap size configuration should be specified as VM arguments in the Run Configurations dialog of JUnit
(see Figure 5 on page 24).
23
Copyright © 2003-2011 No Magic, Inc..
NEW! DEVELOPING PLUG-INS USING IDE
MagicDraw Plug-in Development in Eclipse
Figure 5 -- MagicDraw Test Case running configuration
24
Copyright © 2003-2011 No Magic, Inc..
PLUGINS MIGRATION TO
MAGICDRAW 15.0 AND LATER OPEN
API
Open API in MagicDraw version 15.0 and later versions has changed together with changes in UML 2.1.2 (2.2)
specification. You should read this chapter if you want to migrate your plugin created for earlier MagicDraw version to MagicDraw version 15.0 and later.
UML specification introduced changes in UML metamodel, so we are forced to make these changes in Open
API too. Also it was a good chance to make cleaner UML metamodel implementation API.
There are no big changes in Open API, so migration will not be a long and complicate task for you.
UML metamodel changes
There are two types of changes in UML metamodel API.
UML specification changes
UML 2.1.2 (2.2) specification intoduced few changes in UML metamodel itself. Some metamodel classes were
added, some of them were removed, some metaclasses properties were changed. Most of these changes are
not in core UML, so they will affect you if your plugin is oriented to complex things in UML.
Most changes are made in UML Templates, Simple Time, Interactions.We suggest to look at UML 2.1.2 (2.2)
specification for such changes if you see some compile errors.
UML metamodel API implementation changes
Older UML metamodel API used several interfaces layers for every compatibility level described in UML specification. All these layers were merged into one using package merge, this is why old API had so many interfaces for every metamodel element in different package. Such structure was very complicated and hardly
understandable for new UML users.
MagicDraw version 15.0 and later UML metamodel API provides just one final merged layer. All intermediate
layers were dropped from API. This change reduced UML metamodel API size few times.
Dropped interfaces are from packages:
• com.nomagic.uml2.ext.omg
• com.nomagic.uml2.magicdraw
• com.nomagic.uml2.omg
We left the same package name for merged interfaces like in previous API version com.nomagic.uml2.ext.magicdraw.**. You do not need to make any changes in your code if you was using
interfaces from this layer. Otherwise you need simple change import statement in your java source files. For
example - import com.nomagic.uml2.omg.kernel.Element to import
com.nomagic.uml2.ext.magicdraw.classes.mdkernel.Element.
UML metamodel intrefaces uses Java 5 generics, so it is much easier to understand types of various collections in metamodel.
25
Copyright © 2003-2011 No Magic, Inc.
PLUGINS MIGRATION TO MAGICDRAW 15.0 AND LATER
OPEN API
Removed deprecated methods
Removed deprecated method
Substitution
BaseElement.getProject()
Project.getProject(BaseElement)
MainFrame.getDialogParent()
MDDialogParentProvider.getProvider().
getDialogParent()
MainFrame.setDialogParent(Fram
e)
MDDialogParentProvider.getProvider().
setDialogParent(Frame)
ElementListProperty.setStereot
ype(Stereotype)
ElementListProperty.
setSelectableRestrictedElements(Colle
ction)
Libraries jars changes
MagicDraw Open API classes are packaged into md_api.jar and md_common_api.jar (was md.jar and
md_common.jar). If your plugin was using API classes from some MagicDraw build-in plugin, plugin jar is also
renamed with “xxxx_api.jar” pattern.
Package name change for build-in plug-ins
Some build-in plugins in previous MagicDraw version exposed their Open API. For exampe patterns, transformations, emf and etc. We have changed package name pattern for build-in plugins. Previous API version used
com.nomagic.magicdraw.plugins.impl.** pattern, now these plugins are moved to
com.nomagic.magicdraw.**. For example com.nomagic.magicdraw.patterns.*. Simple import statement
change in your java source will solve this migration issue.
26
Copyright © 2003-2011 No Magic, Inc..
DISTRIBUTING RESOURCES
In this section, you will find information about how to share your created resources with other users. The easiest way to distribute data is to store resources to one zip archive and import the files to MagicDraw with the
MagicDraw Resource Manager. For more information about Resource Manager, see MagicDraw UserManual.pdf.
You can distribute the following types of resources:
• Custom Diagrams
• Profiles
• Templates
• Samples and Documentation
• Plug-ins.
You can distribute one resource type or you may distribute the whole resources set.
How to distribute resources
You can distribute custom resources in the following two ways:
• Using Resource Builder. The recourse can be created using Resource Builder. To download
Resource Builder, click Help > Resource/Plugin Manager. In the Resource Builder, select the
package containing all needed files, add it to the recourse file, and specify several tags. The
resource file you have created can be distributed to your team members and installed using the
Resource/Plugin Manager.
• Distribute manually. Manual distribution consists of the following steps:
1
Create required files. For information about what files are required for each type of
resource, see “Creating required files and folders structure” on page 27.
2 Create Resource descriptor file. For more information about the Resource
descriptor file, see “Resource Manager descriptor file” on page 33.
3 Archive created files to a zip file. The zip file should include the required files, as
well as folders that have structure matching the structure of MagicDraw. For
information about folders structure for each type of resource and to see the
general view of the file structure, see Figure 11, “Structure of directories and files
that could be distributed through the Resource Manager,” on page 33.
4 Import your prepared data to MagicDraw through the Resource Manager. For
more information about the MagicDraw Resource Manager, see MagicDraw
UserManual.pdf.
NOTE
MagicDraw Resource Manager supports zip archives only!
The following sections describe the manual resource distribution in details.
Creating required files and folders structure
To distribute resources, you must create the required files and folders for a particular resource type. Some of
the resource file names should match the standard names.
27
Copyright © 2003-2011 No Magic, Inc.
DISTRIBUTING RESOURCES
For each resource files, there should be a created folders structure, which should match the folders structure of
the MagicDraw installation folder.
To distribute resources, you must create a resource manager descriptor file, which is described in the section
“Resource Manager descriptor file” on page 33.
Distributing Custom Diagrams
Required files for custom diagram distribution are as follows:
• descriptor.xml - Custom Diagram descriptor provided by this plugin.
Figure 6 -- Folders and files structure required for custom diagram distribution
For more information about creating new diagram types, see the section “New Diagram Types” on page 81 or
see the UML Profiling and DSL UserGuide.pdf custom diagrams creation.
Distributing Profiles
Files for profile distribution are as follows:
• CustomProfile.xml.zip (required)
• CustomProfile.htm
28
Copyright © 2003-2011 No Magic, Inc..
DISTRIBUTING RESOURCES
You may choose any name for these files.
Figure 7 -- Folders and files structure required for profile distribution
For more information about working with Profiles see MagicDraw UserManual.pdf and UML Profiling and DSL
UserGuide.pdf.
Distributing Templates
Files for template distribution are as follows:
• CustomTemplate.xml.zip (required)
• CustomTemplate.html
29
Copyright © 2003-2011 No Magic, Inc..
DISTRIBUTING RESOURCES
• description.html.
Figure 8 -- Folders and files structure required for template distribution
30
Copyright © 2003-2011 No Magic, Inc..
DISTRIBUTING RESOURCES
Distributing Samples and Documentation
You can distribute your created samples and documentation and import into MagicDraw with the Resource
Manager.
Figure 9 -- Folders and files structure required for samples and documentation distribution
Distributing Plug-ins
Required files for plug-in distribution are as follows:
• plugins.xml - Plug-in description. For more information about plugin.xml file, see “Plug-in
descriptor” on page 13.
• customPlugin.jar - jarred plug-in class files. You may select any title for this file.
31
Copyright © 2003-2011 No Magic, Inc..
DISTRIBUTING RESOURCES
Figure 10 -- Folders and files structure required for plug-in distribution
The plug-in term may include all resources that could be distributed. Such as custom diagrams, profiles, templates, samples, and others.
See the general structure of the resources that could be distributed with the Resource Manager in the image
below.
32
Copyright © 2003-2011 No Magic, Inc..
DISTRIBUTING RESOURCES
Figure 11 -- Structure of directories and files that could be distributed through the Resource Manager
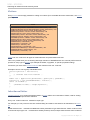
Resource Manager descriptor file
If you are planning to import and export your resources with the Resource Manager, you should read this section. For importing resources to MagicDraw, the resource manager descriptor file should be created. In this section you will find information about descriptor file naming, location, and a sample of this file.
For more information about importing resources with Resource Manager, see MagicDraw UserManual.pdf.
Resource Manager descriptor file naming
The resource Manager descriptor file has specific naming. See the structure of the name:
33
Copyright © 2003-2011 No Magic, Inc..
DISTRIBUTING RESOURCES
MDR_<type>_<plugin name>_<plugin id>_descriptor.xml
For example:
MDR_Plugin_CustomPlugin_3001_descriptor.xml.l
NOTE
All spaces are replaced with the underscore symbol “_“.
Resource Manager descriptor file location
The file location is <MagicDraw installation directory>/data/resourcemanager.
Resource Manager descriptor file content and sample
In this section you will see a basic sample of the Resource Manager descriptor file structure. This sample represents a plug-in distribution, which also includes custom diagram, profile, template, sample, and documentation.
You can also distribute custom diagrams, profiles, templates, or samples separately, you only need to change
the “type“ value.
<resourceDescriptor
critical="false"
date="2007-12-24+21:01"
description="My Plug-in"
homePage="http://www.magicdraw.com"
id="3001"
mdVersionMax="higher"
mdVersionMin="15.0"
name="CustomPlugin"
type="Plugin">
<version human="1.0 beta" internal="1" />
<provider name="No Magic" />
<edition>Enterprise</edition>
<edition>Architect</edition>
<edition>Standard</edition>
<edition>Professional Java</edition>
<edition>Professional C++</edition>
<edition>Professional C#</edition>
<edition>Professional ArcStyler</edition>
<edition>Reader</edition>
<edition>OptimalJ</edition>
<installation>
<file from="data/defaults/data/diagrams/CustomDiagram/descriptor.xml"
to="data/defaults/data/diagrams/CustomDiagram/descriptor.xml" />
<file from="profiles/CustomProfile.xml.zip"
to="profiles/CustomProfile.xml.zip" />
<file from="templates/CustomTemplate.xml.zip"
to="templates/CustomTemplate.xml.zip" />
<file from="samples/CustomPluginSample.mdzip"
to="samples/CustomPluginSample.mdzip" />
<file from="manual/CustomPluginManual.pdf"
to="manual/CustomPluginManual.pdf" />
<file from="plugins/customPlugin/*.*"
to="plugins/customPlugin/*.*" />
<file from="data/resourcemanager/MDR_Plugin_CustomPlugin_3001_descriptor.xml"
to="data/resourcemanager/MDR_Plugin_CustomPlugin_3001_descriptor.xml" />
34
Copyright © 2003-2011 No Magic, Inc..
DISTRIBUTING RESOURCES
</installation>
</resourceDescriptor>
See the terms used in the sample description in the table below:
Element
Description
id
Unique plug-in id. id is used to form a descriptor file name.
To prevent duplicates use a number starting from 3000.
name
Plug-in name. Name is used to form a descriptor file name.
Plug-in name must be unique between all MagicDraw
resources.
type
Type may be one of the following types: Custom Diagram,
Plugin, Profile, Sample, Template.
version internal
version internal is an invisible resource number. This version
number is not visible to the user and may be used for an
internal count. version internal may only be a number.
version human
Human readable version number of the resource.
This version number is visible to users.
version human number may use numbers and/or words.
edition
Supported MagicDraw editions.
installation
installation includes files, which will be copied from the custom
plug-in archive to the MagicDraw folder.
IMPORTANT: Do not use "*.*" ! If file name includes “*.*“,
when uninstalling the plug-in all defined files will be removed.
For example if "samples/*.*" is defined, then uninstalling the
resource will remove all files from the “samples” folder.
35
Copyright © 2003-2011 No Magic, Inc..
JYTHON SCRIPTING
MagicDraw allows you to access open API using Jython scripting language.
MagicDraw on every startup checks for scripts in plugins/com.nomagic.magicdraw.jpython/scripts/. If there are
subdirectories each of them are scanned for the script.xml file. This file provides information about script in this
directory. File is similar to plug-in descriptor described in plug-ins section (See “Plug-in descriptor” on
page 13.). If script.xml contains valid information, script file specified in script.xml is executed. Script file should
contain valid Jython NEW! 2.5.2 script.
NOTE
For writing scripts the user should have basics of Jython programming
language and be familiar with MagicDraw open API.
Creating script
In the following example we will create script which shows a message on MagicDraw startup.
To create script you need:
Step 1: Create directory
First of all a subdirectory in plugins/com.nomagic.magicdraw.jpython/scripts/ should be created.
Step 2: Write script descriptor
Script descriptor is a file written in XML and named script.xml. Script descriptor provides information about
script file to run, version of script, ID, etc.
In the mentioned directory, create script.xml file:
<?xml version="1.0" encoding="UTF-8"?>
<script
id="example 1"
name="Simple menu item"
version="1.0"
provider-name="No Magic"
script-file="main.py"
requiresApi="1.0">
</script>
36
Copyright © 2003-2011 No Magic, Inc.
JYTHON SCRIPTING
Creating script
In the table below, you will find the detailed script.xml file structure.
Element
Description
script
Attributes
Name
id
name
version
providername
script-file
requires-api
Description
Scrip ID, should be unique. Used to identify script.
Example: “my.first.script.0”
Script name. No strict rules applied to this attribute.
Example: “Example script”
Script version. Allows numbers separated with one dot
value. Examples: “1.0”, “0.1”
Script provider name. Company or author name.
Example: "No Magic"
Relative path to script file. This file will be executed.
Example:”main.py”
MagicDraw API version required by script.
Example:”1.0”
Step 3: Write script code
Then in the same directory, create main.py file:
from javax.swing import JOptionPane
# Script starts here
print "Starting script, descriptor", pluginDescriptor
JOptionPane.showMessageDialog( None, "I am a script!!!")
After saving files, restart MagicDraw. On MagicDraw startup message dialog should appear.
Variables passed to script
MagicDraw passes one variable to script pluginDescriptor. This variable contains information from parsed
script.xml file. Variable is instance of PythonPluginDescriptor class.
37
Copyright © 2003-2011 No Magic, Inc..
JYTHON SCRIPTING
Jython
PythonPluginDescriptor
+ getID() : String
+ getName() : String
+ getPluginDirectory() : File
+ getProvider() : String
+ getRequiresAPI() : String
+ getScriptFileName() : String
+ getVersion() : String
+ setID( id : String ) : void
+ setName( name : String ) : void
+ setPluginDirectory( directory : File ) : void
+ setProvider( provider : String ) : void
+ setRequiresAPI( version : String ) : void
+ setScriptFileName( aScriptFile : String ) : void
+ setVersion( version : String ) : void
+ toString() : String
Script can retrieve script directory and other necessary information from pluginDescriptor variable. There is no
need to change any other fields for this variable
Jython
Jython is an implementation of the high-level, dynamic, and object-oriented language Python which is seamlessly integrated with the Java platform.
Using Jython you may access all java API and MagicDraw open API. This allows to avoid compilation and to
get the same results without java code. Using scripting you may do everything that you can achieve using java
plug-in, and even more: you may change your code without recompiling and restarting an application.
More information about Jython you can find at http://www.jython.org
Information about python language you can find at http://www.python.org/
38
Copyright © 2003-2011 No Magic, Inc..
ADDING NEW
FUNCTIONALITY
MagicDraw actions mechanism enables to add new functionality to MagicDraw and the way to invoke it through
GUI.
Invoking Actions
Actions can be invoked from:
Main menu
Main toolbar
Diagram toolbar
Browser context menu
39
Copyright © 2003-2011 No Magic, Inc.
ADDING NEW FUNCTIONALITY
Creating a new action for MagicDraw
Diagram context menu
Keyboard shortcuts
Action can not be represented in GUI. Create a new
action and assign some keyboard shortcut for invoking it.
Creating a new action for MagicDraw
Step 1: Create new action class
All actions used in MagicDraw must be subclasses of MDAction class (see JavaDoc for more details).
The following MDAction subclasses that are used for basic purposes are already created in MagicDraw:
• DefaultBrowserAction – action class, used for browser action. Enables to access some
browser tree and nodes. Recommended to use for performing some actions with the selected
browser nodes.
• DefaultDiagramAction – action class for diagram action. Enables to access some diagram
elements. Recommended to use when for performing some actions with the selected diagram
elements.
• PropertyAction – action for changing some element or application property. Can be used for
changing properties defined by user.
You must override at least actionPerformed() method and implement in it what this actions is going to do.
Example1: simple action
class SimpleAction extends MDAction
{
public SimpleAction(String id, String name)
{
super(id, name, null, null);
}
/**
* Shows message.
*/
public void actionPerformed(ActionEvent e)
{
JOptionPane.showMessageDialog(Application.getInstance().
getMainFrame().getDialogParent(), "This is:" + getName());
}
}
40
Copyright © 2003-2011 No Magic, Inc..
ADDING NEW FUNCTIONALITY
Creating a new action for MagicDraw
Example2: action for browser
public class BrowserAction extends DefaultBrowserAction
{
/**
* Creates action with name "ExampleAction"
*/
public BrowserAction()
{
super("", "ExampleAction", null, null);
}
public void actionPerformed(ActionEvent e)
{
Tree tree = getTree();
String text="Selected elements:";
for (int i = 0; i < tree.getSelectedNodes().length; i++)
{
Node node = tree.getSelectedNodes()[i];
Object userObject = node.getUserObject();
if (userObject instanceof BaseElement)
{
BaseElement element = (BaseElement) userObject;
text += "\n"+element.getHumanName();
}
}
JOptionPane.showMessageDialog(MDDialogParentProvider.getProvider().getDialogParent
(), text);
}
}
41
Copyright © 2003-2011 No Magic, Inc..
ADDING NEW FUNCTIONALITY
Creating a new action for MagicDraw
Step 2: Specify action properties
Property
Function
ID
ID is a unique String for identifying action. If action ID will be set to null,
new ID will be generated.
Action name can be used as ID.
All MagicDraw default actions IDs are defined in ActionsID class (for
more details, see JavaDoc).
You can use these constants for accessing actions. Do not use it as
new actions ID.
Name
Actions name will be visible in all GUI elements.
Shortcut and
mnemonic
Every action can have assigned keyboard shortcut.
Shortcuts can be customized from the Environment Options dialog
box (see MagicDraw User Manual, Section “Environment Options”.)
NOTE
Action must have some ID (not null), in other case,
shortcuts cannot be restored after restarting an
application.
Every action can have a small and large icon.
Icon
Small icon is described as javax.swing.Action.SMALL_ICON and can
be used in menu items.
Large icon is used in toolbar buttons.
Action for toolbar must have a large icon, otherwise it will be displayed
as a button with an action name.
// setting icon. Button with icon looks better than
// with text in toolbar.
action.setLargeIcon( new ImageIcon(
getClass().getResource("main_toolbar_icon.gif") ) );
Description
Action’s description will be shown as tool tip text.
Step 3: Describe enabling/disabling logic
There are two ways for controlling the updating of actions state:
1. Add action to predefined actions group.
Actions can be added into one of predefined actions groups (see Actions groups below). All
actions of one group will be disabled/enabled together.
Conditions for groups enabling/disabling and status updating are predefined and cannot be
changed.
Example:
MDAction action = new MDAction("Example","Example",KeyEvent.VK_E,
ActionsGroups.PROJECT_OPENED_RELATED);
42
Copyright © 2003-2011 No Magic, Inc..
ADDING NEW FUNCTIONALITY
Creating a new action for MagicDraw
2. Implement updateState() method for action.
Here you may describe all conditions when an action must be enabled and when disabled.
Example of updateState() method for some browser context menu action:
public void updateState()
{
//action will be enabled only if there are some selected nodes.
setEnabled(getTree().getSelectedNode() != null );
}
If action is not added to any group, updateState() method for all such actions will be invoked after executing
any command and after closing/opening project or window.
When some actions need to refresh their state, all actions without group can be updated manually:
ActionsStateUpdater.updateActionsState();
Step 4: Configure actions
Every action must be added into some ActionsCategory.
ActionsCategory is a small group for actions. It can be represented as a separator or submenu (nested category).
Categories are added into ActionsManager which is some kind of actions container.
One ActionsManager represents one GUI element – menu bar, context menu, or toolbar.
Table below explains how MagicDraw classes maps into GUI elements.
ActionsManager
Category
Action
Menu
Menu bar
Menu
Menu item
Toolbar
All toolbars
One toolbar
Button
Context Menu
Context menu
Submenu
Menu item
Actions in ActionsManagers are configured by many Configurators.
Configurator is responsible for adding or removing action into some strictly defined place and position between
other actions.
There are three types of configurators:
• AMConfigurator
The configurator for general purpose. Used for menus, toolbars, browser, and diagrams
shortcuts.
• BrowserContexAMConfigurator
Configurator for configuring managers for browser context (popup) menu. Can access browser
tree and nodes.
• DiagramContextAMConfigurator
This configurator for configuring context menus in a diagram.
Can access diagram, selected diagram elements and element that requests context menu.
ActionsManagers for the main menu and all toolbars are created and configured once, so later actions can be
only disabled but not removed.
Context menus are created on every invoking, so ActionsManagers are created and configured every time and
actions can be added or removed every time.
Example 1: add some action into browser’s context menu
final DefaultBrowserAction browserAction = …
43
Copyright © 2003-2011 No Magic, Inc..
ADDING NEW FUNCTIONALITY
Creating a new action for MagicDraw
BrowserContextAMConfigurator brCfg = new BrowserContextAMConfigurator()
{
// implement configuration.
// Add or remove some actions in ActionsManager.
// tree is passed as argument, provides ability to access nodes.
public void configure(ActionsManager mngr, Tree browser)
{
// actions must be added into some category.
// so create the new one, or add action into existing category.
MDActionsCategory category = new MDActionsCategory("", "");
category.addAction(browserAction);
// add category into manager.
// Category isn’t displayed in context menu.
mngr.addCategory(category);
}
/**
* Returns priority of this configurator.
* All configurators are sorted by priority before configuration.
* This is very important if one configurator expects actions from
* other configurators.
* In such case configurator must have lower priority than others.
* @return priority of this configurator.
* @see AMConfigurator.HIGH_PRIORITY
* @see AMConfigurator.MEDIUM_PRIORITY
* @see AMConfigurator.LOW_PRIORITY
*/
public int getPriority()
{
return AMConfigurator.MEDIUM_PRIORITY;
}
};
Example 2: add some action into main menu, after creating a new project
// create some action.
final MDAction someAction = …
AMConfigurator conf = new AMConfigurator()
{
public void configure(ActionsManager mngr)
{
// searching for action after which insert should be done.
NMAction found= mngr.getActionFor(ActionsID.NEW_PROJECT);
// action found, inserting
if( found != null )
{
// find category of "New Project" action.
ActionsCategory category =
(ActionsCategory)mngr.getActionParent(found);
// get all actions from this category (menu).
List actionsInCategory = category.getActions();
//add action after "New Project" action.
int indexOfFound = actionsInCategory.indexOf(found);
actionsInCategory.add(indexOfFound+1, someAction);
// set all actions.
category.setActions(actionsInCategory);
}
}
public int getPriority()
44
Copyright © 2003-2011 No Magic, Inc..
ADDING NEW FUNCTIONALITY
Creating a new action for MagicDraw
{
return AMConfigurator.MEDIUM_PRIORITY;
}
}
Step 5: Register configurator
All configurators are registered in ActionsConfiguratorManager.
ActionsConfiguratorsManager enables to add or remove many configurators to every MagicDraw predefined
configuration (see Predefined actions configurations table below.)
All available configurations are accessible in such a way:
ActionsConfiguratorsManager.getInstance().
add<configuration_name>Configurator(configurator);
Example: Add new configurator for CONTAINMENT_BROWSER_CONTEXT configuration.
//see examples above, how to create configurator for browser actions.
//add configurator into ActionsConfiguratorsManager.
ActionsConfiguratorsManager.getInstance().
addContainmentBrowserContextConfigurator(brCfg);
45
Copyright © 2003-2011 No Magic, Inc..
ADDING NEW FUNCTIONALITY
Actions hierarchy
Actions hierarchy
AbstractAction
(javax.swing)
NMAction
(com.nomagic.actions)
ActionsCategory
(com.nomagic.actions)
MDActionsCategory
(com.nomagic.magicdraw.actions)
MDAction
(com.nomagic.magicdraw.actions)
DefaultBrowserAction
(com.nomagic.magicdraw.ui.browser.actions)
DefaultDiagramAction
(com.nomagic.magicdraw.ui.actions)
PropertyAction
(com.nomagic.magicdraw.actions)
46
Copyright © 2003-2011 No Magic, Inc..
ADDING NEW FUNCTIONALITY
Actions hierarchy
Predefined actions configurations
MAIN_MENU
MAIN_TOOLBAR
MAIN_SHORTCUTS
CUSTOMIZABLE_SHORTCUTS
CONTAINMENT_BROWSER_CONTEXT
CONTAINMENT_BROWSER_SHORTCUTS
CONTAINMENT_BROWSER_TOOLBAR
INHERITANCE_BROWSER_CONTEXT
INHERITANCE_BROWSER_SHORTCUTS
INHERITANCE_BROWSER_TOOLBAR
DIAGRAMS_BROWSER_SHORTCUTS
DIAGRAMS_BROWSER_TOOLBAR
EXTENSIONS_BROWSER_CONTEXT
EXTENSIONS_BROWSER_SHORTCUTS
EXTENSIONS_BROWSER_TOOLBAR
SEARCH_BROWSER_CONTEXT
SEARCH_BROWSER_SHORTCUTS
SEARCH_BROWSER_TOOLBAR
NEW! Selecting elements via element Selection dialog
// Use ElementSelectionDlgFactory.create(...) methods to create element selection
dialog.
Frame dialogParent = MDDialogParentProvider.getProvider().getDialogParent();
ElementSelectionDlg dlg = ElementSelectionDlgFactory.create(dialogParent);
// Use ElementSelectionDlgFactory.initSingle(...) methods to initialize the dialog
with single element selection mode.
ElementSelectionDlgFactory.initSingle(....);
// Use ElementSelectionDlgFactory.initMultiple(...) methods to initialize the
dialog with multiple element selection mode.
ElementSelectionDlgFactory.initMultiple(....);
// Display dialog for the user to select elements.
dlg.show();
// Check if the user has clicked "Ok".
if (dlg.isOkClicked())
{
// Get selected element in single selection mode.
BaseElement selected = dlg.getSelectedElement();
// Get selected elements in multiple selection mode.
BaseElement selected = dlg.getSelectedElements();
}
47
Copyright © 2003-2011 No Magic, Inc..
UML MODEL
MagicDraw UML model is an implementation of OMG UML 2.3 metamodel. We do not provide very detail
description of all UML metamodel elements and their properties in this documentation or javadoc. You can find
all this information in UML 2.3 superstructure specification at:
http://www.omg.org/technology/documents/formal/uml.htm
http://www.omg.org/cgi-bin/doc?formal/07-02-05
You should use UML model interfaces from package com.nomagic.uml2.ext.magicdraw.**
The base interface of all model classes is Element, implements BaseElement inteface.
BaseElement
(com.nomagic.magicdraw.uml)
ElementImpl
(com.nomagic.magicdraw.uml)
Element
(com.nomagic.uml2.ext.magicdraw.classes.mdkernel)
PresentationElement
(com.nomagic.magicdraw.uml.symbols)
All structure, derived from Element you can see in OMG-UML2.3 Superstructure Specification.
All attributes described in UML specification are implemented and accessible through setters and getters.
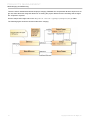
Project
Application
(com.nomagic.magicdraw.core)
-currentProject
Project
(com.nomagic.magicdraw.core)
-model
Model
(com.nomagic.uml2.ext.magicdraw.auxiliaryconstructs.mdmodels)
Project represents main storage of all project data like: main Package (Model) and all diagrams.
48
Copyright © 2003-2011 No Magic, Inc.
UML MODEL
Accessing Model Element properties
Multiple projects can be opened at the same time.
Active (current) project can be accessible in the following way:
Project project = Application.getInstance().getProject();
Also Project is accessible for any other Element:
Project project = Project.getProject(element);
Project
<<getter>>+getActiveDiagram() : DiagramPresentationElement
<<getter>>+getDiagrams() : Collection
<<getter>>+getName() : String
<<getter>>+getFileName() : String
<<getter>>+getDataTypes() : Package
<<getter>>+isRemote() : boolean
<<getter>>+isDirty() : boolean
<<getter>>+getElementByID( id : String ) : BaseElement
<<getter>>+getUsedModulesDescriptors() : List
<<getter>>+getModel() : Model
...
Project keeps references to root Model, also has references to all diagrams.
Root Model
The whole model of one project is contained in a Model instance, accessible in the following way:
Model root = Application.getInstance().getProject().getModel();
Accessing Model Element properties
Model element properties can be accessed with simple setters, getters:
com.nomagic.uml2.ext.magicdraw.classes.mdkernel.NamedElement el = …;
String name = el.getName();
el.setName("new name");
Container properties
Magicdraw uses composite structure of the model.
Every model element is a container and contains its own children and knows about its own parent.
Model element parent can be accessed with Element.getOwner() method. Owned children can be received
with method Element.getOwnedElement()
Different types of children are stored in separate container properties.
You can access these container properties by names that are described in UML specification.
Method getOwnedElement() collects all children from all inner container properties.
Container properties modification and iteration is straightforward using java.util.Collection interface.
Property change events are fired automatically when container properties are modified.
49
Copyright © 2003-2011 No Magic, Inc..
UML MODEL
Collecting all children from all hierarchy levels
Containers implement subsets and unions constraints from UML metamodel specification. This explains how
modification of one container can affect other containers. Make sure you understand subsets and unions in
UML metamodel.
Some containers are read-only. This is true for all DERIVED UML metamodel properties. For example Element.getOwnedElement() is read-only. If you want to add some inner Element you need to add it into subset of
ownedElement - for example for Package.getOwnedPackageMember().
It is enough to set one UML meta-association property value and opposite property will be setted too. For
example Class adding into Package can be done in two ways:
Class myclass = …;
Package myPackage …;
myClass.setOwner(myPackage);
or
myPackage.getOwnedPackageMember().add(myClass);
Accessing elements in container properties
Example : retrieving child model elements.
Element el = …;
if (el.hasOwnedElement())
{
for (Iterator it = el.getOwnedElement().iterator(); it.hasNext();)
{
Element ownedElement = (Element) it.next();
}
}
NOTE:
get<property name>() method call for empty container property instantiates empty collection.
This leads to increased memory usage.
So before iterating check if container property is not empty with method has <property name>().
Adding elements into container
modelElement.get<SomeContainer>().add(child);
modelElement.get<SomeContainer>().remove(child);
Collecting all children from all hierarchy levels
Here is an example of how to collect all children from Element and avoid recursion, using simple for cycle:
ArrayList children = new ArrayList();
Element current = …
children.add(current);
// if current element has children, list will be increased.
for (int i = 0; i < children.size(); i++)
{
current = (Element) children.get(i);
// add all children into end of this list, so it emulates recursion.
children.addAll(current.getOwnedElement());
}
50
Copyright © 2003-2011 No Magic, Inc..
UML MODEL
Collecting all children from all hierarchy levels
Visitors
Every Element has accept() method for visiting it in Visitors (for more details about this mechanism, see Visitor
pattern.)
Visitor
+visitCollaboration( element : Collaboration, context : VisitorContext ) : void
+visitBehavioralFeature( element : BehavioralFeature, context : VisitorContext ) : void
+visitElement( element : Element, context : VisitorContext ) : void
+visitComment( element : Comment, context : VisitorContext ) : void
+visitClass( element : Class, context : VisitorContext ) : void
+visitAssociation( element : Association, context : VisitorContext ) : void
+visitDiagram( element : Diagram, context : VisitorContext ) : void
+visitCallAction( element : CallAction, context : VisitorContext ) : void
+visitAction( element : Action, context : VisitorContext ) : void
+visitInclude( element : Include, context : VisitorContext ) : void
+visitAttributeView( o : AttributeView ) : void
+visitClassView( o : ClassView ) : void
+visitActorView( o : ActorView ) : void
+visitClassifierView( o : ClassifierView ) : void
+visitAssociationTextBoxView( o : AssociationTextBoxView ) : void
+visitDiagramShape( o : DiagramShape ) : void
+visitActionView( o : ActionView ) : void
...
Visitor has visit.. method for all types of model elements and presentation elements.
This is very useful when you are working with large collection of ModelElements and need to perform actions,
specific for every type of Element (for example save/load, copy/paste, or specific properties setting).
Just derive your class from InheritanceVisitor and override some visit.. methods.
Example of how to visit a group of ModelElements:
Visitor myVisitor = new Visitor()
{
// override some visit methods ...
};
Model root = Application.getInstance().getProject().getModel();
Iterator it = root.getOwnedElement().iterator();
while (it.hasNext())
{
((Element)it.next()).accept(myVisitor);
}
InheritanceVisitor
InheritanceVisitor is an enhanced implementation of Visitor pattern and a subclass of Visitor, used for visiting
model elements and presentation elements.
Every visit.. method calls visit.. method for super type.
For example you can put some code into visitClassifier() and it will be executed for all subclasses of a Classifier.
Model elements visit… methods has additional context parameter of type VisitorContext. Visitor context is used
to track what super type visit… methods were already visited (to avoid, multiple visits because some model ele51
Copyright © 2003-2011 No Magic, Inc..
UML MODEL
Changing UML model
ments have multiple inheritance). Open API users should not work with visitor context. All tracking is done in
InheritanceVisitor and Visitor classes.
Changing UML model
SessionManager
SessionManager
<<getter>>+getInstance() : SessionManager
+closeSession() : void
+createSession( sessionName : String ) : void
<<getter>>+isSessionCreated() : boolean
...
SessionManager is the singleton manager used for editing model Elements.
All modifications to model elements should be performed between createSession(sessionName) and closeSession() method calls.
To edit some Element, a session with this manager must be created.
After editing model element, a session must be closed. After that all changes will be applied to the model and
registered in command history (for undo/redo) as one command with a session name.
Only one session can be active.
The following code can be used for accessing, checking and creating the session:
// access singleton instance by using getInstance()
// only one session can be active, so check this.
if (!SessionManager.getInstance().isSessionCreated())
{
// create new session.
SessionManager.getInstance().createSession();
}
If other session is already created and not closed, createSession method throws IllegalStateException runtime
exception.
ModelElementsManager
ModelElementsManager
<<getter>>+getInstance() : ModelElementsManager
+addElement( element : Element, parent : Element ) : void
+moveElement( element : Element, parent : Element ) : void
+removeElement( element : Element ) : void
+createDiagram( type : String, parent : Namespace ) : Diagram
...
ModelElementsManager is the singleton utility class for adding and removing model or moving them to other
parents.
52
Copyright © 2003-2011 No Magic, Inc..
UML MODEL
Changing UML model
Also it helps to create different types of diagrams.
This manager can be used only if some session was created with SessionManager.
ModelElementsManager performs additional checks before modification if element is not read only. Also check
if element can be added to parent is performed. If ModelElementsManager is not used programmer must perform these checks in code explicitly.
Creating new model element
For creation of model element instances use ElementsFactory class.
create<model element type>Instance() method creates new model element instance .
To create model element, a session with SessionManager must be created.
All changes in UML model be registered and on session closing will be added into command history.
// creating new session
SessionManager.getInstance().createSession("Edit package A");
ElementsFactory f = Application.getInstance().getProject().getElementsFactory();
Package packageA = f.createPackageInstance();
…
// apply changes and add command into command history.
SessionManager.getInstance().closeSession();
Editing model element
To edit some ModelElement, a session with SessionManager must be created.
All changes in UML model will be registered and on session closing will be added into command history.
// creating new session
SessionManager.getInstance().createSession("Edit class A");
if (classA.isEditable())
{
classA.setName(newName);
}
...
// apply changes and add command into command history.
SessionManager.getInstance().closeSession();
It is programmer responsibility to ensure that modified model element is not read only. To check if model element is read only use Element.isEditable() method.
Adding new model element or moving it to another parent
For adding new model Element into a model, use addModelElement(child, parent) method provided by ModelElementsManager.
This manager can be used only if some session was created with SessionManager
ElementsFactory f = Application.getInstance().getProject().getElementsFactory();
Class classA = f.createClassInstance();
53
Copyright © 2003-2011 No Magic, Inc..
UML MODEL
Changing UML model
// create new session
SessionManager.getInstance().createSession("Add class into package");
try
{
// add class into package
ModelElementsManager.getInstance().addElement(classA, package);
}
catch (ReadOnlyElementException e)
{
}
// apply changes and add command into command history.
SessionManager.getInstance().closeSession();
If given model element cannot be added into a given parent, IllegalArgumentException is thrown.
For example Operation cannot be added into Package or Operation cannot be added into not locked for editing
Class (in the teamwork project).
If element or parent is null, IllegalArgumentException also is thrown.
If given element is not editable (read-only), ReadOnlyElementException is thrown.
Alternative way to add new model element without using ModelElementsManager:
Element parent = …;
ElementsFactory f = Application.getInstance().getProject().getElementsFactory();
Class classA = f.createClassInstance();
// create new session
SessionManager.getInstance().createSession("Add class into parent");
if (parent.canAdd(classA))
{
classA.setOwner(parent);
}
// apply changes and add command into command history.
SessionManager.getInstance().closeSession();
Removing model element
Class classA = …;
// create new session
SessionManager.getInstance().createSession("Remove class");
try
{
// remove class
ModelElementsManager.getInstance().removeElement(classA);
}
catch (ReadOnlyElementException e)
{
}
// apply changes and add command into command history.
SessionManager.getInstance().closeSession();
Alternative way to remove model element without using ModelElementsManager:
Class classA = …;
// create new session
54
Copyright © 2003-2011 No Magic, Inc..
UML MODEL
Changing UML model
SessionManager.getInstance().createSession("Remove class");
if (classA.isEditable()))
{
classA.dispose();
}
// apply changes and add command into command history.
SessionManager.getInstance().closeSession();
NEW! Refactoring model elements
To refactor an element in a model, use the Refactoring class.
Example 1: Converting an element to an interface
Element elementToConvert = ...;
SessionManager sessionManager = SessionManager.getInstance();
sessionManager.createSession("Convert");
// Converts the element to an interface.
ConvertElementInfo info = new ConvertElementInfo(Interface.class);
// Preserves the old element ID for the new element.
info.setPreserveElementID(true);
Element conversionTarget = Refactoring.Converting.convert(elementToConvert, info);
sessionManager.closeSession();
Example 2: Replacing an element with another element
Element elementToReplace = ...;
SessionManager sessionManager = SessionManager.getInstance();
sessionManager.createSession("Replace");
ConvertElementInfo info = new ConvertElementInfo(elementToReplace.getClassType());
info.setConvertOnlyIncomingReferences(true);
Refactoring.Replacing.replace(element, elementToReplace, info);
sessionManager.closeSession();
Creating Diagram
Example how to create and add to parent element:
Project project = Application.getInstance().getProject();
Namespace parent = project.getModel();
// create new session
SessionManager.getInstance().createSession("Create and add diagram");
try
{
//class diagram is created and added to parent model element
Diagram diagram = ModelElementsManager.getInstance().
createDiagram(DiagramTypeConstants.UML_CLASS_DIAGRAM, parent);
//open diagram
project.getDiagram(diagram).open();
}
catch (ReadOnlyElementException e)
{
}
55
Copyright © 2003-2011 No Magic, Inc..
UML MODEL
Changing UML model
// apply changes and add command into command history.
SessionManager.getInstance().closeSession();
Creating new Relationship object
Model element is relationship if it implements one of the following interfaces: Relationship, ActivityEdge, Transition, ExceptionHandler, Connector.
For checking if model element is relationship call ModelHelper.isRelationship(element) method.
For getting supplier and client elements of relationship use ModelHelper.getSupplierElement(), ModelHelper.getClientElement() methods.
Use ModelHelper.setSupplierElement(), ModelHelper.setClientElement() methods to set supplier and client
elements of relationship.
Steps to create a new Relationship
1. Create a new relationship model element.
2. Set client and supplier ModelElements by using ModelHelper.setSupplierElement(), Model-
Helper.setClientElement() methods.
3. Add new relationship into some parent by using ModelElementsManager.addElement().
NEW! Copying elements and symbols
You can copy model elements and symbols either to another location in the same project or to another project.
This must be done in the same session.
There are two modes of making copies:
• Deep copying (with new data)
• Shallow copying (with reused data)
Example 1: Copying an element
Element element = ...; // Element to copy/paste.
Element parent = ...; // Parent to which the element has to be pasted: either the
same project or another project.
SessionManager sessionManager = SessionManager.getInstance();
sessionManager.createSession("Clone");
// 3rd parameter indicates whether element name uniqueness should be preserved in
the parent.
CopyPasting.copyPasteElement(element, parent, true);
sessionManager.closeSession();
Example 2: Copying multiple elements and symbols
List elements = ...; // Elements to copy/paste.
List views = ...; // Symbols to copy/paste.
Element parent = ...; // Parent to which elements should be pasted: either the same
project or another project.
BaseElement symbolParent = ...; // Parent to which symbols should be pasted.
SessionManager sessionManager = SessionManager.getInstance();
sessionManager.createSession("Clone");
56
Copyright © 2003-2011 No Magic, Inc..
UML MODEL
Working with Stereotypes and Tagged Values
// 4th parameter indicates whether deep or shallow copy is applied.
// 5th parameter indicates whether element name uniqueness should be preserved in
the parent.
List baseElements = CopyPasting.copyPasteElements(views, parent, symbolParent,
true, true);
sessionManager.closeSession();
Working with Stereotypes and Tagged Values
UML metamodel implementation itself does not provide a way to assign stereotypes and tags directly to Elements. UML metamodel implementation in MagicDraw provides pretty complex mapping - every UML Element
can have an Instance of assigned Stereotypes. It is stored as Element.appliedStereotypeInstance property.
Slots of this instance are TaggedValues.
We provide a helper class StereotypesHelper for hiding this mapping complexity . It has set of useful methods
for assigning, unassigning stereotypes and creating TaggedValues. Keep in mind that TaggedValues in this
helper class are called Slots.
StereotypesHelper hase a lot methods for working with stereotypes.
Example: Creating stereotype, applying to element and then setting tag
ElementsFactory elementsFactory = project.getElementsFactory();
// create profile
Profile profile = elementsFactory.createProfileInstance();
profile.setName("myProfile");
ModelElementsManager.getInstance().addElement(profile, project.getModel());
// get metaclass "Class"
com.nomagic.uml2.ext.magicdraw.classes.mdkernel.Class metaClass =
StereotypesHelper.getMetaClassByName(project, "Class");
// create stereotype, stereotypes will be applicable to classes
Stereotype stereotype = StereotypesHelper.createStereotype(profile,
"myStereotype", Arrays.asList(metaClass));
// create tag definition
Property property = elementsFactory.createPropertyInstance();
ModelElementsManager.getInstance().addElement(property, stereotype);
// tag name
property.setName("myTag");
// tag type is String
Classifier typeString = ModelHelper.findDataTypeFor(project, "String");
property.setType(typeString);
if (StereotypesHelper.canApplyStereotype(element, stereotype))
{
// apply stereotype
StereotypesHelper.addStereotype(element, stereotype);
// set tag value
StereotypesHelper.setStereotypePropertyValue(element, stereotype,
"myTag", "myTagValue");
}
Example: Retrieving tag values
// find profile
57
Copyright © 2003-2011 No Magic, Inc..
UML MODEL
Working with Stereotypes and Tagged Values
Profile profile = StereotypesHelper.getProfile(project, "myProfile");
// find stereotype
Stereotype stereotype = StereotypesHelper.getStereotype(project,
"myStereotype", profile);
// get stereotyped elements
List stereotypedElements =
StereotypesHelper.getExtendedElements(stereotype);
for (int i = stereotypedElements.size() - 1; i >= 0; --i)
{
// stereotyped element
Element element = (Element) stereotypedElements.get(i);
if (stereotype.hasOwnedAttribute())
{
// get tags - stereotype attributes
List<Property> attributes = stereotype.getOwnedAttribute();
for (int j = 0; j < attributes.size(); ++j)
{
Property tagDef = attributes.get(j);
// get tag value
List value = StereotypesHelper.getStereotypePropertyValue(
element, stereotype, tagDef.getName());
for (int k = 0; k < value.size(); ++k)
{
// tag value
Object tagValue = (Object) value.get(j);
}
}
}
}
For more information, see javadoc of StereotypesHelper class.
Hyperlinks
Hyperlinks are implemented using stereotypes and tag values. Stereotype "HyperlinkOwner" and the following
its properties (tags):
• hyperlinkText - all simple hyperlinks
• hyperlinkTextActive - active simple hyperlink
• hyperlinkModel - all hyperlinks to model element
• hyperlinkModelActive - active hyperlink to model element
Example: Retrieving hyperlinks
// get stereotype
Stereotype stereotype = StereotypesHelper.getStereotype(
Project.getProject(element), "HyperlinkOwner");
// get hyperlinked elements
List modelValues = StereotypesHelper.getStereotypePropertyValue(element,
stereotype, "hyperlinkModel");
for (int i = modelValues.size() - 1; i >= 0; --i)
{
Element linkedElement = (Element) modelValues.get(i);
}
// active hyperlink
Object activeLinkedElement = StereotypesHelper.getStereotypePropertyFirst(
element, stereotype, "hyperlinkModelActive");
// get hyperlinked elements
List textValues = StereotypesHelper.getStereotypePropertyValue(element,
stereotype, "hyperlinkText");
for (int i = textValues.size() - 1; i >= 0; --i)
58
Copyright © 2003-2011 No Magic, Inc..
UML MODEL
Working with Stereotypes and Tagged Values
{
String link = (String) textValues.get(i);
}
// active hyperlink
Object activeLink = StereotypesHelper.getStereotypePropertyFirst(element,
stereotype, "hyperlinkTextActive");
Example: Setting hyperlinks
Project project = Project.getProject(element);
// get stereotype
Stereotype stereotype = StereotypesHelper.getStereotype(project,
"HyperlinkOwner");
// apply stereotype
StereotypesHelper.addStereotype(element, stereotype);
// add hyperlinks
StereotypesHelper.setStereotypePropertyValue(element, stereotype,
"hyperlinkModel", linkedElement, true);
StereotypesHelper.setStereotypePropertyValue(element, stereotype,
"hyperlinkModel", activeLinkedElement, true);
String activeHttpLink = "http://www.magicdraw.com";
StereotypesHelper.setStereotypePropertyValue(element, stereotype,
"hyperlinkText", "http://www.nomagic.com", true);
StereotypesHelper.setStereotypePropertyValue(element, stereotype,
"hyperlinkText", activeHttpLink, true);
// add active hyperlink - only one hyperlink can be active
if (modelActive)
{
StereotypesHelper.setStereotypePropertyValue(element, stereotype,
"hyperlinkModelActive", activeLinkedElement, false);
}
else
{
StereotypesHelper.setStereotypePropertyValue(element, stereotype,
"hyperlinkTextActive", activeHttpLink, false);
}
59
Copyright © 2003-2011 No Magic, Inc..
P R E S E N TA T I O N
E L E M E N TS
Presentation Element
UML semantic defines only UML metamodel. MagicDraw application has its own structure of classes for UML
elements representation in the diagram. Base class of this structure is PresentationElement.
A presentation element is a textual or graphical presentation of one or more model elements.
In the metamodel, a PresentationElement is the BaseElement that presents a set of model elements to a user.
It is the base for all metaclasses used for presentation. All other metaclasses with this purpose are indirect
subclasses of PresentationElement.
Current version of MagicDraw Open API provides just a basic structure of presentation elements.
Every presentation element can have children. For example DiagramPresentationElement has a collection of
inner presentation elements. PresentationElement of some Package can have a collection of presentation
elements for inner Package elements.
Use PresentationElementsManager to create/modify/delete inner presentation elements of the diagram.
Current version PresentationElement API allows you to:
• Access element bounds PresentationElement.getBounds method).
• Access children of the element (PresentationElement.getPresentationElements method).
• Access properties of the element (PresentationElement.getProperty and
PresentationElement.getPropertyManager methods). The sample of properties would be
Suppress Operations property for class presentation element, Autosize property for any
ShapeElement.
• Access model Element of presentation element (PresentationElement.getElement method).
Presentation element can have no ModelElement, for example TextBox.
60
Copyright © 2003-2011 No Magic, Inc.
PRESENTATION ELEMENTS
Diagram Presentation Element
• Select/unselect or access selection state of the presentation element.
A subclass of presentation elements PathConnector provides information about connected paths to the
presentation element. To get a collection of connected paths to the presentation element, use method
PathConnector.getConnectedPathElements().
Using set and sSet
There are two types of setters for PresentationElement properties:
1. set… setters set some value and fire PropertyChangeEvent.Use set… only if you need that
PresentationElement of this data in diagrams must be updated immediately.
2. Setters with sSet… name are "simple setters" used for silent property changing. Use "simple
setters" when you edit a group of properties. All changes will be applied and dependent elements will be notified on session close.
The same rules are for add, sAddPresentationElement and remove, sRemovePresentationElement
accessories. The same naming rules are used in all Magicdraw.
Diagram Presentation Element
The purpose of this presentation element is to encapsulate all other presentation elements used in some
Diagram.
• To get a collection of inner presentation elements, use
PresentationElement.getPresentationElements method. This method will return only direct
children of the diagram.
• To open a diagram in the MagicDraw UI, call DiagramPresentationElement.open.
• To create/modify/delete inner presentation elements of the diagram, use
PresentationElementsManager.
• To layout diagram, use: DiagramPresentationElement.layout
NOTE: make sure diagram is opened before doing layout.
61
Copyright © 2003-2011 No Magic, Inc..
PRESENTATION ELEMENTS
Shapes
Shapes
Shapes are presentation elements created for such model elements as classes, packages, models,
subsystems and others.
Paths
Paths are presentation elements created for such model elements as Relationships.
Path has the following attributes:
• Supplier – the presentation element of Relationship supplier. Use method
PathElement.getSupplier to access this element.
• Client – the presentation element of Relationship client. Use method PathElement.getClient to
access this element.
• Supplier point - the connection point of path and supplier element. Use method
PathElement.getSupplierPoint to access this point.
• Client point – the connection point of path and client element. Use method
PathElement.getClientPoint to access this point.
• Break points – a list of path breaking points between supplier and client points. This list can be
empty if path is straight. Use method PathElement.getBreakPoints to access this list.
Presentation Elements Manager
Presentation elements’ classes provides just getters for properties. You need to use
PresentationElementsManager if you want to change the properties/attributes of the presentation element. The
same manager is used for creating presentation elements and adding them into diagrams.
PresentationElementsManager can be used only inside the created session with SessionsManager. If session
is not created, IllegalStateExceptions is thrown.
62
Copyright © 2003-2011 No Magic, Inc..
PRESENTATION ELEMENTS
Presentation Elements Manager
PresentationElementsManager can be used only in already loaded and active project. In other cases, results
can be unpredictable.
PresentationElementsManager is implemented as a singleton. Use method
PresentationElementsManager.getInstance to get a shared instance of this manager.
Creating shape element
To create a ShapeElement for given ModelElement in the given DiagramPresentationElement, use method
PresentationElementsManager.createShapeElement. The location of the created shape will be (0,0).
The following code snippet shows how to do this:
com.nomagic.uml2.ext.magicdraw.classes.mdkernel.Class clazz = …;
DiagramPresentationElement diagram = …;
SessionManager.getInstance().createSession("Test");
ShapeElement shape =
PresentationsElementsManager.getInstance().createShapeElement(clazz, diagram);
SessionManager.getInstance().closeSession();
Creating path element
To create a PathElement for given ModelLink between given client and supplier elements, use method
PresentationElementsManager.createPathElement:
com.nomagic.uml2.ext.magicdraw.classes.mddependencies.Dependency link = …;
PresentationElement clientPE = …;
PresentationElement supplierPE = …;
SessionManager.getInstance().createSession("Test");
PathElement path =
PresentationsElementsManager.getInstance().createPathElement(link, clientPE,
supplierPE);
SessionManager.getInstance().closeSession();
The diagram is not passed into createPathElement method. A new path element is created in the same
diagram as client or supplier presentation elements.
Reshaping shape element
To change bounds for the existing ShapeElement, use method
PresentationElementsManager.reshapeShapeElement:
ShapeElement element = …;
Rectangle newBounds = new Rectangle(100,100,80,50);
SessionsManager.getInstance().createSession(“Test”);
63
Copyright © 2003-2011 No Magic, Inc..
PRESENTATION ELEMENTS
Presentation Elements Manager
PresentationsElementsManager.getInstance().reshapeShapeElement(element,
newBounds);
SessionsManager.getInstance().closeSession();
Every shape element has a preferred size. Shape size cannot be smaller than the preferred size. If you will try
to set smaller bounds, these bounds will be increased to the preferred size.
If shape has Autosize property set to TRUE, bounds will be reduced to the preferred size.
Changing path break points
To change a break points list for the given path element, use method
PresentationElementsManager.changeBreakPoints. The same method must be used if you want to change
client or supplier connection point.
The following code snippet shows how to do this:
PathElement element = …;
ArrayList points = new ArrayList();
points.add(new Point(100, 100));
points.add(new Point(100, 150));
SessionsManager.getInstance().createSession(“Test”);
PresentationsElementsManager.getInstance().changePathBreakPoints(element, points);
SessionsManager.getInstance().closeSession();
The order of points in the list must be from the supplier to client connection point. The list may or may not
include the client and supplier connection points.
At first the given points list will be adopted for the current path style (Rectilinear, Bezier. or Oblique) and only
then applied for the path.
Deleting presentation element
To remove the given PresentationElement from the diagram, use method
PresentationElementsManager.deletePresentationElement:
PresentationElement element = …;
SessionsManager.getInstance().createSession(“Test”);
PresentationsElementsManager.getInstance().removePresentationElement(element);
SessionsManager.getInstance().closeSession();
All related presentation elements - all children and connected paths - will be removed too.
Changing properties of presentation element
Most of presentation elements can have properties (for example Autosize for shapes or Path Style for paths).
• To check if element has some properties (or uses properties from its parent), use method
PresentationElement.useParentProperties.
• To get all properties of this element, use method PresentationElement.getPropertyManager.
• To get property of this element with given ID, use method PresentationElement.getProperty.
• To change element properties, use method
PresentationElementsManager.setPresentationElementProperties. The given
PropertyManager can have only few element’s properties (for example just properties you want
to change).
The following code snippet shows how to change element properties:
64
Copyright © 2003-2011 No Magic, Inc..
PRESENTATION ELEMENTS
Notification of Presentation Element draw
ShapeElement element = …;
PropertyManager properties = new PropertyManager();
properties.addProperty(new BooleanProperty(PropertyID.AUTOSIZE, true));
SessionsManager.getInstance().createSession(“Test”);
PresentationsElementsManager.getInstance().setPresentationElementProperties(elemen
t, properties);
SessionsManager.getInstance().closeSession();
The properties must be new instances. You cannot do something like this:
ShapeElement element = …;
PropertyManager properties = element.getPropertyManager().
properties.getProperty(PropertyID.AUTOSIZE).setValue(new Boolean(true);
SessionsManager.getInstance().createSession(“Test”);
PresentationsElementsManager.getInstance().setPresentationElementProperties(elemen
t, properties);
SessionsManager.getInstance().closeSession();
The Ids of all used properties are defined in class PropertyID.
Notification of Presentation Element draw
SymbolDrawNotification notifies when presentation element is drawn (added to diagram):
// element removal listener
final PropertyChangeListener removeListener = new PropertyChangeListener()
{
public void propertyChange(PropertyChangeEvent evt)
{
if (ExtendedPropertyNames.REMOVE.equals(evt.getPropertyName()))
{
// symbol removed
}
}
};
// element drawing listener
SymbolDrawListener symbolDrawListener = new SymbolDrawListener()
{
public void symbolAdded(DiagramPresentationElement diagram,
PresentationElement symbol,
String actionID)
{
// sybmbol added
// register listener
symbol.addPropertyChangeListener(removeListener);
}
};
// register draw listener
SymbolDrawNotification symbolDrawNotification =
SymbolDrawNotification.getSymbolDrawNotification(project);
symbolDrawNotification.addSymbolDrawListener(symbolDrawListener);
65
Copyright © 2003-2011 No Magic, Inc..
PRESENTATION ELEMENTS
NEW! Displaying Related Symbols
NEW! Displaying Related Symbols
MagicDraw allows displaying symbols that are related to a given simbol via relationships. The
DisplayRelatedSymbols class provides API methods for this. Using this class you can control any of the
following behaviors for displaying related symbols logic:
• What relationship types should be included.
• Depth of a relationship tree.
• Whether or not existing symbols should be reused.
Example: Displaying related generalizations and interface realizations
SessionManager sessionManager = SessionManager.getInstance();
sessionManager.createSession("Display related");
Set linkTypes = new HashSet();
linkTypes.add(new LinkType(Generalization.class));
linkTypes.add(new LinkType(InterfaceRealization.class));
DisplayRelatedSymbolsInfo info = new DisplayRelatedSymbolsInfo(linkTypes);
info.setDepthLimited(true);
info.setDepthLimit(3);
PresentationElement view = ...; // A symbol for which you need to invoke the
displaying related symbols action.
DisplayRelatedSymbols.displayRelatedSymbols(view, info);
sessionManager.closeSession();
66
Copyright © 2003-2011 No Magic, Inc..
SYMBOLS RENDERING
The custom symbol rendering API allows modifying the default symbol view. This API includes:
1. Renderer provider API, which allows to provide a custom renderer for the specific symbol.
2. Renderers, which can modify the default symbol appearance.
In this chapter, we will review, how to register the specific symbol views provider and give the example covering
the custom renderers for the package, slots, and dependency link symbols.
TIP!
You can find the code examples in <MagicDraw installation directory>\openapi\examples\symbolrendering folder.
Custom Renderer Provider
A PresentationElementRendererProvider class is an object, which provides custom symbol renderer for a
given presentation element. This provider must be registered into the PresentationElementRendererManager.
Figure 12 -- Abstract interface of the PresentationElementRendererProvider
The main method of the PresentationElementRendererProvider is “getRenderer(presentationElement)”. This
method provides a specific renderer for the given presentationElement (Symbol) or null.
Registering Provider
To make your provider start working, you must register it into the PresentationElementRendererManager. To
add your provider into the custom providers list, use the following method:
PresentationElementRendererManager.getInstance().addProvider(new
RendererProvider());
Custom Symbol Renderer
The PresentationElementRenderer class provides API methods, which can be customized to a provide custom
symbol view for the specific presentation elements.
67
Copyright © 2003-2011 No Magic, Inc.
SYMBOLS RENDERING
Custom Renderers Sample
Figure 13 -- Abstract class of the Presentation Element Renderer Class, by default extended with specific renderers for
path symbols (PathRenderer) and for shape symbols (ShapeRenderer)
Custom Renderers Sample
This example will cover:
• A custom renderer for the package.
The package without inner elements is filled with green color.
• A custom renderer for the slot.
The slot values are rounded.
• A custom renderer for the dependency link.
The dependency link is a blue thicker line with custom line ends.
Creating Custom Renderers
This example shows, how to create custom renderers for the above described symbols.
The custom package renderer - the empty package (i.e., without inner elements) is filled with green
color:
class PackageRenderer extends ShapeRenderer
{
public Color getColor(PresentationElement presentationElement,
PresentationElementColorEnum colorEnum)
{
if (PresentationElementColorEnum.FILL.equals(colorEnum))
{
// color to fill
Element element = presentationElement.getElement();
if (element instanceof
com.nomagic.uml2.ext.magicdraw.classes.mdkernel.Package &&
!((com.nomagic.uml2.ext.magicdraw.classes.mdkernel.Package)
element).hasOwnedElement())
{
// package has no elements - use green color to fill
return Color.GREEN;
}
}
return super.getColor(presentationElement, colorEnum);
}
68
Copyright © 2003-2011 No Magic, Inc..
SYMBOLS RENDERING
Custom Renderers Sample
}
The custom slot renderer (used in instance specification symbol) - the slot values are rounded:
class SlotRenderer extends ShapeRenderer
{
public String getText(PresentationElement presentationElement,
PresentationElementTextEnum textEnum)
{
if (PresentationElementTextEnum.NAME.equals(textEnum))
{
// the slot text is shown as name
Element element = presentationElement.getElement();
if (element instanceof Slot)
{
Slot slot = (Slot) element;
if (slot.hasValue())
{
String string = "";
List<ValueSpecification> values = slot.getValue();
for (ValueSpecification value : values)
{
if (value instanceof LiteralString)
{
LiteralString literalString =
(LiteralString) value;
if (string.length() > 0)
{
string += "; ";
}
String literalValue =
literalString.getValue();
try
{
// round value
double doubleValue =
Double.parseDouble(literalValue);
double rounded =
Math.round(doubleValue * 100) / 100;
literalValue =
Double.toString(rounded);
}
catch (NumberFormatException e)
{
}
string += literalValue;
}
}
return slot.getDefiningFeature().getName() + "=" +
string;
}
}
}
return super.getText(presentationElement, textEnum);
}
}
The custom dependency link renderer - the dependency link is a blue thicker line with custom line
ends:
class DependencyRenderer extends PathRenderer
{
private PathEndRenderer mClientEndRenderer;
DependencyRenderer()
69
Copyright © 2003-2011 No Magic, Inc..
SYMBOLS RENDERING
Custom Renderers Sample
{
// custom client end renderer - use filled circle at the end
mClientEndRenderer = new PathEndRenderer(PathEndAdornment.CIRCLE,
PathEndAdornmentModifier.FILLED);
}
public Color getColor(PresentationElement presentationElement,
PresentationElementColorEnum colorEnum)
{
if (PresentationElementColorEnum.LINE.equals(colorEnum))
{
// use blue color for line
return Color.BLUE;
}
return super.getColor(presentationElement, colorEnum);
}
protected PathEndRenderer getClientEndRenderer(PathElement pathElement)
{
// use custom end renderer
return mClientEndRenderer;
}
public int getLineWidth(PresentationElement presentationElement)
{
// line with is 2
return 2;
}
protected void drawPathAdornment(Graphics g, PathElement pathElement)
{
super.drawPathAdornment(g, pathElement);
// draw circle at the middle of the dependency line
Color background = Color.WHITE;
Property property = pathElement.getDiagramPresentationElement()
.getProperty(PropertyID.DIAGRAM_BACKGROUND_COLOR);
if (property != null)
{
Object value = property.getValue();
if (value instanceof Color)
{
background = (Color) value;
}
}
Point middlePoint = pathElement.getMiddlePoint();
int diameter = 10;
int radius = diameter / 2;
int x = middlePoint.x - radius;
int y = middlePoint.y - radius;
Color color = g.getColor();
g.setColor(background);
g.fillOval(x, y, diameter, diameter);
g.setColor(color);
g.drawOval(x, y, diameter, diameter);
}
}
Registering Custom Symbol Renderer Provider
The example below shows the custom symbol renderer provider, which provides the SlotRenderer for slot, the
PackageRenderer for package, and the DependencyRenderer for dependency link symbols. The created renderer provider must be registered into the PresentationElementRendererManager.
70
Copyright © 2003-2011 No Magic, Inc..
SYMBOLS RENDERING
Custom Renderers Sample
Step 1. Creating the RendererProvider class
/**
* Custom renderers provider.
*/
class RendererProvider implements PresentationElementRendererProvider
{
private SlotRenderer mSlotRenderer;
private DependencyRenderer mDependencyRenderer;
private PackageRenderer mPackageRenderer;
RendererProvider()
{
mSlotRenderer = new SlotRenderer();
mDependencyRenderer = new DependencyRenderer();
mPackageRenderer = new PackageRenderer();
}
public PresentationElementRenderer getRenderer(PresentationElement
presentationElement)
{
if (presentationElement instanceof SlotView || presentationElement
instanceof SlotListElementView)
{
// slot renderer
return mSlotRenderer;
}
if (presentationElement instanceof DependencyView)
{
// dependency renderer
return mDependencyRenderer;
}
if (presentationElement instanceof PackageView)
{
// package renderer
return mPackageRenderer;
}
return null;
}
};
Step 2. Registering RendererProvider
PresentationElementRendererManager.getInstance().addProvider(new
RendererProvider());
71
Copyright © 2003-2011 No Magic, Inc..
D I A G R A M E V E N TS
NEW! Diagram Listener Adapter
MagicDraw provides an API to listen to all diagram changes in a single adapter that works in the following
order:
1. Receives events from all opened diagrams.
2. Delegates these events to your own listener.
NOTE
The adapter works in a project scope.
To listen to diagram change events, you need to create the DiagramListenerAdapter object, i.e., pass the property change listener as a delegator, which will receive all events.
To create the DiagramListenerAdapter object, call:
new DiagramListenerAdapter(propertyChangeListener)
The DiagramListenerAdapter object is registered for a project on its creation.
To start using the adapter, install it. Uninstall it when it is no longer necessary, i.e., you do not need to receive
any events about diagram changes anymore.
Example: Listening to symbol creation / removal
DiagramListenerAdapter adapter = new DiagramListenerAdapter(new
PropertyChangeListener()
{
public void propertyChange(PropertyChangeEvent evt)
{
String propertyName = evt.getPropertyName();
if (ExtendedPropertyNames.VIEW_ADDED.equals(propertyName) ||
ExtendedPropertyNames.VIEW_REMOVED.equals(propertyName))
{
// added / removed symbol
PresentationElement presentationElement = (PresentationElement)
evt.getNewValue();
}
}
});
adapter.install(project);
// When the adapter is no longer needed, uninstall it.
adapter.uninstall(project);
72
Copyright © 2003-2011 No Magic, Inc.
PATTERNS
MagicDraw provides API for applying some design pattern for the selected classifier (pattern’s target). Pattern
can modify a target classifier or even the whole model. It also can create presentation elements in the target
diagram.
Pattern’s functionality is implemented in a separate MagicDraw plug-in. ID of this plug-in is
com.nomagic.magicdraw.plugins.impl.patterns. Usually specific patterns must be added into MagicDraw application as separate plugins.
Target concept
Pattern’s target encapsulates information about classifier you want to apply pattern for.
Target owns:
• classifier
• classifier’s presentation element
• diagram of presentation element
Target is passed to pattern’s method AbstractPattern.applyPattern. It is also accessible from pattern’s properties AbstractPatternProperties.
Using PatternHelper
Open API provides a helper class PatternHelper with useful methods for patterns.
For more details about methods of this class, see javadoc.
Abstract Pattern
Every implementation of specific pattern must provide:
• Pattern properties
• Pattern panels
• Pattern implementation
73
Copyright © 2003-2011 No Magic, Inc.
PATTERNS
Target concept
This information is encapsulated in PatternInfo class.
PatternInfo is used only for pattern registration in the PatternsManager. Other usages are internal and do not
impact specific patterns.
Every pattern must provide main properties and optionally can have extended properties. Main properties are
used for user input from the first pattern wizard page. Extended properties may be used for storing user input
from other wizard pages.
Specific pattern must provide implementation of this abstract class and override AbstractPatternProperties.configurePropertyManager method. If specific pattern has some extended properties, it must override AbstractPatternProperties .configureExtendedPropertyManager method. Both these methods must configure some
property manager – add or remove properties from it.
Every pattern must provide one or more panels for the patterns wizard. First wizard page is always used for displaying main pattern properties. Other pages are optional and may be pattern specific. AbstractPanelContainer
class is used for providing the following information:
Specific pattern must provide pattern implementation class. This class must extend AbstractPattern and implement AbstractPattern.applyPattern and AbstractPattern.getCategorizedName methods.
74
Copyright © 2003-2011 No Magic, Inc..
PATTERNS
How to create my own pattern
How to create my own pattern
This chapter will give an example of a simple pattern for adding method into the target classifier. The pattern
will allow to edit method name in the Pattern Wizard. Pattern will be added as a plug-in into MagicDraw.
Step 1: Create pattern properties class
MyPattern will have only two main properties for displaying not editable target classifier name and for entering
the method name.
package com.nomagic.magicdraw.plugins.impl.examples.mypatterns;
import com.nomagic.magicdraw.plugins.impl.patterns.AbstractPatternProperties;
import com.nomagic.magicdraw.properties.StringProperty;
import com.nomagic.magicdraw.properties.PropertyManager;
public class MyPatternProperties extends AbstractPatternProperties
{
public static final String TARGET_CLASS = "TARGET_CLASS";
public static final String METHOD_NAME = " METHOD_NAME ";
/**
* Add two properties into main properties manager.
*/
protected void configurePropertyManager()
{
StringProperty p = new StringProperty(TARGET_CLASS,
getTarget().getTargetClassifier().getName());
p.setResourceProvider(MyResourceProvider.getInstance());
p.setEditable(false);
PropertyManager properties = getPropertyManager();
properties.addProperty(p);
p = new StringProperty(METHOD_NAME, "method");
p.setResourceProvider(MyResourceProvider.getInstance());
properties.addProperty(p);
}
}
MyPattern does not have extended properties, so we do not override configureExtendedPropertyManager
method.
Names of MagicDraw properties can be translated into other languages, so they are not hard coded inside the
properties. To get property name from property ID, PropertyResourceProvider is used.
We will write a simple PropertyResourceProvider for our pattern’s properties.
package com.nomagic.magicdraw.plugins.impl.examples.mypatterns;
import com.nomagic.magicdraw.properties.PropertyResourceProvider;
public class MyResourceProvider implements PropertyResourceProvider
{
/**
* Instance of this provider.
*/
private static MyResourceProvider mInstance;
/**
* Returns shared instance of this provider.
* @return shared instance.
*/
public static MyResourceProvider getInstance()
{
if(mInstance == null)
{
75
Copyright © 2003-2011 No Magic, Inc..
PATTERNS
How to create my own pattern
mInstance = new MyResourceProvider();
}
return mInstance;
}
/**
* Returns resource for given key.
* @param key a resource key.
* @return the resource for given key.
*/
public String getString(String key)
{
if(key.equals(MyPatternProperties.METHOD_NAME))
{
return "Method Name";
}
else
if(key.equals(MyPatternProperties.TARGET_CLASS))
{
return "Target Class";
}
return null;
}
}
Step 2: Create pattern panels class
MagicDraw API provides the default implementation of AbstractPanelContainer for patterns without extended
properties (just with the main properties panel). This is the PatternPropertiesPanel class. MyPattern will use
this class. Other patterns may extend AbstractPanelContainer and implement/override corresponding methods.
Step 3: Create pattern class
Now we have MyPattern properties and panels. We need just pattern implementation:
package com.nomagic.magicdraw.plugins.impl.examples.mypatterns;
import
import
import
import
import
import
import
import
import
com.nomagic.magicdraw.core.Application;
com.nomagic.magicdraw.openapi.uml.ReadOnlyElementException;
com.nomagic.magicdraw.plugins.impl.patterns.AbstractPattern;
com.nomagic.magicdraw.plugins.impl.patterns.AbstractPatternProperties;
com.nomagic.magicdraw.plugins.impl.patterns.PatternHelper;
com.nomagic.magicdraw.plugins.impl.patterns.Target;
com.nomagic.magicdraw.properties.PropertyManager;
com.nomagic.uml2.ext.magicdraw.classes.mdkernel.Operation;
com.nomagic.uml2.impl.ElementsFactory;
public class MyPattern extends AbstractPattern
{
/**
* Returns the categorized name of the pattern.
* @return name of the pattern {"Common", "MyPattern"}.
*/
public String[] getCategorizedName()
{
return new String[]{"Common", "My Pattern"};
}
/**
* Applies design pattern to the target, using properties, passed as an
argument.
* @param target Target, the pattern is applied for.
76
Copyright © 2003-2011 No Magic, Inc..
PATTERNS
How to create my own pattern
* @param prop the pattern properties.
*/
public void applyPattern(Target target, AbstractPatternProperties prop) throws
ReadOnlyElementException
{
PropertyManager propManager = prop.getPropertyManager();
String methodName =
propManager.getProperty(MyPatternProperties.METHOD_NAME).getValue().toString();
ElementsFactory ef =
Application.getInstance().getProject().getElementsFactory();
Operation op = ef.createOperationInstance();
op.setName(methodName);
PatternHelper.addDistinctOperation(target.getTargetClassifier(), op);
}
}
Step 4: Create Description.html
Every pattern may provide some html file with pattern description. We will provide such Description.html:
<h2>MyPatern</h2>
<h3>Intent</h3>
Add method into a classifier.
Description.html file must be in the same package as MyPattern class.
Step 5: Create plug-in
Create class MyPatternPlugin.
package com.nomagic.magicdraw.plugins.impl.examples.mypatterns;
import com.nomagic.magicdraw.plugins.Plugin;
import
com.nomagic.magicdraw.plugins.impl.patterns.impl.common.PatternPropertiesPanel;
import com.nomagic.magicdraw.plugins.impl.patterns.PatternInfo;
import com.nomagic.magicdraw.plugins.impl.patterns.PatternsManager;
public class MyPatternPlugin extends Plugin
{
/**
* Init this plugin.
* Register MyPlugin in PluginsManager here.
*/
public void init()
{
PatternsManager.getInstance().addPattern(new PatternInfo(new
MyPattern(),
new
PatternPropertiesPanel(),
new
MyPatternProperties(),
"Description.html"));
}
/**
* Close this plugin always.
* @return false always
*/
public boolean close()
{
return true;
77
Copyright © 2003-2011 No Magic, Inc..
PATTERNS
How to create my own pattern
}
/**
* @see com.nomagic.magicdraw.plugins.Plugin#isSupported()
*/
public boolean isSupported()
{
return true;
}
}
Pattern must be registered in the PatternsManager with PatternsManager .addPattern method.
Also we need to provide plugin.xml for this plug-in.
<?xml version="1.0" encoding="UTF-8"?>
<plugin
id="mypatterns.MyPattern"
name="My Pattern"
version="1.0"
provider-name="No Magic"
class="com.nomagic.magicdraw.plugins.impl.examples.mypatterns.MyPatternPlugin">
<requires>
<api version="1.0"/>
<required-plugin id="com.nomagic.magicdraw.plugins.impl.patterns"/>
</requires>
<runtime>
<library name="mypatterns.jar"/>
</runtime>
</plugin>
Compile all classes and bundle them into mypatterns.jar file. Also add Description.html into this jar file.
Create subfolder mypatterns in the <MagicDraw install>/plugins directory and copy mypatterns.jar and
plugin.xml into it.
For more details how to deploy plug-in, see Plugins chapter.
78
Copyright © 2003-2011 No Magic, Inc..
PROPERTIES
MagicDraw Open API provides a set of classes used as properties for diagrams’ symbols and design patterns.
Every property has two major attributes – ID and value. Property has value of type java.lang.Object. Every specific property has value of specific type. For example value of BooleanProperty is java.lang.Boolean, value of
String property is java.lang.String.
Property ID identifies specific property in the properties set.
Every property has specific editor for editing value of the property. For example BooleanProperty is edited with
javax.swing.JCheckBox component, ChoiceProperty with javax.swing.JComboBox, StringProperty with
javax.swing.JTextField.
You may provide your own PropertyEditor for some specific property editing. In order to do this you need to
override Property.createEditor method.
You must set some PropertyResourceProvider to your property instance in order to display normal name, not
id of the property in the MagicDraw UI. PropertyResourceProvider has just one method PropertyResourceProvider.getString(key), where key is id of your property.
79
Copyright © 2003-2011 No Magic, Inc.
PROPERTIES
The collections of properties are grouped by PropertyManagers. Every PropertyManager has name and list of
properties. It can return property by id, properties with the same value, properties whose values are different.
For more details about every specific kind of property see javadoc.
80
Copyright © 2003-2011 No Magic, Inc..
N E W D I A G R A M TY P E S
There are two groups of the diagrams in MagicDraw – creatable and not creatable. Only the diagrams of creatable type can be created (instantiated). Not creatable diagram serves as the base for other types of diagrams.
MagicDraw has 13 predefined types of diagrams (9 creatable and 4 not).
Creatable diagrams are:
• Class
• Use Case
• Communication
• Sequence
• State Machine
• Protocol State Machine
• Activity
• Implementation
• Composite Structure
Not creatable diagram:
• Interaction
• Behavior
• Any
• Static
Communication and Sequence diagrams are subdiagrams of the Interaction diagram. Activity, Interaction,
State Machine and Protocol State Machine diagram are subdiagram of the Behavior diagram.
81
Copyright © 2003-2011 No Magic, Inc.
N E W D I A G R A M TY P E S
Diagram Types hierarchy
<<diagram>>
Class
{creatable}
<<diagram>>
Use Case
{creatable}
<<diagram>>
Implementation
{creatable}
<<diagram>>
Composite Structure
{creatable}
<<diagram>>
Behavior
{creatable=false}
<<diagram>>
Activity
{creatable}
<<diagram>>
State
{creatable}
<<diagram>>
Interaction
{creatable=false}
<<diagram>>
Sequence
{creatable}
<<diagram>>
Communication
{creatable}
The only way to add a new diagram type in MagicDraw is to extend one of the already existing diagram types
and register it. This mechanism is described below.
Adding a new diagram type for MagicDraw
Step 1. Override abstract DiagramDescriptor class
DiagramDescriptor
+getDiagramActions() : MDActionsManager
+getDiagramContextConfigurator() : DiagramContextAMConfigurator
+getDiagramShortcutsConfigurator() : AMConfigurator
+getDiagramToolbarConfigurator() : AMConfigurator
+getDiagramTypeId() : String
+getLargeIcon() : ImageIcon
+getPluralDiagramTypeHumanName() : String
+getSingularDiagramTypeHumanName() : String
+getSmallIconURL() : URL
+getSuperType() : String
+isCreatable() : boolean
Override abstract class DiagramDescriptor and implement abstract methods:
• getDiagramTypeId() – this method must return a diagram type id, which is used to identify the
diagram,
• getSingularDiagramTypeHumanName() – method returns diagram type human name.
• getPluralDiagramTypeHumanName() – method returns diagram type human name in plural
form.
• getSuperType() – this method must return a super type (super diagram) of this diagram type.
82
Copyright © 2003-2011 No Magic, Inc..
N E W D I A G R A M TY P E S
• isCreatable() – returns flag indicating if this diagram type will be creatable.
• getLargeIcon() – returns a large icon for this type of the diagram (see Chapter "Adding New
Functionality.").
• getSmallIconURL() – returns a small icon URL for this type of the diagram (see Chapter
"Adding New Functionality.").
• getDiagramActions() – returns manager of actions used in the diagram.
• getDiagramToolbarConfigurator() – returns action manager configurator which configures
described diagram toolbar (see Chapter "Adding New Functionality.").
• getDiagramShortcutsConfigurator() – returns action manager configurator which configures
described diagram shortcuts (see Chapter "Adding New Functionality.").
• getDiagramContextConfigurator() – returns action manager configurator which configures
described diagram context menu actions(see Chapter "Adding New Functionality.").
Example 1: example diagram descriptor (see OpenAPI examples for the full source code)
/**
* Descriptor of specific diagram.
*/
public class SpecificDiagramDescriptor extends DiagramDescriptor
{
public static final String SPECIFIC_DIAGRAM = "Specific Diagram";
/**
* Let this diagram type be a sub type of class diagram type.
*/
public String getSuperType()
{
return DiagramType.UML_CLASS_DIAGRAM;
}
/**
* This is creatable diagram.
*/
public boolean isCreatable()
{
return true;
}
/**
* Actions used in this diagram.
*/
public MDActionsManager getDiagramActions()
{
return SpecificDiagramActions.ACTIONS;
}
/**
* Configurator for diagram toolbar.
*/
public AMConfigurator getDiagramToolbarConfigurator()
{
return new SpecificDiagramToolbarConfigurator();
}
/**
* Configurator for diagram shortcuts.
*/
public AMConfigurator getDiagramShortcutsConfigurator()
{
return new ClassDiagramShortcutsConfigurator();
}
83
Copyright © 2003-2011 No Magic, Inc..
N E W D I A G R A M TY P E S
/**
* Configurator for diagram context menu.
*/
public DiagramContextAMConfigurator getDiagramContextConfigurator()
{
return new BaseDiagramContextAMConfigurator();
}
/**
* Id of the diagram type.
*/
public String getDiagramTypeId()
{
return SPECIFIC_DIAGRAM;
}
/**
* Diagram type human name.
*/
public String getSingularDiagramTypeHumanName()
{
return "Specific Diagram";
}
/**
* Diagram type human name in plural form.
*/
public String getPluralDiagramTypeHumanName()
{
return "Specific Diagrams";
}
/**
* Large icon for diagram.
*/
public ImageIcon getLargeIcon()
{
return new ImageIconProxy(new VectorImageIconControler(getClass(),
"icons/specificdiagram.svg", VectorImageIconControler.SVG));
}
/**
* URL to small icon for diagram.
*/
public URL getSmallIconURL()
{
return getClass().getResource("icons/specificdiagram.svg");
}
}
Step 2. Register new diagram type in the application
The new diagram descriptor should be registered in MagicDraw using addNewDiagramType(DiagramDescriptor) method of the Application. This method can be invoked when plug-in is initialized (see Chapter "Plug-Ins.").
Example 1: example diagram descriptor registration (see OpenAPI examples for the full source code)
class SpecificDiagramPlugin extends Plugin
{
/**
* Initializing the plugin.
*/
public void init()
{
// registering new diagram type
84
Copyright © 2003-2011 No Magic, Inc..
N E W D I A G R A M TY P E S
Application.getInstance().addNewDiagramType(new
SpecificDiagramDescriptor());
}
/**
* Return true always,
* because this plugin does not have any close specific actions.
*/
public boolean close()
{
return true;
}
/**
* Return true always,
* because this plugin does not
* have any specific suportability conditions.
*/
public boolean isSupported()
{
return true;
}
}
85
Copyright © 2003-2011 No Magic, Inc..
P R O J E C TS
MANAGEMENT
ProjectsManager
A project is the fundamental MagicDraw data structure. Project includes all UML model and diagrams.
ProjectsManager class is responsible for containment and management of projects.
Application
(com.nomagic.magicdraw.core)
ProjectsManager
(com.nomagic.magicdraw.core)
*
Project
(com.nomagic.magicdraw.core)
ProjectsManager projectsManager = Application.getInstance().getProjectsManager();
ProjectsManager
(com.nomagic.magicdraw.core)
...
+closeProject() : void
+createProject() : Project
+getActiveProject() : Project
+getProjects() : List
+isProjectActive( project : Project ) : boolean
+loadProject( descriptor : ProjectDescriptor, silent : boolean ) : void
+saveProject( descriptor : ProjectDescriptor, silent : boolean ) : void
+setActiveProject( project : Project ) : void
...
ProjectsManager provides API for Project creating, closing, saving, loading, and activating.
MagicDraw can have multiple opened projects, but only one project can be active.
//gets all projects
List projects = projectsManager.getProjects();
//gets active project
Project activeProject = projectsManager.getActiveProject();
Active project can also be accessed directly from Application:
//gets active project
Project project = Application.getInstance().getProject();
86
Copyright © 2003-2011 No Magic, Inc.
P R O J E C TS M A N A G E M E N T
ProjectDescriptor
ProjectDescriptor
ProjectDescriptor represents a project (and module) as a resource for storing and loading.
The same project can have multiple ProjectDescriptors.
There are two types of ProjectDescriptors:
• Local project descriptor
Represents a local ordinary project. A descriptor can be created for a project or file object.
• Remote project descriptor
Represents a project stored in the Teamwork Server.
NOTE.
Teamwork Project has both descriptors (local and remote) because it can be saved locally.
Every ProjectDescriptor provides properties:
• URI
Location is some specific String value that holds all information that is needed to access a
project.
• Representation String
Representation String is used for a project identification in user interface (GUI).
• Remote flag
Remote flag indicates if the project descriptor represents teamwork project.
ProjectDescriptorsFactory and TeamworkUtils
ProjectDescriptorsFactory can create appropriate ProjectDescriptor object, TeamworkUtils helps to find an
existing teamwork (remote) project descriptors.
Project management
Projects are saved and loaded by using two methods in ProjectsManager class.
• saveProject(ProjectDescriptor descriptor, boolean silent)
• loadProject(ProjectDescriptor descriptor, boolean silent)
NOTES
“Save” and “Load” means “Commit” and “Update” for the Teamwork Project.
A project cannot be saved using descriptor, if project isn’t specified and a project cannot be
loaded, if file isn’t specified. In such cases IllegalStateException is thrown.
Silent mode means that during save or load process no GUI interruptions for user input will be used, e.g. no
Commit Project dialog box while committing a teamwork project or no Save dialog box while saving a new
project (project will be saved into the last used directory).
Example: Saving active project
ProjectsManager projectsManager = Application.getInstance().getProjectsManager();
// active project
Project project = projectsManager.getActiveProject();
// get project descriptor
87
Copyright © 2003-2011 No Magic, Inc..
P R O J E C TS M A N A G E M E N T
ProjectDescriptor
ProjectDescriptor projectDescriptor =
ProjectDescriptorsFactory.getDescriptorForProject(project);
// save project
projectsManager.saveProject(projectDescriptor, true);
Example: Loading project from file
Project can be loaded, if project’s file name is known:
ProjectsManager projectsManager = Application.getInstance().getProjectsManager();
File file = new File(projectFilePath);
// create project descriptor
ProjectDescriptor projectDescriptor =
ProjectDescriptorsFactory.createProjectDescriptor(file.toURI());
projectsManager.loadProject(projectDescriptor, true);
Example: Importing another MagicDraw project file
Project can be imported, if project's file name is known:
ProjectsManager projectsManager = Application.getInstance().getProjectsManager();
File file = new File(projectFilePath);
// create project descriptor
ProjectDescriptor projectDescriptor =
ProjectDescriptorsFactory.createProjectDescriptor(file.toURI());
projectsManager.importProject(projectDescriptor);
Example: Loading teamwork project
Project can be loaded, if project’s qualified name is known:
ProjectsManager projectsManager = Application.getInstance().getProjectsManager();
// create project descriptor
ProjectDescriptor projectDescriptor = TeamworkUtils
.getRemoteProjectDescriptorByQualifiedName(remoteProjectQualifiedName);
if (projectDescriptor != null)
{
projectsManager.loadProject(projectDescriptor, true);
}
Module management
ProjectsManager also provides module management (module usage, export, import, reload, and package sharing) methods.
Example: Exporting local module
Collection of project packages can be exported as module.
ProjectsManager projectsManager = Application.getInstance().getProjectsManager();
File file = new File(moduleFilePath);
ProjectDescriptor projectDescriptor =
ProjectDescriptorsFactory.createProjectDescriptor(file.toURI());
// export collection of packages as module
projectsManager.exportModule(project, packages, "My local module",
projectDescriptor);
88
Copyright © 2003-2011 No Magic, Inc..
P R O J E C TS M A N A G E M E N T
ProjectDescriptor
Example: Exporting teamwork module
TeamworkUtils class is used to export teamwork module.
TeamworkUtils.exportTeamworkModule(project, packages, "My remote module",
remoteProjectQualifiedName);
Example: Using module
Local and teamwork module usage does not differs. Just appropriate project descriptor must be used:
ProjectsManager projectsManager = Application.getInstance().getProjectsManager();
File file = new File(moduleFilePath);
ProjectDescriptor projectDescriptor =
ProjectDescriptorsFactory.createProjectDescriptor(file.toURI());
// use module
projectsManager.useModule(project, projectDescriptor);
Example: Importing module
Local and teamwork module import does not differs. Just appropriate project descriptor must be used:
ProjectsManager projectsManager = Application.getInstance().getProjectsManager();
File file = new File(moduleFilePath);
ProjectDescriptor projectDescriptor =
ProjectDescriptorsFactory.createProjectDescriptor(file.toURI());
projectsManager.importModule(project, projectDescriptor);
Example: Reloading module
Local and teamwork module reload does not differs. Just appropriate project descriptor must be used:
ProjectsManager projectsManager =
Application.getInstance().getProjectsManager();
File file = new File(moduleFilePath);
ProjectDescriptor projectDescriptor =
ProjectDescriptorsFactory.createProjectDescriptor(file.toURI());
projectsManager.reloadModule(project, projectDescriptor);
Example: Package sharing
ProjectsManager projectsManager =
Application.getInstance().getProjectsManager();
SessionManager.getInstance().createSession("Create shared package");
// create package to share
Package aPackage =
project.getElementsFactory().createPackageInstance();
aPackage.setOwner(project.getModel());
aPackage.setName("myShare");
SessionManager.getInstance().closeSession();
// share package
projectsManager.sharePackage(project, Arrays.asList(aPackage), "my
module");
// save project
ProjectDescriptor projectDescriptor =
ProjectDescriptorsFactory.getDescriptorForProject(project);
projectsManager.saveProject(projectDescriptor, true);
89
Copyright © 2003-2011 No Magic, Inc..
P R O J E C TS M A N A G E M E N T
NEW! Merging and Differencing
NOTE
ModuleDescriptor allows to access/change some module properties, like accessibility, load
mode.
Example: Editing module within project
ProjectsManager projectsManager =
Application.getInstance().getProjectsManager();
File file = new File(moduleFilePath);
ProjectDescriptor projectDescriptor =
ProjectDescriptorsFactory.createProjectDescriptor(file.toURI());
// find module
ModuleDescriptor moduleDescriptor =
projectsManager.findModule(project, projectDescriptor);
if (moduleDescriptor != null)
{
boolean editable = moduleDescriptor.isEditable();
if (!editable)
{
// make module editable (read-write accessibility mode)
moduleDescriptor.setEditable(true);
}
// get first shared module package
MountInfo mountInfo = (MountInfo)
moduleDescriptor.getMounts().iterator().next();
Package aPackage = (Package)
project.getElementByID(mountInfo.getMountPointID());
// create class in module
SessionManager.getInstance().createSession("Create use case in
module");
Class aCase =
Project.getProject(aPackage).getElementsFactory().createClassInstance();
aCase.setOwner(aPackage);
aCase.setName("myClass");
SessionManager.getInstance().closeSession();
// save module
projectsManager.saveModule(moduleDescriptor, true);
if (!editable)
{
// make module not editable (read-only accessibility mode)
moduleDescriptor.setEditable(false);
}
}
NEW! Merging and Differencing
MagicDraw provides the API for project merging (and differencinging).
The project merging consists of three steps:
1. Discovering project changes (differences). Ancestor (in a 3-way merge only) and source proj-
ects are loaded (if they are not loaded yet) for comparing.
2. Accepting / rejecting changes. All target changes that do not conflict source changes are
applied (source changes conflicting with target changes are rejected). A 2-way merge produces source changes only.
3. Applying accepted changes. Changes are applied on the ancestor project (target and ancestor
projects are the same in a 2-way merge).
90
Copyright © 2003-2011 No Magic, Inc..
P R O J E C TS M A N A G E M E N T
NEW! Merging and Differencing
There are API for standard and advanced project merging. Standard API encapsulates all three steps into a single call, while advanced merge API allows for accessing the project differences and controlling what changes
are accepted or rejected.
See the sample API usage code in the <MagicDraw install>\openapi\examples\merge folder.
The following figure shows the domain model of the merging.
91
Copyright © 2003-2011 No Magic, Inc..
PROJECT OPTIONS
MagicDraw UML provides the API for adding the custom project options. These options are project related and
saved together with project data. In this chapter, we will describe how to add a new property and how to
retrieve its value.
Adding Own Project Options
A project contains options with the ability to add new properties.
The following example shows, how to add the above mentioned project option’s configurator at the plug-in’s
init() method in order to have the additional project option ”Test Property” for every project.
ProjectOptions.addConfigurator(new ProjectOptionsConfigurator()
{
public void configure(ProjectOptions projectOptions)
{
com.nomagic.magicdraw.properties.Property property =
projectOptions.getProperty(ProjectOptions.PROJECT_GENERAL_PROPERTIES,
"TEST_PROPERTY_ID");
if (property == null)
{
// create property, if does not exist
property = new StringProperty("TEST_PROPERTY_ID", "description");
// group
property.setGroup("MY_GROUP");
// custom resource provider
property.setResourceProvider(new PropertyResourceProvider()
{
public String getString(String string, Property property)
{
if ("TEST_PROPERTY_ID".equals(string))
{
// translate ID
return "Test Property";
}
if ("TEST_PROPERTY_ID_DESCRIPTION".equals(string))
{
// translate description
return "Test Property in My Group";
}
if ("MY_GROUP".equals(string))
{
// translate group
return "My Group";
}
return string;
}
});
// add property
projectOptions.addProperty(ProjectOptions.PROJECT_GENERAL_PROPERTIES, property);
}
}
});
92
Copyright © 2003-2011 No Magic, Inc.
PROJECT OPTIONS
Retrieving Project Option Value
Retrieving Project Option Value
The following example shows how to access project option’s value:
Property property =
project.getOptions().getProperty(ProjectOptions.PROJECT_GENERAL_PROPERTIES,
"TEST_PROPERTY_ID");
if (property != null)
{
Object value = property.getValue();
}
93
Copyright © 2003-2011 No Magic, Inc..
NEW! ENVIRONMENT
OPTIONS
Adding Custom Environment Options
Application-related options are referred to as environment options. They are saved in the global.opt file that is
located in <user home directory>\.magicdraw\<version number>\data.
You can add custom environment options for MagicDraw.
To add your own environment options
1. Extend the AbstractPropertyOptionsGroup class.
2. Add the extending class to application environment options.
Example: Adding custom environment options
class MyOptionsGroup extends AbstractPropertyOptionsGroup
{
...
}
Application application = Application.getInstance();
EnvironmentOptions options = application.getEnvironmentOptions();
options.addGroup(new ExampleOptionsGroup());
94
Copyright © 2003-2011 No Magic, Inc.
EVENT SUPPORT
MagicDraw UML provides the API for listening to the events, while chaning a model. There is a possibility
either to get an event immediately after the property has been changed, or get the event about all the changes
in the transaction, after this transaction has been executed.
There are four different listener registration types :
• Whole repository listener. You will get events about the changes in all the elements.
• Specific element listener. You will get events about the changes in any property of this
element.
• Element’s specific property listener. You will get events about the changes of this property.
• Specific element type listener. You will get events about the changes in all the elements of
the specific type .
The transaction listener is notified, when all the changes within the transaction are done and the transaction is
closed.
TIP!
You can find the code examples in <MagicDraw installation directory>\\openapi\examples\events.
Property Change Events
Each PropertyChangeListener receives the PropertyChangeEvent.
In order to understand, which property has been changed and how it was done, let’s review a short explanation
of the PropertyChangeEvent.
The main properties of the PropertyChangeEvent:
• Property name. The changed property name.
• New value. The changed property value.
• Old value. The old property value, which was before the property change.
Figure 14 -- Class of the PropertyChangeEvent
Property Names in MagicDraw
All UML property names are stored in the com.nomagic.uml2.impl.PropertyNames class. Use this class,
when you need to listen for UML specific elements’ properties.
The com.nomagic.magicdraw.uml.ExtendedPropertyNames class has additional property names, mostly
dedicated for diagrams/ symbols.
95
Copyright © 2003-2011 No Magic, Inc.
EVENT SUPPORT
Listening to Property Change Events
The events’ names related with model creation/ deletion are listed in the
com.nomagic.uml2.ext.jmi.UML2MetamodelConstants class.
An example of the element’s name change event:
PropertyChangeEvent.getPropertyName() == PropertyNames.NAME;
PropertyChangeEvent.getNewValue() will be new name of element;
PropertyChangeEvent.getOldValue() will be name of element before change.
An example of the new element creation event:
PropertyChangeEvent.getPropertyName() == UML2MetamodelConstants.INSTANCE_CREATED;
PropertyChangeEvent.getNewValue() will be new created element;
PropertyChangeEvent.getOldValue() will be null.
Listening to Property Change Events
The PropertyChangeEvents support provides the ability to listen to the event by different scopes. The scope
depends on how the listener is registered:
• If the listener is registered at the whole repository, it receives events about the changes in all
the elements.
• If the listener is registered at the specific element, it receives events about the changes in any
property of this element.
• If the listener registered with the specific property at the element, it receives events about the
changes in this property.
• If the listener is registered with the specific property for the element type, it receives events
about the changes in all the elements of the specific type.
The PropertyChangeListener should be registered to receive these events.
There are several different ways to register a listener:
To listen for the whole repository, use:
project.getRepositoryListenerRegistry().addPropertyChangeListener(listener,
(RefObject)null);
This listener will get all the property change events from any element.
To listen for any delete operation in the repository and get notified before the delete action is performed, use:
project.getRepositoryListenerRegistry().addPropertyChangeListener(listener,
UML2MetamodelConstants.BEFORE_DELETE);
This listener will be notified, when any model elemet is set to be deleted.
To listen for any property changes of the specific element, use:
element.addPropertyChangeListener(listener);
This listener will be notified when any element property is changed.
To listen for any property changes of the specific element type, use:
project.getSmartEventSupport().registerConfig(aClass, configs, listener);
96
Copyright © 2003-2011 No Magic, Inc..
EVENT SUPPORT
Listening to Transaction Commit Events
This listener will be notified, when any property of any element in the project with this type is changed. If “configs” is NULL, the listener will get all property change events.
NOTE
EventSupport could be disabled from event firing
To check if it is enabled, use:
project.getRepository().getEventSupport().isEnableEv
entFiring()
To stop/ start event firing, use:
project.getRepository().getEventSupport().setEnableE
ventFiring(...)
Listening to Related Elements in Hierarchy Events
There is a posibility to listen for changes of the elements, which are somehow related with the given element.
For example, we want to be notified, when element’s owner name is changed. The SmartPropertyChangeListener class is dedicated for the situations like this. The main idea of the solution is to provide the SmartListenerConfig, which will provide the chain of the property names to listen to.
The SmartListenerConfig class provides static methods for default configuration of property chains. This is
useful, when listening for common property change events.
Use the SmartPropertyChangeListener.createSmartPropertyListener(...) to create and register such listener for the particular element, which will be notified with events provided by the SmartListenerConfig.
NOTE
If the listener is not needed anymore, unregister it using the removePropertyChangeListener(...) method.
Listening to Transaction Commit Events
The TransactionCommitListener is a special listener, which is notified when all changes inside a transaction are
done and the transaction is closed.
Figure 15 -- Interface of TransactionCommitListener
The listener contains transactionCommited() method, which provides a collection of all PropertyChangeEvents that were executed in a transaction.
Event Listening Sample
Element’s Property Change Listening
These examples show, how to create the property change listeners to listen to the different kind of properties.
Listener for listening to the specific element’s any property changes:
97
Copyright © 2003-2011 No Magic, Inc..
EVENT SUPPORT
Event Listening Sample
element.addPropertyChangeListener(new PropertyChangeListener()
{
public void propertyChange(PropertyChangeEvent evt)
{
// evt.getPropertyName() is Changed
}
});
Listener for listening to the specifc property (NAME) of the specifc element:
element.addPropertyChangeListener(new PropertyChangeListener()
{
public void propertyChange(PropertyChangeEvent evt)
{
if (PropertyNames.NAME.equals(evt.getPropertyName()))
{
// name is Changed
}
}
});
Listener for listening the specifc property (NAME) of the specific element type (Classifier):
// create smartListenerConfig for Name property
SmartListenerConfig cfg = new SmartListenerConfig(PropertyNames.NAME);
List<SmartListenerConfig> configs = Collections.singletonList(cfg);
// create listener which will get notified of events.
PropertyChangeListener listener = new PropertyChangeListener()
{
public void propertyChange(PropertyChangeEvent evt)
{
// evt.getPropertyName() is Changed
}
};
// register everything into project’s event support.
project.getSmartEventSupport().registerConfig(Classifier.class, configs,listener);
TransactionCommitListener
This example shows, how to create a transaction commit listener:
Create a custom transaction commit listener:
public class MyTransactionListener implements TransactionCommitListener
{
public Runnable transactionCommited(final Collection<PropertyChangeEvent>
events)
{
return new Runnable()
{
public void run()
{
for (PropertyChangeEvent event : events)
{
if
(UML2MetamodelConstants.INSTANCE_CREATED.equals(event.getPropertyName()))
{
Object source = event.getSource();
if (source instanceof Property)
{
Property property = (Property) source;
Element owner = property.getOwner();
if (owner instanceof Classifier)
{
98
Copyright © 2003-2011 No Magic, Inc..
EVENT SUPPORT
Event Listening Sample
Classifier propertyOwner =
(Classifier) owner;
propertyOwner
.setName("Contains ("
+ propertyOwner.getAttribute().size() + ") attributes");
}
// additionally for this Property we
register listener to listen for any property changes in this Element properties.
property.addPropertyChangeListener(new
DerivedValuePropertyChangeListener());
}
}
}
}
};
}
}
This “transaction commit listener” checks, if new property is created in classifier and updates classifier’s (property owner) name. All changes are done in the same session.
Register the custom “transaction commit listener” into the project
MyTransactionListener transactionListener = new MyTransactionListener();
TransactionManager transactionManager = project.getRepository().getTransactionManager();
transactionManager.addTransactionCommitListener(transactionListener);
99
Copyright © 2003-2011 No Magic, Inc..
SELECTIONS
MANAGEMENT
Selection in diagrams
Every PresentationElement can access selected elements or change their own selection status.
PresentationElement
+getSelected() : List
+isSelected() : boolean
+setAllSelected( select : boolean ) : void
+setSelected( select : boolean ) : void
+setSelected( elements : List ) : void
...
Collecting selected elements
Project project = Application.getInstance().getProject();
DiagramPresentationElement diagram = project.getActiveDiagram();
List selected = diagram.getSelected();
Selection events
Selection changes fire PropertyChangeEvent.
To listen selection change events, PropertyChangeListener must be registered to Project:
Project prj = Application.getInstance().getProject();
prj.addPropertyChangeListener(new PropertyChangeListener()
{
public void propertyChange(PropertyChangeEvent evt)
{
if (evt.getPropertyName().
equals(Project.SELECTION_CHANGED))
{
// was selected
List old = (List)evt.getOldValue();
//now selected
List news = (List)evt.getNewValue();
//do something
}
}
});
Selection in model browser
Model browser is based GUI part for displaying various model trees.
100
Copyright © 2003-2011 No Magic, Inc.
SELECTIONS MANAGEMENT
Selection in model browser
Browser browser = Application.getInstance().getMainFrame().getBrowser();
Browser
+getActiveTree() : BrowserTabTree
+getContainmentTree() : ContainmentTree
+getDiagramsTree() : DiagramsTree
+getExtensionsTree() : ExtensionsTree
+getInheritanceTree() : InheritanceTree
+getSearchResultsTree() : SearchResultsTree
...
Browser has five trees:
• containment
• diagrams
• inheritance
• extensions
• search results
Only one tree can be active:
Tree activeTree = browser.getActiveTree();
Every tree is based on Swing JTree and all manipulations can be done by using API provided by Swing:
JTree tree = activeTree.getTree();
Selected nodes are accessible in the following way:
Node[] nodes = activeTree.getSelectedNodes();
Node is derived from DefaultMutableTreeNode from javax.swing.tree
101
Copyright © 2003-2011 No Magic, Inc..
CREATING IMAGES
MagicDraw Open API provides class com.nomagic.magicdraw.export.image.ImageExporter for creating
images from whole diagram or just part of it.
Image formats are predefined as constants in ImageExporter.
To create image from the whole diagram, use method export(DiagramPresentationElement, int, File).
To create image from selected symbols in the diagram, use method export(DiagramPresentationElement, int,
File, boolean).
102
Copyright © 2003-2011 No Magic, Inc.
CREATING METRICS
Creating New Metric
In order to add new metrics you need to extend the Metric class and implement the following methods:
- MetricResult calculateLocalMetricValue(ModelElement target);
- boolean acceptModelElement(BaseElement element);
Implementing calculateLocalMetricValue(ModelElement target)
protected MetricResult calculateLocalMetricValue(BaseElement target)
{
Collection stereotypes = StereotypesHelper.getStereotypes((Element) target);
MetricResult result =
new MetricResult(MetricResult.create(stereotypes.size()));
return result;
}
In calculateMetricValue you should put the code that will calculate the local value for your metric. In the example it is calculating the number of stereotypes of the elements. This value can be used while calculating other
modes than Local mode.
Implementing acceptModelElement(BaseElement element)
Example: Making the metric be calculated for elements of type Class.
public boolean acceptModelElement(BaseElement element)
{
return element instanceof
com.nomagic.uml2.ext.magicdraw.classes.mdkernel.Class;
}
While implementing acceptModelElement(BaseElement element) method, you have to check the type of elements you want your metrics to be calculated for. However you should restrict it to types of elements that can
be shown in metrics results windows. Elements that can be displayed are Class, Interfaces, Diagrams, Packages, or Model packages.
You may check if the element is eligible to be show, using the method acceptElement(BaseElement element) from MetricsManager class.
MetricsManager class also has a acceptDiagramElement (BaseElement element) that verifies if the given
element is a diagram element.
Metric class:
103
Copyright © 2003-2011 No Magic, Inc.
CREATING METRICS
Creating New Metric
Constructor
The next example will create a metric with the given data about the metrics and put it into the Other group.
public MyMetric()
{
super("My Metric", "MM", MetricType.OTHER, "MY_METRIC",
MetricValue.INTEGER_VALUE);
setDescription("This is my metric.");
}
You have also to provide a constructor for your metrics that must call the following super constructor:
public Metric(String name, String abbreviation, MetricType type, String id,
metricValueType)
int
You will have to provide unique name, abbreviation, and ID for your metric.
The value return type can be integer or real, the constants are on MetricValue class.
There are already some predefined types in MetricType class that can be used.
MetricType class:
104
Copyright © 2003-2011 No Magic, Inc..
CREATING METRICS
Adding new metrics to MagicDraw
MetricType
+BASIC_TYPE : MetricType
+MODEL_SIZE : MetricType
+RELATIONSHIPS : MetricType
+DIAGRAMS : MetricType
+CLASS_EMPLOYMENT : MetricType
+INHERITANCE : MetricType
+COHESION : MetricType
+COMPLEXITY : MetricType
+MOOD : MetricType
+OTHER : MetricType
+REQUIREMENTS : MetricType
...
+MetricType( type : String, description : String )
+getDescription() : String
+setDescription( description : String ) : void
+getType() : String
+setType( type : String ) : void
...
Adding new metrics to MagicDraw
You have to create a Plugin for MagicDraw and make sure that your plugin descriptor file has in its requires
section the following line:
<required-plugin id="com.nomagic.magicdraw.plugins.impl.metrics"/>
In your plugin class you must use then the MetricsManager addMetric(Metric metric) method to add the new
metric to MagicDraw. Now your metric will be available for using as any predefined metric.
MetricsManager
<<getter>>+getInstance() : MetricsManager
+acceptElement( element : BaseElement ) : boolean
+acceptDiagramElement( element : BaseElement ) : boolean
+removeMetricsSuite( metricsSuite : MetricsSuite ) : void
+removeMetric( metric : Metric ) : void
+removeMetric( id : String ) : void
+addMetricsSuite( metricsSuite : MetricsSuite ) : void
+addMetric( metric : Metric ) : void
+addMetrics( metrics : Collection ) : void
<<getter>>+getMetricsSuite( name : String ) : MetricsSuite
<<getter>>+getMetricsSuiteByID( id : String ) : MetricsSuite
+contains( metricsSuiteID : String ) : boolean
...
105
Copyright © 2003-2011 No Magic, Inc..
CREATING METRICS
Full example source code
Full example source code
Plugin descriptor file
<?xml version="1.0" encoding="UTF-8"?>
<plugin
id="com.nomagic.magicdraw.examples.mymetrics"
name="MyMetrics"
version="1.0"
provider-name="No Magic"
class="com.nomagic.magicdraw.examples.mymetrics.MyMetricsPlugin">
<requires>
<api version="1.0"/>
<required-plugin id="com.nomagic.magicdraw.metrics"/>
</requires>
<runtime>
<library name="mymetrics.jar"/>
</runtime>
</plugin>
MyMetricsPlugin class
public class MyMetricsPlugin extends Plugin
{
public void init()
{
MyMetric myMetric = new MyMetric();
MetricsManager.getInstance().addMetric(myMetric);
}
public boolean close()
{
return true;
}
public boolean isSupported()
{
return true;
}
}
MyMetric class
public class MyMetric extends Metric
{
public MyMetric()
{
super("My Metric", "MM", MetricType.OTHER, "MY_METRIC",
MetricValue.INTEGER_VALUE);
setDescription("This is my metric. This metric will calculate the number of
stereotypes for classes.");
}
protected MetricResult calculateLocalMetricValue(BaseElement target)
{
Collection stereotypes = StereotypesHelper. getStereotypes((Element) target);
MetricResult result =
new MetricResult(MetricResult.create(stereotypes.size()));
return result;
106
Copyright © 2003-2011 No Magic, Inc..
CREATING METRICS
Full example source code
}
public boolean acceptModelElement(BaseElement element)
{
return element instanceof
com.nomagic.uml2.ext.magicdraw.classes.mdkernel.Class;
}
}
}
107
Copyright © 2003-2011 No Magic, Inc..
CREATING METRICS
Metric framework structure
Metric framework structure
M etr ics Ma nage r
Me tric s Suite
< <c o ns tru ctor> >+ Metrics C alc ula tor( m e tric s Info rm a tio n : Metrics In form atio n )
+ ca lcu la te () : Metrics R es u lts
+ ca lcu la te ( ele m e n t : B as e Ele m e nt, m e tric : Me tric ) : Me tric Re s ult
< <c o ns tructo r> > +Me trics S u ite ()
< <g e tte r> >+ is S e le cted ( m e tric : Me tric ) : b oo lea n
+ se le ctMetric( m etric : Metric ) : vo id
+ un s ele c tMe tric ( m e tric : Me tric ) : void
+ se le ctMetric( id : S trin g ) : void
+ un s ele c tMe tric ( id : String ) : void
+ ad d Me tric( m e tric : Me tric ) : vo id
+ rem ove Me tric ( id : Strin g ) : vo id
+ rem ove Me tric ( m e tric : Me tric ) : vo id
< <g e tte r> >+ ge tD es c rip tion () : S trin g
< <s e tte r> >+ se tD es c rip tion ( d e sc riptio n : S trin g ) : vo id
< <g e tte r> >+ ge tN am e() : S tring
< <s e tte r> >+ se tN am e( n am e : Strin g ) : vo id
< <g e tte r> >+ ge tMetrics () : C olle ctio n
+ ad d Me trics ( m e trics : Co llec tion , ad d Clo ne : bo o le a n ) : vo id
+ rem ove AllMetrics () : vo id
+ up d ate ( so urce Me tric s Su ite : Me trics Su ite, u pd a teN am e : b oo lea
< <g e tte r> >+ ge tMetricB yNa m e ( na m e : String ) : Metric
< <g e tte r> >+ ge tMetricB yAb b re viatio n( a bb revia tio n : S trin g ) : Me tric
< <g e tte r> >+ ge tMetricB yID( id : Strin g ) : Me tric
< <g e tte r> >+ is D irty() : b o ole an
< <s e tte r> >+ se tD irty( is Dirty : b o ole an ) : vo id
< <g e tte r> >+ ge tS ele cte d Me trics () : Co llection
< <g e tte r> >+ ge tId() : String
< <s e tte r> >+ se tId( id : S trin g ) : vo id
...
...
< <c o ns tru ctor> >-Metric sMan a ge r()
< <g ette r>> + ge tIns tan c e() : Me trics Ma na g er
+ ac cep tEle m e n t( e lem en t : B a s e Ele m e n t ) : bo o lea n
+ ac cep tDia gra m E lem en t( ele m e n t : Ba s eE le m e nt ) : b o ole an
+ re m o veMe tric s Su ite ( m e trics Su ite : Me tric s Su ite ) : vo id
+ re m o veMe tric ( m e tric : Me tric ) : void
+ re m o veMe tric ( id : String ) : vo id
+ ad dMe trics Su ite ( m e tric s Su ite : Me trics Su ite ) : vo id
+ ad dMe tric( m e tric : Me tric ) : void
+ ad dMe trics ( m etrics : Co llec tion ) : void
< <g ette r>> + ge tMe tric s Su ite( n am e : Strin g ) : Me tric s Su ite
< <g ette r>> + ge tMe tric s Su iteB yID( id : String ) : Me trics S u ite
+ co n ta in s ( m e trics Su iteID : S trin g ) : bo o lea n
+ ca lcu la te ( info : Metric sIn form atio n ) : Me tric sR e su lts
< <s ette r>> + se tMe tric s Su iteC o nta ine r( c o nta ine r : Metrics S uite Co n tain er ) : vo id
< <g ette r>> + ge tMe tric s Info rm a tio n Se s s io n( p ro je ct : Pro ject ) : Me trics Info rm a tion
...
Me tr ic s Ca lcula tor
M etr ics Infor m a tion
< <c o ns tru ctor> >+ Metrics In fo rm a tion ()
+ ca lcu la te Metrics () : vo id
< <g ette r>> + ge tMe tric s Su ite() : Me trics S u ite
< <s ette r>> + se tMe tric s Su ite( m e trics Su ite : Metrics S uite ) : void
< <g ette r>> + ge tMe tric s Re s ults () : Me trics Re s ults
< <g ette r>> + ge tMe tric s () : Co llec tion
+ co n ta in s ( ele m e n t : B as e Ele m e nt ) : b o ole a n
...
Metric
<<constructor>>+Metric( name : String, abbreviation : String, type : MetricType, id : String, metricValueType : int )
+calculate( target : BaseElement, calculator : MetricsCalculator ) : MetricResult
MetricType
#calculateLocalMetricValue( target : BaseElement ) : MetricResult
+acceptModelElement( element : BaseElement ) : boolean
+BASIC_TYPE : MetricType
+round( number : float ) : int
+MODEL_SIZE : MetricType
+addProperty( property ) : void
+RELATIONSHIPS : MetricType
+addProperties( properties : Collection ) : void
+DIAGRAMS : MetricType
+removeProperties( properties : Collection ) : void
+CLASS_EMPLOYMENT : MetricType
+removeProperty( property ) : void
+INHERITANCE : MetricType
<<getter>>+getMetricsProperties() : MetricsProperties
+COHESION : MetricType
<<setter>>+setMetricsProperties( metricProperties : MetricsProperties ) : void
+COMPLEXITY : MetricType
<<getter>>+getAbbreviation() : String
-mType +MOOD : MetricType
<<setter>>+setAbbreviation( abbreviation : String ) : void
+OTHER : MetricType
<<getter>>+getDescription() : String
+REQUIREMENTS : MetricType
<<setter>>+setDescription( description : String ) : void
...
<<getter>>+getName() : String
<<constructor>>+MetricType( type : String, description : String )
<<setter>>+setName( name : String ) : void
<<getter>>+getDescription()
: String
<<getter>>+getType() : MetricType
<<setter>>+setDescription( description : String ) : void
<<getter>>-getPropertyIntegerValue( property : String ) : int
<<getter>>+getType()
:
String
<<getter>>-getPropertyFloatValue( property : String ) : float
<<setter>>+setType( type : String ) : void
<<getter>>+isPackage( element : BaseElement ) : boolean
...
<<getter>>+getID() : String
<<setter>>+setID( id : String ) : void
<<getter>>-getPackageForElement( element : BaseElement ) : BaseElement
<<getter>>+getMetricValueType() : int
<<setter>>+setMetricValueType( metricValueType : int ) : void
...
MetricResult
<<constructor>>+MetricResult( value : MetricValue )
+addValue( value : MetricValue ) : void
<<getter>>+getValue() : MetricValue
<<setter>>+setValue( value : MetricValue ) : void
<<setter>>+setValue( value : int ) : void
<<setter>>+setValue( value : float ) : void
<<setter>>+setMinValue( value : MetricValue, value2 : MetricValue ) : void
<<setter>>+setMaxValue( value : MetricValue, value2 : MetricValue ) : void
<<getter>>+isDifferentFromZero() : boolean
<<getter>>+getValueAsFloat() : float
<<getter>>+getValueAsInteger() : int
+hasValidResult() : boolean
+create( value : float ) : MetricValue
+create( value : int ) : MetricValue
<<setter>>+setCalculatedElements( calculatedElements : int ) : void
<<getter>>+getCalculatedElements() : int
MetricValue
-mValue
+@INTEGER_VALUE : int{frozen}
+@REAL_VALUE : int{frozen}
...
108
Copyright © 2003-2011 No Magic, Inc..
CONFIGURING ELEMENT
SP E C I F I C A T I O N
Adding Configuration
Open API provides a way to configure Elements' specification windows. With your own configurator you can
create new Nodes or remove already existing Nodes. Nodes are items of Tree visible on the left side in every
Specification window.
com.nomagic.magicdraw.ui.dialogs.specifications.SpecificationDialogManager class should be used for
registering specification dialog configurator ISpecificationNodeConfigurator.
More information is available in javadoc.
109
Copyright © 2003-2011 No Magic, Inc.
CUSTOM DIAGRAM
PA IN TE R S
MagicDraw API provides a way to add your own custom diagram painters for painting some additional stuff on
the diagram canvas. A good sample would be some highlighting in the diagram.
NOTE!
Painter can be added only into opened diagram's DiagramSurface. BTW, only opened diagram
has DiagramSurface. Closed diagram will return null.
Code sniplet:
Application.getInstance().addProjectEventListener(new
ProjectEventListenerAdapter()
{
public void projectOpened(Project project)
{
project.addPropertyChangeListener(new PropertyChangeListener()
{
public void propertyChange(PropertyChangeEvent evt)
{
if(evt.getPropertyName().equals(Project.DIAGRAM_OPENED))
{
DiagramPresentationElement diagram =
Application.getInstance().getProject().getActiveDiagram();
diagram.getDiagramSurface().addPainter(new
DiagramSurfacePainter()
{
public void paint(Graphics g,
DiagramPresentationElement diagram)
{
g.setColor(Color.BLUE);
List symbols = diagram.getPresentationElements();
for (int i = 0; i < symbols.size(); i++)
{
PresentationElement o = (PresentationElement)
symbols.get(i);
if( o instanceof ShapeElement)
{
Rectangle bounds = o.getBounds();
bounds.grow(5,5);
((Graphics2D)g).draw(bounds);
}
}
}
});
}
}
});
}
});
Full running sample is provided in Open API examples with name CustomDiagramPainter.
110
Copyright © 2003-2011 No Magic, Inc.
A N N O TA T I O N S
Using MagicDraw API you can add an annotation to any base element (model element or symbol in a diagram).
Annotations are shown in the Containment tree and in the diagrams.
Annotation has the following properties:
• severity - like error, warning, info, debug, fatal.
• kind - string representing annotation short name.
• text - string representing annotation text.
• target - target base element.
• actions - optional list of actions. They are shown in a diagram on a symbol’s smart manipulator.
To add or remove annotations, use com.nomagic.magicdraw.annotation.AnnotationManager.
IMPORTANT!
Do not forget to call AnnotationManager.update(), when you are done
with adding or removing in order to refresh MagicDraw UI.
TIP!
Find the sample plugin named “annotations” in MagicDraw Open API
examples directory.
111
Copyright © 2003-2011 No Magic, Inc.
VA LI D A T IO N
Basic conceps
Validation rules and validation suites specify what will be validating and how. They also specify how problem
found by validation rule can be solved.
Validation rule is a constraint with applied stereotype «UML Standard Profile::Validation Profile::validationRule». Validation rules can validate model elements and non model elements (e.g. presentation elements)
as well. UML metaclass specified as a constrained element defines that a validation rule validates elements of
the specified metaclass. Stereotype specified as a constrained element specifies that a validation rule validates
elements that have the stereotype applied. Classifier specified as a constrained element specifies that a validation rule validates instances of the specified classifier. Validation rule’s implementation can be OCL2.0 based
or binary. Binary validation rules can be implemented in Java. OCL2.0 based validation rules are described
using OCL2.0 language. Validation rule can be global or local. Global validation rules will be executed only
once per validation session. Local validation rules will executed for each model element. Validation rule will be
treated as global if:
• it is a OCL2.0 based validation rule, OCL2.0 specification is valid and OCL2.0 specification
does not use “self” variable (explicitly or implicitly by using only a property of constrained
element).
• it is binary based, has specified implementation class name and it has no specified constrained
elements.
Local validation rule will be executed on each model element.
Validation suite is a package with stereotype «UML Standard Profile::Validation Profile::validationSuite». Validation suite organizes several validation rules into a unit that can be used for performing validation. Validation
rules can be added or imported into validation suite.
Active validation suite is a package with stereotype «UML Standard Profile::Validation Profile::activeValidationSuite». Active validation rules can be checked constantly or on model elements change. OCL2.0 or Binary
validation rules can be used in the active validation. We suggest to prefer binary, because they give better performance.
Annotation defines validation result. It contains information about what is incorrect, severity of the problem,
and possible actions that can be used to solve the problem.
112
Copyright © 2003-2011 No Magic, Inc.
VALI DA T IO N
Validation rule developer’s roadmap
Validation rule developer’s roadmap
Validation rule developer’s roadmap allows faster understanding of steps required for creating a validation rule.
Each case is described later in detail.
Create OCL2.0 Validation Rule
OCL2.0 validation rule describes validation logic using OCL2.0. How to create OCL2.0 validation rule:
1. Create a constraint
2. Set stereotype «UML Standard Profile::Validation Profile::validationRule» for the validation rule
3. Set severity level, error message, and abbreviation
4. Specify constrained element(s)
5. Specify specification language OCL2.0
6. Enter OCL2.0 expression as a body of specification
7. Add/import the created validation rule to a validation suite
113
Copyright © 2003-2011 No Magic, Inc..
VALI DA T IO N
Binary Validation Rule
OCL2.0 validation rule can be used in an active validation suite. In this case validation rule will be executed on
any change of constrained elements that are from the validation scope. Executing of the validation rule might
be triggered even if no properties important to the validation rule actually changed and this can slow down
active validating speed. In order to avoid degradation of performance you can create a binary validation rule
that uses OCL2.0 expression to validate model elements but also provides additional information for the
MagicDraw that allows to optimize triggering of executing after model elements change. E.g. we want to check
whether all classes have names. This can be done by creating OCL2.0 validation rule and specifying OLC2.0
expression:
name <> ‘’
The problem is that such a validation rule actually is interested in a class property name value change but it will
be executed on every property value of a class change. How we can fix this problem and inform MagicDraw to
execute the validation rule only on class property name change:
1. Create a constraint.
2. Set stereotype «UML Standard Profile::Validation Profile::validationRule» for the validation rule.
3. Set severity level, error message, and abbreviation.
4. Specify constrained element(s).
5. Specify specification language OCL2.0
6. Enter OCL2.0 expression as a body of specification
7. Create a Java class that extends com.nomagic.magicdraw.validation.DefaultValidation-
RuleImpl class
8. Override method public Map<Class<? extends Element>, Collection<SmartListenerConfig>>
getListenerConfigurations()
public Map<Class<? extends Element>, Collection<SmartListenerConfig>>
getListenerConfigurations()
{
Map<Class<? extends Element>, Collection<SmartListenerConfig>> configs =
new HashMap<Class<? extends Element>,
Collection<SmartListenerConfig>>();
Collection<SmartListenerConfig> configsForClass = new
ArrayList<SmartListenerConfig>();
configsForClass.add(SmartListenerConfig.NAME_CONFIG);
configs.put(com.nomagic.uml2.ext.magicdraw.classes.mdkernel.Class.class,
configsForClass);
return configs;
}
9. Specify the validation rule’s implementation property value - qualified name of the class
10. Add/import the created validation rule to a validation suite
See the MyOCLBasedValidationRuleImpl.java example in the <MagicDraw_install_dir>\openapi\examples\validation directory.
NOTE
The implementation class must be in the classpath of the MagicDraw
application or if the implementation class is in a plugin then the plugin’s
classloader must be registered to the validation system (see "Binary
validation rule in plugin.").
Binary Validation Rule
Sometimes it is hard to specify the rule for some advanced concepts in OCL. For example, string manipulation
is rather weak in OCL2.0, hence the writing rule for string formats, parsing strings is very hard in OCL. In such
cases MagicDraw offers possibility to write rules in Java language and invoke them when validating.
Common steps for creating a binary validation rule:
114
Copyright © 2003-2011 No Magic, Inc..
VALI DA T IO N
Create Binary Validation Rule - Case A
1. Create a constraint
2. Set stereotype «UML Standard Profile::Validation Profile::validationRule» for the validation rule
3. Set severity level, error message, and abbreviation.
4. Specify constrained element(s)
5. Specify specification language binary
6. Create Java implementation class (see all possible cases below)
7. Compile Java code, resulting in one or several classes.
8. Ensure that MagicDraw can find & load these classes. You can place them in the MagicDraw
classpath or use the MagicDraw plugins mechanism. The same rules as writing the code for
open API are used here.
These steps are common to all possible binary validation cases and will not be repeated in each case description.
See the MyBinaryValidationRuleImpl.java example in the <MagicDraw_install_dir>\openapi\examples\validation directory.
NOTE
The implementation class must be in the classpath of the MagicDraw
application or if the implementation class is in a plugin then the plugin’s
classloader must be registered to the validation system (see "Binary
validation rule in plugin.").
Create Binary Validation Rule - Case A
If you want to control when validation rule has to be executed and you want to control what must be validated
and how, then you have to create Java class and implement interface com.nomagic.magicdraw.validation.ValidationRule. The class must have public no-arg constructor. Value of implementation property of
the validation rule must be qualified name of the implemented class.
This case is not recommended for validating model elements because validation rule provider must implement
not only validating of model elements but also other details that are provided by MagicDraw validation engine.
In this case, validation rule provider must correctly implement validating of model elements that are from validation scope defined in project options, should take care that implementation would respect project property
Exclude element from read-only modules and is responsible for implementing when validation has to be executed.
Create Binary Validation Rule - Case B
If you want to concentrate on implementation of validating model elements and delegate task of detecting
model element chages and project property changes to active validation engine then you have to create Java
class and implement com.nomagic.magicdraw.validation.ElementValidationRuleImpl and interface. The class must have public no-arg constructor. Value of implementation property of the validation rule
must be qualified name of the implemented class.
Create Binary Validation Rule - Case C
If the a validation rule is designed for active validation then validation performance becomes very important. In
this case we want that validation rule would be executed only then it is actually required, so implementation of
115
Copyright © 2003-2011 No Magic, Inc..
VALI DA T IO N
Create Binary Validation Rule - Case C
validation rule must somehow inform the active validation engine which model element property changes are
important to the validation rule. In order to create such a validation rule you have implement
com.nomagic.magicdraw.validation.ElementValidationRuleImpl and
com.nomagic.magicdraw.validation.SmartListenerConfigurationProvider interfaces. The
class must have public no-arg constructor. Value of implementation property of the validation rule must be qualified name of the implemented class.
The com.nomagic.magicdraw.validation.SmartListenerConfigurationProvider interface defines a
single method:
Map<Class<? extends Element>, Collection<SmartListenerConfig>>
getListenerConfigurations()
Implementation of this method should return a map of classes derived from
com.nomagic.uml2.ext.magicdraw.classes.mdkernel.Element class to collection(s) of
com.nomagic.uml2.ext.jmi.smartlistener.SmartListenerConfig objects.
Another way would be to extend com.nomagic.magicdraw.validation.DefaultValidationRuleImpl class and override the following method:
Map<Class<? extends Element>, Collection<SmartListenerConfig>>
getListenerConfigurations()
NOTES
In the Constraint Specification dialog box, Constrained Element
property should be specified. Constrained element is element for which
validation rule is created.
Validation rule that is interested in model class and interface names changes example
public Map<Class<? extends Element>, Collection<SmartListenerConfig>>
getListenerConfigurations() {
Map<Class<? extends Element>, Collection<SmartListenerConfig>> configMap =
new HashMap<Class<? extends Element>,
Collection<SmartListenerConfig>>();
Collection<SmartListenerConfig> configs = new
ArrayList<SmartListenerConfig>();
configs.add(SmartListenerConfig.NAME_CONFIG);
configMap.put(com.nomagic.uml2.ext.magicdraw.classes.mdkernel.Class.class,
configs);
configMap.put(com.nomagic.uml2.ext.magicdraw.classes.mdinterfaces.Interface.class,
configs);
return configMap;}
NOTE
In the Constraint Specification dialog box, the Constrained Element property should be Class
and Interface from the UML Standard Profile.
Validation rule that is interested in Activity parameters and Activity parameter node changes example:
public Map<Class<? extends Element>, Collection<SmartListenerConfig>>
getListenerConfigurations()
{
Map<Class<? extends Element>, Collection<SmartListenerConfig>> configMap
= new HashMap<Class<? extends Element>, Collection<SmartListenerConfig>>();
Collection<SmartListenerConfig> configs = new
ArrayList<SmartListenerConfig>();
SmartListenerConfig parameterConfig = new SmartListenerConfig();
Collection<String> parameterPropertiesList = new ArrayList<String>();
parameterPropertiesList.add(PropertyNames.DIRECTION);
parameterPropertiesList.add(PropertyNames.TYPE);
parameterPropertiesList.add(PropertyNames.OWNED_TYPE);
116
Copyright © 2003-2011 No Magic, Inc..
VALI DA T IO N
Create Binary Validation Rule - Case D
parameterConfig.listenToNested(PropertyNames.OWNED_PARAMETER).listenTo(parameterPr
opertiesList);
SmartListenerConfig cfg = new SmartListenerConfig();
Collection<String> argumentCftList = new ArrayList<String>();
argumentCftList.add(PropertyNames.PARAMETER);
argumentCftList.add(PropertyNames.TYPE);
argumentCftList.add(PropertyNames.OWNED_TYPE);
cfg.listenTo(argumentCftList);
SmartListenerConfig argumentConfig = new SmartListenerConfig();
argumentConfig.listenTo(PropertyNames.NODE, cfg);
configs.add(parameterConfig);
configs.add(argumentConfig);
configMap.put(Activity.class, configs);
return configMap;
}
See JavaConstantNameValidationRuleImpl.java example in <MagicDraw_install_dir>/
openapi/examples/validation directory.
Create Binary Validation Rule - Case D
If you want to create a validation rule that will not be used in active validation and you do not need to provide
solving actions then you can create a Java class that contains static method with signature:
public static Boolean <method_name>(<Element_type> param)
and specify <qualifiedClassName>.<method_name> as a body value of validation rule’s specification.
The referred java method must be a static method and it must take exactly one parameter. Several validating
methods can be placed into one Java class or use one class per validating method – this is irrelevant.
The type of the parameter MUST match the type of the constrained element of the validation rule. For validation
rules on metaclasses, use the appropriate class from the com.nomagic.uml2.ext.magicdraw.* package.
For example, to write the rule for metaclass DataType, use
com.nomagic.uml2.ext.magicdraw.classes.mdkernel.DataType as a type of the parameter.
For the validation rules on stereotypes, use the same class as you would use when specifying the validation
rule for metaclass of that stereotype. For validation rules on the classifiers of the model, use the
com.nomagic.uml2.ext.magicdraw.classes.mdkernel.InstanceSpecification as the type of
the parameter.
The following is an example of a trivial validation rule, which always returns true (i.e. all elements are valid):
Java code:
package com.nomagic.magicdraw.validation;
import com.nomagic.uml2.ext.magicdraw.classes.mdkernel.DataType;
public class TestRule
{
public static Boolean testMeta(DataType exp)
{
return Boolean.TRUE;
}
}
117
Copyright © 2003-2011 No Magic, Inc..
VALI DA T IO N
Binary validation rule in plugin
Compile such code into Java bytecode and locate it where MagicDraw can load it (classpath, plugin), and then
you can use it for validation:
1. Create the validation rule in our model.
2. Select DataType metaclass as the constrained element of the rule.
3. Select Binary language for the expression of the rule.
4. Specify com.nomagic.magicdraw.validation.TestRule.testMeta as the body of the
expression of the rule.
Run the validation suite with included validation rule. The method will be invoked for each datatype model element, found in the scope of the validation run. For each element, where this method returns false, an entry will
be placed in the validation results table.
For more information about writing Java code, which navigates through the model and accesses various data
from the model, see other sections of current user guide.
Binary validation rule in plugin
MagicDraw validation engine must be able load validation rule implementation class. Validation engine is able to load
class if the implementation class exists in MagicDraw classpath or if the validation rule implementation class is in plugin
classpath then the plugin must register the plugin’s classloader to validation system in this way:
EvaluationConfigurator.getInstance().registerBinaryImplementers(<PluginClassName>.
class.getClassLoader());
How to provide a solution for a problem found
during validation?
Validation rule returns annotations as validation results to the validation engine. Each annotation can contain a
list of action objects that implements how a particular problem found by validation rule can be solved. In order
to create an action for solving validation rule’s provider must create a Java class that extends
com.nomagic.actions.NMAction class and implement public void actionPerformed(ActionEvent e) method. User will be able to invoke the action from the validation results table or from browser. In
order to enable performing the action on multiple targets the action class must implement
com.nomagic.magicdraw.annotation.AnnotationAction interface.
See MyAction.java, FixJavaConstantNamesAction.java, MyBinaryValidationRuleImpl.java
and JavaConstantNameValidationRuleImpl.java examples in <MagicDraw_install_dir>/
openapi/examples/validation directory.
118
Copyright © 2003-2011 No Magic, Inc..
TE A M W O R K
MagicDraw API provides Teamwork Server accessing methods.
Code sniplet:
// check logged user
if (!user.equals(TeamworkUtils.getLoggedUserName()))
{
// login to teamwork
if (!TeamworkUtils.login(server, -1, user, password))
{
// login failed
return;
}
}
// load teamwork project
ProjectDescriptor projectDescriptor = TeamworkUtils
.getRemoteProjectDescriptorByQualifiedName(projectName);
ProjectsManager projectsManager = Application.getInstance().
getProjectsManager();
projectsManager.loadProject(projectDescriptor, true);
Project project = Application.getInstance().getProject();
Model model = project.getModel();
// get locked by user
Collection userLockedElements = TeamworkUtils.
getLockedElement(project, user);
if (!userLockedElements.contains(model))
{
// model is not locked by user, get all locked
Collection allLockedElements = TeamworkUtils.
getLockedElement(project, null);
if (!allLockedElements.contains(model))
{
// model is not locked - lock
TeamworkUtils.lockElement(project, model, false);
}
}
SessionManager.getInstance().createSession("Rename Model");
// change name
model.setName("MyModel");
SessionManager.getInstance().closeSession();
// unlcok and commit (because do not discard)
TeamworkUtils.unlockElement(project, model, false, false);
projectsManager.closeProject();
// logout
TeamworkUtils.logout();
Check the com.nomagic.magicdraw.teamwork.application.TeamworkUtils class JavaDoc for method descriptions.
119
Copyright © 2003-2011 No Magic, Inc.
CODE ENGINEERING
Since MagicDraw 16.0 you can perform Code Engineering using OpenAPI.
Code engineering allows generation of source code from specific model, and source code reversing into model
elements. MagicDraw provides API for:
• Code engineering sets creation for particular programming languages.
• Automatic component creation for every class involved in forward engineering and every file
involved into reverse engineering.
• Specification of working or output, or temporary directories for processing source code files.
Destination of the code reverse operation output can be any model package.
In this chapter we will review how to manage code engineering and how to do reverse and forward engineering.
Code Engineering Set
A CodeEngineeringSet object represents a code-engineering object as a resource for forward or reverse engineering.
Figure 16 -- Interface of the Code Engineering Set
Each CodeEngineeringSet provides properties, which can be read:
• Name. Represents a name of the code engineering set, visible in the Browser.
• Model elements. Represents elements that are added into the code engineering set from the
model.
• Working directory. Represents a code engineering directory where generated/reversed files
are located.
Forward Engineering
To perform code generation, elements should be added to the CodeEngineeringSet object. Use the following
method to add a list of model elements to the code engineering set:
• addElementsToCodeEngineeringSet(List<BaseElement> modelElements)
NOTE
120
Model elements should be in the working package, otherwise model
element will not be added to code engineering set. Working package is
setted when creating code engineering set.
Copyright © 2003-2011 No Magic, Inc.
CODE ENGINEERING
Managing code engineering sets
Reverse Engineering
Source code files are required to perform the Reverse Engineering. There are 2 methods available for adding
files into code engineering set:
1. addFilesToCodeEngineeringSet(List<File> file);
This method adds given list of files to code engineering set.
2. addAllFilesRecursivelyToCES(String path);
This method adds all specific source code files to code engineering set, starting from given
directory.
NOTE
Source code files should be in working directory, in order to have successful reverse.
Managing code engineering sets
CodeEngineeringManager class provides static API methods for creating, removing, reversing, generating and
adjusting code-engineering settings. CodeEngineeringManager class is used for managing code engineering
sets.
When creating the code engineering set, the following fields are required:
• Language and dialect IDs. All languages and dialects IDs are stored in the
CodeEngineeringConstants class.
• Name of the code engineering set.
• Project, where code engineering set will be added.
• Working package.
• Working directory.
Figure 17 -- Class for managing Code Engineering Sets
• New CodeEngineeringSet can be created directly via CodeEngineeringManager:
CodeEngineeringManager.createCodeEngineeringSet(language,dialect, name, project,
workingPackage, workingDirectory);
Language and dialect can be selected from the CodeEngineeringConstants class. Dialect is
required for DDL and C++ languages.
NOTES
• null workingPackage means, that code engineering working
package will be model Data by default;
• null workingDirectory means, that code engineering working
directory will be MagicDraw install root.
• To remove instance of CodeEngineeringSet use the following method:
CodeEngineeringManager.removeCodeEngineeringSet(codeEngineeringSet);
121
Copyright © 2003-2011 No Magic, Inc..
CODE ENGINEERING
Samples of the forward and reverse engineering
• All Code Engineering Sets can be retrieved by the following method:
CodeEngineeringManager.getAllCodeEngineeringSets(project);
• To perform generation of CodeEngineeringSet object use the following method:
CodeEngineeringManager.generate(codeEngineerigSet);
• To perform reverse engineering use the following method:
CodeEngineeringManager.reverse(codeEngineeringSet, showOptionsDialog);
Language specific options
JavaCEManager provides methods to set Java specific options.These options applies to all code engineering sets in
project.
• To add classpaths for java code engineering sets, use:
CodeEngineeringManager.setJavaClasspath( project, arrayOfclasspaths )
NOTE: setting a new classpath will override the old one.
• To get applied classpaths for java code engineering sets, use:
CodeEngineeringManager.getJavaClasspath( project )
• To resolve collection generics when reversing java code, use:
CodeEngineeringManager.setResolveCollectionGenerics(project,true)
Figure 18 -- Class for managing JAVA Code Engineering Sets
Samples of the forward and reverse engineering
Performing the forward engineering
This example shows how to perform simple java code generation.
Step 1. Creating a CodeEngineeringSet
Project project = Application.getInstance().getProject();
String name = "sample CE project";
String workingDir = OPENAPI_DATA_DIRECTORY_PATH;
// create working package.
ElementsFactory ef = project.getElementsFactory();
Package workingPackage = ef.createPackageInstance();
workingPackage.setName(“my working package”);
workingPackage.setOwner(project.getModel());
// creating code engineering set.
CodeEngineeringSet javaGenerationSet =
CodeEngineeringManager.createCodeEngineeringSet(
CodeEngineeringConstants.Languages.JAVA, null, name, project, workingPackage,
workingDir);
Step 2. Adding model elements to the CodeEngineeringSet
Project project = Application.getInstance().getProject();
122
Copyright © 2003-2011 No Magic, Inc..
CODE ENGINEERING
Samples of the forward and reverse engineering
// create new element
ElementsFactory ef = project.getElementsFactory();
Class classA = ef.createClassInstance();
classA.setName("ClassA");
classA.setOwner(project.getModel());
List<BaseElement> modelsForSample = new ArrayList<BaseElement>();
modelsForSample.add(classA);
javaGenerationSet.addElementsToCodeEngineeringSet(modelsForSample);
Step 3. Performing CodeEngineeringSet generation
CodeEngineeringManager.generate(javaGenerationSet);
Performing the reverse engineering
This example shows how to perform simple java code reverse.
Step 1. Creating the CodeEngineeringSet
Project project = Application.getInstance().getProject();
String name = "sample CE project";
String workingDir = OPENAPI_DATA_DIRECTORY_PATH;// e.g C:\myworkingPackage
// create working package.
ElementsFactory ef = project.getElementsFactory();
Package workingPackage = ef.createPackageInstance();
workingPackage.setName(“my working package”);
workingPackage.setOwner(project.getModel());
// creating code engineering set.
CodeEngineeringSet set = CodeEngineeringManager.createCodeEngineeringSet(
CodeEngineeringConstants.Languages.JAVA, null, name, project, workingPackage,
workingDir);
Here null dialect is used for java language, because java doesn't have any dialect.
Step 2. Adding source code to the CodeEngineeringSet
ces.addAllFilesRecursivelyToCES(new File(workingDir + File.separator + "test
directory")); // starting from C:\myworkingPackage\test directory\
This sets given instance of code engineering set working directory and adds all files from that directory.
Set java classpaths for project:
String[] claspath = new String[] { path1, path2, path3, path4 };
JavaCodeEngineeringManager.setJavaClasspath(mTestProject2, project);
Step 3. Performing reverse of the CodeEngineeringSet
CodeEngineeringManager.reverse(ces, false);
123
Copyright © 2003-2011 No Magic, Inc..
ORACLE DDL GENERATION AND
CUSTOMIZATION
MagicDraw Oracle DDL script generation is based on the Velocity engine. It provides ability to change generated DDL script by changing velocity template. In this chapter we will introduce how Oracle DDL generation
works in MagicDraw, how to change template for some specific things.
Knowledge of the Velocity Template Language is necessary for understanding, editing, or creating templates.
Velocity documentation can be downloaded from: http://click.sourceforge.net/docs/velocity/VelocityUsersGuide.pdf.
For more information about Oracle DDL 11g, see http://download.oracle.com/docs/cd/B28359_01/server.111/
b28286/toc.htm
Introduction to Oracle DDL generation in
MagicDraw
The MagicDraw Oracle DDL generation consists of the following three components:
• Velocity engine. Oracle DDL generation is performed by Velocity engine. The engine collects
context variables and mergers them into template.
• Template. Template is a user-defined document that provides Velocity Template Language
(VTL) syntax. The VTL syntax is used to manipulate the context variables for generating text
script.
The template file can be changed in the CG Properties Editor dialog box (in the Oracle DDL
set shortcut menu, choose the Properties command).
The default Oracle DDL template is stored in <MagicDraw install folder>\
data\DB_engineering\Oracle_template folder.
• Context variables. Context variables are MagicDraw models (retrieved from OpenAPI), code
engineering set information, and user-defined variables.
To identify Oracle object check applied Stereotypes and Tagged Values.
Understanding Oracle DDL Template structure
Default Oracle DDL template is stored in <MagicDraw install folder>\ data\DB_engineering\Oracle_template
folder. Template consists of many macros - velocity functions. Each macro is dedicated for particular object
generation.
This example shows velocity macro for Oracle VIEW object generation:
#macro ( generateView $data )
#set ( $QUERY_RESTICTION = "query restriction")
#set ( $force = false)
#set ( $force = $oracleHelper.getBooleanValueFromDefaultProfile(
$data,$VIEW_STEREOTYPE, $FORCE_TAG ) )
124
Copyright © 2003-2011 No Magic, Inc.
O R A C L E D D L G E N E R A T I O N AN D C U S T O M I Z A T I O N
Customizing template
#set ( $sqlrestriction = false)
#set ( $sqlrestriction = $ oracleHelper.getFirstPropertyValueFromProfile(
$data,$VIEW_STEREOTYPE, $QUERY_RESTICTION ) )
#set ( $sql = false)
#set ( $sql = $ oracleHelper.getFirstPropertyValueFromProfile(
$data,$VIEW_STEREOTYPE, $QUERY_TAG ))
#set ( $columns = false)
#set ( $columns = $ oracleHelper.getViewColumnList( $data ) )
#if ($columns)
#set ( $columns = " ($columns)" )
#else
#set ( $columns = $nospace )
#end
#writeDocumentation ( $data $nospace )
#writeLine( "$ oracleHelper.getCreate($data)#if ( $
oracleHelper.getPropertiesListFromDefaultProfile($data, $VIEW_STEREOTYPE,
$FORCE_TAG).size()>0 )#if( $force ) FORCE#else NO FORCE#end#end VIEW $
oracleHelper.getQualifiedName( $data )$columns AS" $nospace)
#if ( $sql )#writeLine( $sql $tab )#end#writeText( ${sqlrestriction} ${space}
${nospace})${semicolon}
#end
Model element with stereotype "view" is passed to macro function, and then all element information is retrieved
by $oracleHelper utility class. Oracle View stereotype has 3 properties. These tagged values store information
about force, query restriction and query statements.
Method $oracleHelper.getFirstPropertyValueFromProfile( $data,$VIEW_STEREOTYPE,
$QUERY_RESTICTION) gets query restriction statement from element $data.
Customizing template
To change generation of the particular Oracle Object, add new functionality to its macro in velocity template.
Helper utility class will assist in retrieving model information. Read the next chapter to get familiar with available
methods.
We suggest to make a back up of default template. Default template is stored in <MagicDraw install folder>\
data\DB_engineering\Oracle_template folder. The template file can be changed in the CG Properties Editor dialog
box (in the Oracle DDL set shortcut menu, choose the Properties command).
When generating DDL, objects are passed from code engineering set to velocity engine.
Object, that are passed to Oracle DDL velocity engine:
Object name
Object type
Description
$CESList
List<NamedEleme
nt>
List of model elements that are added to code
engineering set.
$dropRequired
boolean
Flag to notify if frop objects is required. This is a
drop setting option which generates Drop statement.
$oracleHelper
Java.lang.Class
This is helper class, for retrieving information from
model elements. Use this class to check element
for applied stereotypes, get tagged values and element’s owned information.
$newLineBracket
boolean
Generation Option to generate bracket in new line.
$genDocumentation
boolean
Language option for documentation generation.
125
Copyright © 2003-2011 No Magic, Inc..
O R A C L E D D L G E N E R A T I O N AN D C U S T O M I Z A T I O N
Utility class
Utility class
This utility class helps to retrieve information from MagicDraw model elements.
Use these commands to get particular information:
• $oracleHelper.hasStereotype($element, $stereotypeName)
Returns true if given element has applied given stereotype.
Name
Parameters
Return
Type
Description
$element
com.nomagic.uml2 Element to check.
.ext.magicdraw.c
lasses.mdkernel.
Element
$stereotypeName
java.lang.String Stereotype name to be checked.
-
boolean
true if elements has applied sterotype with given name.
• $oracleHelper.getBooleanValueFromDefaultProfile($element,
$stereotypeName, $propertyName)
Given an Element, Stereotype name and Tag name, returns tag value as Boolean from Oracle
profile.
Name
Parameters
Type
Description
$element
com.nomagic.uml2 Element to check.
.ext.magicdraw.c
lasses.mdkernel.
Element
$stereotypeName
java.lang.String Stereotype name (from default pro-
file) that should be applied.
$propertyName
java.lang.String Property name which value will be
retrieved.
Return
-
boolean
Boolean value of property (tag).
• $oracleHelper.getPropertiesListFromDefaultProfile($element,
$stereotypeName,
$propertyName)
Returns list of given property values, that exists on given element with applied stereotype from
Oracle profile.
Name
Parameters
Type
Description
$element
com.nomagic.uml2 Element to be tested.
.ext.magicdraw.c
lasses.mdkernel.
Element
$stereotypeName
java.lang.String Stereotype name which should be
applied.
$propertyName
java.lang.String Property (Tag) name to get values
from.
Return
126
-
java.util.List
List of property values.
Copyright © 2003-2011 No Magic, Inc..
O R A C L E D D L G E N E R A T I O N AN D C U S T O M I Z A T I O N
Utility class
• $oracleHelper.getFirstPropertyValueFromProfile($element,
$stereotypeName, $propertyName)
Returns First given Tag property value from given element, which has applied given stereotype.
Name
Parameters
Type
Description
$element
com.nomagic.uml2 Element to be tested.
.ext.magicdraw.c
lasses.mdkernel.
Element
$stereotypeName
java.lang.String Stereotype name, that should be
applied to element.
$propertyName
java.lang.String Property name where to check for
values.
Return
-
java.lang.String First property value in String repre-
sentation.
• $oracleHelper.getDefaultValueAsBoolean($property)
Given an property, returns default value as boolean.
Name
Type
Description
Parameter
$property
com.nomagic.uml2 Boolean Property to be check for
.ext.magicdraw.c default value.
lasses.mdkernel.
Property
Return
-
boolean
Default boolean value of property
(tag).
• $oracleHelper.getFirtPropertyValueFromGivenProfile($element,
$profileName, $stereotypeName, $propertyName)
Returns first given tag property value from given element, which has applied given stereotype
from profile.
Name
Parameters
Type
Description
$element
com.nomagic.uml2 Element to be tested.
.ext.magicdraw.c
lasses.mdkernel.
Element
$profileName
java.lang.String Profile name where stereotype
exists.
$stereotypeName
java.lang.String Stereotype name.
$propertyName
java.lang.String Property (Tag) name, which value
will be checked.
Return
-
java.lang.String First value in property list in String.
• $oracleHelper.getPropertiesListFromProfile($element, $profileName,
$stereotypeName, $propertyName)
Returns list of given property values, that exists on given element with applied stereotype from
given profile.
Name
127
Type
Description
Copyright © 2003-2011 No Magic, Inc..
O R A C L E D D L G E N E R A T I O N AN D C U S T O M I Z A T I O N
Utility class
Parameters
$element
com.nomagic.uml2 Element to be tested.
.ext.magicdraw.c
lasses.mdkernel.
Element
$profileName
java.lang.String Profile name where stereotype
exists.
$stereotypeName
java.lang.String Stereotype name.
$propertyName
java.lang.String Property (Tag) name, which value
will be checked.
Return
-
java.util.List
List of property values.
• $oracleHelper.getStringValue($object)
Given an value from Tag, returns String representation.
Name
Type
Description
Parameter
$element
com.nomagic.uml2 Element to be tested.
.ext.magicdraw.c
lasses.mdkernel.
Element
Return
-
boolean
true if element is the datatype.
• $oracleHelper.isDataType($element)
Returns true if element is data type.
Name
Type
Description
Parameter
$element
com.nomagic.uml2 Element to be tested.
.ext.magicdraw.c
lasses.mdkernel.
Element
Return
-
boolean
true if element is datatype.
• $oracleHelper.getType($type, $modifier)
Given a type and modifier, returns it's description.
Name
Parameters
Return
Type
Description
$type
com.nomagic.uml2 Type of element.
.ext.magicdraw.c
lasses.mdkernel.
Type
$modifier
java.lang.String Modifier of Type.
-
java.lang.String Type definition for Oracle DDL.
• $oracleHelper.getTypeModifier($element)
Returns Type modifier for given element.
Name
Type
Description
Parameter
$element
com.nomagic.uml2 Element to be tested.
.ext.magicdraw.c
lasses.mdkernel.
Element
Return
-
java.lang.String Type modifier description.
• $oracleHelper.getParameters($operation)
128
Copyright © 2003-2011 No Magic, Inc..
O R A C L E D D L G E N E R A T I O N AN D C U S T O M I Z A T I O N
Utility class
Returns list of operation parameters.
Name
Type
Description
Parameters
$element
com.nomagic.uml2 Operation to be tested.
.ext.magicdraw.c
lasses.mdkernel.
Operation
Return
-
java.util.List
List of operation parameters.
• $oracleHelper.getColumnConstraint($column)
Return given property Constraint.
Name
Type
Description
Parameter
$column
com.nomagic.uml2 Column to check for constraint.
.ext.magicdraw.c
lasses.mdkernel.
Property
Return
-
java.lang.String Constraint definition.
• $oracleHelper.getCreate($element)
Returns CREATE statement for given element.
Name
Type
Description
Parameter
$element
com.nomagic.uml2 Element to be tested.
.ext.magicdraw.c
lasses.mdkernel.
Element
Return
-
Java.lang.String description - CREATE or CREATE
OR REPLACE.
• $oracleHelper.getReturnParameter($operation, $createIfNeeded)
Returns Return type parameter of given Operation.
Name
Parameters
Return
Type
Description
$operation
com.nomagic.uml2 Operation to check.
.ext.magicdraw.c
lasses.mdkernel.
BehavioralFeatur
e
$createIfNeeded
boolean
-
com.nomagic.uml2 Return parameter of given Opera.ext.magicdraw.c tion
lasses.mdkernel.
Parameter
Flag to create return parameter if it
is not exists.
• $oracleHelper.getIndexNameDefinition($index)
Returns Name of given Index.
Name
Parameter
129
$index
Type
Description
com.nomagic.uml2 BehavioralFeature as a oracle
.ext.magicdraw.. index to be checked for name.
classes.mdkernel
.BehavioralFeatu
re
Copyright © 2003-2011 No Magic, Inc..
O R A C L E D D L G E N E R A T I O N AN D C U S T O M I Z A T I O N
Utility class
Return
-
java.lang.String Name of infex.
• $oracleHelper.getTableConstraintDefinition($dependency)
Given a dependency, returns table constraint definition.
Name
Type
Description
Parameters
$dependency
com.nomagic.uml2 Dependency to be tested.
.ext.magicdraw..
classes.ddepende
ncies.Dependency
Return
-
java.lang.String Definition of table constraint.
• $oracleHelper.isObjectPackage($element)
Checks if given element is a Package.
Name
Type
Description
Parameter
$element
com.nomagic.uml2 Element to be tested.
.ext.magicdraw..
classes.mdkernel
.Element
Return
-
boolean
true if element is Package.
• $oracleHelper.isPackageDatabase($package)
Returns true if given package is Database.
Name
Type
Description
Parameter
$package
com.nomagic.uml2 Package to be tested.
.ext.magicdraw..
classes.mdkernel
.Package
Return
-
boolean
true if package is database.
• $oracleHelper.isPublic($element)
Returns true if given element has public visibility.
Name
Type
Description
Parameter
$element
com.nomagic.uml2 Element to be tested.
.ext.magicdraw..
classes.mdkernel
.Element
Return
-
boolean
true if element has public visibility.
• $oracleHelper.reverseList($list)
Reverses give list.
Name
Type
Description
Parameter
$list
Java.util.List
List to be reversed.
Return
-
Java.util.List
Reversed list.
• $oracleHelper.getRefName($element)
Returns reference name description for element with "Ref:Element" tag.
Name
130
Type
Description
Copyright © 2003-2011 No Magic, Inc..
O R A C L E D D L G E N E R A T I O N AN D C U S T O M I Z A T I O N
Example
Parameter
$element
com.nomagic.uml2 Element to be tested.
.ext.magicdraw..
classes.mdkernel
.Element
Return
-
java.lang.String Reference element name.
Example
In this sample we will extend current Oracle View DROP statement. In the Default template we have Oracle
view drop function. In this sample the simple macro is presented and it generates the following text:
DROP VIEW view_name;
See the sample bellow:
#macro (dropView $data )
#writeLine( "DROP VIEW $utils.getQualifiedName( $data )${semicolon}" $nospace)
#end
We will add a new tag to identify the "CASCADE CONSTRAINTS" clause in the DROP VIEW statement. The
following script will be generated:
DROP VIEW view_name CASCADE CONSTRAINTS;
There are three steps to do this:
Step 1. Creating a new stereotype and tags
We need to create a new stereotype with the Boolean property, or extend the default "View" Stereotype with a
new property. Name a new property "cascade_clause". Apply the stereotype to the View object and set value to
"true".
We added a new tag to the view stereotype in the default profile.
Step 2. Changing the template file
Add the following lines to the template file:
#set($cascadeOption =false)
##this line is required to for setting new variable to false state.
#set($cascadeOption = $oracleHelper.getBooleanValueFromDefaultProfile(
$data,$VIEW_STEREOTYPE, "cascade_clause") )
This line retrieves boolean value from the given tag in given stereotype "$view_stereotype" and sets it to a
newly created $cascadeOption value.
Then add a new checking clause into the drop statement. See the final method bellow:
#macro (dropView $data )
## sets value to new variable
#set($cascadeOption =
$oracleHelper.getBooleanValueFromDefaultProfile($data,$VIEW_STEREOTYPE,
"cascade_clause") )
#writeLine( "DROP VIEW $utils.getQualifiedName( $data )#if ($cascadeOption) CASCADE
CONSTRAINTS#end${semicolon}" $nospace)
#end
131
Copyright © 2003-2011 No Magic, Inc..
RUNNING MAGICDRAW
IN BATCH MODE
MagicDraw plug-ins allows adding some custom action into MagicDraw actions sets. This approach works fine
providing custom actions for user in UI, but does not solve custom task executing in the batch mode. For example, if you want to run MagicDraw, open some project, execute code generation and close MagicDraw, plug-ins
will not work.
NOTE!
MagicDraw application can not be run on headless device even in batch mode. Graphical
environment is required.
MagicDraw provides API for running it in the batch mode. For this you need to extend the following class:
com.nomagic.magicdraw.commandline.CommandLine
Code sniplet:
public class ExportDiagramImages extends CommandLine
{
public static void main(String[] args)
{
// launch MagicDraw
new ExportDiagramImages().launch(args);
}
protected void run()
{
File projectFile = ...;
//open some project
ProjectDescriptor projectDescriptor =
ProjectDescriptorsFactory.createProjectDescriptor(projectFile.toURI());
Application.getInstance().getProjectsManager().loadProject(projectDescriptor
, true);
// project is opened and now you can work with your project
}
}
Full working sample is provided in Open API examples with name ImageGenerator. It takes a project file, destination directory as arguments and generates images for all diagrams.
NOTE!
132
Do not forget to add all *.jar files recursively (except md_commontw.jar and
md_commontw_api.jar) from <MagicDraw installation directory>/lib directory into the classpath.
Make sure the patch.jar is the first in the classpath.
Copyright © 2003-2011 No Magic, Inc.
NEW! CREATING MAGIC
D R A W TE S T C A S E S
MagicDraw provides a JUnit (www.junit.org) based test framework which can be used for the MagicDraw JUnit
tests development. The main purpose of the MagicDraw test framework is to simplify the automatic unit and
integration tests development for the MagicDraw program and its plug-ins. The MagicDraw test framework can
be used by developers for testing their own MagicDraw plug-ins or for testing standard essential MagicDraw
features.
The MagicDraw test framework consists of an abstract JUnit test case implementation and a number of tools
which might be used for the following purposes:
• Starting the MagicDraw program.
• Managing MagicDraw projects
• Checking MagicDraw program for memory leaks.
Figure 19 -- Main classes of MagicDraw test framework
Creating MagicDraw JUnit Test Case
The MagicDraw JUnit test case should be created by extending the abstract MagicDrawTestCase class from
MagicDraw Open API (see the following MyTest sample). The MagicDrawTestCase class starts the MagicDraw
program automatically for each test case method defined in MagicDrawTestCase and performs the memory
leaks test after each completed test case.
MagicDrawTestCase provides default and specific constructors for creating a test case instance with a specific
custom name for the specific test case method. Test cases with specific names might be helpful when several
instances of the same test case are created and analyzed.
133
Copyright © 2003-2011 No Magic, Inc.
NEW! CREATING MAGIC DRAW TE ST CASES
Creating MagicDraw JUnit Test Case
The MagicDraw test case initialization and tear down should be implemented in overridden
MagicDrawTestCase setUpTest() and tearDownTest() methods. The standard JUnit method suite() might be
used for preparing the tests suite with several instances of test cases which may use different test data.
import com.nomagic.magicdraw.tests.MagicDrawTestCase;
public class MyTest extends MagicDrawTestCase
{
public MyTest(String testMethodToRun, String testName)
{
super(testMethodToRun, testName);
}
@Override
protected void setUpTest() throws Exception
{
super.setUpTest();
//do setup here
}
@Override
protected void tearDownTest() throws Exception
{
super.tearDownTest();
//do tear down here
}
public void testSomething()
{
//implement unit test here
}
public static Test suite() throws Exception
{
//you may create test suite with several instances of test.
TestSuite suite = new TestSuite();
suite.addTest(new MyTest("testSomething", "MagicDraw Test Sample"));
suite.addTest(new MyTest("testSomething", "Another MagicDraw Test
Sample"));
return suite;
}
}
MagicDrawTestCase also provides methods for opening, saving, and closing MagicDraw projects. It also
performs the memory leak test after the test case has been completed and after the MagicDraw project has
been closed. The memory leak test for the whole test case can be disabled using the setMemoryTestReady()
method, while the setSkipMemoryTest() method can be used to disable the memory leaks test on closing the
MagicDraw project.
The list of required MagicDraw plug-ins for the test case can be configured by overriding the
getRequiredPlugins() method of MagicDrawTestCase. The overridden method implementation should return
the list of required plug-ins IDs. Textual information about required MagicDraw plug-ins and their loading status
can be obtained using getRequiredPluginsDescription() and isRequiredPluginsLoaded() methods.
Textual information about the test process can be logged using the Log4j logger. The test case logger for the
TEST category can be accessed using the getLog() method of MagicDrawTestCase. More information about
the Log4j logger configuration and usage can be found at http://logging.apache.org/log4j/1.2/manual.html.
Comparing MagicDraw Projects
To compare two projects for testing purpose, the MagicDraw test framework provides the ProjectComparator
class with the compare() method for comparing two MagicDraw projects (see the following figure). The default
implementation of ProjectComparator can be created using the createProjectComparator() method of the
134
Copyright © 2003-2011 No Magic, Inc..
NEW! CREATING MAGIC DRAW TE ST CASES
Working with Test Resources
MagicDrawTestCase class. MagicDraw projects can be compared by checking their model elements and
element symbols in diagrams for equality.
Figure 20 -- Project comparator provided by MagicDraw test framework
The model elements comparison can be configured using the ModelComparator interface. Developers may
exclude some model elements from the comparison by providing the custom ModelComparatorFilter interface
implementation. Please note that the default implementation of ProjectComparator does not compare the
diagram information table, root model comment, and elements from modules.
The default implementation of DiagramComparator compares diagrams for changes by analyzing a location
and size of the symbols presented in diagrams. The graphical differences of compared diagrams can be saved
in the graphical PNG file using the saveDiffToImageFiles() method of the DiagramComparator interface.
Developers may create their own comparators for the custom diagrams and model elements comparison by
implementing ModelComparator and DiagramComparator interfaces. The custom Model and Diagram
comparators implementation can be set to ProjectComparator using appropriate setter methods.
Working with Test Resources
MagicDraw test cases may use external resources such as configuration files and MagicDraw projects for
testing purposes. It is recommended to keep external test resources apart from test case implementation class
files. The MagicDraw test framework provides methods for retrieving test resources from the one specific
resource directory. Resource directory can be accessed by calling the TestEnvironment.getResourceDir()
method. This method obtains the directory specified by the tests.resources system property. For information
about specifying the tests.resources system property see "Configure Test Environment." on page 136.
Configure Test Environment chapter. The MagicDraw test framework also provides methods for collecting
MagicDraw projects from the resource directory. Developers may use TestEnvironment.getProjects() for
collecting projects recursively from a specific directory. Unnecessary projects can be filtered out by specifying
their names in skip.txt files placed in the projects directory.
MagicDraw test cases may produce some resources as a test output. The output directory for a specific test
case can be created using TestEnvironment.getOutputDir(class). The class here specifies a class of the test
135
Copyright © 2003-2011 No Magic, Inc..
NEW! CREATING MAGIC DRAW TE ST CASES
Configure Test Environment
case which output directory should be accessed. There are also methods for working with output files. An
output file for a specific MagicDraw project can be simply created by changing the project file extension
(TestEnvironment.getFileWithExtension) or adding a special prefix to its name
(TestEnvironment.createFileNameWithPrefix()).
Configure Test Environment
MagicDraw test cases can be run as a regular JUnit test case using the JUnit TestRunner class or configuration
tools such as Ant or Maven. However, some MagicDraw test case specific system properties should be set.
In order to start MagicDraw correctly, all MagicDraw libraries from <MagicDraw installation directory>\lib should
be added recursively to the test case running class path. The MagicDraw test case starts the MagicDraw
program which requires the higher heap size configuration. The Max heap size should be no less than 400MB
and the maximum size for the permanent generation heap should be no less than 128MB. These properties
can be configured by providing arguments to Java Virtual Machine (JVM) as follows:
-Xmx800M -XX:MaxPermSize=135m
The MagicDraw installation directory should be also specified using the install.root system property which can
be passed to JVM as a runtime argument as following:
-Dinstall.root=path_to_MagicDraw_installation_directory
Test cases may use external resources such as configuration files and MagicDraw projects during tests. It is
recommended to keep external test resources apart from test case implementation class files. The MagicDraw
test framework provides methods for retrieving test resources from the one specific resource directory. The
resource directory for test cases can be configured by specifying the tests.resources system property of JVM.
The tests resource property can be passed to JVM as a runtime argument as follows:
-Dtests.resources=path_to_resources_directory
The Log4j logger using in MagicDraw test cases can be configured by specifying the test.properties file which
should be placed in <MagicDraw Installation directory>\data. The following sample presents the content of the
test.properties file. It configures the logger to print INFO category messages to a console with a specific
pattern.
log4j.appender.SO=org.apache.log4j.ConsoleAppender
log4j.appender.SO.layout=org.apache.log4j.PatternLayout
log4j.appender.SO.layout.ConversionPattern=%d [%t] %-5p %c - %m%n
log4j.rootCategory=INFO,SO
log4j.category.PLUGINS=INFO
log4j.category.GENERAL=INFO
log4j.category.MULTIUSER=INFO
More information about Log4j logger configurations can be found at http://logging.apache.org/log4j/1.2/
manual.html.
136
Copyright © 2003-2011 No Magic, Inc..