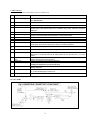
1
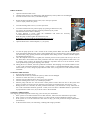
FIRST STARTUP
1.
2.
3.
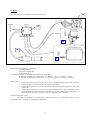
Open the inlet and outlet valves.
Check that the strainer is not damaged (2) and that the 20 µ and 5 µ filters are not damaged.
Turn the sea water inlet valve (1) towards the pump.
4.
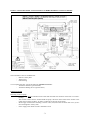
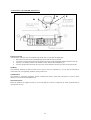
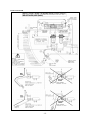
Rotate the Reject/Production outlet valve (12) to the reject position.
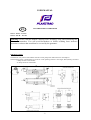
(valve in reject position See photo)
5.
Turn the cleaning outlet valve (11) to the reject hose.
6.
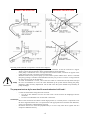
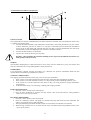
You must first drain the low pressure pump by opening its bleed valve (22),
21
(See photo), the seawater must flow out freely without any air pocket.
Check that the strainer filter is filled up.
If water draining is erratic check the installation and make the necessary adjusmentsre
recommendations (see previous page).
When the pump is filled, tighten the bleed valve (22).
22
WARNING : Do not touch the pump adjusting screw (21)
7.
Open the bleed valve of the multiplier (7). (See photo)
12
7
8.
To start the pump press the « ON » switch on the control pannel. Make sure that the seawater flows
freely through the different parts of the system and that there is a seawater flow at the reject hose level
(R). Allow the pump, primary filtration and amplifier drain during at least 5 minutes and then tighten
the amplifier bleed valve (7).
9. Once the amplifier bleed valve is tighten, the seawater pressure in the system will rise up to 40 to 50
bar. Then after a few minutes fresh water production will start. If the reject/production outlet valve (12)
is turned to reject position, all fresh water produced is rejected to the sea. You can however see the
water produced by opening the sampling valve (ECH).
10. During the first 5 minutes, the water produced is brackish. The sampling valve (ECH) enables to taste
or test it with a automatic saltmeter (optional : 53428). Water is considered drinkable under 750 ppm.
When salinity is correct, change reject/production outlet valve (V12) position to route fresh water to the
watertank.
STARTING THE SYSTEM
1. Open the inlet and outlet valves.
2. Check that the strainer (2) and the 20 µ and 5 µ filters are not damaged.
3. Turn the sea water inlet valve (1) to the pump.
4. Turn the reject/production outlet valve (12) to reject position.
5. Turn the cleaning outlet valve (11) to the Reject position.
6. Start the pump with the "on" switch on the control pannel. If water does not flow in the system and
there is not brine rejection to the sea, drain the system again as explained in the "first start up " part.
7. During the first 2 or 3 minutes, the water produced is brackish : you must throw it away. Then taste or
test it with a automatic saltmeter (optional : 53428) to be sure that it is drinkable before to position the
reject/production outlet valve (12) to divert water to the watertank.
STOPPING THE SYSTEM
The stopping procedure depends on how long you won't use your watermaker.
1. If the system is to be left unused for for less than 48 hours, follow the basic maintenance procedure.
2. If the system is to be left unused for a 2 days to 15 days period, perform a flushing operation cycle.
3. If the system is to be left unused for more than 15 days, you must perform a storage maintenance
(sterilization).
4. At the end of the season, for winterising : flushing and storage procedure.
-6-