1
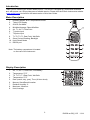
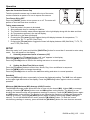
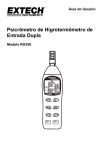
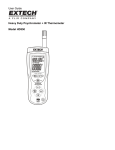
User Guide
Dual Input Hygro-Thermometer
Psychrometer
Model RH350
Introduction
Thank you for selecting the Extech Model RH350. This device is shipped fully tested and calibrated
and, with proper use, will provide years of reliable service. Please visit the Extech Instruments website
(www.extech.com) to check for the latest version of this User Guide.
Meter Description
1.
2.
3.
4.
5.
6.
7.
8.
9.
10.
11.
Humidity Sensor & Air Temperature Sensor
Triple LCD Display
On/Off; Set Mode
Min/Max/Average; Reset Min/Max
Air, T1, Air-T1, Dew Point
T1 probe input
T2 probe input
T1-T2, T2, T1-Dew Point, Wet Bulb
Store Current Reading; Backlight
Hold; Recall Mode
RS232 port
Note: The battery compartment is located
on the rear of the instrument
Display Description
1.
2.
3.
4.
5.
6.
7.
8.
9.
Air, T1, Air-T1, Dew Point, Low Battery
Temperature °C/°F
T2, T1-T2, T1-Dew Point, Wet Bulb
Temperature °C/°F
Date (month, day, year), Time (24 hour clock)
Memory Store/Recall Location
Relative Humidity %
Maximum, Minimum
Hold, Average
2
1
9
2
8
7
3
4
6
5
RH350-en-GB_V2.5 11/14
Operation
Open the Protective Sensor Cap
Twist the protective sensor cap, located at the top of the meter,
counter-clockwise a quarter of a turn to expose the sensors.
Turn Power ON or OFF
Press the [ON/OFF] button to turn power on or off. The meter will
perform a short self-test when turned on.
Taking measurements
1. Hold the probe in the area to be tested.
2. Allow adequate time for readings to stabilize.
3. The Relative Humidity measurement appears in the right display along with the date and time.
4. Air Temperature appears in the top left display.
5. Wet Bulb is in the lower left display.
6. Pressing the [T1T/DPSEL] button toggles the top left display between Air temperature, T1
temperature, Air-T1, and DP (Dew Point).
7. Pressing the [T2▲WB] button toggles the lower left display between WB (Wet Bulb), T1-T2, T2,
and T1-DP (Dew Point).
SETUP
When the meter is off, press and hold the [ON/OFFSET] button for more than 2 seconds to enter setup
mode. Prnt will appear on the display.
1. Selecting temperature units of measure (C/F)
Momentarily press the [T1T/DPSEL] button until “unit” appears in the display.
Press the [MEM] button to toggle between C or F.
Press the [T2▲WB] button to confirm the setting and return to normal operation.
2. Setting the Date/Time (24 hour clock)
Press the [T1T/DPSEL] button to select Year, Month, Day, Hour and Minute in sequence.
Press the [MEM] button to change the settings.
Press the [T2▲WB] button to confirm the date/time setting and return to normal operation.
Data Hold
Press the [RECHOLD] button momentarily to freeze the displayed reading. The 'HLD' icon will appear
on the upper right-hand side of the display. Press the [RECHOLD] button again to return to normal
operation.
Minimum (MN) Maximum (MX) Average (AVG) Function
The MIN/MAX/Average mode allows the user to view only the lowest (MN), highest (MX) or average
readings. Press the [Min/AVRST] button once and MN appears on the display. The display is now
showing the lowest humidity and temperature readings in memory. Press the [Min/AVRST] button again
and MX appears on the display. The display is now showing the maximum humidity and temperature
readings in memory. Press the [Min/AVRST] button again to display the average (AVG) readings in
memory. To exit the MIN/MAX/AVG mode, press the [Min/AVRST] button. To clear the current
min/max/avg readings in memory, press and hold the [Min/AVRST] button for more than two seconds.
3
RH350-en-GB_V2.5 11/14
Backlight Display
in
Press the [M /AVRST] and [MEM] buttons together to turn on the backlight. It will remain on for ten
seconds.
Automatic Power OFF
With the meter off, press and hold down the [ON/OFFSET] + [RECHOLD] buttons for more than 1
second to enter auto power off settings.
Press the [MEM] button to select non-sleep (n) or 2, 5, 10, 20, 40 and 60 minutes autosleep.
Press [T2▲WB] to confirm the selection.
Manual Datalogging
Manual datalogging allows the user to store and recall up to 99 readings with the press of a button.
1. Press the [MEM] button to manually store a single reading into memory. The display will flash 3
times and the memory location number will be displayed below the humidity reading.
2. To view stored readings, press and hold the [RECHOLD] button for 2 seconds and “RECALL” will
blink next to the memory location number on the display.
3. Press the [MEM] button to manually increment through the stored readings.
4. Press [RECHOLD] + [MEM] for more than 1 second to clear the memory.
5. Press [RECHOLD] for more than 1 second to return to normal operation.
in
Note: In RECALL mode, pressing the [M /AVRST] button for min/max/avg readings will auto search
the stored readings in memory and display the minimum, maximum and average values of the
stored readings.
Note: A printer port is located on the side of the meter; however it is not functional on this model.
Calibration
The following verification and calibration procedures require the 33% and 75% RH reference bottles
which are supplied with the Model RH350-CAL kit.
Accuracy Verification
Checking the 33% or 75% RH Calibration
1. Insert meter’s sensor into the 33% or 75% salt reference bottle
2. Check the reading after a minimum of 10 minutes
3. Verify that the reading is within the accuracy specification
Relative Humidity Calibration (33% and 75%)
33% Calibration
1. Turn the meter Off.
2. Insert the meter sensor into the 33% salt reference bottle.
3. Allow the meter one hour to stabilize.
4. While holding down the [Min/AVRST] button, press and hold the [ON/OFFSET] button for 2
seconds to enter calibration mode.
5. “32.8%” (reading may vary depending on operating temperature) will flash on the LCD
screen. After 30 minutes, the flashing will stop to indicate that the 33% calibration is
complete.
Note: Do NOT turn off the meter
6. Proceed to the 75% Calibration below.
4
RH350-en-GB_V2.5 11/14
75% Calibration
1. Insert the meter sensor into the 75% salt reference bottle.
2. Allow the meter one hour to stabilize
3. Press and hold the [Min/AVRST] button for 2 seconds to enter the 75% calibration.
4. “75.3%” (reading may vary depending on operating temperature) will flash on the LCD. After
30 minutes, the flashing will stop to indicate that the 75% calibration is complete.
5. Calibration is now complete. Turn power off.
Note: Frequently check the water level in the salt bottles. Both the 33% and 75% bottles
should be completely saturated with some water present. The bottles are sealed and not
refillable.
RS-232 PC Communications Interface
The meter is equipped with an RS-232 PC interface jack (3.5mm phono) for connection to a PC.
The cable to connect the meter to the PC is included in the optional 407752 data acquisition kit. The
TM
kit includes Windows compatible software that allows the user to store readings in a text file and
display real-time measurements in a series of selectable formats. For more information or specific
operating instructions, refer to the User Guide included with the 407752 kit or contact Extech.
Specifications
Function
Range and Resolution
Accuracy
0.0 to 100.0% RH
±3% RH (10 to 90%)
@ 23°C
Humidity
o
Temperature (air)
o
o
-20 to 50 C (-4.0 to 122.0 F)
o
Temperature (external K)
o
-200 to 1370 C (-328 to 2498 F)
Display
Triple LCD
Sensor Type
Humidity: Precision capacitance sensor
o
±1 C (±1.8 F)
o
o
±(0.3% rdg + 1 C (1.8 F))
Internal Temperature: Thermistor
External Temperature: K-Type Thermocouple
Response Time
60 seconds typical
Dew Point
-68 to 50 C (-90.4 to 122.0 F) (calculated from RH and Air temperature
measurements)
Wet Bulb
-21.6 to 50 C (-6.88 to 122.0 F) (calculated from RH and Air
temperature measurements)
Low Battery Indicator
Yes
Overrange Indicator
E2 (air) E5 (T1), E8 (T2)
Underrange Indicator
E3 (air), E6 (T1), E9 (T2)
Operating Conditions
-20 to 50 C (-4 to 122 F); < 99% RH non-condensing
Storage Conditions
-40 to 85 C (-40 to 185 F); <99% RH non-condensing
Power Supply
4 x 1.5V ‘AAA’ batteries
Battery Life
Approx. 300 hours
Dimensions / Weight
230 x 57 x 44mm (9 x 2.2 x 1.7”); 153g (5.3 oz.)
o
o
o
o
o
o
o
o
5
RH350-en-GB_V2.5 11/14
Maintenance
Cleaning and storage
1. The meter should be cleaned with a damp cloth and mild detergent when necessary. Do not use
solvents or abrasives.
2. Store the meter in an area with moderate temperature and humidity (refer to the operating and
storage range in the specifications chart earlier in this manual).
Battery Replacement
symbol will appear on the LCD. Replace the four (4) 1.5
When the battery power falls low, the
‘AAA’ batteries by removing the rear battery compartment cover and accessing the battery
compartment. Observe polarity when placing the batteries in the compartment. Ensure that the
compartment cover is securely fastened when finished.
Never dispose of used batteries or rechargeable batteries in household waste.
As consumers, users are legally required to take used batteries to appropriate
collection sites, the retail store where the batteries were purchased, or wherever
batteries are sold.
Disposal: Do not dispose of this instrument in household waste. The user is obligated to take end-oflife devices to a designated collection point for the disposal of electrical and electronic equipment.
Other Battery Safety Reminders
o Never dispose of batteries in a fire. Batteries may explode or leak.
o Never mix battery types. Always install new batteries of the same type.
Copyright © 2014 FLIR Systems, Inc. All rights reserved including the right of reproduction in whole or in part in any form www.extech.com 6
RH350-en-GB_V2.5 11/14