1
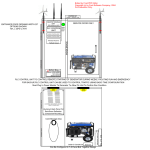
User’s Manual
400 WATT
POWER INVERTER
Limited Warranty
This product is covered by a one year limited warranty. Sunforce Products Inc warrants to the original
purchaser that this product is free from defects in materials and workmanship for the period of one year
from date of purchase. This warranty does not apply in the event of misuse or abuse of the product or
as a result of unauthorized repairs or alterations.
To obtain warranty service please contact Sunforce Products for further instruction, at 1-888-478-6435 or
email [email protected]. Proof of purchase including date, and an explanation of complaint is
required for warranty service.
For more information or technical support
1-888-478-6435
www.sunforceproducts.com
[email protected]
MADE IN CHINA
USER’S MANUAL
Thank You for Purchasing the 400W Power Inverter
For the most beneficial, efficient operation, and long term use from your new inverter,
please read carefully the information and explanation of features contained in this manual.
You are also advised to keep this manual in a safe place for ready reference.
Introducing the 400W Inverter
These inverters lead the field in power inverters and set the pace in development and
design. They have been meticulously assembled to provide reliable service, converting low
voltage, direct current (DC) to 110 volt alternating household current (AC).
The advanced surge capacity of this power inverter gives the means to start most electrical
appliances, including:
Portable Vacuum
TV/VCR combination
Blender
Food Processor
Quarts Halogen Spotlight
In addition, because of state-of-the-art microprocessor controls, the units run cooler, and
have a high working efficiency. This power inverter consumes less battery power, and
therefore runs for a longer period of time.
CAUTION: WORKING WITH BATTERIES
To reduce the risk of battery explosion, follow all instructions of the battery manufacturer
and all manufacturer instructions of additional components.
RISK OF EXPLOSIVE GAS – Working in the vicinity of a lead acid battery is dangerous. Lead
acid batteries contain hydrogen-oxygen gases that can cause explosion and sulfuric acid that
can cause severe burns. Always work in a well ventilated area.
DO NOT SMOKE, OR ALLOW A SPARK OR A FLAME IN THE VICINITY OF A BATTERY!
Remove personal metal items such as rings, necklaces, watches, and bracelets when working
with a battery. Be extra cautious to reduce risk of dropping a metal tool on to the battery.
The battery may spark or short circuit.
NEVER CHARGE A FROZEN BATTERY
If battery acid contacts skin or clothing, wash immediately with soap and water. If acid
enters the eye, IMMEDIATELY FLOOD EYE WITH RUNNING COLD WATER for at least 10
minutes. GET MEDICAL ATTENTION IMMEDIATELY.
Failure to comply with above warnings may lead to explosion, and or severe injury.
Before Using the 400W Inverter
When you turn on an appliance or a tool that runs on a motor, the appliance will go through
two stages:
1. Start up - requiring an initial surge of power (commonly known as the "starting load" or
"peak load".
2. Continuous operation - power consumption drops (commonly known as the "continuous
load".
Before using your power inverter, you should calculate these loads, i.e.:
1. Starting load (at start up)
2. Continuous load (on continuous operation)
The formula for power consumption (measured in either WATTS (wattage) or AMPS
(amperes)) is:
AMPS x 110 (AC voltage)=WATTS
The wattage (W) or amperage (A) can normally be found stamped or printed on most
appliances and equipment, or in the User Manual. Otherwise, contact the manufacturer to
find out whether the device you are using is compatible with a modified sine wave
inverter.
To calculate most starting loads:
Starting Load = 2 x WATTAGE In general, the start up load of the appliance or power tool
determines whether your inverter has the capability to power it.
To calculate the continuous load (same as wattage in the above formula):
Continuous load = AMPS x 110 (AC voltage)
Attention:
Always run a test to establish whether the 400 Watt inverter will operate a particular piece
of equipment or appliance.
In the event of a power overload, the inverter is designed to automatically shut down. This
safety feature prevents damaging the unit while testing appliances and
equipment within the watt range.
Important:
* Make sure you connect your 400W inverter to a 12 volt power supply only.
Do not attempt to connect the inverter to any other power source, including any AC power
source.
* 110 volts of current can be very dangerous. Incorrect operation of your inverter may result
in damage to belongings, personal injury or loss of life.
A. ON/OFF Rocker Switch
B. LED Indicator Light. (Green = Power On, Red = Overload )
C. Two Standard North American 110v AC Outlets
D. High-Speed Cooling Fan
E. 40 Amp Fuse Compartment
F. Power Input Terminals
BLACK = NEGATIVE
RED = POSITIVE
How to Connect the Inverter
The inverter should be connected to the power source using 4 gauge wires
(up to 4 ft.)
1. Make sure the ON/OFF rocker switch (see diagram, part A) is in the OFF (0) position.
2. Connect the BLACK cable to the BLACK (negative) power input terminal (see diagram,
part F) of your power inverter, and tighten the screw to make a secure connection. (Do not
over tighten the screw.)
3. Connect the BLACK (negative) cable from your power inverter to the NEGATIVE (-)
terminal on the 12 volt power source. Double check that both ends of the cable are
connected to NEGATIVE terminals and are tight.
4. Connect the RED cable to the RED (positive) power input terminal (see diagram, part F)
of your power inverter, and tighten the screw to make a secure connection. (Do not over
tighten the screw.)
5. Connect the RED (positive) cable from your power inverter to the POSITIVE (+) terminal
on the 12 volt power source. Ensure that both ends of the cable are connected to POSITIVE
terminals and are tight.
6. Switch the inverter rocker switch to the ON (I) position. The LED Indicator Light (see
diagram, part B) should glow GREEN verifying the inverter is receiving power.
7. Make sure that the appliance to be operated is turned OFF. Plug the appliance into one
of the two AC outlets (see diagram, parts C.)
8. Turn the inverter rocker switch (see diagram, part A) to the ON (I) position.
9. Turn the appliance on.
Attention:
Loose connections can cause a large voltage drop to occur which may result in damage to
the wires and insulation. If you do not make a secure connection between the inverter and
the power source, a reverse polarity will occur. The green LED Indicator briefly flashes when
you first turn the inverter ON is a sign that there is a short circuit within the power supply.
Damage caused by reverse polarity is not covered under the warranty.
When connecting the RED (positive, (+)) terminal to the 12 volt power source's POSITIVE (+)
terminal, a spark may occur as a result of current flowing to charge capacitors within the
inverter. This is a normal occurrence. Because of the possibility of this sparking, it is critical
that both the inverter and the 12 volt battery be placed well away from any possible source
of flammable fumes and/or gases.
Failure to heed this warning could result in fire or explosion
Using the Inverter to Operate a TV or Audio Appliance
This inverter is shielded and filtered to minimize signal interference. Despite this, some
interference may occur with your television picture, especially with weak signals. Below are
some suggestions to try and improve reception.
1. Make sure the television antenna produces a clear signal under normal operating
conditions (i.e., at home plugged into a standard 110 AC wall outlet). Also, ensure that the
antenna cable is adequately shielded and of good quality.
2. Try altering the positions of the inverter, antenna cables, and television power cord.
3. Add an extension cord from the inverter to the TV so as to isolate it, its power cord and
antenna cables from the 12 volt power source.
4. Try coiling the television power cord and the input cables running from the 12 volt power
source to the inverter.
5. Affix one or several "Ferrite Data Line Filters" to the television power cord. Ferrite Data
Line Filters can be purchased at most electronic supply stores.
6. Try grounding the inverter with an 18 AWG (minimum), using as short a length as
possible.
You may hear a "buzzing" sound being emitted from inexpensive sound systems when
operated with the inverter. This is due to ineffective filters in the sound system.
Unfortunately, this problem can only be resolved by purchasing a sound system with a
higher quality power supply.
If the Fuse Blows
Your power inverter is fitted with a 40 amp spade type fuse (see diagram, part E), which
should not have to be replaced under normal operating circumstances. A blown fuse is
usually caused by reverse polarity or a short circuit within the appliance or equipment being
operated.
If the fuse does blow:
1. Disconnect the appliance or equipment immediately.
2. Find the source of the problem, and repair it.
3. Install the new fuse.
The fuse compartment can be found at the back of the unit (see diagram, part E.)
Attention:
Do not install a fuse higher than 40 amps, as this may damage the inverter.
Make sure to correct the cause of the blown fuse before using the 400 Watt again.
Power Source
Your average automobile battery will provide an ample power supply to the inverter for 30
to 60 minutes even when the engine is off. The actual length of time the inverter will
function for depends on:
The age and condition of the battery.
The power demand from the equipment being operated with the inverter. If you decide to
use the inverter while the engine is off, we recommend:
1. Turn OFF the device plugged into the inverter before starting the engine.
2. Start the engine every hour and let it run for approximately 10 minutes to recharge the
battery.
Attention:
Although it is not necessary to disconnect the inverter when turning over the engine, it may
briefly cease to operate as the battery voltage decreases. When the inverter is not
supplying power, it draws a very low amperage from the battery. The inverter may be left
connected to the battery for up to three hours.
It is recommended that the inverter always be disconnected when not in use.
Safety Features
The GREEN LED Indicator light will turn OFF; the RED LED Indicator light will turn ON and
the inverter will automatically turn itself off when:
1. The power input from the battery drops to 10 volts. (When the power input drops to 10.5
volts, an alarm will sound for an extended period).
2. The power input from the battery exceeds 15 volts.
3. The continuous load demand from the equipment or appliance being operated exceeds
400 watts.
4. The circuit temperature exceeds 165°F (74°C)
Attention:
* The 400 Watt inverter is fitted with a cooling fan (see diagram, part D).
* If the cooling fan is unable to maintain a cool enough temperature for safe operation, the
inverter will automatically shut down.
* If the inverter automatically shuts down or a continuous audible alarm is heard:
i. Turn the inverter rocker switch to the OFF (O).
ii. Determine the source of the problem, and resolve it before continuing to use the
inverter.
Important Safety Measures
* For the most effective use, place the power inverter on a flat surface.
* Keep the inverter dry.
* Do not allow it to come into contact with rain or moisture.
* DO NOT operate the inverter if you, the inverter, the device being operated or any other
surfaces that may come in contact with any power source are wet. Water and many other
liquids can conduct electricity, which may lead to serious injury or death.
* Do not place the inverter on or near heating vents, radiators or other sources of heat.
* Do not place the inverter in direct sunlight. The ideal air temperature for operation is
between 50°F (10°C) and 80°F (27°C).
* Keep the inverter well ventilated in order to properly disperse heat generated while it is
in use.
* While in use, make sure there are several inches of clearance around the top and sides of
the inverter.
* Do not use the inverter near flammable materials.
* Do not place the inverter in areas such as battery compartments where fumes or gases
may accumulate.
How Do Power Inverters Work?
There are two stages involved in transforming 12 volt DC (or battery) power into 110 volt
AC power (household current):
STAGE 1:
The power inverter uses a DC to DC transformer to increase the 12 volt DC input voltage
from the power source to 145 volts DC. using advanced MOSFET transistors in a full bridge
configuration.
STAGE 2:
The inverter then converts the 145 volts DC into 110 volts AC (household current), using
advanced MOSFET transistors in a full bridge configuration. A "modified sine wave" waveform is generated by this conversion.
400 Watt Modified Sine Wave Inverter
The modified sine wave inverters has a root mean square (RMS) voltage of 110 volts, but
most AC voltmeters are calibrated to measure pure sine waves for their RMS voltage. This
will result in these meters giving a measurement 20 to 30 volts too low when measuring the
inverter output. In order to measure the inverter output voltage more accurately, use a true
RMS reading voltmeter.
For Your Safety: Precautions to keep in mind before and while using your
Power Inverter:
* Only connect the power inverter to a 12 volt battery.
* Only connect the power inverter to a 12 volt battery with appropriate cables or with #4
gauge wire.
* Do not modify the power cables in any way.
* Make sure the power cables only connect the inverter's NEGATIVE (-) terminal to the 12
volt power source's NEGATIVE (-) terminal, and the inverter's POSITIVE (+) terminal connects
to the 12 volt power source's POSITIVE (+) terminal. Do not reverse polarity. Check these
connections frequently to make sure they
remain tight.
* Make sure the inverter is not close to any potential source of flammable fumes or gases
before connecting the inverter to the power source.
* Make sure the power consumption of the appliance or equipment you want to operate is
compatible with the capacity of the inverter, i.e. does not exceed 400 watts.
* If you are using the power inverter to operate battery charges, keep a check on the
temperature of the battery charger for about 10 minutes. If the battery charger becomes
abnormally warm, disconnect it from the inverter immediately.
* Use only 40 amp spade type fuses.
* If you are powering the inverter with an automobile or marine battery, start the engine
every 30 to 60 minutes and let it run for about 10 minutes to recharge the battery.
* If you hear a continuous alarm or automatic shut down:
i. Turn the inverter OFF immediately.
ii. Do not restart the inverter until the source of the problem has been identified
and corrected.
* Disconnect the inverter when not in use, in order to avoid battery drain.
* Do not allow the power inverter to come into contact with rain or moisture.
* Do not place the inverter near heat or in direct sunlight.
* While in use, make sure the inverter is adequately ventilated.
* Do not operate the inverter near flammable materials, fumes or gases.
Trouble Shooting
Problem
Low or No Output Voltage
Red LED Indicator On
Possible Reasons
Battery voltage may be low.
Recharge or replace battery. May be
necessary to use two batteries to run
some items.
Poor contacts are causing
voltage drop.
Unplug and reattach connections, may be
necessary to use shorter or heavier cables.
Check condition of 12 volt plug and socket,
clean or replace as necessary.
Using incorrect type of voltmeter to test output voltage.
Use a true RMS reading meter.
Battery voltage below 10 V
Low Battery Alarm on ALL
the time
Appliance not functioning
Recharge or replace Battery
AC appliance consumption
is higher than specified
Use a higher capacity inverter or
lower capacity appliance.
Inverter is too hot causing
thermal overload.
Shut off inverter to allow to cool.
Ensure proper ventilation.
Inverter may be defective
TV Interference
Advice
Contact tech hotline.
Electrical interference from
the inverter
Use a filter in the TV power cord
Adjust placement of the television.
TV signal is too weak
Try another TV, different makes and models
may not experience the same interference
Low Battery Alarm on ALL
the time Input voltage
below 10 volts
Recharge or replace battery. May be
necessary to use two batteries to run
some items.
Poor contacts are causing
voltage drop.
Unplug and reattach connections, may
be necessary to use shorter or heavier
cables. Check condition of 12 volt
plug and socket, clean or replace as
necessary.
Appliance won't turn on
Turn inverter ON, OFF, then ON again
Contact manufacturer of appliance to
check start up power consumption and
if product is compatible with a modified sine wave inverter.
SPECIFICATIONS :
Max. Power:
Surge Capability (Peak Power):
Wave Form:
Input Voltage Range:
AC Outlets:
Fuse:
Dimensions:
Weight:approx.
400 Watt
800 Watt
Modified Sine Wave
11 - 15 0.5 VDC
Dual 110V/120V AC 2 prong grounded
40 Amp (spade type)
7.5” x 4.125” x 3.75” (19cm x 10.5cm x 9.5cm)
2.1 lbs. (1 kg)