1
sensor.
The pressure sensor starts and stops the unit automatically. The manometer monitors the pressure
of the material.
The electrical system of the unit consists of an electric box with control buttons and a frequency
inverter. A frequency inverter makes it possible to easily adjust the output of the unit.
The function of a bag wringer is to press the ready plaster bags empty.
6. HIGH PRESSURE SYSTEM DEVICE START-UP
6.1. Place the device on a horizontal surface in the area where the work is taking place so that there
is access to the controls on the device and so that it is as convenient as possible to fill the device
with material. When installing the power cable, make sure it isn’t in the way of other employees on
the site.
6.2. Visual inspection of the device
• make sure the hoses are securely fastened;
• make sure there are no unnecessary parts in the material container;
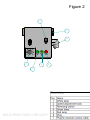
• the reversing switch (figure 2, pos. 3) on the cover of the electric box must be in position 0;
•
turn the speed adjustment knob (figure 2, pos. 2) on the cover of the electricbox to position 50.
6.3. Install the necessary tip on the spray gun. The recommended tips are 645-647-651. Follow the
advice of the manufacturer of the material.
6.4. Fill the container with the material. To empty the bag of putty, turn the bag wringer roller to
the rear position, place the bag on the bag wringer with the bottom toward the roller. Turning the
roller shaft, squeeze the bag end between the roller and the chassis of the wringer. Holding on with
one hand to the bag handle, cut the bag open right underneath the handle. Turning the roller shaft,
squeeze the bag until empty. Turn the roller shaft back into the rear position and remove the empty
bag. Depending on the bag volume, 3-4 bags of material will fit in the container. During the
operation, keep constantly track of the amount of material in the container, and add material if
needed.
6.5. Connect the power cable to the mains power with 16 A line protection.
6.6. Before starting up the device for the first time, as well as after changing the tips, the spray
pressure and switch-off pressure have to be adjusted. It is easier to make the adjustments with two
people. One worker sprays and the other makes the needed adjustments.
6.7. When turning on the device, turn the reversing switch (figure 2, pos. 3) to position 1 and press
the spray gun’s trigger .
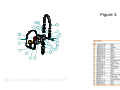
6.8. The device will start and the pressure will start rising. When the manometer (figure 3, position
11) shows pressure under 75-80 bar, increase the material’s pressure by increasing the device
rotation speed, turn the speed adjustment knob (figure 2, position 2) slowly clockwise. After
turning the knob, there will be a lag time before the pressure rises. If you have increased the
pressure beyond 80 bar, immediately lower the pressure by turning the knob anti-clockwise. It is
prohibited to operate it at a higher spray pressure than 80 bar, as this will result in very rapid wear
on the screw pump. Keep an eye constantly on the spray pressure (the manometer figure 3, pos. 11)
and if needed, perform an adjustment.
6.9. When you have achieved the right spray pressure, release the spray gun trigger. The device