1
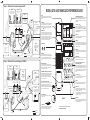
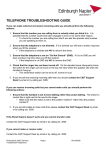
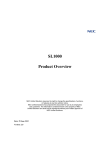
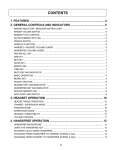
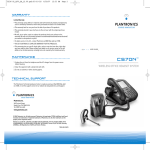
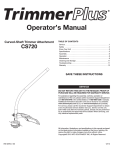
INTERQUARTZ IQ750 and IQ750EHS QUICK START-UP GUIDE
The IQ750 and IQ750EHS offer superior performance and durability and
are covered by a 2 year warranty.
Model IQ750 offers many features including headset support, handsfree
speakerphone, caller ID display, headset support, phone book and
memories.
Model IQ750EHS offers the above PLUS integrated operation with
Plantronics wireless headsets with full EHS (Electronic Hook Switch)
capability. This means that calls can be answered and terminated
directly from the headset.
To view/download a complete list of features and a more detailed user
manual, please visit www.interquartz.com.au
INSTALLATION
Install the IQ750 or IQ750EHS on a desk, table or shelf away from
excessive heat, damp, dust, direct sunlight, vibration, and sources of
electrical or electromagnetic or radio frequencies. If the unit is to be
wall-mounted, use the IQ235 WALL MOUNTING BRACKET or Wall
Mount Kit No. 3 (please order separately).
UNPACKING
The carton contains the following:
Telephone body and handpiece
Coiled Handset cord, line cord and Interquartz EHS Cable (for
IQ750EHS only)
9VDC Adaptor
This Quick Start-Up Guide
Headset Stand (optional)
Headset Riser (optional)
11.The display will show "CLOCK STORED" and the date and time will
be updated.
Note:&use Cursor
or
to correct your numeric entries at any stage in
the above procedures.
HEADSET CONNECTION
CORDED HEADSET
Connect the headset's cable to the socket at the rear marked "Headset".
Please see the following sections entitled "HEADSET POLARITY
SWITCH" and "HEADSET MIC ADJUST CONTROL" to learn about the
settings needed for your headset.
HOLDING AND TRANSFERRING CALLS - This is dependent on
WIRELESS HEADSET (IQ750) with HANDSET LIFTER Connect the
MESSAGE WAITING LIGHT COMPATIBILITY
headset as shown in Fig 1. The connections shown illustrate the
*Plantronics CS60 and the use of an optional handset lifter (a
Plantronics accessory) and are to be used as a guide. Connections
using other headsets and lifters are similar.
If you have a PABX system, an optional circuit may be fitted to suit - the
red lens in the top right hand corner will light. If you have a Centrex
system (eg. Spectrum, Customnet) or a compatible residential line
service such as Telstra Messagebank, the Caller key indicator and the
"Mail" (envelope) icon will flash and "MESSAGE WAITING" will be
displayed. To retrieve your message, consult your voice mail system
user guide.
WIRELESS HEADSET using EHS mode (IQ750EHS) Connect the
headset as shown in Fig 2. The connections shown illustrate the
*Plantronics CS60 and the use of the Interquartz EHS cable (supplied
with the IQ750EHS) and are to be used as a guide. Connections using
other headsets are similar. More details of settings for other headset
models can be obtained from Interquartz.
Fit the line cord and coiled cord and insert the power adaptor plug to
the power socket, and set the Ringer Volume and the Ringer Pitch
controls found on the underside. Lift the handset to check for dial tone
and to wake up the display. See following sections to complete the
setup.
On Line Indicator
The IQ750EHS is fitted with a jack to support the operation of an On
Line Indicator (not manufactured by Interquartz). Connect the OLI into
the OLI Jack on the telephone as shown in Fig 1 & 2.
HEADSET POLARITY SWITCH - (Fig. 5) - Set this switch in either
position to suit your Headset. Try each position to find the setting that
suits your Headset.
Reversed headset
polarity
Normal headset
polarity
LINE CONNECTION
This telephone is supplied with a modular plug compatible with RJ45
and RJ11/12 modular sockets, with the centre pair being reserved for
speech and signalling. Other types of plugs and cords are available on
request.
HEADSET MIC ADJUST CONTROL - (Fig. 5) - Set to adjust your
It is recommended to set up the Date and Time during installation to
ensure correct functioning of the Date display, as follows:
FIRST TIME INSTALLATION OF DATE AND TIME
The display will automatically show step by step prompts to guide you
through the Date and Time setup procedure. The following procedure
assumes that all steps in the "General Setting Up" have been carried
out.
1. If the display is blank, lift the Handset briefly to wake up the
telephone and replace the Handset in the cradle
2. For 10 seconds the display will show "20100101" and "DATEYYYYMMDD" when the unit is first powered up
3. If the display is alive but not showing "20100101" and "DATEYYYYMMDD", press STORE, TIMER; the display will return to the
"20100101" and "DATE-YYYYMMDD" mode for a further 10
seconds
4. Enter Year (4 digits), Month (2 digits) and Date (2 digits)
5. Hour Mode Setting - the display will now show "1-12HR 2-24HR"
6. Press 1 for 12 hour mode or 2 for 24 hour mode display (if 24 hour
mode was chosen, please go to step 9)
7. If 12-hour mode was selected above, the display will show "1-AM 2PM"
8. Press 1 or 2 to select AM or PM time display
9. The display will show "TIME-HHMM" after completion of the Hour
Mode Setting
10 To set the current time enter 2 digits for the hour, followed by two
digits for the minutes
HEADSET OPERATION
USING A CORDED HEADSET
between one mode to any other as follows:
1. To swap to the Handset from the Headset during a call, lift Handset
2. To swap from the Handset to the Headset during a call, press
HANDSFREE/HEADSET.
TRAINEE/SUPERVISOR MODE - Allows for the Handset and a
Headset to be used in tandem. This will enable a supervisor to monitor
a trainee's progress during a call, or "take over" a call. The following
procedures assume that the trainee is using the Headset and a call is in
progress.
1. During a trainee's call the supervisor may lift the Handset (Handsfree
/ Headset indicator will turn off)
2. Quickly press HANDSFREE/HEADSET and the indicator will
illuminate
3. The trainee may continue the conversation with the supervisor only
listening to the call.
USING A WIRELESS HEADSET (IQ750EHS)
Fig. 5 HEADSET MIC ADJUST CONTROL
TIMER
Fig. 4 DATE AND TIME SET UP DISPLAY
your system type, so please check your system's Extension User Guide
to find out how to use the RECALL Key. It is sometimes known as the
Flash or Facility Key.
HEADSET/HANDSET/HANDSFREE MODES - A call can be switched
*Plantronics is a trademark or registered trademark of Plantronics, Inc.
GENERAL SETTING UP
display and Memory operations. The telephone will also operate in a
basic mode when mains power has failed (will automatically power up
approximately 1 second after lifting handset). If 4 x AA Alkaline
batteries (not supplied) are fitted in the absence of mains adaptor or
during mains power failure, they can provide up to one month's support
of all functions.
Please see the Quick Start-up Guide overleaf for information
regarding general operation and controls. Should you require
assistance or have any queries, please send an email to
[email protected]
Headset's outgoing microphone level (adjust with a small screwdriver).
To make a Headset mic level adjustment, make a call and speak via the
Headset. Then, during the call, lift the Handset and use the other
party's help to decide if your voice level is the same loudness. If not,
press HANDSFREE/HEADSET to reactivate the Headset microphone and
use the control to adjust the Headset's mic level. Clockwise rotation
increases the Headset mic output level. Note: the recommended
settings in Fig 1 & 2.
TIMER KEY
To use the timer function as a stop watch when the telephone is idle
(not in use on a call)
1. Press TIMER once to view the last timer value
2. Press TIMER again to start the timer; the timer will count up from
00:00 to 59:59 and then roll over to 00:00 again
3. Press TIMER once more to stop the timer; the display will show the
timer value for 10 seconds
4. Press TIMER again to resume the clock display in less than 10
seconds if required.
To use the timer as a call timer, telephone will automatically enter the
Timer mode when commencing a call. After hanging up, the timer will
stop and its value will stay on the display for 10 seconds.
BRIGHTNESS ADUSTMENT
Press Cursor
Press Cursor
to darken the display
to brighten the display
BASIC OPERATION
IQ750 or IQ750EHS can be used in the same way as a normal
telephone; simply lift the Handset to answer an incoming call, or lift the
Handset and dial on the Keypad to commence an outgoing call. Please
refer to other sections for more about Handsfree, Headset, Caller ID
To answer or start a call, press the Headset's Call Control key (this is
typically the button on the headset's earpiece: see Headset User
Guide). During the call, various functions of the IQ750EHS will be
disabled or modified to protect the wireless headset user's privacy while
maintaining their control of the call, as follows:
1. The MUTE Key will not respond (use the Headset's mute function
instead)
2. The Handset, if lifted off the cradle, will not interrupt the headset and
cannot disconnect the call if replaced in the cradle. There will be no
audio to or from the handset.
3. The red indicator on the HANDSFREE/HEADSET Key, when ON, will
signify that the telephone is in use. However, pressing this key will
not disconnect the call.
The telephone will resume its normal functions as described elsewhere
in this manual when the call on the wireless headset is terminated or if
the telephone is connected to a corded headset.
On Line Indicator
The OLI will be illuminated whenever there is a call on the telephone.
Silent Ringing
Designed for call centers or any application where call-related noise is
to be kept to a minimum, this feature allows incoming calls to ring
silently; the operator is aware of the incoming call, but the telephone
does not add to the room noise even when ringing.
To use the telephone in Silent Ringing mode:
1. Set the Ringer Volume Switch to the OFF position (signified by the
square symbol without a bell symbol inside it)
2. Put your Headset on and wait for the next incoming call
3. When a call arrives, the Ringer/Message Waiting Indicator will flash
and the operator will hear the ringing tone at a low level in the
Headset
4. Press HANDSFREE/HEADSET to answer the call.
ALERT LIGHT SUPPORT - The IQ750 or IQ750EHS is designed to
MEMORY OPERATION
LAST NUMBER REDIAL MEMORY
support the "Alert Light" available on some Headsets. When pressing
HANDSFREE/HEADSET on the telephone, the "Alert Light" indicator on
the Headset will be illuminated, signifying that the user is on a call. This
feature can be used effectively in call centre applications so that the
user's colleagues will be aware that the user has a call in progress.
Model IQ750 or IQ750EHS has 20 Direct Access Memories, 100 Directory
Memories, 80 Caller List and 5 Last Number Redial Memories. All
memories have a maximum 32 digits capacity and 16 characters name
capacity.
The Caller List, Direct Access and Directory Memories are non-volatile (no
batteries needed). Memory Storage can be done in either off-line (with
adaptor or battery powered) or on-line. To enter any number, press
desired digits. To enter letters for name entries, use the letters marked on
the keys. For example, press key 7 (P, Q, R, S) once to enter P, twice to
enter Q and so on. Press Cursor
to make a space. To store, lift
Handset or press HANDSFREE/HEADSET before commencing the
procedures described for storing numbers and names into the Direct
Access Memory and Directory Memory. You can store some of your
favorite network facility codes (e.g. Diversion, Call Forward, Call Back
etc). Consult your system User Guide for the codes that you need to store.
There are 5 Last Number Redial Memories with a maximum of 32
digits each.
Using the Last Number Redial Memory
1. To dial the most recently dialled number, press REDIAL. If you
require an earlier number go to step 2, otherwise proceed to step 3
2. Press SCROLL up or down to select a number from the 5 redial
memories. The most recently dialled number will be identified as
"REDIAL 1" on the display
3. Press DIAL to dial the selected number.
See REDIAL KEY for Direct Redial Function
CALLER ID DISPLAY
When an incoming call is received, information including the Caller's
name, number, date & time will be transmitted to your Caller Display
Telephone between the first and second rings. The Caller's name will
be displayed if delivered with the Caller's number or if the number
matches to numbers stored in the Direct Access or Directory Memories.
The IQ750 and IQ750EHS are also Call Waiting compatible.
Caller ID during an incoming call:
1. The Ringer sounds and the Ringer Indicator will flash
2. After about 1 second, the Caller's information is displayed on the
display
3. If the call is not answered, the Caller's information will be kept on the
display for a further 10 seconds after the last ring; the Caller key
indicator will also flash.
The Caller List can store up to 80 caller records. When it has reached
its full capacity, the oldest record will be replaced by the new call.
To view the Caller List and dial a Number from the Caller List
1. Press CALLER to display the most recent incoming call; if there is no
entry in the Caller List, the display will show "NO ENTRIES"
2. Press SCROLL up to move on to the previous call; subsequent
presses will display successively earlier calls
3. To dial a number displayed; press DIAL
4. If the end of the Caller List is reached, the display will show "END OF
LIST"; you may continue to scroll up or down to review the list again
5. If you choose not to dial any number from the Caller List, the display
will revert to clock mode in 10 seconds.
To store a Call into a Direct Access Memory
1. Press CALLER, the most recent incoming Caller's name and number
will be displayed
2. Press SCROLL up or down to select the number you want to save
into the Direct Access Memory
3. Press STORE; the display will show "STORE"
4. Press a Memory Key (One-Touch or Two-Touch Memory Key); and
the display will show "ENTER NUMBER" below the telephone number
5. Press STORE to confirm. You can use Cursor or to change the
number before saving
6. The display will show the Caller's name; press STORE to confirm.
You can use the Cursor or to edit the name before saving
7. The LCD will show "MEMORY STORED"
To store a Call into the Directory Memory
1. Press CALLER, the most recent incoming Caller's name and number
will be displayed
2. Press SCROLL up or down to select the number you want to save
into the Directory Memory
3. Press STORE; the display will show "STORE"
4. Press DIRECTORY; and the display will show "ENTER NUMBER"
below the telephone number
5. Press STORE to confirm. You can use the Cursor keys to change the
number before saving
6. The display will show the Caller's name; press STORE to confirm.
You can use the Cursor keys to edit the name before saving
7. The display will show "DIRECTORY STORED"
To delete a Call from the Caller List or to delete the entire Caller List
1. Press CALLER and press SCROLL up or down to find the entry you
wish to delete
2. To erase the displayed call, press CLEAR twice in rapid succession;
the display will show "ERASED"
3. To erase the entire Caller list, press CLEAR twice in rapid
succession and hold the key down on the second depression; the
display will show "HOLD TO CLR CALL"
4. To prevent entire directory erasure release the CLEAR key at this
time before 6 seconds has elapsed; otherwise keep holding the key
down and go to the next step
5. 6 seconds from step 3 the directory will be deleted and the display
will show "CALL MEM CLEAR".
Note: See MEMORY OPERATION section for more details of storing
and dialing operations using Direct Access and Direct Memories.
CALLER LIST
The Caller List can store up to 80 callers' details. When viewing the
calls, the "CALL #" "NEW" "REPEATED" "ANSW ERED"
"UNANSWERED", prompts as well as Date and Time details provide
information about the incoming call displayed in the list.
DIRECT ACCESS MEMORY
There are 20 Direct Access Memories accessible via 10 keys. Each
memory can store up to 32 digits plus Pause, , , and Recall. To delete
any incorrect digits while storing, use the Cursor or to move to the
unwanted character and press CLEAR.
To store a Number and Name
1. Press STORE; the display will show "STORE"
2. Press the Memory Key either once to store in a One-Touch memory or
twice for a Two-Touch memory; the display will show "ENTER
NUMBER"
3. Enter the telephone number and press STORE
4. Enter the name by using the Keypad and press STORE to confirm; the
display will show "MEMORY STORED"
To dial from a Direct Access Memory
Press the desired Memory Key either once to dial from its One-Touch
memory or twice to dial from its Two-Touch memory location.
Memory Lock
The upper row of memory keys can be pre-programmed and locked to
prevent them being overwritten. If your upper-row memory keys (the row
nearest the display, see Fig. 3 overleaf) are locked and prevent storage of
new numbers, please contact your system administrator, Interquartz or
your dealer to find out if they can be unlocked.
DIRECTORY MEMORY
The Directory Memory can store up to 100 names & numbers. When the
memory is full; the display will show "DIRECTORY FULL" If attempting to
store a telephone number and name that matches a previous entry, the
display will show "DIRECTORY EXIST"
THUNDERSTORMS
The telephone, in common with household electrical appliances, can
be a source of electric and acoustic shock during thunderstorms. The
possibility of a telephone user experiencing a shock is minimal.
Nevertheless, customers should be aware of some simple precautions
to follow during thunderstorms:
Use your telephone only for calls of the utmost urgency. Keep these
calls brief. Whilst using your telephone keep clear of electrical
appliances and metal fixtures such as: stoves, air conditioners,
refrigerators, window frames and sinks.
WARRANTY - 10 YEARS
Interquartz (A'Asia) Pty Ltd warrants the original purchaser against
failure, under normal usage and in the environment and network for
which it was designed, resulting from defective material and
workmanship at time of manufacture for a period of TEN YEARS from
the date of purchase. For a more complete Warranty statement please
consult the full User Manual.
SERVICE
Please call 1800 6 IQTEL (1800 647 835) from anywhere in Australia
to arrange service or repair of your telephone.
To Store a Number and Name into Directory Memory
1. Press STORE; the display will show "STORE"
2. Press DIRECTORY; the display will show "ENTER NUMBER"
3. Enter the telephone number, then press STORE; the display will show
"ENTER NAME"
4. Enter the name by using the Keypad
5. Press STORE; the display will show "DIRECTORY STORED"
To dial from the Directory Memory using Name Search
1. Press DIRECTORY, the first entry in the directory will be displayed
2. On the keypad, press the key bearing the first letter of the name that
you wish to dial
3. Press SCROLL up or down to find the name and number, then press
DIAL to dial it out.
To edit an entry in the Directory Memory
1. Press DIRECTORY; the first entry in the directory will be displayed
2. Press SCROLL up or down to select the entry you want to edit
3. Press STORE; the first digit of the telephone number will begin to flash
4. Use Cursor or to navigate to the digit(s) to be changed and make
the necessary changes
5. Press STORE to confirm
6. The first letter of the name will flash; use Cursor or to navigate to
the letters to be changed and make the necessary changes
7. Press STORE to confirm; the display will show "DIRECTORY STORED"
To delete an entry from Directory Memory
1. Press DIRECTORY; the first entry in the directory will be displayed
2. Press SCROLL up or down to select the entry you want to delete
3. Press CLEAR twice briefly; the display will show "ERASED".
Caution: If CLEAR is pressed continuously for 6 seconds, the entire
directory list may be deleted.
3C9875001S03
Figure 1 - CS60 and Lifter Connection Diagram for IQ750
Step 5
Step 6
Speaking Volume Minor Adjust
Press the lower button 7 times and then
the upper button 4 times
Set Listening Volume Major Adjust
Control to "3"
MODEL IQ750 & IQ750EHS QUICK REFERENCE GUIDE
Step 3
-
VOLUME
Display
+
Set Volume Slider to
Recommended Setting Position
as shown
1
2
3
4
Step 1
Set Headset Polarity Switch to "P"
Plantronics
Base Power Supply
CS60
Interquartz
IQ750 9V Adaptor
Telephone
Network
Outlet
Reversed headset
polarity
Mains
Normal headset
IQ750
Power
Outlet
polarity
Interquartz
Line Cord
Step 2
Step 4
OLI
Plantronics
Lifter Power Cord
Ringer/Message Waiting Indicator
Displays date, clock, timer, number dialed or received and message
waiting indication available from some services (See overleaf for more
details).
1
2
3
4
Set Headset Mic Adjust Control
fully clockwise to Recommended
Setting Position as shown
Flashes when the telephone rings with an incoming call. Built in
Message Waiting suits both High Voltage (80 VDC), and
Ericsson BP250 Message Waiting (other system types are
optional extras).
STORE Key
Press STORE to store a number and name in either the Direct
Access Memory or Directory Memory. Any memory can store
32 digits for number and 16 characters for name. Storable
digits: 0-9, , , Pause, Recall and Handsfree commands.
Cursor Keys (
750EHS
MEMORY Keys
A total of 20 names and numbers can be stored via 10 Direct
Access One-Touch and Two-Touch Memory Keys. Network
facility codes may be programmed for ease of use. Upper row of
5 memory keys can be protected to prevent over-writing. To
store, lift Handset, press STORE, press Memory Key, enter
number, press STORE to confirm number, enter the name to
store in the memory. See overleaf for more details.
STORE
Press twice to delete the record during record viewing in the
Directory, Caller or Redial Memories.
CLEAR
TIMER Key
When a call is in progress, the word TIMER appears on the
display, and the time will count from 00:00. The call duration will
be displayed for 10 seconds after the call is terminated. See
overleaf for more functions.
EHS
RESET Key
Press to reset the telephone to normal if the telephone appears
to be malfunctioning. The memories will not be affected when
this key is pressed.
Plantronics
Telephone Cord
Interquartz Cable
Interquartz
Handset Cord
PAUSE Key
Reset-
HEADSET
MIC ADJUST
Set Speaking Volume Major Adjust
to "B"
NP P
Pause may be required if your phone is connected to any
network where a momentary pause is needed during dialing. Lift
Handset, dial any digits required before the pause, press
PAUSE, and dial remaining digits. Pause is also storable in a
memory.
Plantronics Cable
Figure 2 - CS60 and OLI Connection Diagram for IQ750EHS
DIRECTORY
Step 6
Speaking Volume Minor Adjust Press the
lower button 7 times and then the upper
button 4 times
Set Listening Volume Major Adjust
Control to "3"
CALLER
Press to cut off transmission from the Handset, Headset and
Handsfree microphones to allow user privacy. The red light
indicates when the mute condition is activated. Press MUTE
again to release the mute condition.
Step 3
-
VOLUME
Step 1
+
1
2
3
4
Set Headset Polarity Switch to "P"
Set Volume Slider to
Recommended Setting Position
as shown
1
2
3
4
Reversed headset
polarity
CS60, CS70N and
VOYAGER 510S
Interquartz
IQ750 9V Adaptor
HANDSFREE / HEADSET Key and Indicator Press
HANDSFREE/HEADSET to activate the Handsfree mode or
Headset mode. Headset mode will override Handsfree mode if a
Headset has been connected to the Headset port. A red
indicator will glow in either mode when the IQ750 is online.
Press the key again to turn it off.
DIAL
Scroll Key (
Mains
Power
Outlet
Step 2
IQ750EHS
HANDSFREE/
HEADSET
MUTE
PAUSE
REDIAL
HEADSET
MIC ADJUST
Step 4
Ringer Pitch Control
Rotate the control to adjust the Ringer Pitch. Located on
the telephone's base.
Set Speaking Volume Major Adjust
to "B"
Interquartz EHS Cable
Plantronics
Telephone Cord
Interquartz Cable
Plantronics Cable
DIAL Key
For use with the host telephone system to invoke special
network facilities such as Call Hold or Call Transfer which may
be available in your PABX or network.
See your telephone system user guide to learn how to use it. It
may be called Flash or Facility Key. Recall timing is preset to
100mS and is user adjustable.
RINGER
PITCH
Volume Slider
Adjusts the hearing level of the Handset Earpiece, Handsfree
Speaker and Headset Earpiece. Set to midway for normal
listening level. Located on the side of the telephone.
RECALL
RECALL Key
Figure 3
OLI
)
Press to dial any number selected in the Direct Access Memory,
Caller Memory, Redial Memories or Directory Memory.
Selection of OFF (no sound), LOW volume, and HIGH volume
of the telephone's ringing sound, which is located on the
underside. When the switch is set to OFF, the ringing sound
can still be heard via the Headset if the Headset is connected
to the Headset port (headset optional extra).
Set Headset Mic Adjust Control
fully clockwise to Recommended
Setting Position as shown
Interquartz
Line Cord
and
To review the Redial, Directory and the Caller memories, press
the Scroll Key to scroll up or down the list.
Ringer Volume Switch (Hi/Low/Off)
Telephone
Network
Outlet
CALLER Key with New Call Indicator and
Message Waiting Indicator
Press to review up to 80 incoming calls stored in the Caller
Memory. The information stored includes Telephone number,
Name, Date, Time and whether the call was answered or not.
The red indicator will flash when a new call is received and will
also flash to indicate Message Waiting for some types of
services.
Normal headset
polarity
Plantronics
Base Power Supply
DIRECTORY Key
Store up to 100 telephone numbers and names in the Directory
Memory. Press to access the Directory Memories.
MUTE Key and Indicator
Step 5
)
CLEAR Key
OLI & EHS Jacks
OLI
and
When storing a number and name into the Direct Access
Memory or the Directory Memory, press Cursor
or
key to
move forward or backward for editing. To enter a space, press
Cursor
(see overleaf for explanation on Date and Time set up
and brightness adjustment).
Should you require further assistance, please email
[email protected]
REDIAL Key
Press the key to redial the last number (max 32 digits), or direct
redial of an unsuccessful number dialed without going off line.
See overleaf for more functions.