1
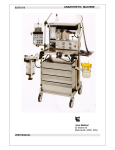
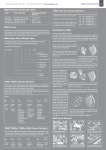
Universal Anaesthesia Machine® User Guide How To Get Help 2 General Description Of The Universal Anaesthesia Machine® 2 Definition Of Statements 2 Specifications 3-4 Components Of The Uam® 5-9 Checklists Prior To Every Operating Session Prior To Every Patient Case Following Every Patient Case Following Every Operating Session 10 10 11 11 11 Using The Control Screen Calibrating The Oxygen Monitor Calibrating The Apnoea Alarm Sensor Setting The Oxygen Alarms Setting The Apnoea Alarm On Or Off 11 11 12 12 12 Filling The Vaporizer 13 Using The Uam Balancing Gas Supply And Patient Demand Using The Bellows Using The Oxygen Concentrator Using An Attached Oxygen Cylinder Using A Pipeline Connector Using The Emergency Oxygen Inlet Using Nitrous Oxide Using An Ayre’s T-Piece (ATP) Using The UAM To Provide Oxygen For An Awake Patient Preventative Maintenance Cleaning The Halothane Vaporiser Replacing The Oxygen Sensor Replacing The Oxygen Concentrator Filter Cleaning The Breathing Circuit Appendix ONE: Breathing Circuit Diagram 13 13-14 15 15 16 16 16 16 17 18 19 19 19 20 20-22 23 How to Get Help EMAIL: [email protected] WEB: www.gradianhealth.org PHONE: +1.212.537.0340 ADDRESS: Gradian Health Systems, 160 Fifth Avenue, 7th Floor, New York, NY 10010, USA General Description of the Universal Anaesthesia Machine® The UAM® combines elements from both continuous flow and draw-over designs to provide a workstation that delivers controlled anaesthesia in all hospital settings. Oxygen can be provided from a variety of sources, and if none of those sources is available the machine will automatically draw in room air without the need for the user to change settings. The vaporizer provides calibrated delivery of anaesthetic agent and the manual bellows ensures that safe assisted respiration can continue without requiring a high pressure gas source. The system has been designed to accept standard anaesthesia accessories such as the breathing circuit, oxygen sensor, and standard connectors for the oxygen and nitrous oxide supplies. The UAM is also designed for simple field service. Most components can be removed with standard tools and a replacement part installed by local technicians without removing the workstation from the hospital. The UAM carries the CE Mark, having passed through EU regulatory inspections. It is manufactured in an ISO-certified factory in England. It is used in a wide variety of hospitals, from internationally recognized academic centers to resource-constrained district hospitals. Definition of Statements The following terminology and statements are important for the operator to understand before consulting the user’s manual for the UAM: WARNING: Indicate a possibility of injury to the operator or others. CAUTION: Indicate a possibility of damage to the equipment. NOTE: Indicate points of interest for proper operation of the equipment. Copyright © 2013 by Gradian Health Systems, LLC. All rights reserved. Gradian Health Systems, UAM, the Gradian logo, Universal Anaesthesia Machine are trademarks (™) of Gradian Health Systems, LLC, registered ® in the U.S. Printed in the United States of America. P/N: 1973-511 Issue A, January 2013 CE 0120 The UAM is manufactured by OES Medical Ltd., Abingdon, UK. 2 Specifications PHYSICAL AND ELECTRICAL g Workstation: 146cm x 53cm x 69cm, 130kg g Top Shelf: 46cm x 31cm, 88cm above floor, 35kg weight limit g Drawer: 10cm x 29cm x 32cm, 35kg weight limit g Materials: Aluminum frame, vertical dovemount side rails on both sides, nylon internal tubing g Mains power supply: 240V, 50-60Hz g Oxygen monitor power: CE-marked, fused and medical grade g Isolator protects concentrator, monitor and sockets g 3.5” TFT touch screen for oxygen display and alarm setting g Membrane switch for oxygen and alarm settings g Front lockable castors OXYGEN SUPPLY AND MONITORING g Oxygen concentrator flow rate: 0.1 to 10.0 liters per minute g Maximum oxygen concentration: 95% g Alternative sources: cylinder yoke, pipeline or portable g Automatic room air intake when patient minute volume exceeds fresh gas flow g Accuracy of glass rotameters: +/- 2.5% when using 100% O2 g Integrated inspiratory oxygen monitoring uses MOX-3 fuel cell g Calibration for room air (21%) and 100% oxygen g Pressure sensitive apnoea or high flow alarm g Adjustable minimum and maximum oxygen alarm settings g Up to ten hour battery backup, trickle recharge from mains power g Membrane keypad and touch screen OPTIONAL USE OF NITROUS OXIDE g Sources: pipeline or cylinder g Hypoxic cut-off: A solenoid automatically shuts off nitrous oxide delivery if O2 level falls below a minimum of 25% g Differentiated flow control knob g Independent glass rotameters accurate to +/- 2.5% VENTILATION g Unique bellows for adult and pediatric use made from durable, long-lasting silicone rubber g 1600cc capacity g Inspiratory pressure relief valve set at 55cm water g Aluminum bellows block g Silicone balloon inflating valve at the expiratory port g 15mm female/22mm male ISO standard taper connection for breathing circuit g 30mm male ISO standard taper connection for AGSS scavenging equipment 3 VAPORIZERS g Stainless steel and plated brass construction g Separate units for isoflurane and halothane g Agent delivery range: 0.5% to 4% g 120ml capacity REAR PANEL CONNECTORS g Mains isolator switch, 2 UK style power sockets g Oxygen and nitrous pipeline NIST connectors and cylinder yokes g Multi-diameter external oxygen hose connector 4 Components of the UAM Patient Vital Signs Monitor Oxygen monitor and control screen ackbar with air inlet, B pressure relief valve and 2 liter reservoir bag Low resistance vaporizer Oxygen concentrator on/off switch Oxygen cylinder and pipeline pressure gauges itrous Oxide cylinder N and pipeline gauges Bellows Pressure relief valve and gauge Fenton Balloon inflating valve Y-piece connectors Water trap Oxygen concentrator status screen Integrated oxygen concentrator Castors (front lockable) 5 See inset Page 6 xygen and Nitrous Oxide O Flow Meters Oxygen monitor and control screen Oxygen and Nitrous Oxide Flow Meters Backbar a. Air inlet valve b. Pressure relief valve c. Reservoir bag Low resistance vaporizer Oxygen concentrator on/off switch Oxygen cylinder and pipeline pressure gauges itrous Oxide cylinder N and pipeline gauges 6 7 Bellows Pressure relief gauge Oxygen sensor 1st one-way valve 2nd one-way valve Pressure relief valve Y-piece connectors Water trap enton Balloon F Inflating Valve ne Way Valve and O scavenging 30mm taper connection alibration settings (to C calibrate oxygen sensor and apnoea alarm) igh oxygen percentage H alarm (user adjusted) Mode (opens screen for system settings) Low oxygen percentage alarm (user adjusted) ercent Oxygen (shows the P oxygen percentage of the anaesthetic gas measured before inspiration) Battery charge status Message Area Apnoea alarm on/off Mains power indicator (machine is on mains power supply) 8 9 in-indexed connectors for E-size P oxygen and nitrous oxide cylinders Oxygen inlet ipeline connections for P oxygen and nitrous oxide Mains isolator (Power On/Off) Fuses for oxygen monitor, oxygen concentrator and outlet plugs British style 3 prong electric outlets CHECKLISTS: PRIOR TO EVERY OPERATING SESSION INSPECT & TEST 1. Check stability: casters OK, brakes function. 2.Connect and check available gas sources: correct pressure, no leaks, tug test on pipelines. 3. Check bellows OK: move up and down and observe Fenton balloon moves freely. 4.Check breathing system: use bellows to inflate 2-litre bag or dummy lung. Check action of Fenton balloon while bag inflates/deflates. (If no dummy lung is available, proceed to 5). 5.Check resistance by pushing bellows with patient Y piece blocked (maximum pressure should be 55 cm water). 6. Check the water trap and empty if necessary. 7. Check the gas scavenging is configured correctly, if available. VAPORISER 1. Check the volatile agent level in the vaporiser and fill as necessary. 2. Check operation of the vaporiser selector wheel (press silver button to unlock). POWER 1.Switch on green mains isolator switch on the UAM back (there will be a delay while the system inspects the quality of the electrical power). 2. Press and hold On/Off button next to the oxygen monitor screen until it lights up. CALIBRATE OXYGEN MONITOR 1.Using 100% cylinder/pipeline oxygen, set oxygen flowmeter to 6 L/minute and wait for maximum reading on monitor. 2. Press CAL, then 02, then GO. When the calibration is finished, press EXIT twice. 3.Turn off the oxygen. Draw room air through the system with the bellows until the reading reaches its lowest value. 4. Press CAL, then AIR, then GO. When the calibration is finished, press EXIT twice. OXYGEN SUPPLY 1. Turn on the oxygen concentrator by using the switch on the front of the machine. 2. Set oxygen flow to 8 L/minute, wait 1-3 minutes. Oxygen % should be greater than 90%. PRESSURE 1.Make sure flow meters are set to zero flow and reservoir bag is empty 2.Press CAL, then PRESSURE: CAL, then GO. When the calibration is finished, press EXIT twice. NITROUS OXIDE 1. Set oxygen flow to 6 litres per minute. 2. Set Nitrous Oxide flow to 4 litres per minute. 3. Gradually turn down the oxygen flow to reduce Fi02 to 25% and lower—nitrous oxide flow should cut off when oxygen concentration is <25%. 10 PRIOR TO EVERY PATIENT CASE 1. Check the level of volatile agent in the vaporiser. 2. Ensure you have the correct breathing circuit. FOLLOWING EVERY PATIENT CASE 1. 2. 3. 4. Turn off the vaporiser. Replace the bacterial filter and mask. Clean any surfaces that may have been contaminated or soiled. In humid environments, turn off the oxygen concentrator after each case. FOLLOWING EVERY OPERATING SESSION 1. Turn off the vaporiser. 2. Operate bellows six times to purge volatile agent from the breathing circuit. 3. Turn off flowmeters and cylinders. Disconnect or turn off pipeline supplies. 4. Turn off the oxygen concentrator. 5. Turn off the control screen: press and hold On/Off button next to the screen. 6. Turn off the patient vital signs monitor if one is plugged into the UAM. 7. Turn off the main power switch on the back of the machine (NOTE: If the battery in the oxygen monitor or the patient vital signs monitor is depleted, leave the main power switch on to trickle charge these batteries). 8. Wipe down the machine with a cloth dampened with a mild detergent (the stainless steel tray may be removed for sterilization if necessary). Using the Control Screen Components of the Control Screen 1. High oxygen percentage alarm (user adjusted). 2. Low oxygen percentage alarm (user adjusted). 3. Mode (opens screen for system settings). 4. Calibration settings (to calibrate oxygen sensor and apnoea alarm). 5.Percent Oxygen (shows the oxygen percentage of the anaesthetic gas measured before inspiration). 6. Message Area. 7. Mains power indicator (machine is on wall power). 8. Apnoea alarm on/off. 9. Battery charge for control screen backup battery. Calibrating the Oxygen Monitor The oxygen monitor should be calibrated at the start of every operating session. Ideally you will have access to 100% oxygen in a cylinder or pipeline. See instructions on page 10. NOTE: If 100% oxygen is not available, do not calibrate the upper limit, but do calibrate for the lower limit using room air. 11 CAlibrating the Apnoea Alarm Sensor A pressure sensor controls the pressure alarms used to detect apnoea. It should be calibrated periodically. To calibrate the pressure sensor: 1. 2. 3. 4. 5. Make sure flow meters are set to zero flow an reservoir bag is empty. On the control screen, select CAL Select PRESSURE: CAL Press GO Select EXIT 6. Select EXIT again Setting the Oxygen Alarms The UAM has high and low oxygen alarms. These are displayed on the oxygen monitor screen. To change the settings on the alarm: 1.Press the window displaying the current alarm setting. Up and down arrows will appear. 2. Use the arrows to change the setting to the desired target. 3.Press the window displaying the new target. The arrows will vanish and the new alarm setting is complete. Setting the Apnoea Alarm On or Off The apnoea alarm measures pressure in the back bar. If the pressure is high for 30 seconds the alarm will sound. NOTE: The apnoea alarm is not a vitals signs monitor: it exists to alert the user of the possibility of apnoea or higher than required gas flow. To turn the alarm off for a session: 1. On the oxygen monitor touch screen, select MODE 2. Press AP ALARMS to Off or On 3. Select EXIT The apnoea alarm will stay off until the oxygen monitor screen is turned off. When the monitor screen is powered on again the apnoea alarm will automatically turn back on. 12 Filling the Vaporizer WARNING: Do not overfill the vaporizer. CAUTION: Halothane is corrosive and can damage the oxygen sensor and the painted exterior of the UAM. When filling with halothane take care to avoid any agent spilling on to the UAM. 1. Set the vaporizer selector wheel to OFF 2. Unscrew the fill cap on the front of the vaporizer. 3.Cover the oxygen sensor with an absorbent cloth to protect it from any dripping volatile agent. 4. Carefully pour the volatile agent into the vaporizer, keeping an eye on the filler indicator window. NOTE: When filling a halothane vaporizer it is advisable to hold a metal bowl underneath to capture any spillage. 5.Fill until liquid in the filler window approaches the maximum level. Be careful not to overfill the vaporizer. If the vaporizer is over-filled: 1. Set flow meters to zero flow and then turn vaporiseer selector wheel to OFF. 2. Unscrew the filler cap on the front of the vaporizer. 3. Place a metal bowl or container underneath the vaporizer. 4.Using the filler cap, insert the key on the bottom of the cap into the hexagonal fitting just below the window on the front of the vaporizer. See picture on page 19. 5. Turn the filler cap anti-clockwise to open the drain underneath the window. 6. Drain until the level in the filler window is below the maximum indicator. 7.Turn on the concentrator (or other oxygen supply) and set the flow meter to 10 liters per minute. 8. Set the vaporizer to its maximum setting. 9.Run the UAM for thirty minutes at 10 litres per minute using your standard scavenging arrangement. 10.Dispose of the drained anaesthetic agent using your hospital’s procedures for disposing of medical waste. Using the UAM Balancing Gas Supply and Patient Demand The volume of anaesthetic gas delivered by the UAM always matches the patient minute volume. If the supply of oxygen from the concentrator, cylinder or pipeline is less than the minute volume the machine will automatically draw in room air to make up the difference. If the minute volume is less than the flow rate set on the oxygen flow meter, excess oxygen will accumulate in the reservoir bag and be released through the pressure relief valve. If no source of oxygen is available, the machine will draw in room air equal to the minute volume. 13 Unlike conventional anaesthesia machines, the UAM does not require compressed air to dilute the oxygen to produce the desired oxygen concentration. To reduce the oxygen concentration simply reduce the flow through the flow meter below the patient’s minute volume. Room air will be drawn in and dilute the oxygen The oxygen monitor will always display the % oxygen in the delivered anaesthetic mixture. gg The UAM shows if there is an imbalance in the demand and supply of oxygen. When demand and supply are in balance, the reservoir bag will be partially inflated. The bellows will be partially inflated and will move up and down with respiration. The machine will present like this: gg If minute volume (i.e. demand) exceeds oxygen supply, room air is drawn in and the reservoir bag will empty during inspiration. You can use this to deliver less than 95% oxygen. If you are using room air only the reservoir bag will stay flat throughout the respiratory cycle. The machine will present like this: g If supply exceeds demand, the reservoir bag will fill up and stay inflated. Similarly, the bellows will rise to its full height. Excess oxygen is vented out the pressure relief valve on the backbar. The machine will present like this: 14 Using the Bellows The bellows are used for IPPV (Intermittent Positive Pressure Ventilation, or controlled ventilation.) To operate the bellows efficiently and with the least required effort, follow these guidelines: gg Place the flat of your hand on top gg gg gg gg gg of the bellows and your thumb under the small pleats for adults. Rotate your hand in a pronating motion (rather than pulling up and pressing down using your arm). Push down briskly to ventilate. Operate only to one side. Give adequate tidal volumes— not small, slow movements Use the small pleats only for children and the large pleats for adults. Using the Oxygen Concentrator When electricity is available the oxygen concentrator produces up to 10 litres per minute of 90 to 95% oxygen. As with any other source of oxygen you control the rate by using the oxygen flow meter. If available you should attach a cylinder or pipeline connection to the UAM as backup in case of power failure. Turn the oxygen concentrator on by using the power switch to the left of the oxygen pressure gauges. You must first turn on the green power switch on the back of the machine. There will be a 10 to 15 second delay before the oxygen concentrator turns on. When the concentrator is turned on the screen on the base of the UAM will light up. A steady green light shows the concentrator is powered on. The display shows the time the concentrator has been turned on during this session, and also shows the total amount of time it has been turned on since the machine was manufactured. You will hear the compressor in the concentrator and the sound of oxygen filling and releasing from the internal reservoir. NOTE: The oxygen concentrator filters air through a removable filter. Please note the preventative maintenance procedure for cleaning the filter on page 20, which will prolong the life and efficacy of the oxygen concentrator. 15 Using An Attached Oxygen Cylinder The UAM accepts an E-size pin-index oxygen cylinder. The cylinder connects via a yoke and Bodok seal and the pressure is displayed on the pressure gauge on the front of the machine. Bull-nose cylinders may be attached to the pipeline inlet using an approved 4 Bar medical regulator. Using A Pipeline Connector The UAM accepts pipeline connections for oxygen. Each machine is supplied with an oxygen hose connecting to the UAM’s NIST inlet. The other end is typically shipped with a BS 5682 probe, which is the British standard. Probes for other connector types can be arranged. Pipeline pressure is displayed on the gauge on the front of the machine. Using the Emergency Oxygen Inlet An emergency oxygen supply connection is mounted on the back of the machine. It accommodates differing tube sizes from ward-style flow-meters. CAUTION: oxygen from this source is not controlled by the glass flow meter on the front of the UAM. Rather, it must be controlled with an external flow meter attached to the cylinder providing the emergency oxygen. NOTE: Use only 1 litre/min flow to conserve the oxygen in the external cylinder. This will provide 30-35% oxygen to the patient. Using Nitrous Oxide The UAM supports cylinder and pipeline sources of nitrous oxide. The flow of N2O is controlled by the right hand side flow meter. The N2O flow knob has a different size and shape to distinguish it from the oxygen flow meter control knob. The UAM automatically cuts off nitrous oxide if the percent of oxygen in the anaesthetic mix falls to 25% and below. The oxygen monitor must be powered on and working correctly for nitrous oxide delivery to occur. An exhausted oxygen sensor or battery will shut off N2O supply. The cut off mechanism is electrical, unlike older style mechanical interlocks. The N2O valve is closed in its resting position and must receive a current from the oxygen monitor to open. Any interruption of that current, including a decrease in oxygen below 25%, will shut off the flow of nitrous oxide. 16 RECOMMENDATIONS For Using the Jackson-Rees modified T-Piece (ATP) with the UAM 1 When using the T-Piece the UAM operates as a continuous flow machine with the backbar and bellows filled to capacity. This allows the operator to control flow of anaesthetic gas using the open ended bag. General: gg The ATP is required for babies less than 4 kg and is preferable for children up to 10 kg body weight. gg Standard bellows with a Y-piece is permissible down to 4 kg body weight, using demand flow. gg When using the ATP, the UAM generates a forward gas flow (with a maximum pressure of 5 cms water) that fills the bellows. Gas from the bellows then fills the ATP bag. The one-way valve directs IPPV towards patient, preventing back flow into bellows, thus normal inflation pressure of greater than 5 cms water is easily generated. Use standard gas flow of 2-3 times calculated patient minute volume. gg Only use ATP circuits with wide bore tubing (>10mm and maximum 2 meters length) with free-flowing open ended bag— no valve or constriction device on the outlet of the bag, eg for PEEP or CPAP. 1 These are recommendations only and do not replace the professional guidance of the 17 anaesthesia provider. WARNING: If ATP bag outlet is constricted, pressure in the ATP may be higher than 5 cms water and no gas will flow from vaporiser into the ATP reservoir bag. Overinflation of the UAM bellows is a warning signal that the ATP may be constricted. Set up: 1. Connect the 15 mm ATP to the inspiratory outlet on the UAM. The expiratory port and balloon valve are not used. Connect CO2 monitoring, if available, to show gas flow from flow meter is sufficient to eliminate CO2. 2.Disable the apnoea alarm on the oxygen monitor. See instructions on page 12. In use: 3. Start with gas flow of 6 litres per minute. 4. Apply system to patient with air-tight mask. 5. Close off end of the Jackson Rees bag and pressurize the circuit. 6.Wait for bellows to rise, give gentle IPPV and adjust flow so that bellows rests between 1/3 and 2/3 of maximum height. 7.Bellows must stay inflated: observe up and down movement of bellows to show correct forward flow of gas into ATP. 8. If bellows is too full, oxygen vents via back bar or agent is wasted via ATP. If Power and Supply of Oxygen Fail: gg Option 1: remove ATP, connect Y-piece to both UAM ports and continue with bellows on demand-flow basis. If no paediatric Y-piece is available, use adult Y-piece. gg Option 2: continue with ATP and have a second person to operate the bellows manually providing forward gas flow from vaporiser to fill ATP bag. Continue IPPV with ATP bag as before. Using The UAM To Provide Oxygen For An Awake Patient The UAM can be used for pre-oxygenation or to provide oxygen to an awake patient (e.g. during regional anaesthesia.) Oxygen tubing may be connected from the 15mm inspiratory port on the machine to a venturi or Hudson-type loose-fitting mask on the patient. WARNING: The tubing must not exceed 2 meters in length and must have a bore of 20 FG (approximately 7mm) or more. Use of a narrower bore or longer tubing will produce high resistance and result in oxygen being vented through the positive pressure relief valve on the back bar and will not reach the patient. 18 Preventative Maintenance Cleaning the Halothane Vaporizer Drain Halothane vaporizers every 3 months to prevent thymol build up. Excess thymol can damage the selector wheel mechanism over time. 1. Unscrew the filler cap on the front of the vaporizer. 2.Place a metal bowl or container underneath the vaporizer and cover oxygen sensor with an absorbent cloth. Halothane is corrosive and can damage the UAM if spilled. 3.Using the filler cap, insert the key on the bottom of the cap into the hexagonalfitting just below the window on the front of the vaporizer. 4.Turn the filler cap anti-clockwise to open the drain underneath the window. 5.When finished, turn the filler cap clockwise until the drain if fully closed. Do not overtighten. 6. Re-fill the vaporizer with halothane. 7.Dispose of the old anaesthetic agent using your hospital’s procedures for disposing of medical waste. Replacing the Oxygen Sensor Replace the oxygen sensor after 12 months, or when an alarm message on the oxygen monitor indicates that the sensor has failed to calibrate. NOTE : Always keep a spare sensor and store it unopened in its sealed pouch. The sensor begins to decay when you open the packaging and expose it to air. To replace the oxygen sensor 1. Ensure that the UAM is turned on. 2. Disconnect the telephone style cable. 3. Turn the existing sensor anti-clockwise to disconnect it. 4.Remove the new sensor from its container and remove the extension piece covering the bottom of the sensor. 5.Place the sensor in position, and turn it clockwise to screw it into place. Do not overtighten. NOTE: Take care to engage the thread correctly, and ensure that the replacement cell is fitted with a suitable O ring to prevent leaks from the breathing system. Replacement sensors include a new O ring. 6. Connect the oxygen sensor cable. 7. Recalibrate the oxygen monitor. 19 REPLACING the Oxygen Concentrator Filter The oxygen concentrator includes a replaceable filter that cleans the room air entering the oxygen concentrator. Keeping it clean will extend the life of the concentrator. To replace the filter: 1. Turn off the UAM and disconnect it from the mains power supply. 2. At the lower back panel, loosen the six hex bolts using a 4mm hexagonal wrench. 3.Carefully tilt the rear panel back from the top, taking care not to disconnect the wires attached to it. 4.Detach the two hoses leading to the air filter. Press the orange collar to release the hose. Do not pull on the hose without depressing the collar. 5. Remove the cover plate that holds the filter in place by removing the center M5 nut. 6.Filters may sometimes be cleaned by shaking or vacuuming. If the filter is too dirty to clean replace it with a new one. Replacement filters can be ordered from Gradian but are less expensive and quicker to find from local automotive parts suppliers. 7. Install the new filter and replace the cover plate. 8. Replace the back panel, connect the mains power supply, and turn the UAM on. Cleaning the Breathing Circuit Instructions for Storage, Cleaning, Disinfection, Sterilisation and Use of InterSurgical Breathing Device WARNINGS: Reprocessing in accordance with the instructions contained in this leaflet should be carried out prior to first use and after each use. Black Rubber Reservoir Bags, Face Masks and Breathing Tubing may contain natural rubber latex, which may cause allergic reactions in some individuals. Repeated reprocessing and use may affect the conductive properties of black rubber. Do not use gamma irradiation or ultrasonic cleaning equipment. Do not sterilise with dry oven sterilisers. Do not sterilise or disinfect with compounds that contain or are similar to phenol or alkylamines (gluco protamine). Do not clean or wipe with solvent based or chloride solutions. Plugs or valves must be removed from masks with an inflatable cuff prior to sterilisation. Do not pull on the cuff of masks. Connectors supplied attached to a silicone catheter mount do not have to be removed prior to moist heat sterilisation. However, products must not be connected to any other connector, product or device when being cleaned, disinfected or sterilised. Hard brushes or other materials that might damage a silicone surface should not be used to clean products containing silicone. Avoid product contact with hard or sharp edged objects. Port caps on connectors, Y-pieces and elbows must be removed prior to reprocessing. Limitations on reprocessing Products can be sterilised by moist heat (autoclaving) up to temperatures of 137° centigrade in accordance with methods specified in EN 554. Products may be subjected to thermal disinfection at temperatures up to 93”C. Utilising lower temperatures may extend the life of rubber products. Some products may exhibit discolouration after repeated 20 exposure to high temperature steam sterilisation and/or automatic washer/disinfector reprocessing regimes. These instructions for use are not valid for Ruben Valves & Grey Latex Free Reservoir Bags. CONTAINMENT AND TRANSPORTATION It is recommended that all products be reprocessed as soon as is reasonably practical following use and prior to first use. PREPARATION FOR CLEANING If the product has a valve, it should be reprocessed in the open position. Plugs and valves must be removed from masks with an inflatable cuff prior to sterilisation. CLEANING – MANUAL Manual cleaning should only be considered where no facilities exist for automated washing and disinfection or automated cleaning is contraindicated. Hand wash using a mild detergent such as a neutral pH liquid soap or tri-sodium phosphate. Rinse thoroughly with clean water, and wipe with an appropriate soft absorbent material that will not leave fibres on the device. Hard brushes or other materials that might damage the products should not be used. Do not use a washing machine. Dry at room temperature. Reservoir Bags and Rubber Masks may be dried by hanging in a warm cabinet at a maximum temperature of 50° centigrade. Do not dry on a hot surface. CLEANING – AUTOMATIC See section on automatic disinfection. DISINFECTION – MANUAL Manual disinfection should only be considered where no facilities exist forautomated washing and disinfection or automated disinfection is contraindicated. Use a proprietary disinfecting agent. Concentration and immersion times stated by the manufacturer must be strictly adhered to. Compatibility with the natural rubber, polychloroprene, stainless steel, polysulfone, polycarbonate and polypropylene materials used in the manufacture of the product must be established prior to conducting any disinfection cycle or routine. Rinse thoroughly with water of a suitable quality, and wipe with an appropriate soft absorbent material that will not leave fibres on the device. Dry at room temperature. DISINFECTION – AUTOMATIC Products can be washed and disinfected using an automated process at temperatures up to 93”C for 3 minutes & 10 seconds (thermal disinfection) cycles at lower temperatures may ex1end product life. MAINTENANCE Ensure storage in appropriate conditions as outlined below. INSPECTION AND FUNCTION TESTING Before each use and prior to first use, check that there is no damage or deterioration that would affect the safe functioning of the product. Check connections for distortion, cracking, security, leakage and occlusion. If the product contains a valve, ensure that the 21 valve opens and closes with the adjusting cap in the fully open position by passing air through it. When connecting I disconnecting taper connections, use a push I pull and twist action. Valves can be fully closed by turning the cap clockwise. PACKAGING No particular requirements. STERILISATION Plugs and valves must be removed from masks with an inflatable cuff prior to sterilisation. Dry at room temperature. Products can be sterilised by moist heat (autoclaving) up to temperatures of 137° centigrade in oven sterilisers. STORAGE Thermoplastics and Natural & Synthetic Rubber products—Store between 5- 25°C, at normal atmospheric pressure. Keep out of direct light, and away from sources of radiation, fluorescent light, electric motors and diathermy equipment. Degradation of rubber is increased in the presence of oxygen, oxidising agents, ozone, ether, phenols, cresold, terpanes, hypochlorite, formaldehyde, ketone, inorganic acids and hydrocarbons. Avoid contact with metals, oils, solvents, greases, and strong detergents. If rubber products are cracked, crazed, lose elasticity, become sticky, or lose their colour when touched, they are likely to be unsafe for further use, and should be replaced. Reservoir bags should be completely dry (inside & outside) before being stored. The instructions provided have been validated by the manufacturer as being capable of preparing a device for re-use. It remains the responsibility of the reprocessor to ensure that the reprocessing as actually performed using equipment, materials and personnel in the reprocessing facility achieve the desired result. This normally requires validation and routine monitoring of the process. Likewise, any deviation by the reprocessor from the instructions provided should be properly evaluated for effectiveness and potential adverse consequences. CLEANING/STERILISATION For masks with an inflatable cuff, the cuff should be fully deflated prior to insertion in the automatic washer/disinfector. The valve should be placed in the washer/disinfector and/or autoclave upside down (with the 22mm connector). 22 Appendix ONE: Breathing Circuit Diagram oxygen concentrator pressure relief valve REG O2 / N2O flow control low resistence vaporizer external o2 inlet air intake valve 2 litre reservoir bag O2 / N2O Cylinder & pipeline input silicone bellows o2 Alarm & n2o cut-off oxygen analyser sampling port b ellows block to patient inspiration +2 valves expiration gas flow inlet y-Piece outlet scavenger inflating balloon valve balloon actuator pipe If you have a question or any service related issues, please email: [email protected] 23 For service issues, please email: [email protected] Gradian Health Systems 160 Fifth Avenue, 7th Floor New York, NY 10010, USA Phone: +1-212-537-0340 www.gradianhealth.org