1
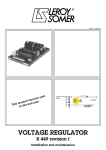
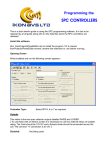
Battery Analyzer MST-8000 + Instructions t d o o b o e . . l r f w w w 1 Zeus Technology Co., Ltd. Shenzhen 1.Appearance..................................................................................................................................... 3 2.The Boot.......................................................................................................................................... 4 3.Functional Test................................................................................................................................5 a. Battery test...................................................................................................................................5 b. Starting System Test................................................................................................................... 7 c. Charging System Test................................................................................................................. 7 d. Maximum load test..................................................................................................................... 8 5.System Settings............................................................................................................................... 9 a. Language Settings....................................................................................................................... 9 b. Time Set........................................................................................................................................9 t d o o b o e . . l r f w w w 2 Zeus Technology Co., Ltd. Shenzhen I. Appearance 1. Storage battery tester host 2. Display Interface: Using 320 * 240 color LCD screen that can display different functions and measurement data 3 Left ◀: Switch pages or set of data . l r f 4 Right ▶: Switch pages or set of data 5 on the key ▲: Selection function or set of data o o t d b o e . w w w 6 down key ▼: Selection function or set of data 7 Escape key (Esc):. Exit current page or return to the previous level 8 OK key (Enter): OK option or enter the next level 9 detachable printer module: print test results and related information (including test time and test models). Note: If you need to use the printer, you must install the printer before the host boot. If the printer is in the process of loading operations after power is unprintable 3 Zeus Technology Co., Ltd. Shenzhen 2.The boot 1. connecting wiring and battery battery tester between. Red clip connect the battery positive, black clip connect the battery negative. If red or black clip clip connection is not reliable, the following diagram interface 1.0 and Figure 1.1 shows, there is a problem at this time need to disconnect to reconnect to clip. o o 图 2.1 图 2.0 t d b o e . . l r f 2.wiring to normal after device initialization is successful, the display will automatically boot interface (as shown below), press any key to continue. w w w 图 2.2 4 Zeus Technology Co., Ltd. Shenzhen 3.Functional testing a. Battery Test After the normal boot, press any key to enter the main menu, as shown in Figure 3.1.0. o o 图 3.1.0 t d . l r f Press "▲ ▼" button, select "1 battery test" press <Enter> key to enter the next one, if the battery voltage is too low (less than 11.5V) will be prompted interface (Figure 3.1.1), press <Enter> key to continue measuring, <Esc> key to abandon measurement. If the battery voltage is normal, it will go directly to the battery type selection screen (Figure 3.1.2). On the subject of battery type battery by selecting the corresponding option. b o e . w w Press <Enter> key to enter the next one. Enter battery specifications set value (Figure 3.1.3). "▲" setpoint plus 5 "▼" setpoint minus 5 w "◀" set value minus 100 "▶" set value plus 100 After setting the setpoint press <Enter> key to start the measurement. Will be displayed after the measurement test results shown in Figure 3.1.4 5 Zeus Technology Co., Ltd. Shenzhen 图 3.1.4 图 3.1.3 r f If the test result lower right corner of the interface with an icon of the printer, press <Enter> key to print the test results, you can enter the test results before printing models, the interface shown in Figure 3.1.5. Enter up to 16. "▲ ▼" to select the character you want to enter. (You can enter letters, numbers, there is a small part of the sign) o o "◀ ▶" Select the digits to enter t d . l When you're finished, press <Enter> to save the print, <Esc> key does not save print. 3.1.6 print result shown in Fig. w w b o e . w 图 3.1.6 图 3.1.5 Note: 1, before the test, ensure that the engine does not start, all electronic devices have been turned off. 2, after the car running for some time, not immediately tested, because the battery voltage is slightly higher than normal available, open headlights, etc. 2 to 3 minutes, before they can properly test. 6 Zeus Technology Co., Ltd. Shenzhen b.Starter system test In the main menu (Figure 3.1.0) Select option 2 (starter system testing), and 图 3.2.0 . l r f press <Enter> key to enter the starter system test interface (Figure 3.2.0 below). prompted display interface to operate. After starting the engine to wait around for about 15 seconds to read the test data (minimum voltage value). For 12V systems. If the minimum voltage value is greater than 9.6V, then start the system normally. If less than 9.6V, shows the battery voltage is too low to start, check that the relevant part of the connection points, lines, and starters. If the 24V system, the minimum voltage 19.2V places as a reference boundaries. Test result print operations can refer battery test results printing operation. b o e . t d c.Charging System Test o o In the main menu (Figure 3.1.0) Select option 3 (charging system test), press <Enter> key to enter the charging system test, then the operation prompt interface (Figure 3.3.0 below) will appear. w w w 图 3.3.0 图 3.3.1 7 Zeus Technology Co., Ltd. Shenzhen Prompted interface prompts: 1, first start the car, the car starts to wait for about 15 seconds, to ensure stable operation of the engine has been 2, press <Enter> to start testing, enter the test screen (Figure 3.3.1) 3, the engine speed is gradually increased to 2000r / min. The device records the minimum and maximum charging voltage value in this process. 4, the end of the test, reading the test results. Test Data Analysis 1, the voltage is normal charging system is 13.3 ~ 15 v. Two, if more than 15 v, please check the car's regulator. If less than 13 v, please check the connections, lines and alternators. r f Note: If the 24v system, the reference voltage value can be multiplied by two. . l test result print operations can refer battery test results printing operation. o o d.Maximum load test In the main menu (Figure 3.1.0) Select option 4 (maximum load test), and press <Enter> key to enter the maximum load test operation prompt interface (Figure 3.2.0 below). t d w w b o e . w 图 3.4.0 图 3.4.1 Follow the prompts, first open all the electrical equipment, and then start the engine after waiting for about 15 seconds waiting for the stable operation of the engine press <Enter> to start testing, intrusion detection interface (Figure 3.4.1). Check the minimum voltage, if the minimum voltage <12.8V, then the load may be a problem, check the generator belt, or whether there is a short circuit wire. 8 Zeus Technology Co., Ltd. Shenzhen 5.System Settings a. Language Settings In the main menu (Figure 3.1.0) Select option 5 (System Settings), then press <Enter> key to enter system settings selection interface (shown in Figure 3.5.0). 图 3.5.1 t d o o . l r f 图 3.5.2 Select the language setting, press <Enter> key to enter the language selection list (Figure 3.5.1, Figure 3.5.2 below), available in English, Portuguese, Spanish, French, German, Italian, Russian, Simplified Chinese , Japanese, Turkish, Traditional Chinese total of 11 kinds to choose from. Use the arrow keys "▲ ▼ b o e . ◀ ▶" select the corresponding language, press <Enter> key to confirm to change the language. w w b. Time setting w In the System Settings menu (Figure 3.5.0), select the time setting press <Enter> key to enter the time setting interface (Figure 3.5.3) (YYYY.MM.DD) to date, (HH: MM: SS) last minutes and seconds 图 3.5.3 9 Zeus Technology Co., Ltd. Shenzhen arrow keys "◀ ▶": Select the object to change. "▲ ▼": adjust the value. Press <Enter> to save the changes after modify, press <Esc> key to discard changes t d o o b o e . . l r f w w w 10